You must be logged in to rate content!
13 minute read
Steering Column Repair
Compliments of wssix99 @ www.ls1tech.com
This thread is a how-to from a recent replacement of my Firebird's wiper switch assembly. Since it's one of the deepest components on the column, this procedure will illustrate how to get to most of the other components that can be replaced during an in-car repair.
The good news is that this column is largely unchanged since 1969, so many parts are easy to get and inexpensive. The bad news is that this column is largely unchanged since 1969 and the newer/modern components have been jammed in the old column, which makes some parts very expensive and/or hard to work with.
Before you get started, you'll want to read through the whole thread and confirm you have the needed tools and parts before you tear in to the column. The first time out, the complete dis-assembly and re-assembly will probably take from 1-4 hours, depending on how deep in the column you are looking to go and if you have all the tools right at hand.
As well, if you see any items that are incorrect or should be added, please PM me and I'll be happy to edit the guide.
Disclaimer
This thread describes information on how to remove the drivers side airbag. Please beware that this task is VERY dangerous and, if done improperly, can result in accidental airbag discharge, injury, severe burns, or death. The reader proceeds at their own risk and is strongly encouraged to have this work performed by a professional if they do not feel that they can perform this work safely.
Static electricity is sufficient in some circumstances to activate the bag. When working with the airbag, you should make sure not to tough any exposed connector terminals or use a grounding strap to dissipate any static on your person.
The airbag is loaded with a pyrotechnic device and the equivalent of rocket fuel. When activated, the airbag exerts a great deal of energy, burning the fuel and forcefully inflating the airbag. Obviously, passengers in a normal driving/riding position safely contact the bag in a crash. However, if a person is near the bag when it activates, they may be burned by the hot gasses or experience trauma from the force exerted by the bag.
Above all else, the airbag should be fully disabled by disconnecting the car's battery and disconnecting the airbag prior to removal.
1) Purchase your parts. Wiper switch, turn signal switch, key cylinder, etc. At very least, you will want to replace your turn signal cam and turn signal cam springs if they have over 75K miles on them. These are the first to wear out and having to pull the column apart again a couple months later to replace these VERY inexpensive parts is a total pain!
- Turn signal cam springs (Doorman part #49312)
- Turn signal cam (Doorman part #83232)
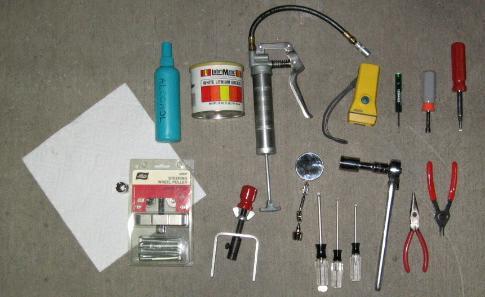
2) Assemble your tools:
- Rubbing Alcohol (for grease clean-up)
- White Lithium Grease
- Brown Lithium Grease
- Flashlight
- Terminal Removal Tool (or paperclip)
- 6mm Nut Driver
- Screwdriver (Flat Head, #1 Phillips, and #2 Phillips)
- Lock Ring Pliers
- Needle Nose Pliers
- 21mm Socket and Wrench
- T-27, T-25, and T-20 Torx Drivers
- Inspection Mirror
- Steering Wheel Lock Plate Compressor
- Steering Wheel Puller and Socket (for the puller)
- Paper Towels and/or Gloves
3) DISCONNECT THE BATTERY. Under the hood, disconnect the negative terminal at the battery and tuck away the terminal so it can't make contact with the battery.
4) Remove the lower instrument panels. The shroud below the steering wheel comes off by removing the two #2 Phillips head screws in the front of the panel and by removing the two 6mm bolts at the bottom of the panel. As you pull the panel away, be sure to disconnect the rear hatch release button connector. Next, pry the two plastic retainers, holding the lower instrument panel cover in place, down from the dash until they disengage. The lower cover then pulls down and out of position. (Note, when you replace this panel, there is a black plastic tab on the left side that goes behind the left side kick panel.)
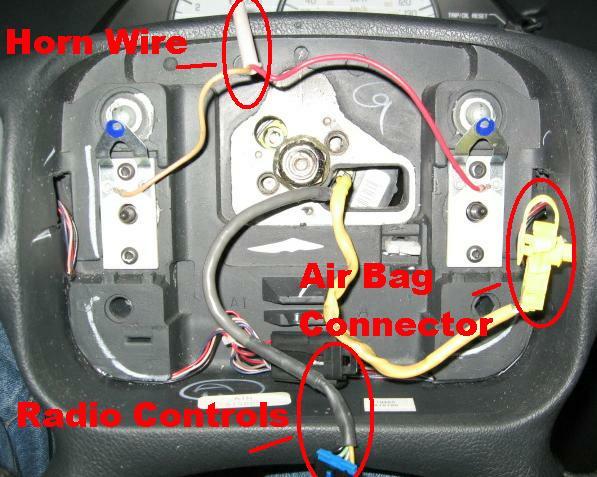
5) Unplug the driver's side airbag connector. It is a yellow connector clipped to the base of the steering column, with yellow wires going in to each side. You will need to remove a connector lock before you will be able to remove the connector.
6) Two additional black connectors are attached to wires running down the column. One is for the turn signal switch and the other is for the wiper switch and cruise control. If you will be removing either, this is a good time to remove the connectors.
7) Turn the steering wheel so it locks; preferably with the wheel generally straight.
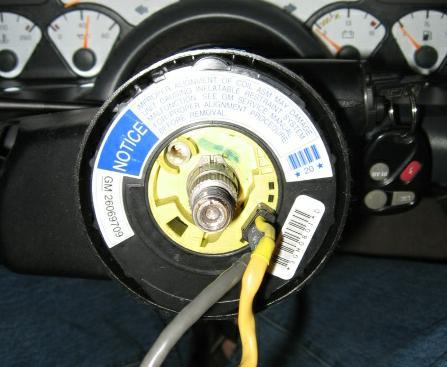
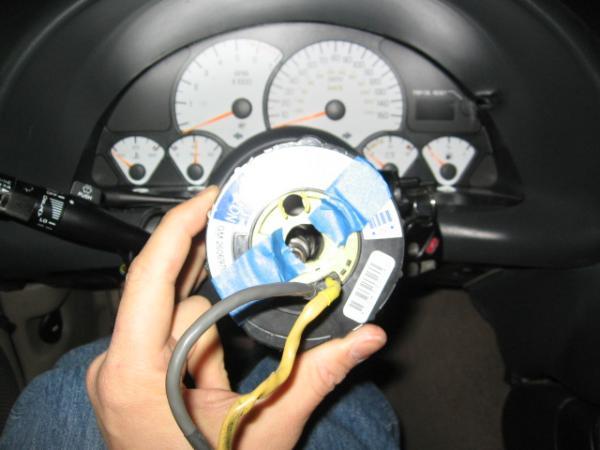
8) Remove the airbag. MAKING SURE YOU KEEP YOUR FACE AWAY from the steering wheel, unscrew the two T-25 Torx screws in the back of steering wheel, which hold the airbag in place. (Note: the screws are captive and will not come out once loosened.) Slowly pull the airbag away from the wheel and turn it so that the bag faces to the side - outward towards open space. (You do not want the bag pointed towards the wheel or something hard because it can turn in to a projectile if it goes off.) Using a small flat head screw driver, pry up the yellow terminal lock on the airbag connector and then pull the yellow terminal straight away from the airbag. The terminal should pull away from the back of the airbag easily once the lock is removed. Keeping the bag at arms length, place the removed airbag in a place where it won't turn in to a projectile if it were to go off.
9) Disconnect the horn wire going in to the upper left of the wheel. The wire removes by pressing the white plastic collar inwards and turning 1/4 turn to the left. (counter clockwise) The plastic collar and wire should then come out. Do not force this step/wire or you can break the turn signal cam that it plugs in to.
10) If equipped, disconnect the steering wheel control connector .
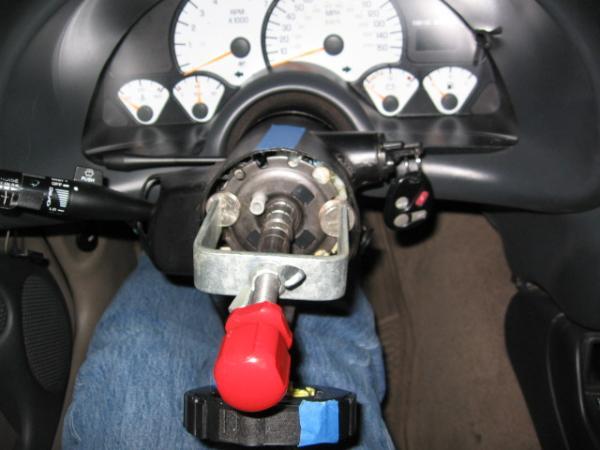
11) In the center of the wheel, remove the steering wheel lock nut retaining ring and then remove the lock nut with a 21mm socket.
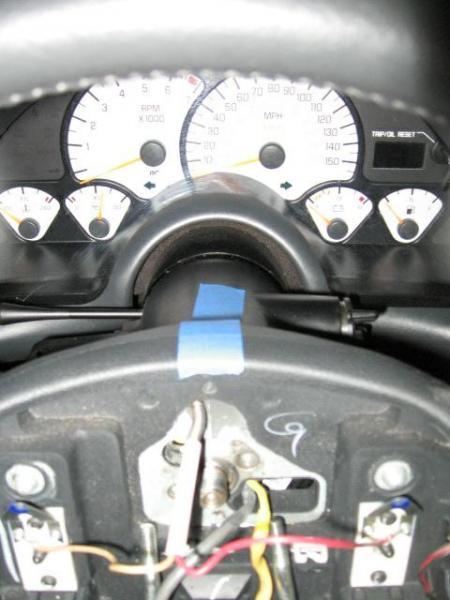
12) Index the steering wheel by placing a piece of tape across the wheel AND column. This will be needed to properly align the wheel when it goes back on.
13) Using a steering wheel puller (you'll need one equipped with 5/16"X18 TPI bolts) thread the bolts in to the wheel BY HAND. Do not tighten with force. Then turn the center shaft of the puller slowly until the steering wheel comes off the post.

14) As you remove the wheel, be sure to thread the steering wheel controls and airbag wire through the portal.
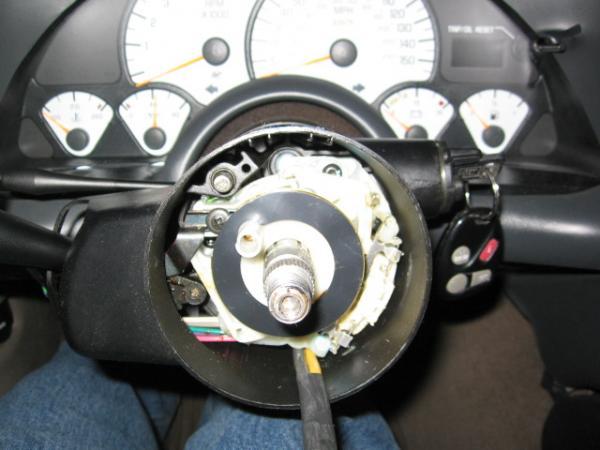
15) Remove the clock spring. NOTE: THE ORIENTATION OF THE CLOCK SPRING. WHEN REPLACING, THE LARGE KNOB AT THE TOP OF THE COLUMN WILL NEED TO BE ORIENTED CORRECTLY IN THE RIBS ON THE INSIDE OF THE COLUMN SHROUD IN ORDER FOR THE UNIT TO WORK PROPERLY. Using lock ring pliers, remove the clock spring retainer. Next, use some tape to secure the inner ring of the clock spring (to ease putting it back together) and slowly pull the clock spring out of the column. As it comes out, the wire you disconnected earlier will pull back up through the column. Dangle the clock spring off the column, making sure the wire isn't bound up and that it doesn't come out so far that the free end of the wires at the base of the column get lost.
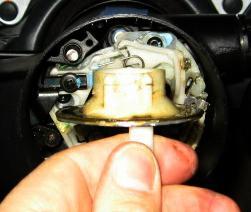
16) Use a steering wheel lock plate compressor to press the lock plate in to the column. (Note: My compressor is old and I'm too cheap to buy a newer, longer one, so I've used a few quarters in this picture to make up the difference. If only all problems with length were solved so inexpensively...)
Once compressed, use a small flat head screwdriver, lock ring pliers, and a lot of patience to remove the retaining clip. Slowly release the compressor and remove the lock plate, the washers, and springs behind it.
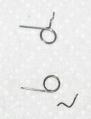
17) Next, remove the turn signal canceling cam from the column and inspect the two nubs. The picture below shows two groves worn in to the nubs from the canceling springs. Time for this one to be replaced!
18) Remove the hazard switch using a #1 Phillips head screwdriver. Be sure not to lose the assembly and spring inside the button!
19) Remove the black turn signal linkage at the upper left of the turn signal switch with a #2 phillips head screwdriver.
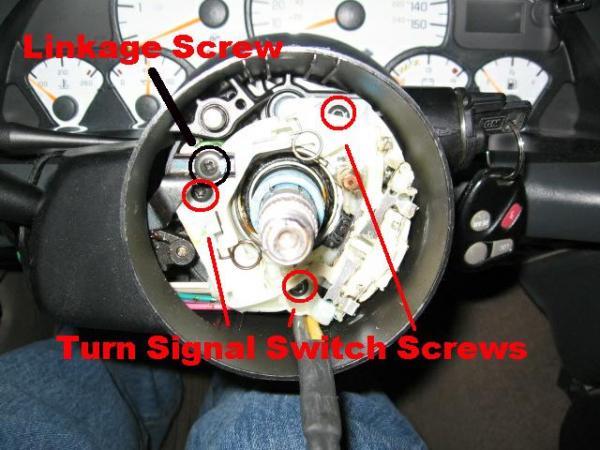
20) You will see the two turn signal cam springs above and below the steering shaft. These weaken over time and you will want to replace them as you put things back together. My timing was perfect as one of them snapped on me right as I touched it.
21) Disconnect the turn signal switch connector at the base of the steering column by removing the three T-20 Torx bolts and pull the switch out of the column slowly, making sure the wires and connector don't bind up. At this point, you are ready to replace your parts:
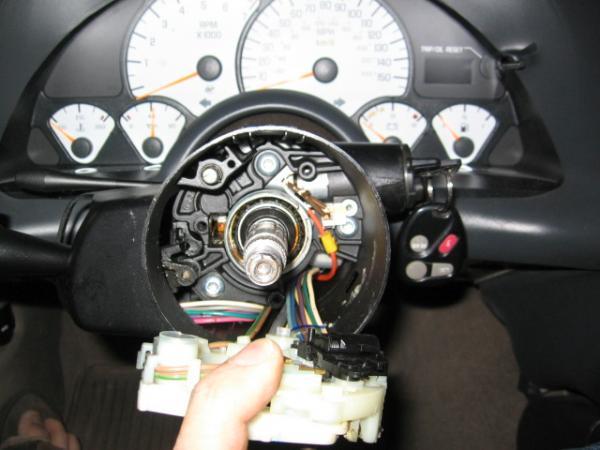
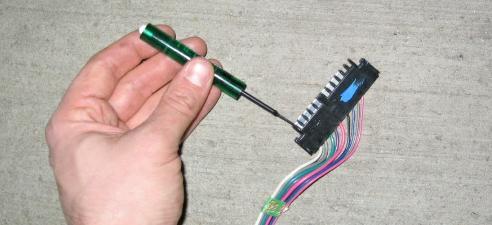
A) The turn signal and wiper switches can be replaced by removing the wire terminals from the connector body with a paperclip or terminal removal tool. (tool p/n - 12094429) The wires can then be fed back up through the column and the switch pulled out. (A wire or string should be attached to the wires so the new ones can be pulled back the same way.)
B) The ignition cylinder can be removed by first making sure its in the off position. The cylinder key position switch can then be easily pulled out with some needle nose pliers. The cylinder retaining bolt is next removed with a T-20 Torx driver and then the cylinder wire needs to be disconnected at the base of the column and then fed back up, just like the turn signal wires above. Once the wire is free and the wire retainer is removed, the cylinder will pull straight out to the side.
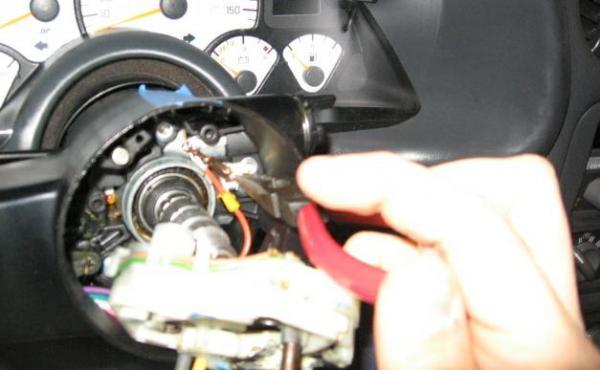
c) The wiper switch is removed by the following procedure:
- Remove the plastic cover at the rear of the signal stalk.
- Disconnect the cruise control connector coming out of the stalk. (if equipped)
- Pull the turn signal stalk straight out the side of the column.
- Disconnect the wiper switch connector, remove the terminals from the body and feed back up the column, similar as to is done for the turn signal switch. (above)
- Loosen the ignition cylinder and pull partially out so it does not connect to the cam.
- Remove the three upper collar retaining screws with a T-27 Torx driver.
- Pull the upper collar out slightly and drive the wiper switch pivot pin out and towards the dash.
- When putting the column back together, you should make sure the black high beam cam and plastic cam cover are in place before sliding the upper collar back down. As the collar slides down, the cam and the steering wheel lock rod will need to be fed back in to position in the collar.
The column goes back together in the reverse order it was taken apart. As the mechanism goes back together, you will want to watch for the following:
- Be sure to replace the turn signal cam and turn signal cam springs with new parts.
- All brown grease should be removed and replaced liberally with brown lithium grease.
- The turn signal contacts should be liberally lubricated with white lithium grease in order to keep the turn signal mechanism from binding up. You'll notice that getting new grease under the metal springs/contacts and in between the plastic parts that rub together will make your turn signal lever feel just like new.
If you get stuck or are not sure how things go back together, this article is great and has a lot of other details:http://www.crankshaftcoalition.com/w...ck_Rebuild.pdf