You must be logged in to rate content!
7 minute read
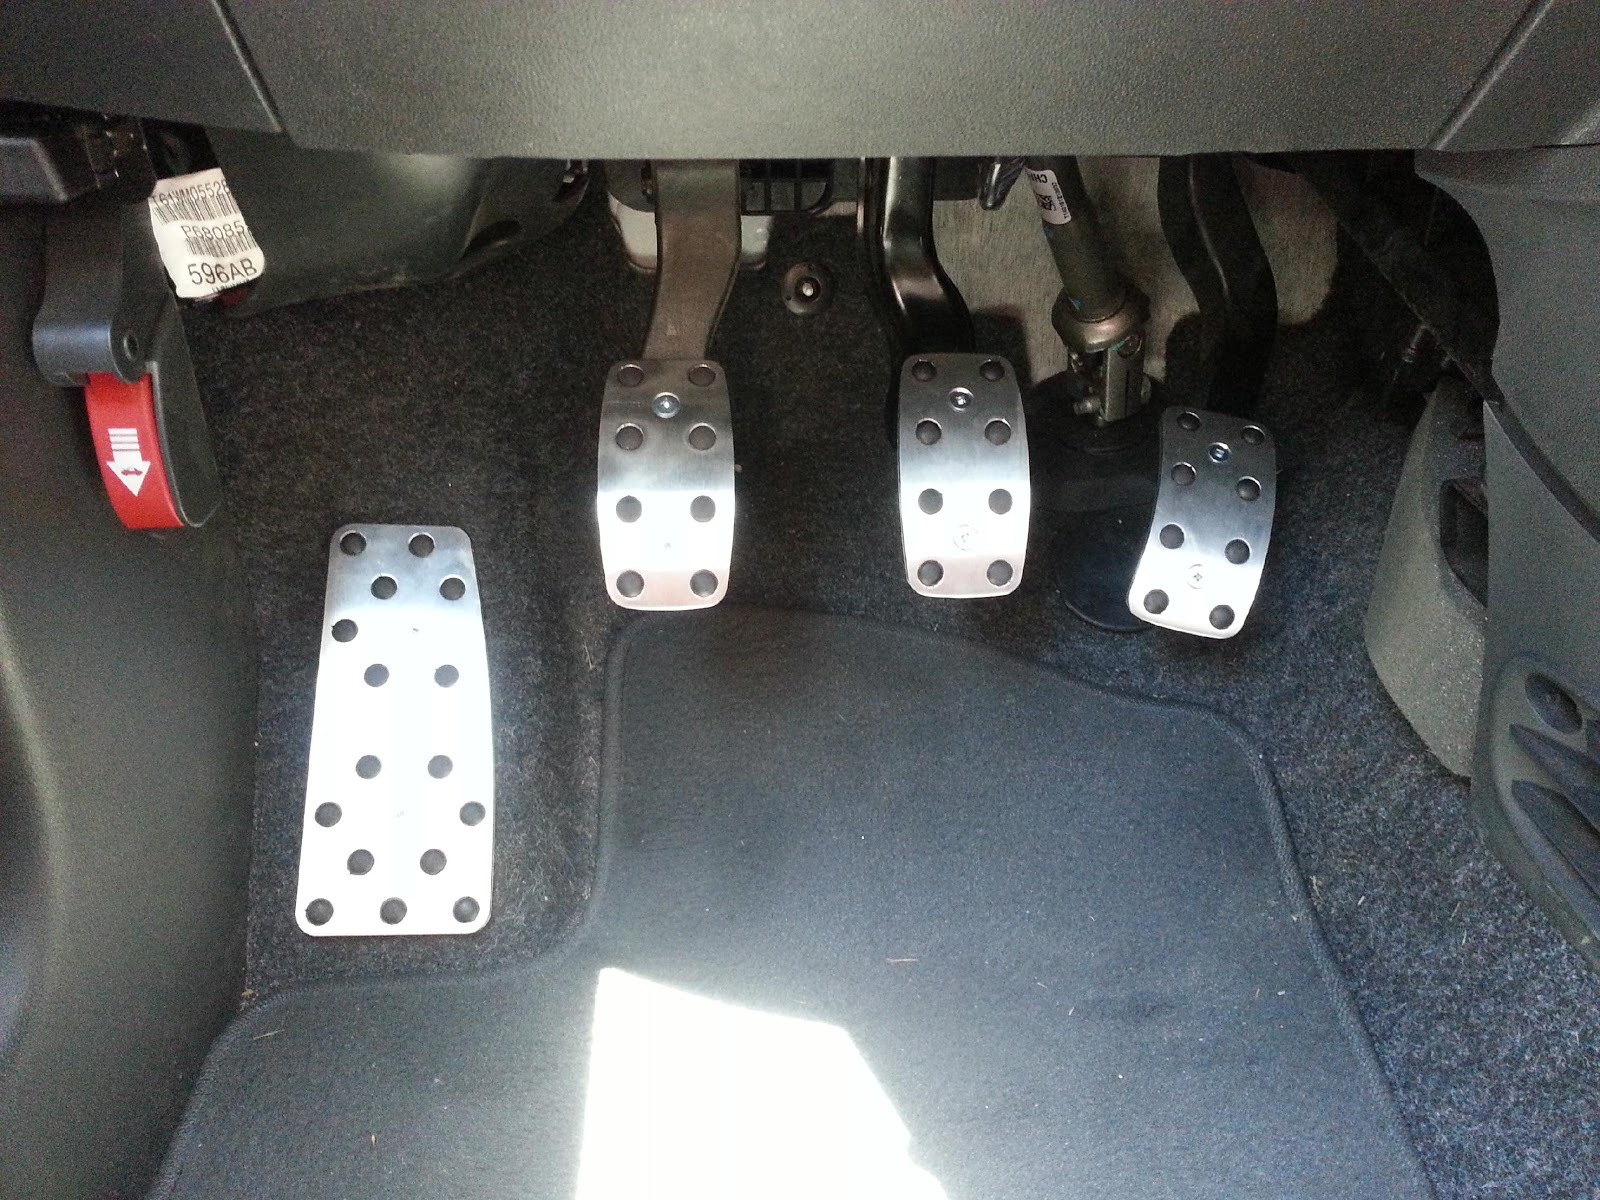
Black Aluminum Pedal Installation
Compliments of FirstCarFiat @ fiat500owners.com
6-20-2013
Was getting bored of my plain black rubber pedals and wanted the ability to heel-toe in my little 500, something that just wasn't easy with the large gap between the gas and brake pedals. So I got my hands on a set of aluminum pedals by Black (courtesy of a friendly forum member).
Here is what I went through to install them. (sorry I didn't take pics while doing it, was more concerned with getting it done quickly).
Tools needed:
Drill
1/8 bit
7/32 bit
Smaller drill bits of various sizes
masking tape
pen/pencil
needle nose pliers
screw driver for whichever screw head you get (I used square heads because thats what my local hardware store had)
*The kit that I got had some 3/4in screws that may have worked, but the heads were not flat and I didn't want the screws to stick out like the black rubber nubs, so I went out and got some new hardware to secure the pedals. The 10-32 size really sits flush in the holes and looks perfect.
Additional hardware that I used instead of the provided screws:
5x 10-32 1/2in machine screws w/ flat head
5x washers for size 10-32 screws
5x nuts for the 10/32 screws, with nylon enforcing centre
3x 10 1/2in regular screw w/ flat head
1) Remove the rubber covers on the clutch and brake pedals. There are two things securing the pedal covers to the pedal itself. The first is towards the top of the pedal and it is a rubber plug. The second is the sort of sleeve at the bottom of the cover. To remove the cover pull up the top part of the cover and pull hard enough to have the plug pop out of the pedal. Then slide the cover down to remove it. Do this for both the clutch and the brake. The gas pedal doesn't have a cover, but we will get to that later.
2) Black recommends to use a degreaser and clean the pedal faces before installing the new pieces. I used some palmolive soap and a paper towel (they seemed clean enough after that).
3) Place masking tape on the clutch and brake pedals.
4) Hold the new clutch pedal onto the pedal face. There is not much room to drill the holes so you will have to move it into the right place where the holes in the new pedal are just above the lower edge of the pedal face and just below the big hole where the pedal cover plug once went through. Use your fingers to feel behind the new pedal to square it up. While holding it in place use the pen to draw through onto the masking tape where you will drill. Next is the brake pedal.
5) Similar to the clutch pedal, hold the brake pedal onto the pedal face. Unlike the clutch I lined up the brake so that the top hole in the new cover would be at the bottom of the big hole where the plug was and then the bottom hole in the new pedal lined up a little above the bottom of the pedal face. (it may be confusing to read but should make sense if you have it in front of you). Again, square up this pedal cover and draw where you will need to drill onto the masking tape.
6) My clutch pedal face is plastic so drilling was simple (my clutch pedal was replaced and not sure if the original is plastic or the same metal that my brake pedal is). If your pedal is metal follow the same drilling procedure as what I did for the brake. I started with the 1/8 bit and drilled a pilot hole. Then moved up to the 7/32 bit and made the hole big enough to just barely fit the 10/32 machine screws. Now remove the tape on the clutch pedal.
7) For the brake pedal I only needed to drill the one hole as I used the hole from where the plug was from the old pedal covers. I started with a very small bit (smaller than 1/8) and after a little patience finally got it to bite into the metal. Then I moved up in diameter until I made a 7/32 hole. Remove the masking tape.
8) To install the pedals I secured them with 2 machine screws per pedal with a washer behind and a nut to lock it in. The reason for the needle nose pliers is because you need something small enough to hold the nut from under the pedals while tightening the screws. Theres not a lot of room and it can get a little frustrating trying to hold the nut, but eventually got it.
9) The gas pedal is a big piece of plastic and theres no good way to use the same method as for the brake and clutch. If you feel under the gas pedal there is an open part underneath the top half of the pedal which allows for your fingers to get in and secure a screw and nut. But for the bottom part there is no way to fasten a nut on, so that is where the screw comes in. Using the same method as the brake and clutch pedal, I put down masking tape and marked off where I wanted my holes to be (just make sure that the top hole has open space underneath; just feel under and guestimate). Then I drilled out a 7/32 hole on top, and a 1/8 pilot hole for the bottom.
10) To secure the gas pedal I used a machine screw, washer and nut to hold the top part of the pedal in place. The open space under the pedal allows for this. The bottom of the pedal was simply screwed in. No worries, it is very secure.
11) The dead pedal just gets screwed in to the floor (there is plastic under there so no worries). I mounted mine a little lower than I could have for looks, but functionally it would work better mounted higher up.
These pedals look amazing and the added size of the gas pedal really helps to heel-toe.
In the picture it looks like there is only one screw in each pedal and no screws in the dead pedal, but they are there, just a bad picture.
Enjoy!
10-28-2013
Putting on the metal pads really doesn't add much in terms of changing the pedal height. Remember that you are removing the stock rubber covers.
The gas pedal is a direct bolt on, so that may sit a little higher, but that just helps bring it closer to where the brake pedal is and is partly why heel-toeing is made easier with this mod.
My wife sits quite close to the wheel and finds that her legs are a little too upright, but thats what you get with the high up Italian seating position.
I personally sit so that my arms are bent just a little when extended to hold the wheel at a 9:30-2:30 position and my legs are fine (but I am only 5"10)