You must be logged in to rate content!
15 minute read
Aftermarket Exhaust How To
Compliments of AtomicZ_Eric @ www.corvetteforum.com
Hello forum members! This exhaust install DIY is my first and I hope it is helpful to those attempting to install their own aftermarket exhuasts. This is not only meant to be a "how to," but also (and perhaps more importantly) a "how NOT to." I will tell you all my mistakes and problems and how I solved them. This should take 3-4 hours... Not the 10+ I required. Hopefully you find something in here helpful for your installation. A few notes:
+ I am not a professional mechanic. Follow my advice at your own risk.
+ I installed a Borla ATAK over the axle system (p/n 11822), but the install is similar for nearly all C6 base, GS, Z06, & ZR1 cat-back systems. I also took a look at some Corsa directions which were very similar. At the very least this guide could help you formulate your plan for your system.
+ Borla's directions were very clear and easy to follow. I followed them nearly to the letter with a few noted exceptions below. I will use their instructions as the basis for this DIY.
- Disassembly #8: I removed the hanger assembly.
- Assebmly #2 : I flipped the oder of the H-pipe and over the axle system.
+ I will note in the number in Borla's directions.
+ If you do not have access to a lift AND do not want to cut your exhaust off, DO NOT attempt this install. In other words: A lift is required to get the car high enough off the ground to drop the OEM exhaust without cutting it off.
Here we go...
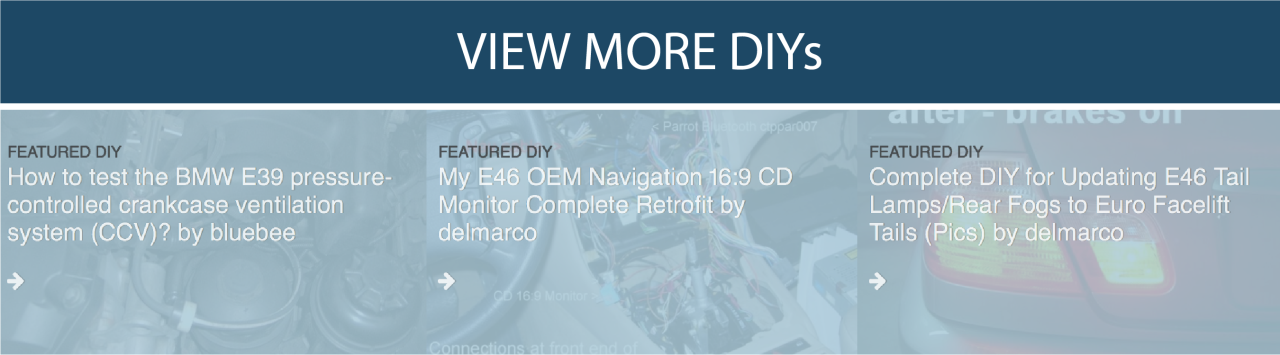
Put your vette on jack stands. The photo below shows 4 with only a jack as a back-up. After this photo was taken I added four extra jack stands (2 under the front cross member, and 2 near my work area). Please be safe. An exhaust install to save a couple hundred bucks is not worth a limb or life!
OEM Exhaust Removal Steps 1-9
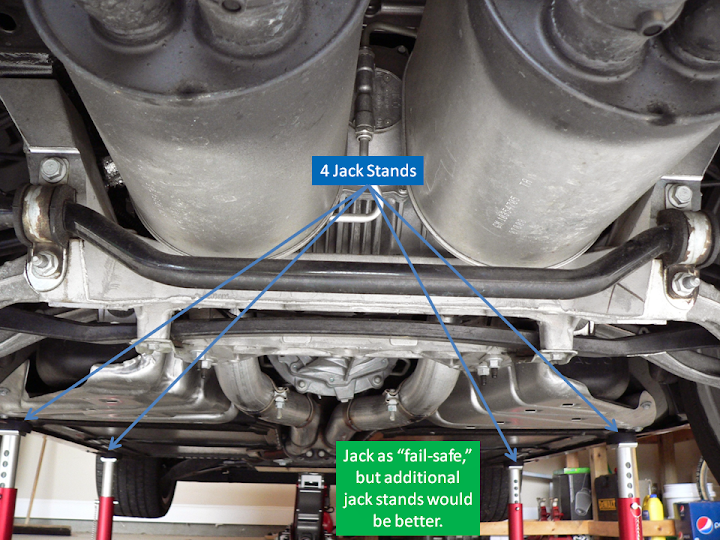
Step #1
Remove the top 2 bolts and bottom 2 nuts securing the anti-sway bar. Both are 18mm. To remove the bottom 18mm nuts you must use a 15mm wrench to hold the bolt they're attached to to prevent it from spinning. Leave the lower bolt in once the nuts are removed.
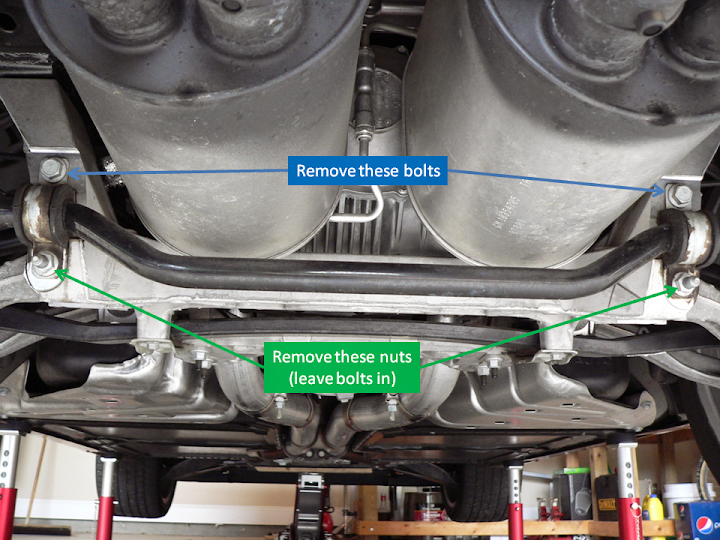
Step #2
Swing the anti-sway bar down and out of the way.
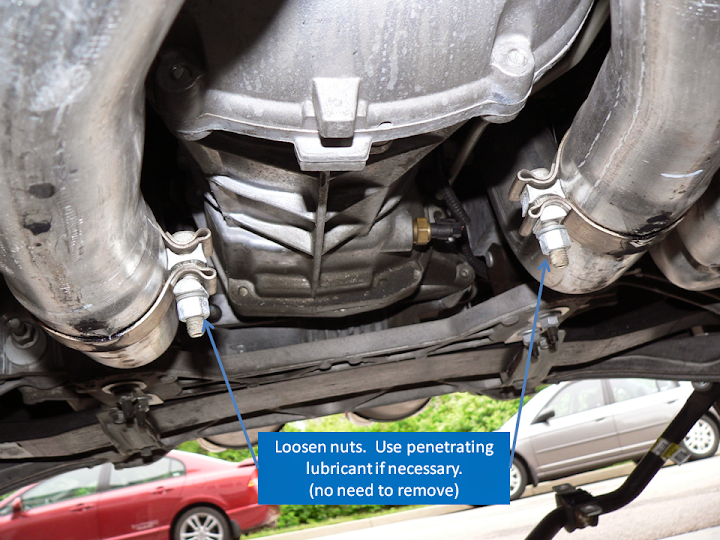
Step #3
Loosen the clamps securing the OEM over the axle system to the H-pipe. The nut is 15mm.
Step #4
Remove the spring hangers. They're 13mm.

Step #5a
Remove the 15mm bolts and nuts holding the H-pipe flange to the catalytic converters. The nuts take a long time to remove - be patient.
Do not remove the flanges from the stud bolts yet. They will support the from the of the H-pipe.
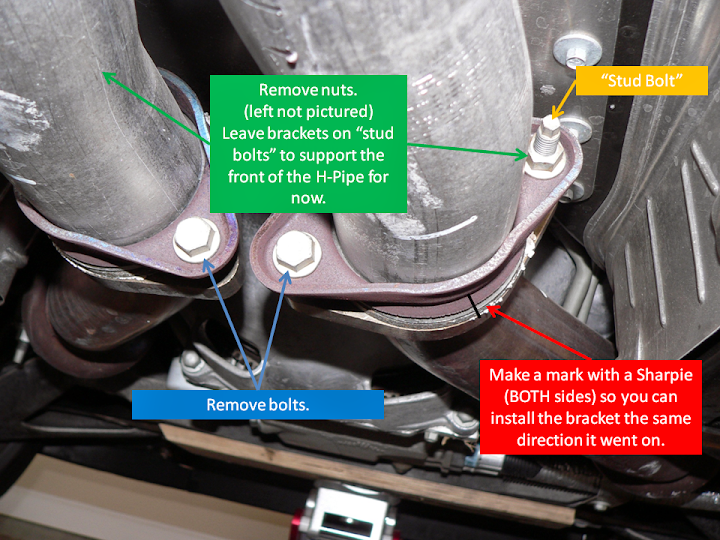
To clarify my comment in red: Make a mark on "BOTH sides" means to mark both the left and right flanges.
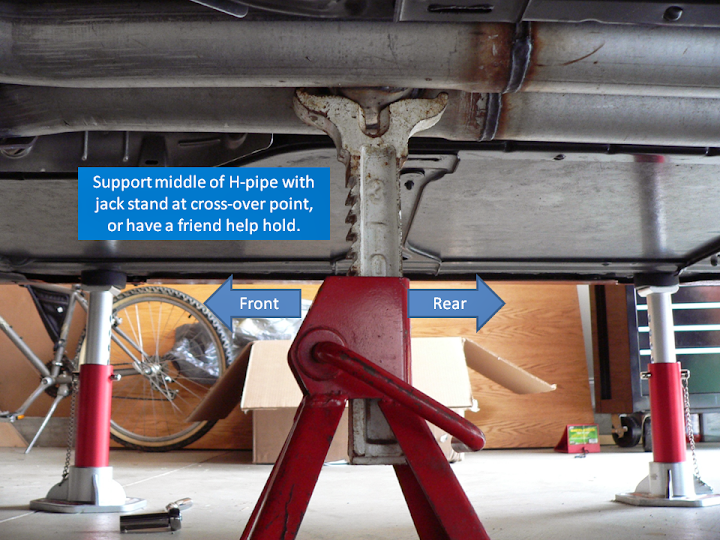
Step #5b
A buddy would be better than a jack stand for supporting the H-pipe.
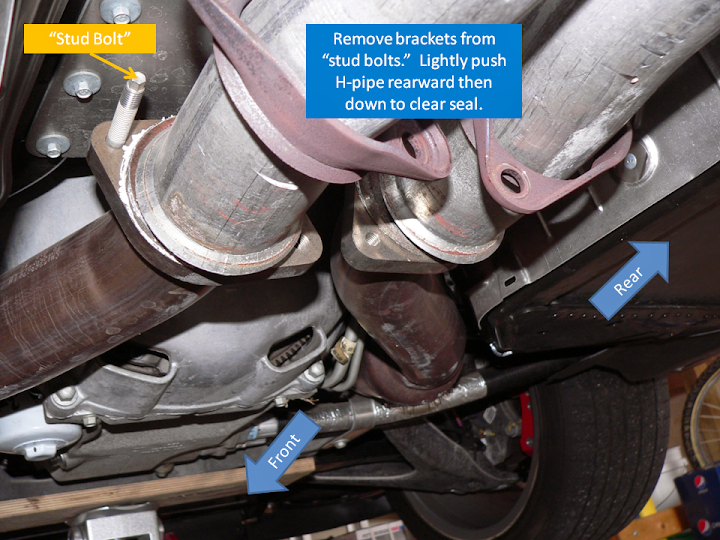
Step #5c
Remove the flanges, push the H-pipe slightly to the rear and downward to clear the seals.
Step #6
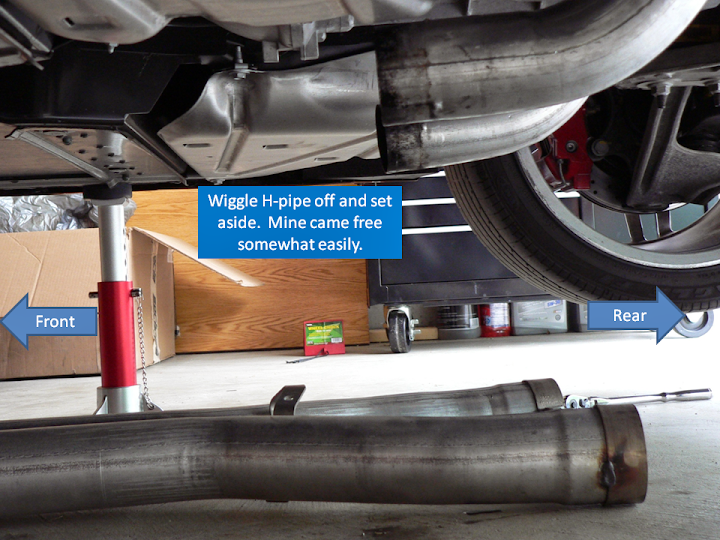
Remove the H-pipe by wiggling it free from the OEM over the axle pipes.
Step #7 (only necessary if you have NPP)
Remove the vacuum lines from each muffler assembly. This was fairly difficult due to the tight space and how snug the rubber lines were gripping the pipe. I used a small flat head screw driver to try to loosen the front of the rubber hose. I don't know if it worked?
The method that worked for me:
Left hand for driver side. Index finger on top. Thumb on bottom. Wiggle off.
Right hand for passenger side. Index finger on top. Thumb on bottom. Wiggle off.
Insert the supplied plugs into the vacuum lines and tuck them into the bumper.
Sorry there are photos of this step. The angle was pretty severe and space was tight.
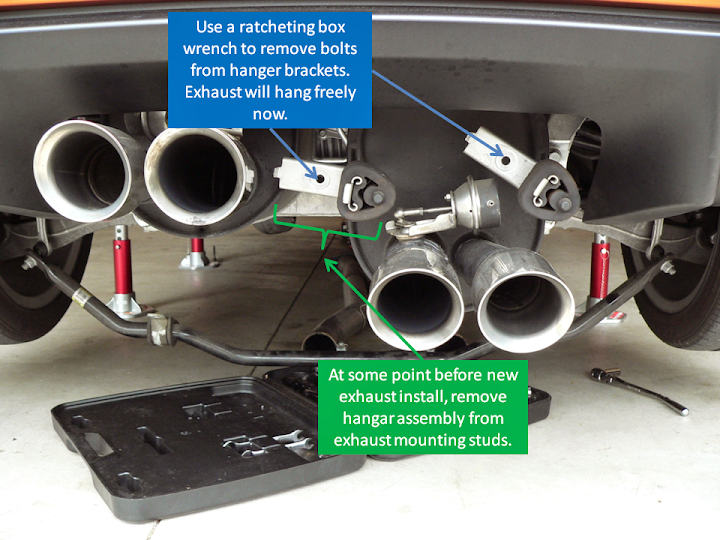
Step #8
Borla's instructions say to use a spray lubricate to remove the rubber hangers from the metal studs. I tried to remove without a lubricant and they would not budge. The ends of the metal studs appeared to be much larger than the hole in the rubber hanger.
Instead I removed the 4 hanger assemblies. They are each connected to the rear of the car with a 13mm bolt. Removing the rubber hangers later, once the exhaust is off the car, was MUCH MUCH MUCH easier for me.
Step #9 and #10 - Remove the muffler assemblies...
With a lift:
I did not perform this method because I did not have a lift. It appears the exhaust rotates about the axle, with some wiggling, to get it out. There are various youtube videos that show this process taking place.
Spoiler: There seems to be some trick to getting it free. Even after cutting my exhaust off I could not get the over the axle pipe to come out through the rear of the car, no matter what I tried. Please read on for warnings about yanking the OEM exhaust out, and what damage it can cause.
Without a lift:
I had to cut the OEM exhaust off to remove it. The car was not high enough in the air to rotate the OEM system off. Unlike Borla, Corsa, etc. the OEM mufflers & over the axle pipe is ONE ASSEMBLY that does not come apart. Rotating it off requires a lot of ground clearance. I nearly dropped the car trying to raise it high enough to get the OEM exhaust off (I may detail my foolishness in a follow-up post).
DO NOT, under any circumstances, try to raise your car that high with jacks + jack stands. IT WILL NOT WORK. YOU WILL LIKELY DROP THE CAR AND HURT OR KILL YOURSELF.

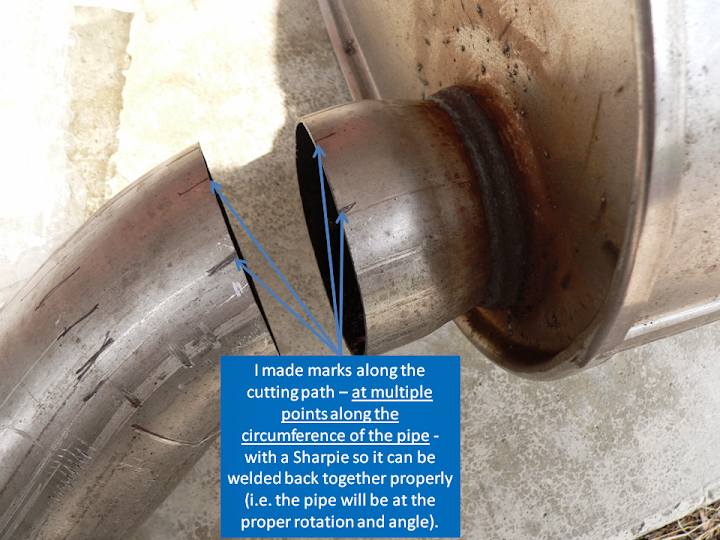
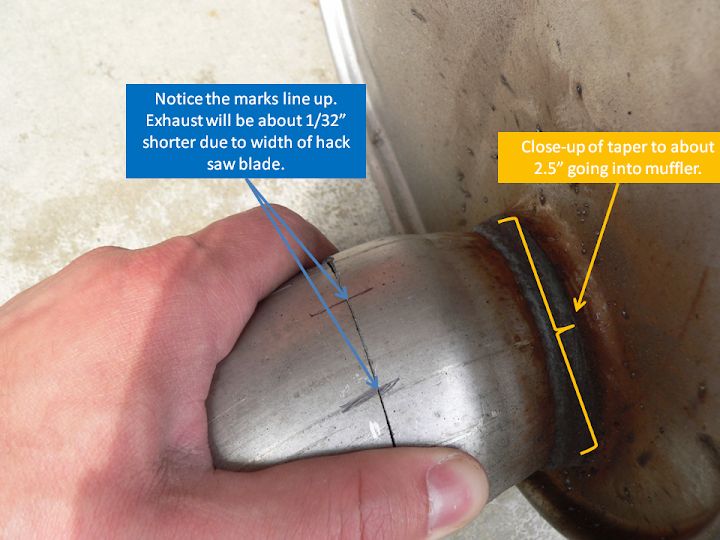
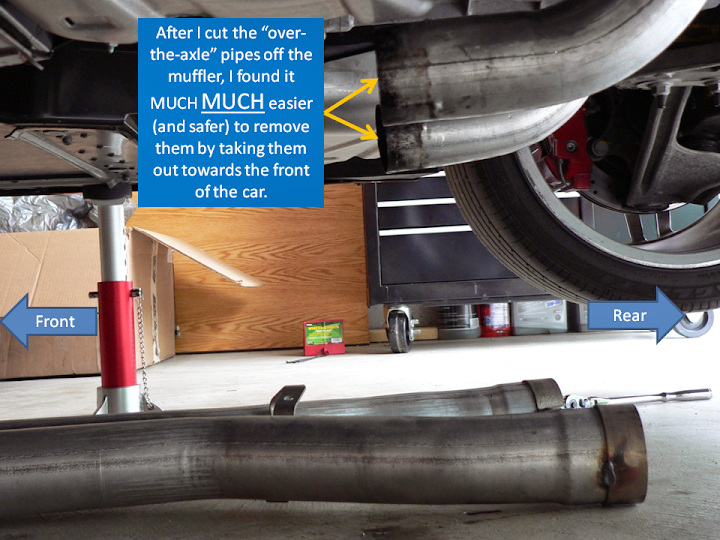
I used a hack saw to cut the OEM exhaust off. I made marks along the cutting path so it can be welded back together properly - albeit 1/32" shorter. 
 I never planned to sell my OEM exhaust or get any value from it, so cutting it was no concern to me. The marks are necessary so that the pipe can be welded back together with the proper orientation.
Now this may shock you - If I were doing this again AND had access to a lift, I would still cut the OEM exhaust off. Above the axle there are a lot of delicate items: electronics, brake lines, fluid lines, etc. After watching a couple videos of people wiggling, tugging, and pulling the OEM exhaust out, I had to wonder, "Did any damage occur?"
Even after cutting the OEM mufflers free from the over the axle pipe, I could not get the pipe out through the rear of the car - in what I consider I safe manner. Although I'm an electrical engineer and consider myself mechanically inclined, I am not a certified mechanic or exhaust specialist. So take my advice with a grain of salt. However, with the mufflers cut free, the over the axle pipe slid VERY EASILY and SAFELY down and out to the front of the car.
Below are some photos showing what is near the removal path of the OEM exhaust.


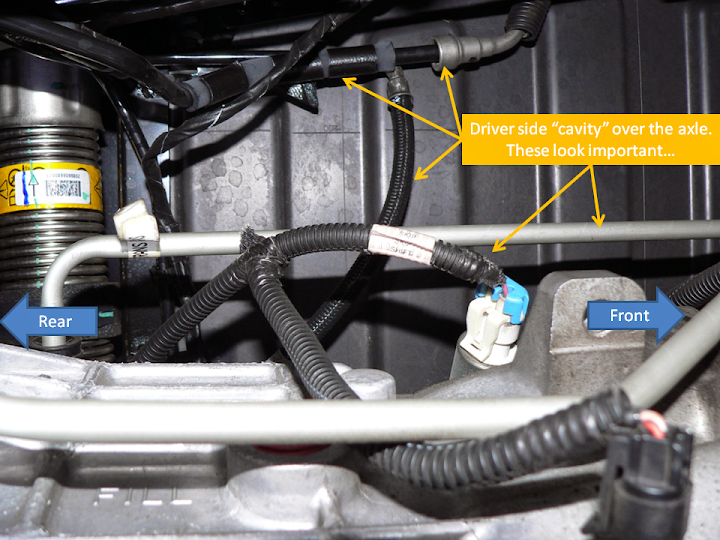
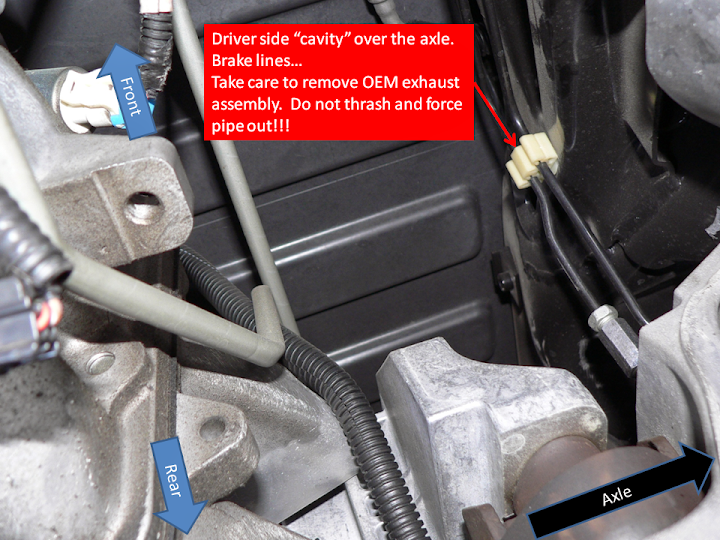
Perhaps there's some "trick" or angle that I don't have the experience to perform. Just keep this info in mind if you take your vette to a random muffler shop and have a guy tugging away at your OEM exhaust to get it out.
New Exhaust Install Preface
The general flow of the entire process:
Remove H-pipe --> Remove OEM muffler assembly
Then
Install aftermarket H-pipe --> Over the axle pipe --> Muffler assembly
I struggled to install the system with this order. I needed to twist the driver's side over the axle pipe to get it into the muffler assembly. This was not possible b/c it was already installed to the H-pipe.
To me, it makes sense to put things together in the REVERSE they were taken off. In other words, work backwards. If the mufflers were the last item you removed, then it should be the first thing you'd put on. Almost like "rewinding" the install (for those still familiar with VHS tapes) 
My flow for the entire process:
Remove H-pipe --> Remove OEM muffler assembly
Then
Install muffler assembly --> Over the axle pipe --> H-pipe or X-pipe.
So Borla's steps
1,2,3,4,5,6.... I have modified to
4,3,2,1,5,6....
Also would like to note that a particular Corsa set of directions I viewed matched the Borla install flow (i.e. H-pipe / X-pipe first). I still like mine better. 
New Exhaust Install Steps 1-9
Before you begin:
Test fit your new exhaust parts on the bench and make sure everything goes together OK. Inspect all electronics, plug connectors back in if you removed them, inspect brake lines, etc. My left over the axle pipe was a tighter fit into the muffler assembly, so I decided to install that first when it was time for the step. DON'T FORGET TO INSTALL THE HANGER ASSEMBLIES!!!
Eric's Step #1. (Borla's step #4)
Have a friend help lift the new muffler assembly into position under the rear of the car. Insert the hanger studs into the rubber hangers. Have a friend help with this. Did I mention to have a friend help? I did this alone and it was very awkward.

(Note: If you were to follow Borla's install order, not only would you have to lift the muffler assembly into place, BUT ALSO insert the over the axle pipes. That's why I like my method better! )
Eric's Step #2-3. (Borla's step #3-2)
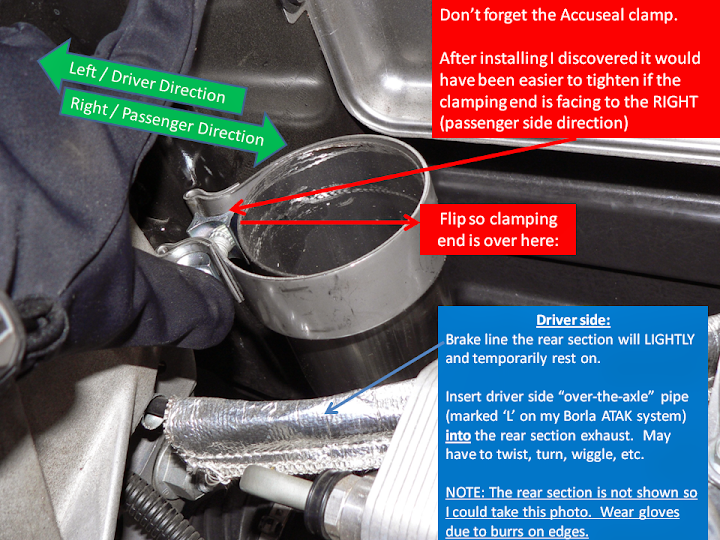
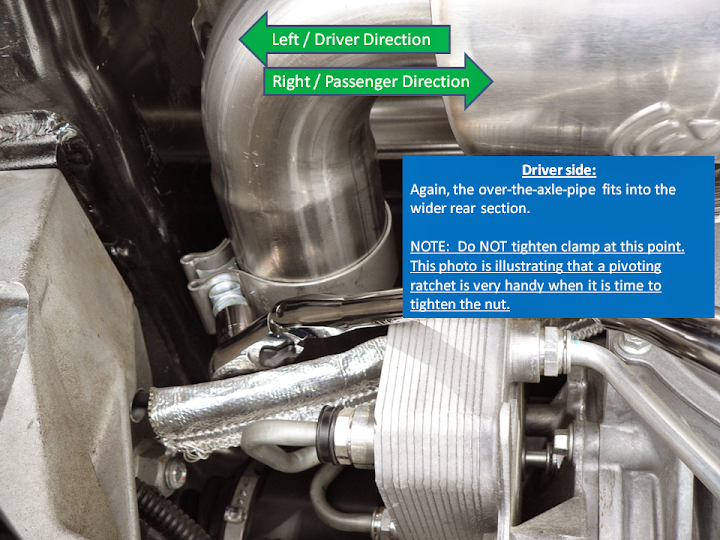
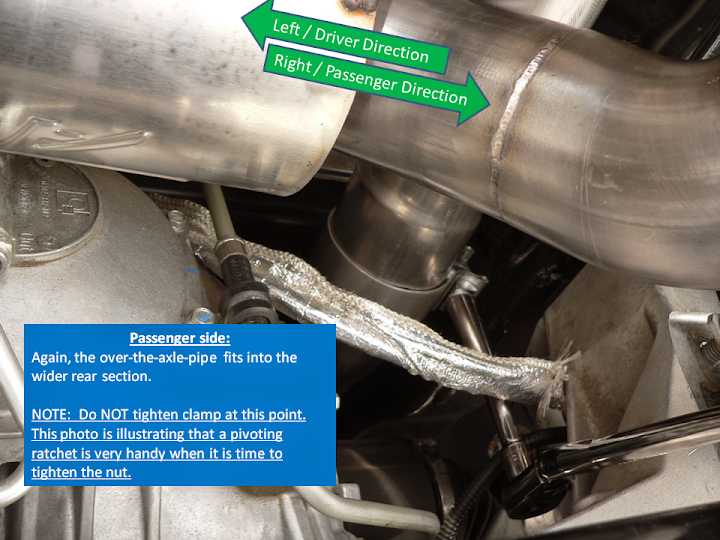
Slide the Accuseal clamps that came with the kit onto the muffler assembly with the proper orientation shown below. To clarify the photos and my comments - the clamping end should be toward the passenger side (right).
Take each over the axle pipe and maneuver it over the axle into the muffler assembly. My passenger side slid in no problem. The driver side required a little twisting - good thing you didn't already install the H-pipe / X-pipe, right??? 

Eric's Step #4. (Borla's step #1)
Reinstall the H-pipe. Or, if you have a cat-back system this is where you would install the X-pipe that came with your system. The procedure should be similar.
The photo is pretty self-explanatory. You may notice that this is a photo I used before with the OEM system (I forgot to take a photo with the new pipes).  Don't forget the spring hangers.
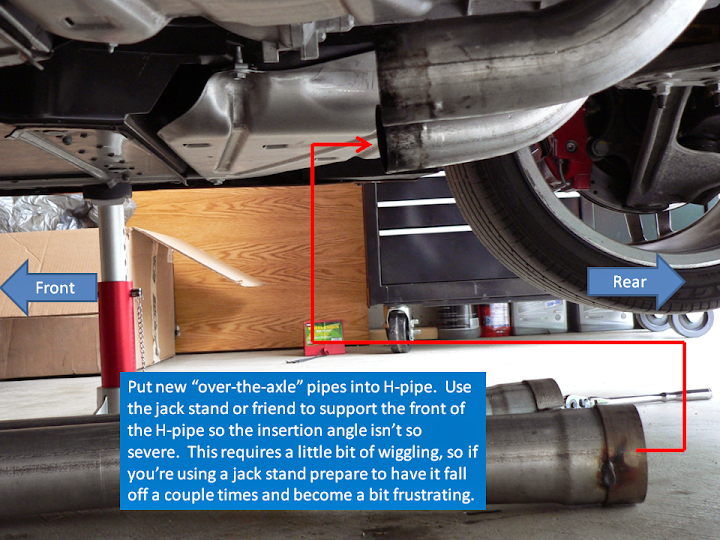
Don't forget to line up the marks you made during the removal process!

Eric & Borla's Step #5.
Check exhaust system for proper clearance an alignment.
Step #6.
When tightening everything up start at the front and work backwards. Tighten the H-pipe or X-pipe first. Torque bolts / nuts to 35-40 ft. lbs. Try to tighten them evenly - i.e. don't torque the bolt down first and then the nut. That would result in the flange not applying equal pressure and the seal and likely leaking. I guess this goes without saying, but just a reminder. We all make mistakes sometimes.
Next tighten the Accuseal clamps 32-35 ft. lbs. where the over the axle pipes fit into the H/X-pipe. Next are the Accuseal clamps where securing the over the axle pipes into the muffler assembly.
If I recall correctly I could not get my torque wrench in there, so you may have to do this section by feel. Also, make sure that the Accuseal clamp opening is not over the notches.
Step #7.
Reinstall the anti-sway bar. Torque top bolts to 45-49 ft. lbs. Torque the lower nuts to 65-70 ft. lbs.
Step #8.
Before starting your vette be sure to perform one last check of all clamps, seals, hoses, spring hangers, etc.
Step #9.
Start vehicle and check for any leaks, rattles, etc. Fix if any exist. None existed for me, so I was good to go.
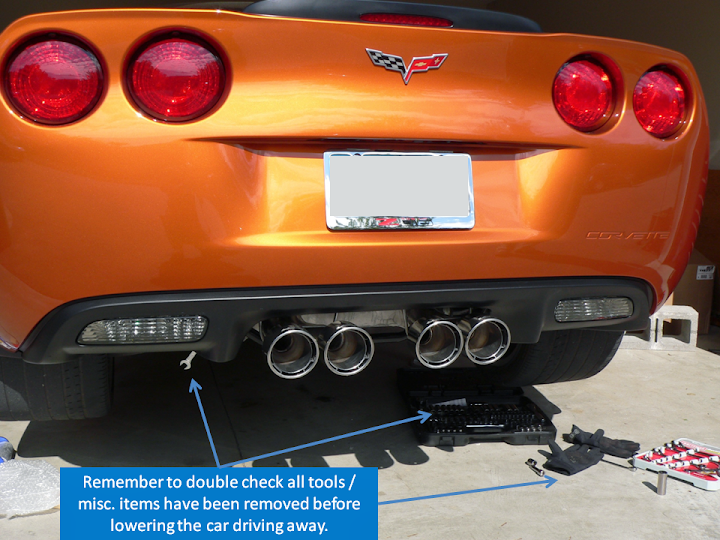
Lower the car and go on a test drive. Depress the throttle fully and enjoy the fruits of your labor. Corsa directions recommend getting the car back in the air and double checking everything is still tight after a test drive. This makes sense. I didn't do it, but will check next time I have her up for a fluid change.
CONGRATULATIONS!!!
I hope this guide has helped you work through your exhaust install. Please remember to take your time and be safe.


Nice details!
Posted by Diggymart on 5/1/20 @ 3:43:21 PM