You must be logged in to rate content!
8 minute read

THE 402 MOD: Audi allroad suspension adjustment
Compliments of Nebuchadnezzar @
The 402 Mod: Suspension adjustment via VAG-COM tool
Disclaimer: I assume no liability or responsibility for any damages or loss that may arise either directly or
indirectly as a result of the application of the information provided herein. Please read instructions fully before
attempting this modification. Serious harm or injury may come to you or your vehicle by performing these
modifications. This mod will seriously alter the handling characteristics of your vehicle. Perform this
modification AT YOUR OWN RISK.
What will you need?
A VAG-COM tool:software and cable available from Ross-Tech
A ruler or tape measure if you're looking for precise measurements
And of course, an Audi allroad
What does this modification do?
The Audi allroad comes with a height adjustable suspension that lowers or raises the car through four preset
levels. The car's computer includes a calibration tool that allows you to reset the height to factory specifications
in case you're car was to get out of normal operating range. This modification "tricks" your car into thinking
that it is out of normal specifications. By telling the allroad that it is indeed higher than it really is, it will adjust
itself to ride lower on all four settings or vice versa if you were to tell it that it was lower than it really is.
Does the car still go "up and down"?,
Yes. However, if you lower your car 1/2 inch, ALL settings will be 1/2 inch lower. There is NO way to only
lower the lowest setting.
How do I alter the ride height of my allroad?
With your engine not running, but the car's ignition set to "on", log into the allroad using your VAG-COM tool.
Select "Less Common Modules" you'll see the following screen:
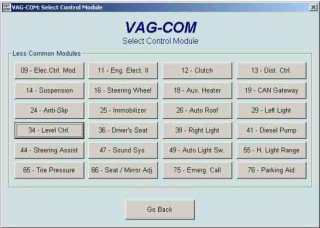
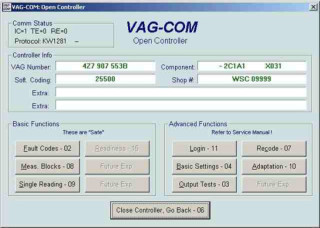
Click on Module 34 to enter the Level Control module. Your VAG-COM will open the module and you'll be
presented with this screen. Click on Advanced Function 11 for the Login screen. This function unlocks the
adaptation module.
When the Login screen appears, enter in 31564 and click on "Do It". You will then return to the previous
screen. Click on module 10 to open the adaptation screen.

When the adaptation screen appears, be warned that you MUST finish the entire adaptation or else you will
cause an error and you suspension will be locked in Level 2 until you successfully complete the full adaptation
process. If you just purchased your VAG-COM tool and it is still running in "Shareware" mode, you will not be
able to complete the process. If you do encounter an error while doing the adaptation, don't panic. Simply start
the process over again from the start and it will complete eventually.
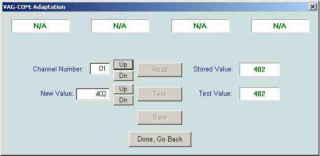
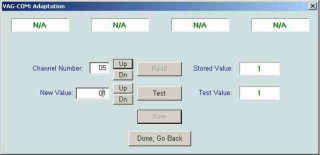
Press the UP button next to Channel Number to increase it from the default value of "00" to "01". If required,
press the READ button. Your car will automatically adjust it's ride height to Level 2 for calibration. Wait for
this height adjustment to complete. Your VAG-COM will list four green N/A's in the top four windows and to
stored value will read "402".
Channels 01-04 correspond to the four corners of your vehicle. You must complete the following steps for all
four corners of your car.
01 = Left Front
02 = Right Front
03 = Left Rear
04 = Right Rear
"402" is what the allroad ALWAYS thinks is the proper setting for Level 2. The value of "402" according to the
Bentley CD manual is the distance measured from the center of the wheel to the bottom of the fender in
millimeters. If this is the first time you are performing this modification, and your car has been operating
properly, it should be safe to assume that "402" is the proper value. You can also take a tape measure and
measure this value if you care to. We will discuss secondary adjustments performed after modifying the ride
height later in this document.
Knowing that the allroad at this point "thinks" it's at a 402mm setting, if we were to enter "402" in to the New
Value window, we'd be making no change to the ride height. If fact, you can enter in 402 to successfully
complete the adaptation process so your car doesn't go into Suspension Limp Mode. Note that although it
already reads 402, you will need to delete and re-enter 402 to have to option of testing and saving the settings.
However, if you care to alter the ride height of your vehicle, we must trick the allroad into thinking that it is
higher or lower than it really is. Therefore, if we want to lower the allroad 15mm, we would tell the computer
that the allroad measured "417" and enter that into the New Value field. To raise the allroad 15mm, we would
enter in "387". What you enter is up to you, however, there are some limits as to what the computer will take as
a valid entry, so it wouldn't be a bad idea to take baby steps in changing the settings.
To change the setting, enter in the New Value and press the Test button. Once the value is accepted by VAGCOM,
press the Save button.

When presented with the "Are you SURE" prompt, click on Yes to proceed.
Press the UP button next to Channel Number again and the value will increase from "01" to "02". Enter in the
same number as you did in the previous section into the New Value field and repeat the procedure. Do this until
you have successfully set New Values for Channels 01 - 04.
NOTE: You may wish to enter in a slightly different value for Channels 03 and 04 when lowering your vehicle
if you prefer for your car to have a more aggressive appearance. 5mm seems to be enough of a difference to
prevent the allroad from looking "weighted down" in the rear.
After the four channels have been set to your preference, you must save your settings. After setting and saving
Channel 04, press the UP button once more so that the Channel Number reads "05". This channel is for saving
your previous work.
Enter in a New Value of "01", test and save. You'll get an error, but don't worry, everything is okay. Click on
the "Done, Go Back" button to exit out of the adaptation screen. That's it, you're finished!
For good measure, start your allroad's engine and move up and down through the four levels of your car a few
times before going for your first test drive. Once you've confirmed that all works well, carefully go for a test
drive to check to see if it is to your liking.
If you need to readjust your allroad after completing your first adaptation, it is important to remember that your
allroad thinks the last adaptation set it properly to 402mm between the center of your wheel to the fender. It has
no clue as to where it really is set to. Therefore, if you lowered your allroad by 15mm by entering 417 into the
New Value field on all four channels and wish to lower it an additional 5mm, you DO NOT enter in 422 the
second time around. This will lower your allroad an ADDITIONAL 20mm. Rather, simply enter in 407 and you
car will lower itself another 5mm since it thinks it's only off by 5mm. Keep a record of your modifications so
you know exactly what number needs to be entered to get your car back to stock settings. Or you can measure
and use this adaptation program as it was meant to be used to get your car back to factory specifications.
17mm in the front and 13mm in the rear will make your car noticeably lower, and you probably shouldn't go
any lower. As for height, 20mm was accepted by the vehicle, however, no driving was done at this level, so
please exercise caution and common sense. And remember the disclaimer above!!!