You must be logged in to rate content!
15 minute read
Transmission and clutch swap DIY
Compliments of alaincopter @ http://forums.vwvortex.com
5-4-2010
Swapping a transmission is essentially simple, but there are lots of steps involved in the process. Make sure you can afford the time to have the car off the road.
The order in which you should proceed with each step doesn't necessarily have to be the same as explained in this thread, so experiment and see what works best for you. Others who have done it are welcome to chime in with tips and different ways to do things. I don't have pics of every single step as I didn't have all the time in the world and was doing it all on my own for the most part.
Before getting to work, it is a good idea to spray some PB blaster, WD40, fluid film or any other penetrating oil on every nut and bolt you will be working on. Leave them soaking for a few hours or even overnight.
First thing to do with the car on the ground is to loosen the 30mm nut that holds the outer ends of the drive axles. Use a large rachet or breaker bar for this. I also loosen the lug nuts - taking the wheels off is not absolutely necessary but it helps make room. Jack the car up and secure it with jack stands. Keep the jack stands on the subframe, far apart from each other enough to fit yourself through, a creeper if you are using one, and for a transmission to eventually go through.
![]()
With the car jacked, finish removing the wheels and the nut and 30mm washer from the drive axles. then start loosening the 12-point type bolts that hold the axles on the flanges on the transmission. You will need a 8mm triple square or 12-point bit for this. If you don't have one, buy the pack that comes with four different sizes of them - you will use the 10mm bit in the future for head bolts anyway. Use a 13mm wrench to drive the bit.
Make sure that before attempting to turn each bolt, you clean it inside really well. PB blaster and a really fine pick will do it. When inserting the 12-point bit, gently hammer it until it is firm. These bolts will not strip if you do this.
To loosen the first one, get a helper to step on the brakes for you if you cannot loosen the bolt while just by holding the axle by hand for it not to turn. After the first bolt is out, you can insert a screwdriver through the hole to stop the axle from turning.
![]()
Remove each half-axle from the car. The downpipe will have to come off at some point so you might as well do it before removing the passenger-side half axle. This is what I did on mine but my downpipe is very different from the stock one.
If you have difficulties removing the half-axles, try prying the transmission to the side using a crowbar or large wrench.
Next remove these three 13mm bolts that hold the starter on:
![]()
Now pull the starter, and keep it far from where you will be working on. You may be able to leave it on top of the engine mount, or you can remove it completely if you find it will help. Do not to let the wires touch the engine block or any other metal, or better yet disconnect your battery before removing the starter.
![]()
Now pull the reverse sensor wires off. They are shown in the pic above. On 5 spds they are on the passenger side of the tranny, and on 4-speeds they are at the rear of it.
Next is to loosen the clutch cable (it is held by two 17mm nuts, which sandwiches the washers onto a bracket that's part of the driver-side engine mount) then unhook the cable from the clutch release arm.
Start taking off the 19mm bolts that attach the transmission to the engine. They are 5 in total, all 19mm. Going clockwise, starting from the bolt you see immediately below the clutch release arm in the pic above (say that's bolt number 1) that one is there by itself, bolts number 2 and 3 hold the coolant heater bypass structure between the tranny and the engine block, number 4 holds the end of the ground strap, and number 5 is a long one with a 19mm nut on the other end.
Also remove the tin plate on the bottom. It is held on by two or three (don't remember mine only had one) 10mm bolts attached to 10mm nuts on the other end.
![]()
You don't have to remove the drive axle flanges or the differential cover like I did. They are all held by 13mm bolts. If you leave them on, you can loosen the speedometer cable with vise grips, or some VW special tool.
Now undo the shifter linkage cage. It's just one 13mm bolt, with a 13mm nut on the other end and a spacer in between. Here is a comparison pic between a 5 speed linkage (left) and 4 speed linkage:
![]()
![]()
As you can see, they are the exact same metal structures. Top bushings are the same (the 4-speed ones shown are missing the dust caps), middle bushings are different, and the ball on the bottom is a different size as well.
Back to the transmission, now you may also undo the 19mm bolt holding the big transmission mount onto the body. You can undo the brackets as well if you wish, they make it easier for the tranny to slide out (13mm bolts for the front one, 6mm allens for the rear one), and if you are going to be removing the long torque bracket on the side (recommended instead of bending it out of the way) you must undo the 17mm stretch bolt holding the rear drivers-side end of the subframe to the body. This bolt is supposed to be one time-use only, but many have re-used them.
Now support the rear end of the transmission with a jack, because the next step will be removing the front stubby motor mount and we don't want the whole drive train to jerk backwards with any violence.
Undo the two 17mm or 19mm i forget bolts holding the front motor mount on:
![]()
Also undo the 17mm nut on the side motor mounts, so the engine can move. Lower the end of the tranny, and the whole thing will begin to come down. You may want to jack the front of the motor up - not really necessary at this point, but it will be later for the new tranny to go in.
Have a jack handy to support the middle of the transmission a bit lower when it comes out - two jacks work well, one in the front and one in the back. Pull the transmission off the engine block and rest it on the jacks. Have the jacks up enough so that the transmission is still inside the tunnel and cannot fall to the side.
![]()
Now lower it smoothly and bring it to the ground. Slide it out the front.
![]()
So this is what we are left with:
![]()
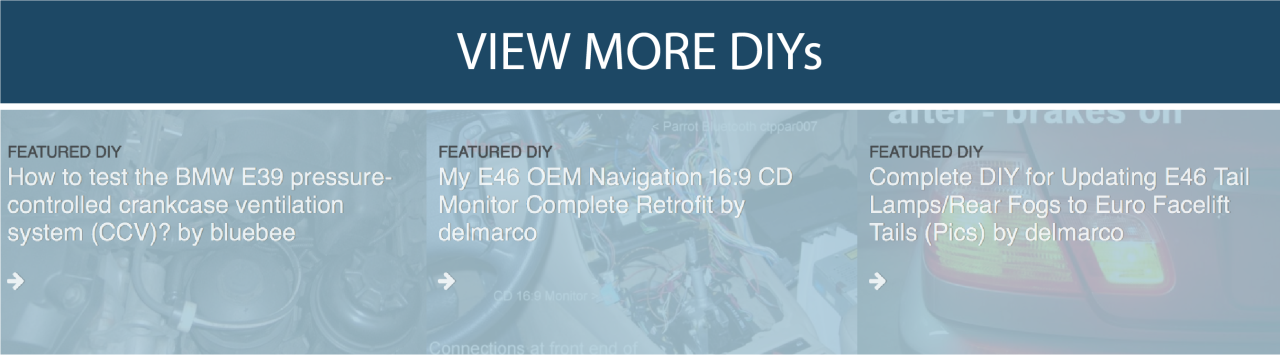
If replacing the clutch, remove the six 13mm bolts holding the pressure plate on. Out it comes and exposes the flywheel:
![]()
Now, you are supposed to remove the flywheel and get it resurfaced before installing a new clutch. In order to keep it from turning, you could stick a screwdriver through one of the holes so the engine block stops it from turning (thanks j-boogie and themagellan for the tip and picture)
I chose to keep mine in place as the ceramic clutch I installed wouldn't have a problem grabbing onto the flywheel, but to be on the safe side you should remove the flywheel and get it resurfaced if you want to do things properly, especially with if using a stock clutch. The flywheel is held on by 6 15mm bolts. These bolts are one-time use only and must be torqued to 30 Nm following a star pattern, plus 1/4 turn again following the same star pattern. Removing the flywheel will also give you access to replacing the rear main oil seal.
Now onto installing the new clutch. It is not absolutely necessary, but it is highly recommended to use a clutch alignment tool as shown - you can loan one from your local parts store for free just putting down a deposit. It will allow you to perfectly align the clutchdisc in no time. A misalignment of even a milimeter will make it impossible or very hard for the transmission to go in. It is hard enough to get it in even with a perfect clutch alignment, you don't wanna make it any harder than that.
![]()
Make sure it sort of looks like this up close:
![]()
Now a little bit of cleaning, and we are ready for the new transmission:
![]()
Note the two guide pins on the engine block on the picture above, one on either side.
Prior to mounting the transmission, ensure that these pins are not missing from the block, and that there is none attached to the transmission.
Thanks folks! Torque specs for the pressure plate bolts: 25 Nm, tighten each bolt 1/2 turn at a time in a star pattern.
The pressure plate I am using has 1200 lbs of pressure, which equals to a very stiff clutch pedal. In order to make the clutch pedal a little softer and increase the range of control, I lenghtened the clutch release arm to 20.5 cm compared to the stock 18.5 cm:![]()
20.5cm is the most you can go without any problems clearing the subframe and maintaining good release travel. This is the same length as used for the same arm on brazilian Quantums, and on 91-93 Fox 4-speed transmissions, so you could source one of those instead of modifying yours.
I had previously installed a brazilian limited-slip differential on my car, so I swapped that differential over to the new transmission. Here is a comparison pic of the LSD compared to a stock open differential:![]()
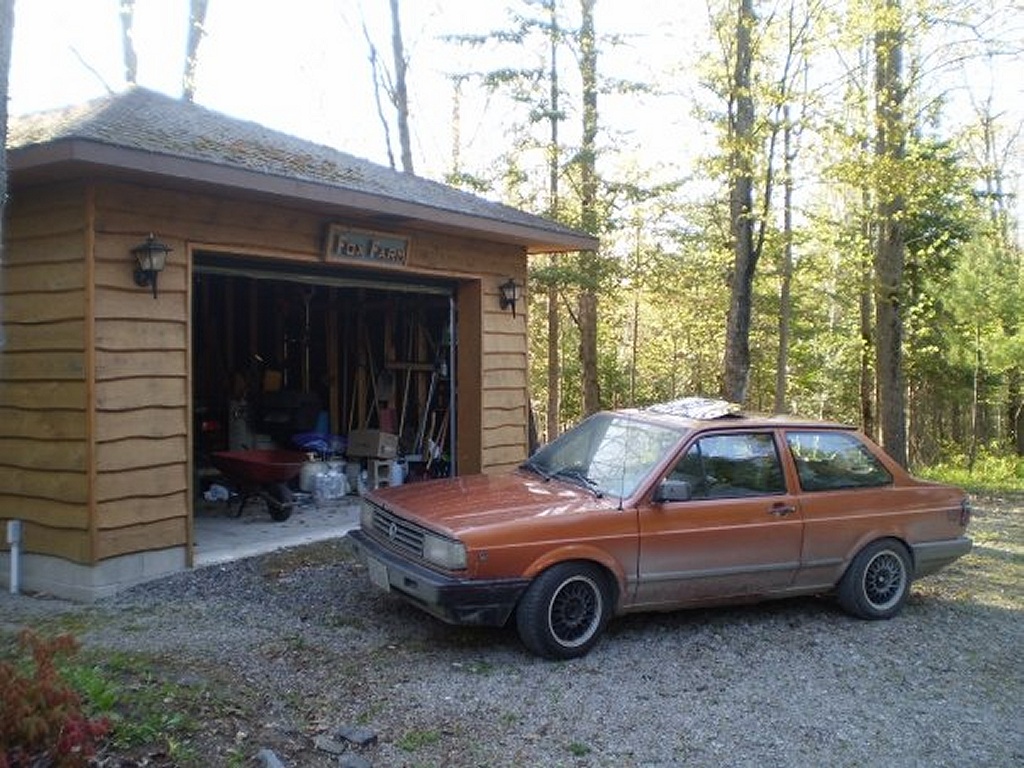
Newer tranny assembled and ready to go:![]()
Don't forget to replace the throw out bearing, and grease up the rotating points for the clutch release fork/shaft. Bring the transmission under the car, and jack the rear of it:![]()
Now jack the front:![]()
If you haven't yet, jack up the front engine mount to tilt the back of it down. This is necessary for the transmission to clear the steering arms going in.
Move the front jack to around the middle of the transmission so it gives you room to manualy insert the spline into the pilot bearing.![]()
Line it up as best as you can by moving the rear of the transmission and then the front and then the rear again, and ensuring the whole thing is lined up with the engine, both vertically and horizontally.
Instead of the front jack, you can use a strap attached to a 2x4 piece of wood resting against the strut towers, to keep the front of the transmission at a height close to what you will work with. Having a helper for this step might also be a good idea. Getting the transmission in and keeping it in can take a while and really piss you off, but it is a great joy when accomplished.
Have a couple of the bolts handy when putting it in, so that you can screw it in by hand to keep the transmission in place once you put it in. Attach all other bolts, keeping in mind the bolts that hold the heater core valve and the ground strap.![]()
![]()
Now attach the brackets and the big tranny mount (jack the rear of the transmission up for this).![]()
![]()
Then you can re-attach the front and side engine mounts, connect the wires for the reverse sensor, reinstall the starter (make sure to grease up the bushing on the transmission where the starter shaft goes into), hook up and adjust the clutch cable, attach the speedometer cable, attach the half axles and the downpipe, and attach the shifter linkage. In order to align it, you can shift the transmission into third gear, then have a helper hold the shifter in the spot for third gear inside the car as you tighten it underneath. Take a shower and enjoy!![]()
5-7-2010
Thanks all!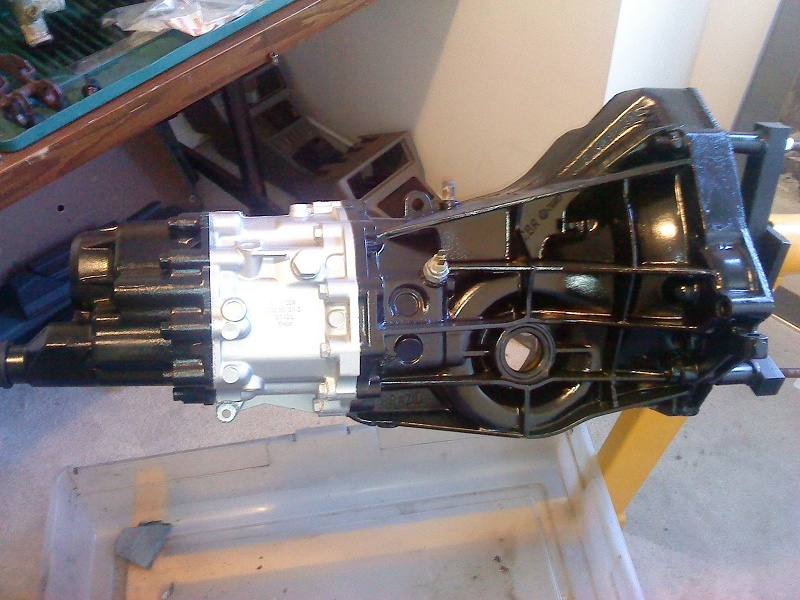
Thought I'd post a little trick that originated down South. This is for the folks with PSA 5 speeds where the reverse is where a 6th gear would be. This trick makes it easier to shift into reverse, making it so that you don't have to push the shifter down to engage reverse. Keep in mind that the transmission already has an internal lock feature which will prevent from it going into reverse directly from 5th or when the car is moving forward.
I don't have pictures of this since I did it last year when I did my first transmission swap, but maybe I'll take some pictures in the future when I re-do my interior. Or someone else could post theirs.
Remove the center console, and you will see two 10mm bolts around the side of the shifter housing. Undo these two bolts, and remove the slide piece that these bolts attach to, from the inside of the metal housing. Now you no longer have to push the shifter down to shift into reverse. Now try to shift from 5th directly to reverse to confirm that the internal lock does its job.