You must be logged in to rate content!
35 minute read
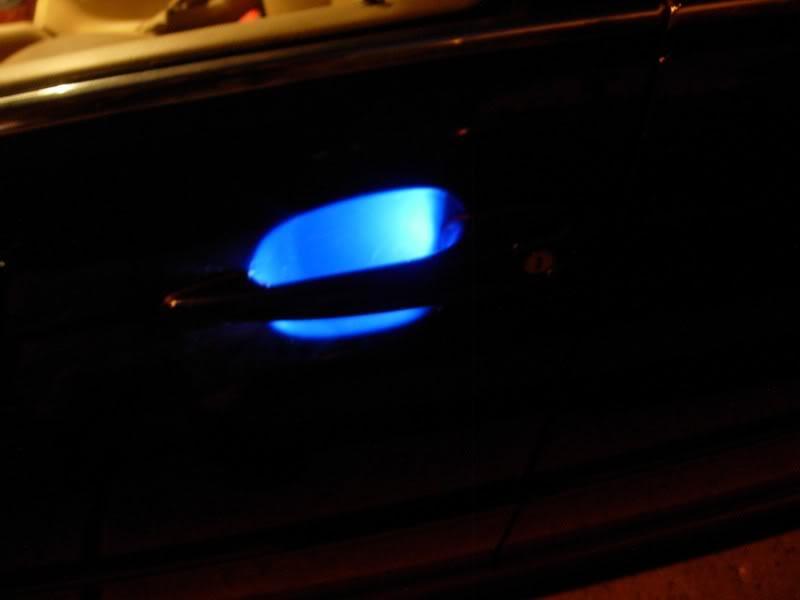
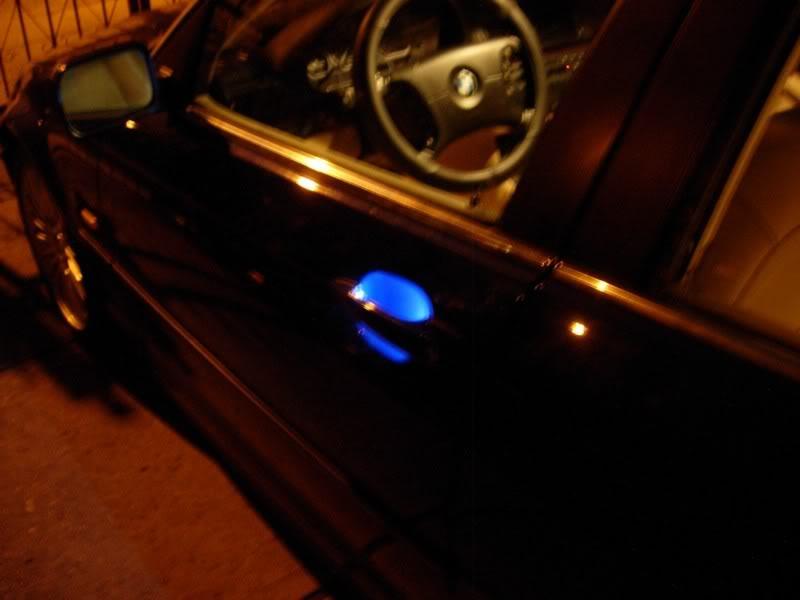
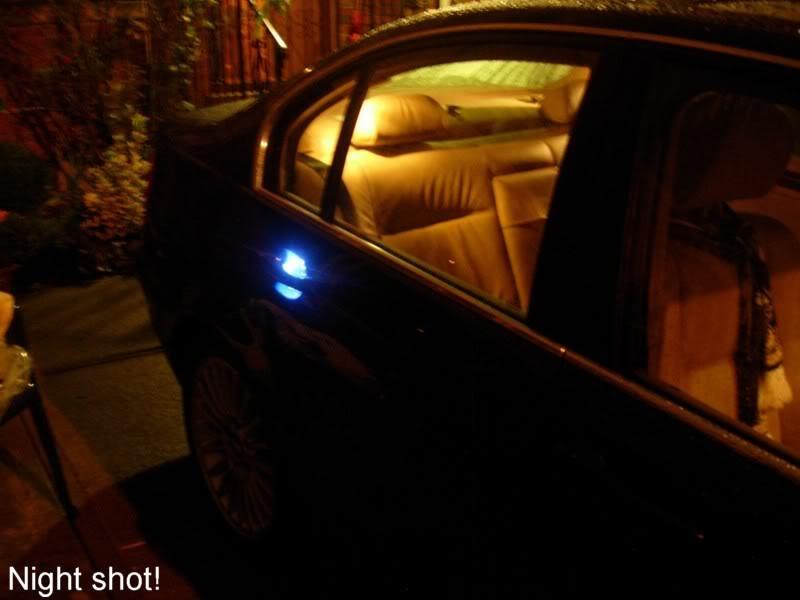
Exterior and Interior Door Handle LED Install
Compliments of delmarco @ www.bimmerfest.com
This is the first true monster DIY I've done on my E46. It took me 7 grueling days on my own to complete. The idea of this DIY is to show you how you can do it in less time and with less headache, if you choose to do it. The end result is worth it and you can tackle other projects such as fixing door leaky seal/rattling issues and window regulators whiles attempting this DIY.
TIPS:
1. I found it best starting with the drivers door first, rear doors next and finishing up on the front passenger door. This insured that the hardest door was done and out the way first. You do not want to start the easy doors first and then get to the hard door and realize you can't finished your project or you under estimated the true difficulty of what you were doing. In saying this I'm explicitly stating the Driver's door is by far the hardest of the doors. If you can do that door, literally half the work is done and you can follow with the easier doors.
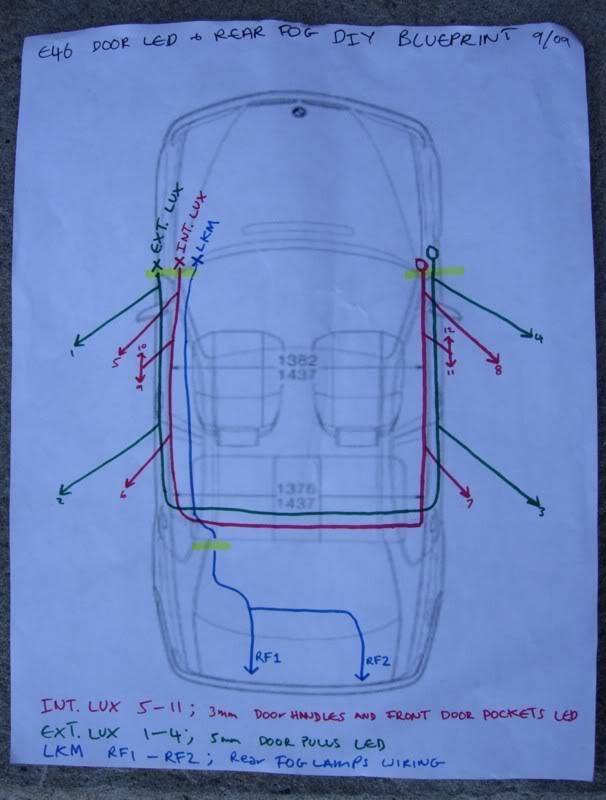
2. Give yourself lots of time to do this DIY. Make sure you really want this, because you do not want to be standing at midnight in front of your car with the door panels off, battery unplugged, spools of wiring around your feet and 20 screws and bolts in your pockets wondering what the hell possessed you to do this. Start with a blueprint and outline for how you will do it. For me it was laying the main wire branches first then going door to door tapping into the branch as I reached each door. For you it could be drilling holes in the handles first then placing the LEDs bulbs and wiring in all the doors before passing the wiring thru to the car and finding tap in points.
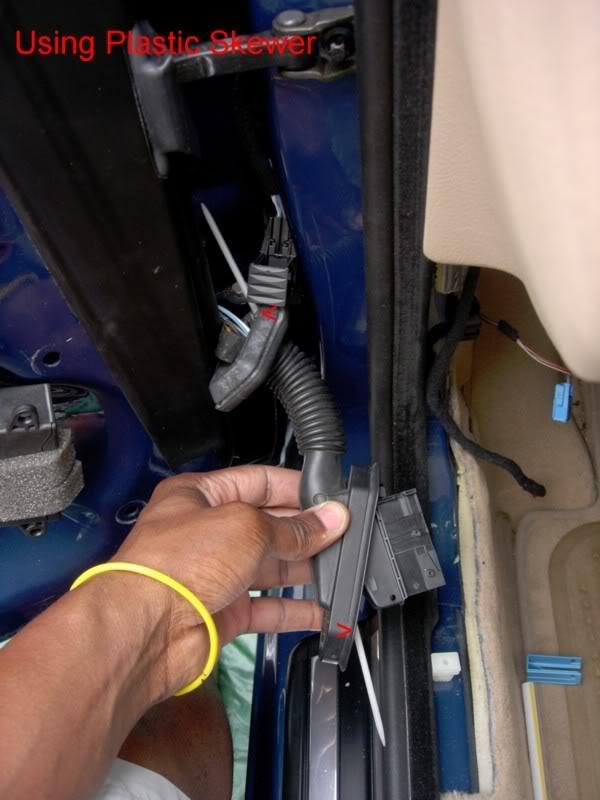
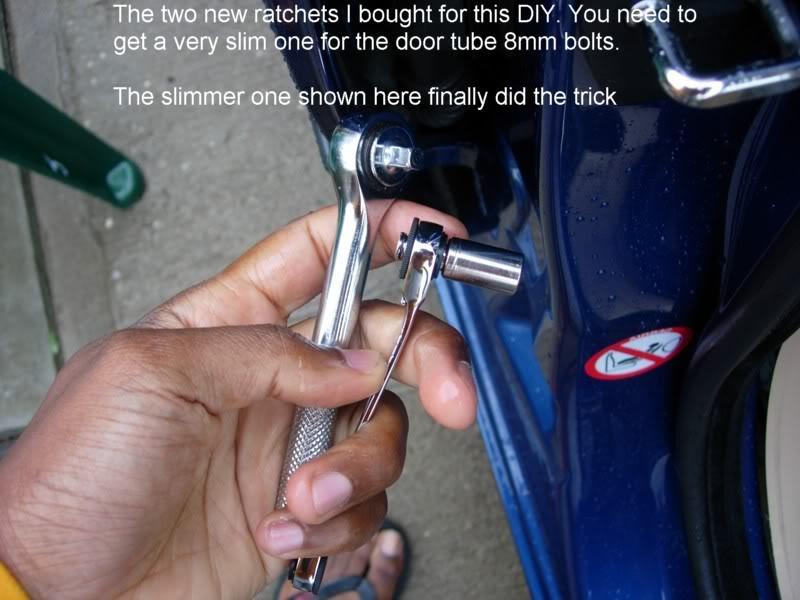
3. Get lots of wires and all the tools you need before. A flat/skinny ratchet tool is a must for the door jamb wire harness rubber connector tubes. A couple of Slurpie straws and plastic skewer made this DIY a lot easier.


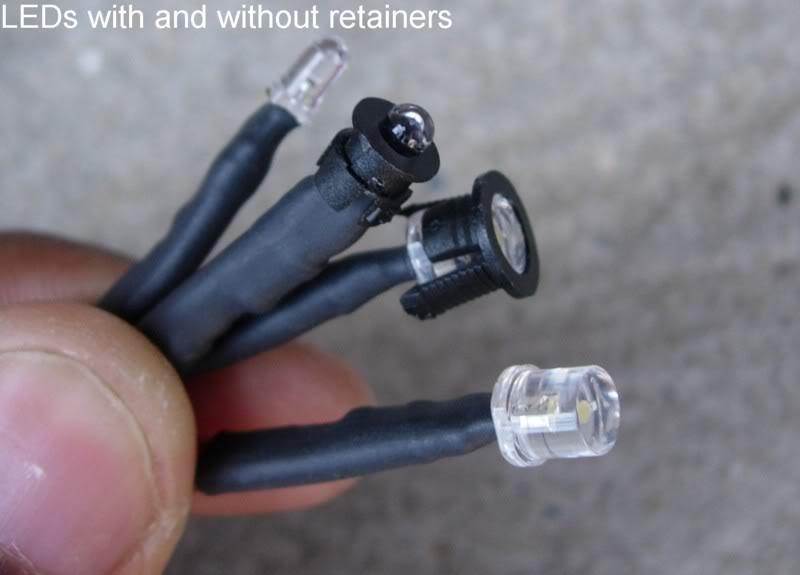
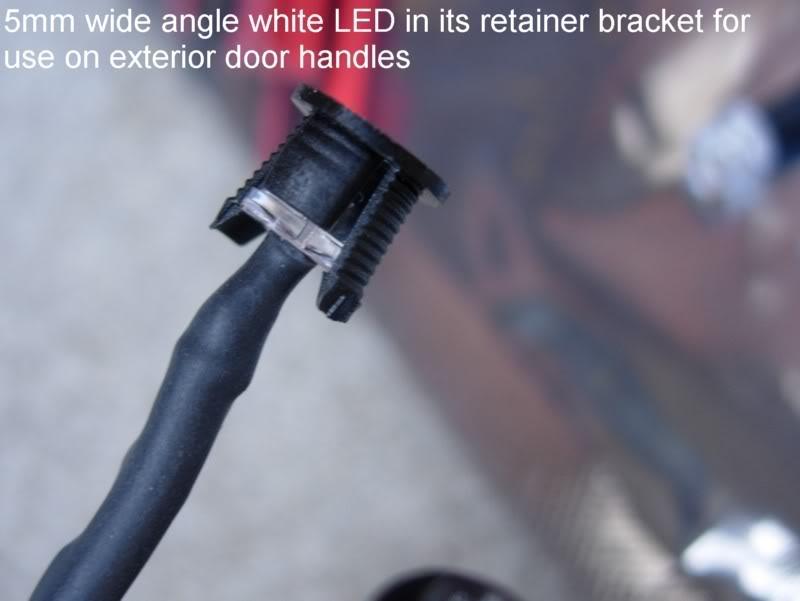
4. Pre-wired LEDs with Retainers also makes this DIY easier. Get your LEDs pre-wired with retainers. I bought mine on eBay from a USA/Michigan based seller for $6.99 for a set of 10 bulb and the corresponding retainers were 99 cents for a set of 10


DIY PROLOGUE:
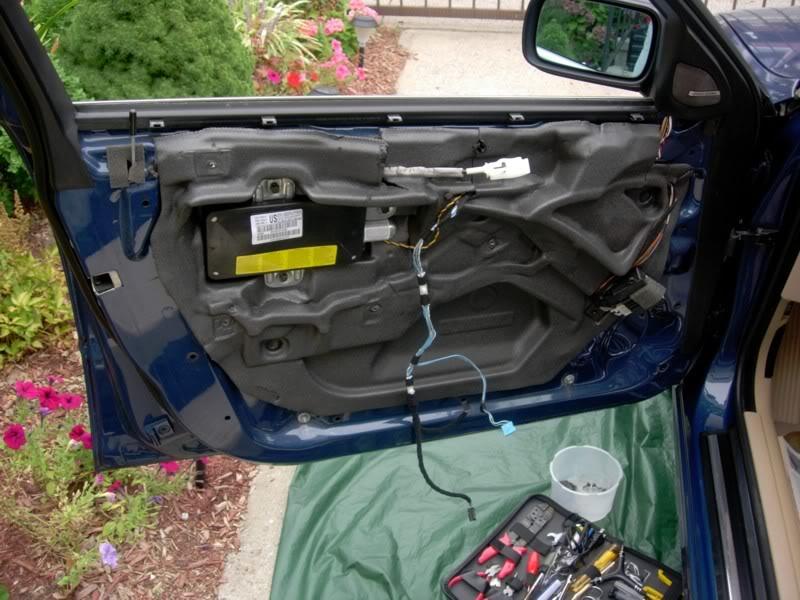
I began by rolling the windows all the way down and removing my door panel, unclipping the inside door handle latch cable-thingy, unplugging the speakers and setting the door panel aside. At this stage I didn't really find any "technical" need to unplug the battery because removal of the airbag is not required but I did anyway just to be sure the thing didn't explode on me. I realized later on when I removed the door rubber connector tube and I needed to unplug the door harness (w/ the airbag wiring) the battery did indeed have to be unplugged beforehand to avoid any airbag light errors.
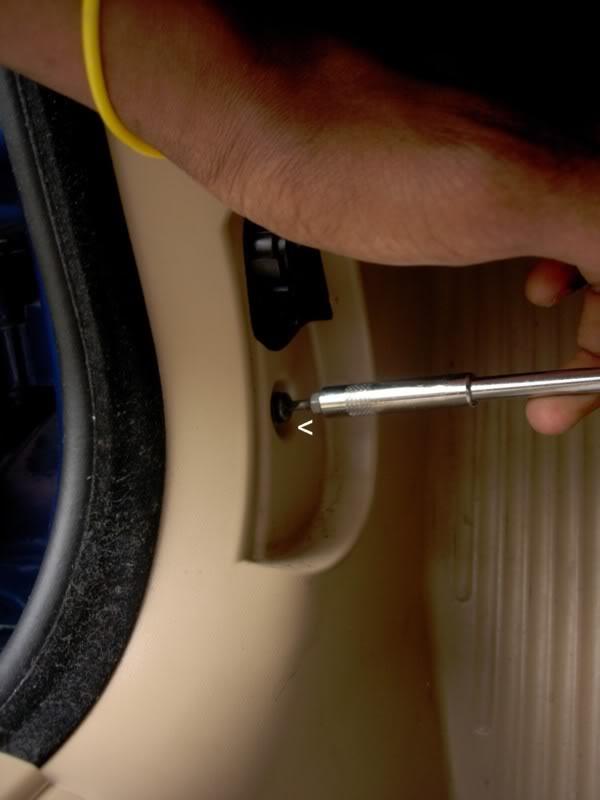
Next I removed the steering wheel's lower black panel and driver side footrest panel. The black panel came off easily but the footrest panel took a while to figure out. The Haynes manual sort of hints that the door sill needs to come off before this panel as it overlap it. And indeed the door sill overlaps both the footrest panel as well as the B pillar base-(which you will have to remove eventually).
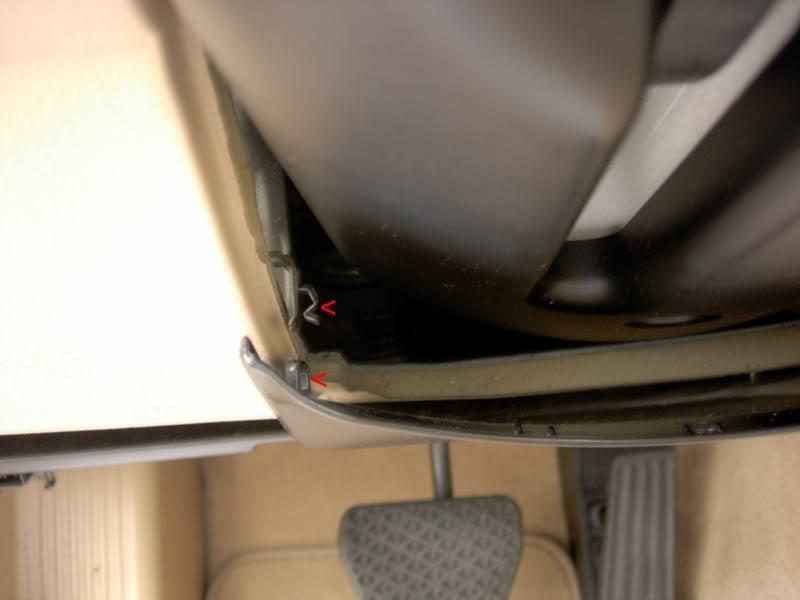
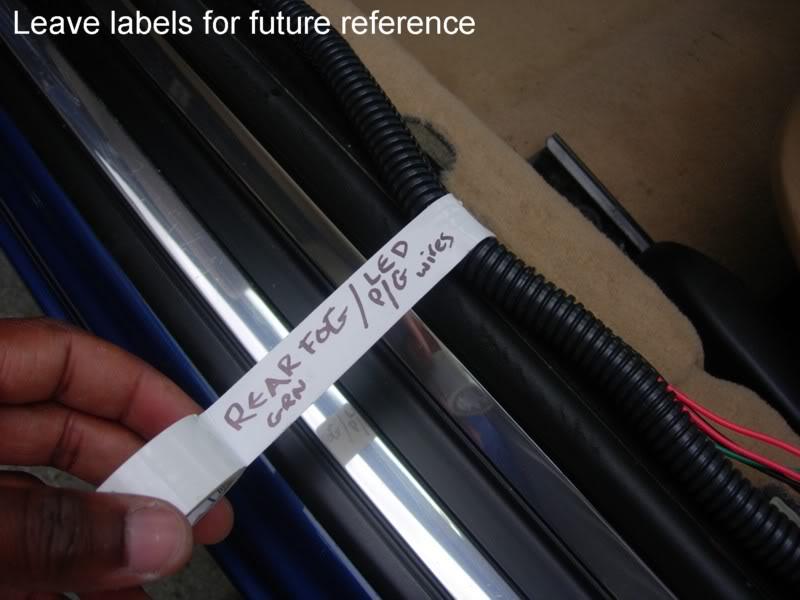
The door sill is a beeyotch to remove. The clips are heavy duty and I found the ONLY way was using my bare hands to grip the inside edge and squatting using all my arm and leg power to pull it off. The middle clip of the sill trim came loose before the edges. And when the sill came off I never even budged the outer clips, instead I broke the sill's clip holder groove on the underside where the outer clips connect to the sill trim. Not bad because the trim will still go back on as the groove that holds the clips isn't completely damaged and more than one clip in point holds it in place. Also in future the sill should come off easier but I probably won't need to remove it once I'm done as I'm laying down all my wiring for the door LEDs, rear fog, and PDC onetime at the same time.

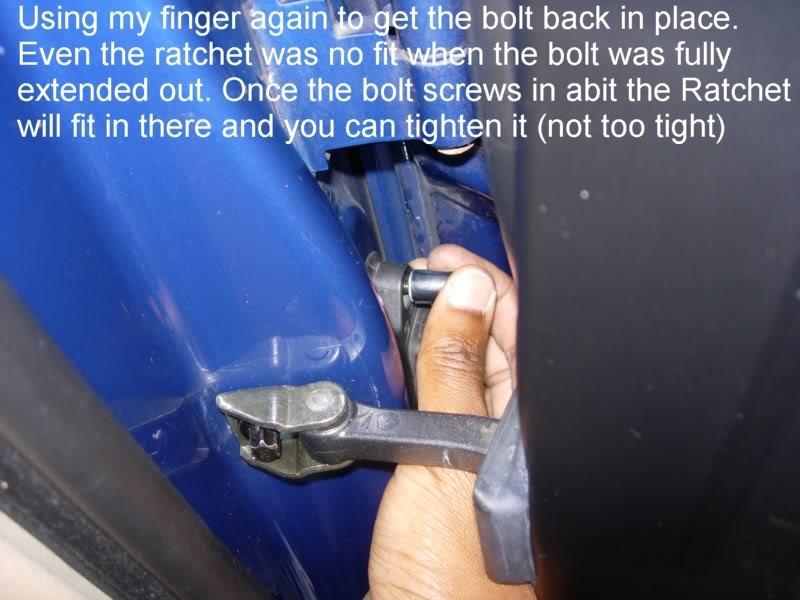
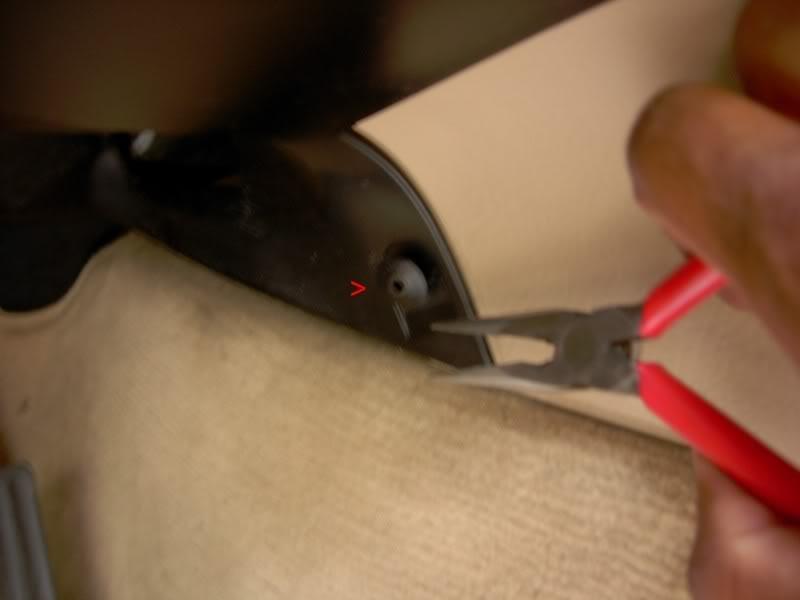
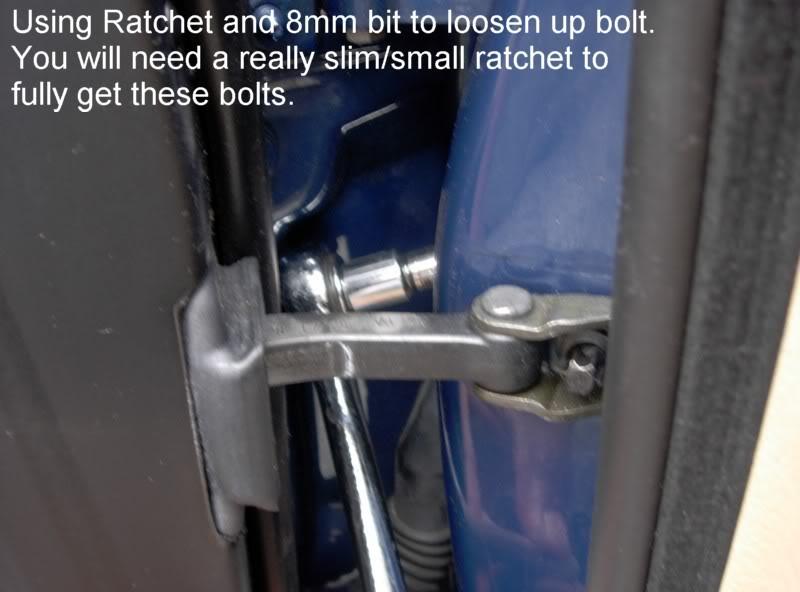
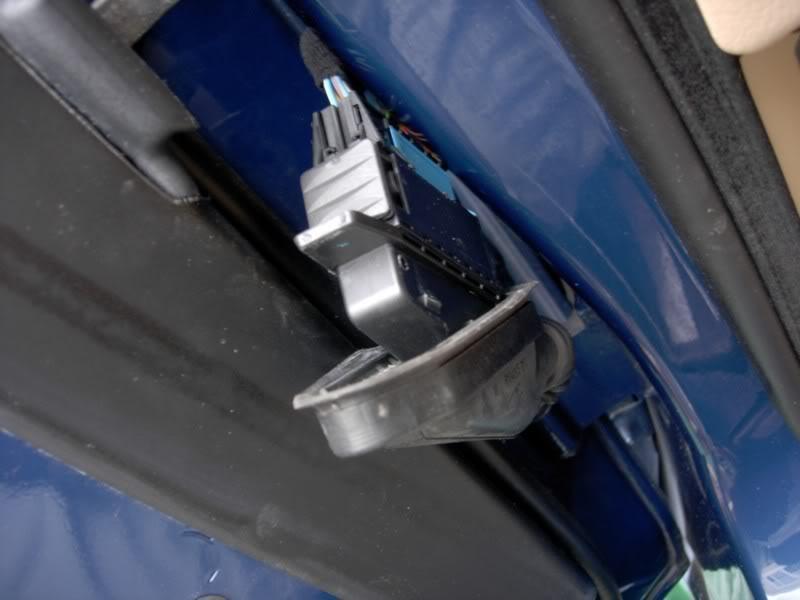
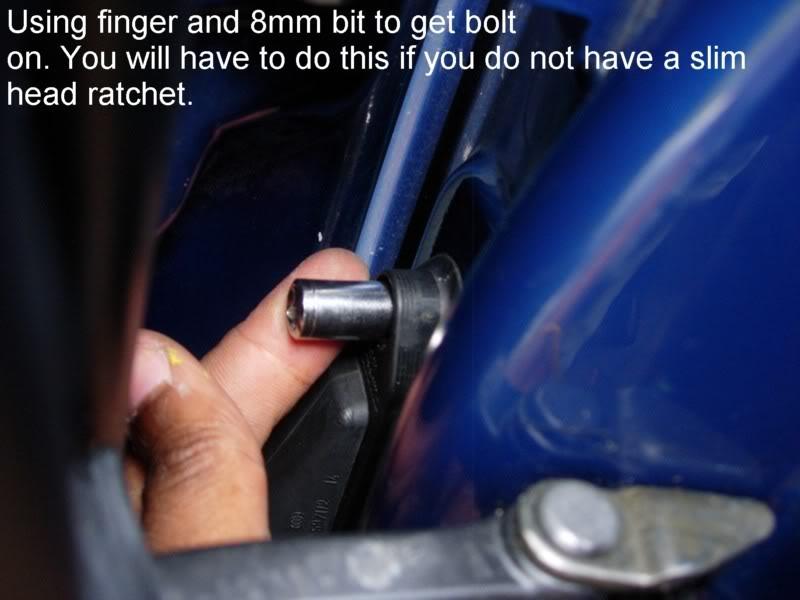
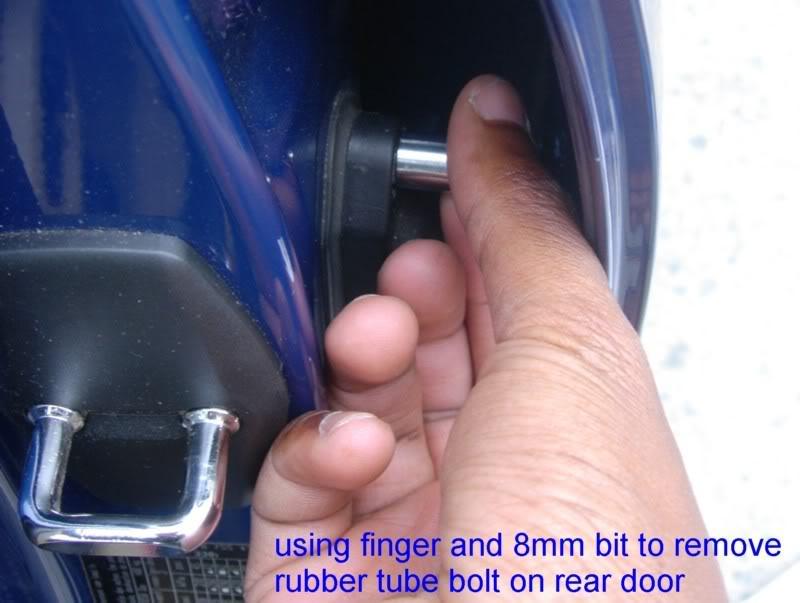
As soon as the sill comes off, the footrest trim panel will slide right out. Next I used an 8mm hex socket to remove the rubber connector head from the car side. I could barely fit my ratchet in there and lucky for me the bolt was not tight at all and I ended up using my finger and just the 8mm bit to unscrew the bolt. In future I need to pick up a smaller ratchet head to remove the rubber connector tubes on the other doors (I guessed not all the bolts were going to be as easy and I was right).

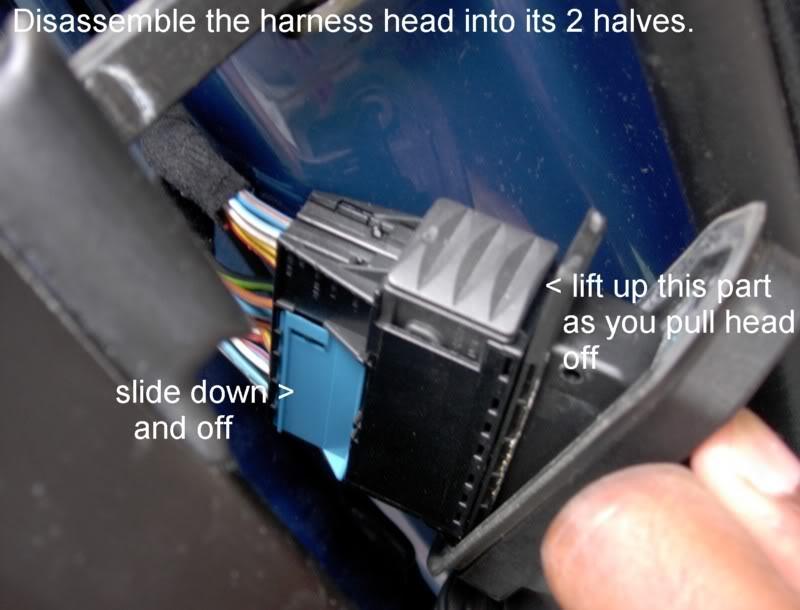
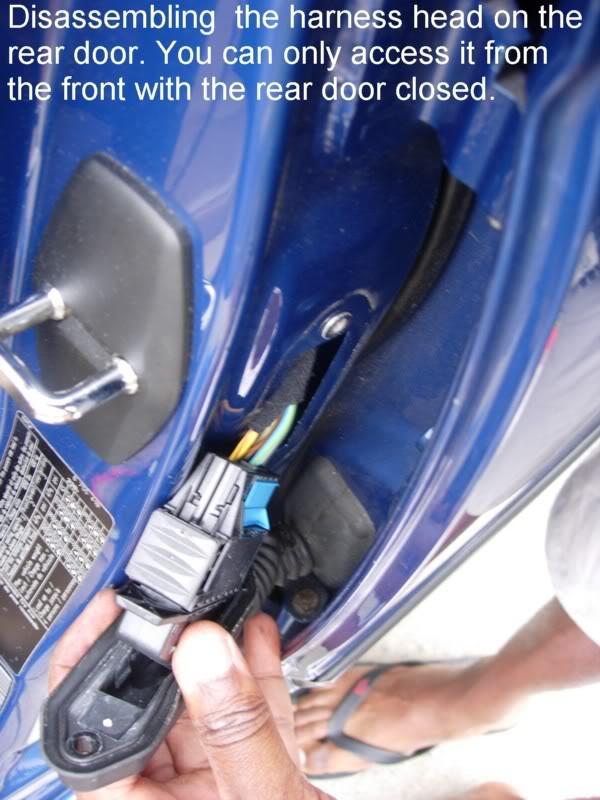
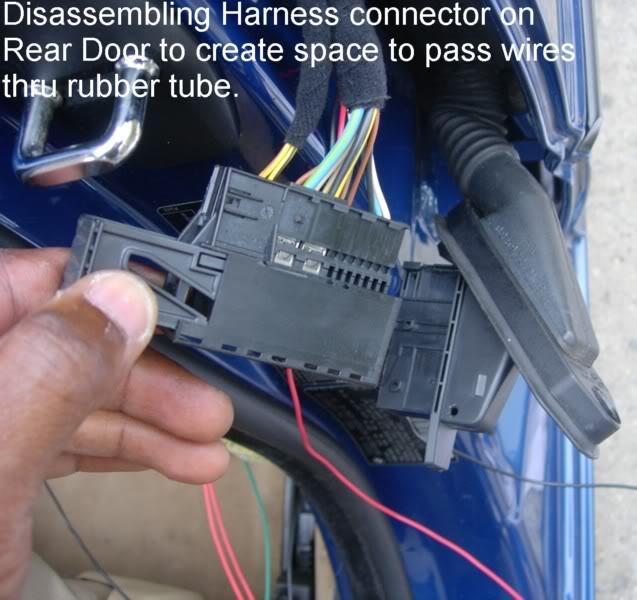
I next removed the tail end of the tube from the door frame where it simply suctions over the hole that carries the wires into the door. Then I disassembled the wire harness head. UNPLUG THE BATTERY BEFORE DOING THIS as you are unplugging the airbag in the door when you cleave this harness and this can cause airbag warning lamp malfunction. It cleaves into two halves. Slide off the blue lower cover. Then pull up the top square bit simultaneously as you separate the halves. It is straight forward once you visually grasp what you need to do.
I realized my LED wires fished easily thru from the foot well and out to the hole to the outside where the rubber connector joined the car. But I also eventually realize that was not the way to do it.
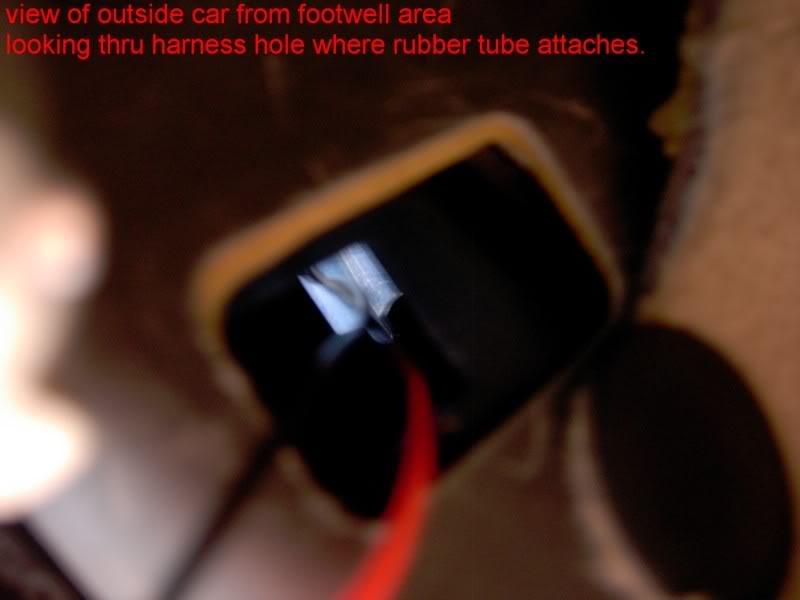
The next step took about 2 hrs figuring how to get the my LED wires from the door side thru (or around) the rubber tube and into the car.
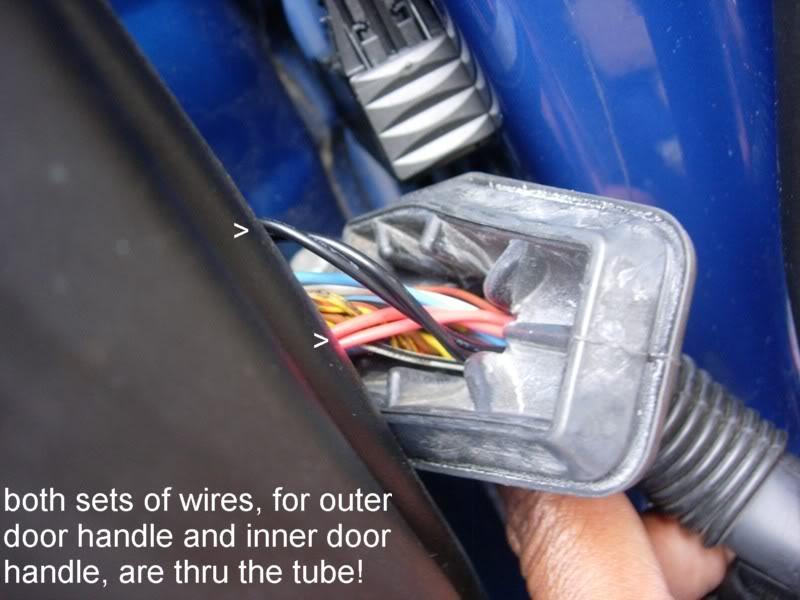
First off, kudos to all those that got their wiring around the outside of the rubber tube. That way seemed more impossible to me as the rubber tube needs to be sealed flush against the holes in the door and car and any LED
wires not going into the tube will leave a nice gap where the tube seals against the holes (that will obviously and eventually let water in. When a tear or unglued section of the door's inner vapour barrier lets in tons of water I can't imagine what kind of flooding in your footwell a fully unsealed door tube would cause.).
So the ONLY way I could see of doing this was to get all my LED wires into and thru the rubber tube.
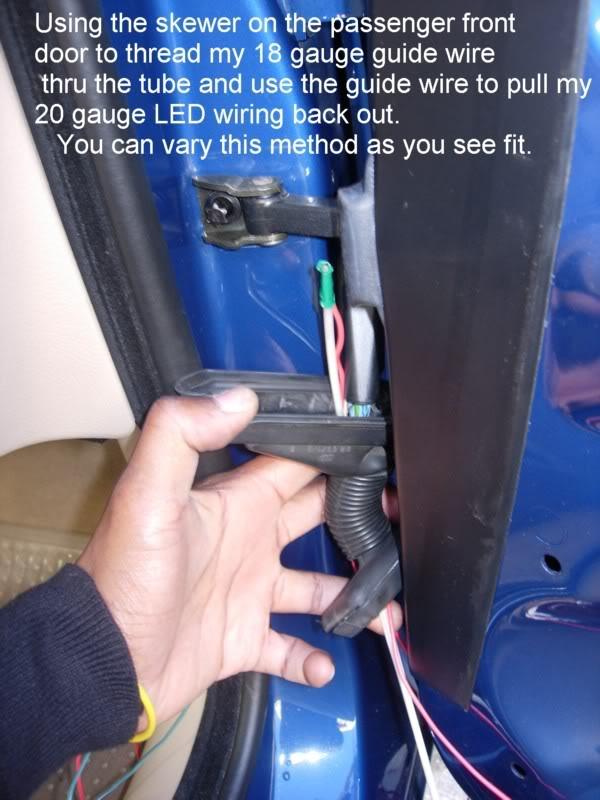
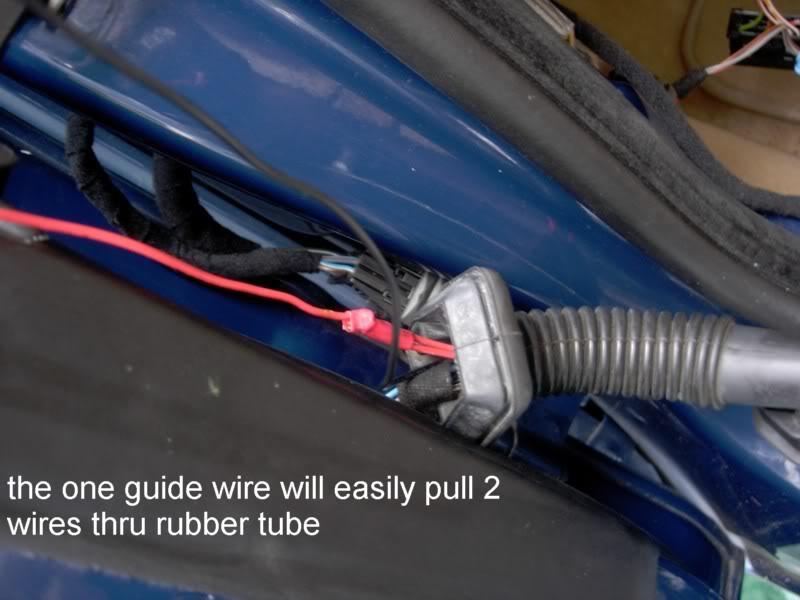
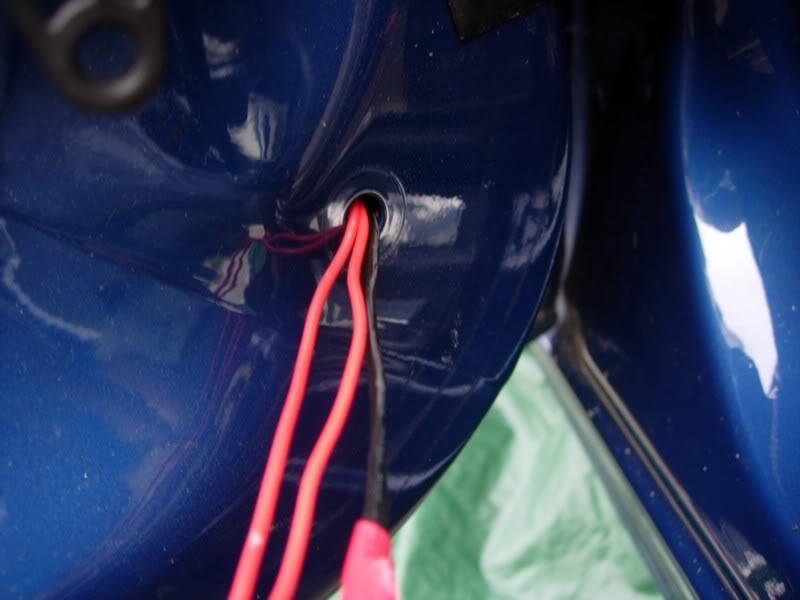
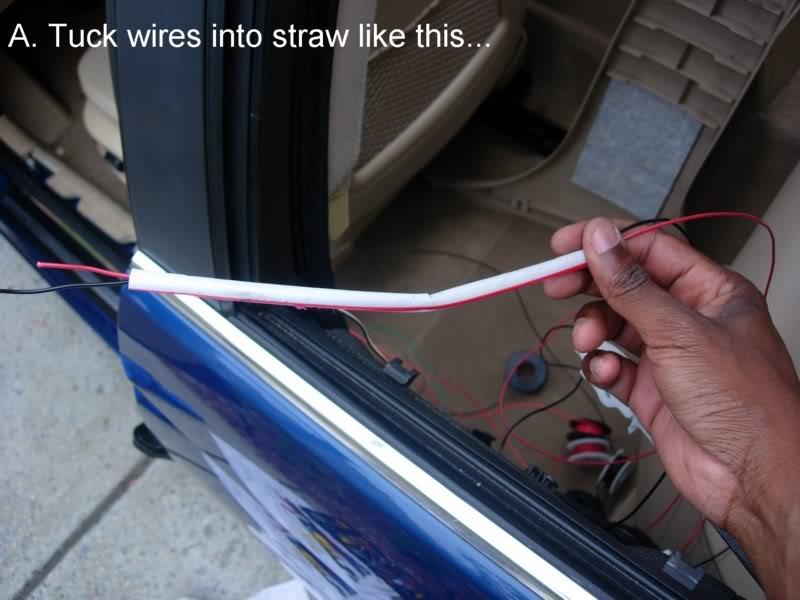
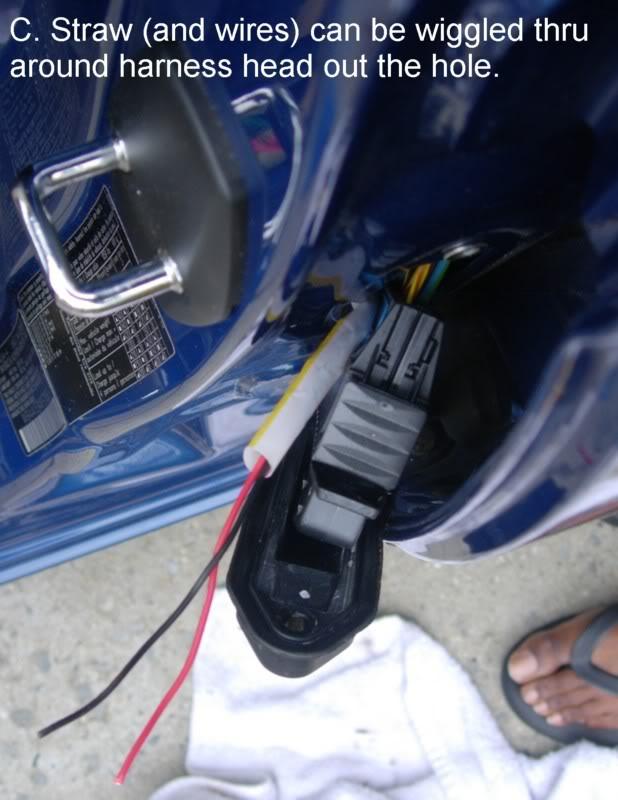
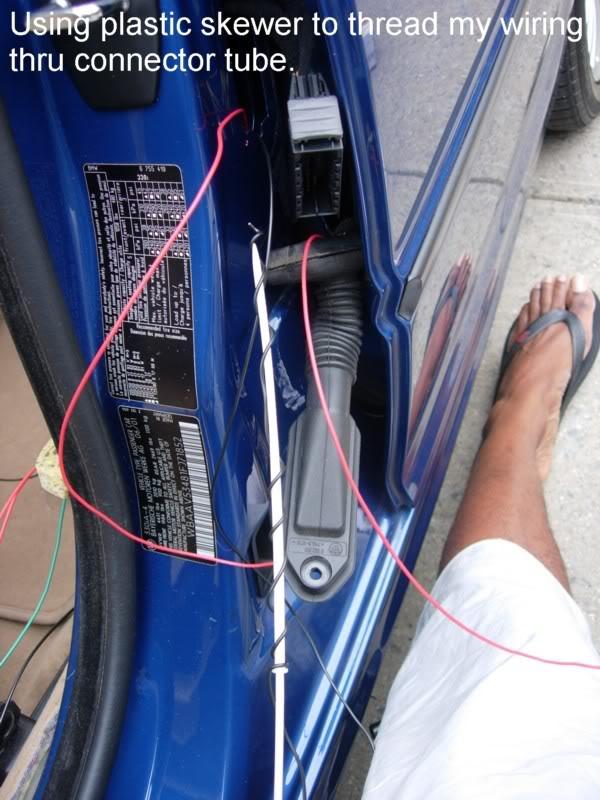
After two more hours of trail and error; I found that using a plastic skewer I could literally thread the 18 gauge wire thru the tube (one at a time) from the tail end towards the head.
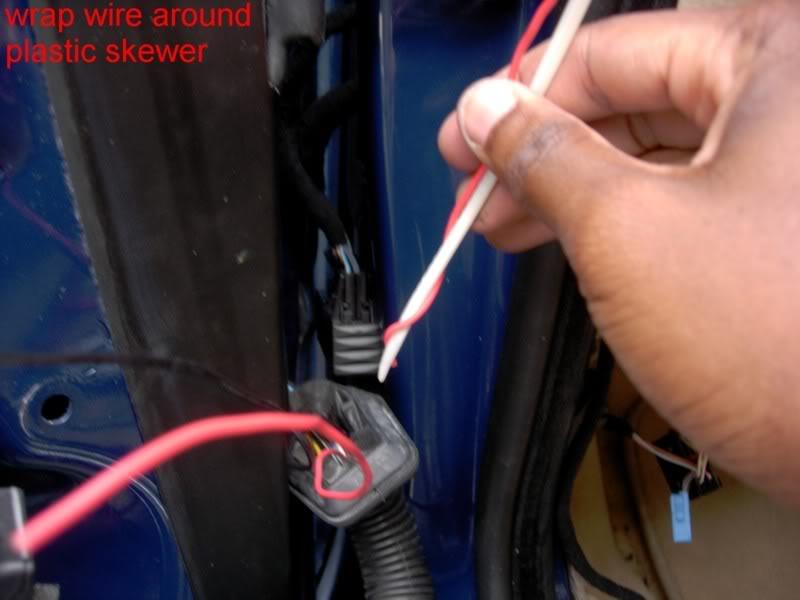
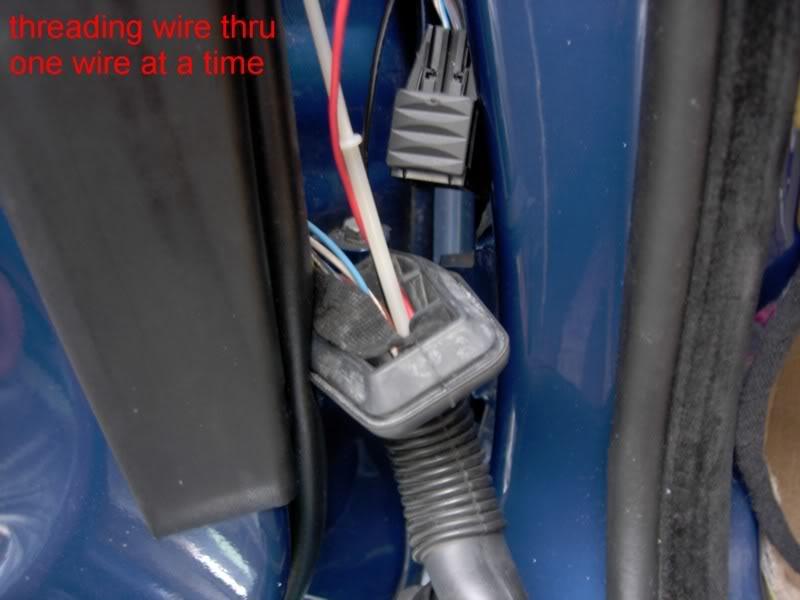
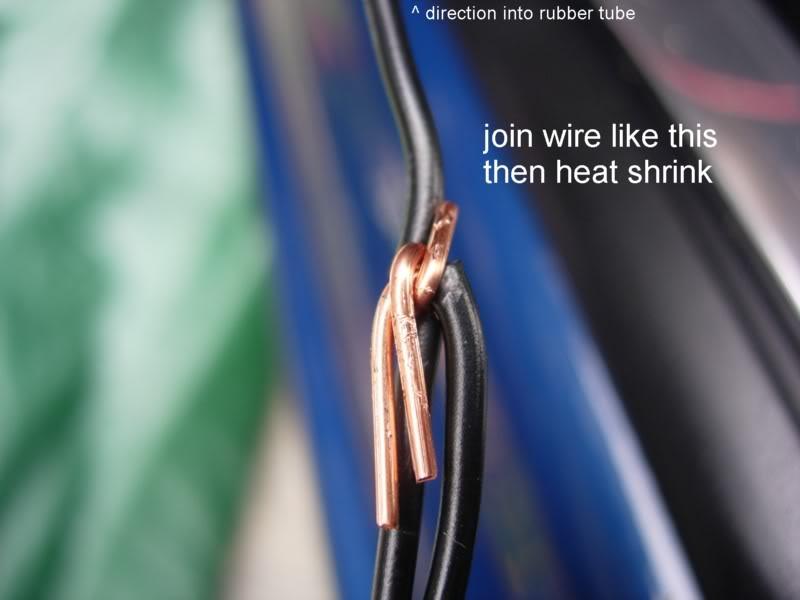
After getting the first 2 wires thru the tube gets real tight to thread anymore. So designated the 2 wires already inside the tube as guide wires that would each fish out 2 more wires (totaling all the 4 wires I needed to get thru) I heat shrink 2 wires to each guide wire already in the tube and pulled the new wire sets one at a time thru leaving all my 4 wires (one set for inner handle LED and the other set for outer handle LED) going thru the tube OEM style.
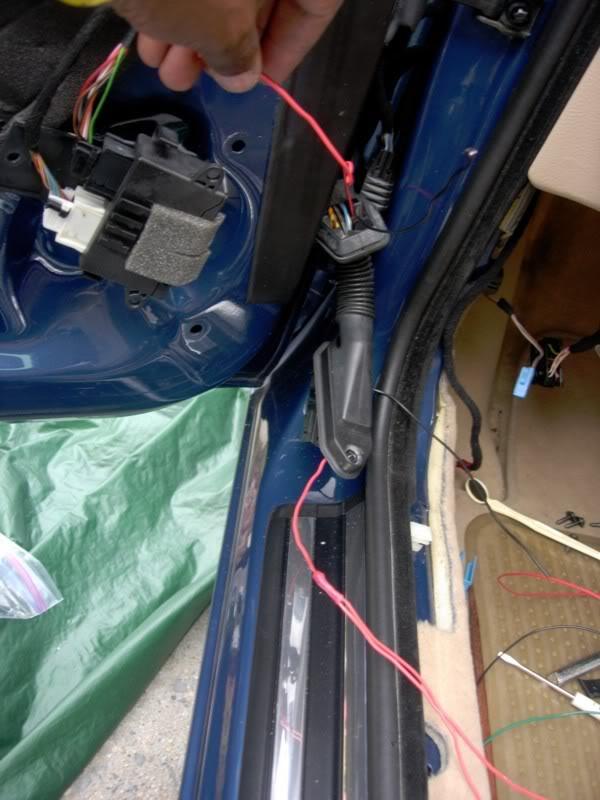

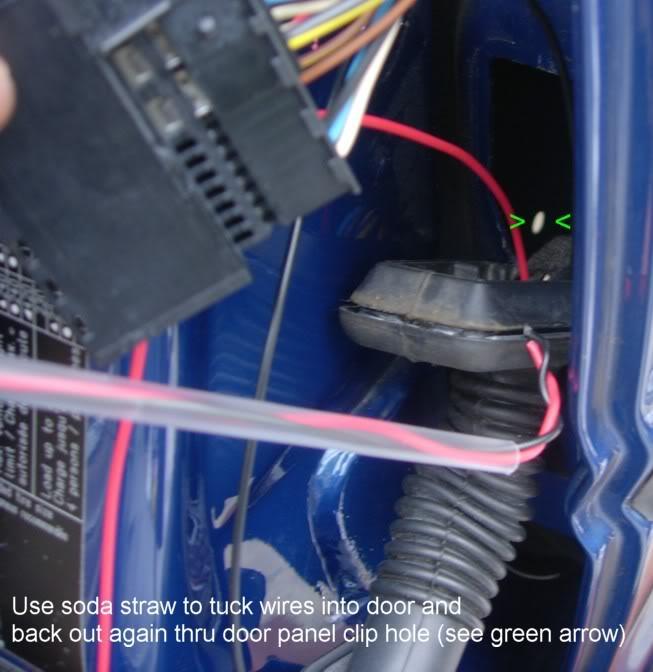
Next I fished the wires into the car door and found it real easy to pluck them out using a needle nose pliers thru one of the many lower panel clip holes in the door frame (if you use one of these holes to snake your wiring thru remember to remover the corresponding clip on the door panel when you replace the panel or you will crush and/or cut your wiring).
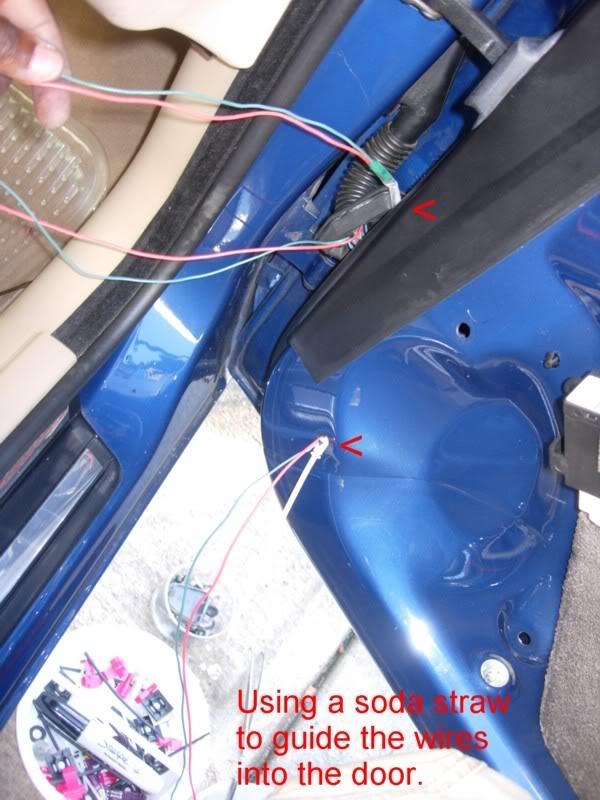
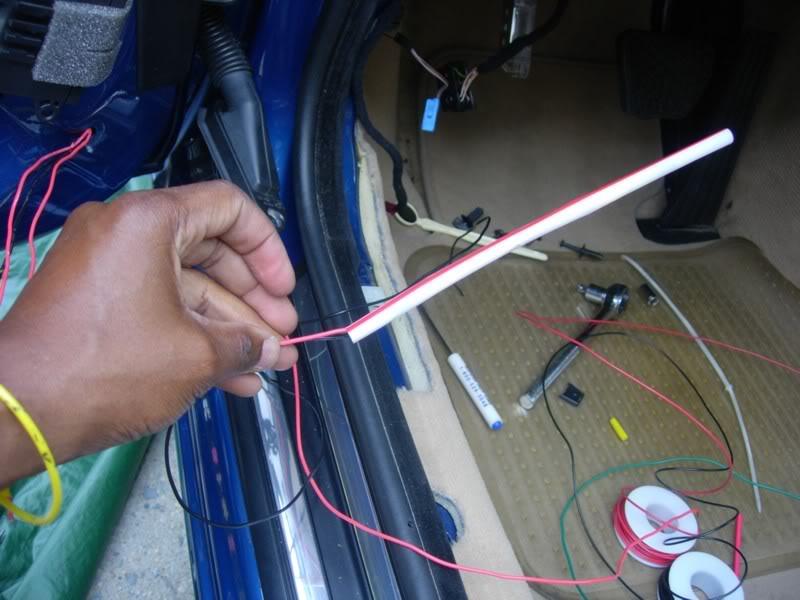
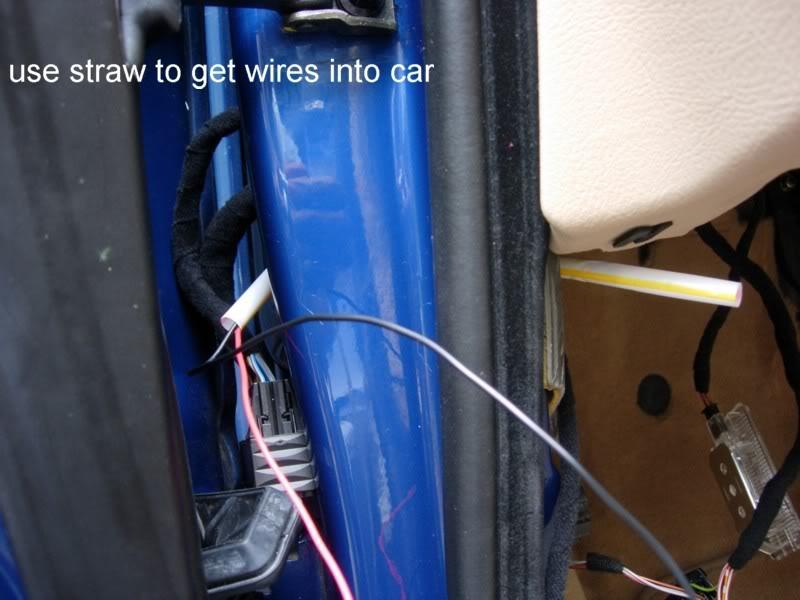
18 gauge wire, which is firmer and durable, is a must for making this part easy. Later you can join the 20 gauge wire to the ends and run them up to the LED bulbs. After this I used a soda straw to guide the car-bound end of the LED wires back into the foot well area.
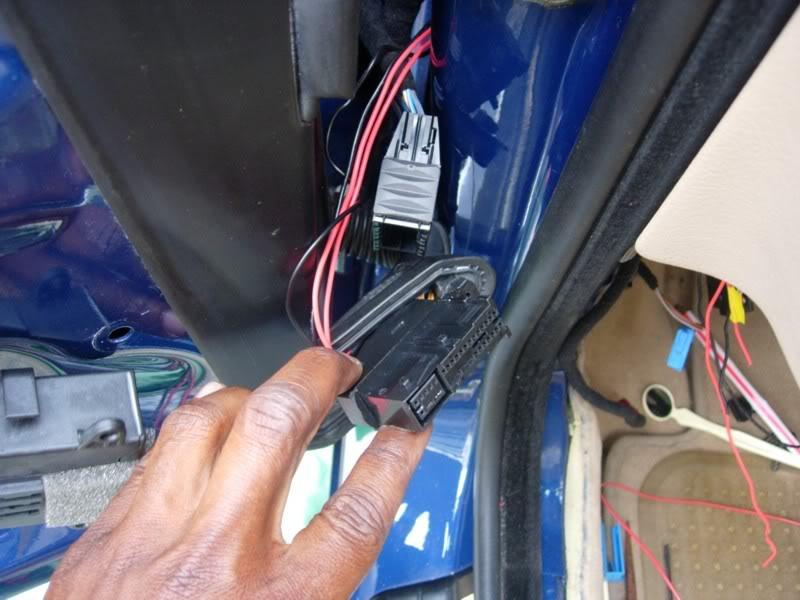
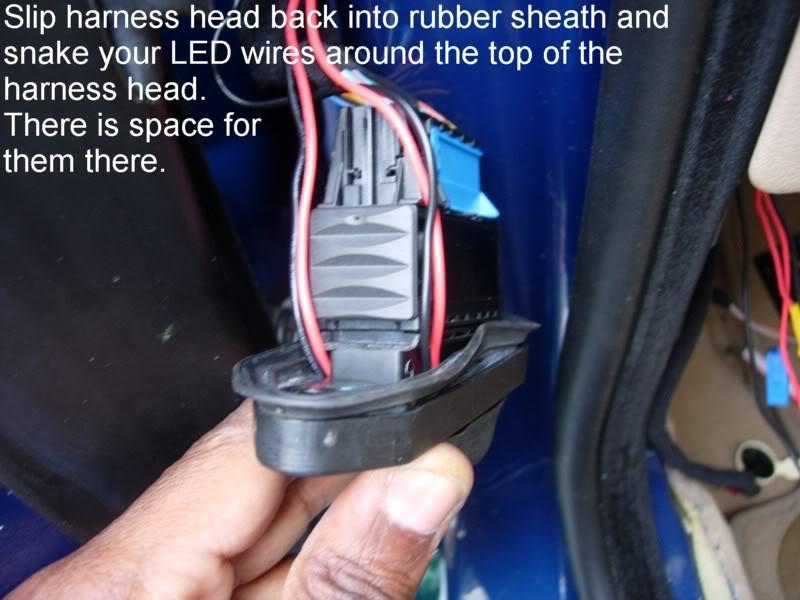
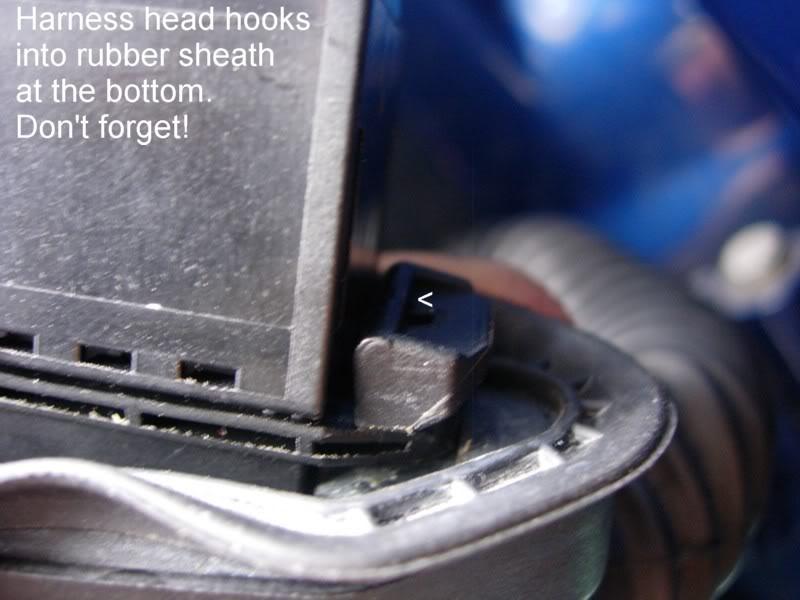
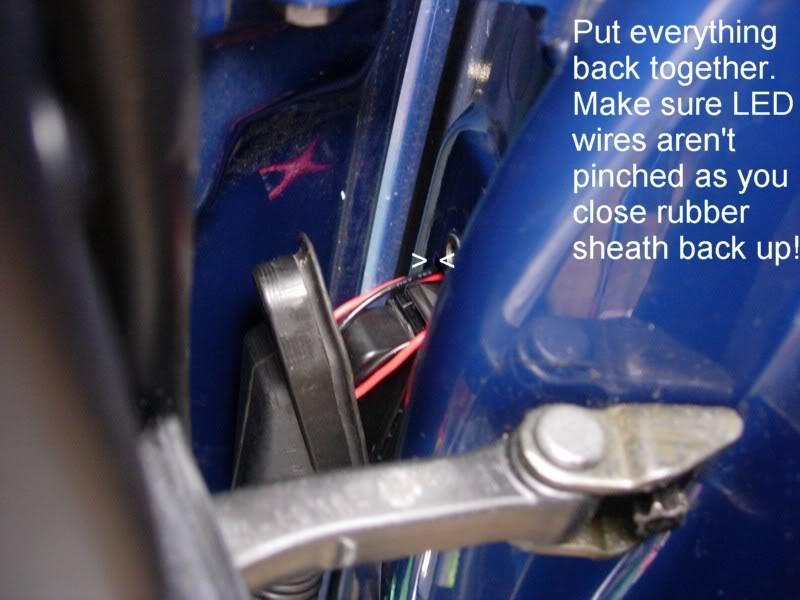
Next I reconnected the harness head and sealed back up the rubber tube's sheath head into the car making sure my LED wires were not pinched against the edge of the metal hole. Use your 8mm bit to replace the tube's bolt. Then you can reseal the tail end of the tube back onto the doorframe. The tail end should just pop back in. AFTER THE DOOR TUBE HARNESS IS RECONNECTED YOU CAN PLUG BACK IN THE BATTERY.
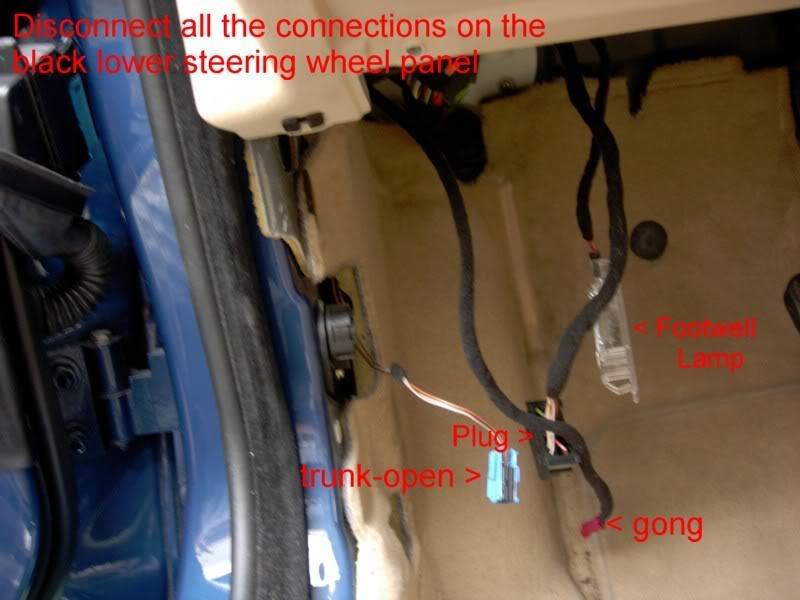
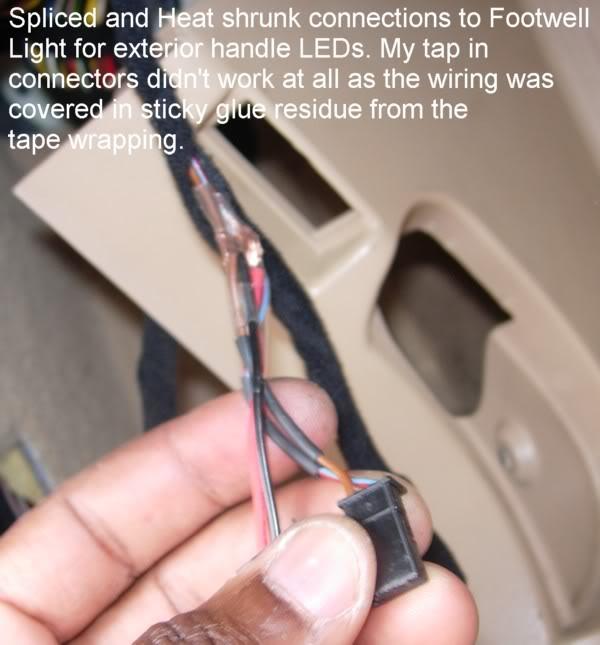
Go back into the car and find your foot well lamp splice two really long 18 gauge wires (about 20 feet long) one each to power and ground-(the brown wire of the two going into the lamp). Take these long wires out of the way by running them along the length of the car to the rear seat.

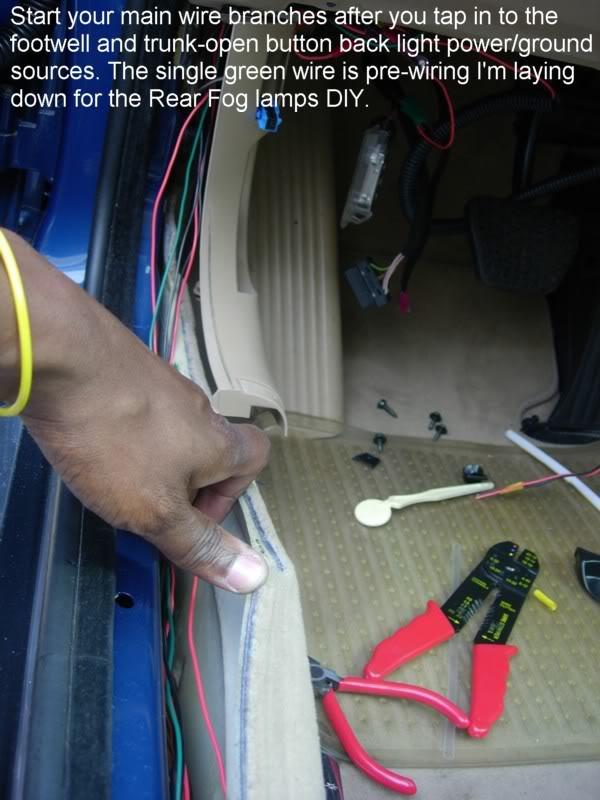
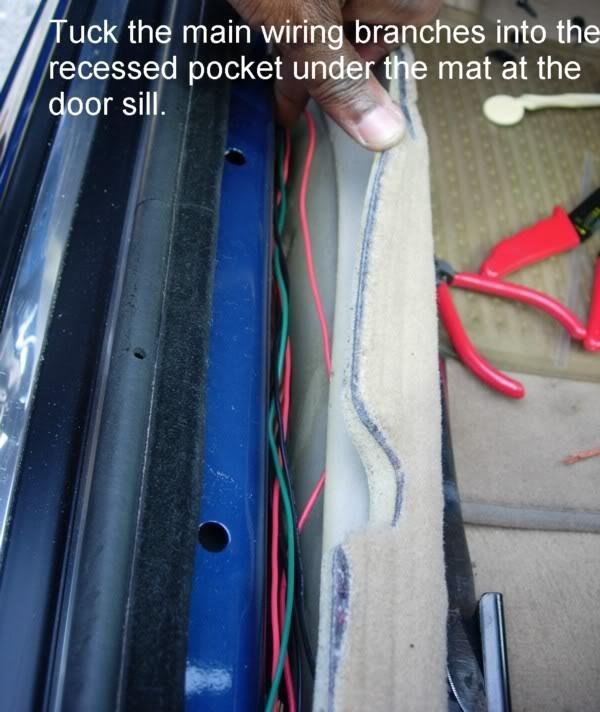

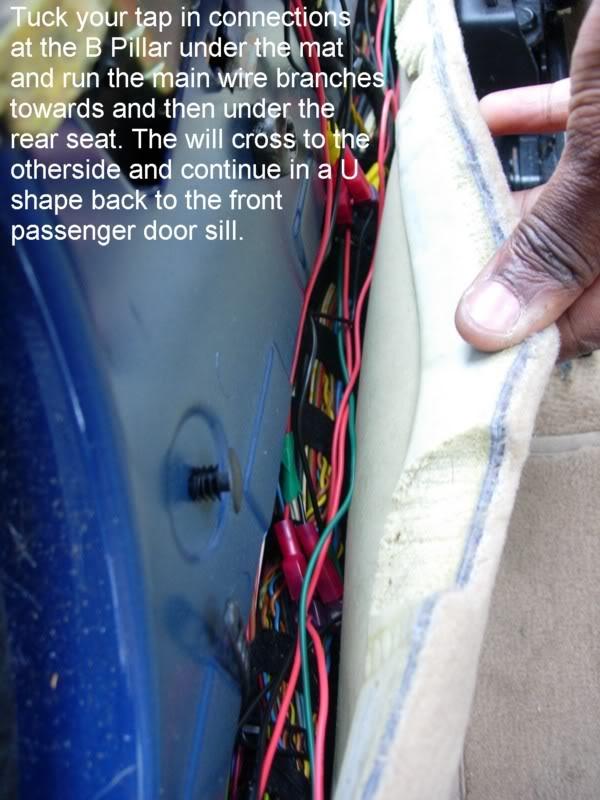
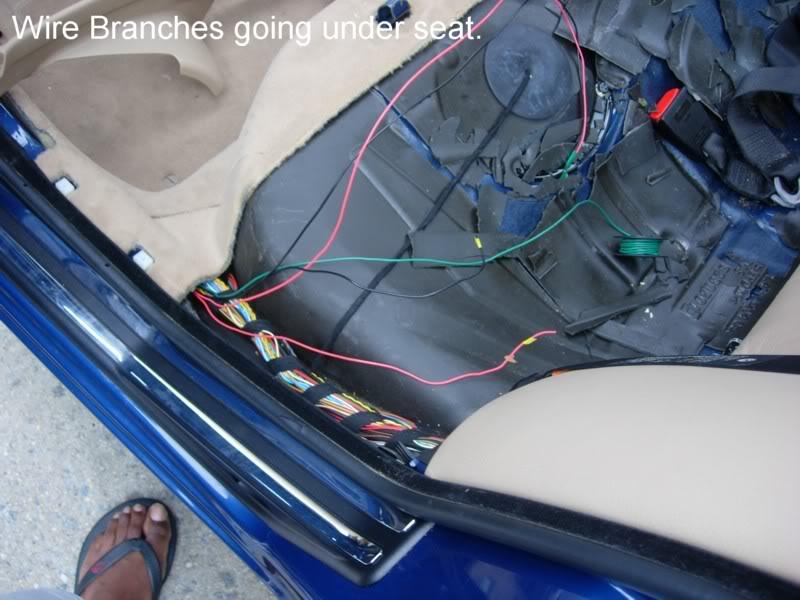
Remove the rear seat as you will run these wires under them to the passenger side of the car. This will be your main branch line for the outside handle LEDs. At each door you will splice off from these main wires your wiring that will go into the door and power the LEDs (see my blueprint diagram in the TIPS section).

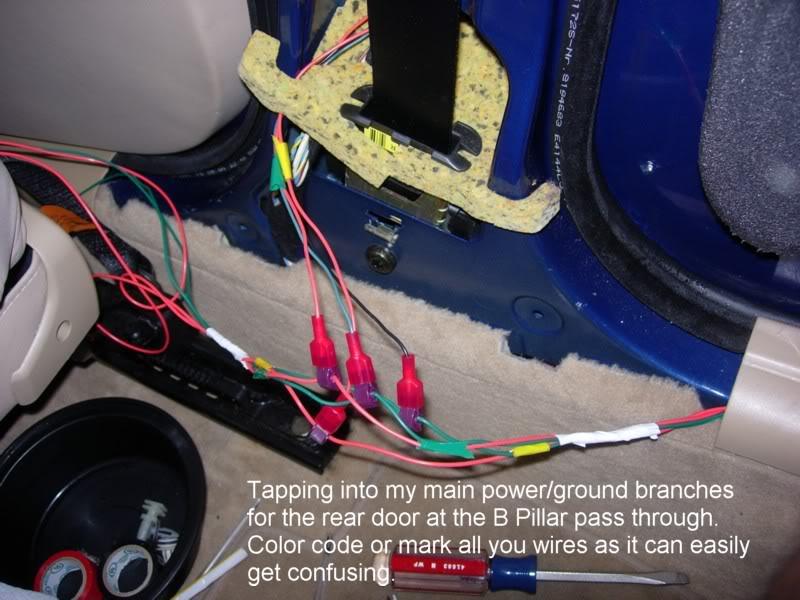
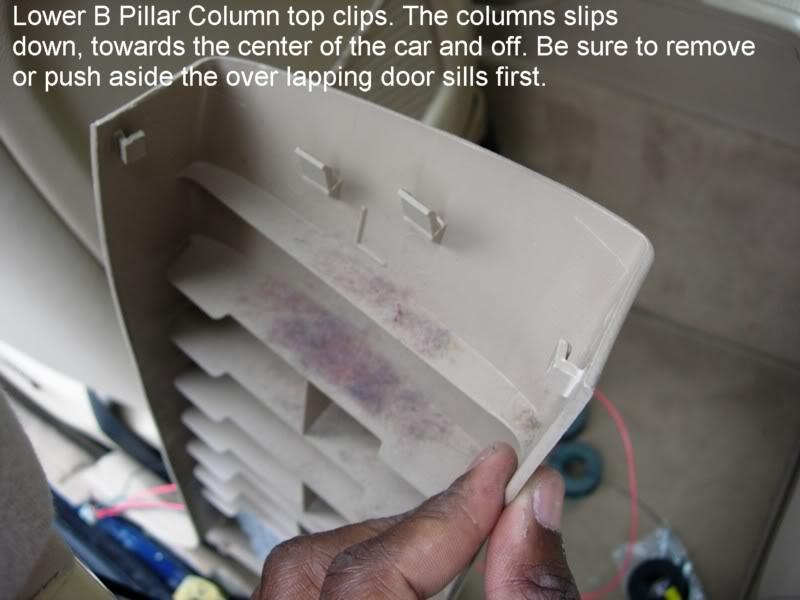
At the rear passenger doors this is inside the lower half of the B Pillar Columns. The Columns slide right off (pulling them down and towards the center and front of the car) once the front door sills have been either removed or shifted off where the overlap the B Pillar base.
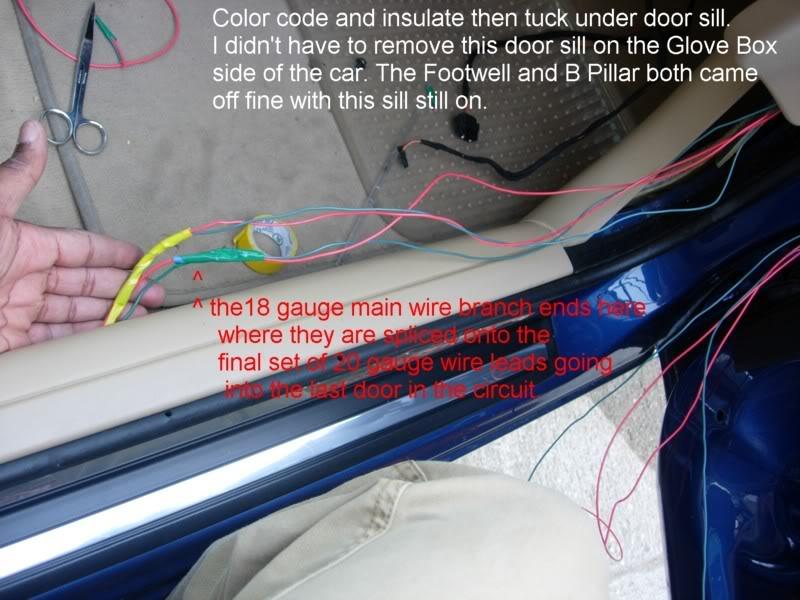
At the front passenger side foot well area/ under the glove box these wires should terminate or you should cut them so the end around here. Here under the glove box area you will connect the ends of the main branch to 20 or 22 gauge wires that will run thru the door jamb tube into the door and straight to the passenger door handle led bulb completing the power/ground circuit loop for the outer door handle LED. You can also run the 18 gauge wiring thru the door jamb first before connecting on your 20 or 22 gauge wire to them.
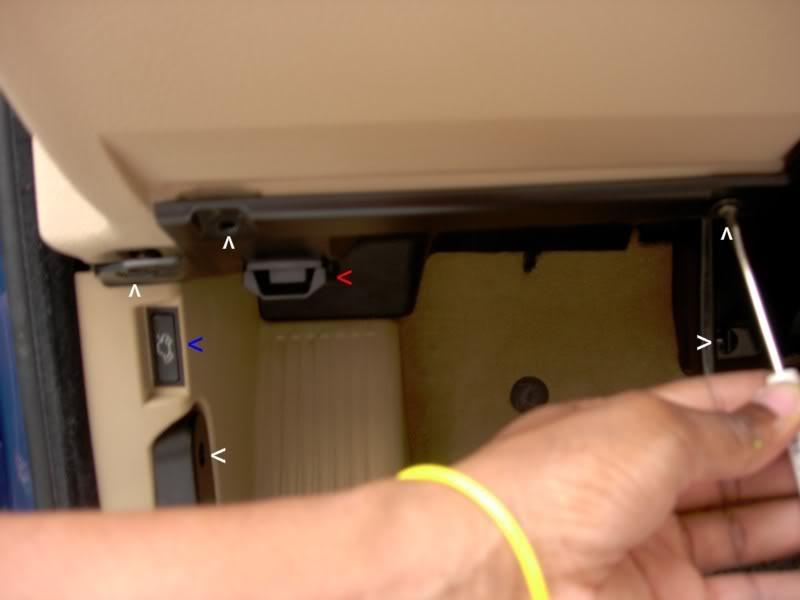
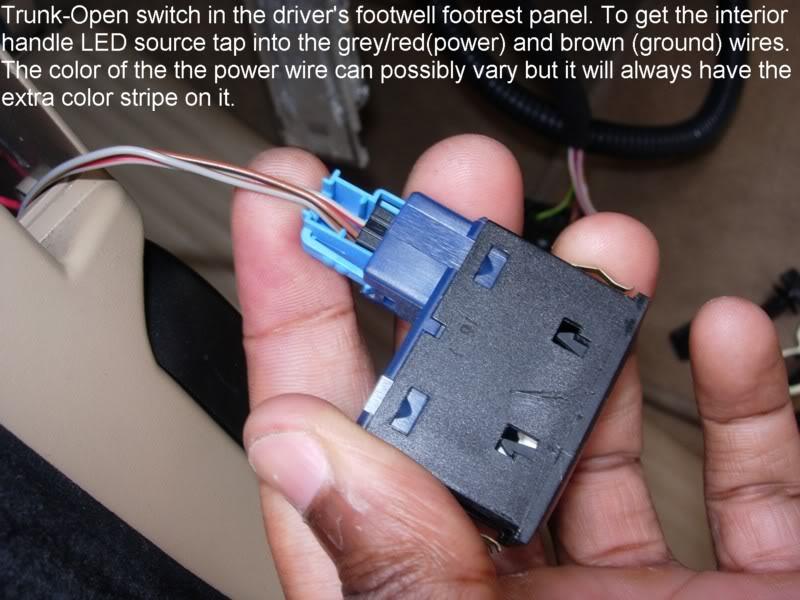
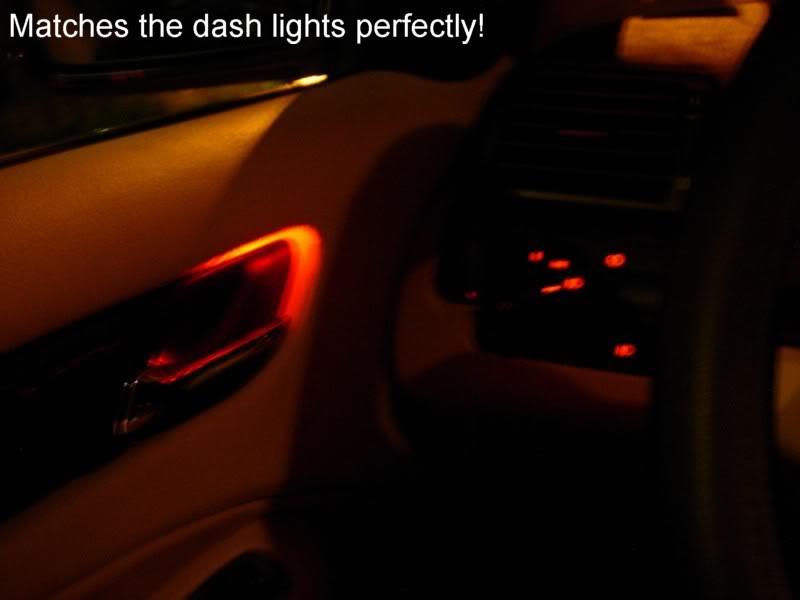
You will repeat the same procedure for the interior door handle LEDs. You can use the trunk-open button to tap into the dash/cabin back light. There is three wires going to the trunk lamp switch (brown is ground and the grey wire with the red strip should be the power for the dash lighting-it may vary for different cars so test it before sealing everything up.
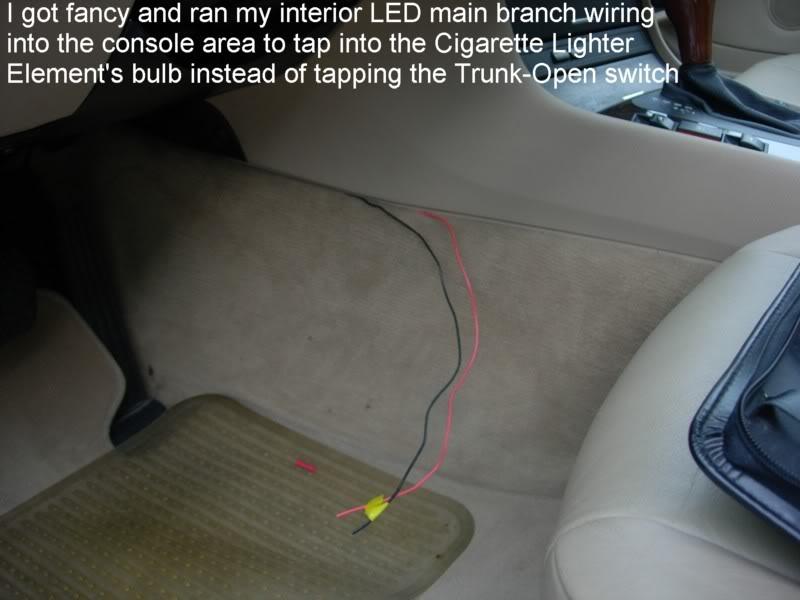
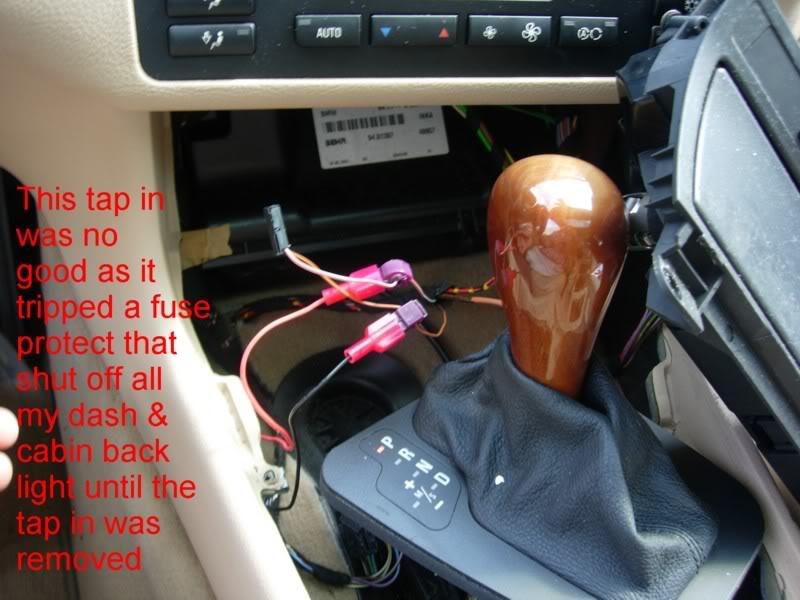
NOTE ABOUT TAPPING IN: I tried to get fancy and tapped into the Cigarette Lighter Element's Ashtray bulb under the console area and after a few minutes after the inside door handles' LEDs were turned on, the tap in apparently tripped some sort of fuse protection device that shut off all power to all my dash/cabin back light. Luckily for me it happened in the daytime. As soon as I removed the tap in connectors from the Element's Ashtray bulb the dash/cabin backlight returned. So there must be some sort of issues with tapping in using those wires. So for now I recommend the trunk-open switch or another source that is easy for you to get to in the car.
DIY IN AND OF ITSELF:
Now after 3 to 4 days of trail and error and I will simply write how I got it all to work on the driver's door and will tell you to basically repeat the same for all doors leaving notes as to what varies between the doors.
NOTE: If you are only doing interior handles then skip the part for exterior handles vice versa. Save yourself the time and just go to the part that is relevant to what you are doing.
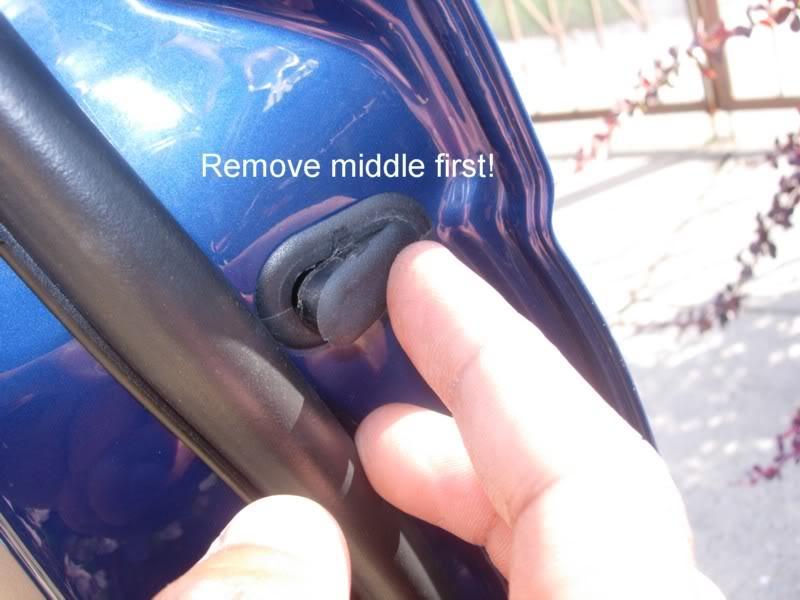
1. EXTERIOR DOOR HANDLES: Once your door is pre-wire for the LEDs (meaning all your wiring is in the door area and only needs to be connected to the LED bulbs). Begin by removing the outer door handle. On sedans I realized it is different that coupes previously DIYed in the forums. We have a small plastic/rubber oval cover outside of the door panel area in the door jamb that took me almost 40 minutes to figure out.
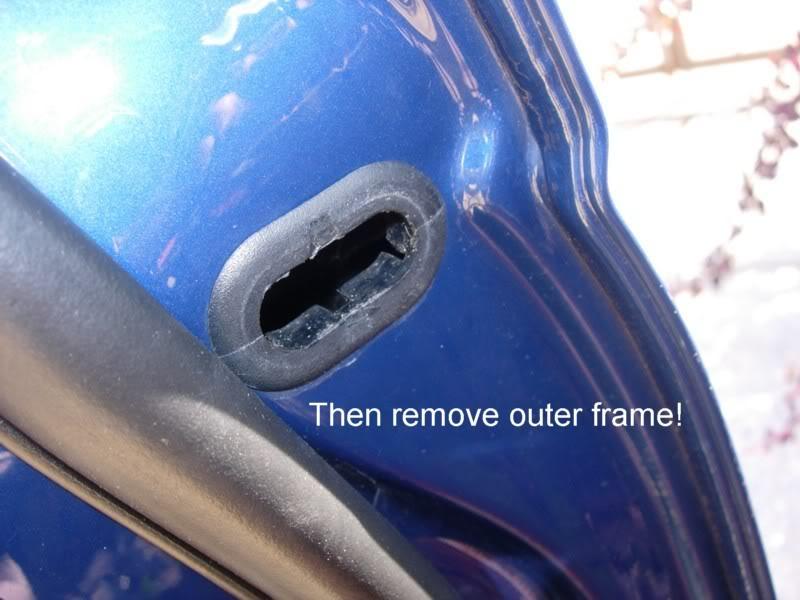
Pluck it off with a small flat head screw driver starting with the middle hump bit. Only then when that bit if off you can remove the oval frame after. The frame does not come off before the middle bit.
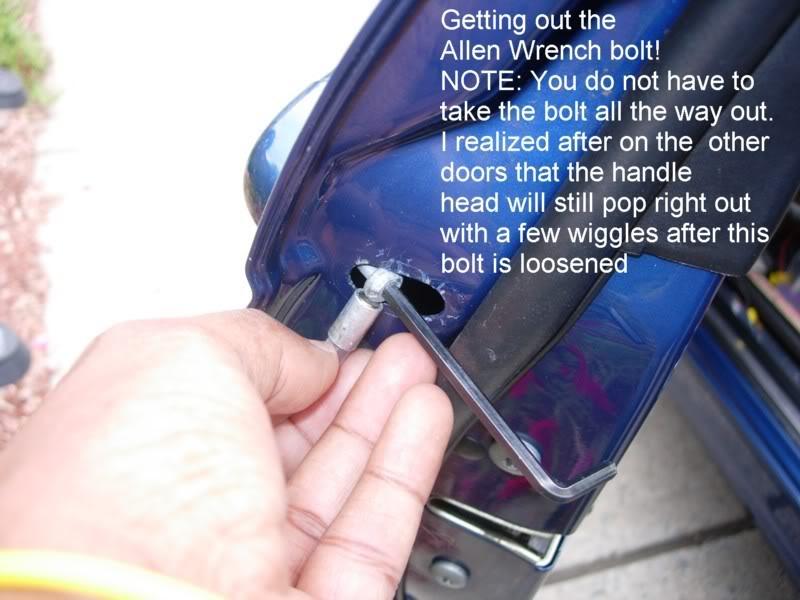
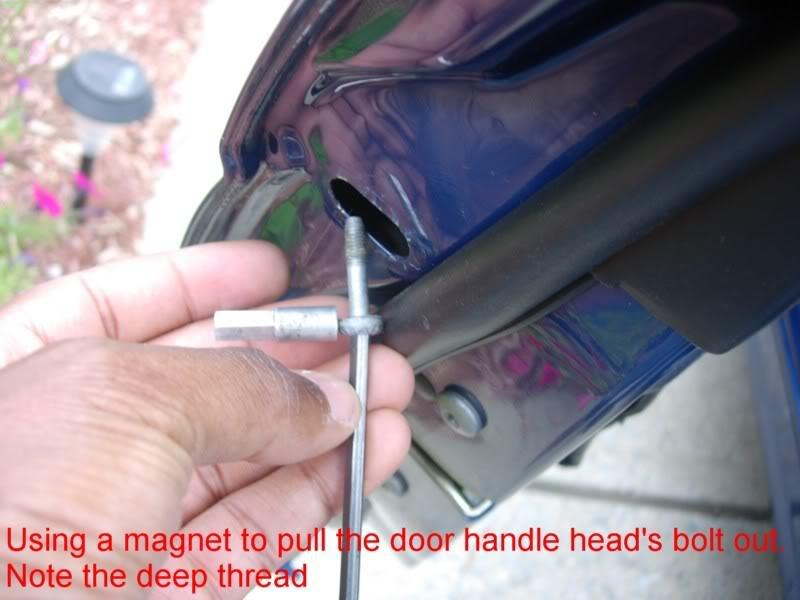
Get an Allen wrench and unbolt the lock head's bold. It is a deep threaded bolt and will take lots of turning and wiggling to remove. Keeping wiggling and pulling at the outer handle with your other hand as you unscrew the bolt. This makes it easier.
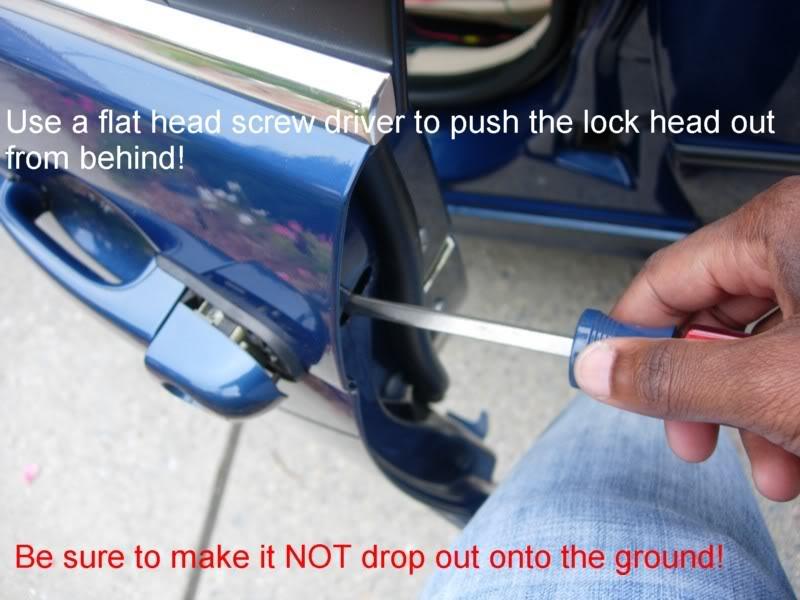
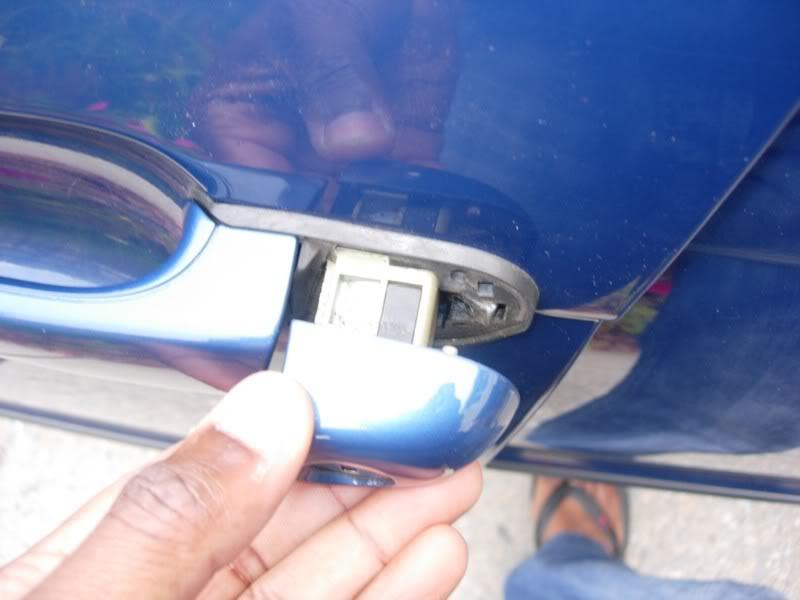
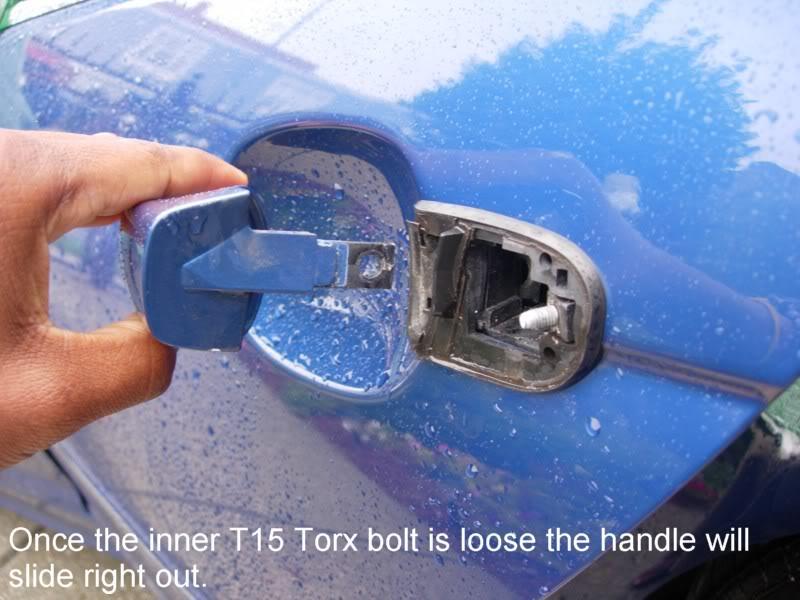
When done the outer door handle head will just slide off (if it is stuck you can push it from the backside thru the hole with a wide flat head screwdriver).
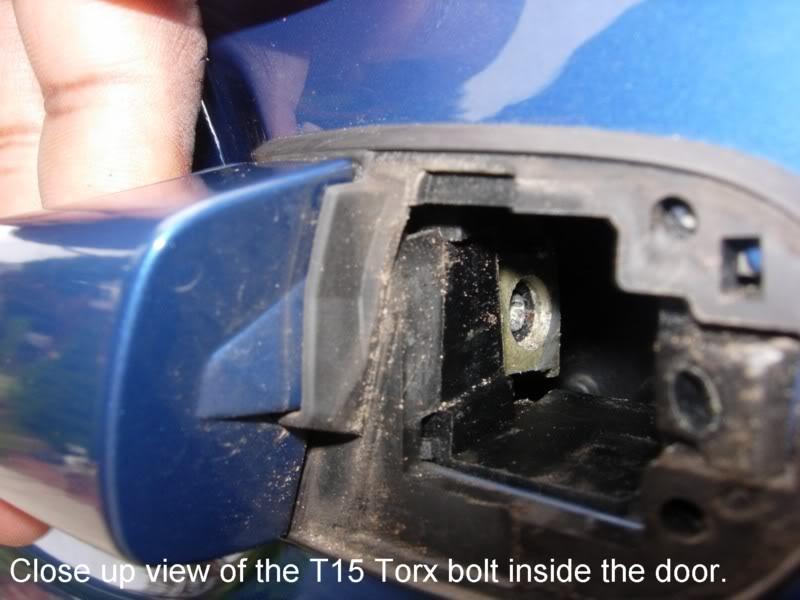
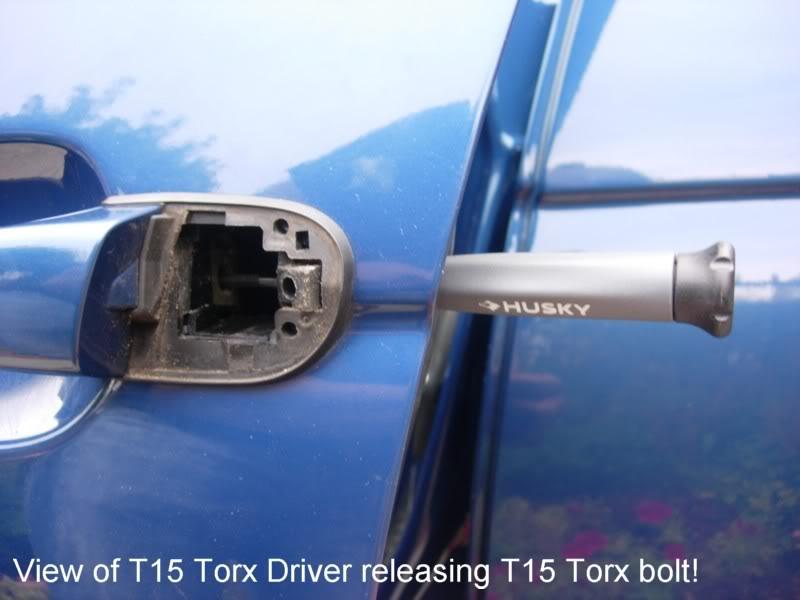
When the head is off you will use a Torx T15 driver to remover the pull handle via the hole. This screw is not removable it only screws to a point and then the handle will come off. Pull at the handle whiles unscrewing so you will know that the handle is free.
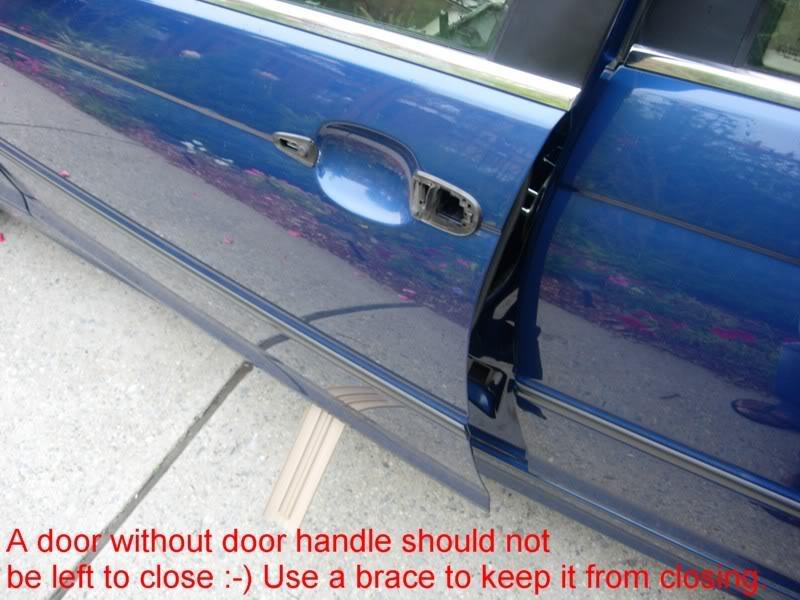
NOTE: Once your outer handle is off, and I assume the inside door handle/panel is off at the sametime as well you do NOT want to let the door close or you will have no way of reopening the door (well there is a way to open it but it's too cumbersome so I will tell you DO NOT let that door close. Put a towel or brace in the door jamb so it doesn't swing itself shut.
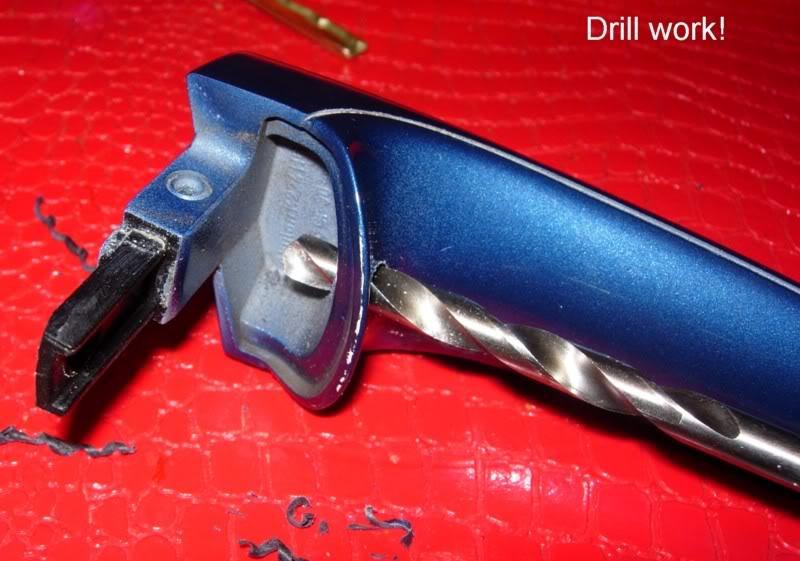
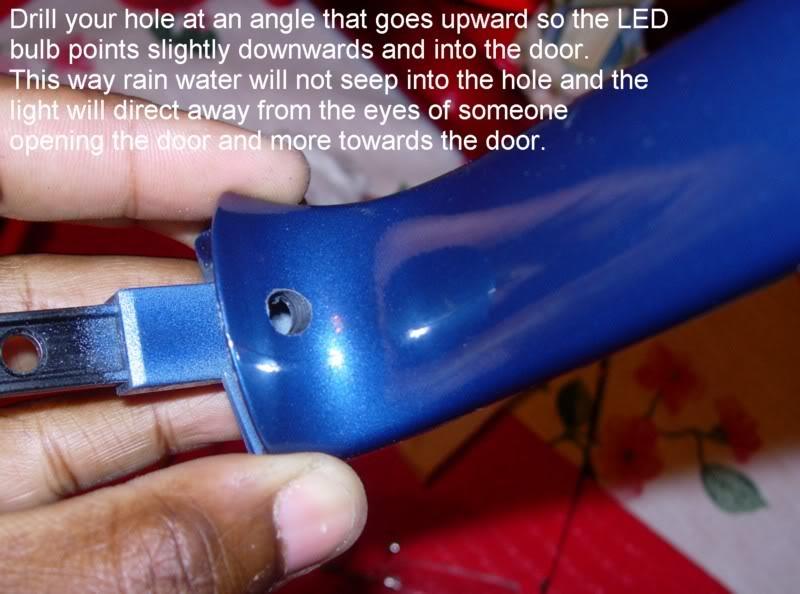
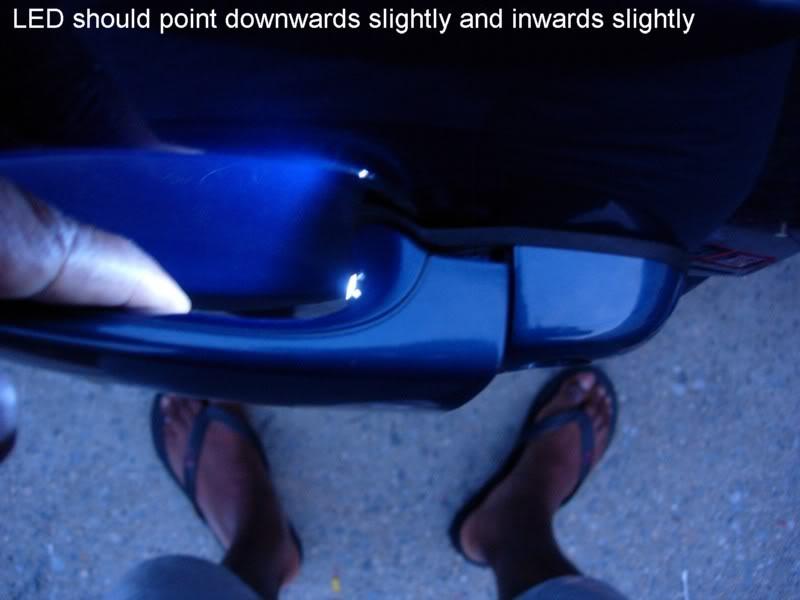
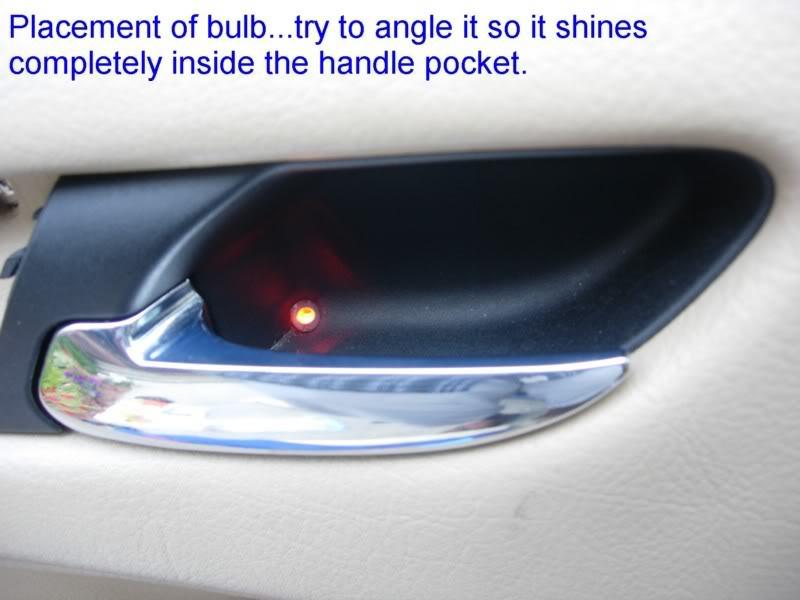
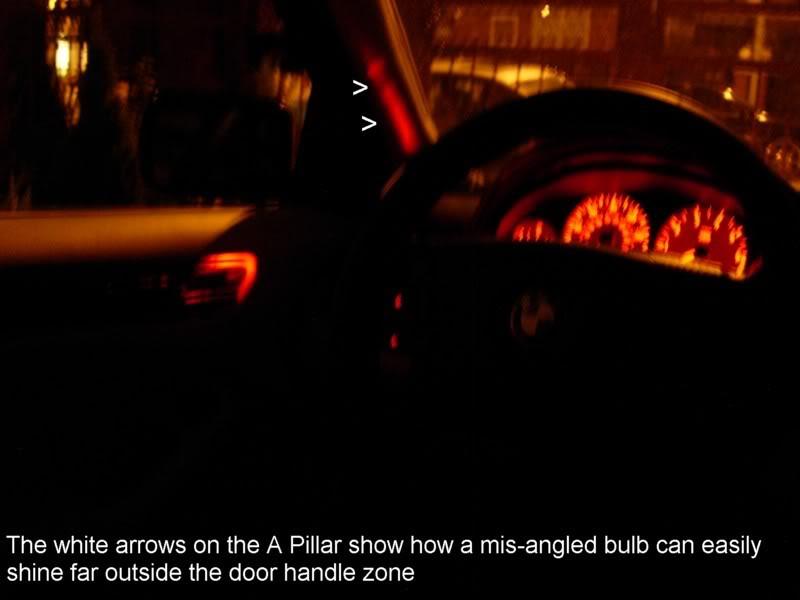
Take your handle inside and begin drilling. Drilling is straight forward. Drill your holes at an angle that favors the bulb pointing slightly downward into the handle area. This sloping angle for the drill hole will prevent rain water from running into the hole and will help direct the shine of the bulb down into the handle and away from the face of the person opening the door.
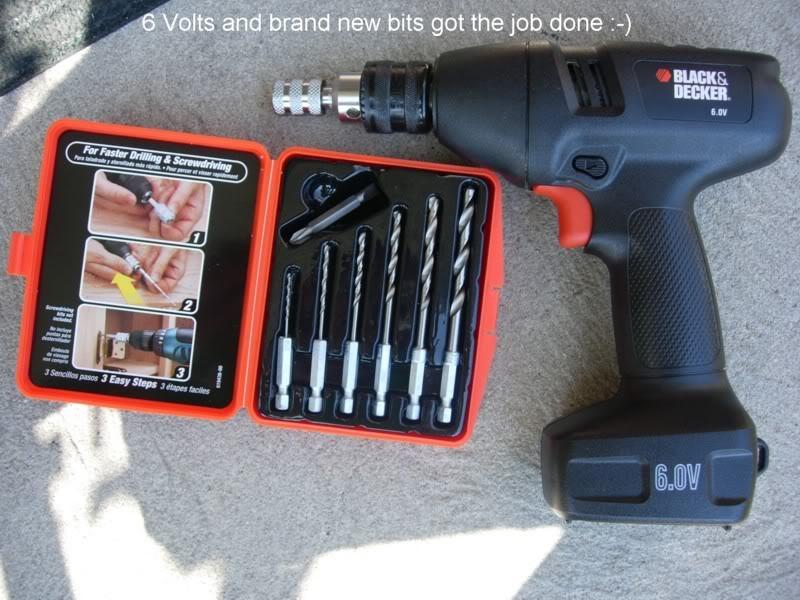
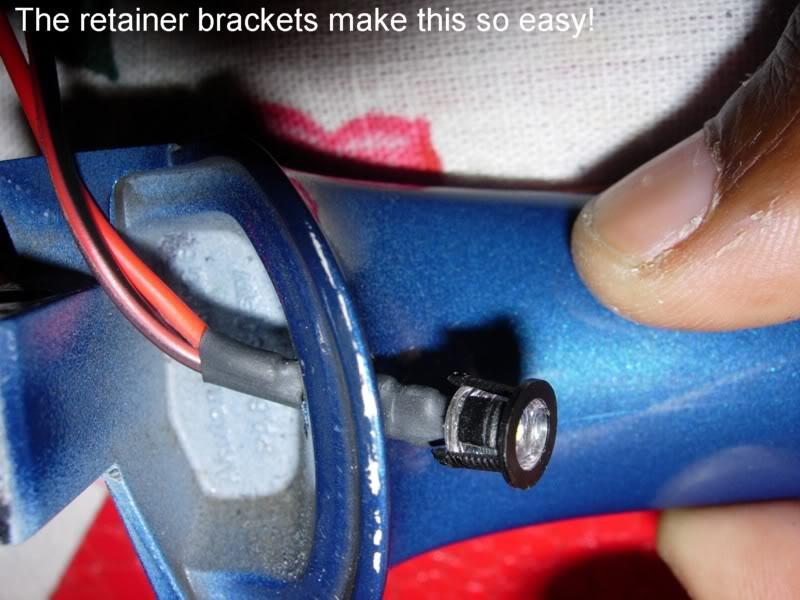
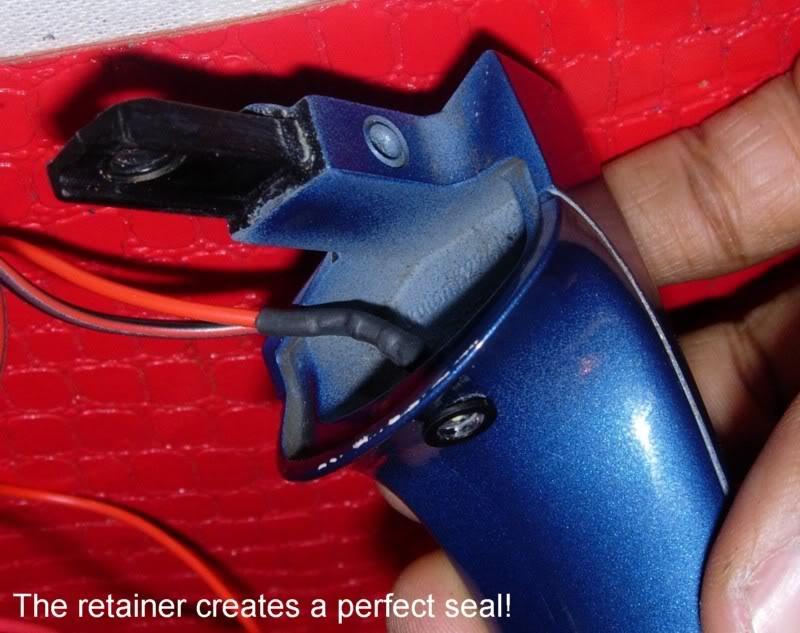
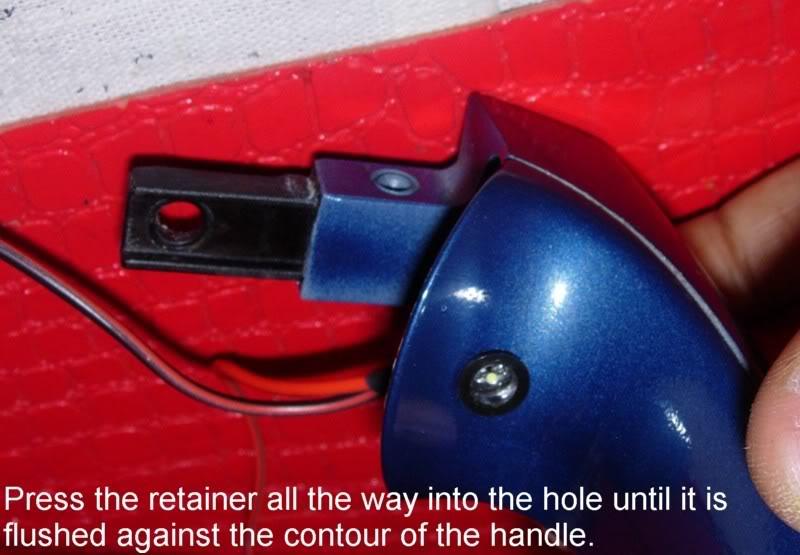
I used a 6V drill which not powerful at all and it got perfect holes thru the handle that were big enough to fit the 5mm bulb retainer firmly in place. The bulb retainer is a great help in simply holding the LED flush in place so there is no play and no open gaps to let in moisture and water. I know some folks used glue and sealant goop but the retainers make this so easy to remove and replace the LEDs.
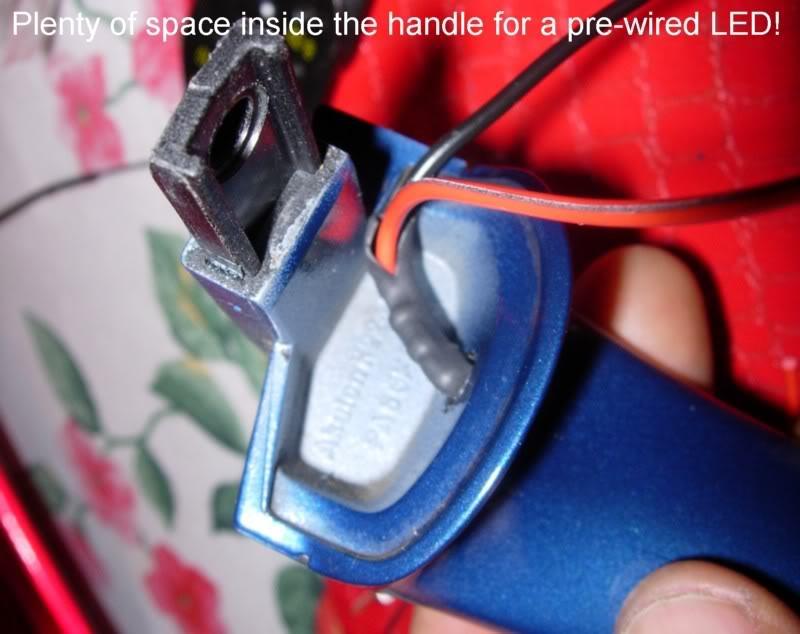
(NOTE ABOUT PRE-WIRED LEDs: I followed a DIY that suggested resoldering the bulb's resistor down the wire so that the only LED fits in the handle and the resistor is out of the way. Well my soldering job lasted all but 2 minutes after pulling the handle to open the door. I spent another hour trying to get the soldering right because inside the door awaits too many snags and objects and the sliding window glass that the wiring must pass over before exiting on the vapour barrier side of the door. So the worse place to have a weak link in the wiring is the middle of the wire where it passes thru the door. After an hour I gave up and just used my pre-wired LEDs just as they were . Lo and behold I found that the pre-wired LED by itself fit better and snugger in the handle than any other way.)
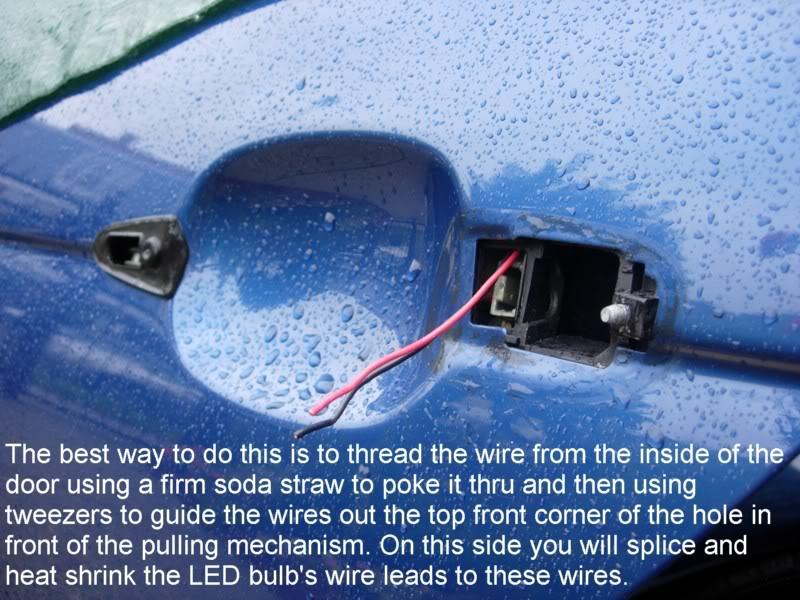
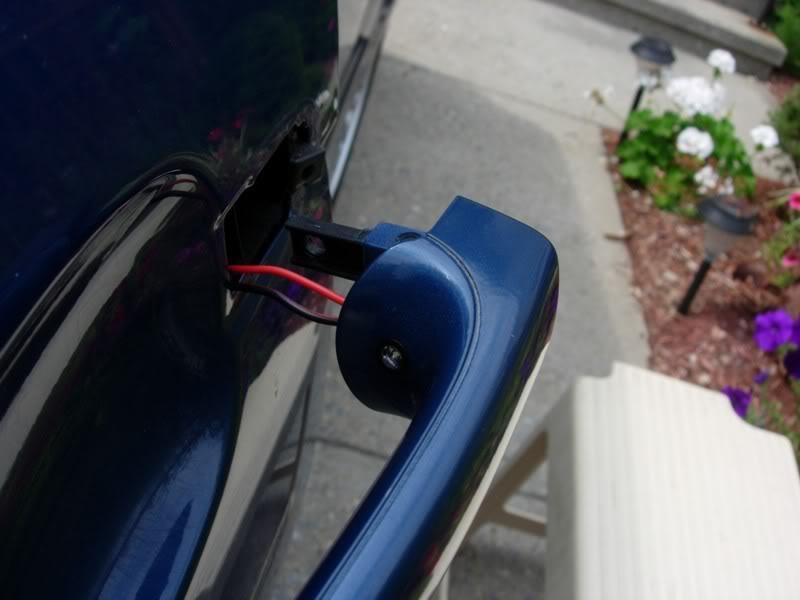
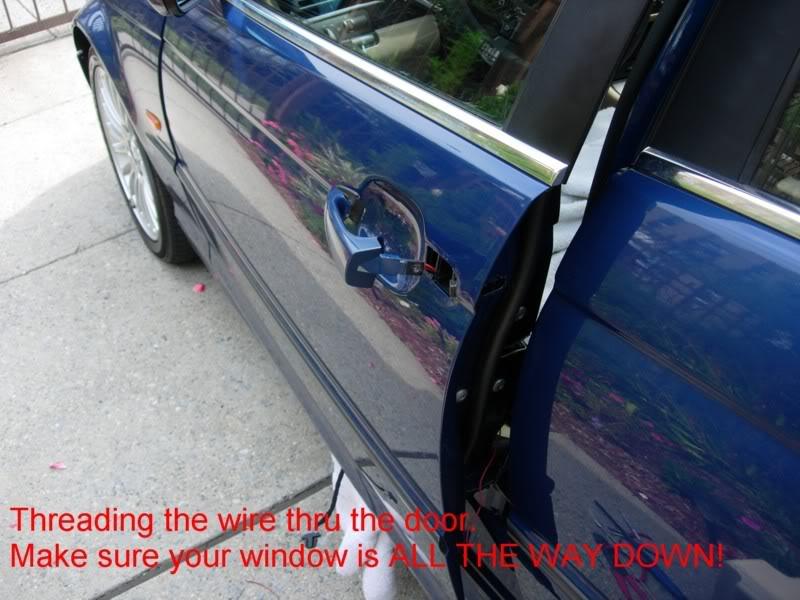
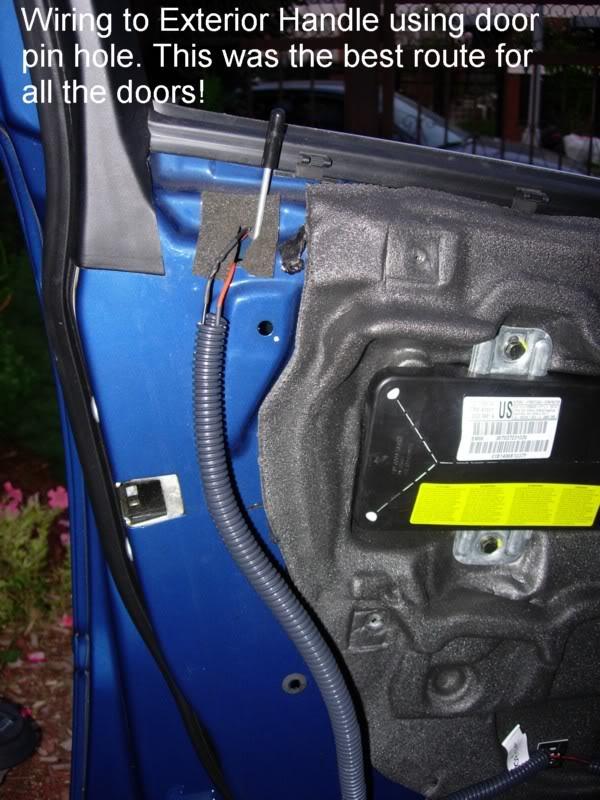
Pass the wire thru the door and around the door glass. MAKE SURE THE WINDOW IS ALL THE WAY DOWN. I found the lock pin hole to be the best exit point around all the in-door obstacles. Use a soda straw to get the wire thru. Also on the handle itself it is best to snake the wires under and to the front of the handles "pulling mechanism" or in front relative to where the T15 bolt screws in.
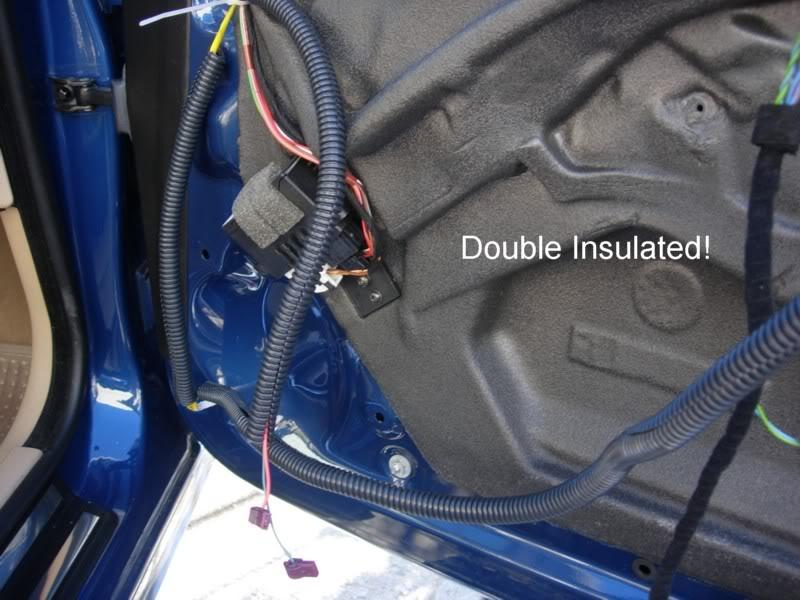
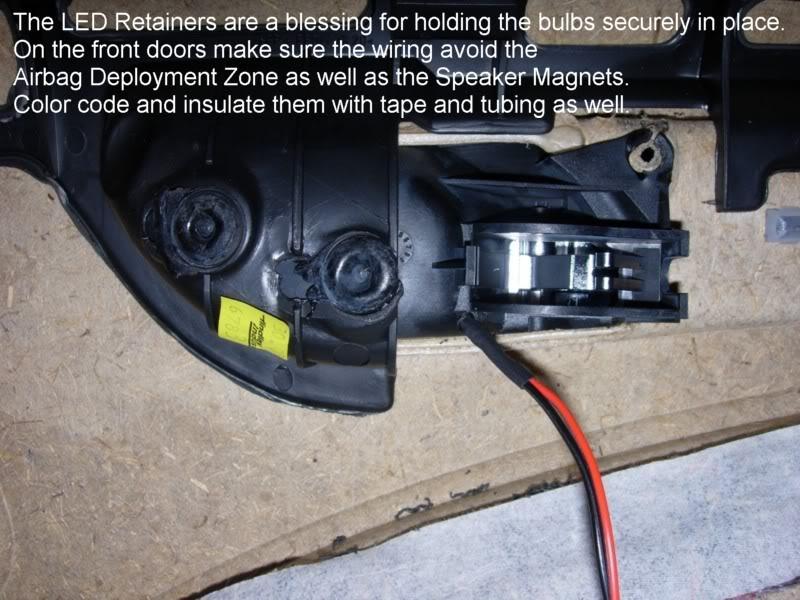
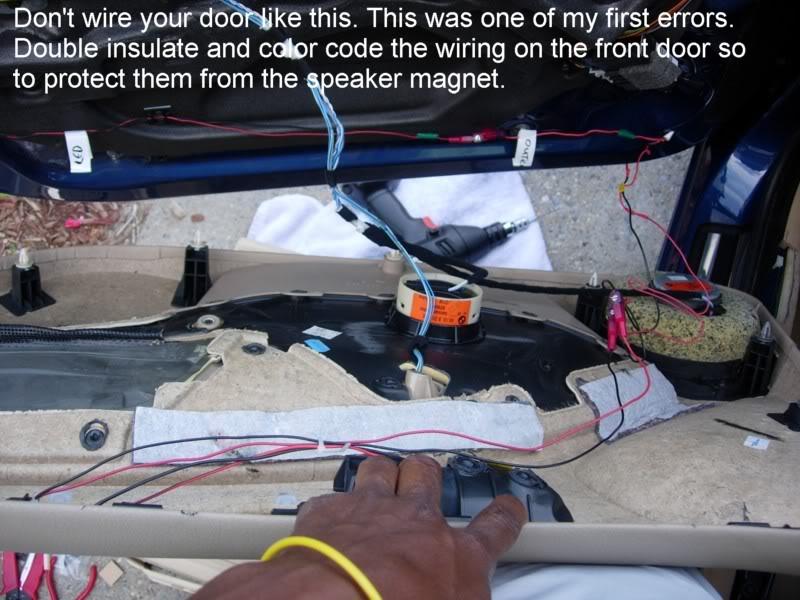
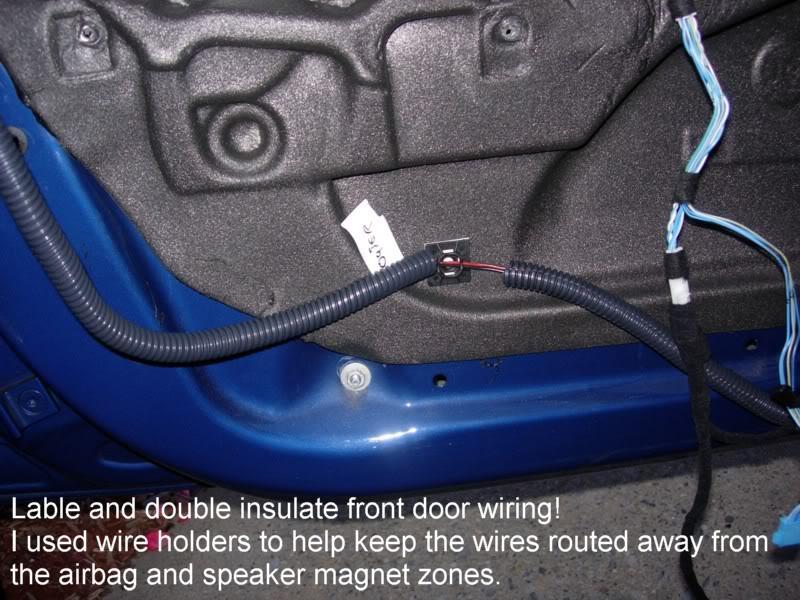
NOTE about the wiring in the front door; the speaker magnets are very powerful and it is near impossible to avoid them (especially if you do the inner handles). My inner LED bulb shorted out the minute I turned the radio on during a test. I saw that the wires ran over the speaker magnet. I did my best to divert the wiring around the speaker and double insulated the wiring with electric tape and my plastic 3/8 wire hose harness. This fixed it. Also YOU MUST avoid the airbag deployment area.
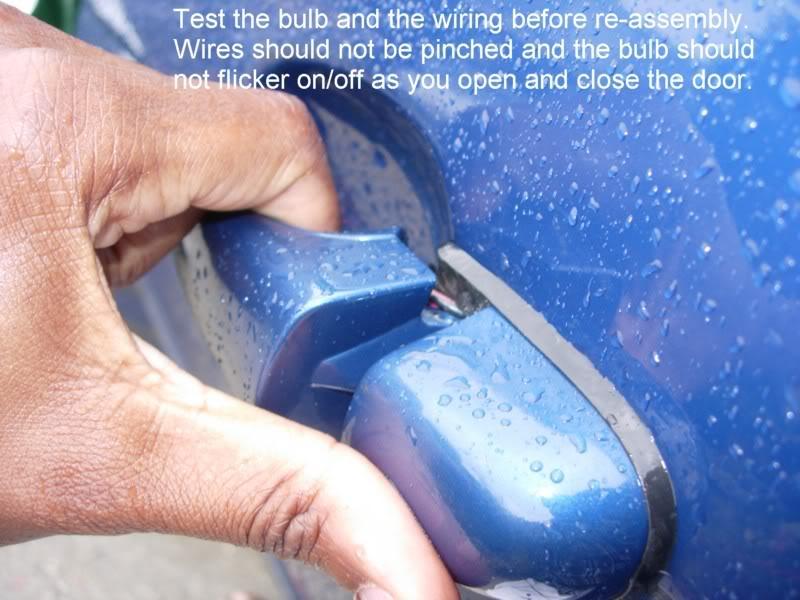
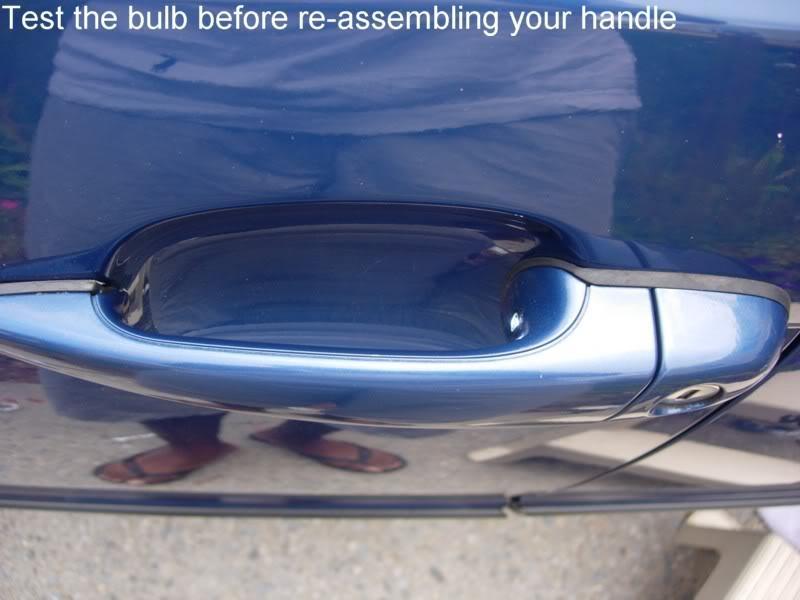
When you are satisfied with the wiring of the outer handle, test the bulb and then reassemble the handle completely making sure the T15 and the Allen Wrench bolts are fully tightened. Test the bulb again; turning it on and pulling at the door handle AND closing and opening the door-slam the door shut really hard and yank it open hard to make sure everything remains intact and the bulb is still lit. Also put the windows up and back down again to make sure nothing is snagging.


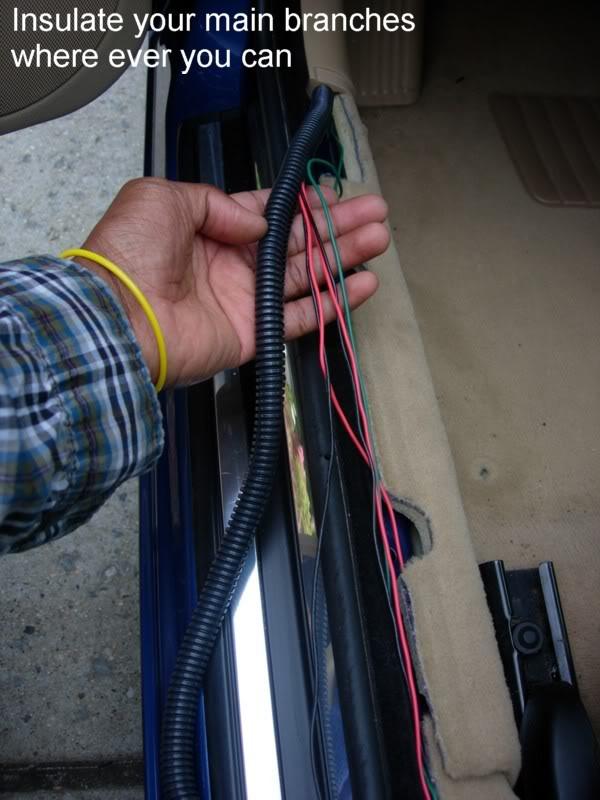
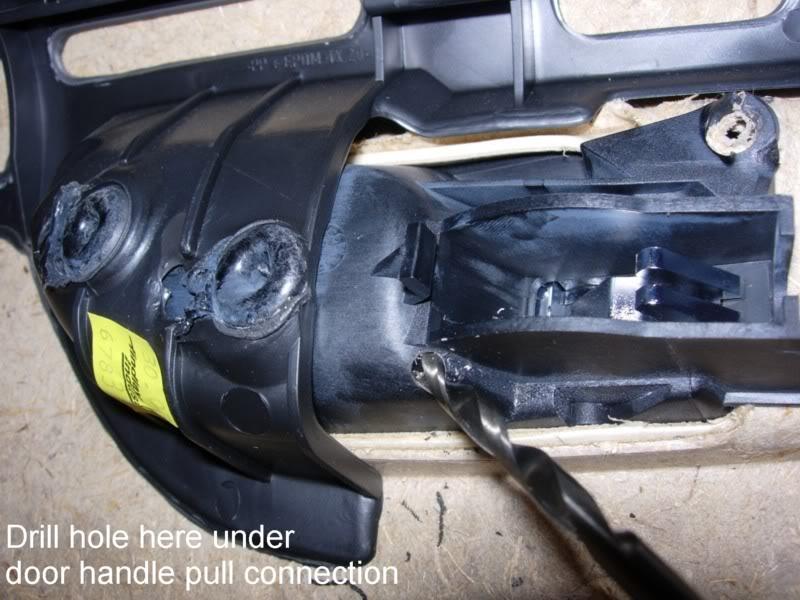
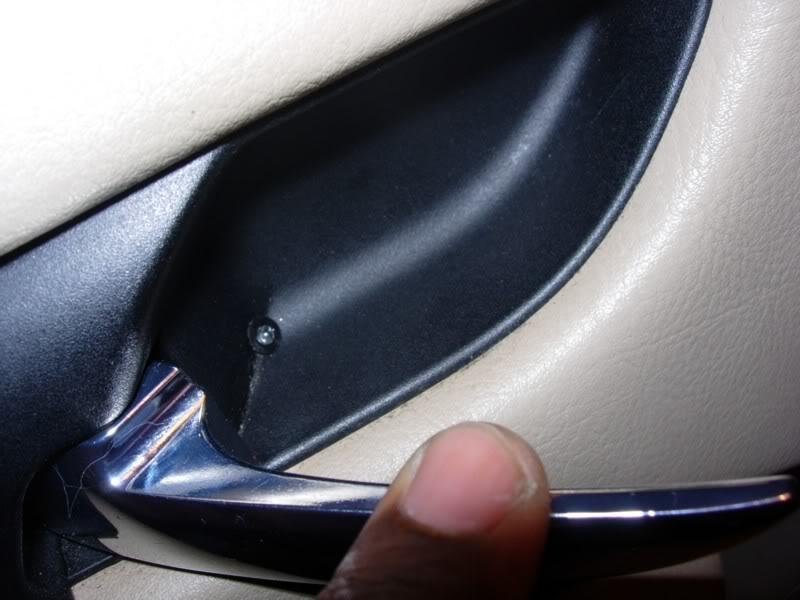
2. INTERIOR DOOR HANDLES: Now to do the inside door handles; Get your drill again and drill a small hole under where the white connector connects to the backside of the handle. From the front side the hole should be in the corner pocket across from the level. Insert your 3mm LED bulbs and retainers in the hole and make sure the wiring isn't in the way of any screw in anchor holes, the door handle's white connector and the air bag deployment area. Also on the front door double insulate your wiring with electrical tape and if you can get your hands on some plastic/rubber electrical tubing (3/8 size or smaller should do-I got mine at Home Depot 10 foot of tube in a bag for $1.99. Radio Shack and Walmart wanted $5.99 and up for 3-4 foot in a bag).
Insulating the wires will protect them for the speaker magnets.
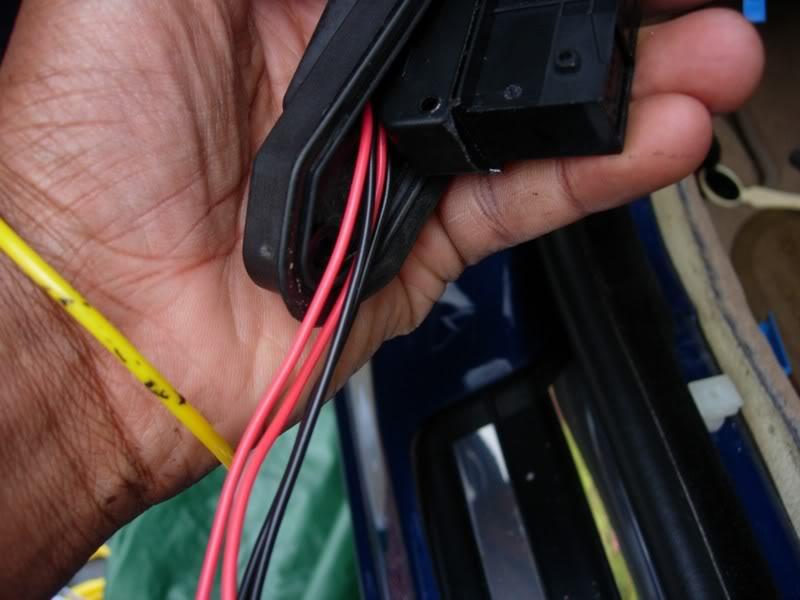
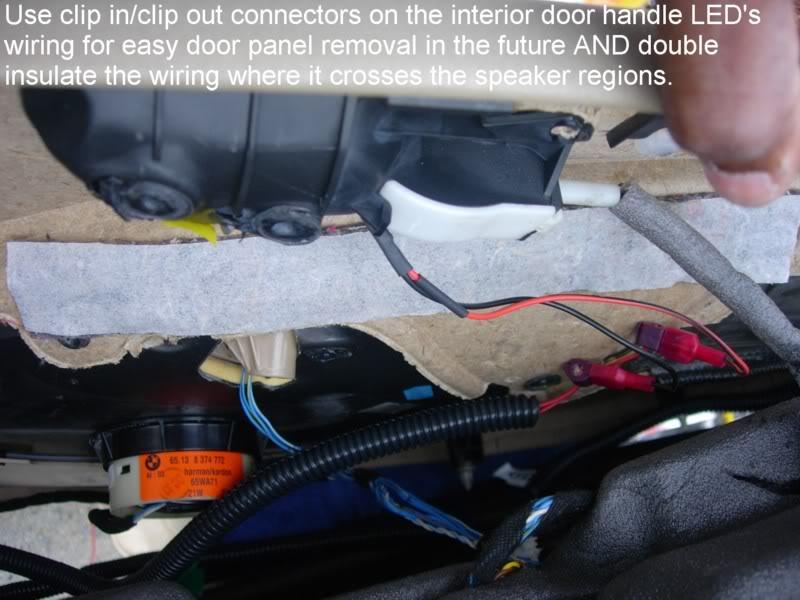
On the interior handle LEDs make sure the wiring going from the door frame to the handle is broken by clip in/clip out connectors so when you remove the door panel from the door as the handle is imbedded into the panel you can easily unclip the wiring to detach the door panel.


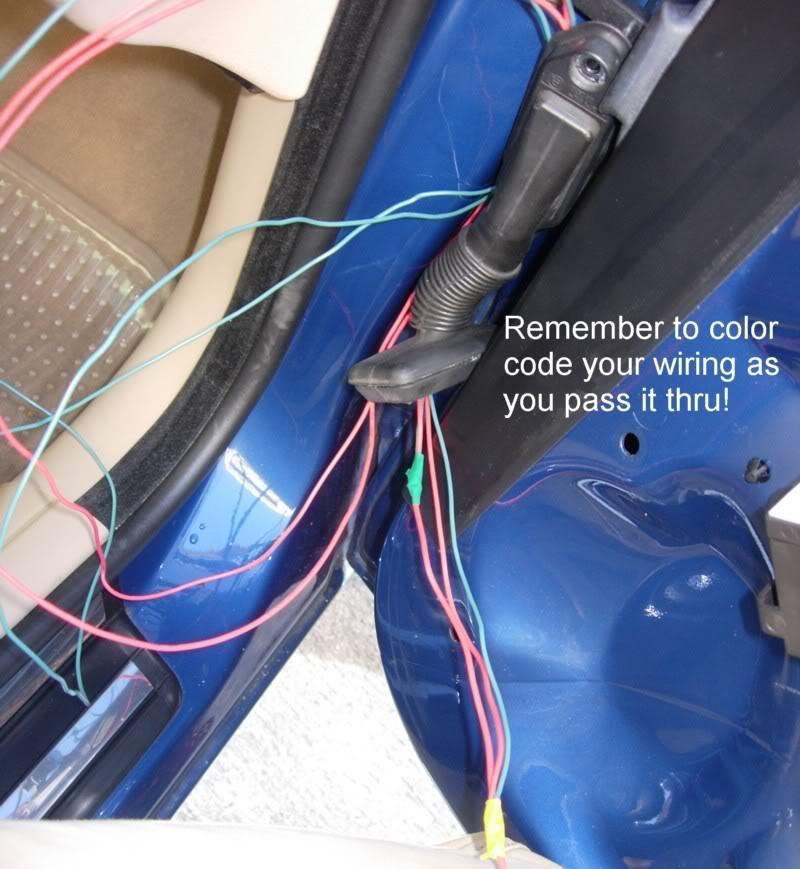
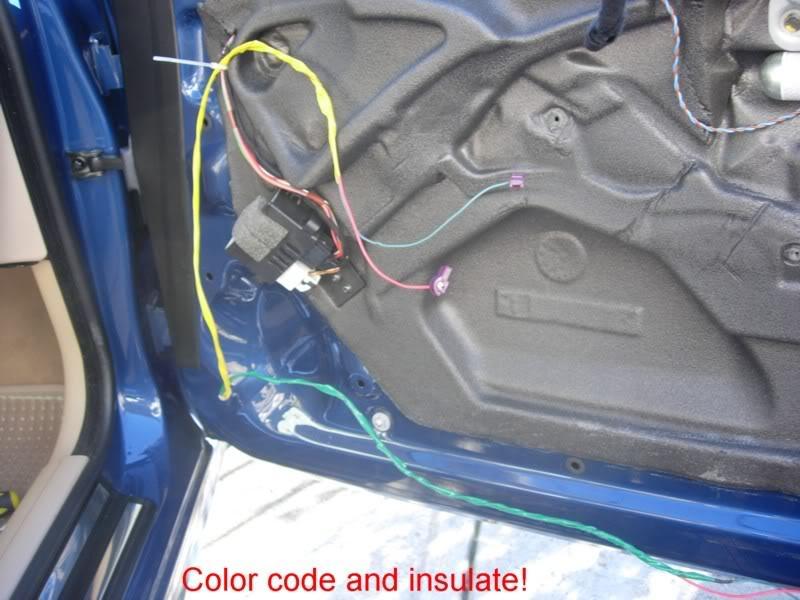
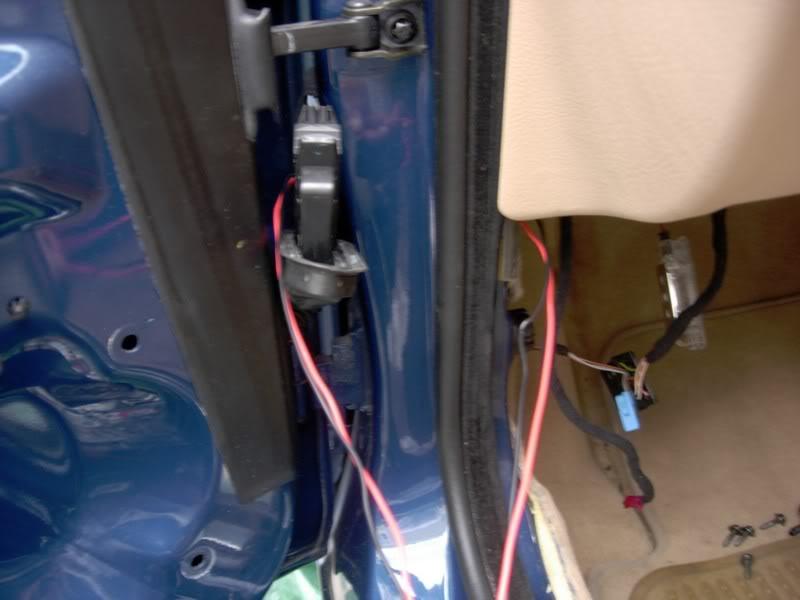
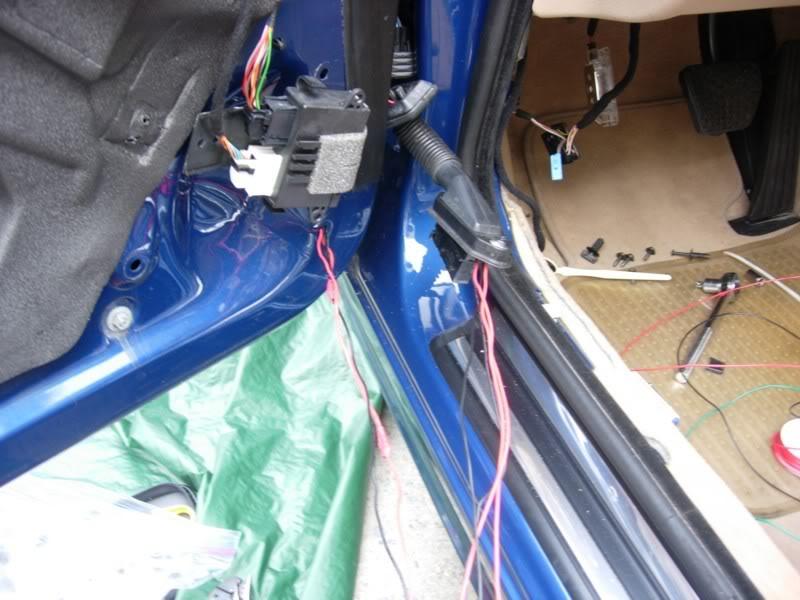
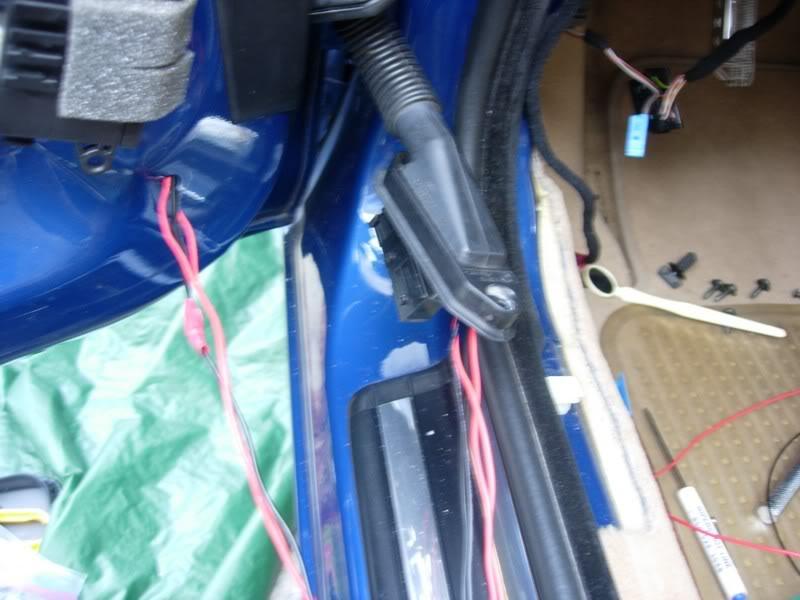
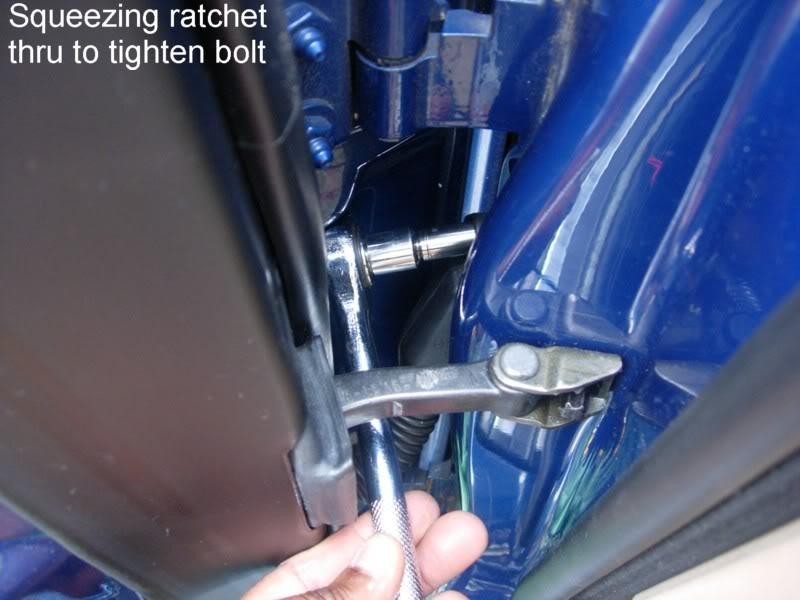
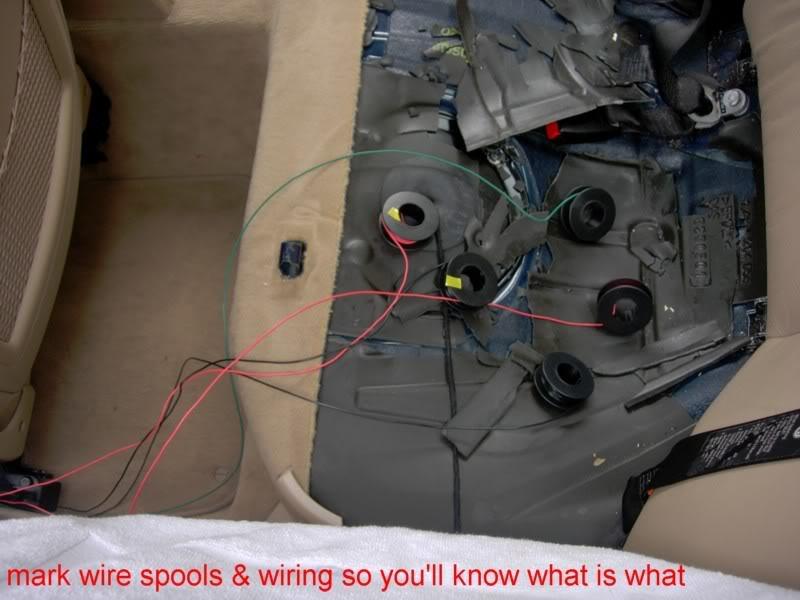
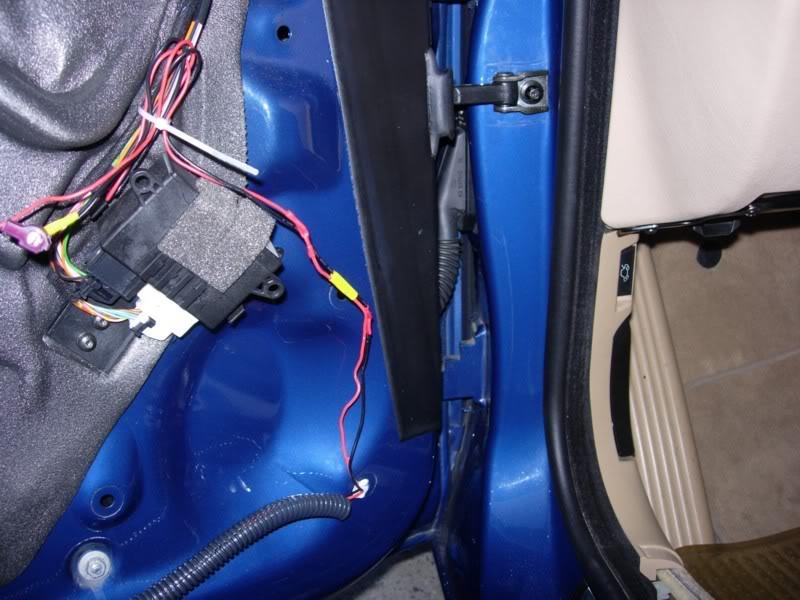
3. REAR DOORS: The rear doors are easier to wire than the driver doors. To wire up the rear doors you have to put the window all the way down and close the door. The wire harness rubber door tube can ONLY be accessed with the rear door closed and from the front side of the door where your VIN and Tire Pressure sticker are. Here the space to get the 8mm bold off the rubber tube head is slightly narrower than the front door. Also my rear door bolts were tight so I spent an hour at Home Depot looking for a really thin ratchet for these bolts. After $20 spent and another 40 minutes sitting in New York City rush hour traffic (any other time the trip would've taken 10 minutes-my luck) I was able to use my new tool to remove these annoying bolts. Once the tube is off, unbuckle the wire harness into its two halves the same way you did the front door. You will notice there is far less wiring traveling thru the tubes and snaking your wiring thru the tube is way easier and quicker than the front door. Unlike the front drivers door, where I snaked the wires from outside in, here I snaked the wires from inside the car at underside of the B pillar to outside then into the tube and into the door. Tap in to your main branch wiring sets for outer and interior LEDs. For those doing both the inside and outside handles mark the wiring with color tape so you will know what is what because it gets confusing quickly as the wiring work builds up. See my pictures for examples of how I did it.
On the rear door there is no huge speaker magnets or Air bag deployment spaces to avoid so just insulate the wiring once color coding it and/or labeling it for future reference. Remember to break the interior LED wire lines with clip in/clip out connectors so you can easily unclip them to remove the door panel in the future. Note because the rear door area is so small relative to the front door you can pass your wiring thru across the inside of the sliding window glass and make a small horizontal cut in middle of the vapour barrier to pass your wiring thru. Do not tear the barrier at the bottom, make a vertical cut or peel it off at the bottom seal without resealing it as your car will be prey to floods on the carpet whenever it rains.
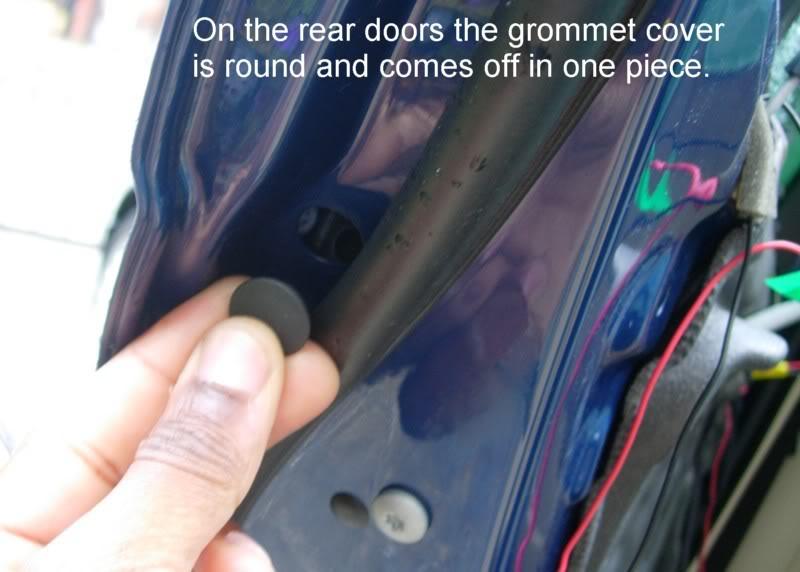
The outer door handles have a different style grommet to remove. It is a round black dot and the grommet lid just pops off with a flick of a flat object. NOTE: the were two grommet dots on my car. You want the upper most one and the larger of the two.
Access to removing the outer handles is the same as the front door. Same location of Allen screw and T15 bolts. The outer 5mm LED bulb placement , pig tail insertion and exit points will be the same as the front door. MAKE SURE THE WINDOW IS WOUND ALL THE WAY DOWN when passing the wiring thru the door and be sure to test everything when the wiring is complete.


4. PASSENGER/GLOVE BOX AREA FRONT DOORS:
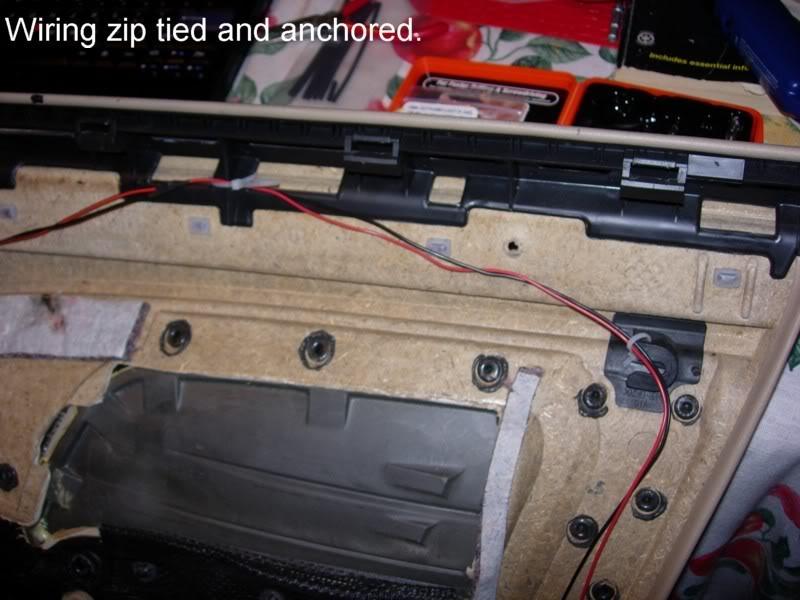
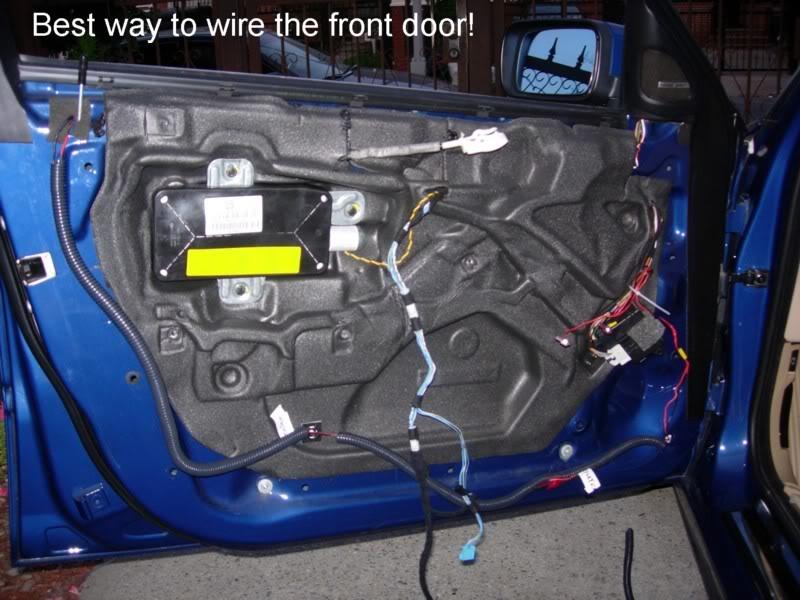
Driverside door has been explained above. Here are some pics of the inner door final wiring
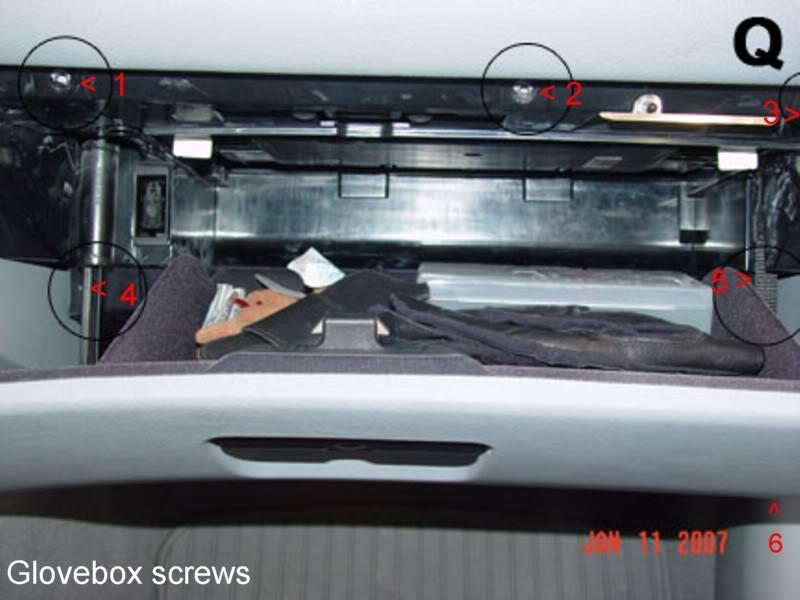
The Passenger front door's only exception here is the Glove Box NEEDS to be removed before the foot well panel in order to get into the hole going to the rubber door tube.
Unlike my previously owned E36 (1995 318i) the E46 Glove Box is easy as pie to remove. 6 easy to find screws hold it in place. Once the screws are off it just drops down and out with a tug. The foot well panel is connected by door panel-like clips and just pops right off.
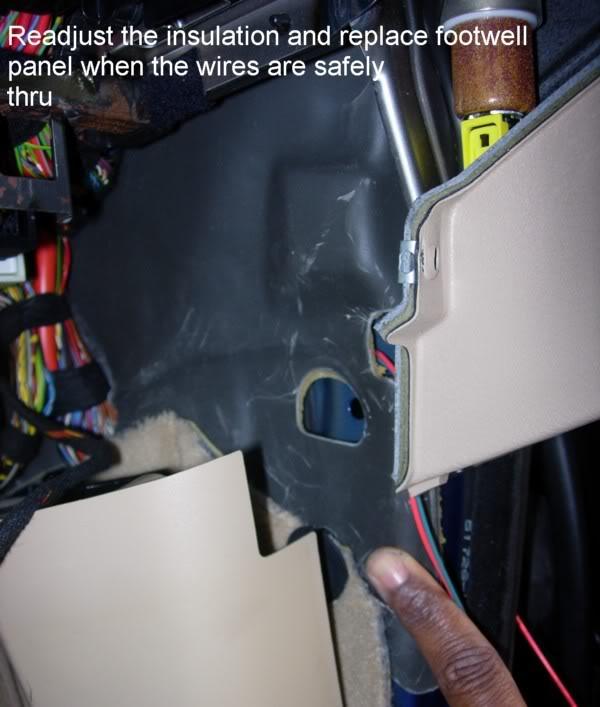
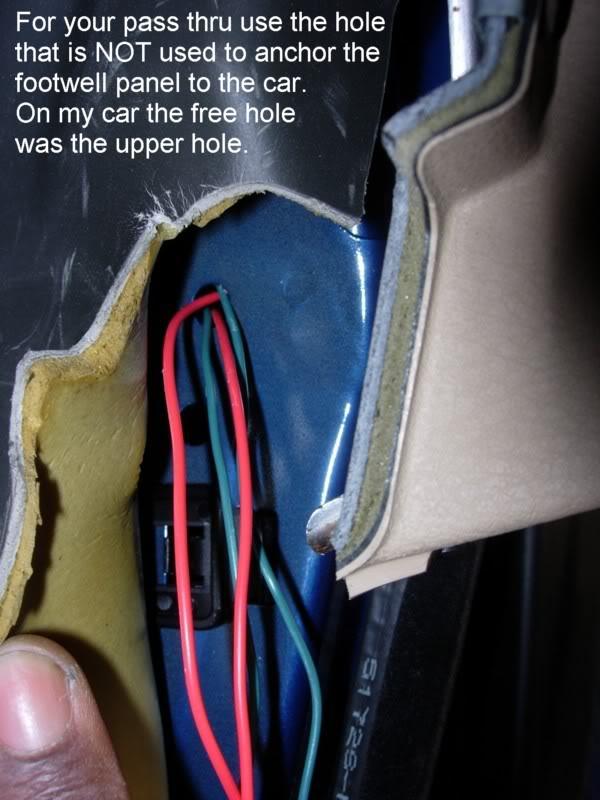
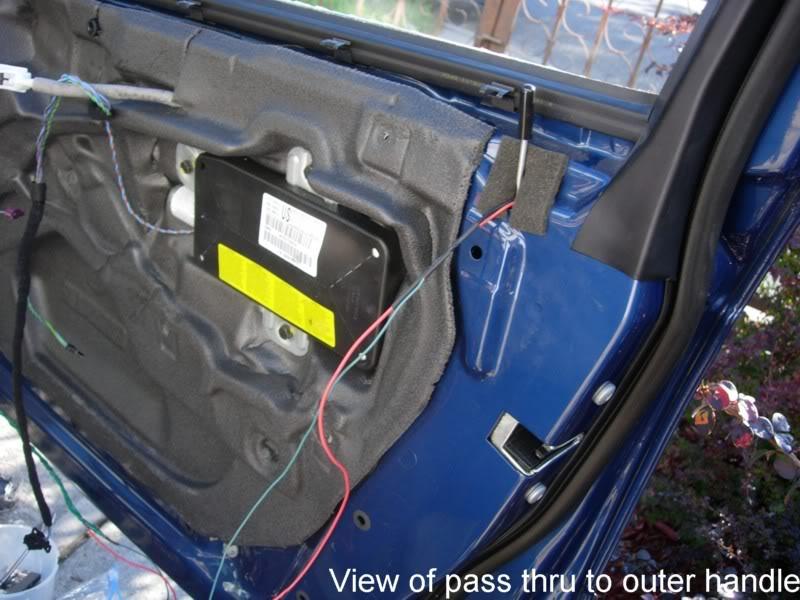
The pass thru hole on this side is either not as large as on the driver side or was way deep behind the insulation. However, I found a small circular pass thru for my wires. NOTE: Some of the openings are for the foot well panel clips to reconnect to the car so don't use them.
The rubber connector tube seems like it carried less wiring than the drivers door and by this time (after doing three tubes) I had become such a pro at passing my LEDs wiring thru that I managed to do it without having to unbuckle the tube's wire harness connector head, so I didn't need to unplug the battery because the airbag was not unplugged. Wiring and double insulation for this door should be identical to the drivers door.
NOTE: This picture below was taken from another DIY. It is obviously not my picture but it gives the idea of what I'm describing.