You must be logged in to rate content!
19 minute read

My E46 OEM Navigation 16:9 CD Monitor Complete Retrofit
Compliments of delmarco @ www.bimmerfest.com
Components Installed and Coded in this DIY:
-16:9 CD Navigation Monitor
-MK4 Navigation Computer with the 2010 Tele Atlas North America High DVD East/West Set
-BM53 Navigation AM/FM Radio Receiver
-Navigation Retrofit Harness Adapter
-OEM Aux-In for Navigation
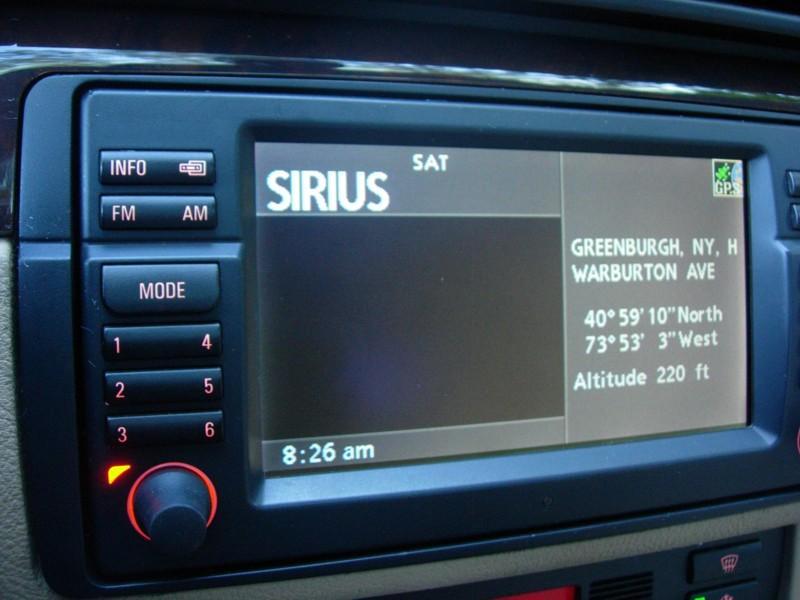
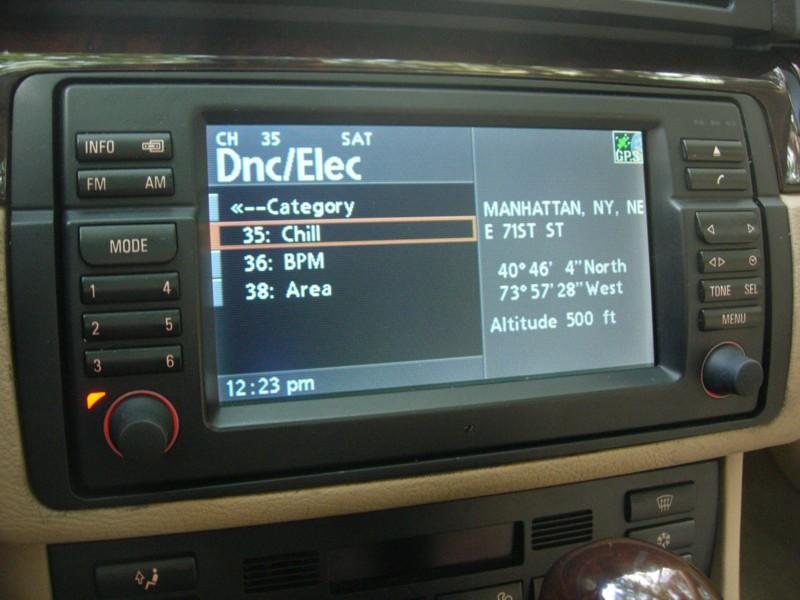
-OEM BMW Sirius Receiver (BMW P/N 84110153365) for Navigation
-Voice Command Bluetooth using Parrot CK3000 and Connects2 CTPPAR007
-Alpine KCA-420i & Intravee2 iPod Interface Adapter
-Coding of MK4 and Factory E46 Alarm
I wasn't going to do an official DIY write up for this because it is one DIY that I will NEVER EVER recommend since results and budgets are guaranteed to vary.
You can get all the straight dope you need for the RETROFIT at these LINKs:
http://www.bigpatsfans.com/nav/Ultim...rofitPart1.pdf
http://www.bigpatsfans.com/nav/Ultim...rofitPart2.pdf
It is the link I followed but, because that retrofit was done years ago and key things have changed since then, those attempting this retrofit will want to read what I wrote here or may want to ask current opinions on the project as prices and parts availability have changed and will continue changing over the years.
When said and done this is what my journey looked like:
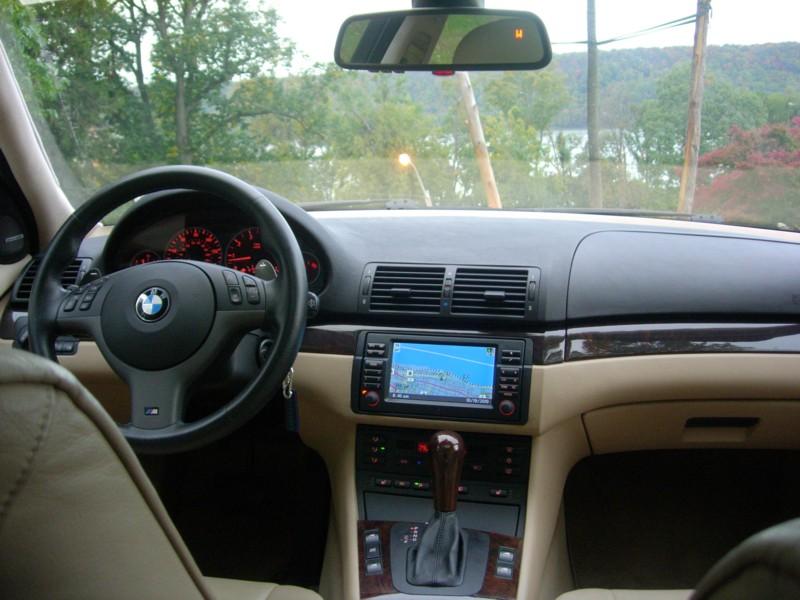
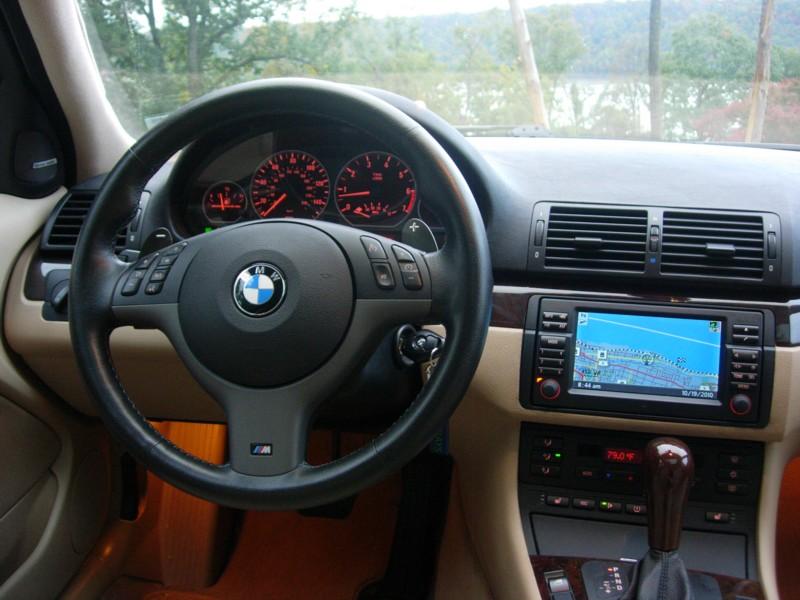
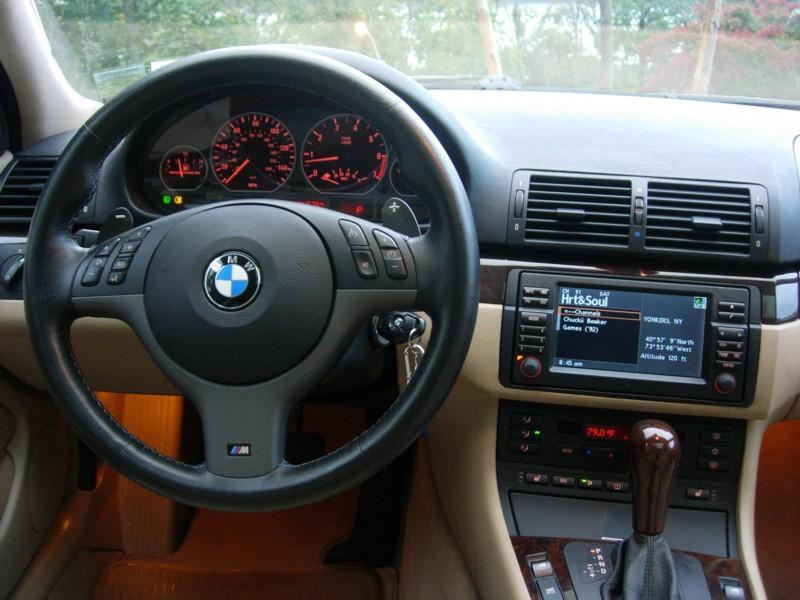
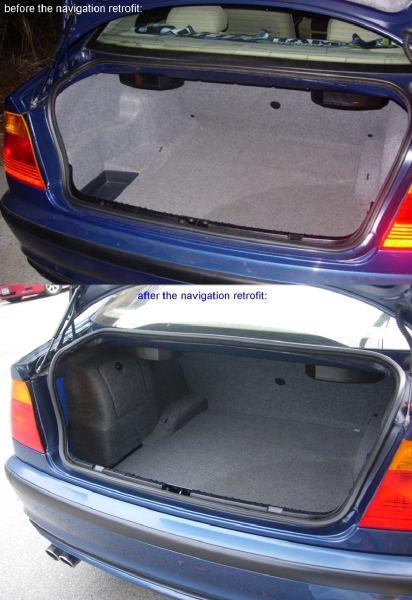
MY CABIN BEFORE:
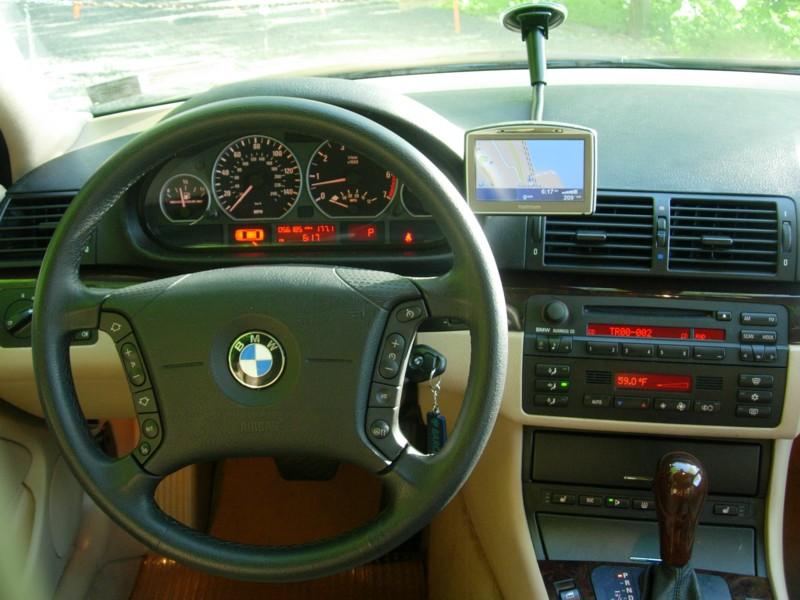
MY CABIN AFTER:
(I also upgraded to a new SMG M Sport Steering Wheel):
PROLOGUE:The two main reasons I attempted this Retrofit were-
A. I got the opportunity to get a full working new retrofit kit for only $1100.
B. I figured I could sell the current set up that I had in my car at the time; the CD53 MP3 head unit ($400), the iPod USA-Spec ($100), the Parrot Bluetooth ck3000 and ctppar007 kit ($100), and my Tom Tom Go 720 unit ($100) all for at least $500 to $700.
Now I subtracted this $700 I would make from $1100 I would spend and saw that when the dust settled it would only cost me $400 for a clean retrofit install! 
After reading thru SNA77's DIY links on the retrofit, I figured about $100 to $200 extra would be eventually spent to get any extra parts and unseen expenses for the project.
I expected the DIY would take about 8 hours tops and leave me about $600 max ($400 plus at most $200 for unseen expenses) in the hole which was cheaper than the $699 Dynavin DVN-E46 kit!
So I charged ahead with the project expecting it being relatively easier and cheaper for me than it normally is and man was I wrong.
PART ONE: COMPLETE BUDGET BREAKDOWN AFTER THE DIY WAS FINISHED-
Money Spent on Complete Retrofit Kit:
TOTAL: $2,600
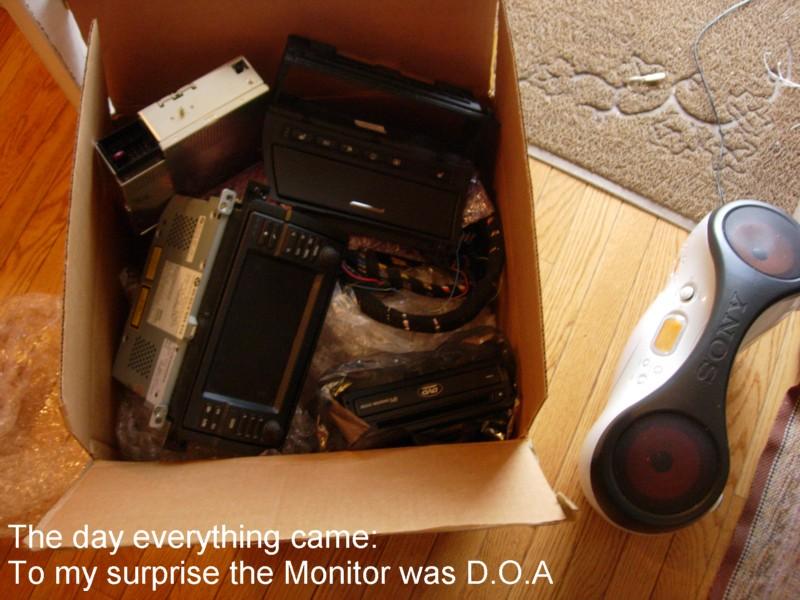
$1100 for 2004 MK4 unit, 2007 BM53, Retrofit Wire Harness, HVAC relocation kit, and NON-WORKING CD 16:9 Monitor (that was sold to me under the impression it was new and working).
$700 for a brand new replacement CD 16:9 Monitor
$200 for various parts (mounting brackets in the trunk, trunk trim, trunk tray)
I also ended up spending $600 for other little miscellaneous things I either had to buy or got billed for like:
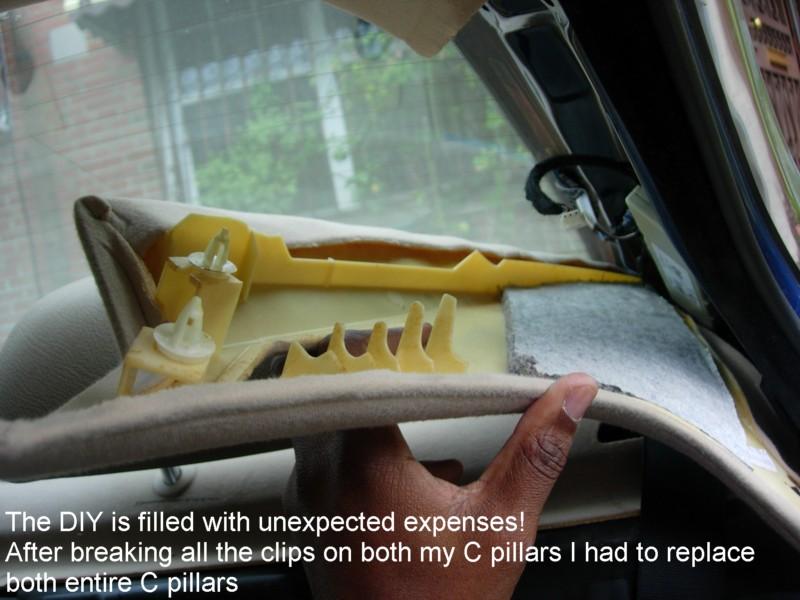
shipping/ebay/paypal fees ($90) from selling my old parts, buying the 2010 Navigation DVDs and coding to Mk4 to car ($100), a new GPS antenna ($10), the Navigation Aux In kit ($40), The Navigation iPod Data Alpine KCI adapter+ iPod Intravee 2 kit ($300) as well as various screws, bolts and I had to replace both my rear C pillars ($60) that I damaged during the installation.
Money Earned by selling old parts:
TOTAL: $1020
$630 made selling my Alpine CD53 MP3 Player ($520 on eBay), USA-Spec iPod Data kit($80), Old CD53 radio bracket ($30)
$140 made selling my Tom Tom Go 720 on eBay
$250 made selling the non-working monitor that came with the first kit
TOTAL SPENT: $2600 - $1020 = $1580
Getting ripped off buying the original kit with a bad monitor is what really set me back money-wise and time-wise as I waited a full month to get a working replacement monitor. 
My advice is to make sure the parts you buy come with some sort of warranty against fraud and the seller is readily available to refund your money or make some sort of amends on what they sell you. 
PART TWO: COMPLETE DIY PROCESS-
It took me about 12 to 15 hours of actual DIY prep and installation time.
This was before the month-long wait to get all the parts in the car and working (a fully working replacement monitor took a bulk of that time to come in as I literally went thru 3 bad ones before I finally got a brand new working monitor).
The tools required are your basic ratchet kit with 8mm and 10mm being the most used heads. Also a good torx set with T20, T25, T27 and T30 as well as the T50(for the rear seat belts) drivers being mainly used. Electric pliers, a clean dull butter knife or pry tool and a small flat head screw driver were also essential in the retrofit. Also have a scissors, lots of zip ties and electrical tape nearby. Said and done, surprisingly, there are no special tools or any textbook knowledge of using tools required for this DIY.
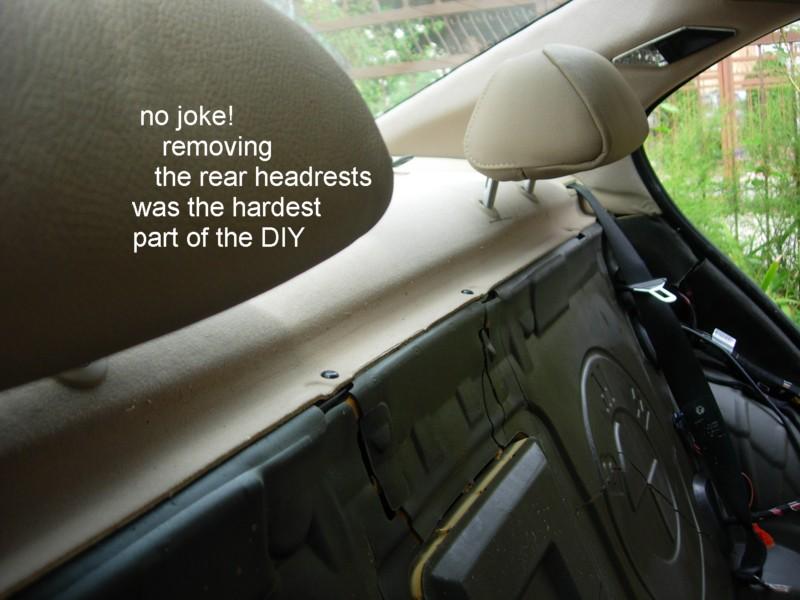
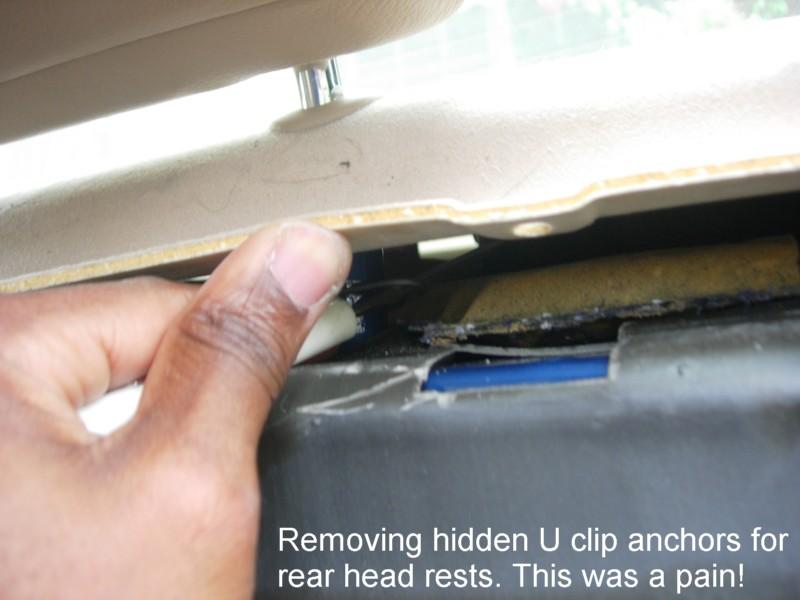
Knowing what I know now I can DIY this again in about 3-5 hours. Most of the original DIY time is spent figuring out stuff. Like removing the front seat took me less than 5 minutes and the rear seat took even less time but I spent about 1 full hour maybe more figuring out how to remove the two rear seat head rests!
The DIY instructions I was following only said that the head rests each pull right up but didn't mention on some E46 cars they are held in place by stubborn, tiny and impossible to see U clips under the rear deck. It took me about 40 minutes to find this out on my own and another 20 to 30 minutes figuring out how to get the U clips unconnected.
The thing you realize with this DIY, like most DIYs, is that it is really easy to complete once you know what it is you are doing. It is just the little unexpected things you come across that can really stump you (like the rear head rests in my case), but the big scary things you expect to spend all day on is really easy and takes about 5 minutes to remove or install (the front seat in my case).
Here are some pictures from the grueling experience (in the end it was worth it...sort of) 

Going into this DIY be sure to keep a side-budget of around $100 to $600 for unexpected stuff. The clips on both my C P!llars were old and brittle and broke clean off leaving me to purchase two new replacements from bavarianbmwparts on eBay for about $30 each. I also broke the child seat anchor covers on the rear deck and to my surprise it is a discontinued part at all the USA BMW Dealerships and can only be special ordered thru the Canadian Dealership from Australia. Three weeks shipping and they cost $10 each. I also broke clips on my door sills and B P!llar during the DIY but don't need to replace those since they still anchor into place. But just to show you that you need to expect trim and parts to be brittle with age and to break when you remove them.
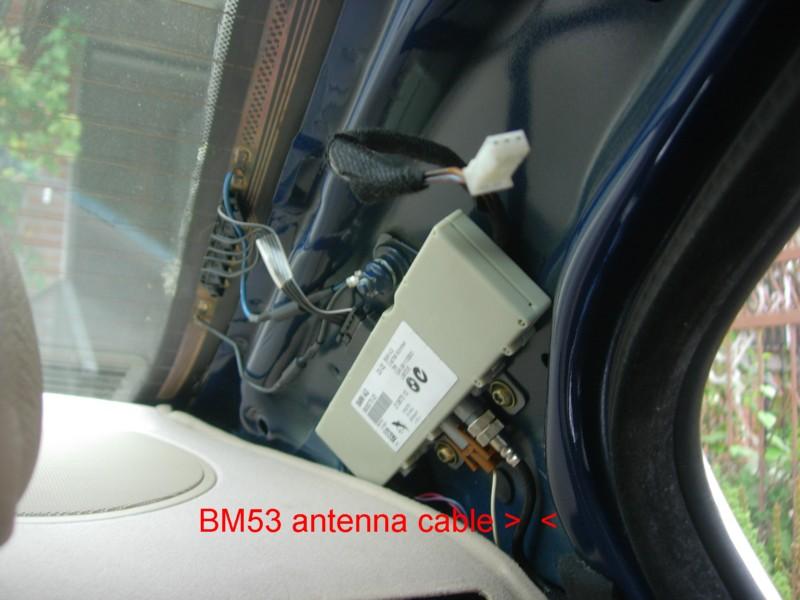
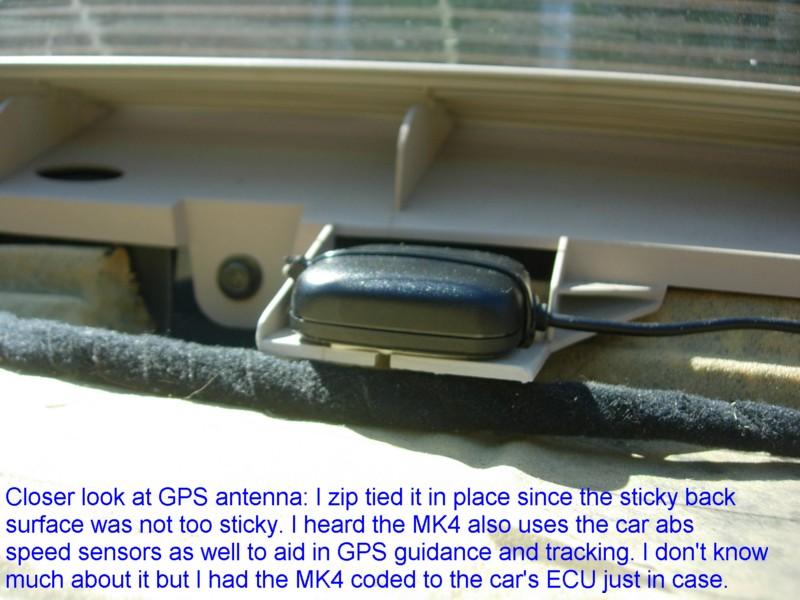
Laying the cable was easy I started at the rear seat and attached the rear deck/mid car connectors first: the BM53 antenna, the ground, the Mk4 GPS antenna (the seller who ripped me off with the monitor must have also forgot to pack the antenna so I ended up buying a new one on eBay for about $10). In fact removal of the rear deck was the hardest-to-figure-out part of the DIY.
The front driver seat was easy to remove and I didn't have to take the seat out of the car. I only tilted it out of the way to access the carpet below. And the carpet is already pre-cut and peels back easily. I ran the harness under the sills to the carpet entry point at the base of the B P!llar going under the driver's seat to the center console. Maneuvering the hefty 17pin front end connector head under the carpet up to the console/tranny area was tricky but not difficult. This took about 20 to 30 minutes to do. On the sedan I think it is easier to do than the coupe because I found that I didn't need to cut or make a slit in the carpet at all. Also on the sedan you do not have to remove the front driver seat belt on the B P!llar. There was no real surprises here but it is important to keep your work neat and organize or you can easily lose track of what you are doing.

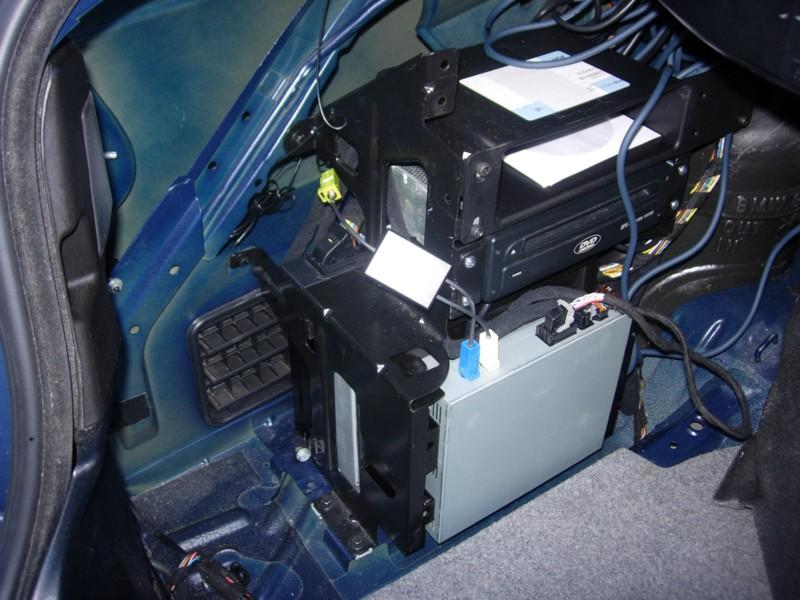
Even after I got the main two trunk brackets there was still extra mounting brackets, about 20 bolts and body nuts that I needed to get everything mounted properly. Everything is in metric it was hard to track down the correct bolts (here in the USA) and I eventually went to the BMW dealership where nuts and bolts are $1.75 each. In this picture I used a Folgers Coffee container to support the BM53 and the Sirius is taped up and tucked in the back behind the car's frame. I need to get the BM53 bracket and the bracket retaining bolt ($24 at the dealership), a Sirius Receiver bracket kit and the oddment tray that replaces the CD Changer above the MK4 (about $14 at the dealership):
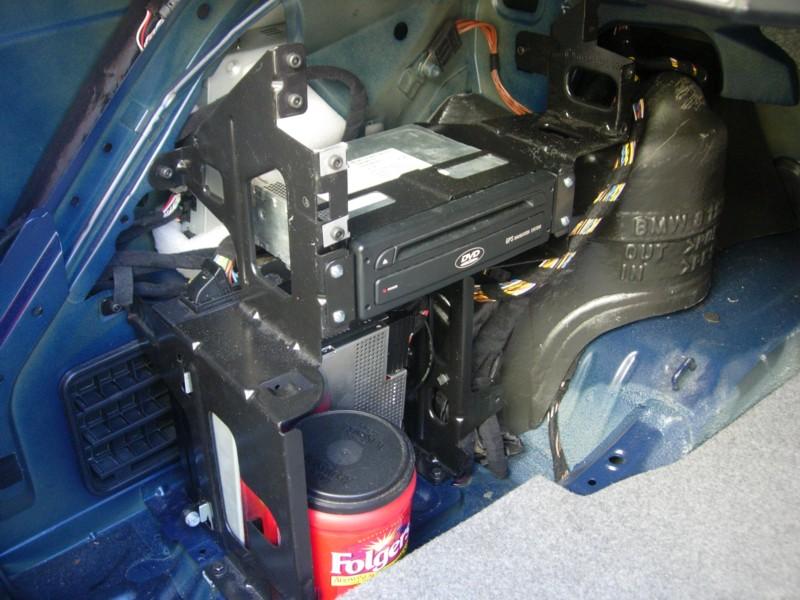
Said and done when all the parts are properly mounted: My car already had a Navigation-ready Sirus Receiver that I also mounted in addition to the BM53, the original HK amp, the MK4, the Alpine KCA-420i iPod adapter, and the Oddments Tray that takes the place of the CD Changer above the MK4 drive.
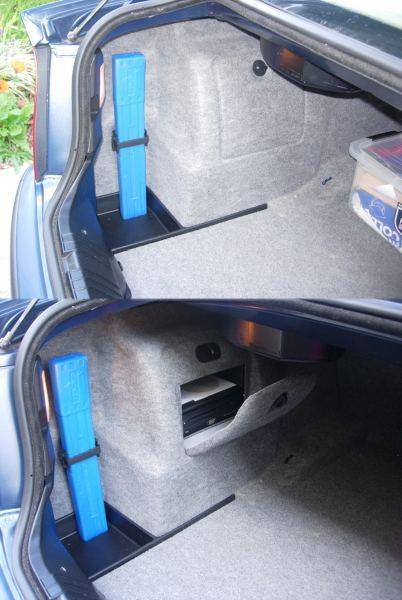
Also the new trunk wall lining mat trim and tray are needed. I bought the Tray for $30 at the BMW dealership which was the only place I could find it and the Trunk Mat Wall with the CD Changer/Navigation-Door from bavarianbmwparts on eBay for $40:
The drama that ensued at the front. The connections can get messy so it is BEST to work in sections. Finish at the back of the car first before tackling the front. They are more connections at the front of the car that need your undivided attention and care when making them. It only looks scary but it is not and literally should take even the most clumsiest DIYer about an hour to connect everything, replace the HVAC/ashtray and push in the new Monitor. Make sure the battery isstill unplugged when you make your connections or you will run into problems (don't me ask how I know).
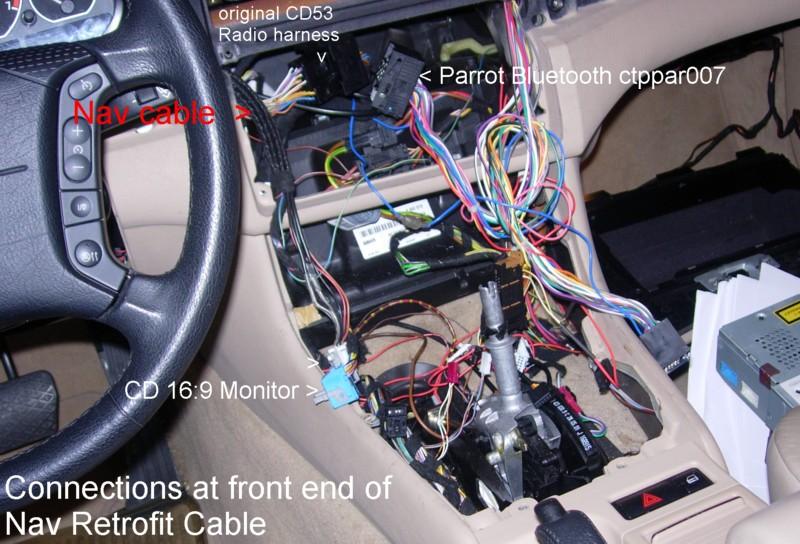
Also be sure to have a retreat route in the event you complete your project and find one or more of the components are not working and you have to back track. Keeping your old Alpine CD53 Business Radio and Bracket for a few extra days after you finish the DIY is wise. Even if the retrofit wiring is laid down and the components are connected in the trunk you can still re-install your CD53 at the front and use it while waiting for your issues (refunds, shipping time, warranty replacements) to get sorted out.
I waited a month before I got my monitor issues resolved. That was a month without radio or a CD monitor in my car. 
I literally started this DIY at the start of Labour Day weekend Sept 3rd, 2010 and on October 7th, 2010 I completed it with everything working and coded in the car.
NOTE ABOUT CODING: I had the MK4 coded to the car's ECU even though I was told by a few sources that it is not necessary. I however heard that the MK4 uses information from the ECU and Wheel Sensors in the car for GPS positioning and tracking in the event a signal from the antenna is not present. I don't know much about that but just to be sure I had a 100% legitimate working retrofit I allowed it to be coded to the car. At coding I learned that the car's ECU has the "ability" to recognize that the MK4 is present and that to me is enough evidence that coding must be important.

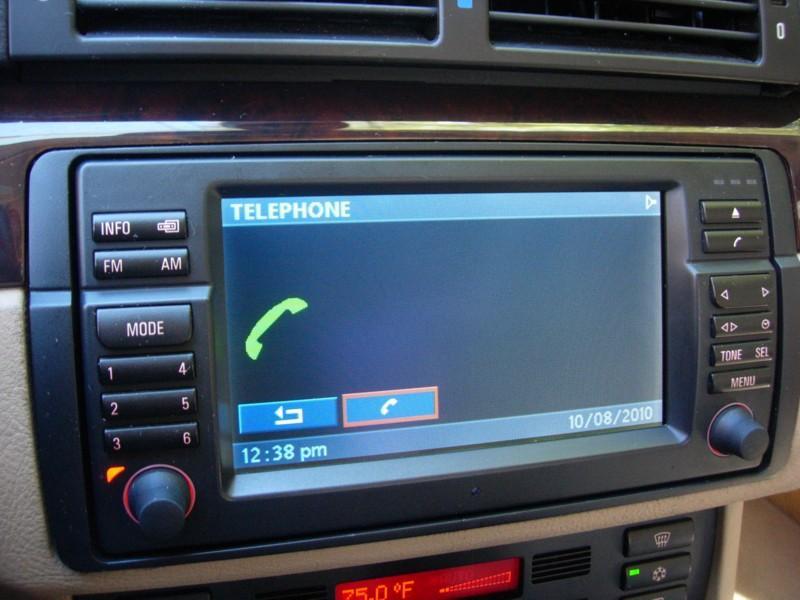
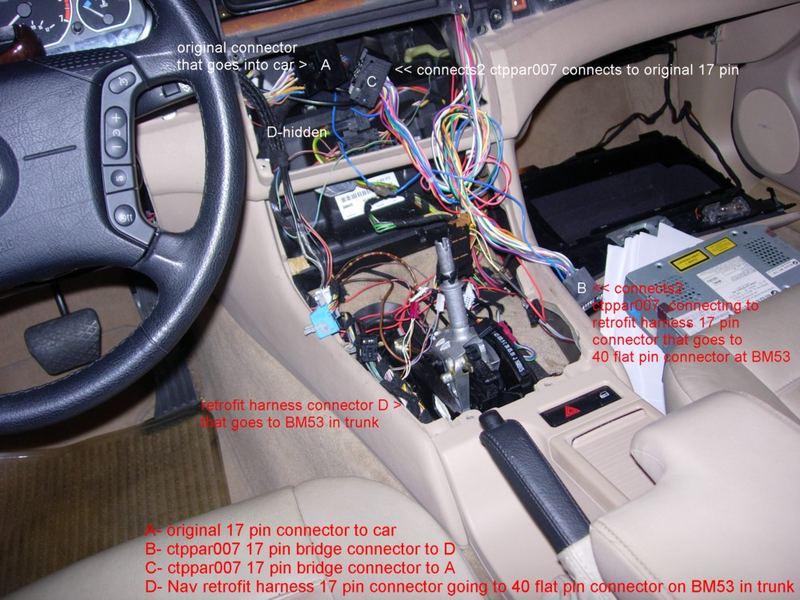
Also by accident I discovered I didn't need to sell my ck3000/ctppar007 kit and buy the very expensive OEM ULF Bluetooth kit because the ctppar007 connector actually connects to the Nav retrofit cable at the front of the car and provides an even better Bluetooth and Voice Command experience off the BM53 and 16:9 CD Monitor than the CD53 did.
PART THREE: And finally there were some last minute stumpers in this DIY that I managed to solve-
NOTE: Leaving the car's battery unplugged the entire time until after ALL the connections are made-no matter how small it may seem is important.
Sirius Data Connection: the issue was the original pin inputs on the CD changer cable in the front is not only reversed going from 6 to 1 and 7 to 12 but it is upside down as well. So it is double counter-intuitive
NOTE: Only two BMW Sirius Receiver models for the E46 are known to work with the BMW BM53 Navigation radio.
BMW P/N 65120416377 and
BMW P/N 84110153365 and
possibly the new 04/2010 replacement units BMW P/N 65 12 0 439 436 may also work with navigation.
If the Sirius Receiver does not have these P/N it will NOT work with Navigation.
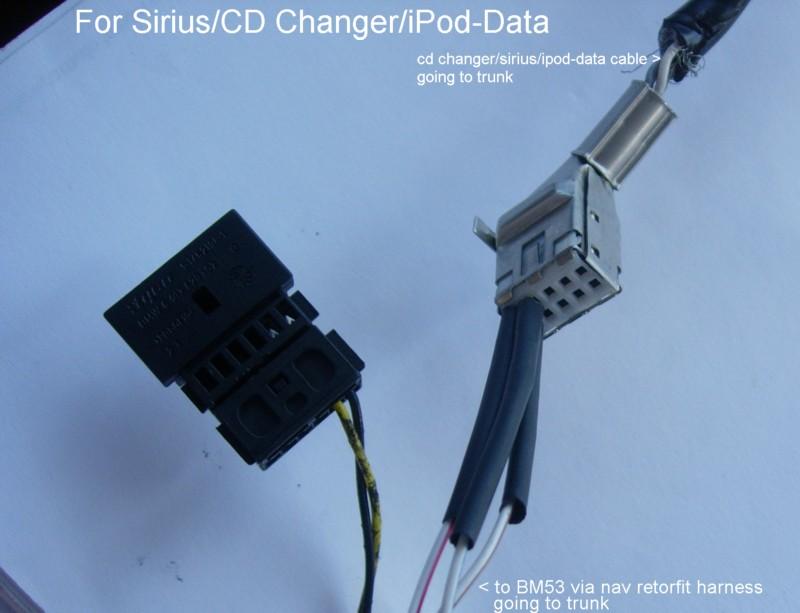
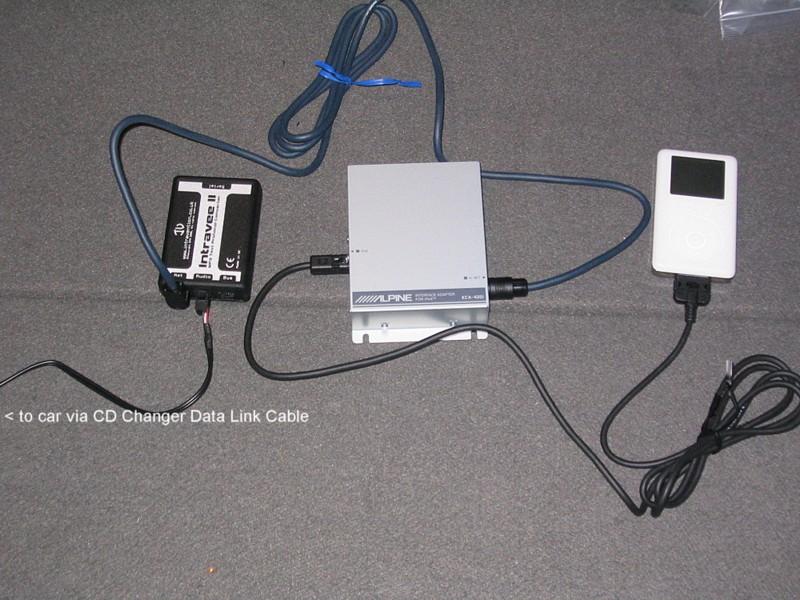
IPOD DATA: The Intravee II with Alpine KCA-420i iPod Adapter is above all the ultimate option for seamless control and play of your iPod thru the Navigation Monitor. The connections are simple and it connects in the trunk. This set up maybe an inconvenience for some folks that have iPhones and/or prefer their iPods in the cabin nearby hands reach but for me having everything locked safely in the trunk is ideal since I do not like clutter in my dash area and the Monitor and Steering Wheel buttons control EVERY ASPECT of what you need to do in terms of locating, playing and enjoying music from your iPod. Also due to lack of issues with the kit once it is installed in your trunk lining you NEVER need to go back to pull it out again or have to reboot it until you are ready to sell the car. The only two downsides to this kit are the availability (only one website in the UK sells the Intravee II and the Alpine KCA-420i is also semi-rare and mainly located on eBay auctions) and the price (the Intravee II is a solid $250 and the Alpine KCA is about $50 and up on eBay or $100 new). YES: you do need both the Intravee II and the Alpine KCA-420i to get this to work. Here below this picture shows the set up:
Here is a very good video showing most of the main functions and capabilities of the Intravee 2 (w/ Alpine KCA-420i) Adapter of a BMW Navigation Screen.
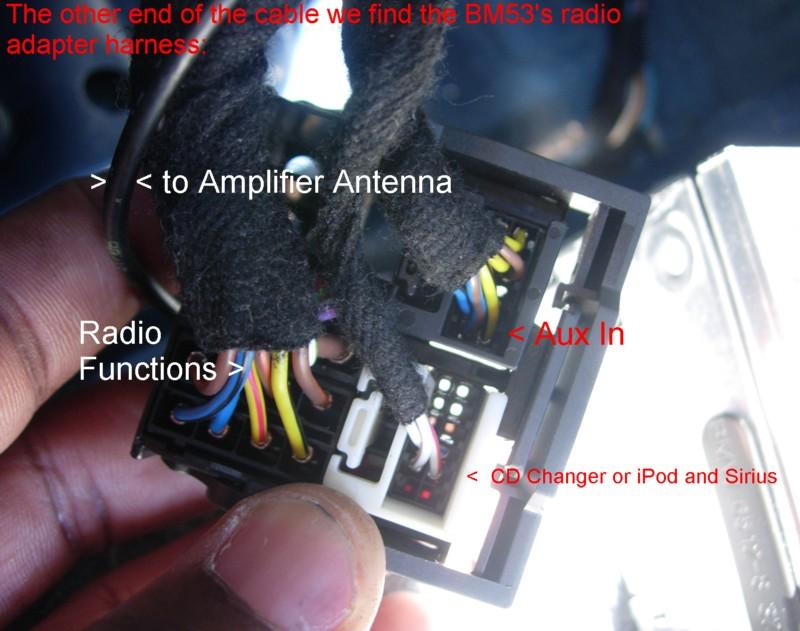
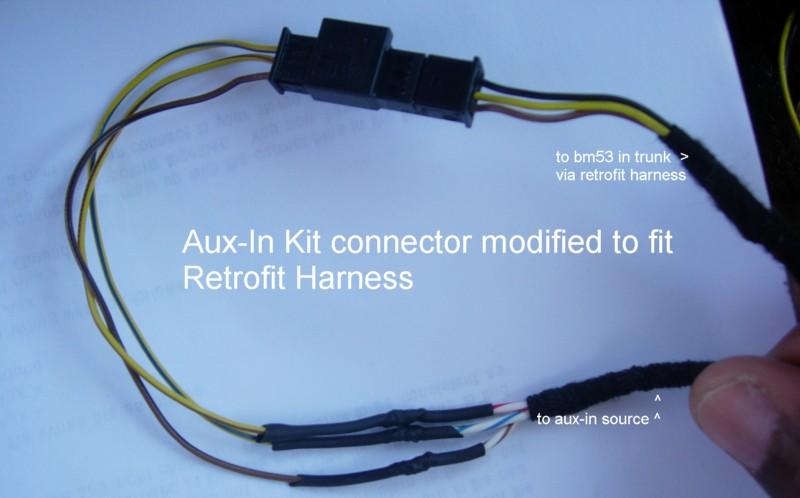
AUX: the issue here is the kit you buy for navigation does not seem to come with the right male connector for the "retrofit harness" female connector. I supposed the regular factory harness came with a male connector for the Aux in female connector but if you are retrofitting with a retrofit specific harness you must modify the aux harness female connector to a male connector to fit the retrofit harness's female connector AND you need to swap the pin no.s around so the colours are where they should be.
http://img844.imageshack.us/gal.php?...ofitbmwe46.jpg
remember anything is possible...even if it seems super expensive and impossible to DIY.