You must be logged in to rate content!
15 minute read
2000 1.8T SAIS Delete... The Write-Up
Compliments of Pscheoverdrive @ http://www.audiworld.com
4-22-2008
Ok, so... I'll make my write up debut with a topic that I think a few of you are interested in. Big props to Pentosinjunky for taking pics, letting me use his garage, making 7-11 runs and staying up so late to help me with this. Also to IAmAwesome for his chats...
Usual crap applies... I, AudiWorld, and other contributing members are in no way responsible for you screwing up your car. And this isn't the most basic mod in the world, so if you can't figure out how to change your air filter, skip. No joke.
Secondary Air Injection System Delete on a 2000 1.8T, v.2.0
Ok, so... I've been complaining about this thing called the Secondary Air Injection System for quite some time now. It's for emissions (do a search for more info), but all mine did was leak. My combi valve was bad, and my SAI pump was toast. I eliminated both and some leaky crap with this mod... And all it cost was $40 to get the SAI block off plate from Int Engineering. Last time I checked, they were sold out, or no longer making the product or something (I probably got the last one. :P Haha...), but it shouldn't be too hard to get one fabbed up somewhere. Or just bug Int and maybe they'll make some more.
Here's the question most of you will probably have: how's my car holding up after the SAIS delete? Well, it's been two weeks, and only on occasion, I will get an 'incorrect flow detected' code. Occasion. And if I get it, it's only on a really cold start up (in the morning, pretty much). It's pretty infrequent. Will I pass emissions? VAG-COM's readiness function shows me failing 4/8 areas. Pretty bad... So, probably no. But, I have some other issues to work out, so how much can actually be attributed to the SAIS can't be determined at this time (I probably was failing in those ares before). Once I get those issues worked out (probably no time soon), I will post an update.
*Update*
Well, on the last readiness test I did, I was passing 7/8 tests. The only one I was failing was the catalytic converter test. And that's probably due to my cat not being in my car anymore. Going to get that custom tuned-out. However, the P0140 code has been coming up frequently. That can be custom tuned-out, as well, which I plan on getting done.
*End update*
So, if you still want to do this, or are just curious about how I did it, here's what you'll need:
-Some basic tools, including hex keys/sockets
-Jack, jackstands
-The aforementioned block-off plate
-Some small vacuum line (read the write up, look at your car and figure out how much)
-Some proper, screw-types clamps, or zip ties if you got silicon vac line
-A vac T that'll fit the small vac line (very easy to find at cheapo auto part stores)
-Something to block off the hole left on the airbox (keep reading to see what I'm talking about)
-75Ohm resistor
-Soldering iron, solder, electrical tape, that kinda stuff...
-Some of these:
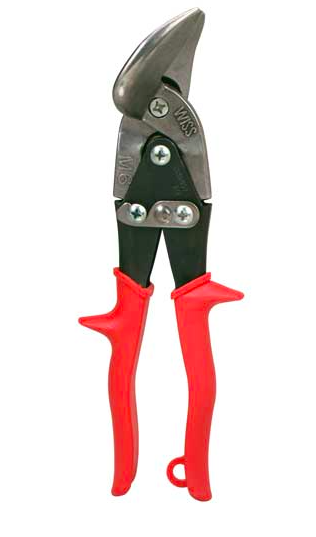
...For getting off some of those freaking one-time use clamps. You could get by without them, I guess, but for like, $15, why not save yourself the trouble? All your other lines are going to leak, so you'll see a lot more use from these guys if you buy them.
Here's the battle plan:
Looks simple enough, right? It's not so bad figuring out what you need to do, it's just tough to do it b/c of tight space. Unfortunately, due to that tight space, some the pics were impossible to take, so this isn't a picture-book write-up...
Prep your workspace by taking off the motor cover, airbox cover and all the plastic covering stuff around it.
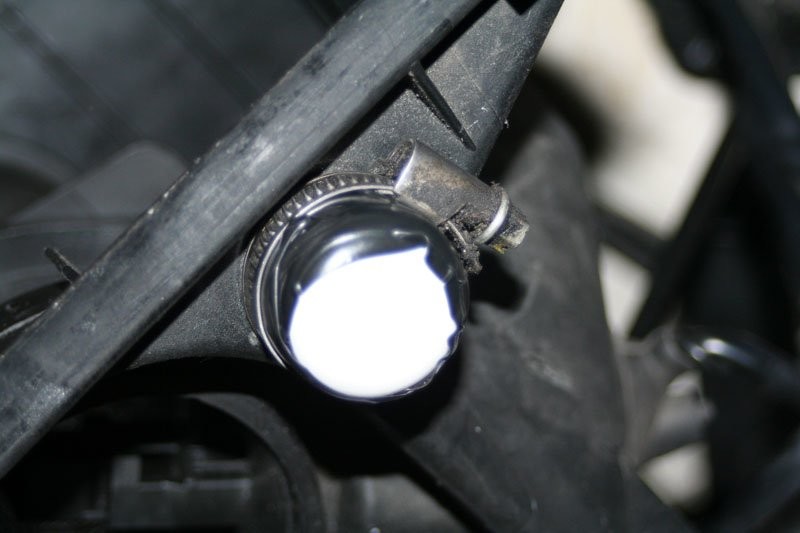
First order of business is to find the combi valve. I didn't get a great shot of it still in the car (I think Pentosinjunky was out when I took it out), but it's the round, shiny thing sitting right behind your motor, very hard to miss. It has two lines coming off of it: a small vacuum line towards the driver's side, and a metal tube towards the passenger side. Use a hexkey to take off the two bolts holding the tube to the left on, and then remove the two bolts holding the combi valve to its spot on the motor. Use those tin snips to remove the one-time-use clamp from the vacuum line, and take the sucker off. Here's what it looks like when the combi valve is out:

Now, you'll notice that there's something under the combi valve. It looks like this:
Take it out! It's held in with three bolts. Clean up the area on your motor. While you're down there, look down to see if there's coolant all over the place. If there is, you'll need to replace your coolantflange. Else, let's continue.
Before installing the block off plate on your motor, which is relatively straight forward, know this: the shiny, pretty pretty bolts that come with the plate are far from the quality of the galvanized Audi OEM bolts. If you cross thread the bolt, or if it gets stuck, like in my case, you'll end up with this:
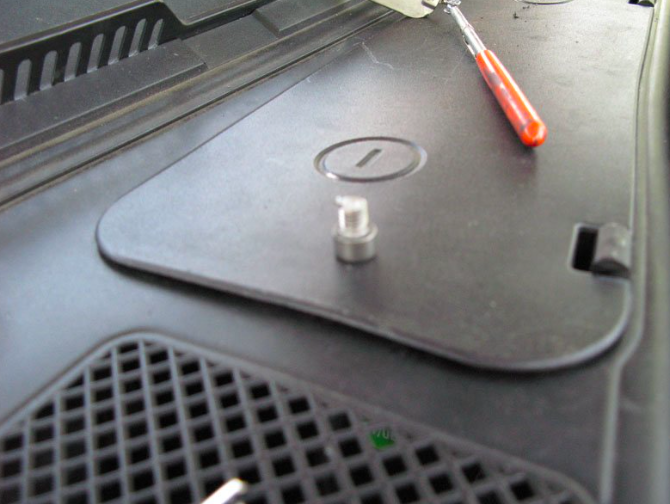
Happened to me. Can't exactly drill the bolt back out or anything... So I installed it like such, with the remaining good bolt:
And then I lined the perimeter of the block off plate with JB Weld. It's been quite a number of weeks since doing this, and the JB Weld has held up well. See my coolant leak?
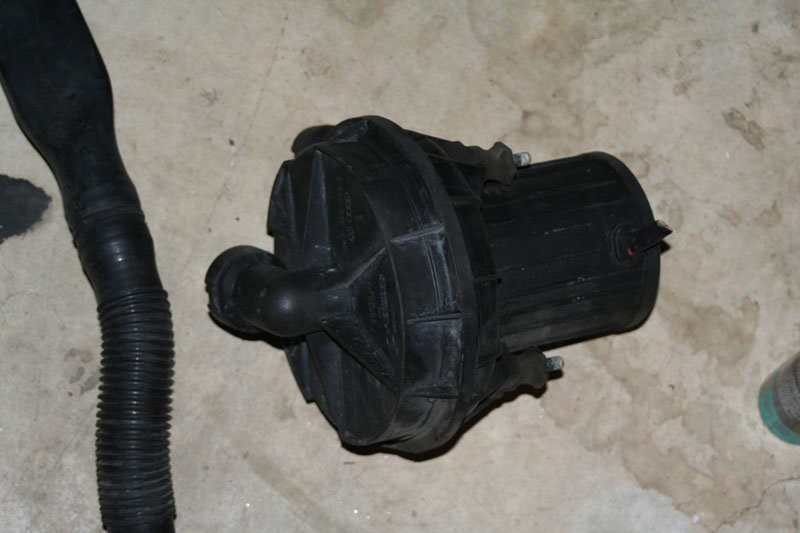
Next up, remove the SAI pump. Jack the front of the car up, put it on jackstands, drop the belly pan and get under the front of the car, looking right behind the passenger side foglight. You'll see this ugly thing:

Detach the two, crappy, cheap, ugly plastic hoses coming off of it (how the heck did those things ever work in the first place?), and the electical connection. Doesn't matter if you damage the hoses or not (unless you plan on going back to stock or something), but don't damage the electrical connector! On the pump side, clip off the connector, giving yourself a few inches of free wire.
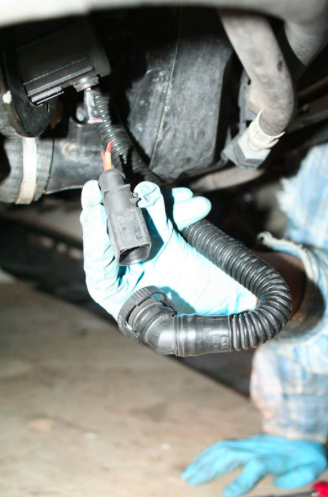
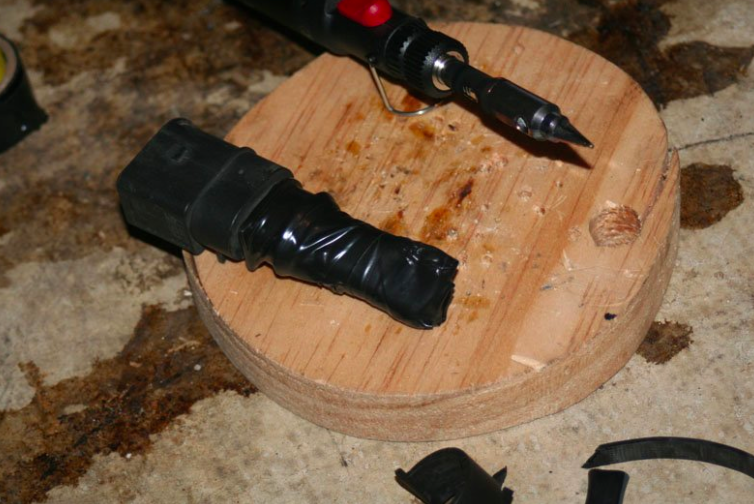
Strip the wire on the connector, and attach the 75Ohm resistor to it.
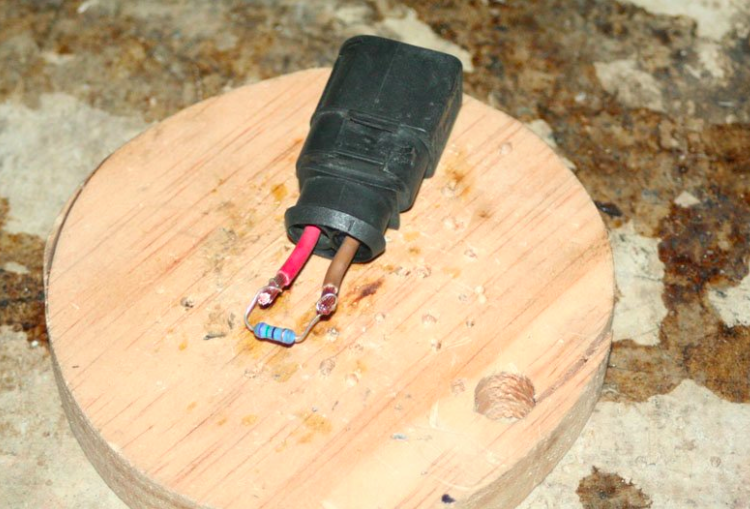
Solder it on, and then tape it up nicely.
Set it aside for the moment...
Now, freeing the SAI pump isn't the easiest thing in the world. There're three bolts holding it on. The bottom two are easy enough, but getting to the top one is tricky. I (if I remember right), ended up taking the foglight grille out and sticking my hand through there to reach. You don't need to take the whole bumper off. Taking off the lower trim, though, helps a whole lot. Somebody claimed that you can remove the bracket that held the pump in place. Well, maybe on his car, but not on mine. It is attached to some other stuff... Look around for yourself. You could cut it, but I just left it, since it's not in the way of anything. Getting the pump out of the bracket can be tricky, so cutting it may not be a bad option. I had to push the bracket towards the bumper in order to yank the pump out of it... No pics, sorry!
Attach the resistor-connector-thinger-thing that you made back on the car-side connector. Zip tie it up, duct tape it up or something. It's kinda like letting your junk dangle next to a giant, unenclosed fan. You wanna secure it, ya know?

Now... Free your airbox. It's being held captive by a matrix of connections... Free... Your.... Airbox....
Also, remove the heatshield next to it. That thing'll get in the way later.
Now, see the smaller hole?
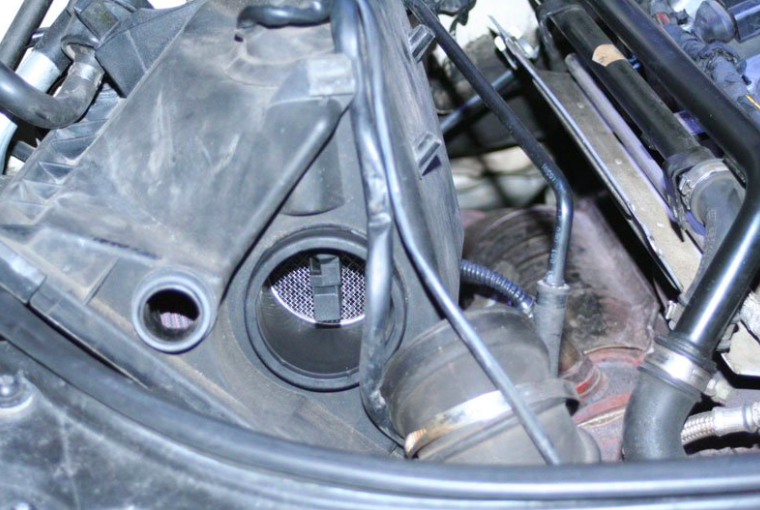
The hose that was connected to that was also connected to the SAI pump. Well, not anymore. It should be free... Yank it out, and set it next the SAI pump.
...But now look what you did! You've got a hole in your airbox. Whatcha gonna do about it? Here's what I did, thanks to a trip to Wal-Mart by Pentosinjunky:
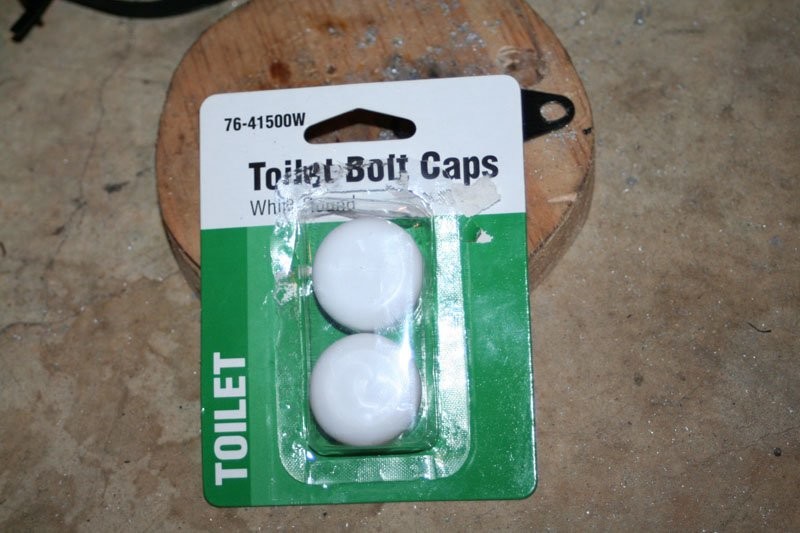
It took some Dremelling to make it fit. I put some gasket-maker (just b/c I had a lot extra lying in my toolbox) around the cap as a seal. And then I electrical taped it. And then I clamped it.
But, you know... Do what you want... It's only post-air filter and your MAF is only RIGHT NEXT TO IT, so you know... :P
Yarp.
You can put your airbox back together if you want... Don't attach all the crap to it quite yet, though. Just close it over the air filter and clamp it down.
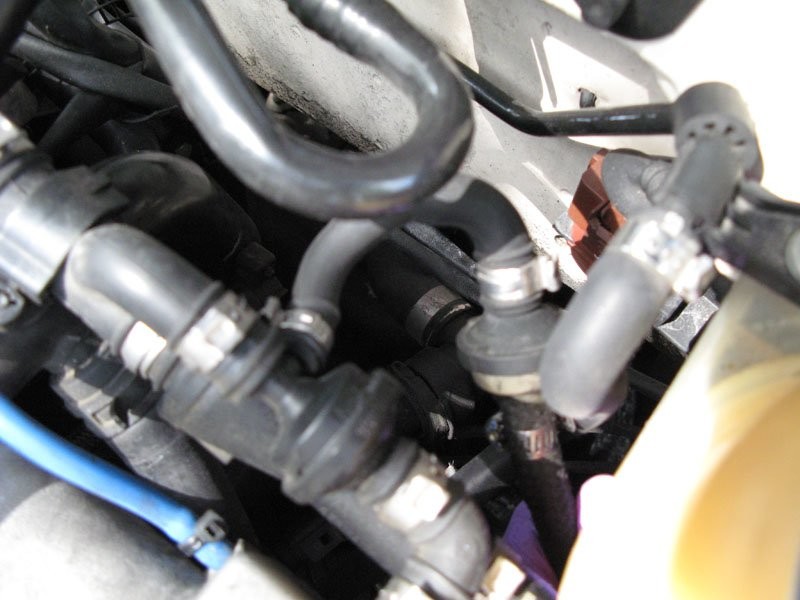
Now... Back to that other hose that was coming off of the SAI pump. Well, only half of it is crappy. The other half... Is you know, connected to that metal pipe that was on the combi valve. I don't quite get why Audi would do something like that... It's like, using aluminum foil as the last section of your exhaust or something. Anyways... This one is quite a pain to get off. You'll have to free it up starting from the mounts on the motor. They're right there, in plain sight...
However, there's also two bolts holding the metal pipe halfway down to the SAI pump. These are a pain. You pretty much have to do them blind. They're in this pic, but hard to make out:
...Sorry... :P
Once it's freed up, feed the mess through to the bottom of the car and pull it out. Stack the hoses and the SAI pump in a little pile...
...And light them on fire, and do an African mating dance... Or chain it to the back of your car and drag it for 400 miles. Or put on some latex gloves, drill holes in them while explaining why you couldn't get in to med school and then dissect them, eyes still open... Or...
...Sorry... :P
Ok. Well, good news is you're about half-way done. Bad news is, there's lots more blind work to be done. Very blind. B/c good pics are like, impossible to take for this procedure.
Refer back to the battle plan:
The first thing you'll want to do is get the N112 and N249 (the SAI solenoids) out from under the intake mani. You could leave them on and do all this stuff, but trust me, it's a lot easier getting them free first. There're two hex bolts that hold each solenoid to the plate under the intake mani. Cut off all the one-time use clamps, and CAREFULLY pull off all the hoses. The connections going from the solenoids to the driver's side hoses are metal, but the other two are plastic and very fragile. People break them, and break them easy. This is a big reason why you should use those tin-snips to remove the one-time use clamps... Use pliers/a screwdriver, and you'll probably break a nipple off (not yours, on the solenoid). Carefully detach the electrical connections from the valves. There's a metal clip that you remove first with some needle-nose pliers, and then the connector slides right off.
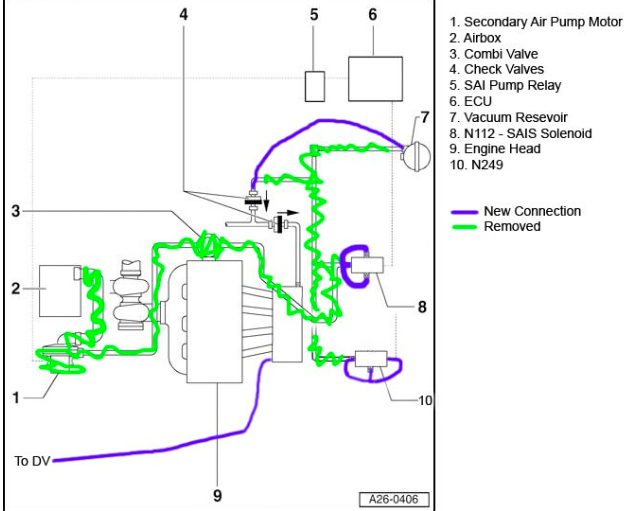
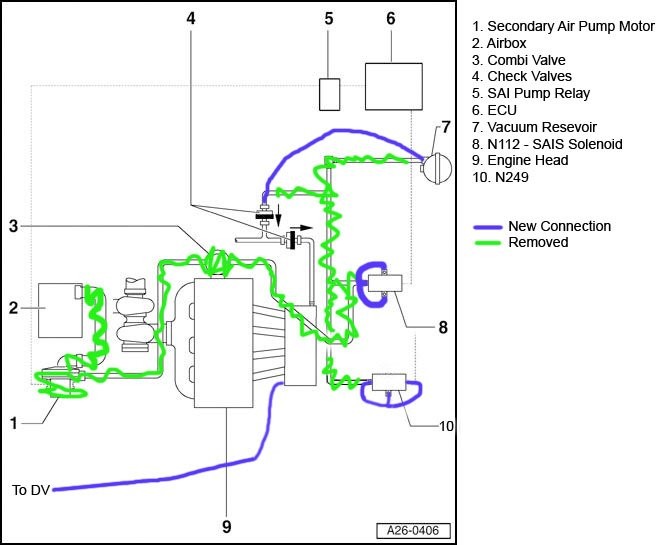
Now when you're done, you can take some small vac line, the T, and make the N112 and the N249 look like this, like in the plumbing diagram:

This is probably not necessary. I did it for one reason - if I ever need to use these things again, the tubing will keep the nipples clean. And b/c it's all routed back to itself, you won't risk blowing off a cap or damaging the solenoid.
Put zip-ties/clamps on the connections, if you want. The N112/N249 aren't going to be doing too much, so I didn't bother. :P
You can put the N249 and N112 back on the car and reconnect the electrical connector thingy-things.
So, go back to the front of your engine, and run a small vac line between the nipple on the intake mani and the DV. I put a T on it that goes to my boost gauge. It looks like this:
Now... Your F-hose should be freed up, except for one point... Follow it to that point. From here, what I did was clip the tube right after the right-angle connector direcly below #5 on the diagram, and placed that free end on the left-most check valve (#4). After doing so, the F-hose and the vac lines to the N112, N249 and combi valve should all be free. Take it out!
Here's what'll be left in place:
And uh... Yeah. That's pretty much it. Clear your codes w/VAG-COM, b/c if you did this, you probably have a bunch. Put reconnect all the airbox stuff, put all the covers back on, and say goodbye to the Dirt-Devil sound when you turn your car on.
If you've got improvements, comments, questions or better pictures, let me know and I'll edit the write up some.
And my apologies for my dry humor... :P
1. I'm pretty poor right now...
2. It saves some weight and makes room in the engine bay.
3. Reliability... It removes a lot of points of failure.
4. I've developed a serious erffing hatred for the system... It's cost me probably around a grand in trips to the shop, replacing other parts due to its malfunctioning, replacing the solenoids, O2 sensors from running rich, etc. After picking and hunting at leaks and problems, it was best to just take it all out.