You must be logged in to rate content!
11 minute read
EMERGENCY HOOD RELEASE PROCEDURE
Compliments of Bill Prince @ thelincolnforum.net
9-10-2008
The dreaded event happened!
The hood release cable broke on my 1961 Lincoln Convertible.
Fortunately, I had a 1961 Sedan to look at so as to fiqure it out.
This procedure will make the opening of a locked hood fast and easy in an emergency.
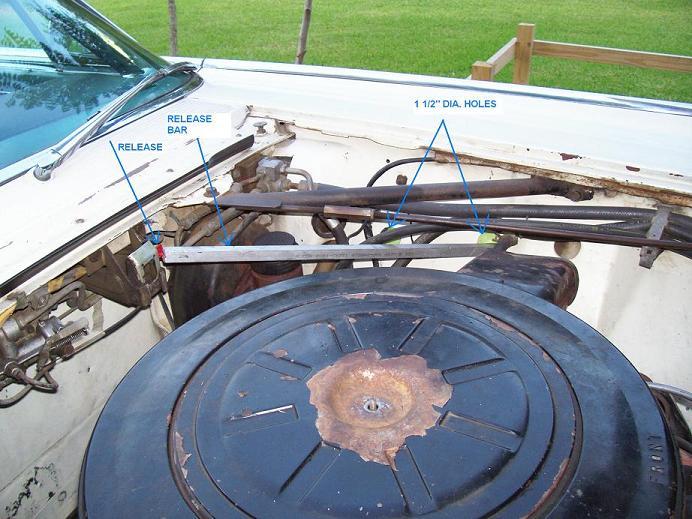
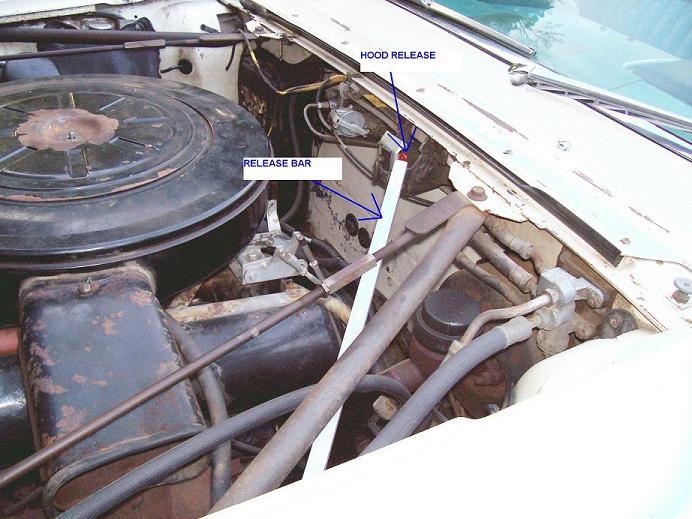
Here is what I did. Please note that this will not work if you want your car to be 1000% correct since I made a modification to my car. I am pleased with it myself however since my cars are not point cars. See the photos for exactly what end result looks like. I drilled 2 holes in the inner fender. Each being 1 1/2" diameter. I used a bi-metal circle cutter in an electric drill. I made a pilot hole first and then the 1/4" drill (in the circle cutter) and then the full 1 1/2" diameter hole. I drilled two holes, however (as I found out later), you can drill just one hole. The one in the picture, with the aluminum bar going through it, is the only one needed. The second might make the hood releasing a little easier. The 1 1/2" diameter size is large enough to let you see the release latch with a flashlight. I also painted the release latch, that has the cable attached to, RED so that I could see it the next time this happens. I made a release bar out of 1/2" x 1/2" square aluminum. I cut a V notch in the working end with a hack saw. The V notch is for engaging the bottom of the release lever (where the cable is attached). This allows the bar to be pushed againt the release lever and NOT slide up and off of it before it is depressed, thereby releasing the hood prong and opening the hood. I used the second hole for my flashlight so that I could guide the release bar into position on the red release lever. I did not have the lever painted RED for the first time opening of the hood since I could not get into the hood of course. I did all of this work with the car jacked up at the front drivers side so that the tire just barely was off the ground. The next time, as I found out by checking after I had opened the hood, I will be able to open the hood without jacking the car up. I can now release the hood in an emergency with in a couple of minutes using my release bar, which will be kept in the car. Only modification is the hole, which can be covered with a removeable plate and the RED paint on the little release lever. I made my release bar 44" long. It can be as short as 36" as I show in the pictures. Note: The placement of the holes needs to be such that they do not interfere with any hoses/wires or screws. I plan on doing this to my 1961 Sedan so that when the day comes that the hood does not open, I can open it with ease. Easier to do before the event, as a precautionary measure.
I have no idea if this has been done before, so forgive me if it is old news. I did not do a search.

You are right, it was a lot of work to get the hood opened the way I did it. And I did think of puting a secondary cable in place.
HOWEVER, since I had bought the car only a few days before the cable broke and could not get into the engine compartment, the secondary cable was not an option at this point.
I still have to find a cable to replace the original with. I don't know how I will do this. Let me know if you have some information on finding a cable to use. Now that I have a secondary way of opening the hood I may not put a secondary cable on the convertible. I am not sure about what I will do on the sedan. Since every thing is done as for as selecting the hole size and position and I have the realease bar made, all I have to do is drill one hole which will only take a few minutes.
2-18-2013
I MADE SOME CHANGES TO MY PROCEDURE, BUT DID NOT POST THEM UNTIL NOW.
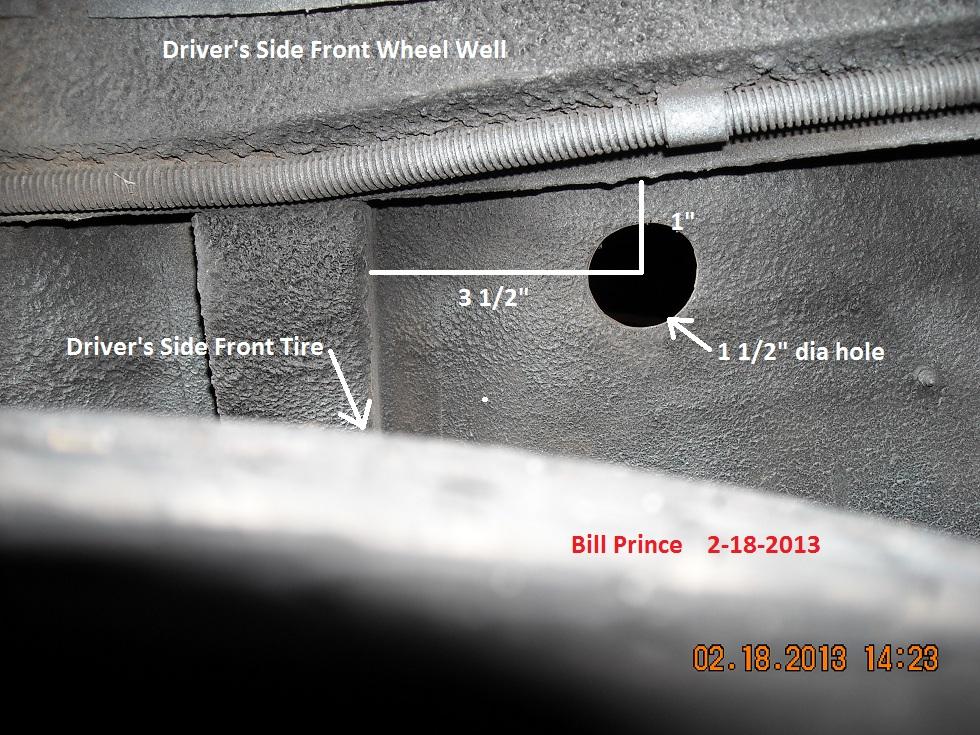
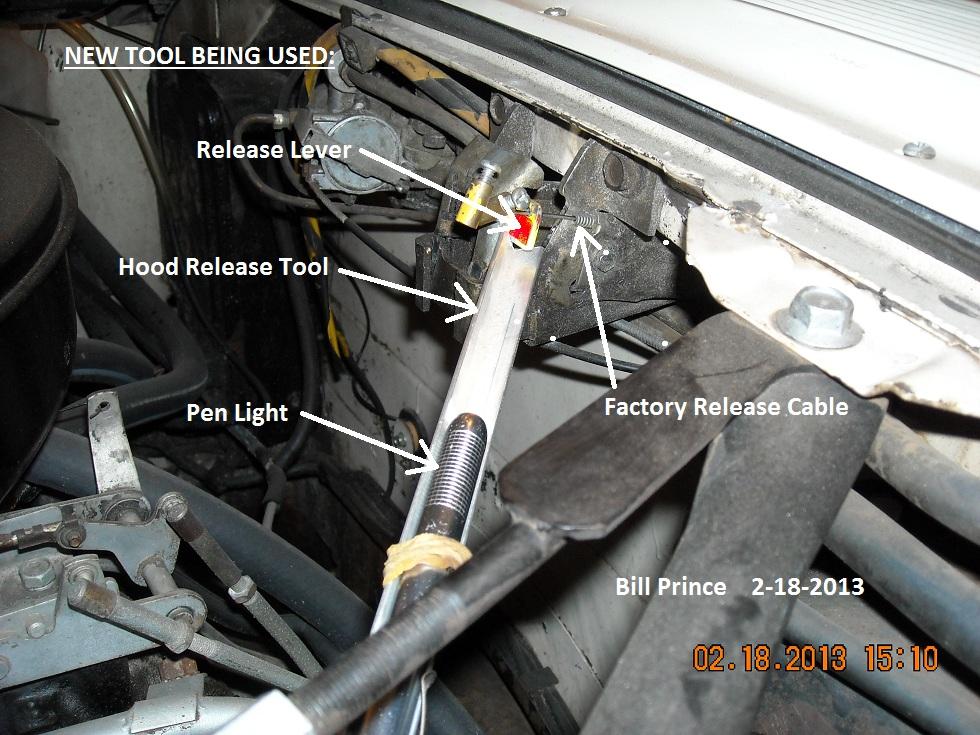
I DESIGNED A NEW TOOL FOR THE EMERGENCY OPENING OF THE HOOD. IT IS MADE OUT OF 1/2" X 1/2" X 1/16" ALUMINUM ANGLE THAT IS 38" LONG. IT IS VERY LIGHT, EASIER TO USE, ABLE TO ATTACH A LIGHT TO IT, AND MOST OF ALL IT IS VERY EASY TO US THE "V" OF THE ANGLE TO ENGAGE THE HOOD RELEASE LEVER (THAT IS NORMALLY PULLED BY THE HOOD RELEASE CABLE).
I ATTACHED AN "ENERGIZER" PEN LIGHT WITH A RUBBER BAND TO THE "V" OF THE ANGLE CLOSE TO THE BUSINESS END OF THE TOOL. WHEN THE LIGHT IS TURNED ON AND INSERTED INTO THE 1 1/2" ACCESS HOLE IN THE DRIVER'S SIDE WHEEL WELL, IT IS EASY TO SEE THE LEVER AND ENGAGE IT SO THAT YOU CAN PUSH THE LEVER - THEREBY RELEASING THE HOOD. I ALSO ONLY USE "ONE" ACCESS HOLE IN THE FENDER WELL. ON MY PREVIOUS PHOTOS, IT IS THE ONE CLOSER TO THE FRONT OF THE CAR. THE SECOND HOLE IS NOT NEEDED WITH THE NEW TOOL, WHICH HAS A LIGHT. IT HELPS TO PAINT THE LEVER A BRIGHT COLOR OR INSTALL A SMALL STICK ON REFLECTOR MATERIAL TO THE LEVER - SO THAT THE TOOL LIGHT "LIGHTS UP" THE LEVER. OTHERWISE IT IS A LITTLE HARD TO SEE IF YOU HAVE THE TOOL ON THE LEVER OR SOMETHING ELSE.
I HOPE THIS HELPS SOMEONE SOMEDAY. THE TOOL IS EASY TO PLACE UNDER THE FRONT SEAT OF THE CAR. IT IS LIKE HAVING AN EXTRA KEY HIDDEN ON THE CAR. WHEN YOU NEED IT, YOU WILL BE VERY GLAD THAT YOU HAVE IT!
NOTE: A SECOND BACKUP CABLE IS FINE, BUT THIS TOOL DOES NOT RELY ON ANOTHER CABLE - IT IS FOOL PROOF. I WAS NOT ABLE TO RUN A NEW CABLE THROUGH THE FIREWALL OR IN THE OLD CABLE SHEATHING. INSTEAD, I INSTALLED A NEW CABLE, WITH THE RELEASE IN THE DRIVERS WHEEL WELL, WHERE IT IS EASY TO ACCESS, BUT HIDDEN.

PLACEMENT OF THE SINGLE 1 1/2" DIA. HOLE FOR EMERGENCY HOOD RELEASE TOOL ACCESS:
NOTE: MAKE SURE THERE IS CLEARANCE FROM ITEMS IN THE ENGINE COMPARTMENT BEFORE DRILLING THE HOLE.
DE-BURR HOLE AND PAINT EDGES TO PREVENT RUST.
NEW TOOL BEING USED. NOTE THAT THE "V" OF THE ANGLE ENGAGES THE LEVER IN A WAY THAT IT WILL NOT SLIP OFF.
11-24-2013
First of all, I am not sure if the 1966 (which is a different body than the 1961) has a single latch in the center of the hood by the windshield or if it has two - one on each edge of the hood like a 1960 Thunderbird has. I would think that is has only one in the center. Frozen can mean different things. The hood release cable can be stuck or broke, and that can be deemed frozen. Or, the latch can be broken stuck. Or both!
It would be hell to get under the car to try to find a way to reach up into the engine compartment so that the latch could be released. My guess is that my fix would be the best. Keep in mind that I am not looking at a 1966 engine compartment to be sure. The best thing to do is to look at another 1966 that has a working hood. You wold then have to determine the position of an access hole to be drilled that would allow you to insert the hood opening stick through and push against the latch. Drilling the access hole and making a release stick like mine is rather simple. I don't think there is a magic way to get the hood open. I tell you, when my hood release cable broke and I was able to pull it all the way out of the cable sheathing, it was an OMG moment! Fortunately I had another 1961 setting next to it with a working hood release for me to look at. You may only have to jack up the driver's front of the car to have access to the inner fender well so that you can drill a hole - then push on release stick to open the hood. Actually it is rather easy. Again, you will have to look at a 1966 to see what the deal is.
I assume you are aware that the hood hinges are in the front of the car - so the hood opens backwards.
The trunk opens like a normal car - from the rear, with hinges by the rear window. The exception is the 4 dr convertibles, in which the trunk lid (also referred to as the deck lid) opens by hydraulic power to the rear - with hinges being by the rear bumper.
These cars are heavy and complex (the hood release is only the tip of the iceberg), being the opposite of a simple antique Mustang - however they are designed and built much more expensively and are very sharp looking cars. They are also rather inexpensive as compared to most other antique cars - so you get a lot of bang for the buck, as long as you can deal with the repairs. I sometimes like a challenge, so they can be fun restore, drive, show, and enjoy - they get a lot of attention as well.
You can have a locksmith "Key" the trunk lock if needed. That means that they can cut a key to work the lock, by doing some manipulating and small incremental filing of the key blank. I had to have this done on my sedan, since I lost the original keys. I still can not believe that I did that!!! I watched him very closely, and sort of learned how to do it. I had some small files already, and bought a good magnifying glass to try it myself. I did not have a key for the glove box on my convertible (it was unlocked however). I was actually successful at "keying' the lock. I went to an independent hardware store, where they had old Ford key blanks (the same as Lincoln, but a different head). I was surprised that I was able to do it. Rather hard to do - you have to develop an eye for where to file.
12-10-2013
I have thought about that myself and thought that there was some ideas stated here in the past -however:
There could be several reasons including the fact that if the safety latch was placed on the driver's side, there would be the possibility that you would hit your head on the protruding latch when checking the power steering fluid level.
Also, most of the fluid levels that are usually checked are on the passenger side, including: Oil, Trans, Radiator, and battery. Even the fuse box.
I think these were the reasons.
However there is maybe a residual reason: If you pull over on the side of the road, you will have to immediately walk off of the active road to the shoulder side of the road to unlatch the hood - taking you out of the way of passing traffic.
Of course, just opening the hood at a car show is a hassle - but the cars were never at car shows when new.