You must be logged in to rate content!
5 minute read

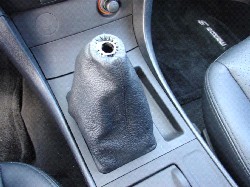
04+ MAZDA3 SHIFT BOOT INSTALLATION INSTRUCTIONS
1. Begin by removing the shift knob. This is threaded, and should screw right off.
2. Next, open the center console, and remove anything that might be in it.
3. Grab the front of the cover right in front of the center console, and gently tug upward.
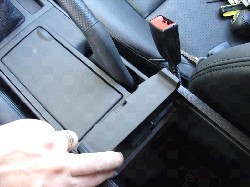
4. Continue to pull upward on the cover, sliding further and further toward the front over the car. The entire cover, including the cup holders, is held in place only by clips.
MANUAL CARS ONLY
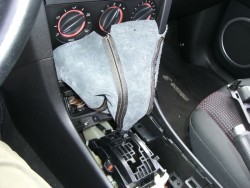
5. Once the cover is loose, remove it from the center console. You might need to turn it sideways to maneuver it around the parking brake.
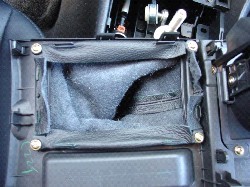
6. Once the cover is removed, flip it over. There are four Philips headed screws that need to be removed to remove the shift boot. Take these screws out, and the boot will come out (with the rectangular plastic holder).
AUTOMATIC CARS ONLY
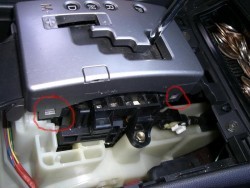
5. The silver piece has four clips, two on each side. Unclip.
5A. Turn boot inside out and place one or two zip ties on the end. Keep zip ties loose for now.
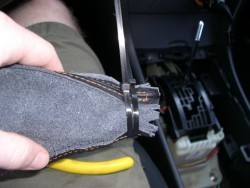
6. Put boot on upside down.
6B. Tighten zip ties and turn shift boot from inside out back to normal. It took me a while to get it just right. There isn't much room on the bottom of the boot so I didn't even bother securing it. It remains pretty snug when you place the console back together again.
MANUAL AND AUTOMATIC CONTINUED
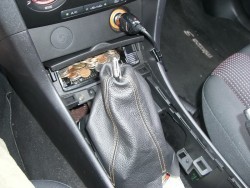
7. Slip the ebrake boot on.
8. Simply put the new boot in place and put everything back together. You will need to remove the top trim piece from the old boot and install it on the new one as well.
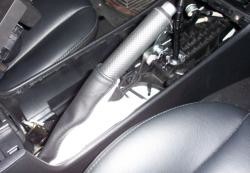
9. Finally, screw the shift knob back on.
INSTALLATION OF THE ARMREST COVER
1. Heat up the armrest with a hair-dryer on hi for 2-3 minutes. The leather will warm and become more stretchy, with an armrest this tight as on the Mazda3 it's very important to get as much stretch as you can.
Locate the front of the armrest cover and if applicable, insert the padding inside the cover placing it as far towards the front as possible.
2. Slip the armrest cover over the armrest starting in the front.
3. It is preferrable if you have a friend hold the elastic across the front to take out all the slack out of it while you work your way towards the back.
4. Grab the sides of the armrest at the bottom as you pull back (make sure you grab the bottom of the leather and not the elastic so you don't rip the sewing as you tug on it). As you pull back, the foam padding will slide backwards as well...make sure it does so just enough so that it clears the sliding armrest button and no more.
5. Work your way backwards slowly pushing down on the foam on top to get all the slack out as it will be a very tight fit at the back.
6. Grab one corner in the back pulling from the bottom of the leather and over the corner of the armrest...make sure the elastic is at least below the edge of the armrest.
7. Hold the corner that you just did against the armrest and with the other hand repeat step 6 for the other corner. In 6 & 7, if you encounter any difficulty, make sure you get rid of all the slack there is from the front to the back and try again.
8. Tuck the elastic edges hanging off the back under the armrest for both aesthetic purposes and for the sliding armrest (if applicable) to function properly.
ENJOY YOUR NEW LEATHER BOOTS!
Useful tip
You have installed a product made out of genuine leather. As you know, to maintain a leather product in good condition, you should take care of it. We suggest occasionally (every 4-6 week for example) applying some leather conditioner/UV protector to keep your leather from drying up in the sun and cracking.
Redline Automotive Accessories Corp. will not be held liable for any labor, incidental or consequential damages of any kind. Proceed at your own risk.