You must be logged in to rate content!
12 minute read
Custom Koni and Ground Control coilover setup assembly
Compliments of OptionZero @ http://zilvia.net
8-3-2009
Finally collected all the parts for a koni/ground control custom setup. . . and now that I finished taking the california bar exam, I have some time to mess with it.
There's a billion threads asking about what coilovers are best - from all I've heard from credible posters, this is the best possible setup. Comfort, adjustability, performance, price. The only thing that held me back was having to gather random parts and assemble, but now that I have all the parts and saw how it came together, it really wasn't that hard.
First off, parts checklist and pricing:
Fronts
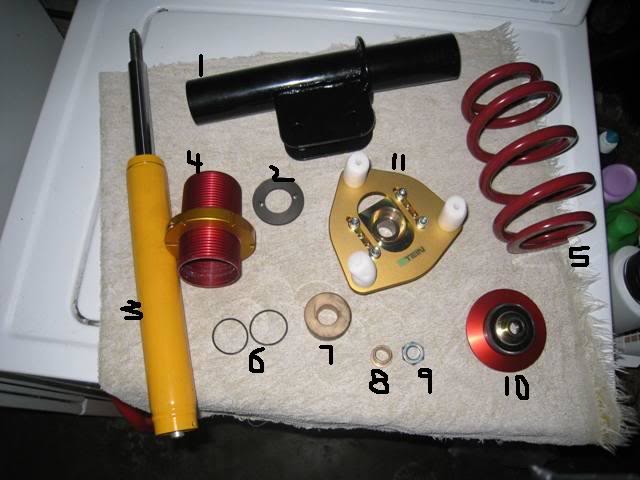
1. Custom housings - $375/pair
These are custom made by Veilside180sx (Richard) who posts here and on his website NissanRoadRacing.com They can be made for S13/S14 and optional z32 uprights in the rear. I believe he can do different colors.
2. Gland Nuts - (included in Veilside180sx's housings)
These secure the Koni inserts inside of the housing.
3. Koni 8611-1257 Race Insert - $299/each (2 needed)
The heart of the setup - infinitely adjustable (2.5 turns) rebound on top, 12-clicks of compression adjustment on the bottom. Purchased from Shox.com
4. Ground Control coilover sleeves ($399/set including springs)
Height adjustment of about 3 inches IIRC. Come with Eibach springs in any spring rate/height you want. When ordering tell them you have Konis to get the proper internal diameter (ID). They also include top mounts, but I didn't use the fronts. Purchased from Shox.com
5. Eibach springs (included in GCs)
I used 2.5inch internal diameter and 7inch height, with 450 lbs/in front and 350 lbs/in rear spring rates. Roughly 8/6 in kg/mm.
6. Rubber o-rings (included in GCs)
O-rings that go around the coilover housing between the GC sleeves to prevent the sleeves from rotating when using the perch adjustment.
7. Bumpstop (comes with Koni inserts)
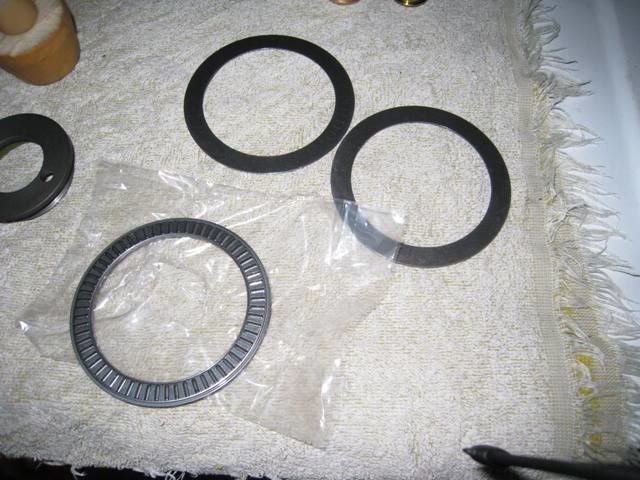
8. Flanged sleeve bearing (Mcmaster Part #6659K21) - $1.23/each, 4 needed
Required to center the Koni shaft within the Tein camber plate bearing. Flanged edge also serves as added surface area for the bearing to rest atop the Vorshlag top hat. Info: METRIC SAE 841 BRONZE FLANGED-SLEEVE BEARING, FOR 14 MM SHAFT DIAMETER, 18 MM OD, 14 MM LENGTH
EDIT: Get Mcmaster part #6658K22 instead. That is a non-flanged sleeve bearing, 14mm ID, 18mm OD, 18mm length.
9. Locking nut (comes with Konis)
Secures the top of the coilover assembly.
10. Vorshlag spring perch - $75/pair from
These go atop the spring and below the Tein camber plate. These spring perches include a sealed bearing. The Tein camber plate has a spherical bearing that allows the coilover to deflect, but it is not designed for rotational forces which occur when the coilover's working. The Vorshlag spring perch can support the weight of the car while allowing the components to rotate safely. Purchased from RRT
11. Tein Pillow Ball front Upper Mounts - $190-200 from anywhere basically
There are a number of camber plates that work, I just went with the tried and true Teins because they're easy to get and others have used them before. The measurements I refer to may differ from camber plate to camber plate, so beware.
Rears:
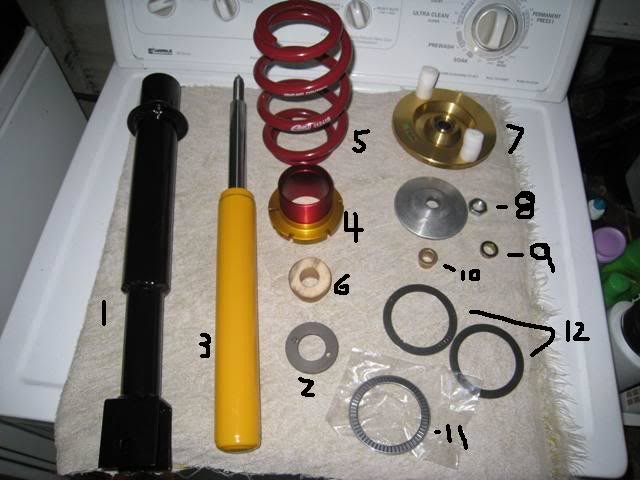
1. Custom housing
see above
2. Gland nut
see above
3. Koni 8610-1436 Race Insert - $199/each
Single adjustable for rebound only. You can use 8611's in the rear here as well, it's just another couple hundred bucks. Purchased from Shox.com
4. Ground control sleeve
See above
5. Eibach Spring
see above
6. Bumpstop
see above, comes with the Konis. Koni gives you 2 per set of inserts, but you only need 2. Because they are far too tall, I just cut them in half and use half on each corner.
7. Tein Pillowball Rear Upper Mounts- $160-$175
see above
8. Locking nut
Comes with the Konis.
9. Flanged bearing
This is an important piece - it's a small metal flanged bearing INCLUDED in the Vorshlag top hats used in front. Distinguish this from the other brass flanged bearing from McMaster (entry 8 in the fronts). This pieces will be used to space the rear tophat from the Tein upper mount. The internal diameter of this piece is 14mm, which is appropriate for the Koni shaft, but the OD is TOO BIG to fit within the tein upper mount. It therefore cannot function as a centering mechanism the way the brass bearing can.
EDIT: Get Mcmaster part #6658K22 instead. That is a non-flanged sleeve bearing, 14mm ID, 18mm OD, 18mm length.
10. Brass Flanged Sleeve bearing - $1.23.
I told you to order 4 of these above. This CAN fit inside the tein bearing and center the koni shaft. Purchase from Mcmaster.com
11. Torrington Bearing - $8.37/each
This is a needle and roller bearing. Combined with the housing pieces below, they will serve the same funtion as the Vorshlags, but for cheaper. You can use Vorshlags here if you wanna spring for it. The only difference is these are unsealed but cheaper. Order from Amazon.com HERE. You need 2.
12. Torrington Bearing Housings - $3.67
These will sandwich a Torrington bearing. Amazon listing here. You need 4.
. . .
Second, putting it all together
FRONTS
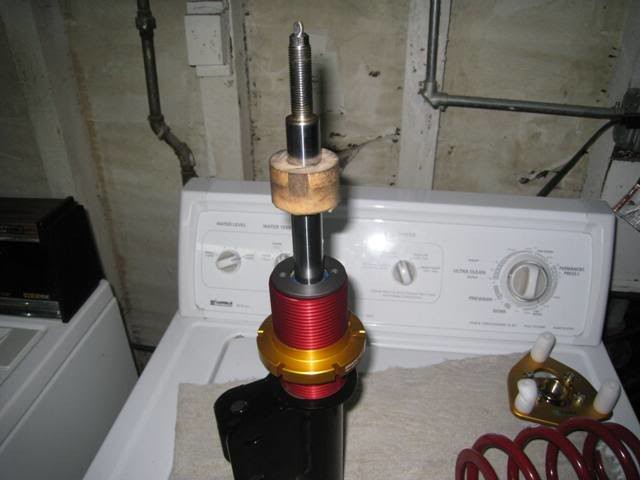
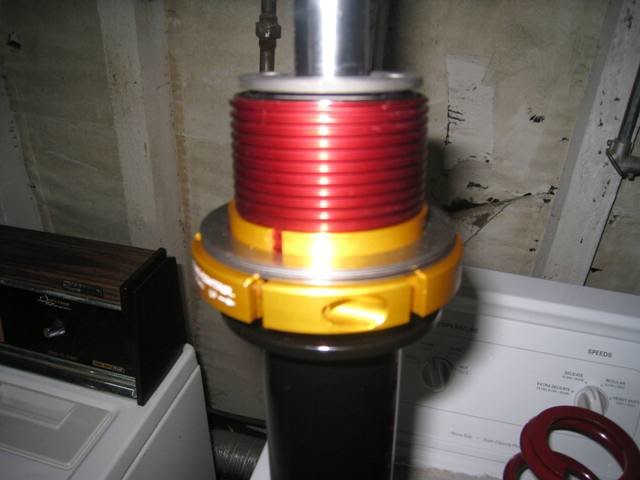
Step one:
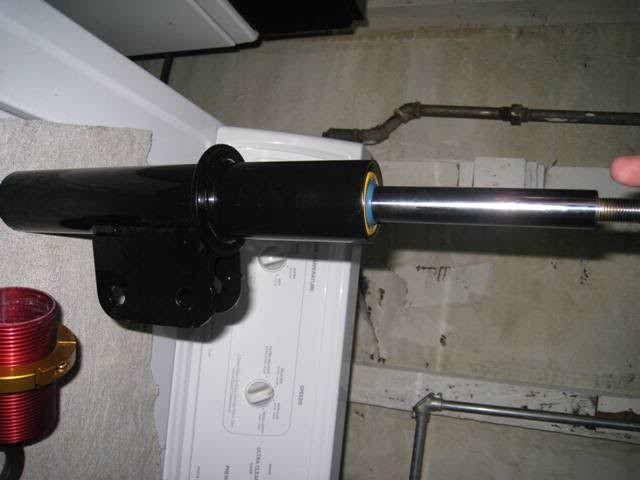
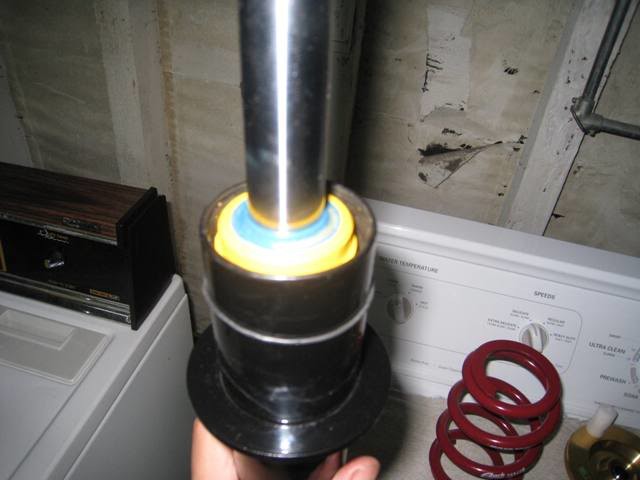
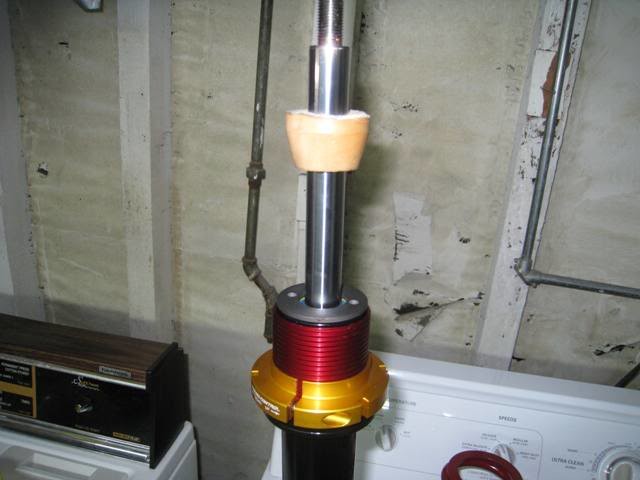
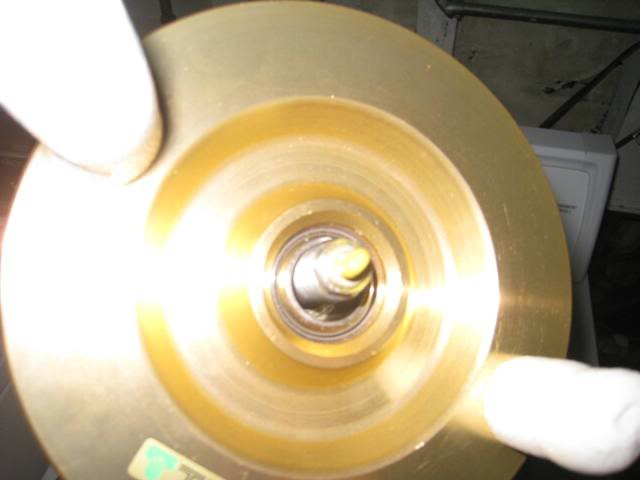
Put Koni 8611 insert into front housing. The bottom of the housing has a hole for the compression adjuster.
Step two:
Wrap a couple of the Ground Control-supplied rubber rings around the housing. These will prevent the sleeve from rotating through simple friction
Step three:
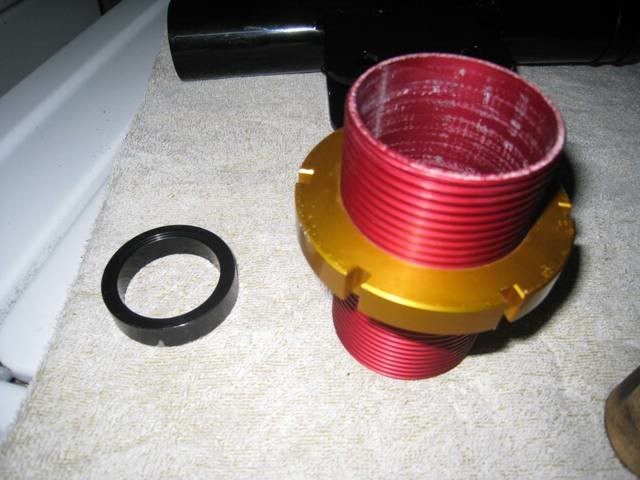
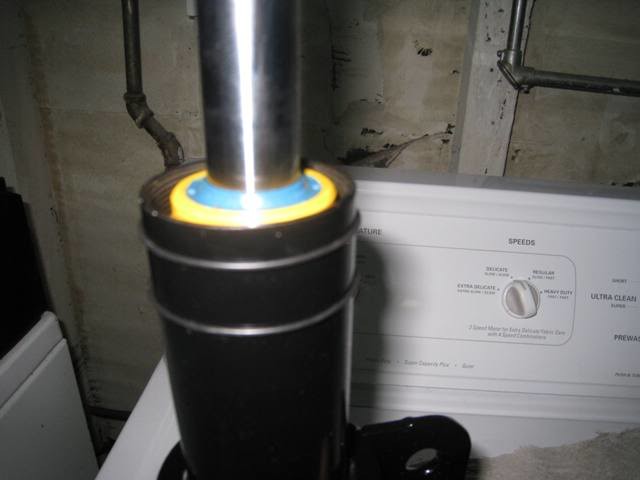
The front Ground control sleeves have this black ring on the inside. I'm not sure what it's for, but it prevents the sleeve from sliding all the way down the housing properly. I just punched it out. Be careful, it only slides out one way.
Step four:
Slip the Ground Control sleeve over the housing.
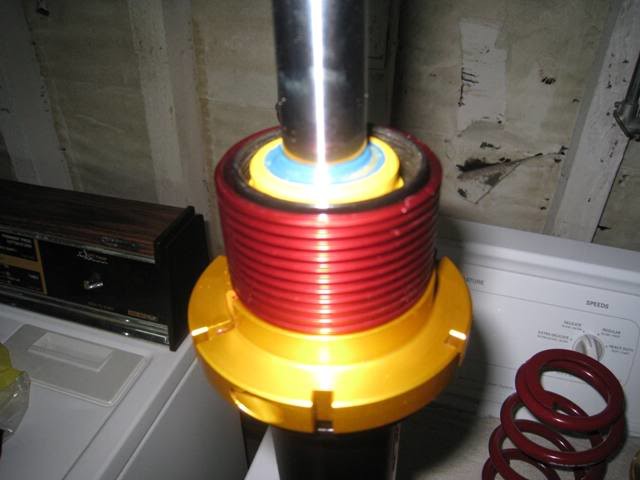
Step five:
Place the Veilside180sx-supplied gland nut above the housing, make sure its centered properly, and tighten it so the Koni insert is snug inside the housing. You should use threadlocker on this, you do not want it getting lose. I did not use the threadlocker yet because I am just test fitting everything. If i fuck up i want to be able to take it apart.
Step six:
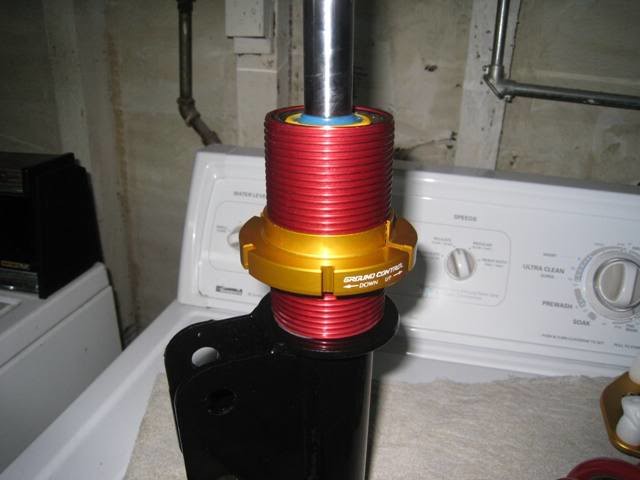
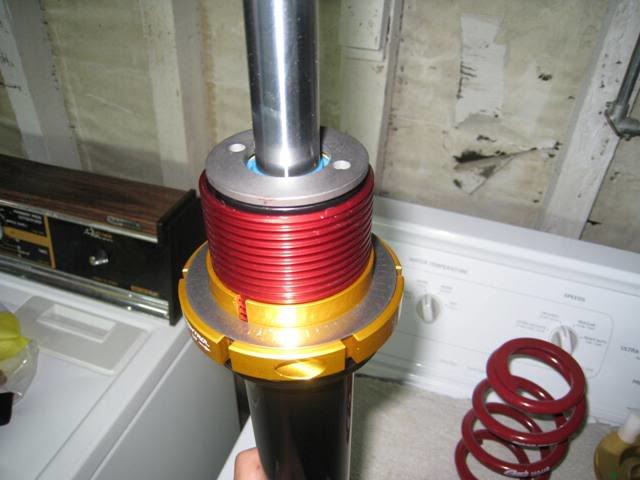
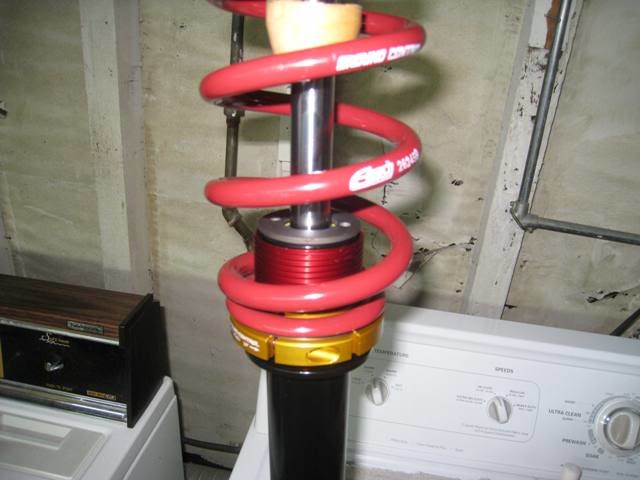
Take half a bumpstop (if you haven't yet, hack 'em in half) and slide it onto the shaft of the Koni insert.
Step seven:
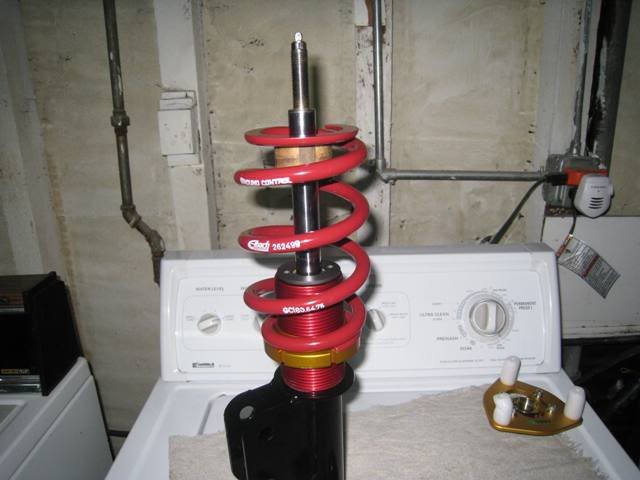
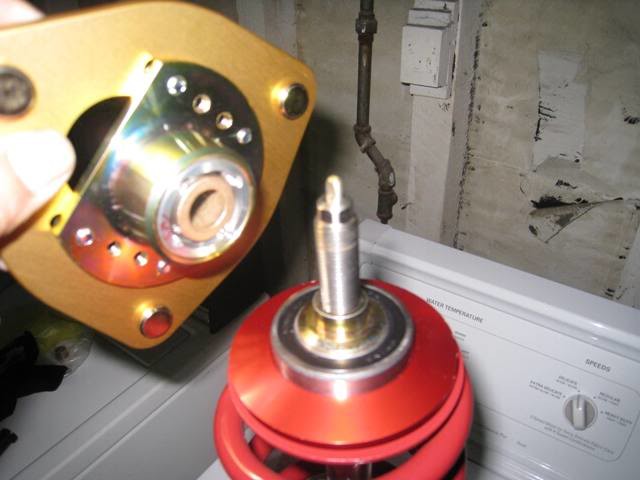
Mount the spring on top of the Ground Control perch.
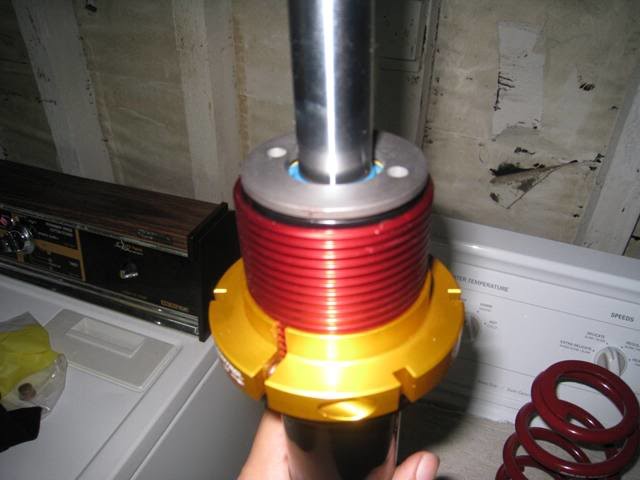
Step eight:
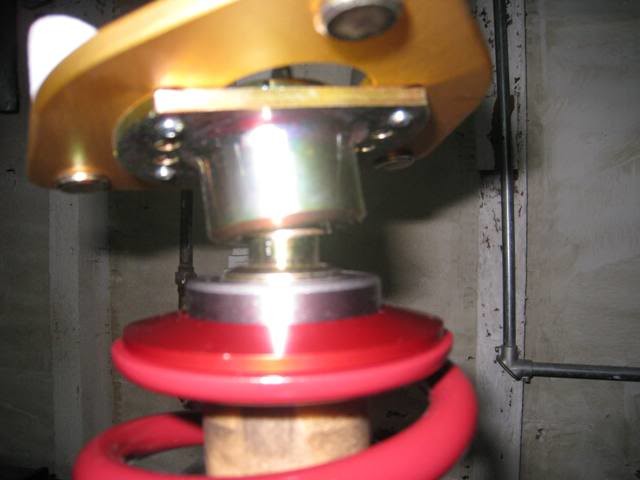
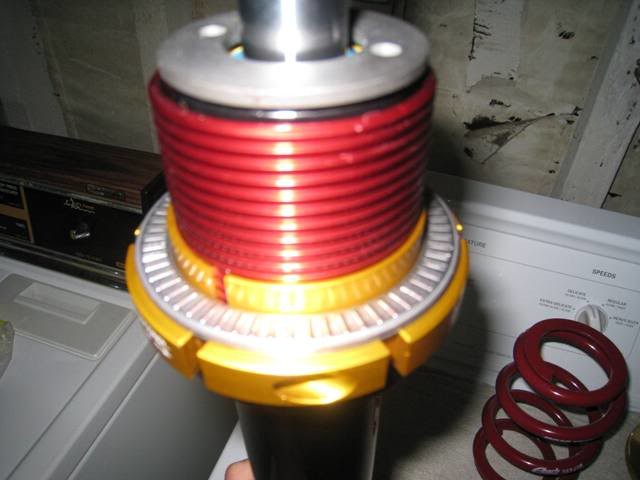
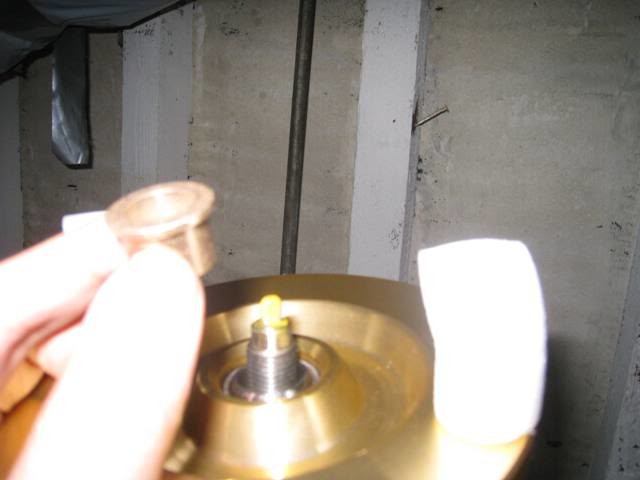
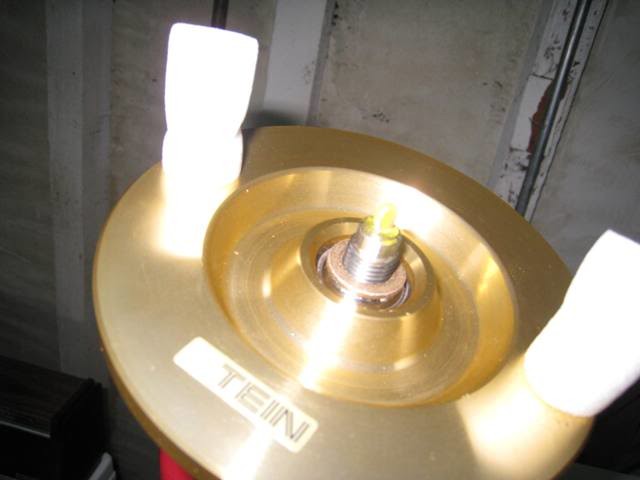
Put the Vorshlag top mount above the spring. The ID of the vorshlag piece is 14mm, so the Koni shaft goes right through it.
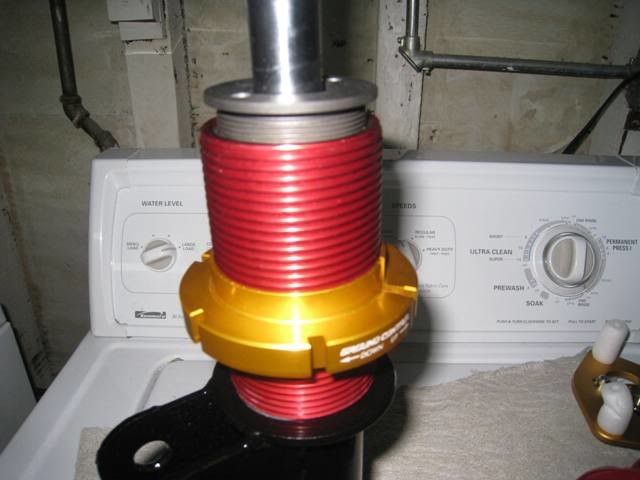
Step nine:
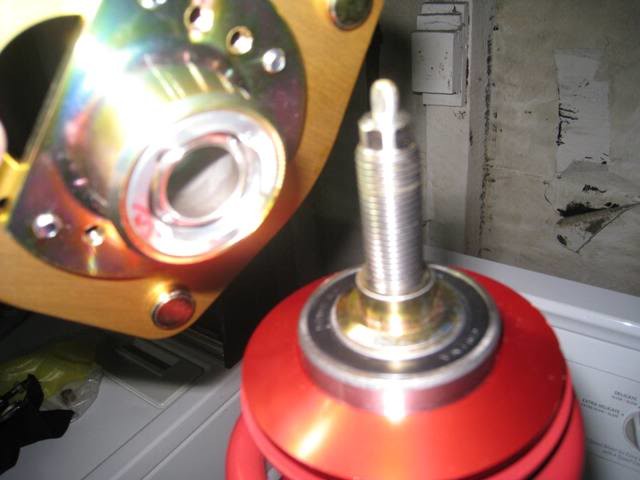
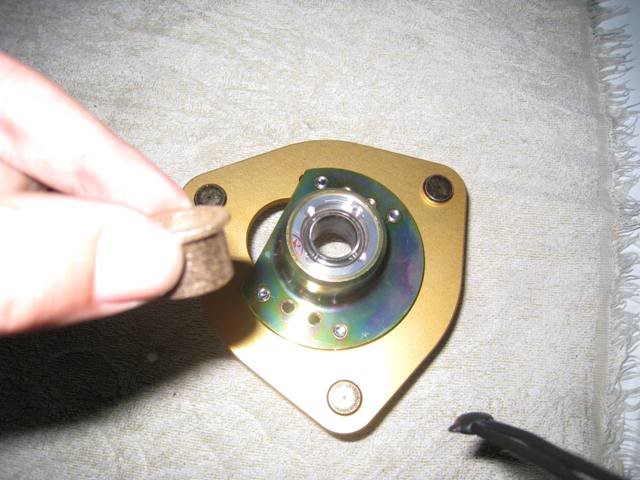
Put one of the flanged brass sleeve bearings inside the Tein spherical bearing. The pictures should show you why you need the bearing. With no brass piece, the rim of the Tein bearing is putting all of the weight on to the metal snout of the Vorshlag piece. With the brass piece, there is more surface area. The brass piece also centers the Koni shaft inside the Tein bearing.
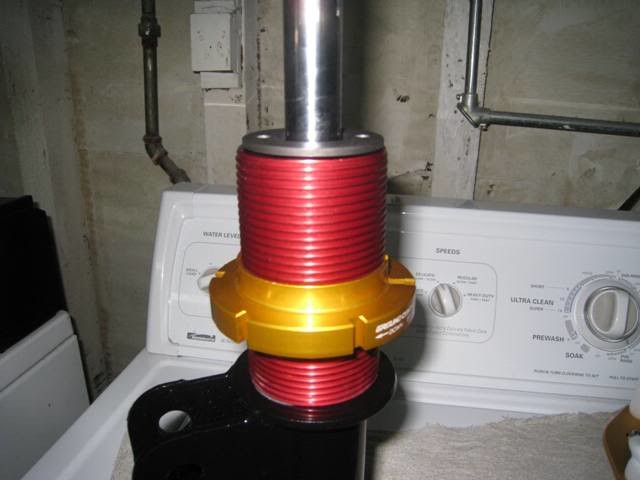
Step ten:
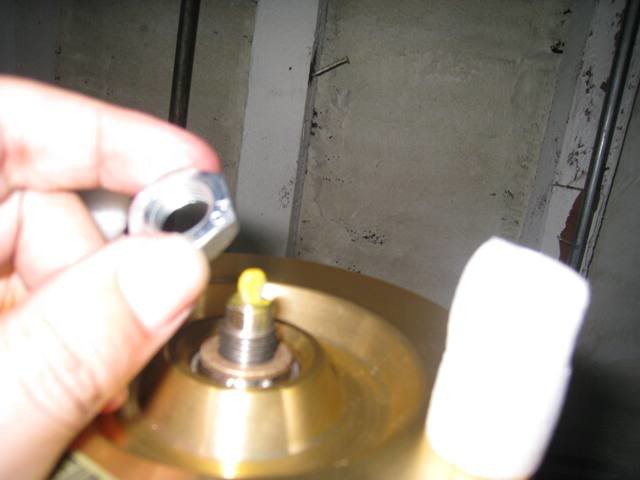
Thread the Koni-supplied nut onto the Koni shaft and tighten it up. This requires threadlocker as well. I believe Koni recommends 33 lbs/ft of torque. I'm not entirely sure what the best way to tighten it is. With a socket over the nut, I think you'd need some way to hold onto the Koni shaft. Def suggested carefully using vice grips to hold the shaft while you tighten the nut.
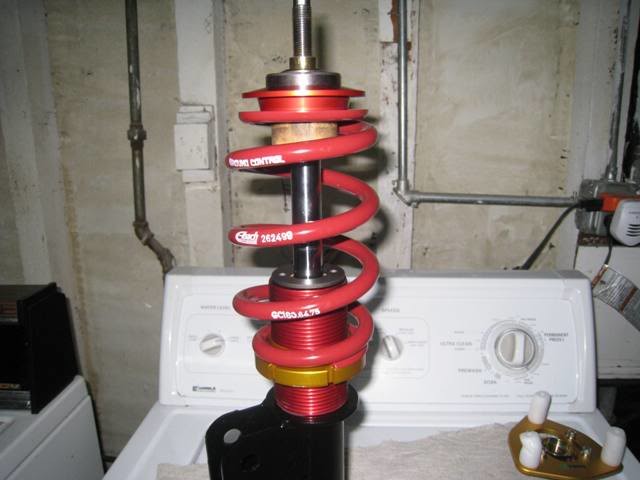
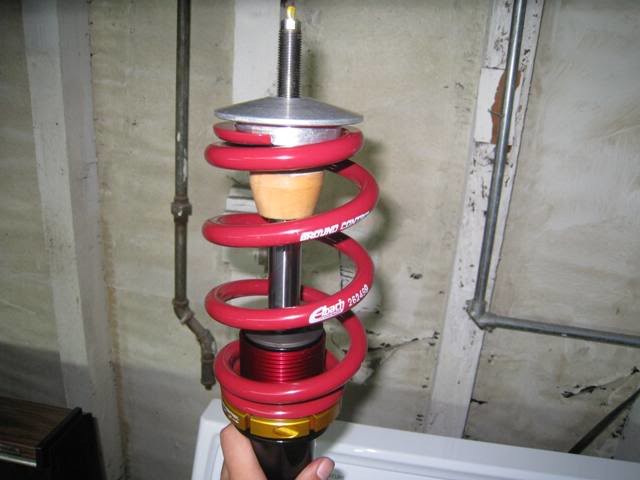
Here's a pic showing the articulation available:
REARS
Step one:

As before, drop the Koni insert into the housing. Wrap one of the GC-supplied rubber rings around the housing.
Step two:
Slide the ground control sleeve on.
Step three:
Thread the Veilside180sx-supplied gland nut onto the housing. Don't forget threadlocker.
Step four:
Bump stop goes on.
Step five:
Put one of the Torrington bearing housings on.
Step six:
Bearing itself goes next.
Step seven:
Top it off with another housing piece.
Step eight:
Spring
Step nine:
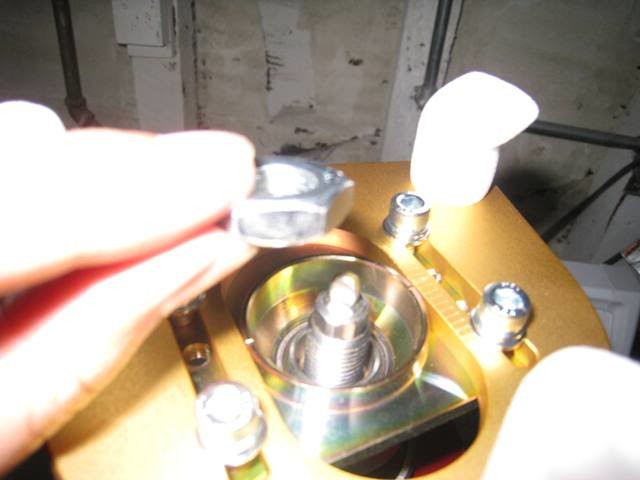
Shit, i forgot to mention it above. . . that silver piece is a top hat supplied by Ground Control. GC gives you four, I only used two since I have vorshlags in front. It has the proper ID for the Koni shaft (14mm)
Step ten:

Important point - put the flanged piece that comes with the VORSHLAG tophats above the ground control top hat. It has the proper ID for the Koni shaft, but as mentioned, it will not go inside the Tein bearing . . .but we don't want it to. This piece serves as a spacer between the GC tophat and the Tein bearing to there is room for the Tein camber plate to deflect.
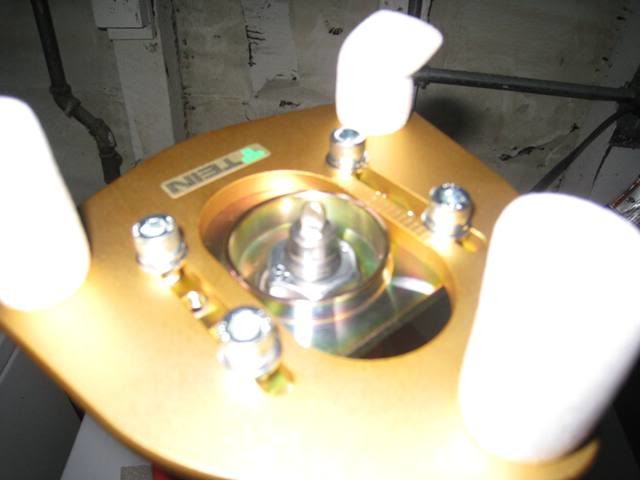
Step eleven:
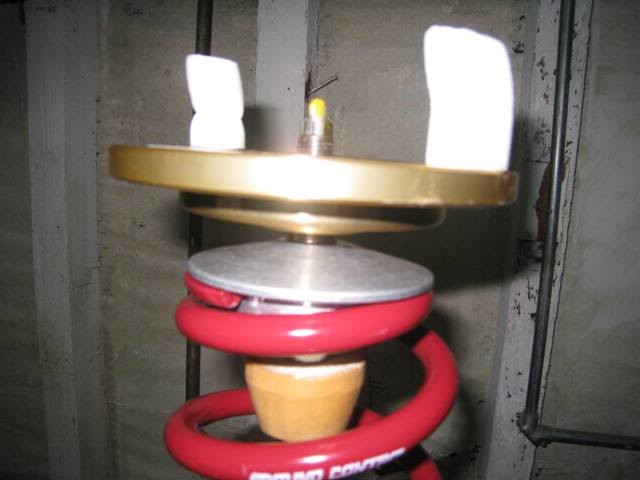
Put the Tein top mount on. As you can see in the second pic, the Koni shaft is not properly centered inside the bearing. We can't have that flopping around . . .
Step twelve:
This is where the brass flanged pieces come in handy. Insert it into the Tein bearing, and viola, the Koni shaft is centered.
Step thirteen:
Use the last Koni-nut to hold it all together. Threadlocker here as well.
Hope this explains it. If deemed useful, perhaps it can go into the Premieproject area or FAQ section.
And if i fucked up anything, please let me know asap.
Much love to veilside180sx, McCoy, Def, and anyone else I bugged.
Waiting for Def's z32 upright bearings so I can get all that stuff on my car.
11-11-2009
heads up for people putting the GC sleeves on
GC supplies some rubber bands that you wrote around the housing and create friction between the housing and the sleeve to hold it in place. Not the most technologically advanced system.
On one side, the rubber band has slid out of place so my sleeve is moving a bit. I don't think it's a huge problem, but I still have to get around to fixing it. I'd have to crack open the locking nut on top which means taking the whole thing off the car.
That and i need to get around to getting helper springs