You must be logged in to rate content!
13 minute(s) of a 731 minute read
6-13-2011
patrikman:
I spent the first 24 years of my life in WI and will always be a Wisconsinite. My goal is to have this thing ready to go for our week long road trip to Madison and Milwaukee for Katy Perry at Summerfest during the week of July 4th. I'm just worried there won't be enough storage space in the hatch to bring back extra Spotted Cow. :-(
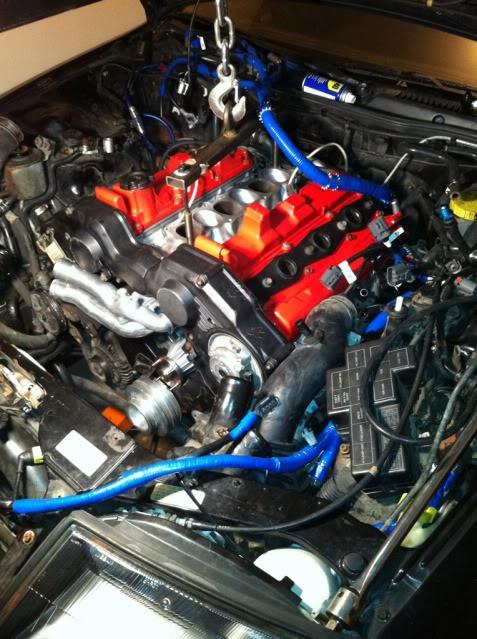
The motor is back in!!!!!!!!! :cheers:
I think I did a little work Friday night but don't remember what. Probably prep work.
Saturday after a late start my girlfriend and I started getting the motor ready to go in. I thought it would be pretty much ready to go, but there were a lot of little things.
Since I put the turbos on the oil return lines were always off by about 1/4" from the ports in the oil pan. After doing a little bit of reading I realized I needed to clock the turbos. This wasn't a big deal, except the drivers side turbo can't be clocked. It can, but it can't be moved in the direction it needs to because the stainless steel oil feed line gets in the way. The passenger side we clocked and it lines up fine. Does anyone think this will be a problem? I've got Z1 silicone oil return lines bridging the gap, but I have a feeling that this is something that will leak eventually. I'm also not really sure what to do about it.
I forgot one of the other big struggles Saturday was getting the AT pilot bushing out and putting a new MT bushing in. I got the AT bushing out by locking my channel locks onto the bushing, and driving a chisel into the gap between that and the crank. After maybe 2-3 minutes it was out. Relatively pain free and I was very proud of myself for coming up with a new method. I had heard that the bushing puller was kind of useless and didn't wanna make a trip for nothing. I didn't realize there was a MT bushing behind the auto one, so I used the same chisel which was about 1mm smaller in diameter than the bushing to cut it in half and pull it out. The whole process took maybe 20 minutes to remove both bushings, but it worked with simple tools I had on hand.
Putting the motor in was the easy part. Getting the accessories lined up...not so much. We worked for about 20 minutes on the power steering pump and couldn't get it in position. We skipped that and got the AC and alternator in place. Unfortunately when we pulled this apart she pulled the accessories off and now doesn't remember how it all went back together (this is why I usually like to do things myself) so it took a while to figure everything out.
I've got the pivot bolt in the alternator, but I'm not sure where the second bolt goes or how it holds tension on the belt. The AC is in place without much issue. Still cant get the power steering pump in place. Anyone have any suggestions? The FSM really isn't any help.
Sadly, everything mentioned above took about 6 hours. We worked until a little after 7pm and called it quits to take the dog on a walk and take Mal out to dinner.
Sunday I put the flywheel on and put new hose clamps on every line and hose I could find. Brand new Z1 oil cooler lines, silicone oil return lines, and silicone water lines for the turbos, and PCV hoses. I sure hope nothing leaks after all this.
As of right now I can't do a whole lot more until I figure out how to get the power steering pump on and until I get my outer water hose on the passenger side from Coz. I still have to put on my new injector connectors but I don't want to do that until the plenum is on so I don't make ANY mistakes. (Feel terrible cutting up a NEW OEM harness).
Things are still on track for getting it started this weekend...as long as that water pipe gets here mid-week sometime. Fingers crossed!

6/15/2011
Sadly no pics today.
I had a little time to kill after work yesterday so I hooked up the accordion pipes on the drivers side and my new silicone PCV hoses and etc. Non eventful. This time it took all of 30 seconds to get the power steering pump in place. I have no idea why it took over an hour to mess with it this weekend and still not figure it out. But I got it in place and the bolt to thread all the way to the back. Woot. After I realized I didn't have the adjustment bolts hooked up (and totally forgot how they went on) I had to go through the FSM page by page until I found a picture of how they should be setup. The FSM is TERRIBLE. How bout an index or something? Jebus.
After finding the pictures and hunting down my alternator bracket, I got those in place and the water pump-alt-crank belt on. I have a UR underdrive crank pulley and HI overdrive water pump pulley. Supposedly the guy who sent me the water pump pulley was sending the correct set of belts...but...I cant find a belt that fits the power steering, everything is way too long. I guess I'll just have to measure with string and see if autozone has something.
The only snag of the evening came when I realized I completely lost my AC adjustment bolt. Does anyone know the specs on that?
I've done just about everything I can do now until that water pipe comes in. I don't wanna take the chance of installing the donwpipes or transmission or even intake hoses in case I have to pull it all off again just to access that hose. Poo.
6/15/2011
Thanks for the compliments. I really didn't think people would enjoy reading about tightening hose clamps and losing my tools so much.
And as far as not being able to take on a project of this size:
Nonsense!
As long as you have access to tools and even a little bit of know-how (you're on TCL, you've probably got an inkling) you can handle something like this. How many engine builds have I done before this? None. How many project cars have I had before this? Zero.
I'm doing all of this in a 1 car garage at my condo. My neighbors think I'm crazy but I think its fun. Yes, its taking me way longer than I anticipated but I'm learning more than I ever imagined.
If you ever have the chance, I highly recommend tackling a project like this. It's one hell of a confidence booster.
6/27/2011
Well....I've done a fair amount in the last week. Not ambitious enough to type it all.
The transmission went up with my girlfriends help on Sunday, but I didn't get the clutch lined up right so I had to do it again on Monday. (Note: Advance has clutch alignment tools for $2) After using the alignment tool the trans slid right on and everything after that was pretty simple as I've done a plenum install with this top feed fuel rail about a dozen times now. I took my time and labeled every connector on the wiring harness using the layout in the back of the FSM. I know what all the sensors ON the engine are, but wasn't sure what was where on the harness (mainly coils connectors and injector connectors). I soldered on new injector connectors for my EV14 top feeds and was nervous about cutting into a brand new harness.
All in all, I've got everything hooked up as far as I can tell (already triple checked) and I built a rig to prime the oil pump (shop vac + filter with a hose) and after cranking I had oil pressure! Woo. Step 1 good.
Step 2 was actually trying to start the car. I worked for a good 9 hours on Saturday starting with finishing the transmission install, getting the exhaust on, getting the plenum put back together, sorting out the wiring harness, installing new connectors, and retracing my vacuum system. After all of this obviously I really wanted it to start, but I had planned on having to sort out some kind of problem.
I guess that made it sting a little less when the car didn't start.
After first couple attempts: Code 11
Checked CAS ground connection and it was iffy so I grounded it straight to the battery.
No more code 11, and it sounded like it almost fired for a second.
I can smell fuel, we checked for spark on 2 cylinders and both were good, I have 60psi of fuel pressure when the pump is primed. And then we gave up. Battery is almost dead too
Things I need to check after work today:
I heard you can just hook an LED up to an unplugged injector connector and the LED will go on when the injector is supposed to fire.
Either that or I gotta pull a lot off to pull the CAS and test it.
I also heard if the CAS isn't working all the plugs fire at the same time, so I have to pull 2 plugs and check them at the same time.
Aside from that I don't know where to go Oh well. One thing at a time. I was REALLY hoping to take the car up to WI for the week. If it doesn't start tonight I can't see that happening.
6/28/2011
Borrowed a timing light from a friend, but before I went to check timing I figured compression would be a better check.
1: 65
2: 70
3: 82
4: 65
5: 70
6: 60
Sooo. I'm thinking its timing. I added oil to cyl 1 and it only went up 5 psi to 70, so likely not ring gap or a build issue. Unless its something in the heads.
But I pulled the front timing covers back off, pulled the plenum, and all the coolant pipes. I'll have to pull the lower timing cover now too, I don't remember that being pleasant. Looks like I'll have to cross my fingers for august now. Ugh.
9/20/2011
Finally pulled the motor back out and took the heads off sunday night. When I set the head down on the ground, a bunch of grit poured out. It seems someone didn't do a good enough job cleaning out the heads after they machined them. I wonder if grit is holding the valves open.
Now I have to hope the shop will correct the problem 6 months later at no cost to me. And hope that it didn't work its way anywhere else. The bores were clean and grit free, for what its worth.
Not happy.

9/20/2011
I just stopped by the shop with receipt (from april) and picture in hand.
I was completely calm and friendly and I think it went a long way. I stated my case and they said they'd take care of it. I'm really surprised.
Might even be able to put it back together by the weekend. yay! (leak check BEFORE assembling the longblock though)
And yeah, I was terrified the bores would be ruined. Surprisingly not. Lucky me?
9/22/2011
So I got a call from the machinist and he said he pulled the heads apart and hand lapped the valves (shouldn't that have been done in the first place?), cleaned everything, and put it back together.
When I got there I used some armor all window cleaner (i had it in the backseat) to spray into the ports and check for leaks. Most of the valves weeped. Some held pretty steady, but 3 or for sprays was gone in about 5 seconds. This seems like too much to me.
I can't find anything difinitive online, but if the heads are assembled with spring pressure on the valves, shouldn't they form a perfect seal to liquid at 0psi?
One of the guys at the counter (not the machinist) said he filled the ports last night to leak check them and they stayed full. Clearly that didn't happen.
A) Should fresh cut and lapped valves leak?
B) Am I getting hosed?
Keep in mind these are my used heads with a supposed 3 angle valve job.
10/5/2011
Just picked up the heads from the shop again. He said they held water overnight, but...he said that last time too. So I wasn't/am not getting my hopes up.
When I got to the car I sprayed some water in them and they held water for ~30 seconds before one valve slowly began to weep. MUCH BETTER. From what I can tell so far at least. Still not getting my hopes up.
I'll put the heads back on tonight and put some air in the cylinders and see how they hold.
Can I get excited now?
1/5/2012
Nope. Put the heads back on the car, when I got the lifters in, they were sitting way too high.
Sent my heads to Z1. They confirmed my suspicions. Federated auto parts in Painesville, OH royally borked my heads. Even after 3 tries. They didn't bother cutting the tips of the valves after the seats were cut, didn't clean out the ports, etc. Z1 took care of everything and painted them for me.
I JUST unpacked them and hope to put them back on the motor tomorrow. I've finally got some room in my garage and I've got the motor sitting on a stand waiting for work. Maybe I'll get to drive the Z this year.
1/23/2012
Alright, should have taken pictures, but since this is my 4th(?) time doing this, I'm sure I've already posted these. Did a leakdown test yesterday and everything was in the green (20-25%) on a ice cold motor. I'll do the same test after I put the cams in.
Yesterday I built my new IKEA workbench, torqued the heads down, and installed all hardware related to both turbos. When I removed them all I took off was the stainless steel oil feed lines and the 4 turbo-exhaust manifold bolts so it was mostly pretty easy to get back on. I had to grind away at the exhaust flange a few mm to make the oil feed line easier to install.
Afterwards I rebuilt and cleaned all my lifters just to be safe since they have been sitting for about a year now. Tonight I'll be installing the cams and hopefully timing the motor.
Trying to get everything ready to go by Friday. The plan is to install the motor this weekend. I just need to figure out how to transport the motor 4+ miles to the car.