You must be logged in to rate content!
7 minute read
Cheap in-car camera mount
Compliments of MightyBobo @ www.the370z.com
11-2-2009
*UPDATE*
I finally decided to update this post with a video of the typical performance for HPDE's. Notice, no annoying clicking at all.
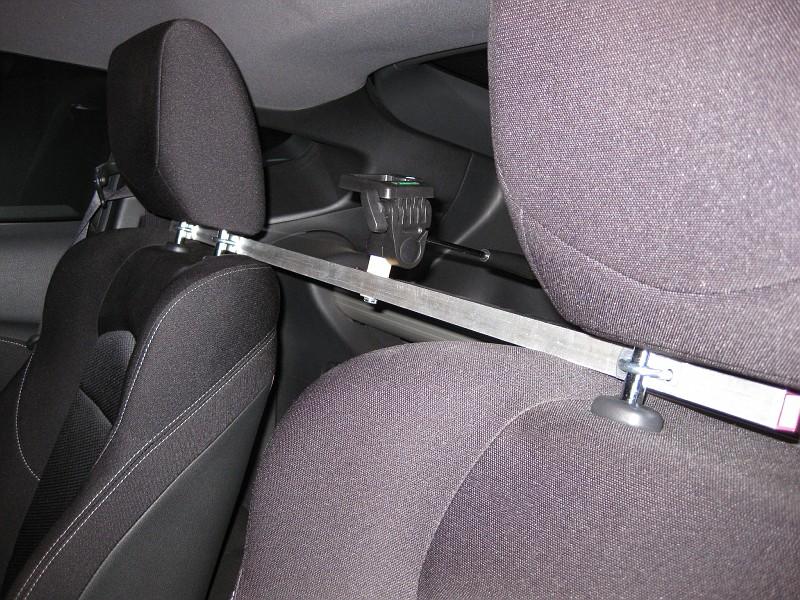
So, I was running low on funds for my HPDE, but I wanted to at least tape SOME of my sessions with my cheap point and shoot. Did a little searching, and decided to make my own in-car mount. Now, Im also using the base from my current Tripod, which makes things easy for me - you will need to customize this to suit you.
First thing first, things I used:
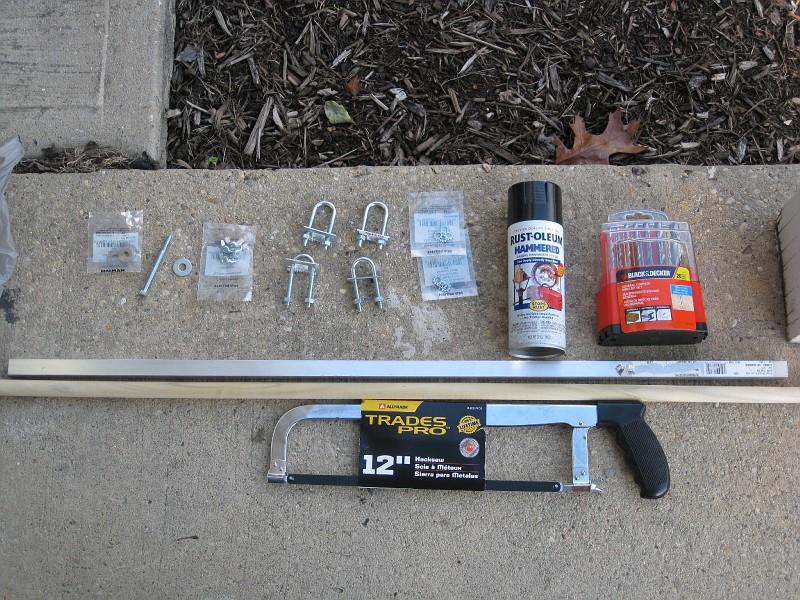
- 3' x 3/4" square tube ($10 or so)
- 3x U-Bolts with the plates and nuts (all of which came together when you bought one...)
- 6x locking washers for your U-bolts
- 3/4" x ~4" bolt (not sure on the PRECISE length off hand)
- 3/4" wing nuts (for the long bolt)
- At least three 3/4" washers
First, I went and measured dimensions for the actual posts. I was ORIGINALLY intending to have u-bolts wrapped around each headrest post, but it turns out that the distance between the 2 farthest posts is exactly 36" lol. So, I compromised, and decided to go with 2 posts on the passenger side, and 1 on the driver side.

I started by cutting off ~2" worth of wooden dowel, and drilling a 3/4" hole through the center:

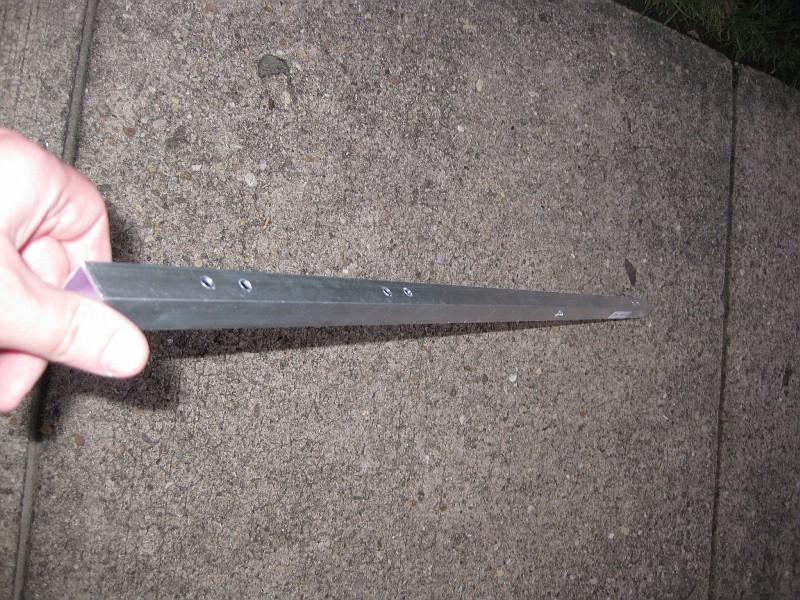
I then started using painters tape and a pen to mark where the head rest posts were, and then using the u-bolts themselves, I marked where I'd need to put holes through the aluminum.
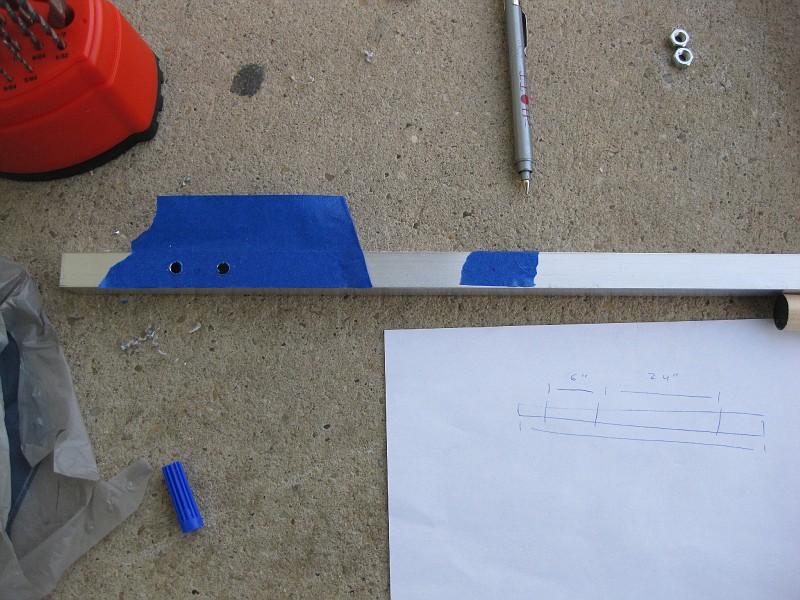
Once done drilling all the holes for the u-bolts, I then turned the rod 90 degrees, and put a hole exactly halfway between the inside passenger side u-bolt holes, and the driver side u-bolt holes.
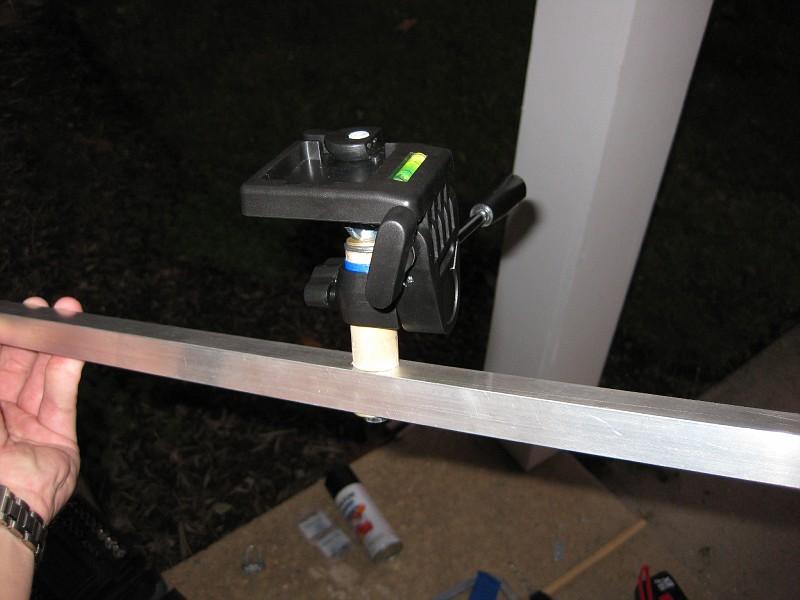
Finally, I began assembling the important part - the mount. I slid one 3/4" washer over my long bolt, and put it through that center hole. Then, I put the dowel over that. I then put one more 3/4" washer at the top, with a wingnut to cap it off. I originally felt this would make for easy removal/installation of the mount, but sadly it looks like I'll need a wrench no matter what just to get it tight enough. Also, It turned out that the 3/4" dowel was slightly too small for my mount, and the 7/8" was too big...so I need to wedge something over the dowel that will make for a tight fit for the head.
When all was said and done, you're left with this:
Youtube sadly compressed the **** out of this video, gotta figure out how to fix that.
Things I'm going to do to make it better: use those 3/4" wingnuts on the u-bolts themselves - that will make not only the bar much easier to remove, but easier to ensure its actually tight. Also, its getting a nice coat of paint here tomorrow, seeing as the sun was going down just as I finished it. Also, the video was a VERY dry run - I slapped it into the car as quick as possible before it got too dark. Lots of rattling, which I know the problem (base was hitting the wingnut on the dowel), and I know the actual base wasnt even tight on the dowel yet.
Other than that, I made a perfectly good camera mount and it maybe cost me $25 total, including the $6 paint lol. Your results will vary if you dont have a mount that you could put onto a dowel - I'll leave that up to you to figure out, but an "easy" solution would be to simply put a bolt through the center hole the same size as needed for the camera. Only downside is, it'll be facing up in the air. I wanted adjust-ability.
12-10-2009
You guys are killing me lol.
OK, I'll say again - when I installed the mount for the example video above, the noise was mainly due to the fact that I did NOT tighten down the u-bolts enough, due to quickly fading daylight.
Now, Im not saying that there isnt SOME rattle when I tighten them completely, but the VAST majority of the noises in the video are due to two things:
1) Loose u-bolts
2) Loose camera mount on the wooden dowel, so it was knocking against the wing nut at the top anytime I'd hit a bump.
I will record another example when I pick the car up from the body shop on the way home.
12-11-2009
My biggest plans to improve it are:
-Use the wing nuts on ALL the u-bolts, instead of normal 6-point nuts. That'll greatly improve how easy it is to get in and out.
-Putting a little rubber on the head rest posts would definitely help a bit not only from a perspective of quieting it down (not that you get much noise in its current form anyway...), but also help ensure the bolts don't come loose. I noticed if I didnt tighten them quite a bit, just the movement of my seats during the racing would jimmy them loose.
-Trim up each end so they don't extend much past the posts, just from a size perspective. Also, cap off each end with a nice plastic cap to hide the sharp, pointy edges.
Other than that, Im very satisfied with it. I think the view is perfect, and combining that with my GoPro's versatility, I think I'll be set for some time 
9-22-2010
*Update*
I added a newer, better video showcasing how good the mount did during my latest HPDE. The only changes I made to the mount since then, is I shortened it so that only 2 U-bolts connect (one on each side of course), and that allowed us to move our chairs more independently.