You must be logged in to rate content!
6 minute read

93-97 FIREBIRD/CAMARO SHIFT BOOT/E-BRAKE/ARMREST INSTALLATION INSTRUCTIONS
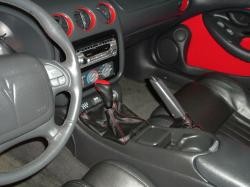
1. Begin with removing you shift knob by rotating it counter clockwise.
2. Grab the ring within the base of the factory shift boot, push the ring towards the front of the car, and lift up to disengage it. Remove the factory boot and ring from the car.
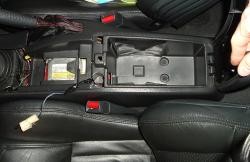
3. If you are installing the ebrake boot as well, remove the top piece of the center console: Open your center console door and grab the top center console piece right behind the cup holder (arrows). Push forward and lift up to disengage the piece from the console. Disconnect the traction control wires and ash tray light. Also remove the center console pocket light that is located at the rear of this piece. It does not need to be disconnected, just remove the black clip from the top and slide the light out the bottom.
4. Remove the factory boot from the ring and replace with the RedlineGoods shift boot.
5. Align the RedlineGoods shift boot with the ring and cut the slits for the side and rear teeth of the ring. Make sure to leave enough room for your lever travel. Test it in the car before you make ANY cuts. If you are installing just the shift boot, reinstall everything in reverse order and you are done.
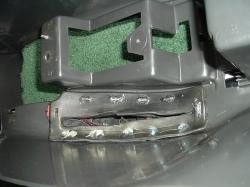
6. If you are installing the ebrake boot asa well, remove the three 10mm bolts that hold the center console down (circles). Pull your e-brake up as far as it will go. Lift the rear of the center console up and lift out. Make sure the console light is fed down through its hole as to not snag, and make sure to unclip the wires from the rear of the lighter outlet. Remove from the car.
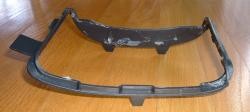
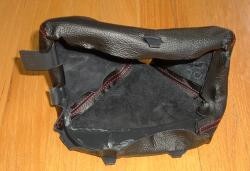
7. Turn the center console over and remove the factory rubber e-brake plate from the console. Simply pull off of the plastic teeth (circles). Save the rubber plate. Align the RedlineGoods e-brake boot with the factory rubber plate and cut the slits for the front and rear teeth (the sides should already be cut into the boot).
8. Insert the teeth of the console into the slits in the RedlineGoods e-brake boot, and then reinstall the factory rubber plate to help keep the boot in place. You may also want to place some hot-glue over the teeth to make sure they hold.
9. Reinstall the center console into the car. Feed the e-brake into the boot and make sure the seat belt buckles are not stuck under the console. Make sure the feed the console light through its opening, reattach the wires to the power outlet. Gently snug the three 10mm bolts.
10. Reinstall the top piece of the center console. Make sure to reattach the traction control wires, the wires to the ash tray light, and the center console pocket light.
11. Reinstall the shift boot and shift knob.
ENJOY YOUR NEW LEATHER BOOTS!
Useful tip
You have installed a product made out of genuine leather. As you know, to maintain a leather product in good condition, you should take care of it. We suggest occasionally (every 4-6 week for example) applying some leather conditioner/UV protector to keep your leather from drying up in the sun and cracking.
Redline Automotive Accessories Corp. will not be held liable for any labor, incidental or consequential damages of any kind. Proceed at your own risk.
93-97 AUTOMATIC CAMARO
Parts needed: Shift boot, Ratchet, 7mm socket, high strength epoxy glue
1. Turn the car on but do not start, put the car in the lowest gear (1st for me but 2nd for some others). This is helpful when removing the shift knob.
2. For stock shift knobs there is a large staple in the front of the shift knob. Pull this out and the shift knob should just pull off. For most aftermarket (like my MBA shift knob) shift knobs simply unscrew and remove the adapter.
3. Now put the shifter in neutral and pull up on the back part of the shifter plate. Once the back is lifted pull back on it so the front part comes out. Unhook the small gear selector bulb and pull off the plate.
4. On the underside of the shifter plate there are 4 (7mm) screws. Remove these and disassemble the shifter plate, remembering how things went for an easier reinstall.
5. On the shifter boot you will need to fold the top of the leather, the part that will be closest to the shift knob, into itself to fit the length of your specific shifter. You could cut it but it looks much better when it is folded.
6. Now to fasten the boot to the shifter plate I used a 2 part high strength epoxy. Fold the bottom part of the boot over the plastic flab’s on the shifter plate. I used a hot glue gun to temporarily hold the boot in place for test fitting. Make sure you test fit before you permanently glue. Reinstall everything and move the shifter from Park through all the gears to the lowest gear you have several times to make sure the boot doesn’t hold the shifter back from fully functioning. When you are sure it is going to work go ahead and carefully apply epoxy to the plastic flabs on the shifter plate and to the edges of the boot. Do not get any epoxy on the visible part of the boot when it is installed onto the car, even though it dries clear, it doesn’t look very well. Allow to dry and cure following the directions for the epoxy.
7. Reassemble all the parts of the shifter plate and reinstall it onto your car, don’t forget to hook up the light. Reinstall the shift knob and move the shifter back and forth a few times to make sure everything works.
8. ENJOY!