You must be logged in to rate content!
19 minute read

DIY OTRCAI
Compliments of svede1212 @ https://ls1tech.com
11-21-2008
i would have thought that everybody would have seen this on another board but for those that haven't:
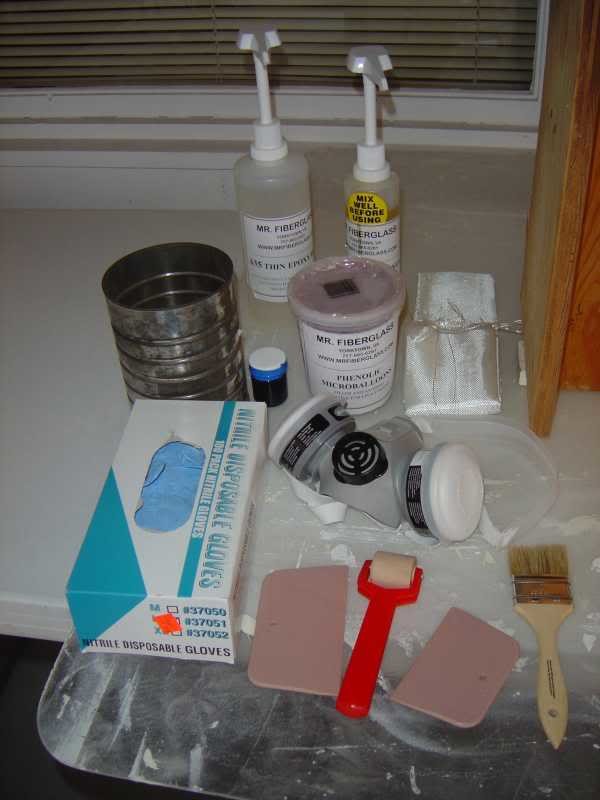
DIY is what the car hobby is all about. BMW people pay to have things done... muscle car people get dirty and I am a very dirty, dirty boy  . First off two things; one is a recognition for buickcadillacman and to Scraggy for giving me some motivation for actually getting this thing going. I've been talking about it and kicking it around for over a year and a half . The second is I am not an expert by any means at fiberglassing but I spent some time researching it on the web and assembling the supplies as well as looking over the situation on the car to come up with my solution. This like almost everything I've done on the car was my first time so you can do it too. I'm sure there are others here that have real craftsmanship or have other ideas. It is my opinion that it isn't so hard that you can't come up with a workable one of any size, shape or type for yourself using the basics of what I did here.The first thing was to assemble the supplies. Some of the stuff, like most of the tools, I already had and I think the total on the supplies I had to buy was about $100 with the filter being the the most expensive part of it. The list to the best of my memory was:
2” Foam insulation board
Foam board compatible glue
Filter (K&N 33-2522)
Packing tape
Floor wax
1 bag of glass cloth from Menards
Play-Doh
Bondo
Acetone
Vinegar
Wax paper
3 ft. 1/2” x 3/4” aluminum angle iron
Bump hose connector that I already had
Hose clamps & misc. hardware like screws
The following was from www.mrfiberglass.com
1 qt. epoxy resin and medium cure rate hardener
Hand pump set for above
1 qt. Phenolic microballons
1 oz. carbon black coloring
1 yard 3 oz. 4 HS (harness) cloth
Tools were:
Measuring tape
Hack saw
Dremel
Hand saw
Drill & bits
4” hole saw
Wire brush
Sand paper
Razor blade
Cheap brush
Scissors
Wall paper seam roller
Plastic body putty spreader (got these from Menards. They're only $1.29 for 3)
Homemade jig to hold the form
Old metal can
Respirator
Disposable latex or nitrile gloves
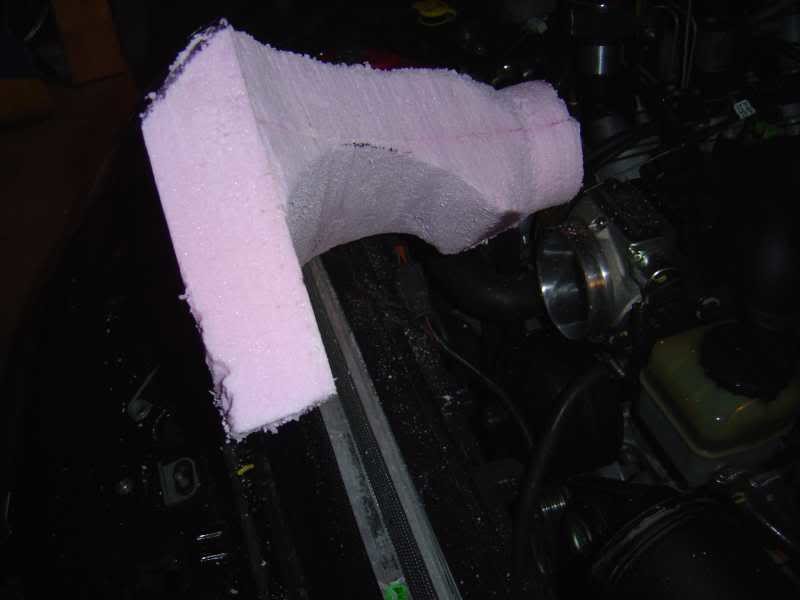
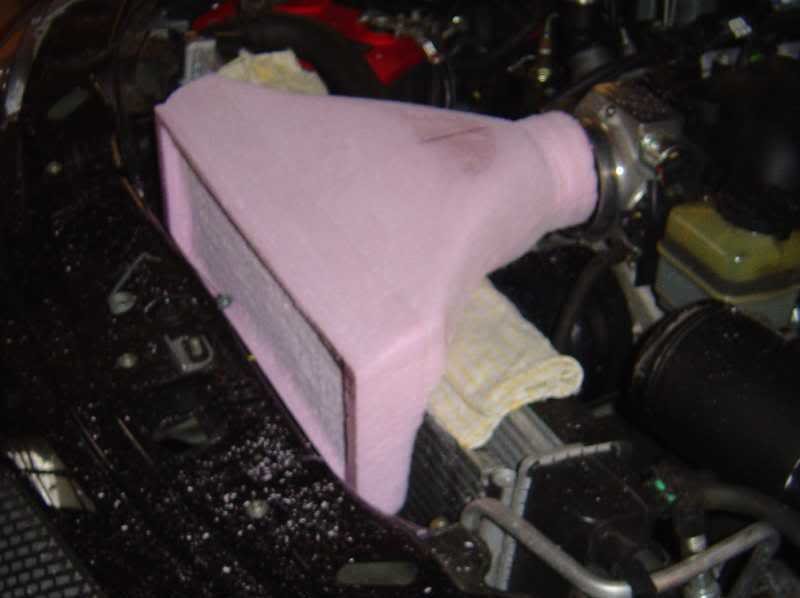
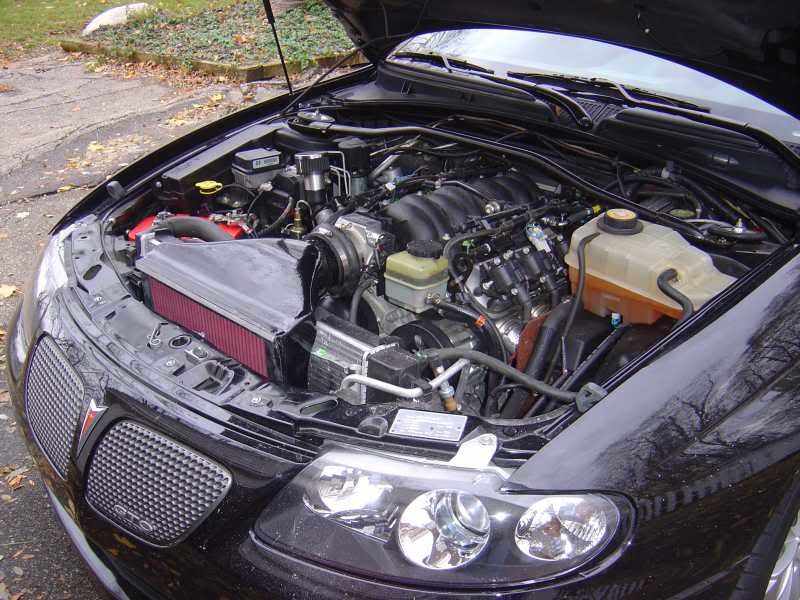
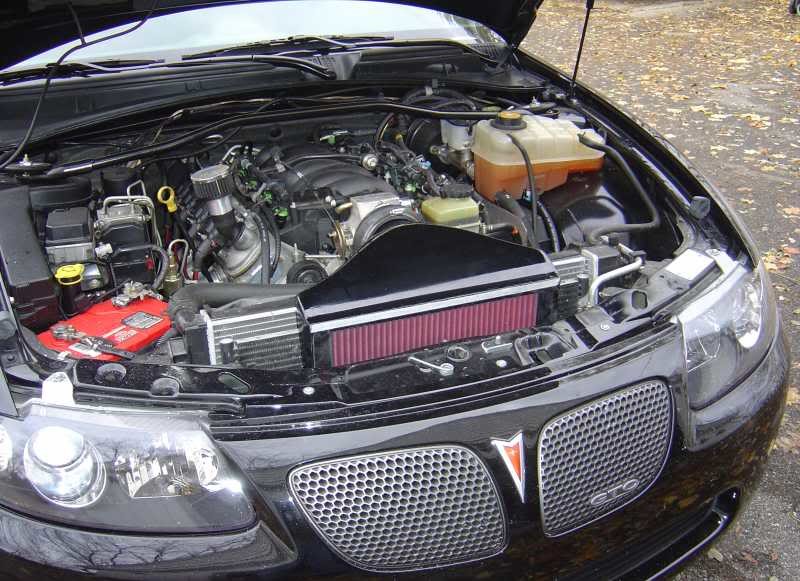
I started up looking over the engine bay and taking some basic measurements. The '04 LS1 radiator is a little lower than the LS2s so I have a little more room for clearance. I had purchased the filter from Auto Zone (they had to order it) and got the biggest one that was also as thin as I could find. There is only ~2 1/4” between the car's front metal work and the radiator to fit everything down. I felt that being able to easily service the filter was important plus with with the shaping of the vertical part of the form and the thickness of the filter it left only a little more than an inch for air flow from the lowest point behind the filter. The reason for the intake was obviously to get cool air in (which I was already getting with my SS Intake) but also for having one that had the straightest shot into the TB. Intakes like my old one (sometimes referred to as a Hardcore type) have bends with one being a hard 90* right in front of the TB. I felt that having the intake higher gave that straight shot and yet it still could collect cool air from the grill as well as the gap along the hood. That gap BTW isn't insignificant. There's about 15 sq. inches of opening along that gap right at the highest pressure part of the front of the car. Having the intake high also doesn't block much of the radiator. It's cold out now so it may be next year before I can get any real testing done. I also am going to think about if I want to cut the stock plastic trim piece or make up my own fiberglass ones to go on either side of the intake.
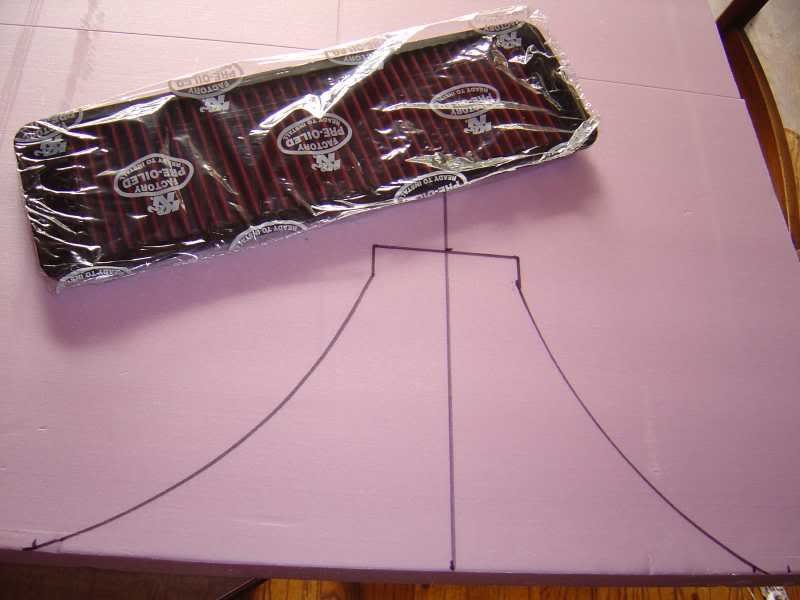
In measuring I noted that the TB is off center as is the whole engine. The filter needed the whole width that had the full 2 1/4” part of the gap and that is centered on the car so it meant that the intake was going to be asymmetrical. I marked up the rough outline and cut it out with a hack saw blade on the curved sections and a hand saw on the straight sections. A hot wire cutter would be the preferred method as it makes less of a mess but I used what I had at hand.
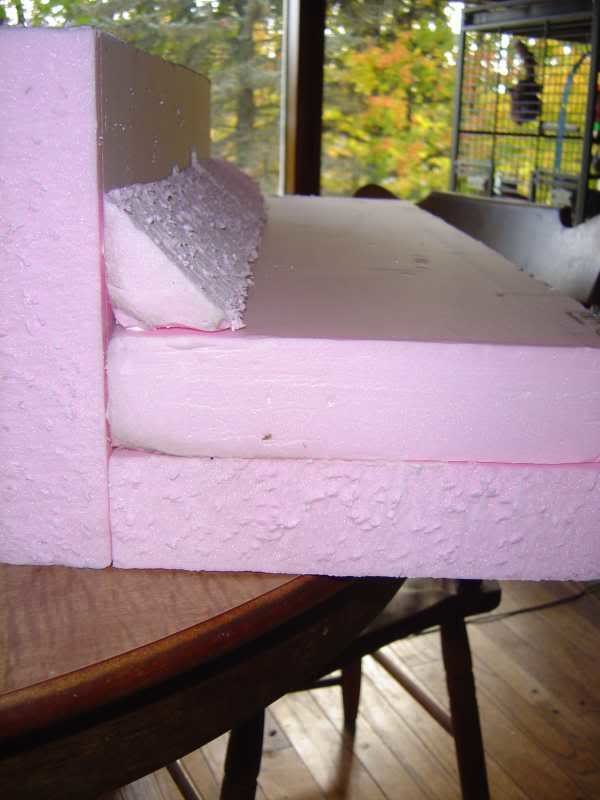
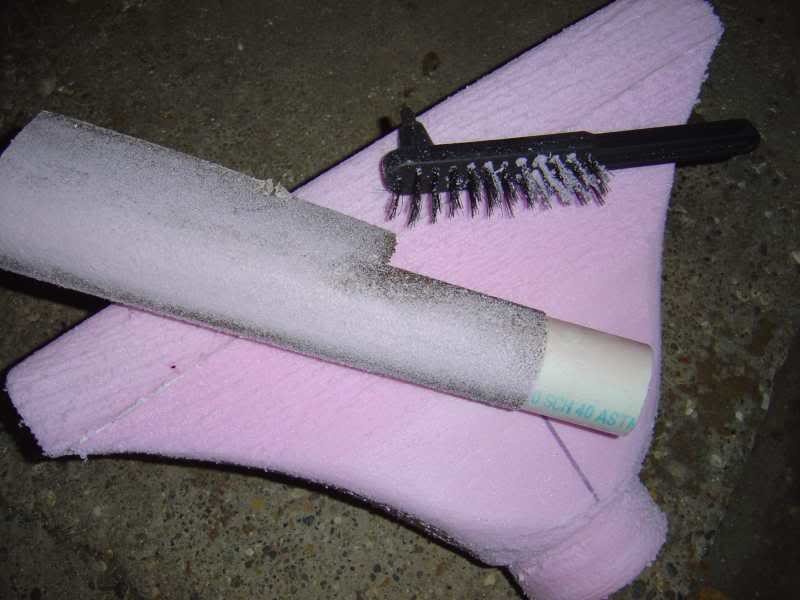
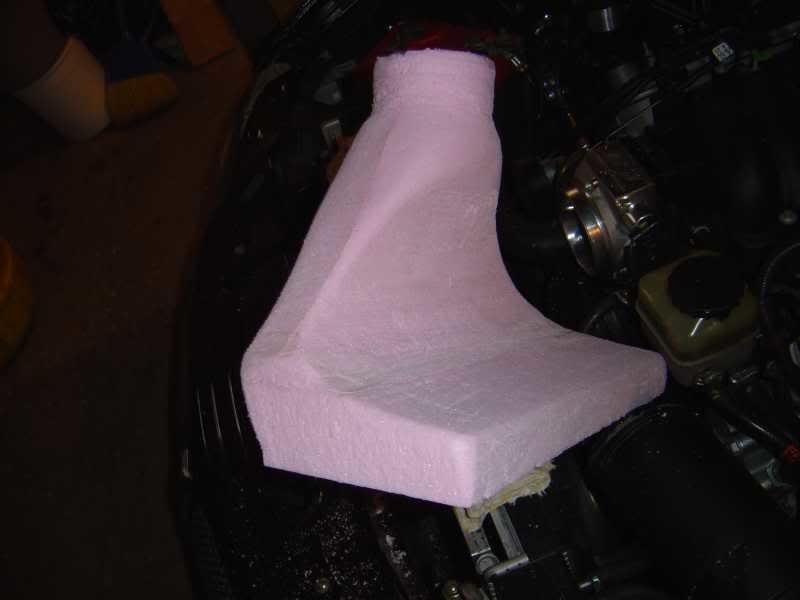
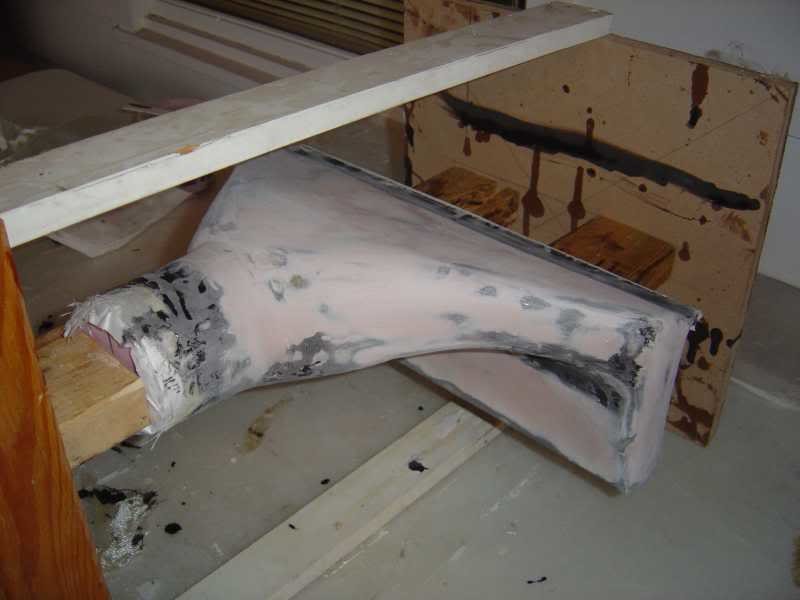
I used a 4” hole saw to cut the TB end as I had one and it made a nice smooth cylinder. You could hand shape that if you had too. Starting on the rough fit I marked where it was going to take some material removal and after a little trial and error discovered that a wire brush makes a great way to take away material quickly and shape it. I only stroked it in one direction “pulling it” towards me until the shape looked close and then used 40 grit sand paper to do the final smoothing. It's a mess so do this outside. It makes for a nice dusting of pink snow in your driveway.
Shaping tools of wire brush and 2" PVC pipe with sandpaper stapled on it
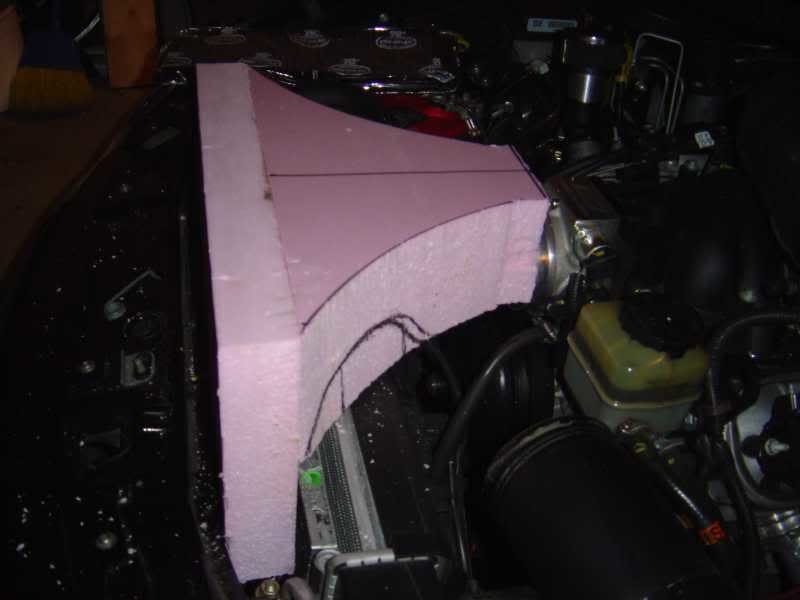
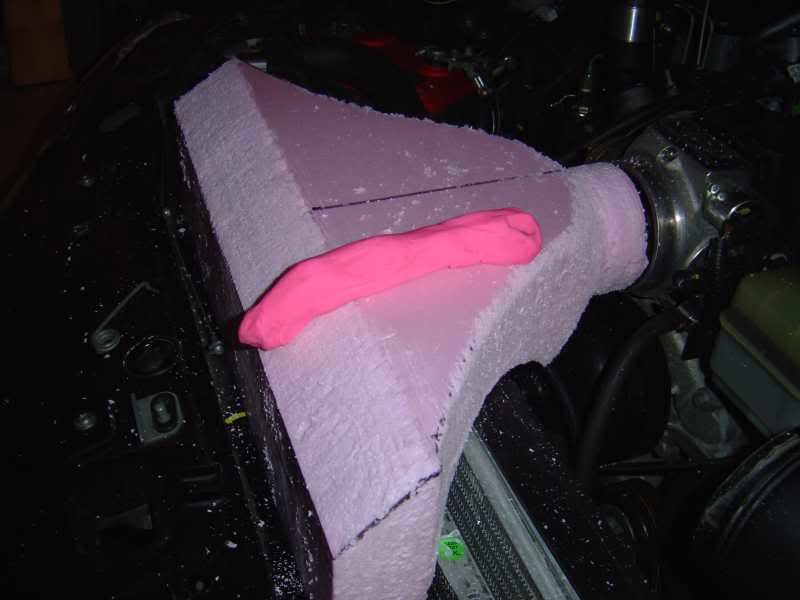
After some rough fitting it's time to get serious about it and I put a cloth under it to hold it up a little to simulate the thickness of the fiberglass. I put some Play-Doh on the form, covered it with wax paper and closed the hood to find out where it was going to hit. Make sure you put the wax paper over the Play-Doh before you close the hood or you'll jam the stuff into your hood liner. Don't ask how I know  . Figure a little room for the thickness of glass on top. Another thing that you may have to account for is engine torquing. I have an Engall's Stiffy engine torque dampener to keep the engine from moving so much when revving. A compliant “hump” coupler connecting the intake to the TB and/or poly engine mounts would be a great help also.
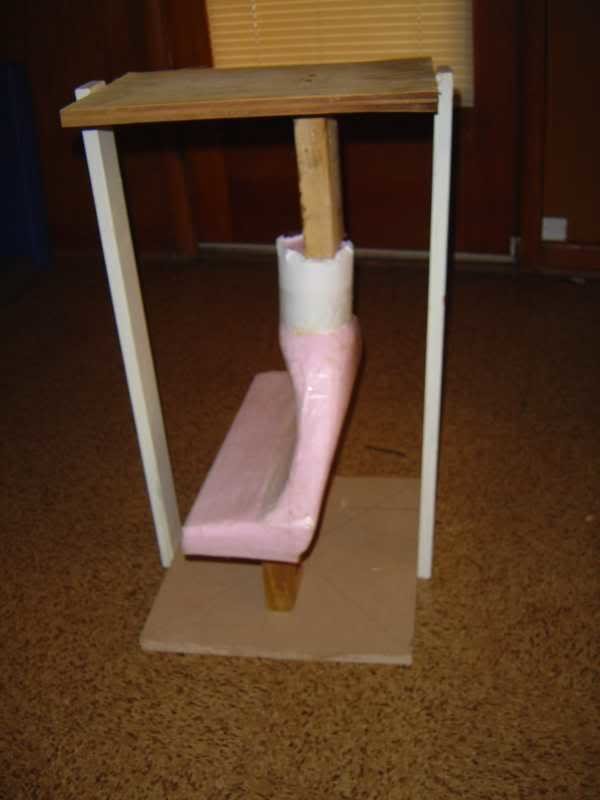
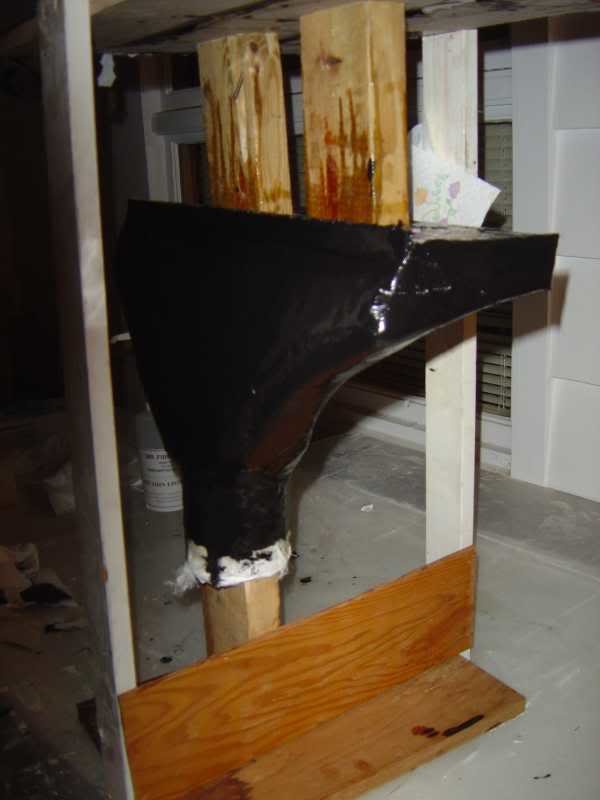
When you get the form to your liking it's time to prep it for laying up the glass. The first thing you do is wrap the entire foam form in clear packing tape. The tape makes it easier to get the innards out later as well as preventing the epoxy from melting the foam. The outside tape surface becomes the shape that's the surface on the inside of the intake after you remove the tape/foam so you need to lay it on as smooth as you can. After the tape layer is applied you need to coat it with some kind of mold release. A good paste wax is one of the things you can use and I had a can of it around from doing my hardwood floors. You should apply at least 4 coats of wax letting it dry between coats and buffing it out after the 2nd and 4th coats. The other thing that became apparent to me was that it was going to be a mess having to epoxy all the sides of the foam at once so I made up a jig out of scrap wood to hold it. I pounded several finishing nails into short 2 x 4 pieces that would hold each end to give it the bite it needed to hold securely. Now I could rotate it to work on either side or stand it up on either end.
I didn't get any pictures of the actual glass layup because my hands were busy and it was a mess but you should cut the cloth pieces out first as best you can and plan where they are going to go allowing about an inch overlap. You can adjust the cut with your scissors after it's on the form but it's a little messy. The wife freaked because I used “her good scissors” but the epoxy cleans up pretty easy if you get to it before it completely hardens. This where the vinegar comes in. It's amazing but it will clean epoxy off your tools and skin as long as it hasn't fully set up. I was able to even clean the brush and use it again and again. Acetone works too but you don't want to use it on your skin. It can carry the epoxy into your system. I'm trying to save my liver for serious drinking so I used the vinegar, nitrile gloves and the respirator in an area outside my house. I laid it up in 3 separate layers letting it harden for a day between layers and then sanding it before applying the next layer. I used the 4 HS for the first and last layer as it is a very smooth cloth for appearance on the outside and for smooth inner air flow. I used the coarser but stronger cloth for the middle layer of the sandwich. The neck has 4 layers of glass for extra strength. The hand pumps that I got from Mr. Fiberglass made it really easy to portion the ratios of resin and hardener which were 3:1. I wasn't sure how much to make up on the first time and I used 9 pumps of resin with 3 pumps of hardener. It was way too much and I wasted half of it. On subsequent layers, 6 and 2 pumps were more than enough to saturate the cloth with some left over. Mix the stuff thoroughly and it's recommended to use a metal container. I reused the same can because by the next day what was left had hardened to a nice smooth bottom. After I was done with the project I had about an inch and a half of wasted epoxy hardened in the can. You need to work fairly quickly as it has a pot life of about 20 minutes. I read you can also put mixed unused epoxy in the freezer as it sets very, very slowly when cold if you want to save it. You do need to use it as soon as you get it thawed the next day.
I took the cheap paint brush and cut the bristles to about 1 1/2”. You need them fairly stiff to work the epoxy into the cloth. Apply the epoxy first to the taped/waxed form. Lay up the glass cloth onto that one piece at a time and re-apply the epoxy over the top to “wet out” the cloth. Put on enough to wet out the cloth but not so much it runs and drips. Use the brush, spreader and seam roller to work out any big air bubbles trapped in the cloth. After the cloth gets wet is becomes somewhat transparent and forms to the shape a little better. Be careful not to push the cloth as it will want to slip around. You can lay up other layers after its initial “set” period which on this epoxy was 3-4 hrs but before it's “dry” period of 8-10 hrs but it's hard to do while it's tacky. If you decide to wait until after it fully dries you need to sand it before the next layer. I liked being able to smooth it between layers so I let each layer dry until the next day and then sanded and applied the next layer.
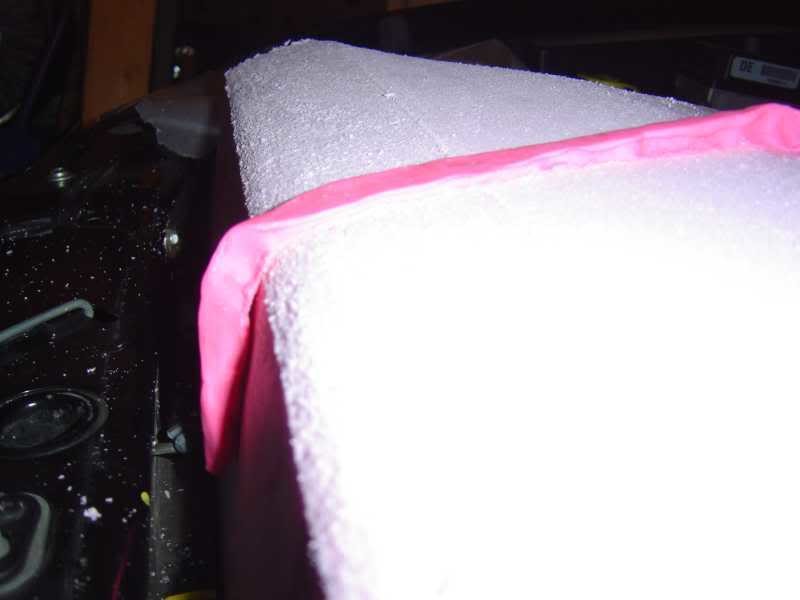
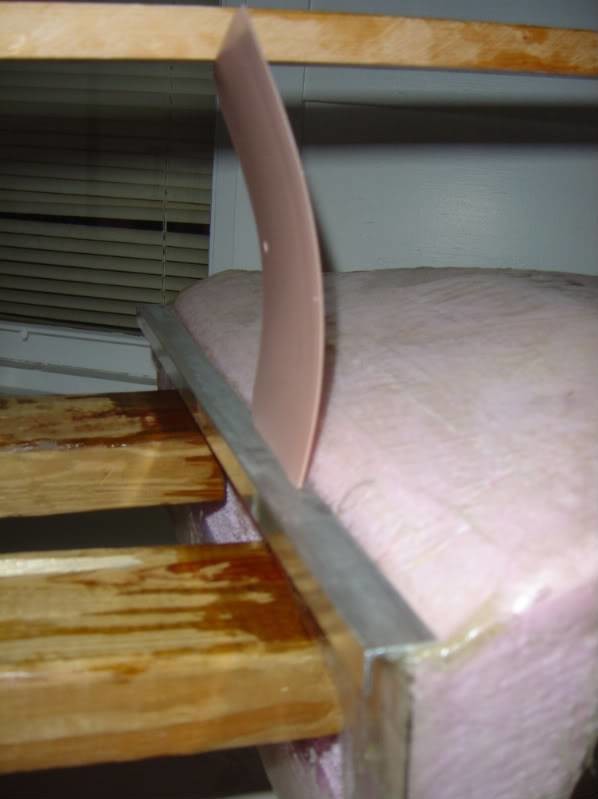
After the first two layers I used the epoxy to glue down a strip of the angle iron along the little flat ledge I had formed in the front on top. It will later be used to hold the top part of the filter. Here you can see the first glass layers almost disappear after getting laid up with resin.
The top layer went over the top of the angle iron to firmly hold it in place. After I was done laying up the cloth I made up a mixture of 3 pumps resin and one pump hardener and mixed it just a little of the black coloring and added the microballons until I got a thicker consistency. The microballons also make the resin a little stronger and easier to sand. I added the coloring mainly to see what it would look like (it looks good) but found that it has the benefit of helping when it came time to sand it. You could easily see where the top layer ended so you didn't go too deep and it made it easy to see where to add the Bondo when I got to the final finishing. You can see it looks a little ragged yet.
After sanding (you always sand between coats) I skimmed a thin layer of Bondo over the intake to fix any imperfections and make it as pretty as I could. The Bondo sets quickly and in about a half an hour I could sand it and re-apply where ever it was necessary.
The top coat was some of the carbon black coloring (it's very concentrated) mixed in 2 pumps resin to 2/3rds pumps of hardener and that was a lot more than enough to “paint” the outside black and give that nice shiny finish. It sags slowly but surely so don't try to put on very much otherwise you'll come back and it will be dripping off the bottom. I did two thin layers waiting for 4 hrs. between for good coverage. Because the coloring is through the entire layer it won't peel or rub off like paint would. Spraying would be an even better option if you wanted it to be absolutely perfect but brushing it on worked fairly well as it self levels fine. You'll just have a few tiny pinholes from air bubbles. To minimize them i gently brushed the surface bubbles from one side to the other before it started to set. Don't go too crazy because a lot of the imperfections will slowing flow away before it dries.
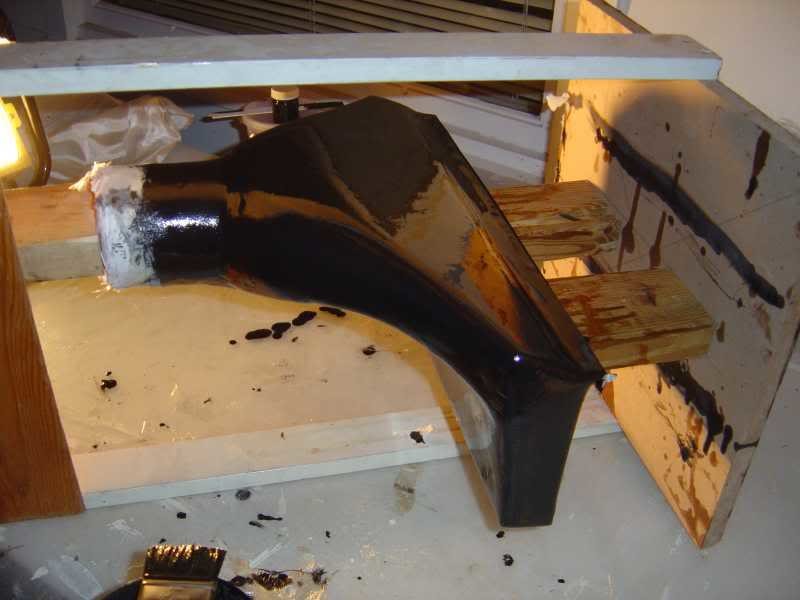
After hardening (i gave it 2 days) it was time to trim the intake. I cut off the neck to length with a hack saw and measured where the filter opening needed to be on the front. I used a small cutting wheel on my Dremel to cut the filter opening.
This part is pretty messy. It was time to remove the foam from the inside. I got the box I'd thrown my waste in and poured a little of the the acetone into the neck end of the intake and watched the foam dissolve away. It's important that you do the Wizard of Oz “I'm melting, I'm melting” as you watch the foam shrink away. After you get it down to a gooey level you can pull out the tape along with the goo. Use your gloves!
The filter was then tucked into the angle iron and pushed into place. I was going to put the other piece of angle iron on the bottom with screws to hold the bottom of the filter but it snapped in so tight and then it's held so it can't move after I installed it in the car so for now I'm just going to leave it. It was more luck than brains that made it fit in so well.
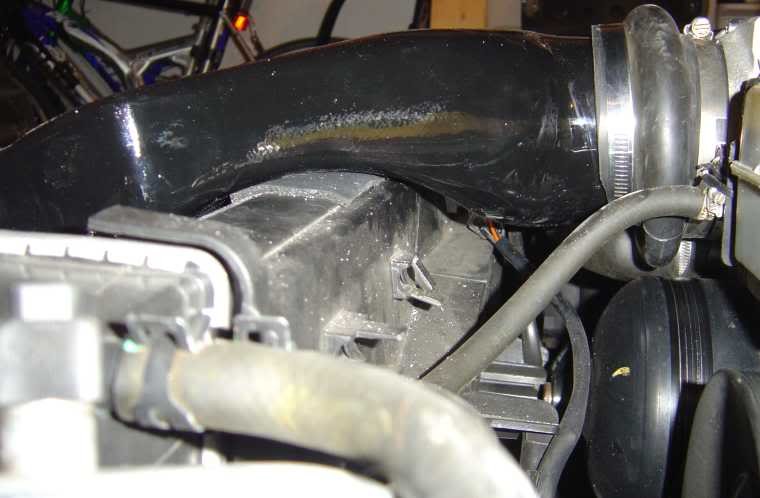
Hooked up and ready to go. I put a strip of 2" wide foam insulating tape on top of the radiator and condenser to cushion and insulate it. after testing it a bit i also covered the back side of the vertical piece with foam tape to insulate and cushion it. I'm really happy with the way it came out. I expected it to be “OK” as I said I've never done anything like this before but it looks as good in person as in the pictures. It makes really loud sucking noises out of the front, much more than my other intake. Testing to come when and if the weather gets better before I put her away for the winter.

i initiated the test by idling the car in the driveway for a half an hour to get some heat soak. i felt hot air coming out the gap below the hood and recorded IATs of 93*. i suspected that it would do that as air can easily get over the top back up into the front. a completed shroud should help that. with the engine off today's MAP was 98 kpa.
MAP stands for Manifold Absolute Pressure and can be thought of as barometric pressure. With the engine off (static) the MAP will be whatever the pressure is that day at that altitude. With the engine on and a wide open throttle you ideally would like that same MAP kpa as when the engine was static. A lower number than that means the air can't refill the manifold as fast as the engine is sucking it out. That lower number results from a restriction in the filter, piping, bends, TB, air source, etc. With my old SS Intake, which was a thru-the-fender type with a 9" cone filter and 4" tubing, I typically recorded MAP kpa's within 1-2 kpa of static MAP at high RPM WOT. I believe that the bends, especially the sharp 90* right before the TB was the restriction.
Today when I got out to the freeway and got on it (log of which is below) my MAP went from the static MAP of 98 kpa and didn't go lower but actually rose to 99 kpa as my speed went up! No restrictions there so i know that the "little gap in the hood" and filter are more than up to the job.
The IATs dropped rapidly from stopped temps and as said should vastly improve with the shielding from a shroud. Next summer when it's hot out will be the best test but seeing as it's supposed to snow tomorrow this may be the last test i get this year. i'm very stoked over the results as conjecture has met measurements.
The MAP is in the second section from the top. The line is purple and the value is listed to the left.