You must be logged in to rate content!
7 minute read
Removing Exhaust
Compliments of RADONCulous @ planet-9.com
12-5-2014
I did not see any articles on “do it yourself†removal of the exhaust system, so I figured this may help those of you interested in attempting an exhaust swap. My disclaimer: USE EXTREME CAUTION. I am a novice at these tasks and had the guidance of a close friend / member on this forum who graciously provided his tools, garage, and quite honestly did most of the work. We did this together as a team and it took roughly 45 minutes to do the following steps.") on “do it yourself” removal of the exhaust system, so I figured this may help those of you interested in attempting an exhaust swap. My disclaimer: USE EXTREME CAUTION. I am a novice at these tasks and had the guidance of a close friend / member on this forum who graciously provided his tools, garage, and quite honestly did most of the work. We did this together as a team and it took roughly 45 minutes to do the following steps.
on “do it yourself” removal of the exhaust system, so I figured this may help those of you interested in attempting an exhaust swap. My disclaimer: USE EXTREME CAUTION. I am a novice at these tasks and had the guidance of a close friend / member on this forum who graciously provided his tools, garage, and quite honestly did most of the work. We did this together as a team and it took roughly 45 minutes to do the following steps.
Step 1: Park your car in a safe area where you can work.
Step 2: Once in an ideal location, pull the parking brake / place a stopper in front of the front wheels so the car doesn't roll forward with the subsequent steps as rear end of the car will be on jack stands.
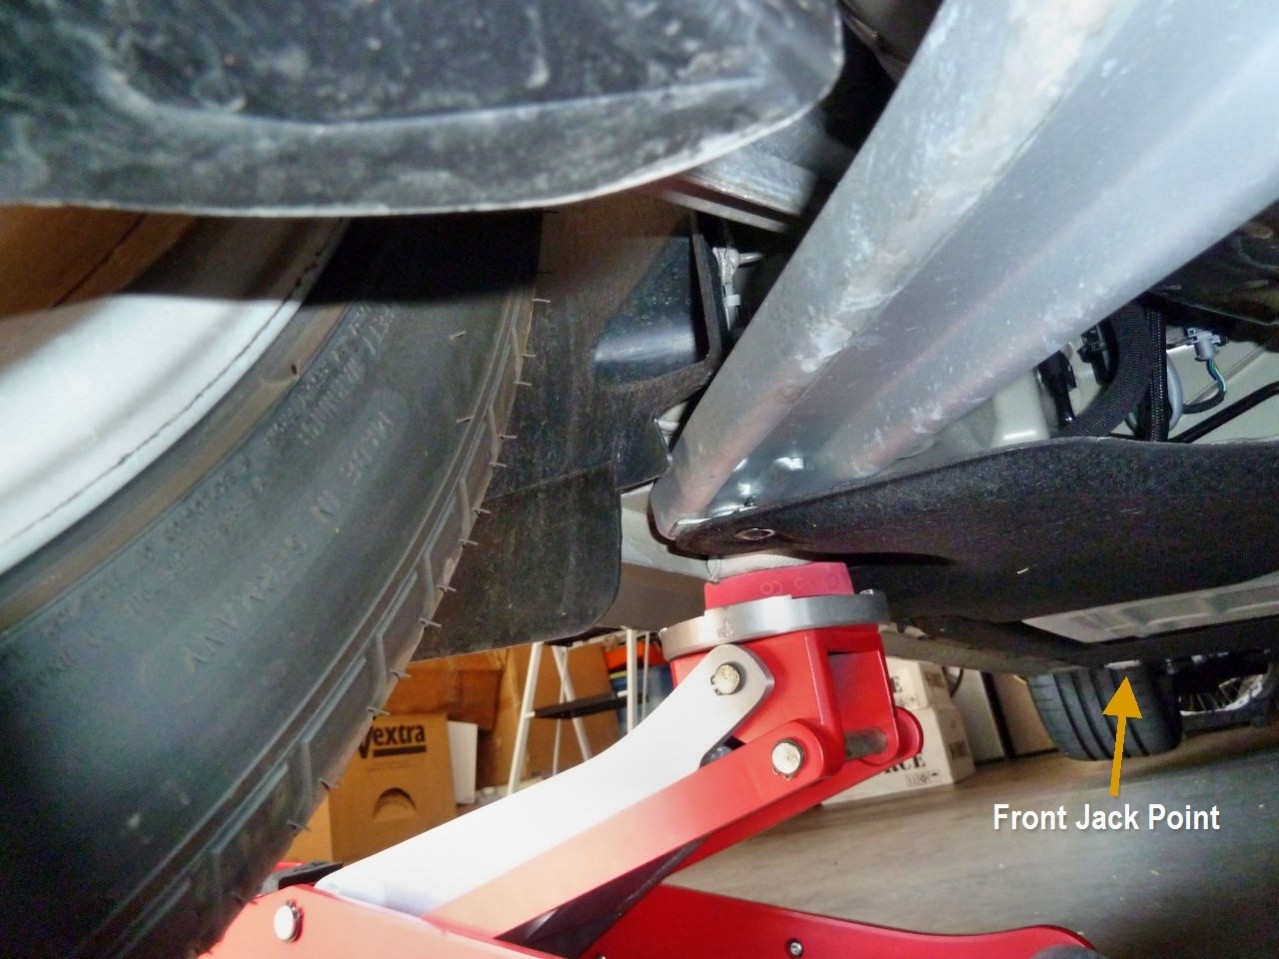
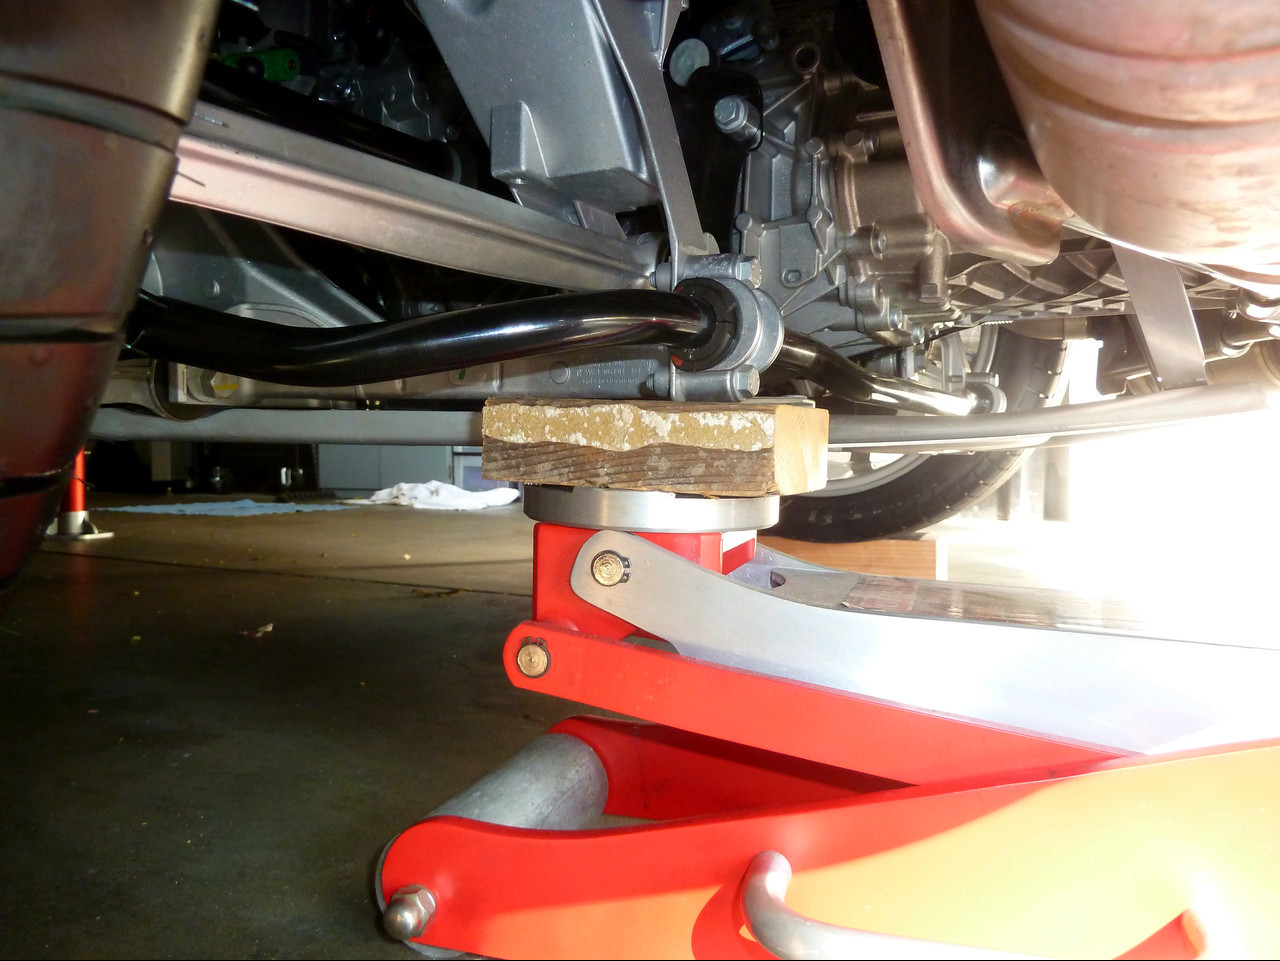
Step 3: Find the jack point under the car. The goal is to get the rear of your car on the stands to both work under as well as to remove both of the rear tires. We used Terry989's thread Getting your 981 on jack stands . We jacked up the car on the support structure found on both sides of the car medial to the wheels as seen in Terry’s pictures.
http://www.planet-9.com/attachments/981-cayman-boxster-modifications/51793d1371050242t-tutorial-how-remove-exhaust-diy-exhaust-removal-jackstand1.jpg (http://www.planet-9.com/attachments/981-cayman-boxster-modifications/51793d1412825193-tutorial-how-remove-exhaust-diy-exhaust-removal-jackstand1.jpg) (http://www.planet-9.com/attachments/981-cayman-boxster-modifications/51794d1412825195-tutorial-how-remove-exhaust-diy-exhaust-removal-img_0018.jpg)http://www.planet-9.com/attachments/981-cayman-boxster-modifications/51795d1412823470t-tutorial-how-remove-exhaust-diy-exhaust-removal-img_0017.jpg (http://www.planet-9.com/attachments/981-cayman-boxster-modifications/51795d1412825197-tutorial-how-remove-exhaust-diy-exhaust-removal-img_0017.jpg)")
http://www.planet-9.com/attachments/981-cayman-boxster-modifications/51793d1371050242t-tutorial-how-remove-exhaust-diy-exhaust-removal-jackstand1.jpg (http://www.planet-9.com/attachments/981-cayman-boxster-modifications/51793d1412825193-tutorial-how-remove-exhaust-diy-exhaust-removal-jackstand1.jpg)http://www.planet-9.com/attachments/981-cayman-boxster-modifications/51794d1412820400t-tutorial-how-remove-exhaust-diy-exhaust-removal-img_0018.jpg (http://www.planet-9.com/attachments/981-cayman-boxster-modifications/51794d1412825195-tutorial-how-remove-exhaust-diy-exhaust-removal-img_0018.jpg) (http://www.planet-9.com/attachments/981-cayman-boxster-modifications/51795d1412825197-tutorial-how-remove-exhaust-diy-exhaust-removal-img_0017.jpg)")
There is also a central jack point, but we opted to do one jack at a time, but took a pic so you can see how you could use the central jack point. You can use pieces of wood to help distribute the weight / not stress the bolts. We didn’t feel comfortable with this when we started and did the one side at a time method a la Terry’s tutorial. (When we were done with the exhaust swap we used the central jack point to lower the car and it did not have any visible stress or change in structure). http://www.planet-9.com/attachments/981-cayman-boxster-modifications/51799d1412823284t-tutorial-how-remove-exhaust-diy-exhaust-removal-img_0019.jpg (http://www.planet-9.com/attachments/981-cayman-boxster-modifications/51799d1412825548-tutorial-how-remove-exhaust-diy-exhaust-removal-img_0019.jpg)Step 4: Once the car is stable and propped on the rear jack stands safely, then proceed with removing the rear tires. You will need a 19mm socket wrench. Remove all the bolts and save the top most bolts to remove at the end (the wheels tend to slip off once all the bolts are removed--this is the pro-tip to do this simple process well.) Carefully remove the top bolt and have someone hold the wheel. Be careful when you remove the wheels as you risk damage to the brakes / rotors during this step (particularly if the wheel drops). In the last pic here you can see the post-cat pipe of the exhaust.")
(http://www.planet-9.com/attachments/981-cayman-boxster-modifications/51799d1412825548-tutorial-how-remove-exhaust-diy-exhaust-removal-img_0019.jpg)Step 4: Once the car is stable and propped on the rear jack stands safely, then proceed with removing the rear tires. You will need a 19mm socket wrench. Remove all the bolts and save the top most bolts to remove at the end (the wheels tend to slip off once all the bolts are removed--this is the pro-tip to do this simple process well.) Carefully remove the top bolt and have someone hold the wheel. Be careful when you remove the wheels as you risk damage to the brakes / rotors during this step (particularly if the wheel drops). In the last pic here you can see the post-cat pipe of the exhaust.")
Step 4: Once the car is stable and propped on the rear jack stands safely, then proceed with removing the rear tires. You will need a 19mm socket wrench. Remove all the bolts and save the top most bolts to remove at the end (the wheels tend to slip off once all the bolts are removed--this is the pro-tip to do this simple process well.) Carefully remove the top bolt and have someone hold the wheel. Be careful when you remove the wheels as you risk damage to the brakes / rotors during this step (particularly if the wheel drops). In the last pic here you can see the post-cat pipe of the exhaust.
")
Step 5: Now that the wheels are removed you will have to remove the post-Cat pipe as indicated in the pictures. (We will essentially remove the exhaust in parts in the way we are describing to make it easier to do. In total it will be roughly 2 or 3 overall large parts.) For this step, you will need a 13mm socket wrench. There are two bolts that need to be removed in this area. Also we recommend removing the bolts from both sides of the car during this step.
First bolt:
(http://www.planet-9.com/attachments/981-cayman-boxster-modifications/51803d1412825812-tutorial-how-remove-exhaust-diy-exhaust-removal-img_0027.jpg)")
Second bolt:
")
You may need this tool to reach in the area as there is not a lot of space to work with:
")
This is the result:

(http://www.planet-9.com/attachments/981-cayman-boxster-modifications/51807d1412826050-tutorial-how-remove-exhaust-diy-exhaust-removal-img_0047.jpg)")
Step 6: You will need to remove the clamps holding the exhaust in place. There is one clamp on either side of the car. You can do one side and at a time so the system can be removed in parts (wait to start removing any pieces after step 7). You will need to use your 15mm socket wrench.


The bolt is quite odd and has a star pattern. Here are pics although a 15mm socket will work:
Step 7: The last clamps you will have to remove require an 11mm socket. Once these clamps are removed you can now you can remove one half of the exhaust.The central portion including the tips can be removed with one side or by itself (hence 2 or 3 overall large parts). We removed the exhaust as two pieces (refer to last picture on this thread showing the whole exhaust system).")
Step 7: The last clamps you will have to remove require an 11mm socket. Once these clamps are removed you can now you can remove one half of the exhaust. The central portion including the tips can be removed with one side or by itself (hence 2 or 3 overall large parts). We removed the exhaust as two pieces (refer to last picture on this thread showing the whole exhaust system).
")
Close up:
")
")
Now you can carefully remove one half (or one third) at a time. If removed in two parts, pay attention to the side that has the central portion of the exhaust (essentially the tips) as this will be the hardest to remove. You can swing the tips down to help loosen them. Its hard to remove them due to the expansion and contraction of the heated metal. Here is half of the exhaust removed:
")
Step 8: Go back to remove the other half of the exhaust as per step 6 (remove clamp) and step 7 (taking off the exhaust)
")
Step 9: Congrats you now have an exhaust-less car!
")
Full exhaust system:
")
Overall there should be 4 clamps. One clamp on the either sides of the car that were removed in step 5 and two clamps in the middle that are removed in step 7.