You must be logged in to rate content!
6 minute read
Rear seat delete
Compliments of VettViperKiller @ supraforums.com
8-13-2012
I wanted to share some pics of a recent rear seat delete that I fabricated.
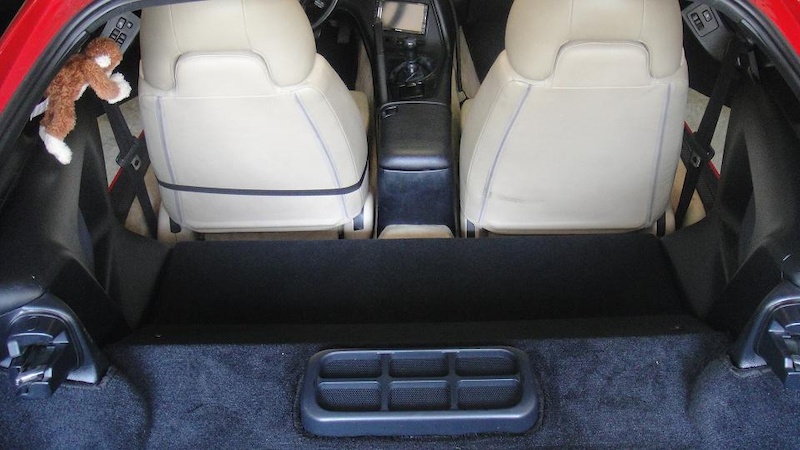
I knew I wanted the rear seat out; its useless, it has significant weight, and it impedes the front seats from reclining when in my preferred driving seat position (I've got long legs). I tried running with the rear seat removed, but it was very unsightly and it let in a lot of road/exhaust noise.
I had some defined goals with this particular area of the car and I believe I met all of them with this little set up.
1. My finished product retains the sound deadening characteristic of the OEM seat
2. Its very light weight (<10lbs)
3. It looks clean IMO.
4. I retained a seat 'shape,' the lower half of which serves as a useful shelf.
Using some wood, auto carpet, 3m glue and a whole bunch of staples I ended up with this: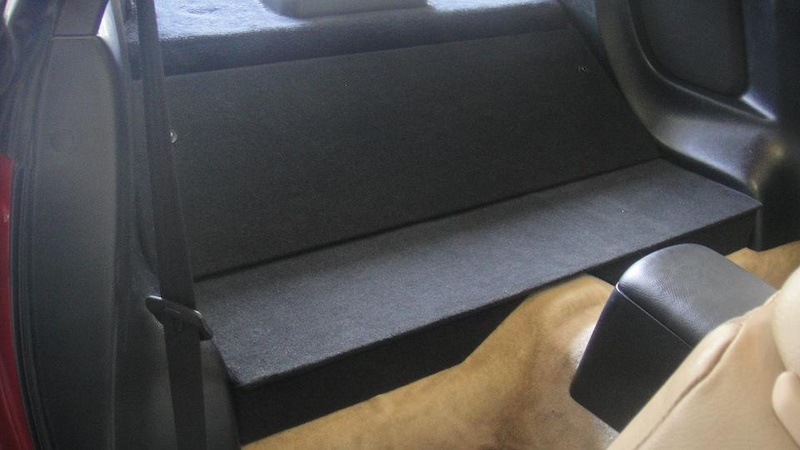
The backrest is bolted down using stock mounting points. The seat floor is held down by the backrest. No rattling, I used rubber washers and cut the pieces to fit snugly. That coupled with the carpet keeps it tight and rattle free.
8-21-2012
Hey guys, I wrote a DIY for all the workshop rats =) If youre interested I can make these on the weekends just PM me. Its fun and I'm single so I have shit loads of free time.
DIY rear seat delete
What you will need:
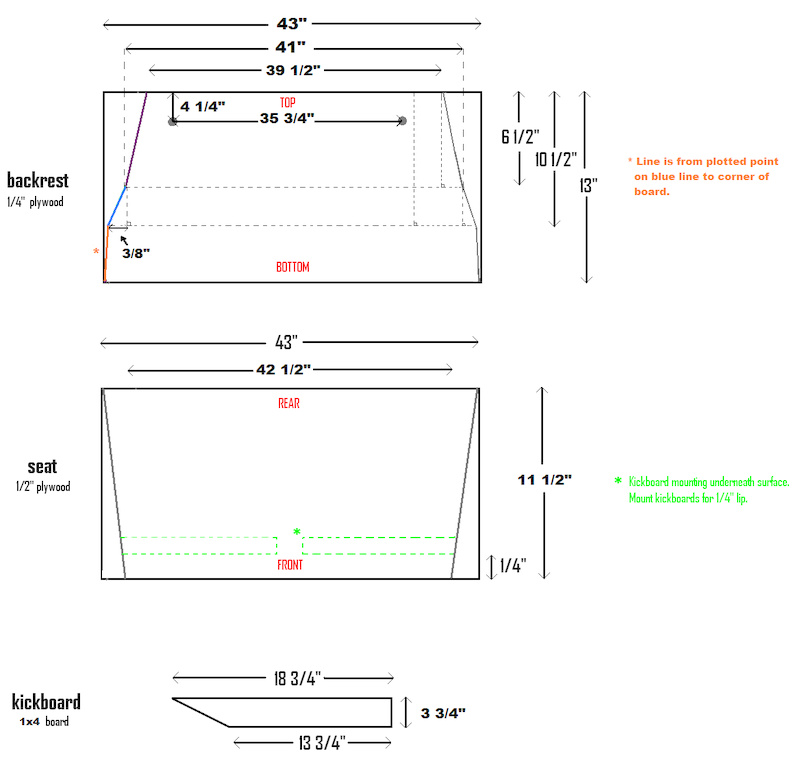
(2) 43”x13” 1/4” plywood or substitute. I used oak. Lowes also carries cedar for all of you Scandinavian sauna freaks. ;D
(1) 43”x11 1/2” 1/2” plywood or substitute.
(1) 1x4 x 4’ board. I used pine. This is enough to make the left and right kickboard. Its referred to as a 1x4 but these are not actual dimensions, no worries!
(1) can of 3M or Loctite spray glue
(1) Roll of black automotive interior carpet. I purchased mine from Pepboys, a large roll is more than enough.
(2) M8x1.25 x 40mm bolts. I used hex bolts because they are black.
(2) Rubber washers (black)
(1) Large bolt to plug up rear seat dual seat-buckle mounting point. You can reuse a bolt from the seat belt/spool assemblies.
(7+1) 1 1/2" wood screws
A Staple gun and staples. I used 1/8” and ¼” staples
A Power drill with ½” wood bit.
Couple sheets of sandpaper. I used 400, just enough to take care of large splinters.
Jig Saw with #20 wood blade or equivalent wood cutting device.
Measuring Tape
Square with long straight edge
Pencil/pen for marking wood
Carpet knife
Phillips screw driver, socket wrench and sockets (to remove seats, seat belts, buckles etc.)
Preparation and Fabrication:
1. Remove rear seat cushion
2. Remove rear seat backrest. 2 bolts, identifiy their mounting points. You will be bolting the backrest portion of the seat delete to these bolt holes.
3. Remove rear seat dual belt-buckle (on top of trans tunnel)
4. Remove left and right seat belts/belt spools (2 bolts for each assembly, 1 near bottom of B pillar and 1 behind hatch side paneling, adjacent to targa top mount
5. Cut and drill backrest structure.
6. Cut and drill the second backrest sheet. Identical to first backrest shape, but -1 1/2" in width
7. Using glue and staples, affix both backrest pieces together. The larger piece is the backrest face and provides the lip for flush fitment. The smaller piece aids in structural rigidity.
Make sure the bolt holes line up and that the backrest face evenly overlaps the sides of the narrower backrest piece (3/4" on each side).
The top and bottom of both pieces should line up.
8. Cut seat structure.
9. Cut kickboards and attach to seat structure using wood screws. Screw through the seat surface into kick boards. I recommend pre drilling to avoid splitting the wood.
10. Cut carpet in large general shape to cover wood. Wrap backrest and seat seperately. When wrapping the seat be sure to at least cover the bottom of the kickboards,
this improves static friction between the seat delete and the floor of your supra.
11. Using spray glue and staples, affix carpet to wood. Figure out how you are going to wrap the wood BEFORE you apply glue/staples, then make it permanent.
12. Trim excess carpet. I recommend completely covering the undersides of the back rest, kickboards and seat to improve insulating and sound deadening qualities -need not be pretty.
13. Backrest: Find bolt holes through carpet and cut a SMALL 'X' in carpet to allow for passage of bolts. Repeat on underside if you covered that in carpet as well.
14. Plug rear seat dual belt-buckle mounting point with bolt from seat belt/spool assembly. (greatly reduces road/exhaust noise!!!!!)
Installation
1. Starting at trans tunnel: Hold the backrest parallel with the car floor, slide the backrest up against the car body until the bolt holes in the backrest line up with the bolt holes in the car body (same bolt holes that held OEM backrest). The edges of the backrest should slide underneath the interior plastic paneling and speaker enclosures. This is correct and eliminates visable gaps. The double layer of 1/4" sheeting with a 3/4" wide 1/4" thick lip on the sides allows for the back rest to fit under the side plastic paneling. A carpet covered 1/2" thick sheet will not properly fit under the interior plastic paneling.
2. Insert bolts, using rubber washers between carpet and bolt head. Hand tighten only!
3. Install seat by holding kickboards and angling seat surface toward ground. Insert under back rest and push in kickboards to raise the seat surface until it meets the backrest. The
seat will make contact with the car body behind the backrest.
Thats it, the process is finished. If everything was correctly constructed, the seat should stay wedged between the backrest, car body and floor. I have tested my setup under hard cornering, acceleration and braking and it hasnt moved at all. I would advise against putting too much weight on the seat as its not fastened. I store a plastic tool box with 14 lbs. of tools, a CD case and some air freshener back there but thats about it. If you wish to make the seat more secure, some velcro between the bottom of the kickboard and the floor of your supra will go a long way. Enjoy your +30 lbs of weight savings and the reduction of unnecessary ridiculousness!