You must be logged in to rate content!
18 minute read
Swap manual transmission from automatic - I did it!
Compliments of Moljinar @ vwvortex.com
6-8-2005
Well, I went and did it!
The automatic was getting weaker by the day and with a 3 day weekend coming up I decided it was time to swap the automatic transmission for a manual. I've been looking at doing this for over a year and had gathered all the info and parts I needed. Interestingly enough, if you do a search on the Vortex you'll find numerous threads that mention swaps, some that even list most of what has to be done but NONE are comprehensive. So this post will be long and complete.
The short story is is a pleasure to drive now. Handles quicker, accelerates better (duh!) and is more of a GTI than ever. Even milage appears to be better. I figure I removed 150-200 pounds of auto related crap from the car and put in only 100. And I lost 10 lbs myself doing it!
Took two days by my self. Nothing hard. Some a little frustrating.
The Recipient: 85 Cabby aka "Buffy"Â, with 3 spd auto, 100mm axle set. Power steering.
The Donor: 83 GTI aka Moljinar, 5 spd manual FK tranny with 90mm axle set. Manual steering.
The list of stuff:
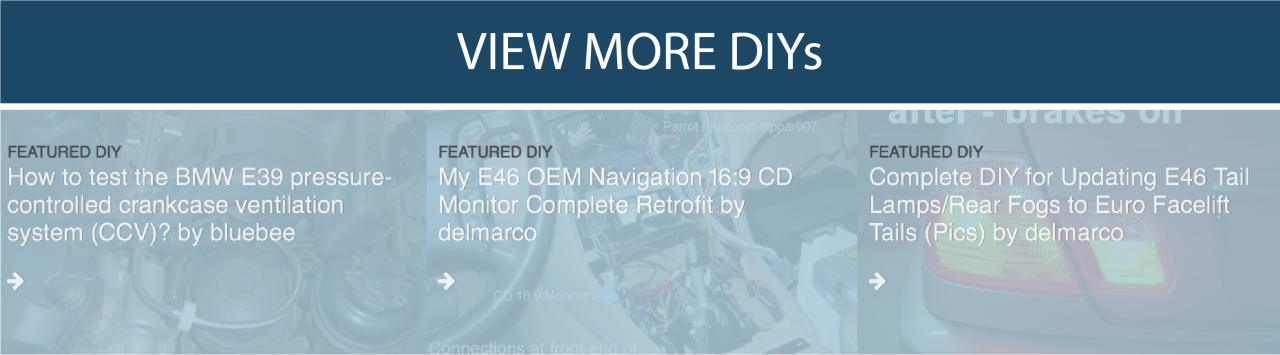
1. Manual tranny, 020 type. 100mm axles or 90mm axle set. Both work (we'll discuss this later)
2. All clutch stuff. Clutch disc, pressure plate, flywheel, flywheel bolts, crankshaft bolts.
3. Shift linkages. All links and rods. Including the shifter lever, the ball socket it goes in, the rod it attaches to that runs the length of the exhaust tunnel and the bracket that holds the nylon bushing the rod runs thru. Shift knob. It is best to remove all pieces from a donor vehicle so you can get it all and not miss anything. Then you can replace the few parts that may be too worn.
4. Clutch cable.
5. Speedo cable.
6. Starter for manual tranny car. The auto starter is completely different , it even spins in the wrong direction!
7. Clutch pedal.
8. Pedal bracket for manual car. There are issues here with ones from older donor cars. You can buy the exact bracket you need from the dealer and I suggest you do.
9. You will need a new/different steering rack. The rack in an auto-equipped VW doesn't have the bracket to bolt the shift linkages to. Get a rack from a manual- equipped donor vehicle, preferably an identical model car. Early rabbit models use a different u-joint where they attach to the steering column. You can also change from power steering to manual steering at this point if so desired.
10. Backup switch plug with wire pigtail for rewiring backup lites.
The Procedure:
1. While the car is on the ground use a long breaker bar or impact wrench and break loose the right and left front axle nuts.
2. Then loosen the lug nuts on the front wheels .
3. Jack up the car and put on jack stands to make it secure.
4. Remove the wheels.
5. Remove the 2 bolts that attach the strut to the steering hub (on each side.)
6. Remove the tie-rod ends from the steering hub. I use a puller.
7. Remove the tie-rod ends from the steering rack rods. Make note of how far in the ends were attached. We'll need to know this later to help in realigning the toe-out.
8. Pull the axles out of each hub. Swing the hub to the side and out to make room. The axles my need some gentle persuasion to get loose.
8. Remove the battery. Undo the ground connection(s) to the auto tranny.
9. Remove the starter. Undo the starter connections. Remove speedometer cable. Remove throttle cable. Remove shift cable.
10. Remove driver side engine mount bolt.
11. Remove front engine mounts.
12. Remove rear motor mounts. This will leave the engine and tranny hanging down at an angle. This can stretch, pull apart some vacuum connections and electrical wiring. Take heed!
13. Remove two bolts from tranny to engine on the top of the tranny.
14. Remove lower bolts from tranny to engine.
15. Put jack under tranny so it won't fall to far. Pull tranny back from engine. When the input shaft clears the torque converter it will drop suddenly. Be ready for it.
16. Once removed pull the tranny out from under the car.
17. Throw it away! (just kidding, you may need the axles)
18. Undo the u-joint from the steering rack to column. Separate if possible.
19. Remove the power steering hoses from the rack. This will make a major puddle if not ready for it! (If you already have manual steering ignore this part.
20. Remove the steering rack from the car. You do this by sliding the rack all the way over to the passenger side as far as you can get it. Push the steering rod on the drivers side in to the rack as far as it will go. There will be just enough room to pull the rod out thru the hole it goes thru and then move it aside. Now move the rack to the drivers side and remove the other rod from its hole. You should now have a loose rack lying on the ground.
21. In the car interior remove the console and lay it aside.
22. Remove the shifter plate (3 small bolts) Undo the shifter cable from the shifter.
23. Detach the two red wires from the switch. This is your starter wire from the ignition to the starter. You must connect these two wires to get voltage to the starter (or run a brand new wire, but why?)
24. Detach the other two wires. This is the backup-light wiring and will have to be dealt with later to get them working.
25. Remove the shifter mechanism from the car. Throw it at least 50 ft. from the vehicle.
26. Remove the shifter cable from the car. I found this to be impossible. So I got a hacksaw and cut the cable in half. That made it possible.
27. Remove torque converter from drive plate. Doesn't remind you one of those things that curlers throw down the ice in the Olympics? 28. Remove the drive plate from the crankshaft. Save the bolts!!!!
29. Remove the front motor mount for reuse. Remove the rear motor mount for reuse. Remove the driver side motor mount for reuse. Unless you have these from the donor car.
30. Back in the car interior you need to start removing the pedal bracket. It is held on by three (3) bolts behind the brake booster. Remove these form inside the engine compartment. These are a pain to get off. Very slow process.
Under the bracket there is one screw that must be removed that holds it to the underside of the dash. The bracket is also help to the steering column by a spring clip that is quite a pain to undo. There is also a clip on the brake shaft that attaches to the pedal, remove that too. The bracket should now be loose and ready to remove. Undo the throttle cable from the throttle pedal while you're under there.
Your car is halfway there!
Intermission! Go have a beer and a sandwich!
Do things in this order for an easier install!
Steering rack
A. Reinstall the new powersteering rack. Opposite procedure as removing it. Make sure you have the brackets for the shift linkage attached to it.
B. Make sure the u-joint is hooked back up. If you have a Rabbit rack and a Cabby (later model) column the two won't mate. You'll need the Rabbit column or the Rabbit joint or something. In short make sure your rack is compatible.
C. Reinstall the PS hoses.
D. Refill the PS reservoir as needed.
Manual Tranny
1. Attach the pressure plate to the crankshaft. Make sure your bolts are locktited well and torqued correctly!! See discussion on bolts before you do this. Major problems can arise (don't ask how I know this) Before you do this you might want to replace the rear main seal.
2. Put the clutch plate inside the flywheel and bolt up. Locktite the threads well and torque properly. Use the centering tool to make sure the clutch is centered correctly. Torque according to the diagram in the manual.
3. Put the manual tranny on a jack and wheel it under the car. Without going in to much detail here you need to get the tranny lined up with the clutch bushing and the dowel rods on the engine block lined up with the holes in the tranny. This is a huge wrestling match to get it done. But then I was never a weight lifter so maybe you'll find it easier than me.
4. Once lined up install the top tranny to engine bolts and tighten. Put the bottom bolts in and tighten. Remount the starter and front motor mount and tighten.
5. Using a jack lift the rear of the tranny enough that the drivers side motor mount slips into the mount. Reinsert bolt and tighten.
6. With the engine and tranny now back together start attaching the ground straps, starter wires etc. Be thorough!
7. Check for vacuum lines that have been pulled out of whack. Major culprits are the brake booster and air bypass hoses.
8. Fill the tranny as per the Bentley. DO NOT RUN IT DRY! Running with too little can fry your 5th gear as well.
Pedal Cluster
1. Take new pedal cluster and install in the reverse order. Here's the lowdown on what has to be done in addition.
2. The manual pedal cluster has a small tube on it that holds the end of the clutch cable. If this unit is not new check the welds for cracks, many of them crack and leave you stranded. If cracked replace/repair as needed.
3. If the bracket is from an older car be aware that it's not a perfect fit. The slot on the top of the original is about 4 inches long and helps get it lined up and installed. The one from my Rabbit had a slot only an inch long and made life hell. So I filed the notch open another ½ inch and that was enough to get it installed.
4. The brake pedal on an older bracket has a pin that holds the pedals in line and is larger in diameter than the Cabbys. So you can't reuse the Cabby brake pedal. The Rabbit brake pedal has a curve to it that can complicate using the connector thats on the end of the brake shaft. Use the Rabbit pedal, knock out the connecting pin (small1/4 or so) and use the connector and pin that came with the Cabby. Tight fit but works.
5. Clutch pedal. Ya gotta have one. Make sure it's compatible with the hinge pin of the bracket you're using. Hook up cable as usual.
6. There's a spring clip that holds the bracket to the steering column. It's a bitch to get it back together. In fact I still haven't so don't worry about it too much.
7. If you loosened the steering column when you removed the original bracket then tighten it back up.
8. Bolt back up to the brake booster. Itll be a bit easier than removing it. WARNING!!! There is a bracket that is L shaped and goes behind the brake booster bracket and it is impossible to see at first. If it slips down it will block the pedal cluster bolts from going all the way thru the firewall. I lost a good half hour to that crap.
9. Rehook up the brake light switch. If you're using a Rabbit pedal bracket the Cabby switch won't work. But if you file one of the two tabs off of it and cut down the other it'll fit ok. Another good reason to get a Cabby bracket in the first place!
Shift Linkage
1. Bolt the linkage brackets to the steering rack. It may already have them bolted on. The one with the bushing can be replaced and I'd suggest doing so. It's cheap and will go a long way to tighten up the shifter.
2. Install the shifter rod and lever assembly. It should bolt down to the original holes. Before you do you might want to sand and paint the shift rod and polish or paint the shift lever too. Where the shift lever attaches to the shift rod there are two bushings. They're identical in size to some of those supplied in the shifter bushing kit from VW and others. I found significant slop there. Replacing those bushings made a ton of difference. You never hear about changing those. Also the ball bushing that the shift lever goes thru is also available and getting a new one is a grand idea.
3. Attach all the linkage parts and test. Align the shifter as described in the Bentley. If you need a 15mm spacer for the reverse lockout setting use a standard cassette tape case. Works perfectly.
4. You DID use all new bushings didn't you? You DID put in a short shifter kit didn't you?
5. Test. Readjust as necessary.
6. You will need a new cover plate for the console. The old one for the automatic obviously won't work. Find one in a junkyard (the Rabbit GTI console is a different size) Or make your own. Or buy one from Langford!
Suspension
1. Reattach the axles on both sides. Put the nuts on. We'll tighten them later.
2. Reattach the tie-rod ends. Try to get them back to where they were before we removed them. Attach the tie-rod ends to the steering hub. Don't forget to cotter pin them!
3. Reattach the hub to the strut mount. Try to get the camber set back to where it was originally. Tighten as required.
4. At this point I try to start the car which is still on jack stands. Unless you frigged something up it should start up ok. Test the clutch and shifter for proper operation. Its easier to do it now than when its back down on the ground. If everything passes then put the wheels back on and remove the jack stands.
5. Tighten the lug nuts to spec.
6. Tighten the axle nuts to spec. Again, a very large breaker bar and a length of pipe might be useful.
Now start it up and drive away.
Gotchas!!!
Here are several things you should watch out for.
1. While the engine is tilted severely many things can pull loose. I've already mentioned vacuum hoses. Also there may be ground straps on the back of the engine that will need to be reattached. I fried a wire in my dashboard because it became the only drain wire for the car. Turns out a strap from the firewall to the head had come off.
2. Crankshaft bolts. My bolts were from a 83 GTI that did not use the newer stretchy bolts. So they needed 55 ft-lbs of torque. Unfortunately I read the 85 Cabby manual that said to use 30 ft-lbs (for the new type of bolts) So the bolts backed out about 200 miles later and I found my self stuck along side the road. No damage fortunately but I spent another 4 hours removing things so I could retorque the suckers. And put waaay more LockTite on! Know what bolts you're using and what they need for torque!
3. Axles. This is a confusing issue for many. The 85 up Cabby uses 100mm axle flanges and thicker axles. They also feature larger CV joints. The hub on a Cabby is machined for these CV joints to clear. The splines inside the hub are identical to the CV joint found with the 90mm axle set. If the tranny you want to use have 90mm flanges and you want to use your existing 100mm axle set you'll need to change the flanges. Some trannys can't be changed over. If you have the 90mm axle set with the tranny you can install the whole thing with no problem. It'll bolt right up. You CANT put a 100mm axle set in a hub designed for a 90mm set though. Just in case you were thinking about putting your old automatic in your old Rabbit. Don't mix and match CV joints and axles. They have different lengths and can bind up.
4. This may sound strange but your starter needs two (2) bolts to work properly. I lost the bottom bolt and installed it with only one. Since it's a concentric fit into the hole I knew it wasn't needed to center it. However, it cranked like a very poor tired starter on an automatic cabby. I was getting ready to buy a new one when I finally put a bolt in . The extra grounding did the trick. It now cranks like new.
5. This is a good time to remove the oil pan and clean and repaint it. I'm happy to say my oil pan was clean enough inside to eat off of. Over 200K miles of good living I guess. No sludge anywhere.
If I can think of anything else I’ll add it later. Meanwhile I have many auto tranny parts for sale including a very new starter!
I'm adding in comments from BROKE about getting the necessary clutch/flywheel items you need.
If it's a 020 tranny then it shoudl fit with no problem. But I'll let everyone else tell you which ones are which. I don't have a list handy.
6-9-2005
I just added another item to the original post. I'll repeat it here...
9. Rehook up the brake light switch. If you're using a Rabbit pedal bracket the Cabby switch won't work. But if you file one of the two tabs off of it and cut down the other it'll fit ok. Another good reason to get a Cabby bracket in the first place!
Also new pics!
Tranny size comparison...
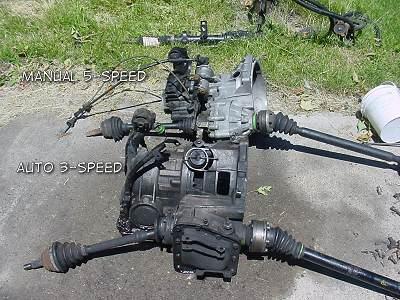
Brake pedal differences...
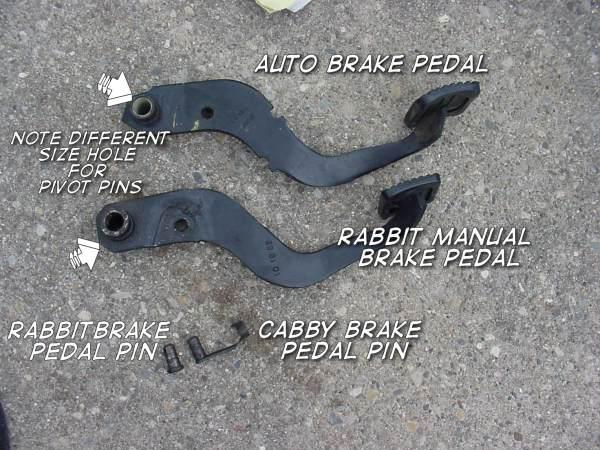
Axle removal...
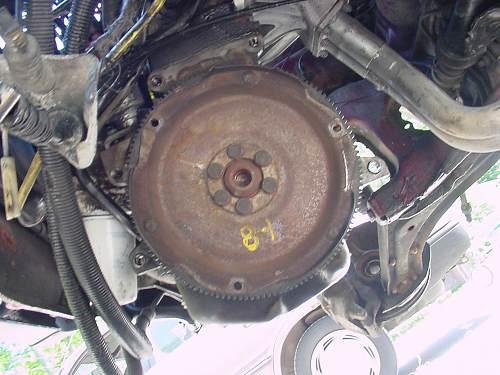
Automatic driven plate before removal...
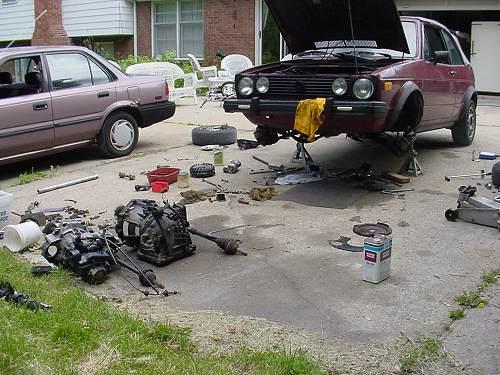
Don't call OSHA...!
![]()
Someone asked what I used to do this job so I labeled a pic for you...
http://p250.merlyyn.com/images/tools.jpg
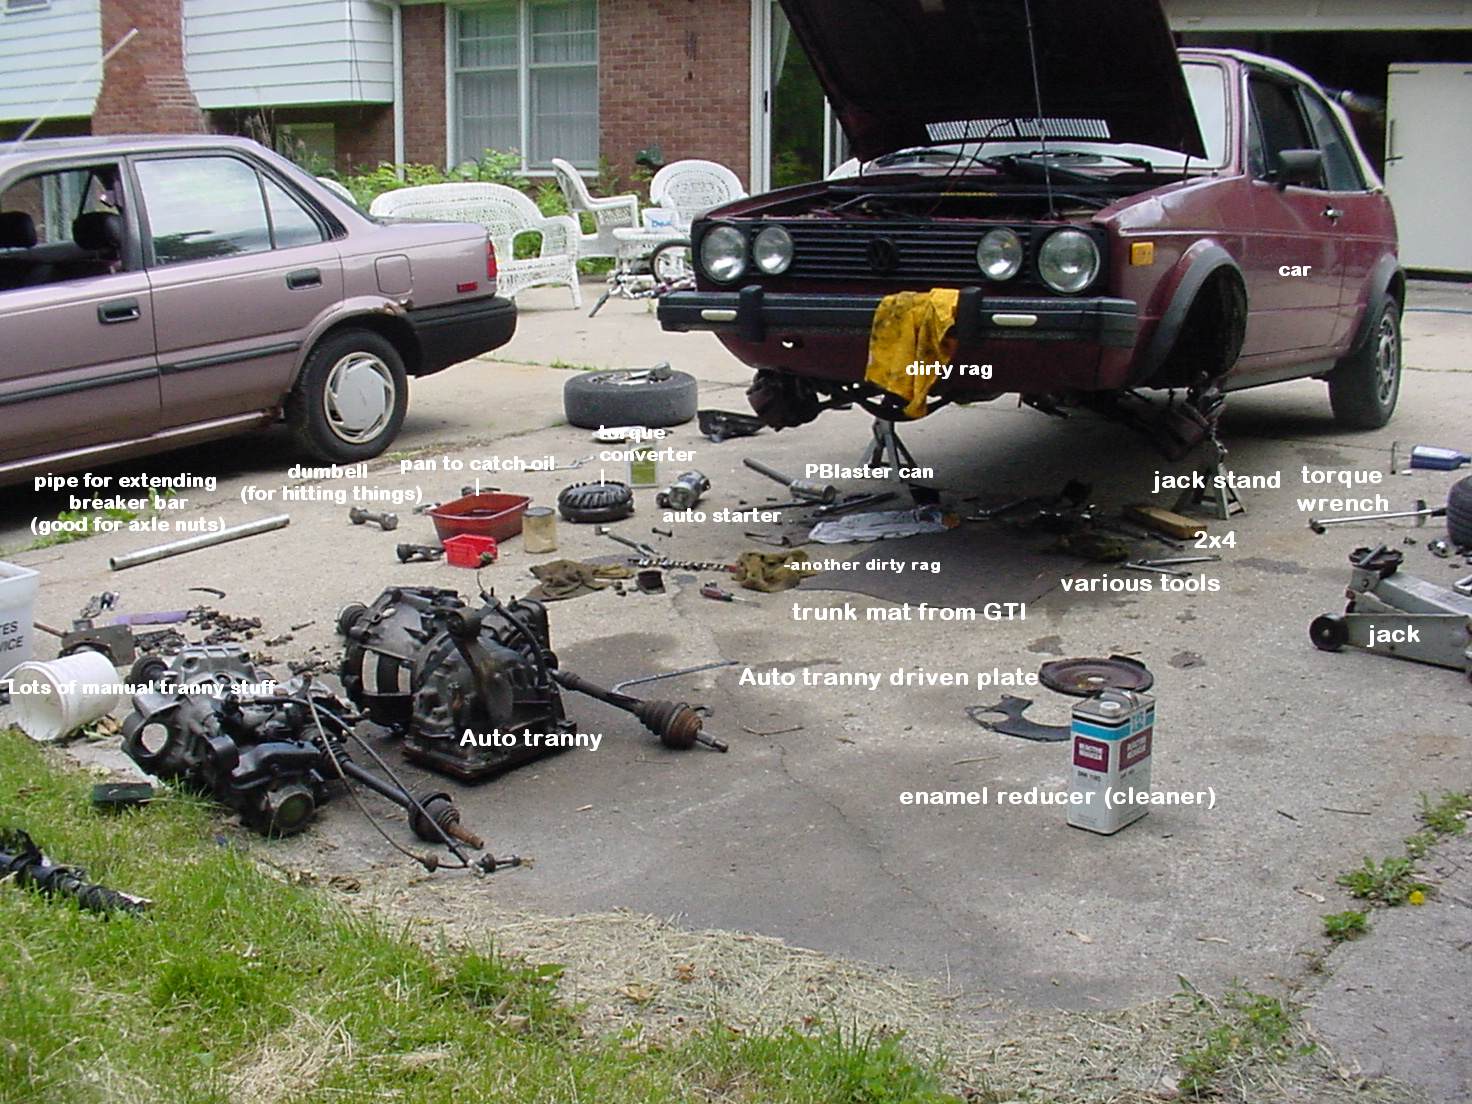
I agree! Plus it you look carefully you'll see the real weight is being caried by the lower ball joint adn control arm. The brake line only prevents it from swinging wider.
6-28-2007
I found the power steering rack for $30, I already had the tranny which is easily found for lerss than $100. The pedal cluster I pulled from a junk car.
11-11-2008
My deep dark secret is that I never got around to wiring my backup switch. ![]()
The wires for the auto switch are below the shifter console. You'll see them when replacing the shifter. Extend those wires thru the firewall to thew tranny's backup switch. There are two different kinds of backup switches depends on which tranny you have.