You must be logged in to rate content!
33 minute read
"02m / o2m 6 speed into mk3 12v VR6 (Pictures Fixed)
Compliments of nater @ vwvortex.com
5-28-2006
Guys,
I thought I'd throw this together as I'm just about done...but due to Murphy's law something is bound to go wrong.
So, much like my Turbo thread please throw in your $.02 and help if you can.
Tools used:
(I'll update this list as I remember items I used)
** basic sockets/hand tools (30mm for axle/driveshaft hub bolts)
** angle grinder
** 12mm X 1.50 die for threading the shifter rod if you want to keep your exising mk3 golf ball shifter. Note: The mk4's don't use a thread, it seems they use some other mechanism - you'll see when you get your shifter box and cables.
** welder (I had someone do it - more info will be below)
** engine hoist
** triple square socket (for driveshaft to tranny bolts)
** 4 jackstands (or a lift)
** extra jack
** drill and drill bit for drilling through metal (shifter box)
** an accurate laser measure (measuring for custom-length axles) - or you can trust my measuring which would be specific to my car and the way my motor sits in the engine bay with the re-located motor mount.
Equipment purchased for swap:
(I'll update this list as I remember what else I bought)
** 02m 6speed Tranny, flywheel, clutch, starter, shifter box & cables off of ANY 24v VR6 model car (one example is 2003 Jetta GLi, but I believe 2002 had a GTi version with 24v's).
Disclaimer: be very careful when ordering parts at the dealership - make sure it shows the 6sp transmission on his ETKA. While I'm unsure exactly which car had the 24v o2m combo I DO KNOW that the 2003 Jetta GLi did. Be careful again, I believe in '04 it went to the 1.8t motor.
** 24V VR6 Tstat housing (this is because the 12v housing actually interferes with the transmission when you shift)
** 24V Tstat housing bolts. This housing is longer than the 12v so even the long bolts from the mk3 version won't work.
** 24v upper and lower radiator hoses...b/c the oem hoses have too many 'kinks' in them due to the different angles of the new tstat housing outlets (pointing in different directions now)
** Don't forget to order new axle nuts for your axles (on the spline where the hub is) b/c I'm pretty sure they are one-time-use only.
** Custom-made trans mount (I'll talk more about this later, there are a couple ways to go about securing the trans to the subframe)
** "Modified" existing front mount (let this be your last worry as it's not that complicated)
** Custom axles (some have cut down 02m axles but they aren't cheap to buy and then customize)
** 24V 02m slave cylinder line (you can't just connect your existing slave line to the o2m. This needs to be modified.
** Flywheel-to-crank and clutch bolts (24v vr6 o2m)
** Don't forget to get the harness/plugs for trans speed sensor and reverse light (b/c your mk3 12v vr6 plugs don't match up).
My "Method" of swap (some things can be done differently if you use your imagination.
Summary:
The trans bolts right up to the 12v vr6 motor. Before you do this, you'll need to remove the old flywheel/clutch assembly (of course) and re-install with new dealer-sourced bolts. Once torqued down you can install the transmission.
I did it by pulling the motor out entirely. And I'd suggest you do it also if you plan on moving the transmission mount. And even if you make your own mount you'll probably need that room anyway.
That is your biggest hurdle (besides the driveshafts), getting the rear mount situation "fixed". Once you've done that you can put the motor back in.
Anyway,
while the motor is out I pulled the exhaust to allow myself room to get the stock shifter box out. Use your Bentley here and you'll figure out how that comes out...it's fairly straight-forward yet a pain at the same time (bolts up top in the pass compartment and also underneith).
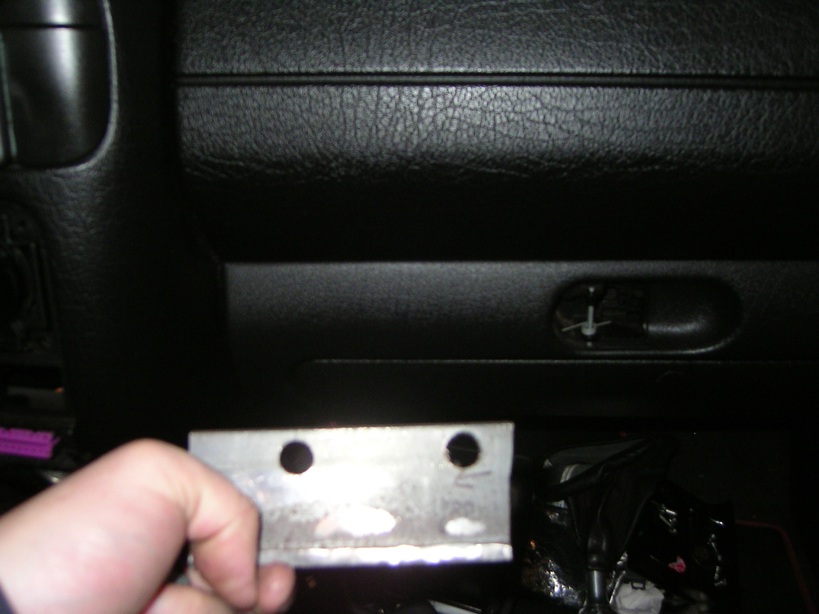
Once the old box was out I test-fitted the new one. Problem is, no bolt holes match up. This is where your mechanical and creative proficiency come in...find a way to mount your box (like that?)
Once that is done you can put the motor back in (if you do it with the motor out of course).
Once your motor is back in all you are doing is swapping some sensor plugs on the trans, hooking up the coolant hoses, swapping the starters and grounds, etc...
Oh, one last thing....you can now install the axles. I made it easier by unbolting the ball joint to allow movement of the control arm to get the new ones in. You can do it any way you want - there may be an easier way to do any of this, I'm just documenting what I've done.
Ok, now for the specifics (with pics and in no particular order) :
Here's why I went this route anyway:
![]()
I somehow broke my bolt kit on the peloquin and it spewed out silver paint.
Plus,
I wanted a beefier trans that had oem parts availability. What I've heard from some reliable sources is that the O2m (in stock form) has been able to hold well over 450-500whp/trq on AWD cars. EIP's R32 held up to a bit more than that for a long time - and that is with traction. So I figured it was a good choice.
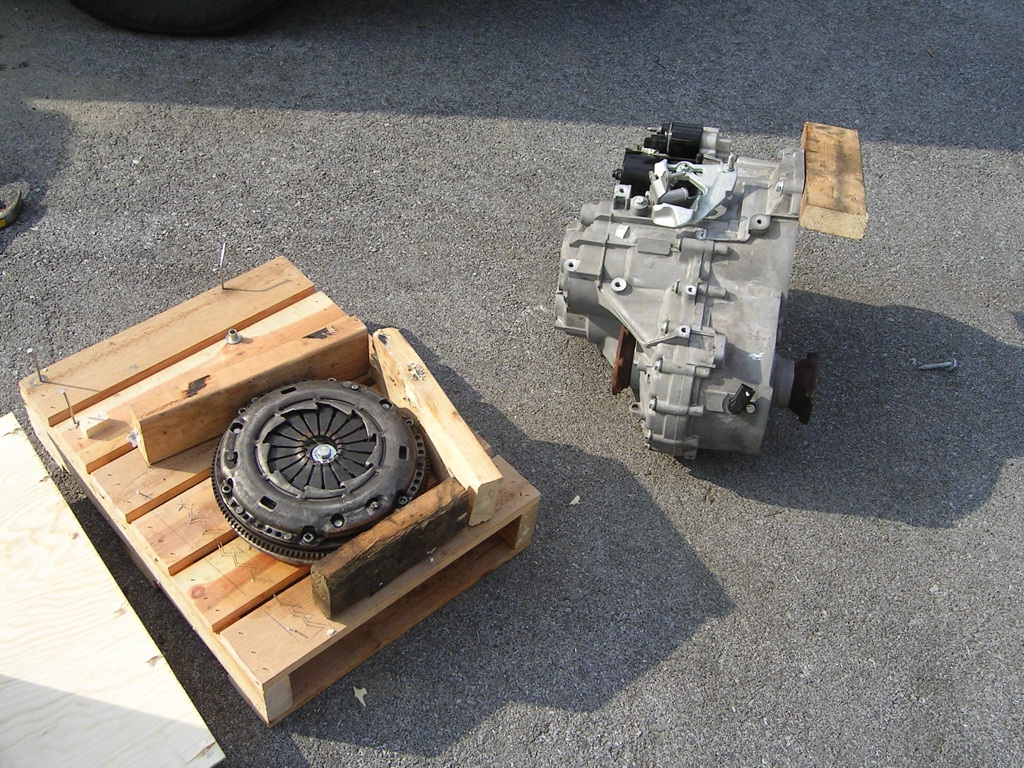
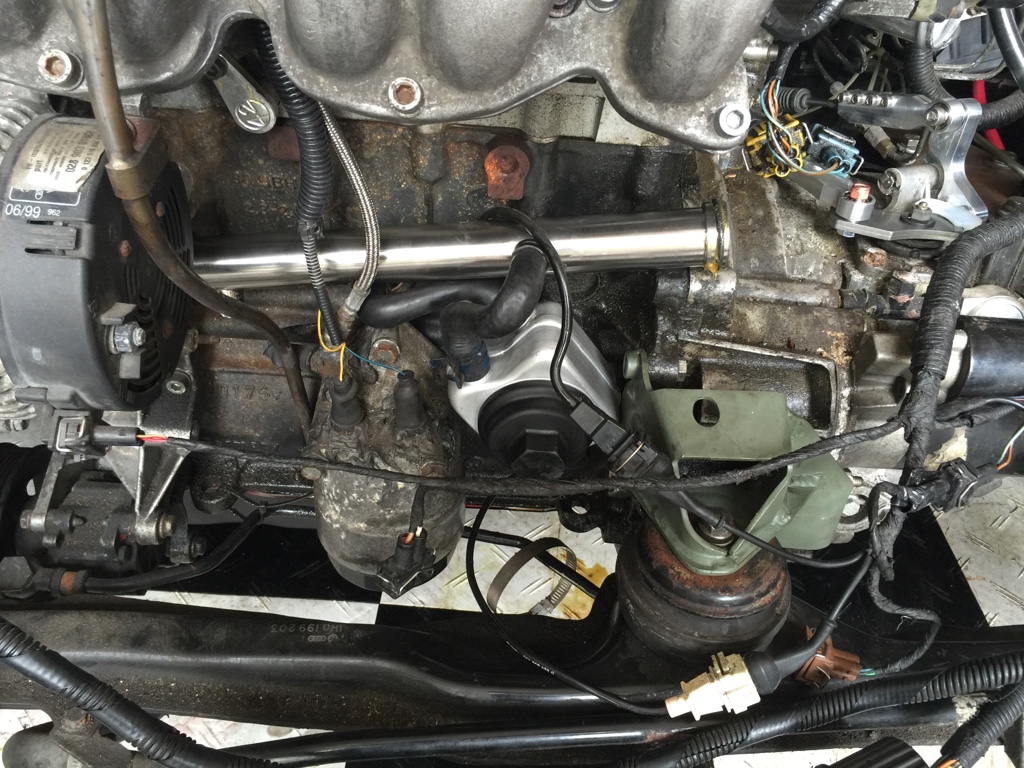
The 02m Shifter box/cables:
And of course the o2m/clutch/starter:
The slave cylinder line (you can only get the "round thing" in my left hand by ordering the entire line - and no, it's not listed as a slave cylinder):
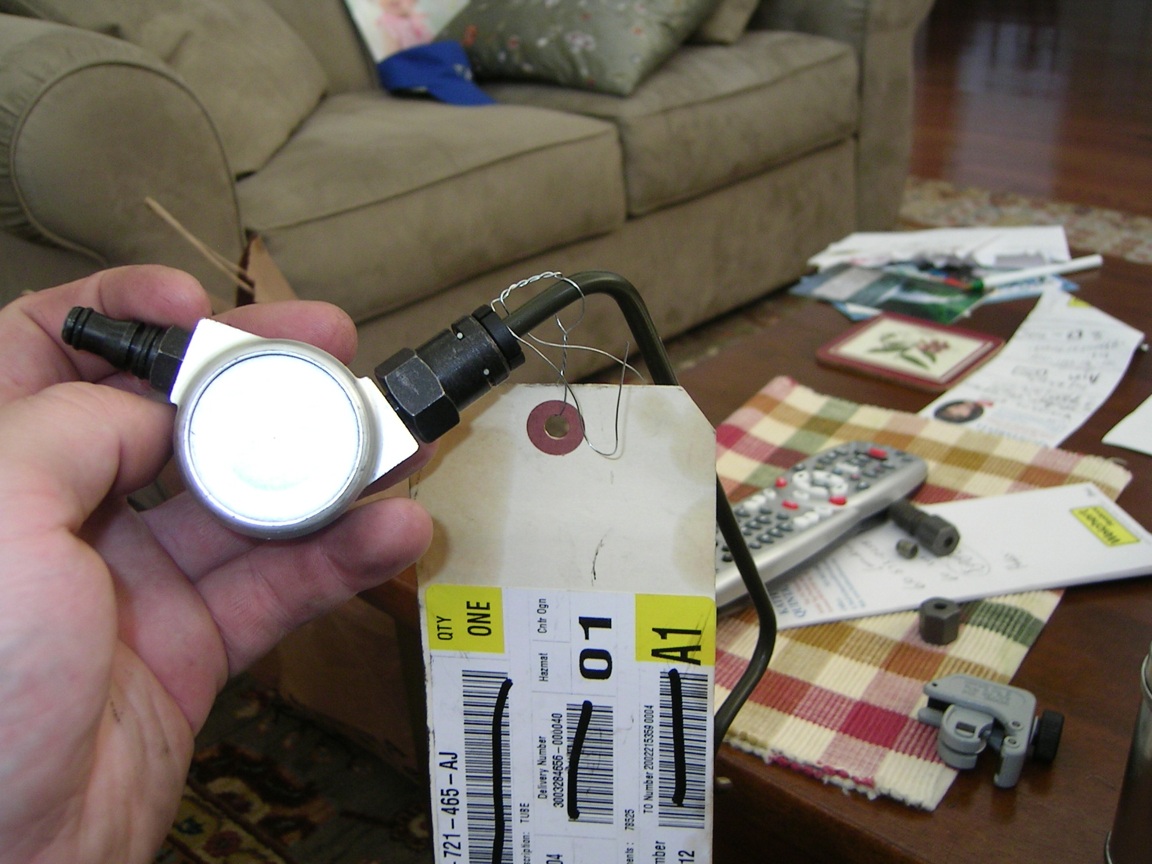
That connector b/w my thumb and left index finger plugs into the slave cylinder assembly (which *should* be on the trans when you buy it). You can see it on the picture below...it's hard to see, but is right above the starter and has a yellow cap on the end (that yellow cap was put in there to keep fluid from seeping out during shipment).
![]()
Here is the trans mount that I sourced from dutchdub.com:
![]()
Here's the link: (Updated June 2008) and scroll about half-way down to see more pics.
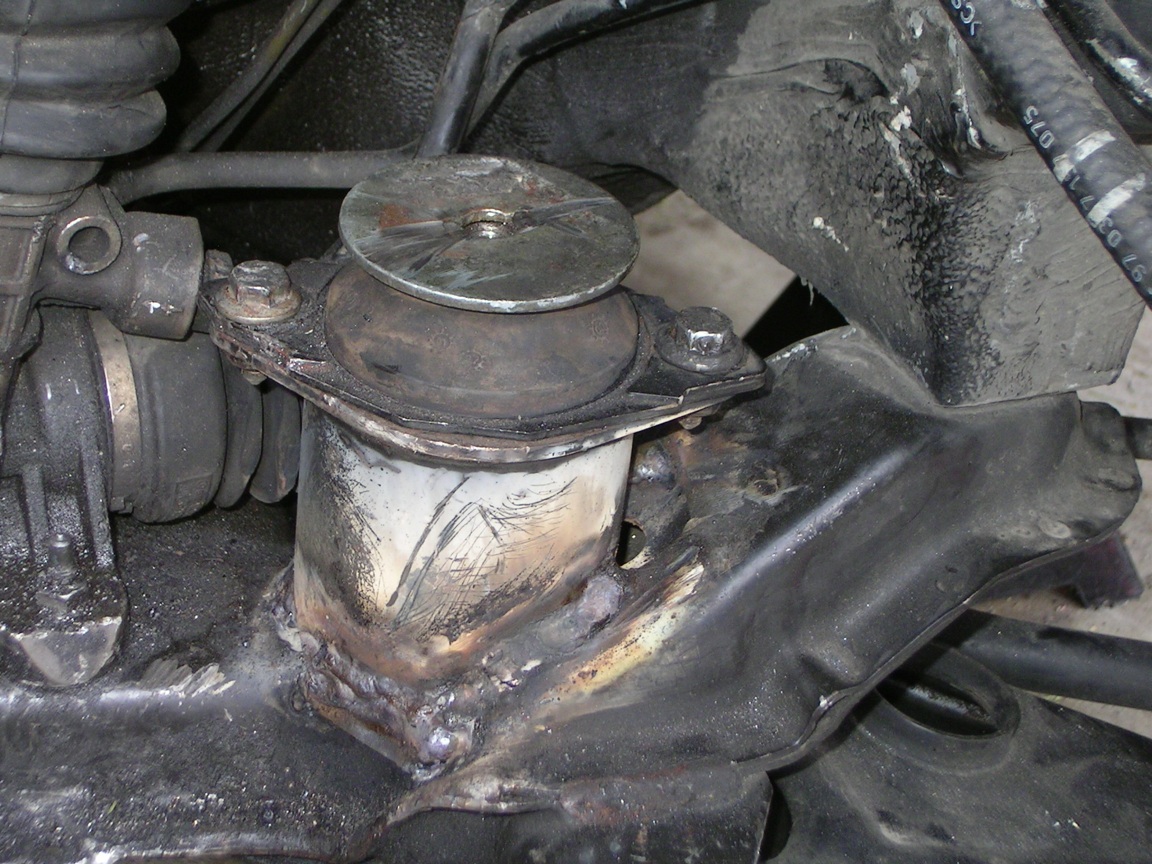
The problem with this mount is it's not PERFECT. I think that's because it's meant for an AWD (ie. R32 tranny) conversion. It gets you close but not quite. if you use this mount you MUST cut off and re-locate your "cup" that sits on the rear subframe
Here's how I did it...
I cut it out:

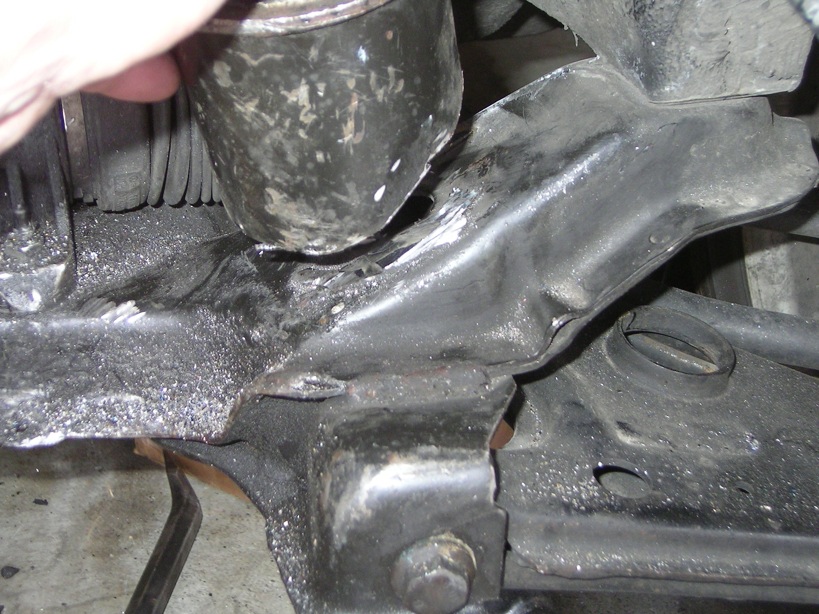
And attached it to the transmission mount that I got from dutchdub:
![]()
By doing this, I can simply put the motor back in the car, bolt down the other two mounts and see where the cup "sits".
That's when I called the welder and had him stick weld it in one small spot (just to keep the mount there when I pulled the motor again).
This way you get the perfect fit.
I then pulled the motor and allowed him to get about 85% of the mounts' circumference welded (factory design had less then that maybe for drainage? So I didn't stress when he couldn't get all the way around it).
Here's what we ended up with:
![]()
Here's what I did to mount the o2m shifter box in the car...
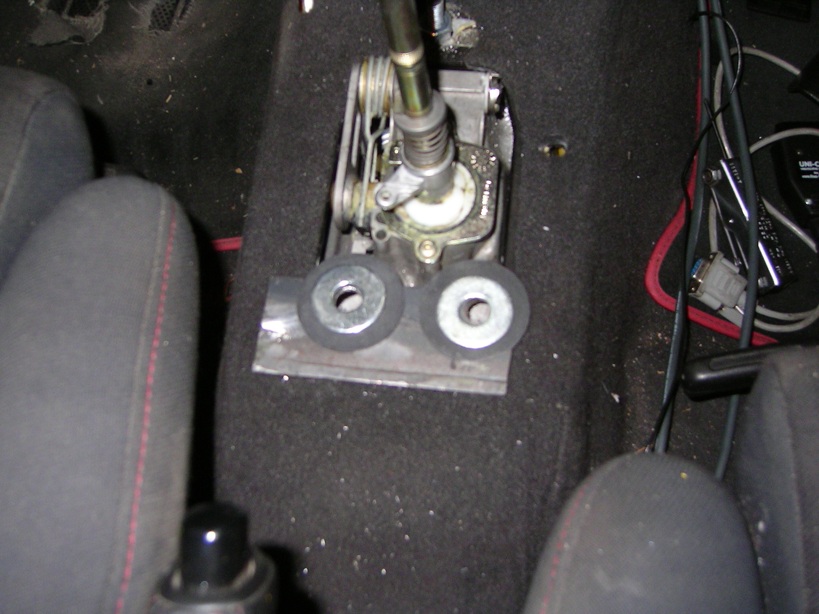
It's hard to see, but there is one bolt that I drilled through the middle of the shift box and also through the bottom of the car. It's on the part of the shifter b/w the shifter and radio area (behind the stick shift).
The other two washers are going to take bolts that go into existing threads in the box itself. I put rubber washers in it to keep vibration down.
As you can see in the above pic I just cut a piece of angle iron and drilled holes through it to make a steady fasten. Time will tell if this will hold up...if not, I'll have it welded. Here's a pic:
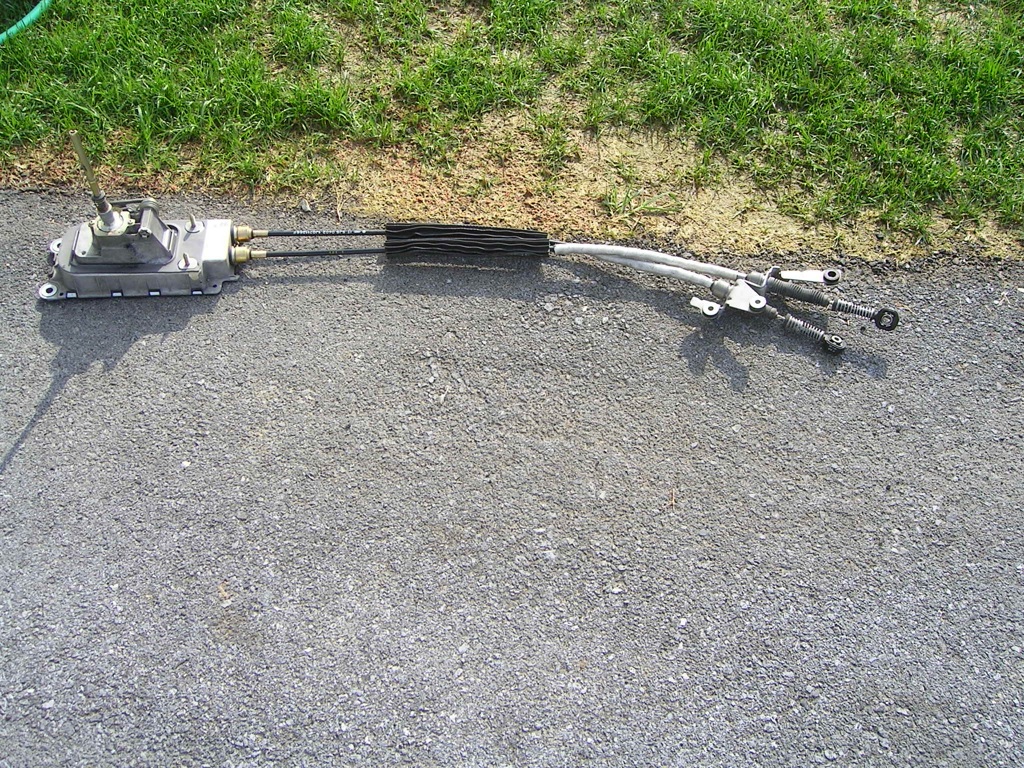
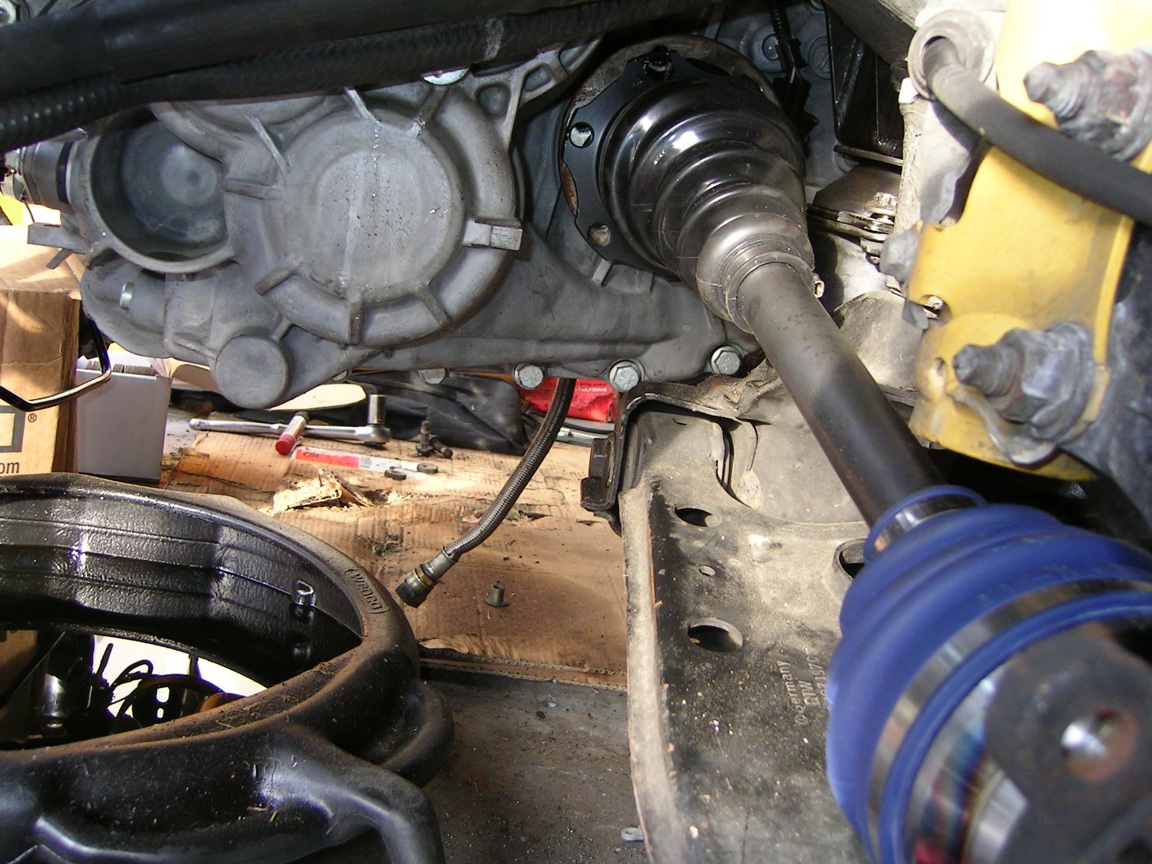
Here's my custom driveshafts from The Driveshaft Shop
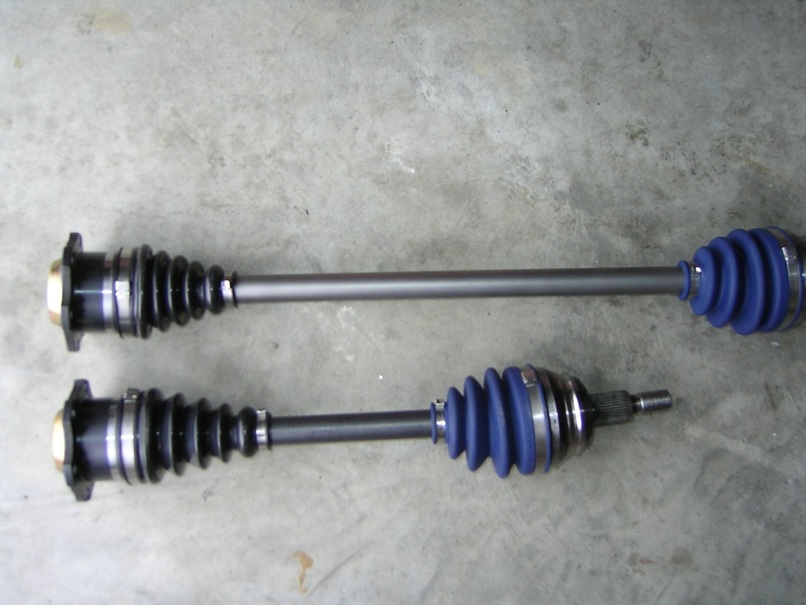
The length of the driveshafts (as measured from the "flat" of the inside of the hub just above the ball joint/knuckle):
Drivers Side:
16 1/2"
Pass Side:
26 13/16"
Measured at ride-height. If you are up on jackstands you can simulate ride-height (according to driveshaft shop) but sitting the jackstands in the front under the knuckle in the front suspension.
**Remember, this is total length and the point it was measured from was discussed with the driveshaft shop. If you are unsure exactly where to measure from ask who is doing your axles**
If you are doing it using 02m axles then you'll need to find the amount needed to cut off and go from there.
These driveshafts are "Level 2" which they said are made to hold 350whp. FYI, they cost about $750
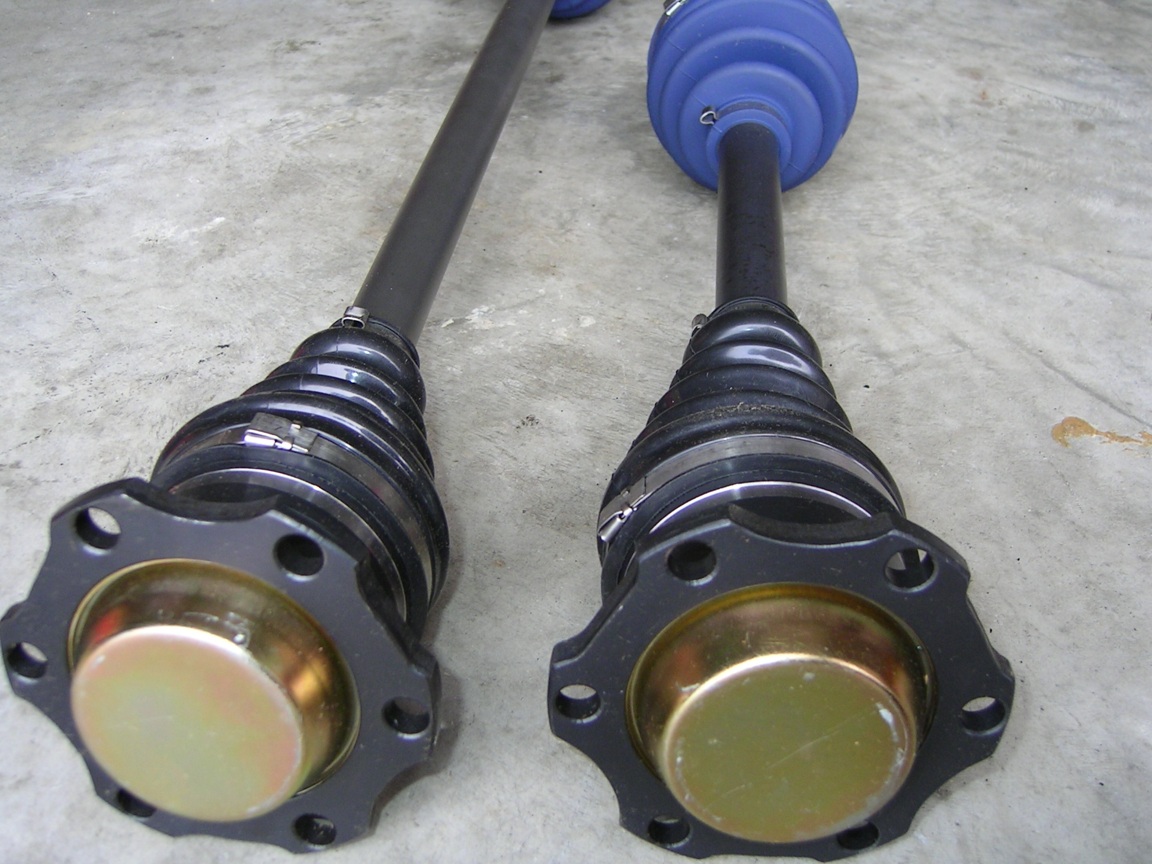
Test fit:
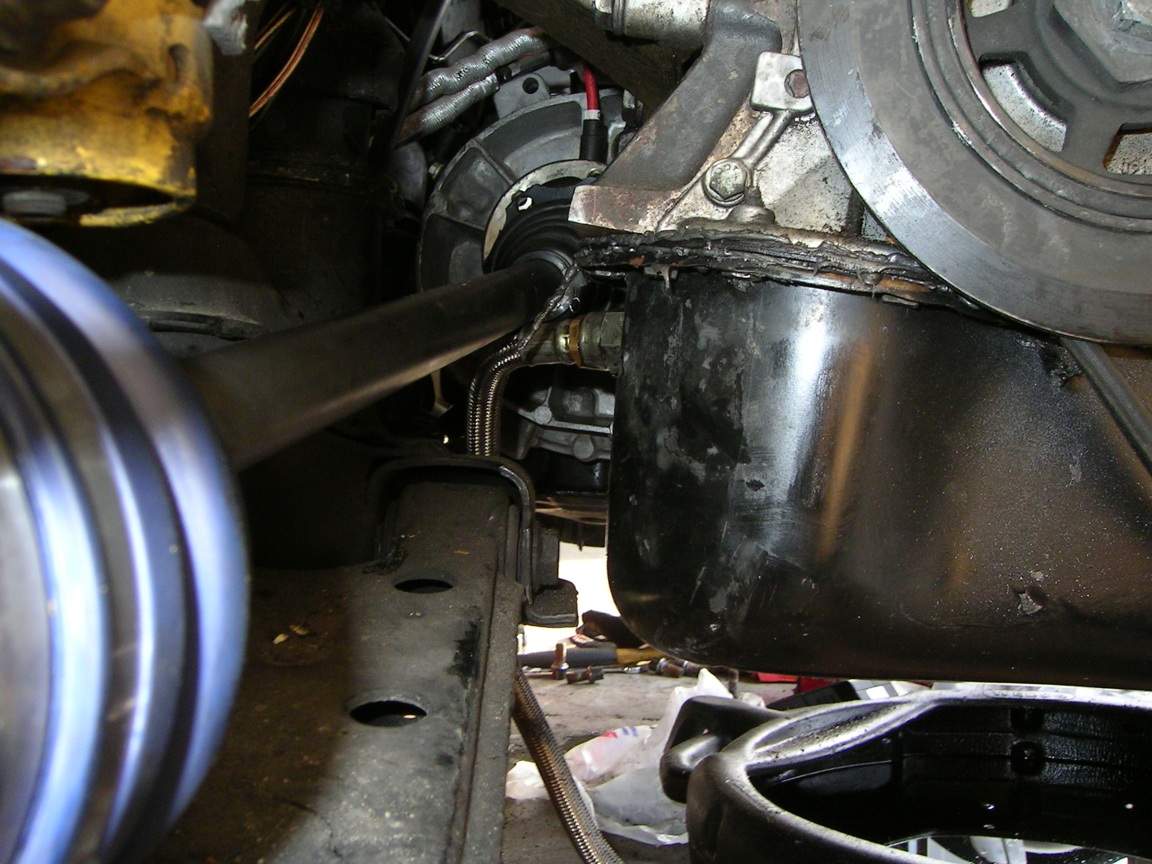
And on the drivers side I've got room even with the relocated mount:
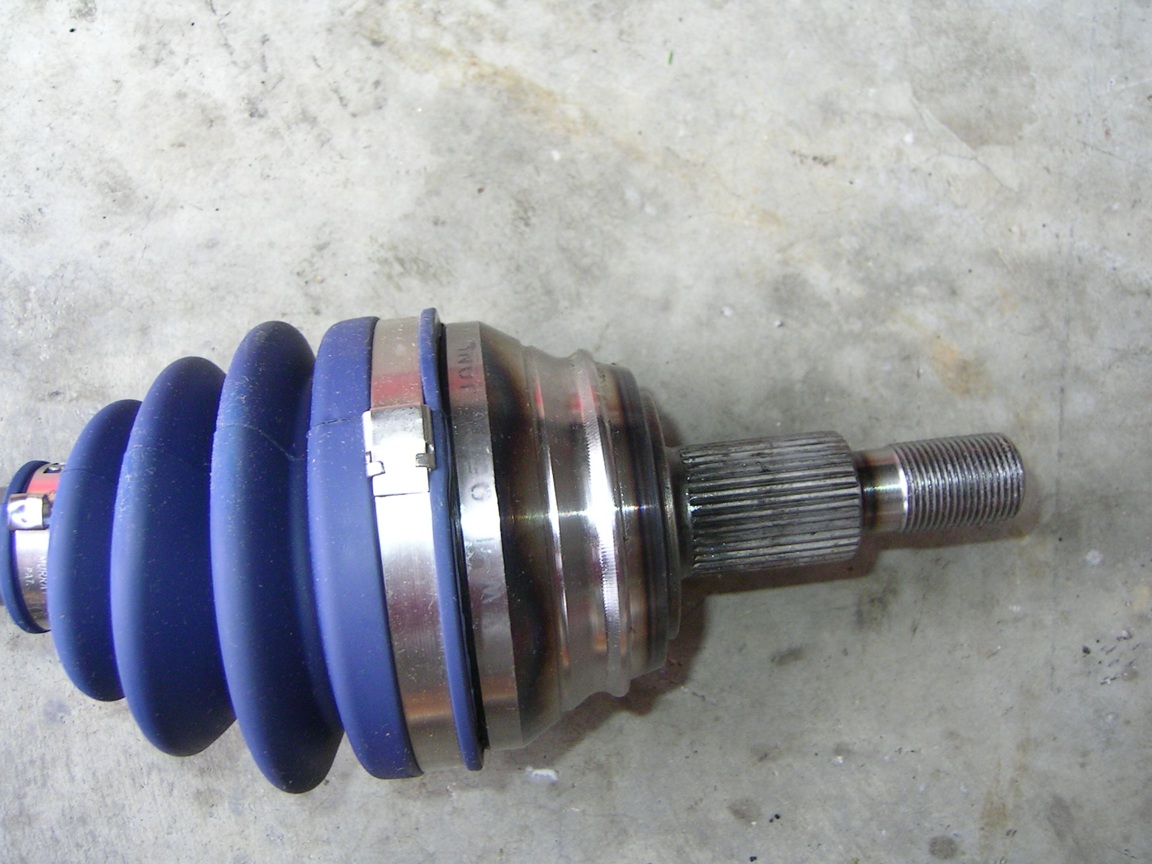
And another closeup pic of the driveshaft itself:
So this is where I'm at...I'm just waiting on some misc parts to arrive at the dealer (they ordered me the wrong bolts for the driveshaft to tranny fasteners).
ALSO:
There are two connectors on the tranny: One in back (I think the speed sensor) and one up front towards the starter (I'm not sure what that is) but both of them have different connectors than the 12v 02a...so you'll have to swap them out.
New info as of Feb 24, 2009
****Assuming your o2a/VR6 MK3 has the same color wires this is what you need to do to get your O2M speed sensor to wire up to your MK3 wire harness****
Get your hands on an o2M speed sensor (Hopefully it came with the trans) AND the plug/wiring that comes out of it.
Now cut your o2a speed sensor plug off of the harness and solder the wires like so (OEM 02a wiring on left - o2m on right):
Black -----> Black/White
Blue/White -----> Blue/White
Red/Green -----> Brown.
I have added pictures on a post dated Feb 24th, 2009.
Other than that, I just swapped over the starter cables/grounds/etc... and started wiring her up.
I'm having an issue getting pressure in the clutch slave cylinder (clutch pedal at the floor) but I think that may just be an issue of me losing some and bleeding it out.
I'm sure I left a few things out, I'll add in stuff as I remember. And I'll keep adding to this thread as I progress.
**another disclaimer**
Don't go with my measurements on the axles until you double check them for yourself...I have yet to test drive the car so I could run into some issues. My goal is to update this thread/post after I drive it to verify that the axles are perfect and everything is fine.
Until then, please use this thread as an informational source only and that you could end up with a totally different scenario than I.
Where I sourced my parts:
02m trans and related parts: Dean at BVA Motorsports
Slave and other oem parts: vw dealer
Driveshafts: The driveshaft shop
Hope this is a good source of info. If anybody has other info to add please do so!
EDIT: 5.30.06 to add a couple items I forgot to purchase for the swap.
EDIT: 6.2.06 tool list addition.
EDIT: 2.24.09 Added specific info on wiring of speed sensor so odometer/speedometer can work.
5-30-2006
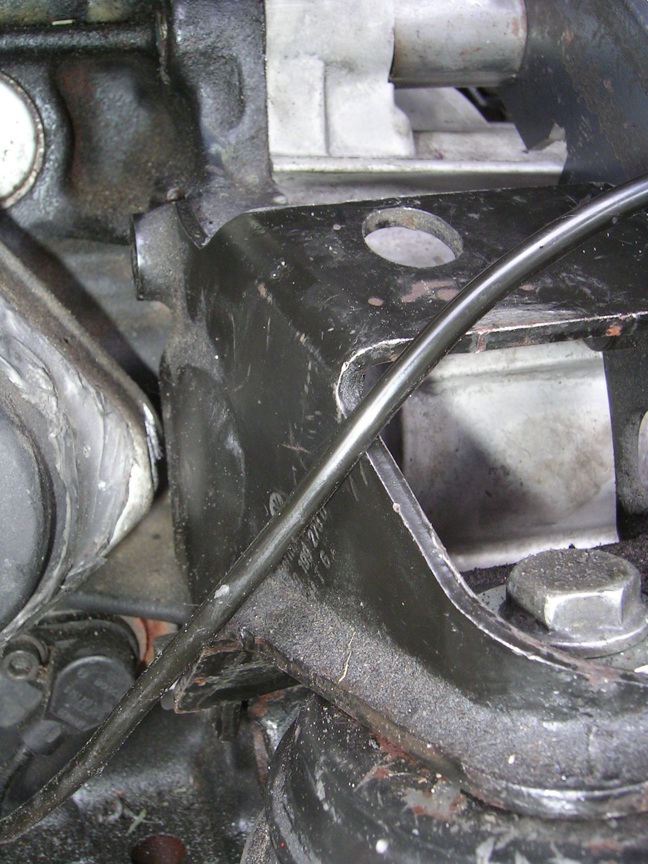
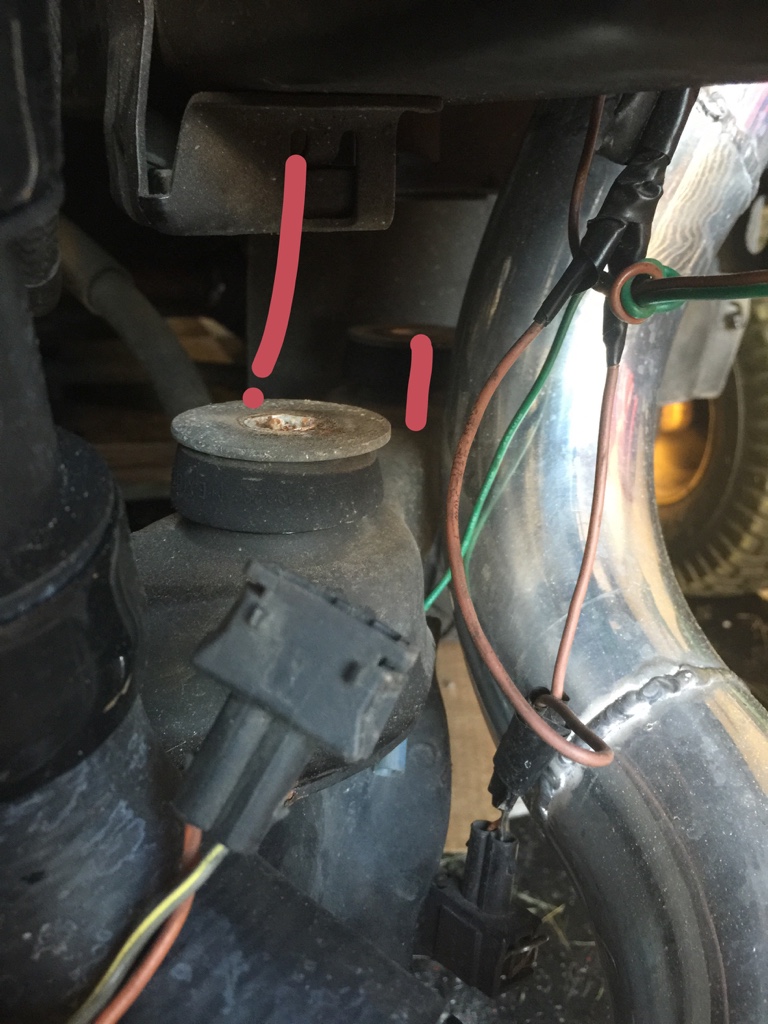
I haven't done (yet) anything to the front mount - although I'll take pics soon to show that it DOES bolt up on the one side. The problem is it doesn't have a through bolt (from right to left side) that you have with the o2a...so therefor my guess is it may not hold up too long.
As for the back/trans mount...
I literally cut it from the subframe and just moved it - had it welded back in place.
Those pics:
Below is just after I cut the mount off the subframe:

And a wider shot of the "area" where the mount once was (notice the 'hole' in the subframe...that was where the mount sat):
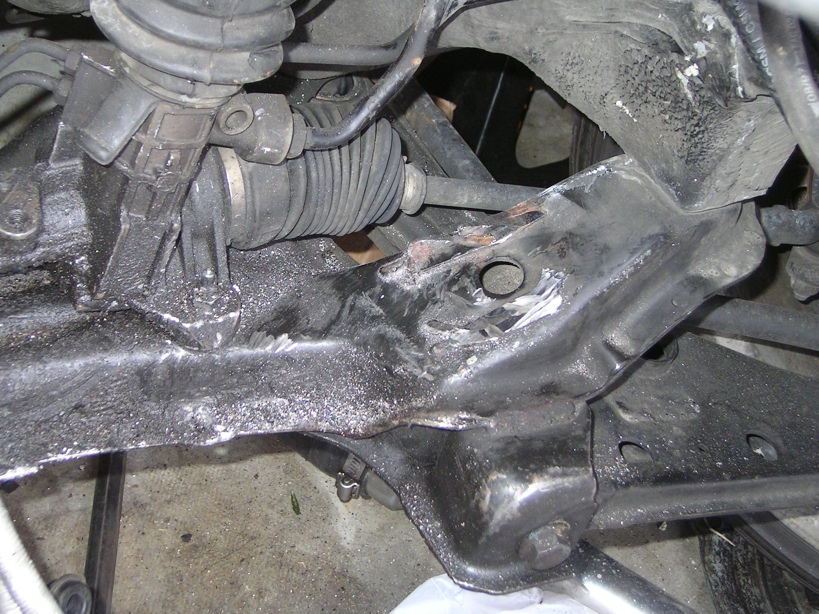
Here's the mount just after I moved it down and forward slightly (notice that same 'hole' that is barely poking out of the mount on the right side of it):

And a side-view - looking from under the wheel well on the drivers side.
![]()
You may need to scroll to the right a tad on this pic (or a couple others) as when I resized some came out slightly too big...and I'm not going to be resizing anytime soon.
I'll post pics of how the trans/motor is mounted up front...but it'll hold for now in stock form.
6-2-2006
Something I just did this morning...
For those of you that want to keep your stock Golf Ball 5 speed shifter knob...
You'll need to thread the shifter rod to accept it. Your MK3 Golf Ball shifter (and maybe other mk3 shifters too?) is a 12mm X 1.50 Pitch.
I bought a 12mmX1.50 pitch die today, cut about 2" off of the shifter rod (because it's pretty tall in stock form) and threaded the rod.
It now accepts the Golf Ball shifter.
Tip while threading: Counter-hold the shifter rod with a pair of vice-grips to keep it from turning too much while threading...those plastic parts may break under the twisting/load of you using the die (even with oil).
**added on to the first page** (if anybody cares).
6-4-2006
Update:
Axles installed, wheels back on...
Car still up on jackstands as I need to get the exhaust back in and would like to keep it accessible.
This gearbox is amazing-feeling just sitting in the car.
Effortless shifting like butter through all 6 gears...what an amazing difference.
I'll have pics of the driveshafts installed later today.
Here's some other stuff I thought I'd add for more detail...
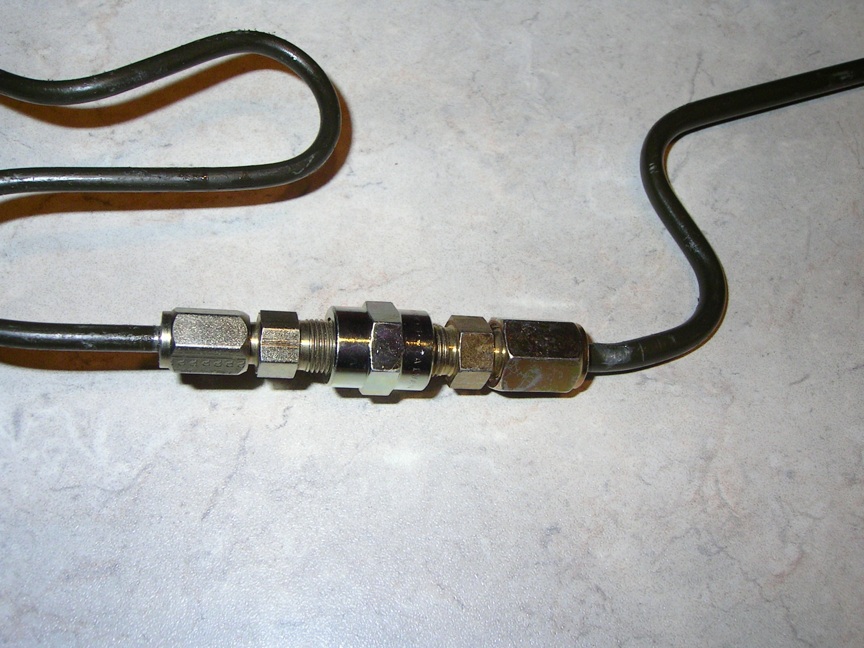
If you go the route I did (just mate the o2a hydraulic line for the slave to the o2m line) then you'll like this pic.
The diameter of the o2m line is larger (8mm vs 6 I believe) so a simple compression fitting doesn't work - and metric compression fittings are hard to find already. I had to compromise and get a reducer (well, sorta). This pic shows the compression fittings that connected the two lines (and yes, it's holding very well).
Make sure you get the fittings from a reputable place that sells compression fittings and general hydraulic-equipment parts. They are made to hold some serious PSI.
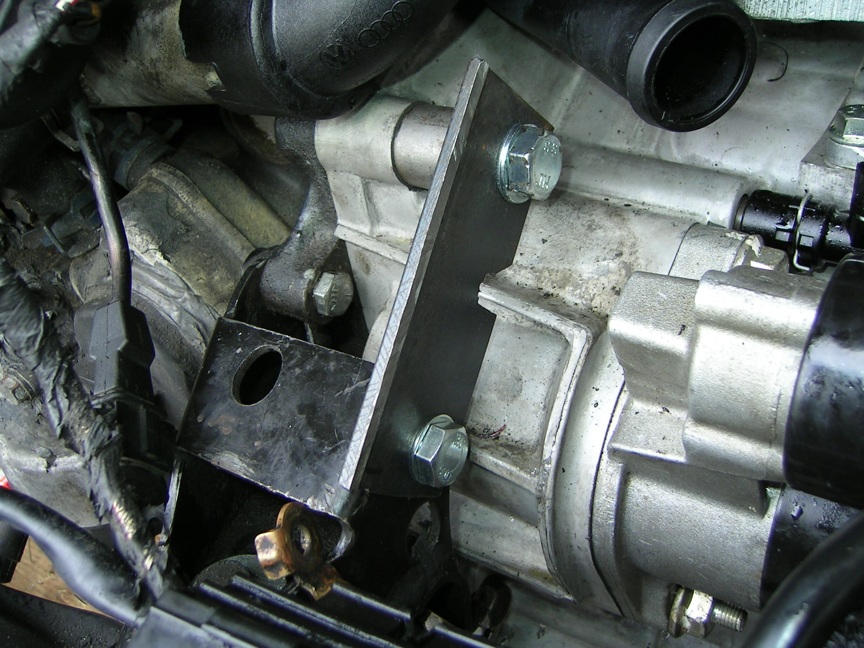
And for those asking about my front mount...I finished that today. It's nothing special as it's not welded. But it is strong and bolted up to the tranny well enough to hold the power I'll be putting down.
This pic is self-explanatory. All I did was cut plate steel and drill holes in it to accomodate the bolts. One for the mount (on the bottom) and one for the tranny (up top), as well as a spacer between the bolt/steel and the tranny.
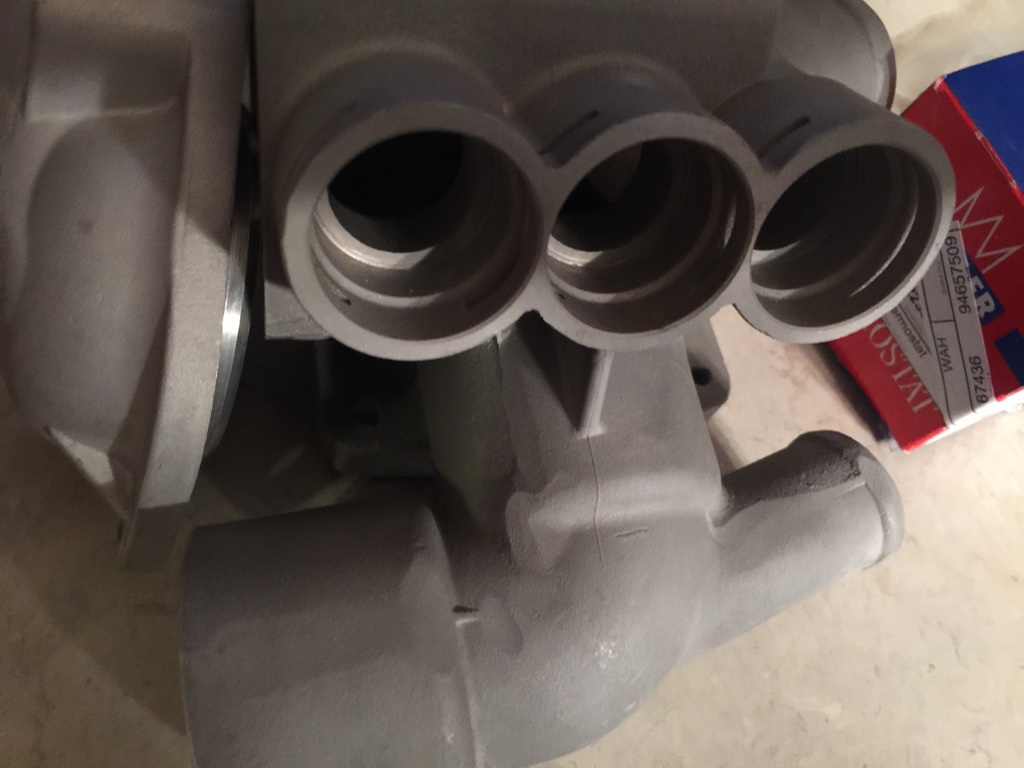
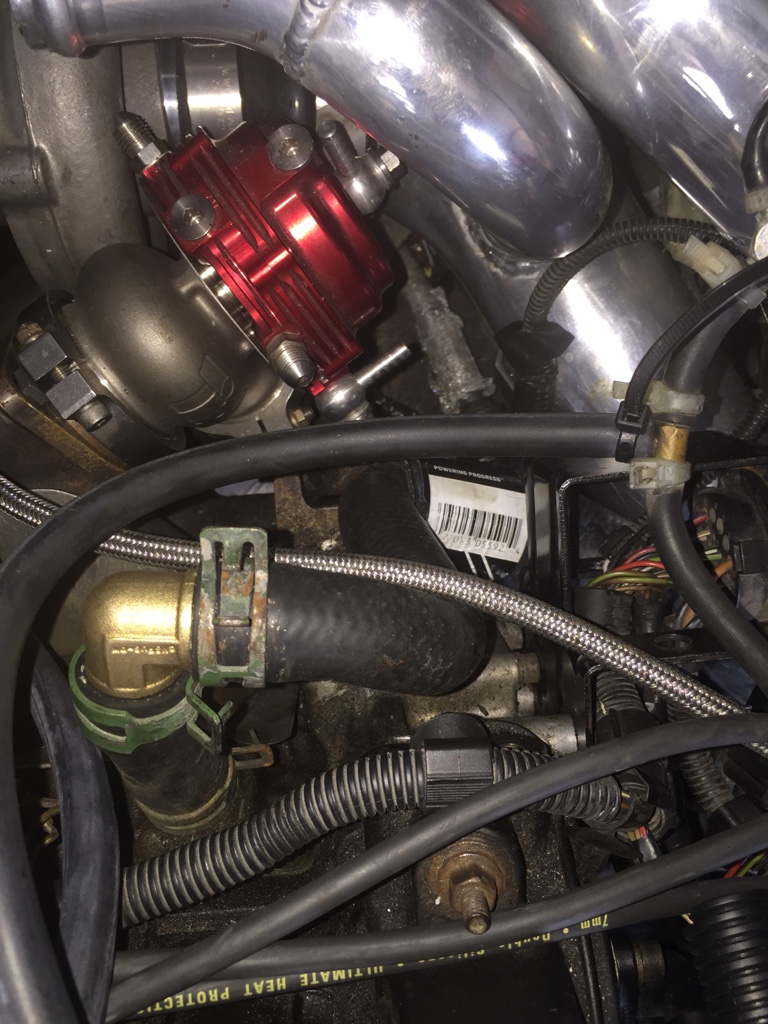
This pic also shows a tad bit of the 24v thermostat housing.
Also,
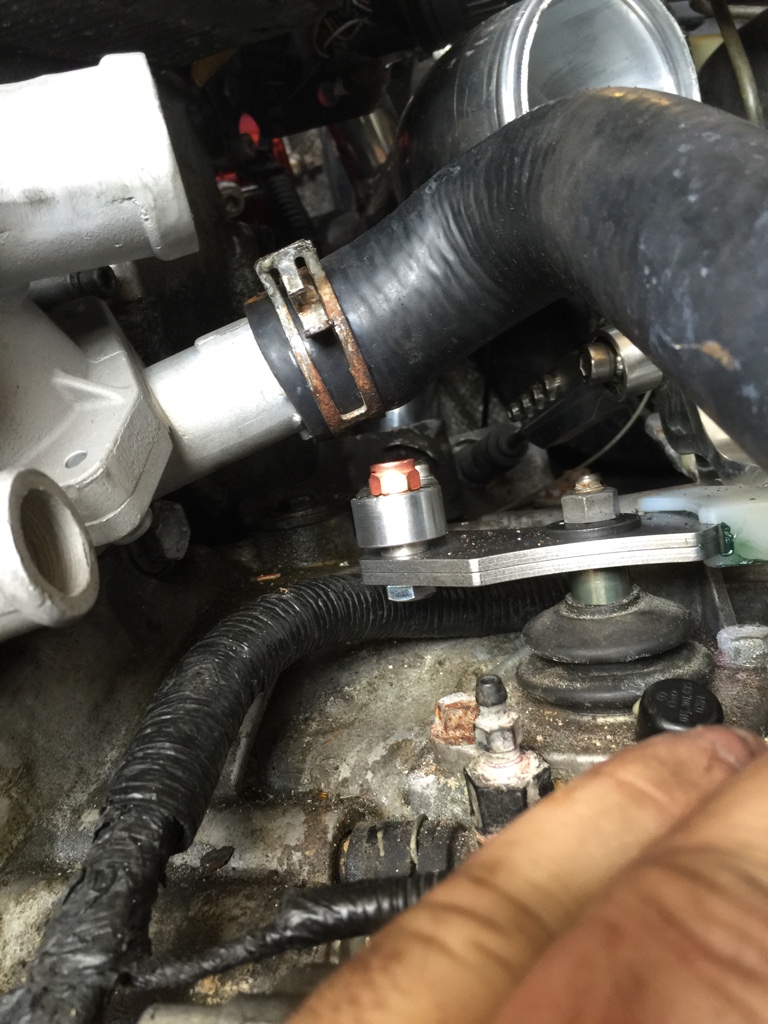
Looking closely at the above pic, you'll see a smaller bolt attaching to the block (This is just using the existing mount and engine block - so no modifications there).
And a front shot.

Looks like the knock sensor wire is blocking it but you can see that I used a bolt (very bottom of the mount on the left side to go through the mount and into the tranny. Again, this took no modifications, I was only using existing holes in the mount and in the tranny.
Make this one a short bolt - b/c it ends only about 2 inches in...and it would suck if you were torquing it down and cracked the tranny.
 almost done.
6-11-2006
UPDATE:
Drove it today for a while...car is AMAZING!!!! Still have to work out some slight kinks.
For example: 24V upper rad hose (I used the 24v tstat housing) and lower rad hose still don't quite mate up to the 12v radiator.
The lower hose I decided to modify from my 12v (I had to shorten it).
The upper rad hose is the 24v one - and it touches the rad fan support. I used a device similar to what VW added to protect the a/c lines from the fan...but that keeps sliding off the hose.
What I think I'll do is cut the rad fan support and then protect the hose with something (maybe an aluminum pipe sleeve of some kind.
The 3" exhaust made an even bigger difference then the tranny IMO (as far as the car feeling faster).
This thing is fast as balls now .
Problem is the clutch isn't holding any of the power...at about 5-6psi the damn thing slips. And I'm sick of working on this car.
EDIT: For those of you doing this swap in the future note that the driveshaft shop axles seem to be perfect (length-wise). I was worried about clicking when going around corners or something like that...not as of my first drive.
I know I'll want to turn up the boost but even at 8.5 psi this thing is amazing (compared to before).
6-17-2006
Update:
Yesterday I got the muffler/tailpipe section welded back in and she quieted up a bit.
I love that 3" exhaust!!!
Today I decided to play around with the clutch slave cylinder to see if the clutch slipping had something to do with that (worth a look before I pulled the trans).
Turns out I either bled it wrong and had too much pressure or something else weird...
cuz she holds and she is ****** FAST!!!!
DAMN!!!!
What a perfect box for this turbo vr6!!!!
EDIT:
Also,
Last week I received the correct plugs/harnesses for the speed sensor (trans) and reverse light from BVA Motorsports (Thanks Dean!).
They plugged right in and both work perfectly. Now I know how fast I'm going.
7-12-2006
I'm not sure what the total cost was to be honest...
But the parts alone cost me over $2600.
And I'm not sure if it's a better option than the quaife or apt kit...my thoughts about this is that the o2m can handle quite a bit of power and it's "OEM" so if anything ever breaks (like a gear etc) then it's all OEM parts stuff.
On the quaife...I heard their parts are expensive. So if I break a quaife gear that would cost me some coinage...
So that's why I went the route I did.
11-17-2007
And an update:
Still running stock clutch, differential...basically stock tranny 100%.
Still shifts like butter.
My "design" of the front mount is ok. Could use some welding though (I used 1/2" plate steel with SS bolts to mount it and they like to loosen up over time (even with loc-tite) so I might have somebody weld it and get rid of those bolts.
Besides that, and having to reroute my coolant hoses (upper rad and others) it's stock looking under the hood.
4-7-2008
Here's an update on some stuff since I get lots of PM's about this:
1) Everything is STOCK. In other words, the trans itself and everything in it and attached to it are stock as it sat in the donor car (GTi VR6 24V).
2) Only consistent *issue* I've had in almost two years is that the 3 bolts that hold the dutchdubs tranny mount to the box like to back out over time. Nothing to be overly concerned about as it happens very slowly...I've tried loc-tite but it doesn't work. I'll throw some lock washers in there soon and I'm sure that'll fix it.
Other than that, it's a great box....not a daily driver but I've beat on it during the weekends for about 2 years....
I'm not rushing to get my car dyno'd but I can only guess that I'm *around* 300whp/300wtrq.
Hope that helps.
6-20-2008
Update:
Been in for two years and still running strong with no hiccups. Smooth as silk.
I complained of a slipping clutch early on but it has "calmed down" a bit lately.
The only change I made was removing a make-shift cover on the transmission that I put in (o2a cover at the flywheel/oil pan doesn't match up). Problem is I had an oil leak at the oil pan gasket that was getting soaked up by the foam seal and I believe it might have been making the clutch slip.
I removed that cover and since I don't drive the car in anything but sunny weather I'm not worried as much about contaminants entering. Clutch is holding up better.
BTW, all OEM clutch/flywheel/trans (no LSD).
Only at 11psi now though.
I'll report back when I turn up the boost. Only thing holding me back at this point is a reliable boost controller (of which I haven't purchased yet).
2-24-2009
I updated the first post but thought I'd add a couple pictures....
Assuming your wiring is the same as mine (mk3 and mk4 speed sensor plugs) you'll need to do the following to get your O2M speed sensor to work with your speedo/odometer:
**Make sure you get the 02M speed sensor with the trans*** Assuming this is a junkyard o2m make sure whomever you buy it from keeps some wires coming out of the o2m speed sensor...this way you can use the plug and solder the wires to your mk3 harness like so:
02a MK3 VR6 Speed Sensor Harness ---------> 02M harness
Black ----------------------------------> Black/White
Blue/White ------------------------------------> Blue/White
Red/Green ------------------------------------> Brown
5-29-2015
I'm sorry for the confusion on the coolant flange.
There is really only ONE reason I'm going to the cast coolant flange vs OEM plastic: if it needs modification.
For example: some R32 guys are buying the mk3 cast housing because it's not available for their mk4 car yet. What a couple of them are doing is cutting the one outlet a bit shorter to allow some space.
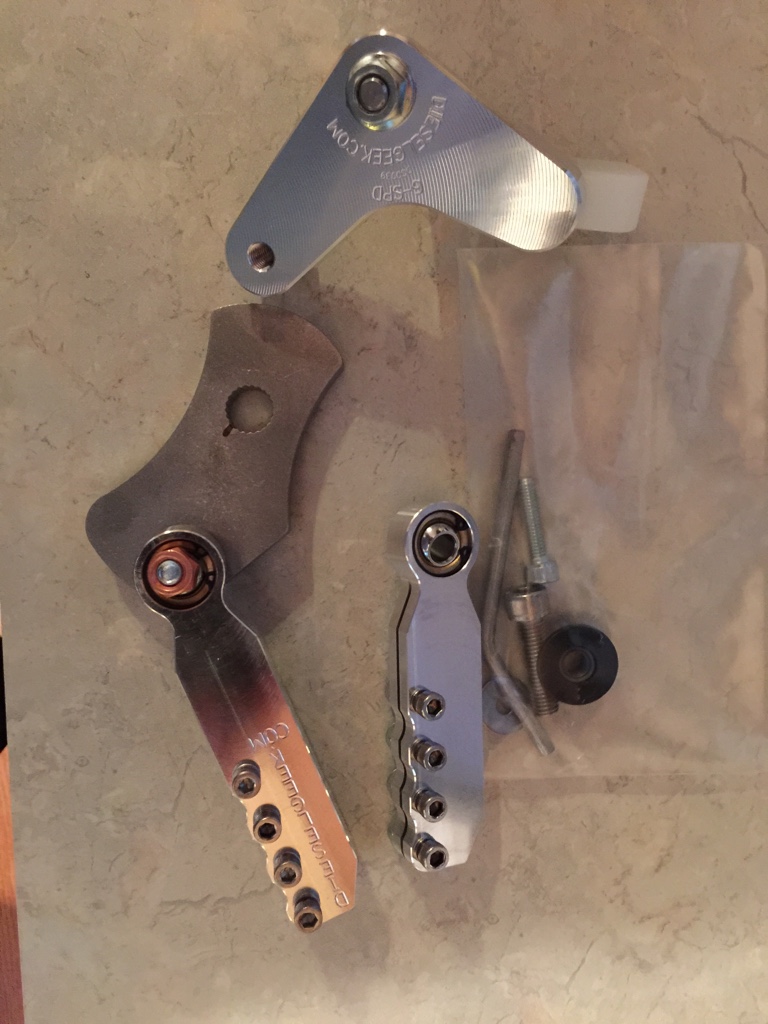
Another R user noted that it didn't look like he needed to modify anything to clear the o2m linkage.
When I asked, he showed me his short shifter kit, which is much less bulky than the OEM o2m linkage.
The Ahhhhh hah! moment had arrived! I may very well be able to go back to the OEM mk3 housing if combined with a short shifter made by dieselgeek, which will now allow me to get back to my OEM cooling system hoses (my biggest nightmare has been the non-OEM look of cutting hoses and using copper elbows and such!). Thank god.
Anyway,
I'll modify THIS post with a pic of that short shifter and who makes it.
Edit: link to short shifter
http://www.dieselgeek.com/mobile/pro...ss-sigma6.htm=
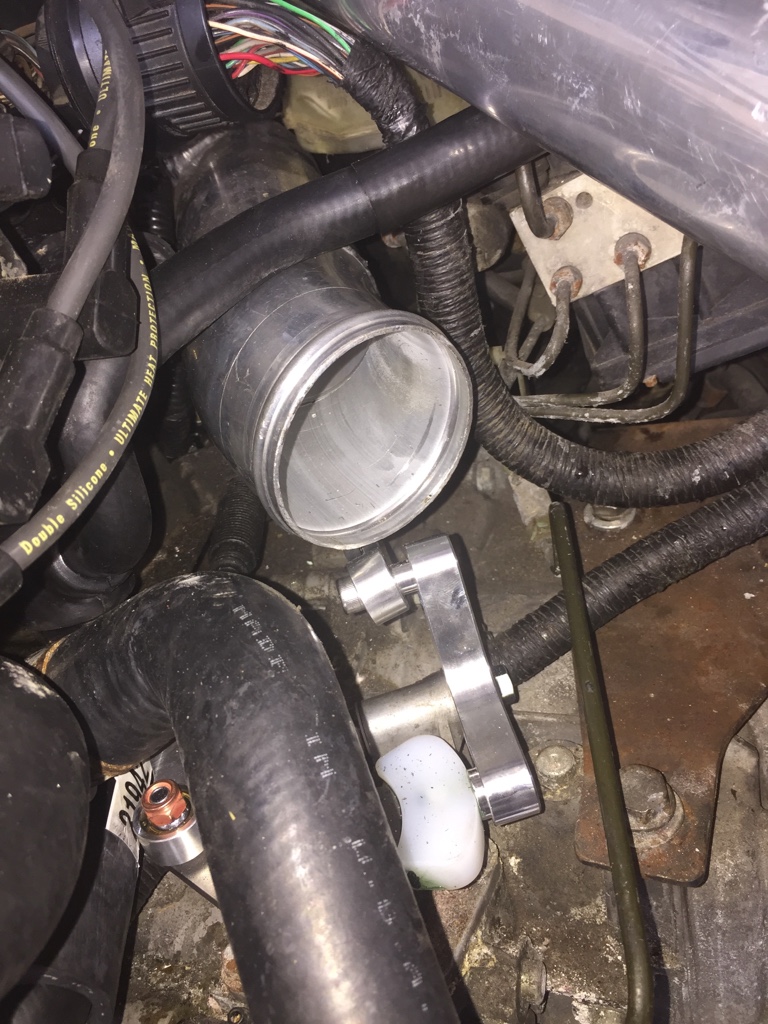
And a picture, cast housing and short shifter just barely clears the housing. Wonder if I could cut that stud down a tad and go with a lower profile nut (see red marks):
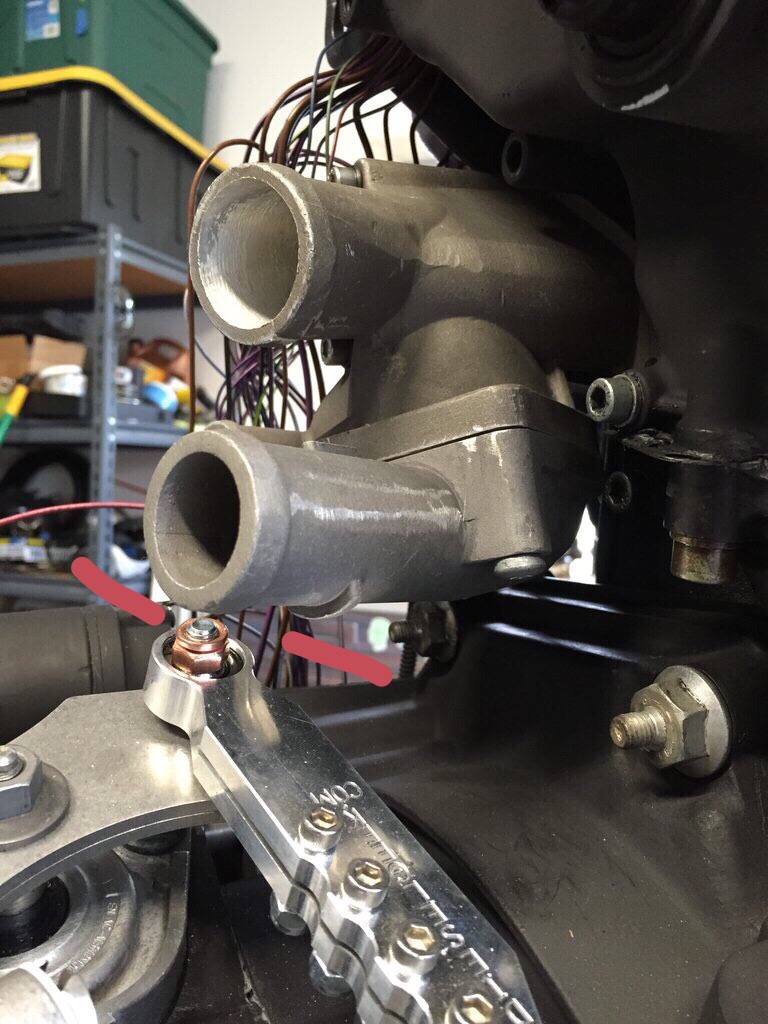
Updated. So in a week or so I'll order these two items and see where that gets me!
6-19-2015
Purchased a Diesel Geek Short shifter today to make room around the TSTAT housing....
Also ordered a cast MK3 12V TStat Housing so that I can go back to original equipment hoses...Again, can only go to original hoses if short shifter kit is used.
We shall see, and I will update this thread with pics when they arrive. Fingers crossed.
Oh,
And also ordering a custom front mount for mk3 12V o2m swap. Will post those pics shortly. 
6-25-2015
Ooooo some fun stuff came in!!
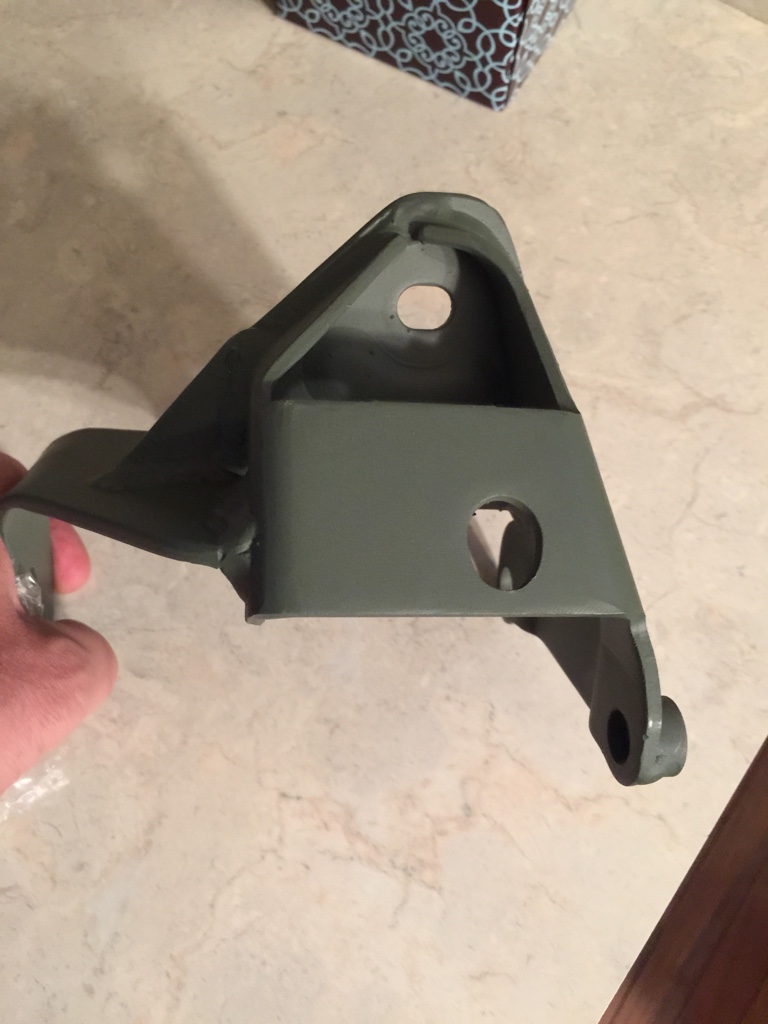
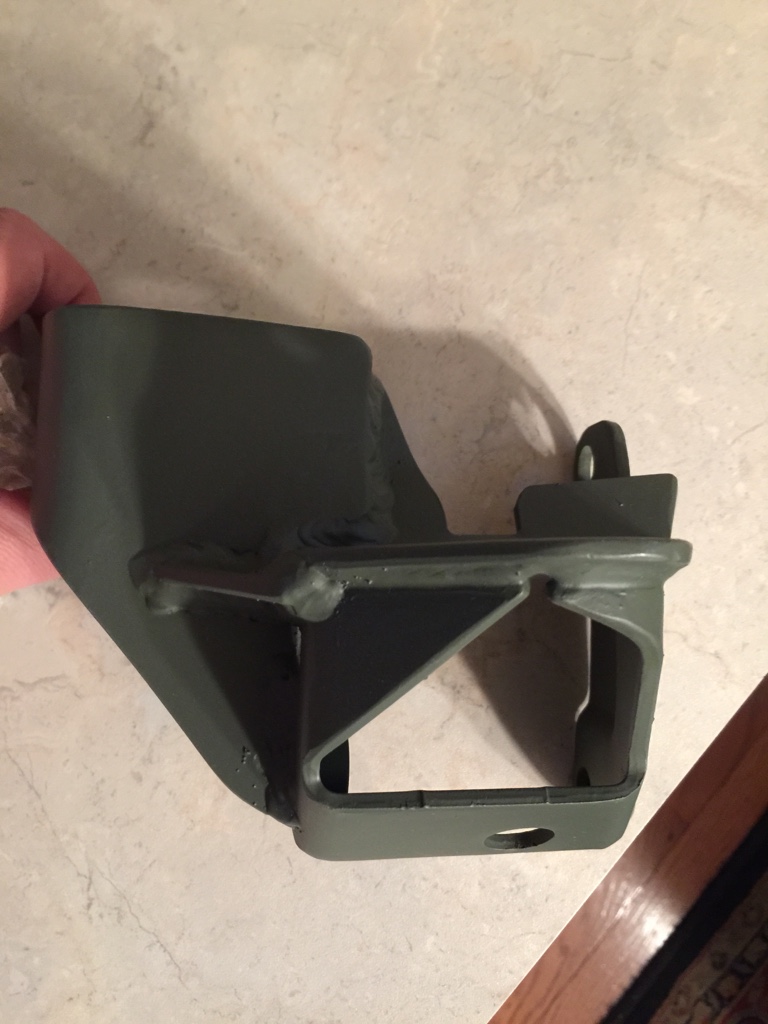
Front Mount (generalprinciple.com/02M). Thanks Shawn!
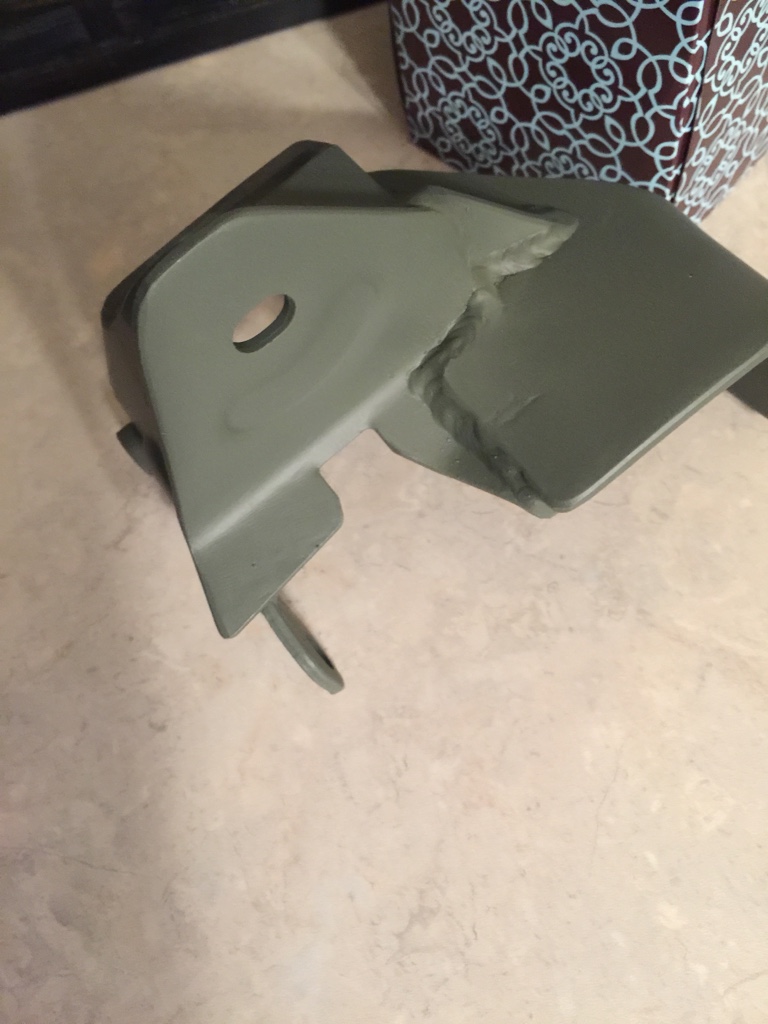
02M short-shift (to allow room to re-install original mk3 tstat housing) from Diesel Geek:
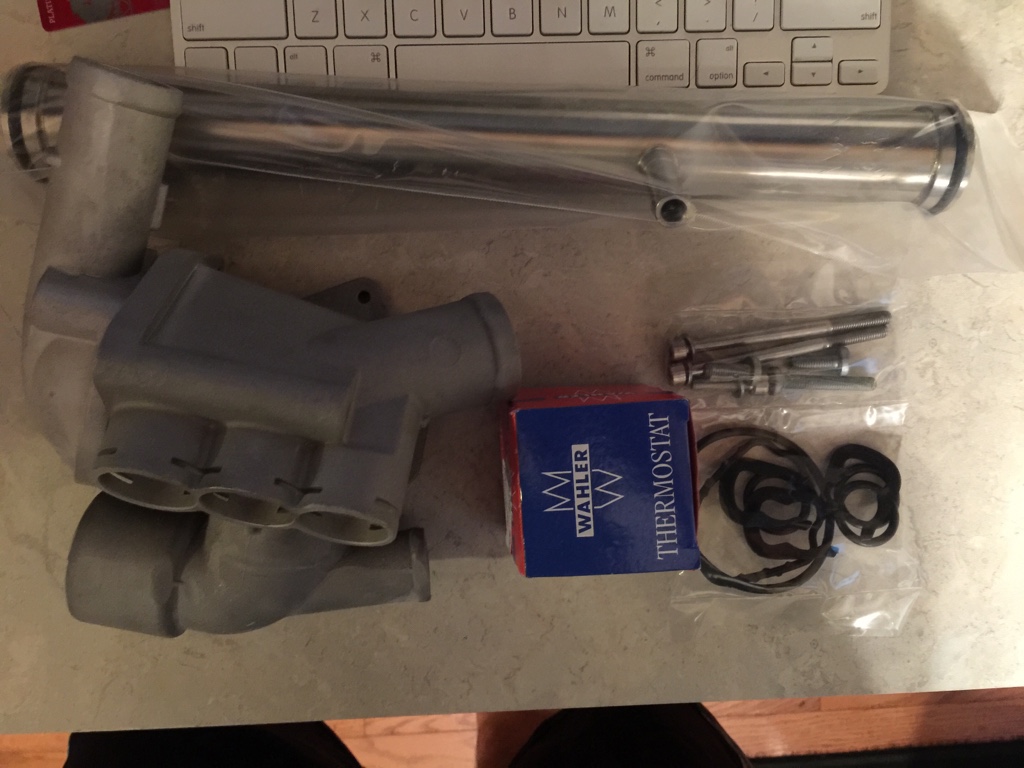
Tstat housing!!! Back to oem mk3 style to get back to mk3 oe hoses. Thanks Eurowise!!!! Came with a new aluminum water pipe, tstat, gaskets, hardware, clips:

Can't wait to see if the short shift kit will do what I think it may-make room for the mk3 tstat housing to be put back in.
If you recall, this swap requires use of mk4 24v tstat housing due to shift linkage getting in the way of tstat outlets/hoses.
If you don't know, the 24v housing is very different and requires custom hoses, not just 24v or 12v hoses.
6-28-2015
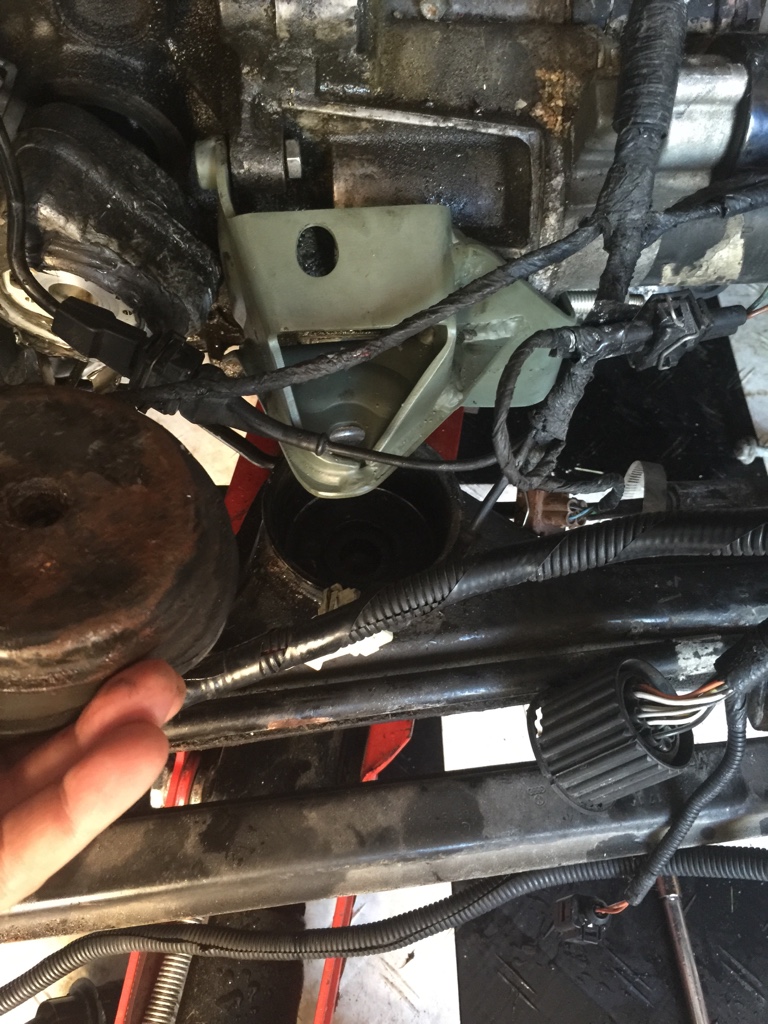
Started today. The new front mount is incorrect.
What a mess when there is no front in it!

6-29-2015
Turns out the mount bracket is NOT incorrect. It's just that it is EXTREMELY tight to get in/out.
You must lower the front forward subframe to get enough room for the bracket to slide in straight and unobstructed.
Remove front mount, lower subframe, install.
Two 16mm bolts each side:
drivers side.
Lowered:
7-4-2015
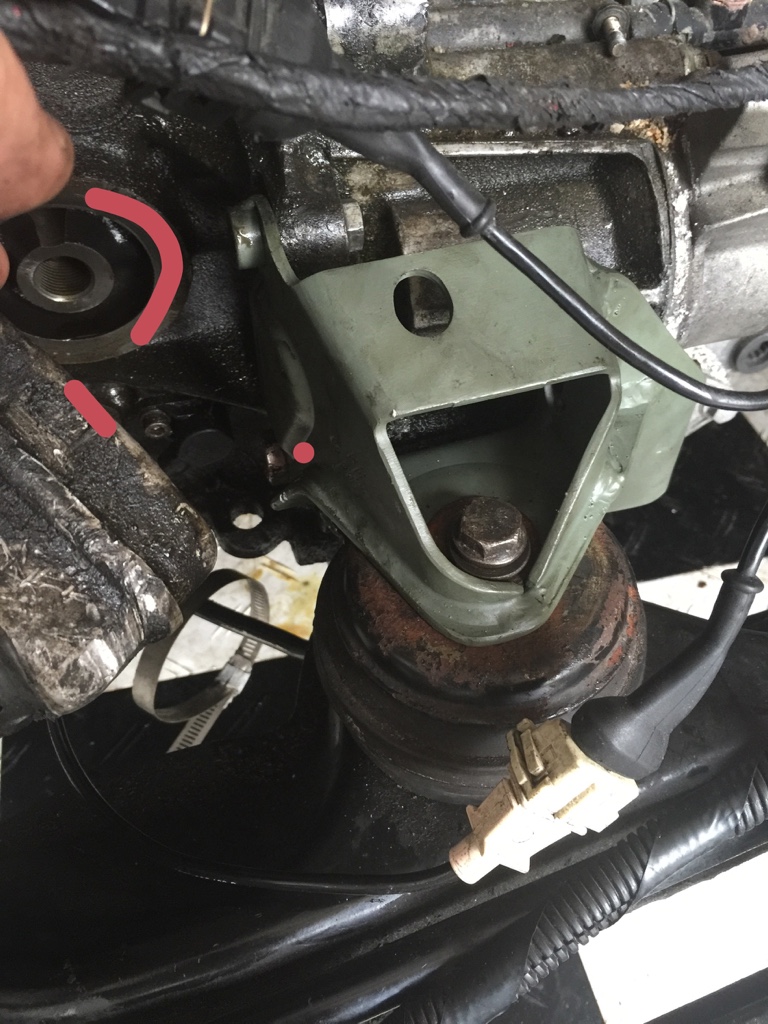
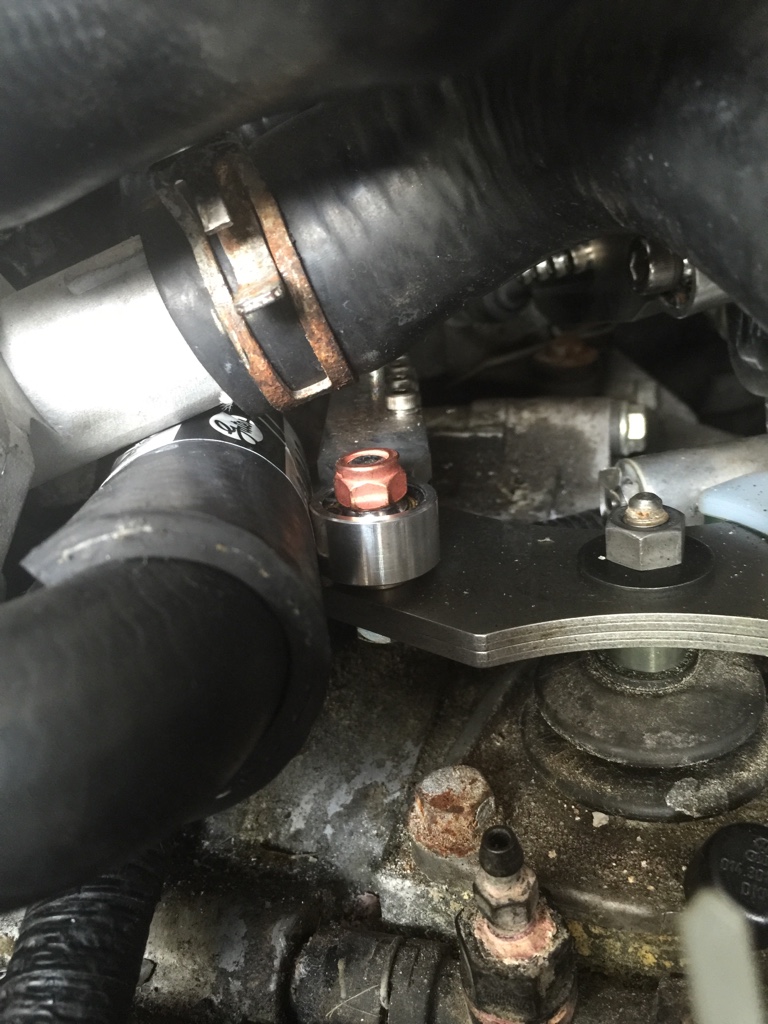
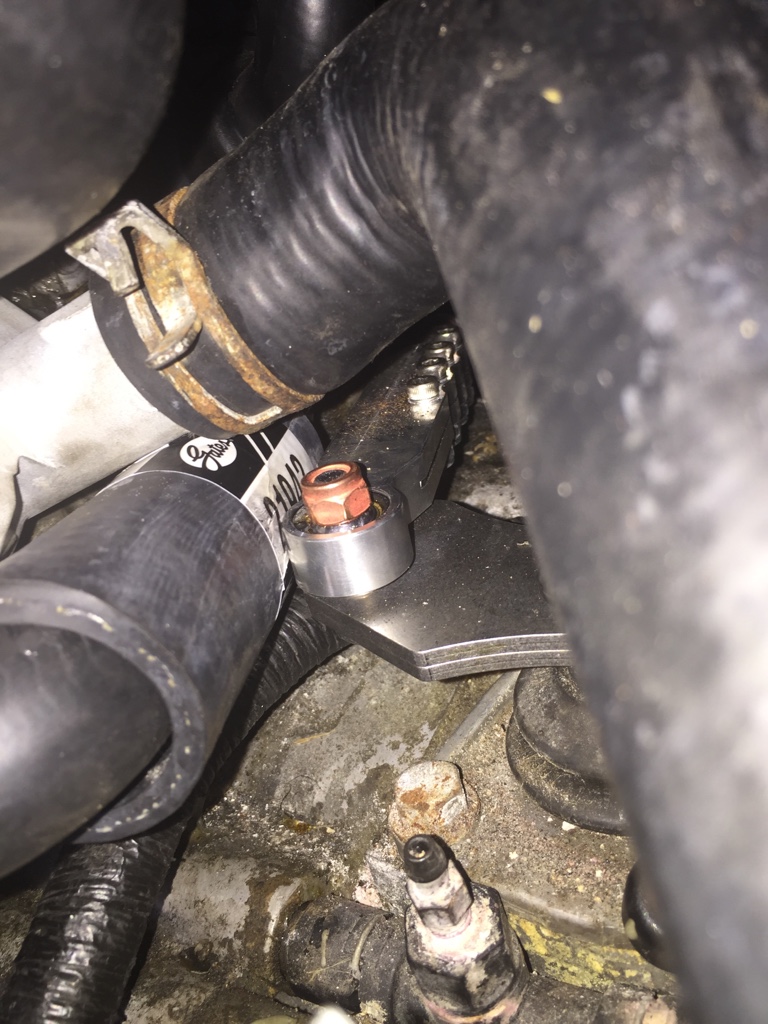
So officially got this front mount in.
Easiest just to take the front clip off
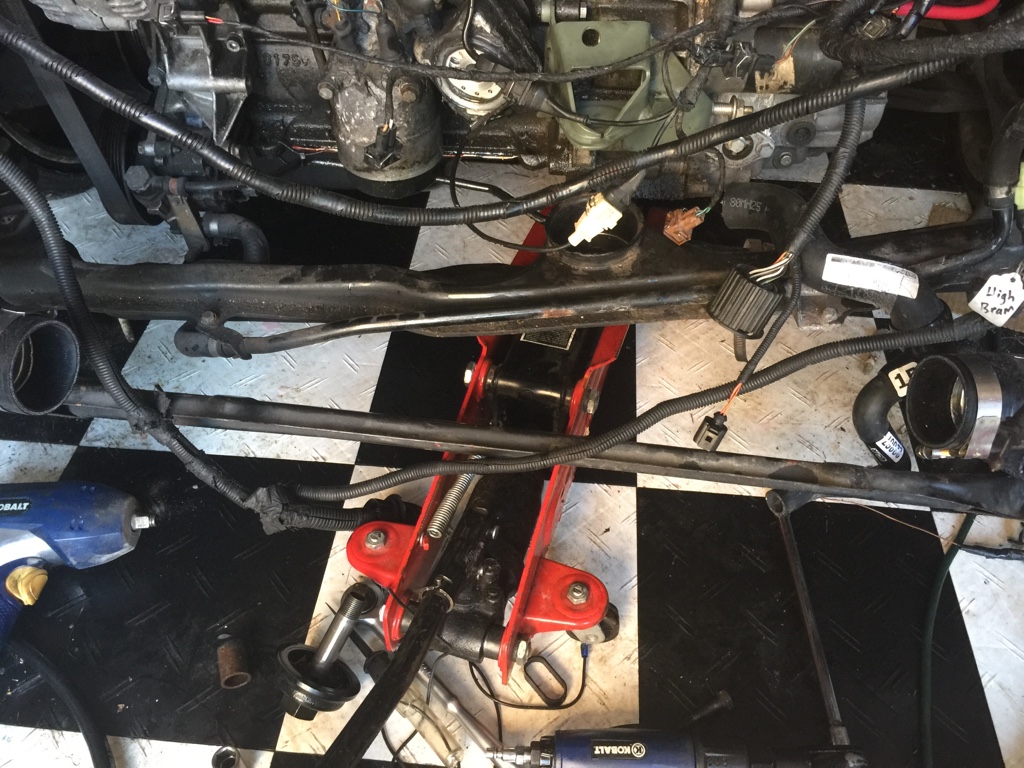
In order to get a socket on the trans bolt (red dot) you'll need to remove the oil cooler.
I pulled my water pipe because I am replacing tstat housing-which made removal of oil cooler even easier (due to inlet/outlet coolant hoses).
Mount looks solid and up to task.
Next project today is the short shift kit.
Stay posted...
Ok, I guess I fixed the mk3 vs mk4 tstat housing "issue".
My only disclaimer is that I haven't actually put the hoses on but it appears that with the short shift kit installed you can clear the linkage (only 1/2" to spare).
Seems it's at its closest when in 5th gear.
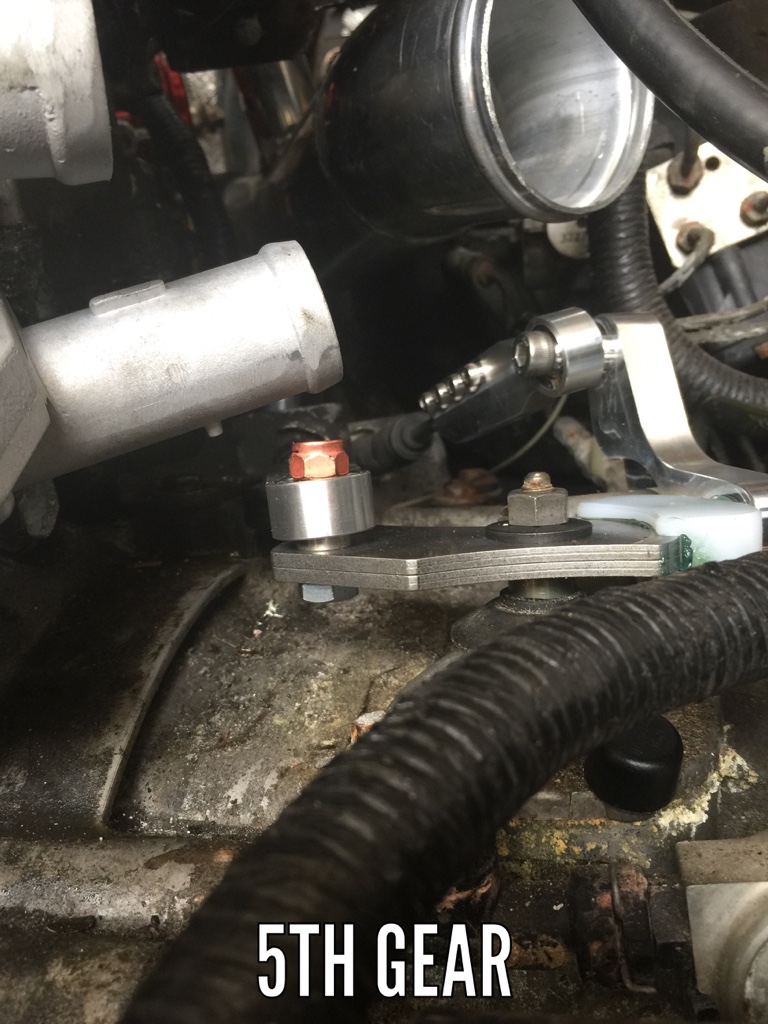
Ordered new oil cooler and looking at mk3 hoses next. Maybe a samco kit
7-8-2015
Ok so I put some new stuff in today...
New oil cooler just because: #376726221 @ 38.88
Two oil cooler hoses:
021121096
021121058A
These are the hoses that go from oil cooler to engine block and from oil cooler to water pipe.
Might as well replace while its out.
Back to OEM MK3 hoses!
CHR0018P: Contitech Upper rad hose
CHR0101P: Contitech lower rad hose
Two Oil cooler seals:
038117070 (oil cooler cap to oil cooler)
038117070A (cooler to block)
Realized I cut up many of my hoses in attempts to make it work during my 02M project so I had to order more:
1H0121157H: Heater Core to TB to Head
1H0121063B: Tstat Housing to Aux WP to coolant bottle drain.
1H0121073C (for reference only) is the other hose that comes out of the aux water pump (mine is still in good shape).
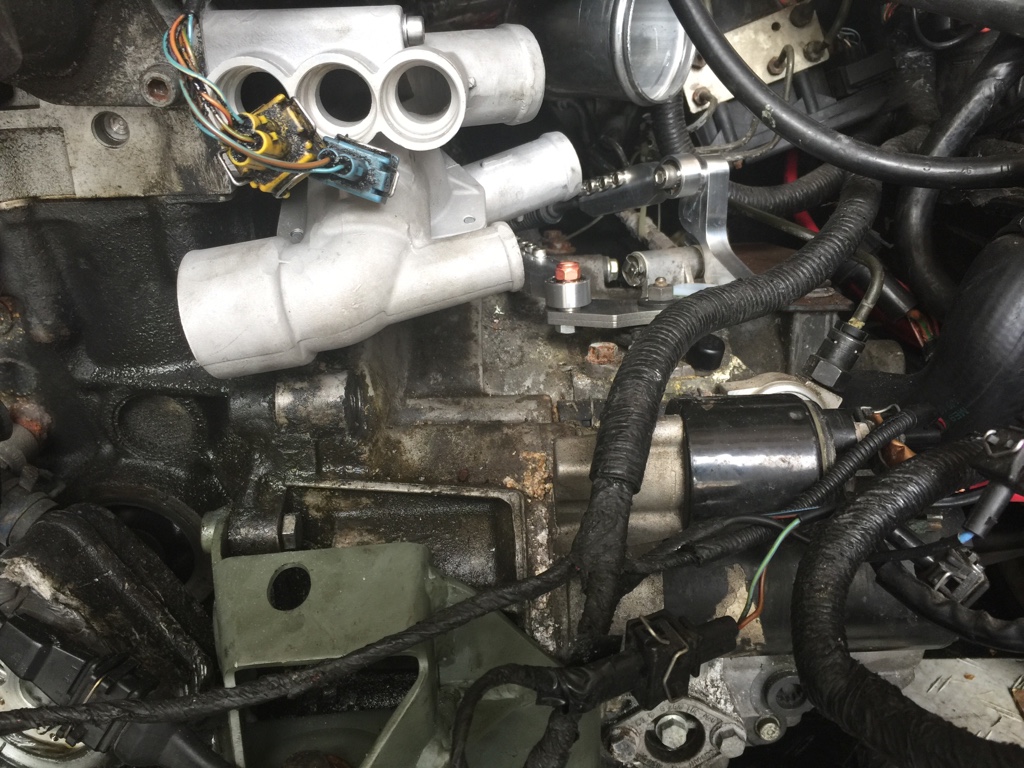
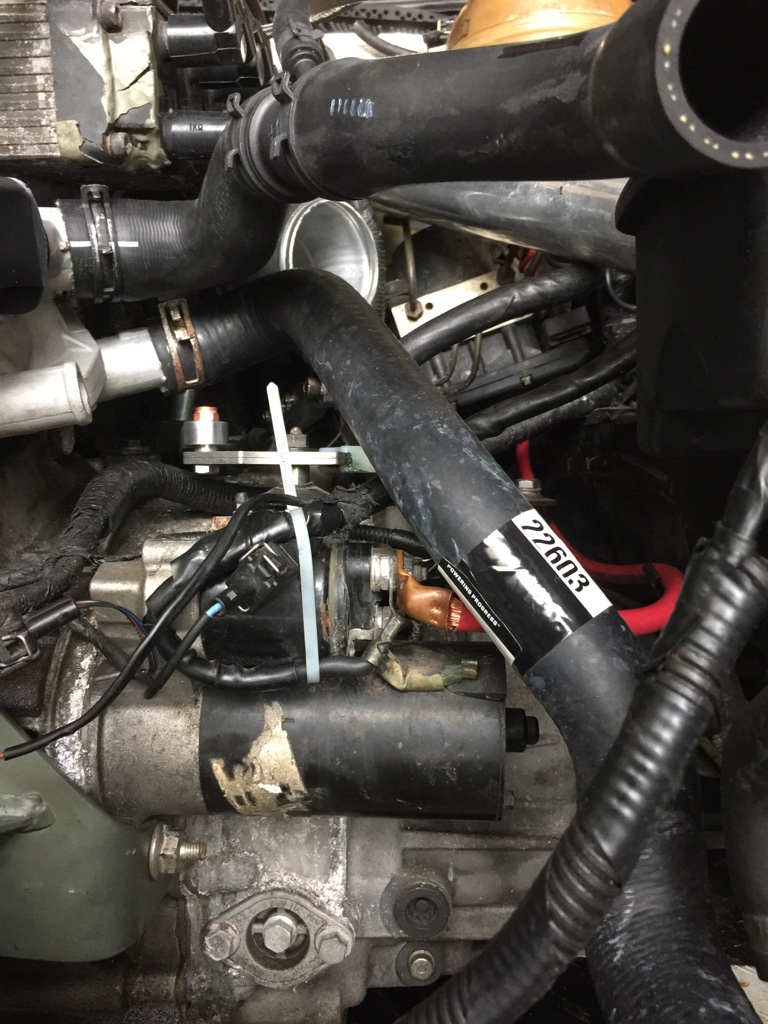
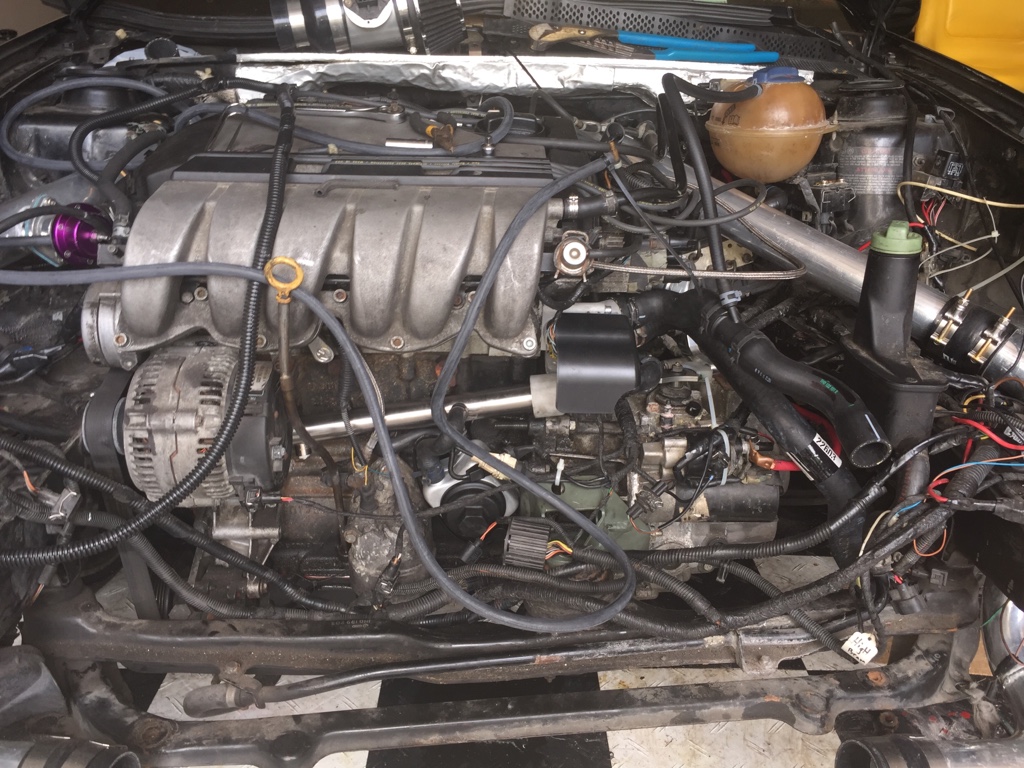
Some progress pics:
Oil cooler and new water pipe:
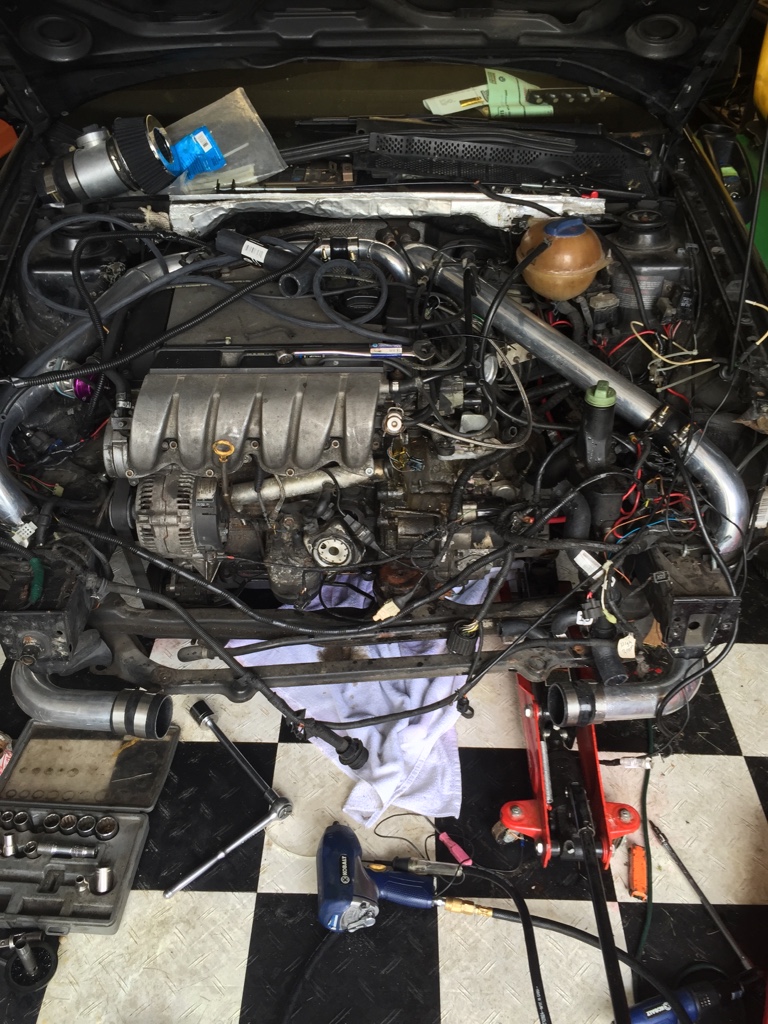
Trying to tidy up this wiring mess!

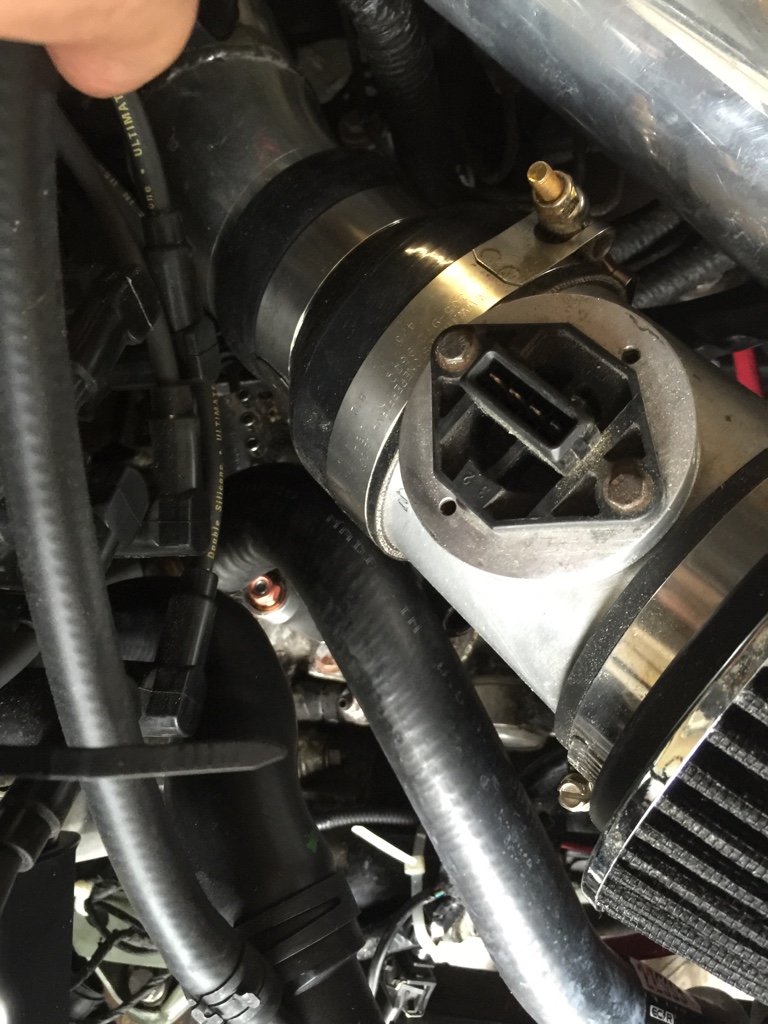
Thermostat housing cover that the folks at Eurowise sent along with the water pipe and tstat housing. For reference this part number is an OE part (unsure what car it came on as stock): #357972279

And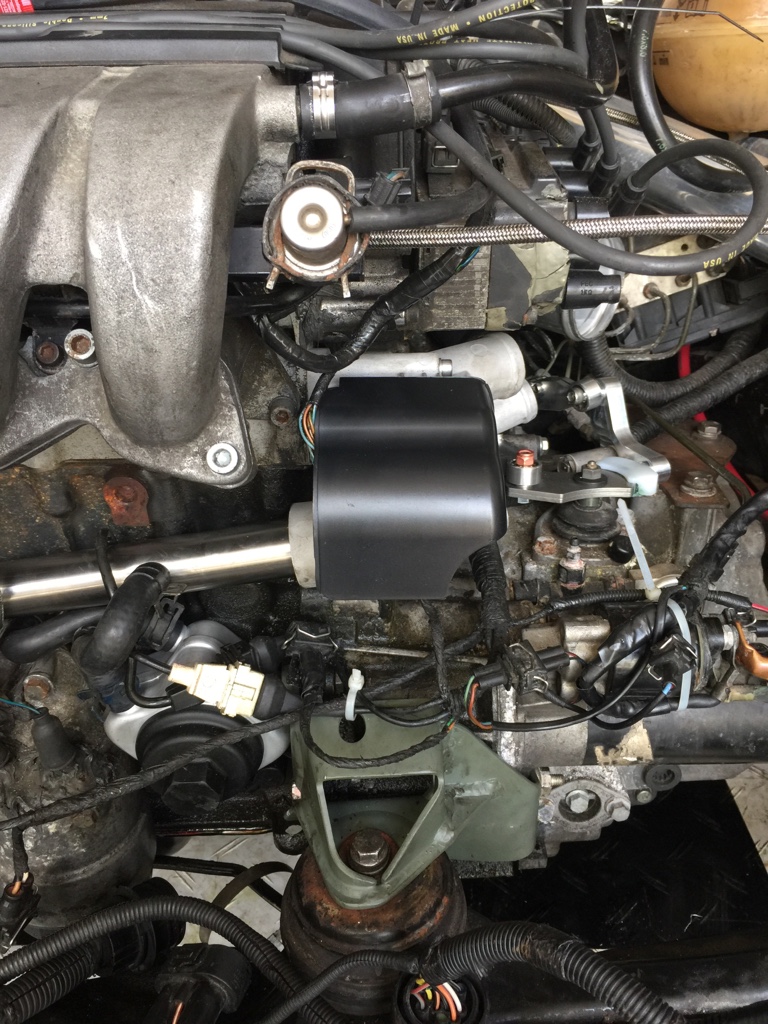
And check it out! Hose fits on to the mk3 tstat housing with room to spare!
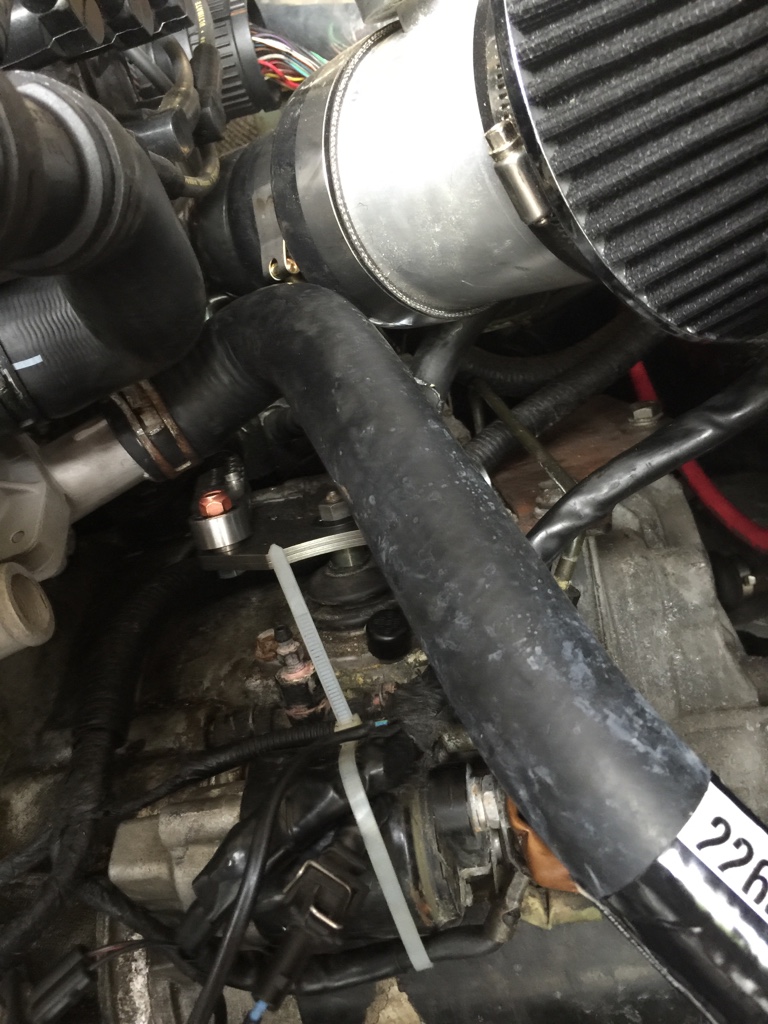
And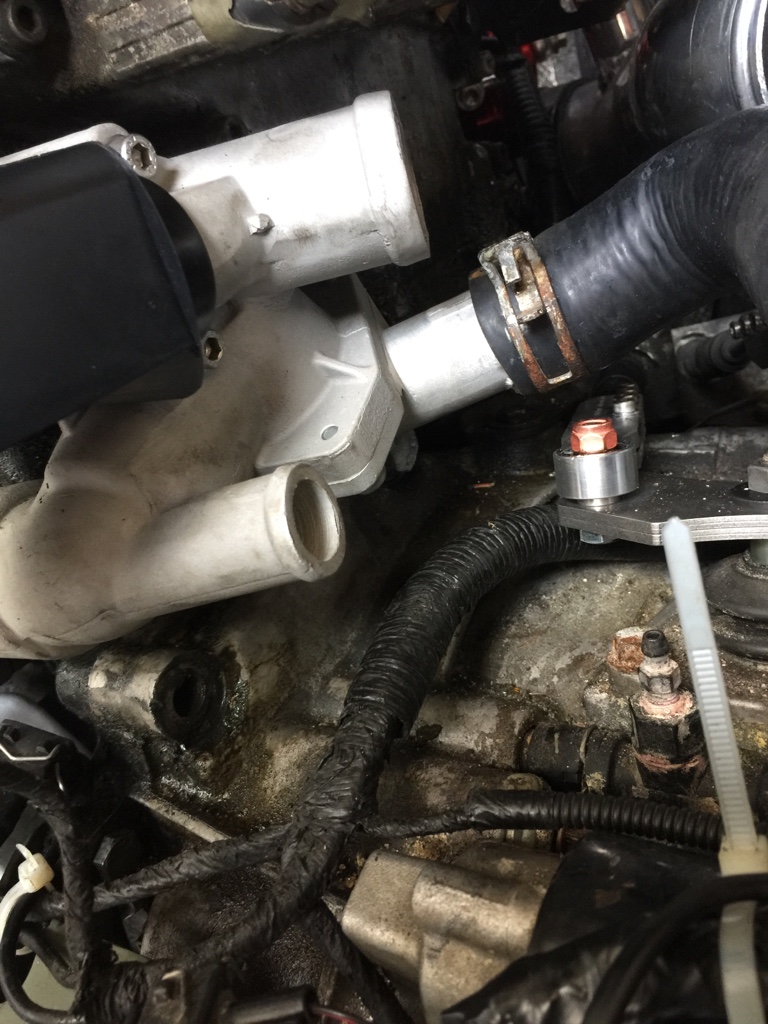
Pics with both upper and lower hoses connected:
And with the new location of the maf housing and filter it's way tight but still fits:
7-12-2015
So I'm posting more updates:
Today I finished up my cooling system hoses.
Decided not to run 100% stock due to impending failure of the heater core.
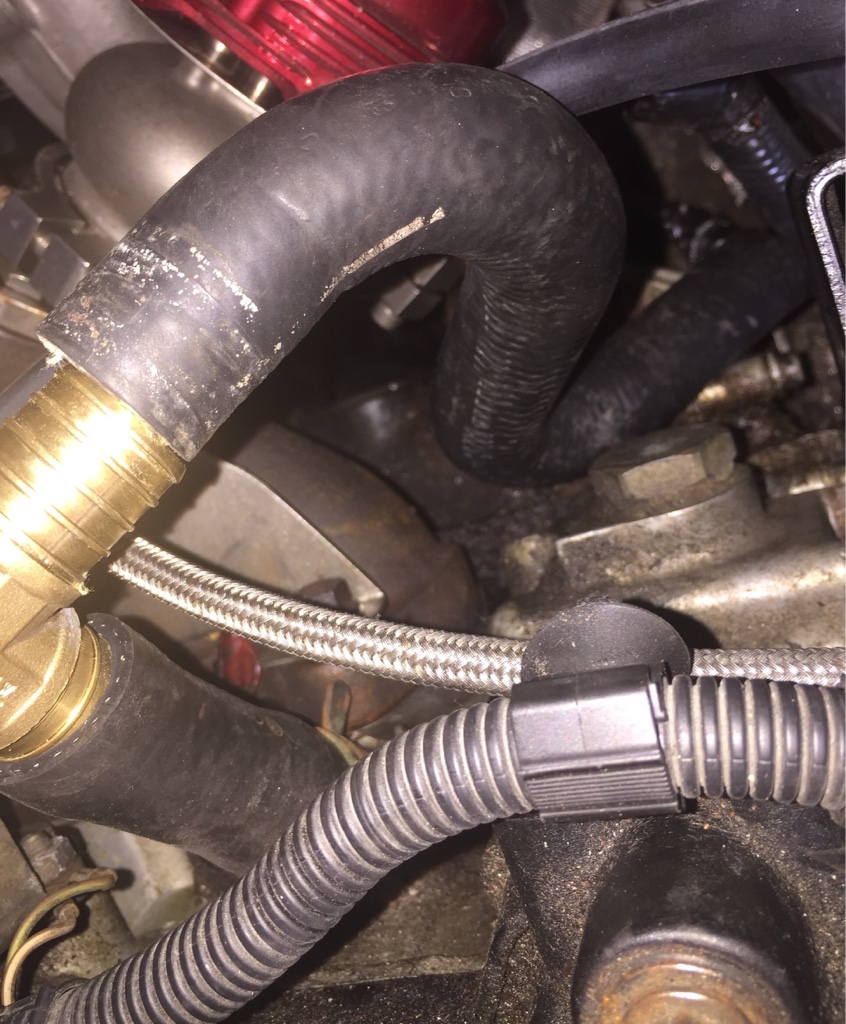
I cut the heater hose that comes out of the head in the back of the head:
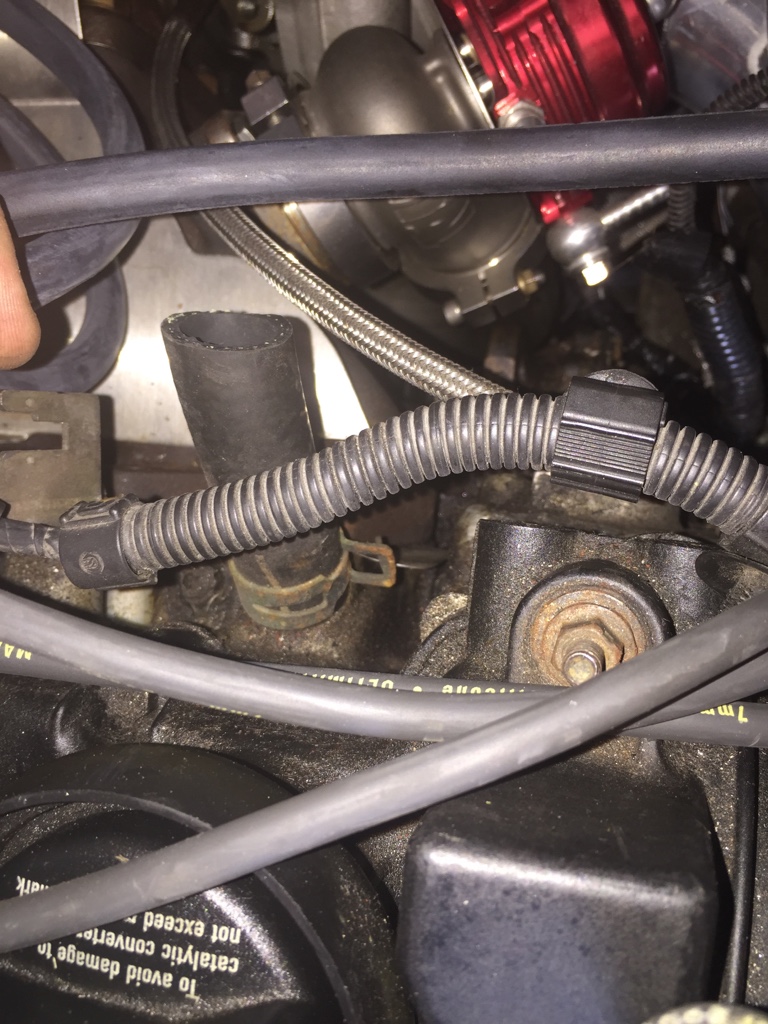
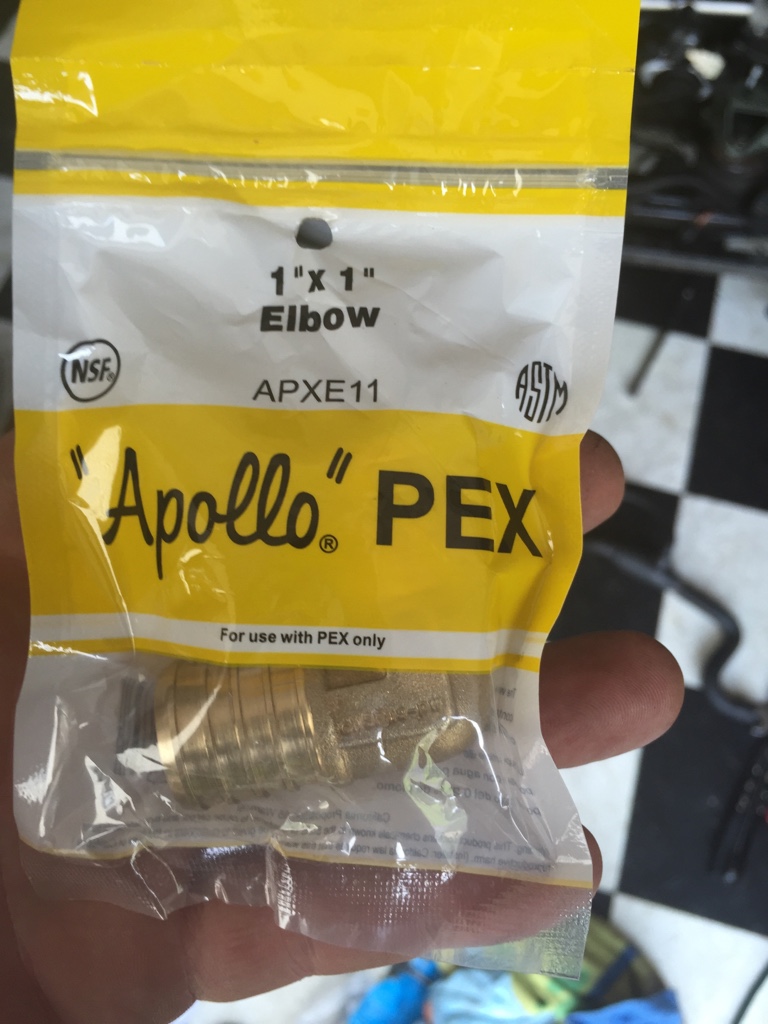
Inserted a 1" brass 90 degree fitting

Since I also wanted to take the aux water pump out of the equation I used part of an existing new hose and cut an "S" section out of it:
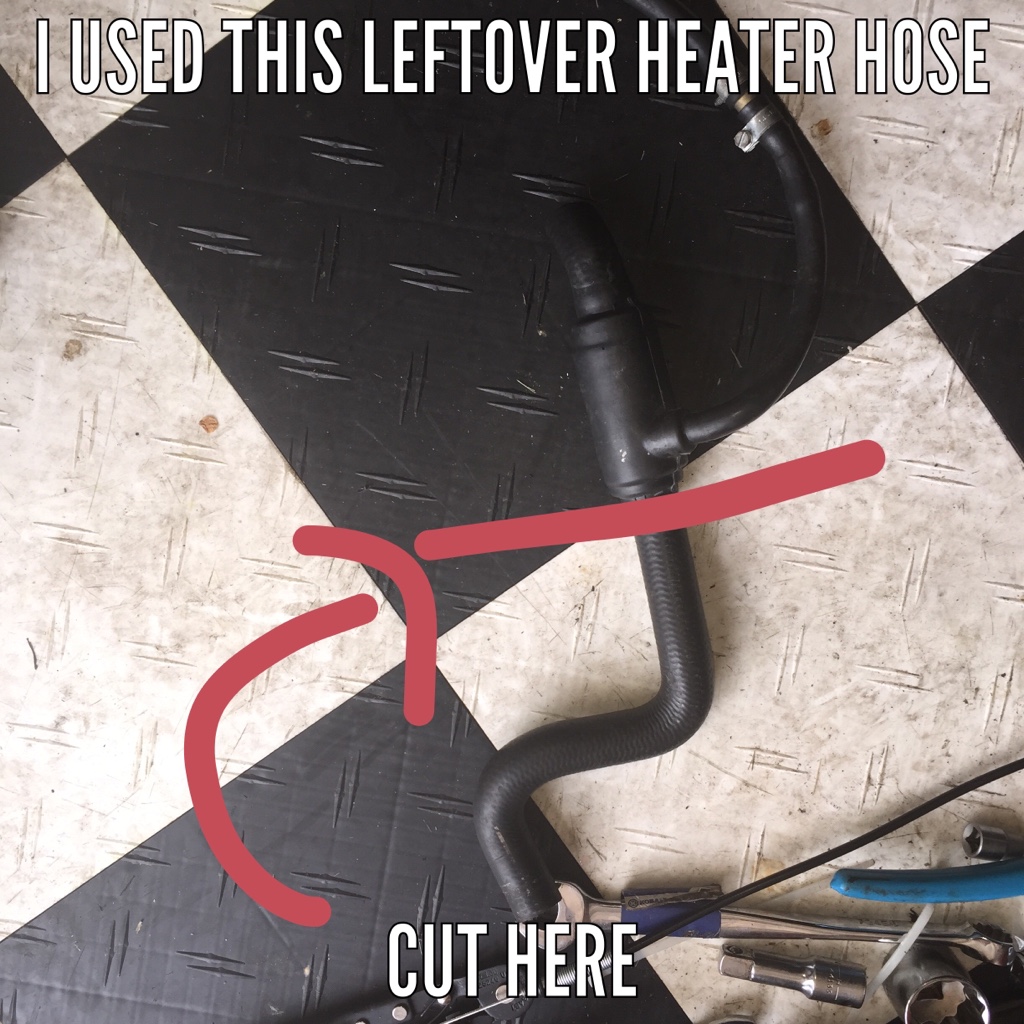
I snaked it down to the hose that comes out of the tstat housing and also is the drain of the overflow tank.
And connected with another 1" 90.

Notice it's very tight so I sleeved the hoses in a couple areas.
Since I'm removing worthless hoses I had to remove this T (left hose goes to TB).
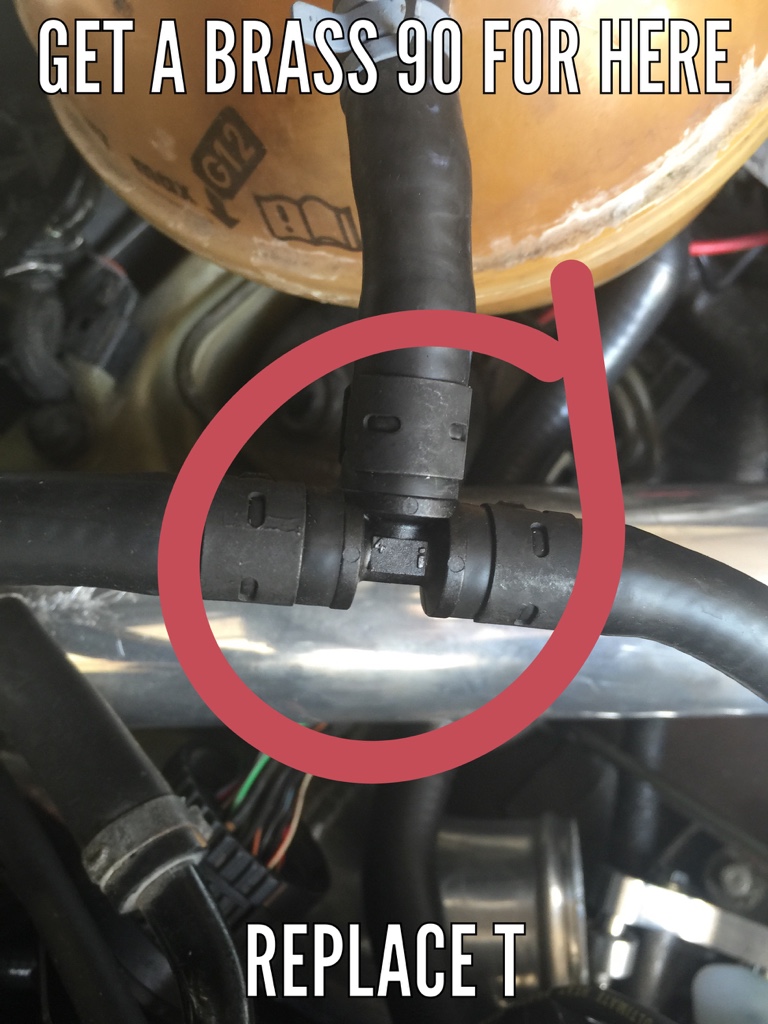
You can put a 90 degree barbed brass fitting there-the hose won't comfortably reach the overflow bottle without stressing the upper radiator hose.
I just used a longer small diameter hose to cut out the 90 deg fitting or coupler. The more clamps=more possible leaks.
About to put the air filter/MAF housing in.
It's tight but it'll be ok.
Still messy but who gives a crap? I'm all GO, no show.
Will post more updates as I have them.
Oh, random thought:
I removed my ac so I thought I'd post the belt size/type for reference:
7PK1290 or 021145933C - it's what I'm running. Verified by looking at the belt today.
4-21-2016
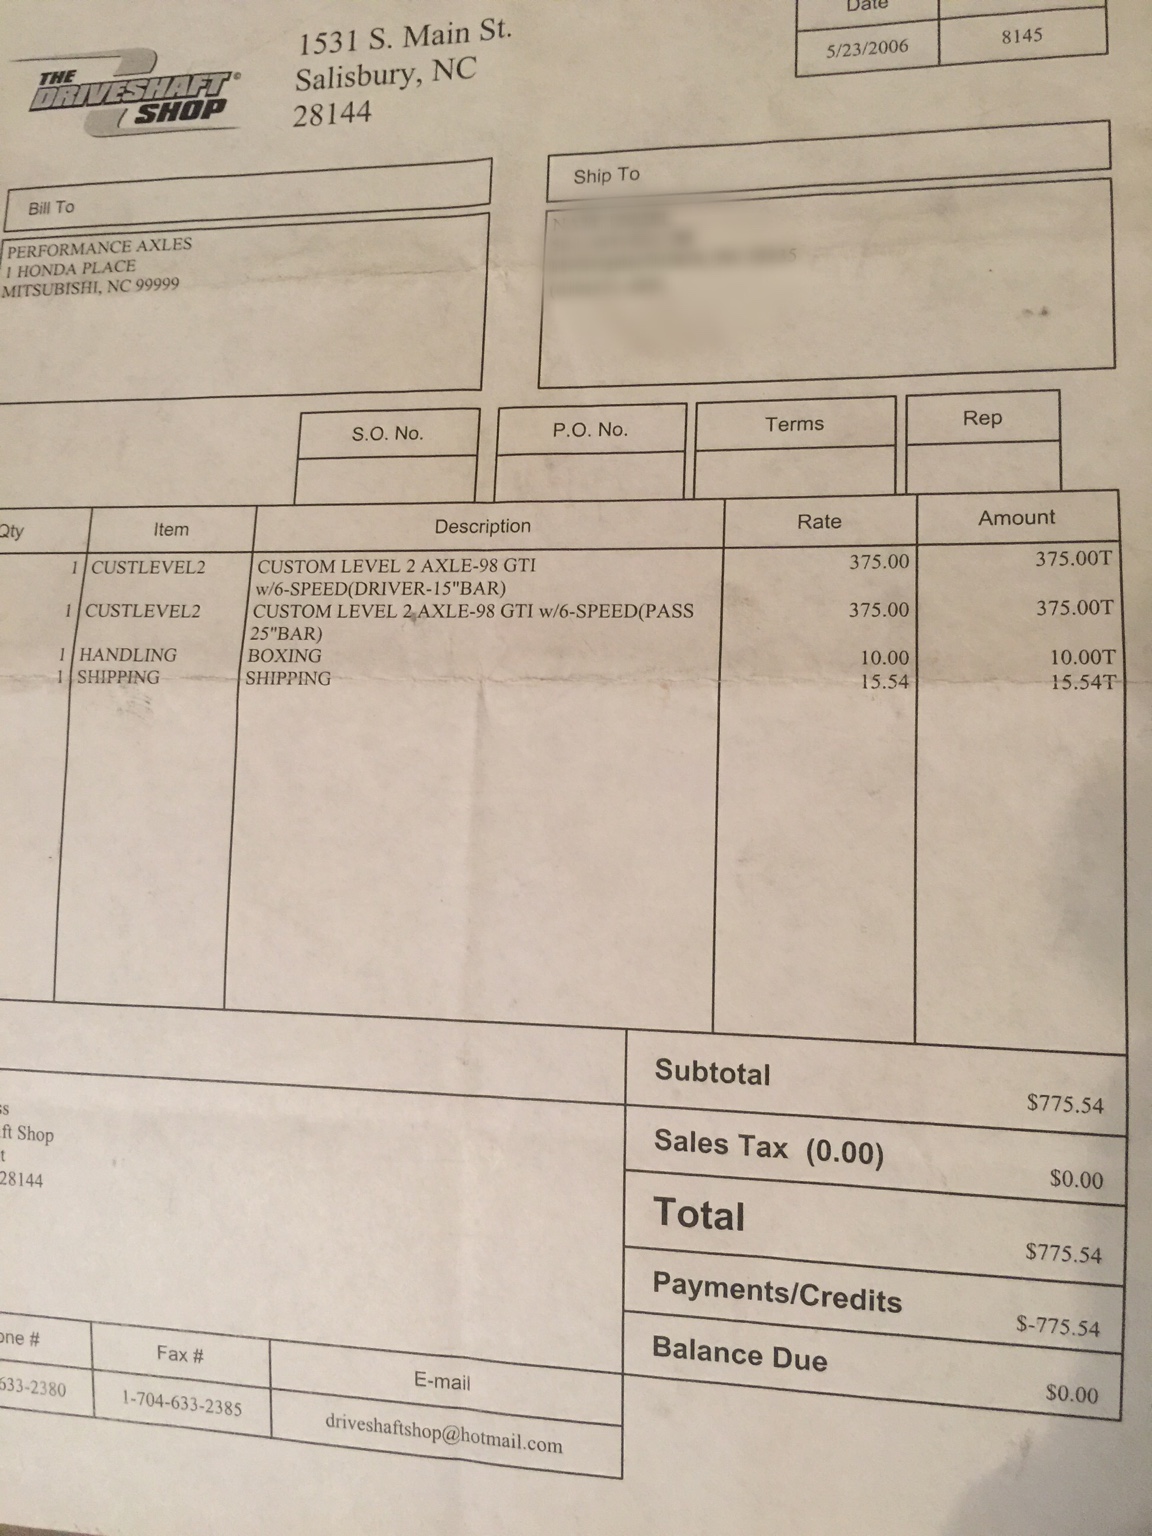
Somebody requested part numbers on DSS axles.
Here is my receipt...