You must be logged in to rate content!
19 minute read
Re: Memory settings again (phaeton Also)
Compliments of PanEuropean @ vwvortex.com
3-3-2005
Hi Rodger:
I'm going to provide a 'step by step' process for you and your technician to follow. Hopefully this will allow you to get the car set up EXACTLY the way you want it. I suggest you print this out and take it to the dealership with you. I am going to assume you have keyless access. If you don't have keyless access, then let me know and I will make a second, different set of instructions (if needed) for cars without keyless access. I don't have any experience on cars without keyless access, but I can go to my dealer and figure it out using their demonstrator, if need be.
Don't feel bad about the difficulty you have encountered, the instructions provided in the owner manual are not clearly presented, and the owner manual does not provide a good overview of the different processes involved. The Phaeton Service Manual (Robert Bentley CD) that your VW technician uses doesn't even touch on this subject.
Step 1 - Assigning keys to drivers using the Infotainment Screen
Begin by making up three different colour key tags, one for each of your keys. Label them with your name, your partner's name, and the word "Valet". The valet key will be different than the other two, if you look carefully at it, you will see that it does not have a button for unlocking the trunk in the middle of the side with the three buttons.
Next, take key number 1 (with your name on it), and lock the car with that key, by pressing the remote locking button. Put the other two keys a short distance away from the car, for example, put them 10 feet away from the car, in the mechanic's toolbox.
Using key number 1 again, unlock the car by pressing the unlock button on that key fob. Get into the car, put key number one in the ignition, and turn the ignition on. You don't have to start the engine, just put the key in the ignition and turn it on. Now, follow the instructions on page 52 of booklet 3.1.2 of the owner manual (North America English version 09.2003). I'll paraphrase the instructions here, but the owner manual is the authoritative reference.
a) After you have turned the ignition on and dismissed the lawyer screen (only dismiss the first screen, the one that has the word "ACCEPT" beside the button), you will then see a screen that indicates that a "Profile" has been chosen. Hopefully that profile will match the key you used, but if it does not, no problem, we will fix that next.
b) Press the big button that is permanently labelled SETTINGS. This is below the screen. Now press the soft-key that says "User Profiles". Hopefully, you will see a small key symbol next to your name. If you don't, then turn the rotary dial to select your name, and press the rotary button inwards to confirm the choice.
c) If appropriate, edit or enter the name of the driver by pressing the softkey "Profile Name", and using the rotary button to spell out the letters of your name. For example, turn the rotary dial until R appears, then press the rotary dial in. Then turn it until O appears, and press the rotary dial in. Same with D, G, E, and R.
d) Turn the ignition off, get out of the car, lock it using the pushbutton on the key fob you just finished working with. Go to the toolbox, drop that key fob into the drawer of the toolbox, fish out the second key fob, and unlock the vehicle with the second key fob. This will most likely be the key fob you will assign to your partner. Now repeat the process, making sure that in step b) and c) above, you select the profile with your partner's name, and spell out that name, if needed.
e) Lock the vehicle with the second key, go drop it in the toolbox, get the third key (the valet key), unlock the vehicle with the valet key, and repeat the process again. Assign some name to the valet key - if you don't have a kid that drives the car, just spell out the word 'valet'. Don't use the word 'guest', that word has a different meaning in this context and it is a reserved word.
OK, what you have just done is to match the three key fobs with the memory functions of the car that don't involve physical movement of things. For example, the radio station presets, climate settings, language of the user, preferred units of measure (miles or kilometers), in other words, things that are electronic in nature and do not physically move.
Step 2 - Assigning Preferences for 'Things that Move'
Things that move include seats, mirrors, the steering wheel, stuff like that. Literally, things that physically move when you change them.
Settings for things that move are stored using the buttons on the outboard side of the driver seat. This has nothing - repeat, NOTHING to do with keys for the Phaeton. Later on, you can link these preferences to a key, but for the time being, consider them to be totally independent of keys, because they are.
Unlock the car (with any key), then toss that key back into the toolbox. It's not critical that you actually toss the key into the toolbox, but the point I am trying to convey here is that this process does not involve keys!
Sit in the car (you don't need to turn the ignition on), and move the 18 way power seat around until you have it just the way you like it. Now move the two exterior mirrors around, using the mirror joystick, until you have them the way you like them. Move the interior mirror around, just by grabbing it and twisting it, until you have it the way you like it. Adjust the steering wheel the way you like it (tilt and telescope) using the 4 way rocker switch on the outboard side of the steering wheel.
Now, you need to store these settings in the car memory. Because you have just set the car up to your personal preferences, and we are assuming that you are using key 1, you might as well store these settings in "button 1" of the driver seat memory panel. This will keep things nice and simple.
Go to page 89 of booklet 3.1.1 of the owner manual (note that this is a different booklet), and read the instructions in the left hand column only. Don't yet get involved with setting mirror preferences for reverse, you can do that later. (Trust me about this). As you can see from reading the instructions, the correct process for storing the settings for 'things that move' is to press the SET button on the outboard side of the driver seat, then press the appropriate memory button just forward of the SET button. In this case, button 1, since they are your settings.
I don't know how long you have to press the SET button, or whether you are supposed to hold SET in while you press the number button you want to assign - as you can see, the owner manual is ambiguous about that. So, normally I hold the SET button in first for about two seconds, then press the desired memory button (e.g. button 1) for another 2 seconds. You can easily check to see if the seat retained your preferences by moving the seat to a different position, then pressing and holding memory button 1, to see if the seat moves back to where you had it when you pressed the SET button. Hopefully it will.
Repeat this same process for button two. If you don't have the second driver with you, use very exaggerated settings (e.g. seat all the way forward, and all the way up), because this makes it easier to check seat behavior later on. Once the whole process is finished, it is very, very easy to modify seat and mirror settings.
HINT: If you don't have a regular third driver, program the number 3 seat memory button to move the seat all the way up and all the way back. This makes it easy to put it in this position for vacuuming the car, or to allow a driver to get into the car easily.
Step 3 - Associating Preferences you just set for 'Things that Move' with individual keys
First, here is an overview of the concept of what we are now going to do. It helps greatly if you comprehend the concept before you try to do the work. We have already associated keys with specific drivers - this was done in step 1. At the same time we did step 1, the car established 'profiles' for each driver. These are the profiles for 'things that don't move'. The car will automatically store and update these profiles as time goes by and the appropriate driver (key-specific) settings in radio stations, the temperature settings, unit of measure settings, etc. In other words, for 'things that don't move', the car keeps a running memory of exactly how you had things set up when you last drove it, and will recall all these settings for you when you next drive it, even if someone else (with another key) has driven it and changed everything totally.
But - the car does not yet know which seat memory button is associated with which key fob. I know this sounds dumb, and you are probably thinking "why doesn't it just associate seat memory 1 with driver profile 1" - but it doesn't, and you have to tell the car ONCE ONLY - when you first buy it - which seat memory button is to be associated with which key. Remember, all the settings for ‘things that move’ are stored in the control panel on the outboard side of the seat – NOT in the infotainment screen in the center console of the car.
Step 3.1 – Making the link between the seat memory control panel, and which key should recall which settings from that panel
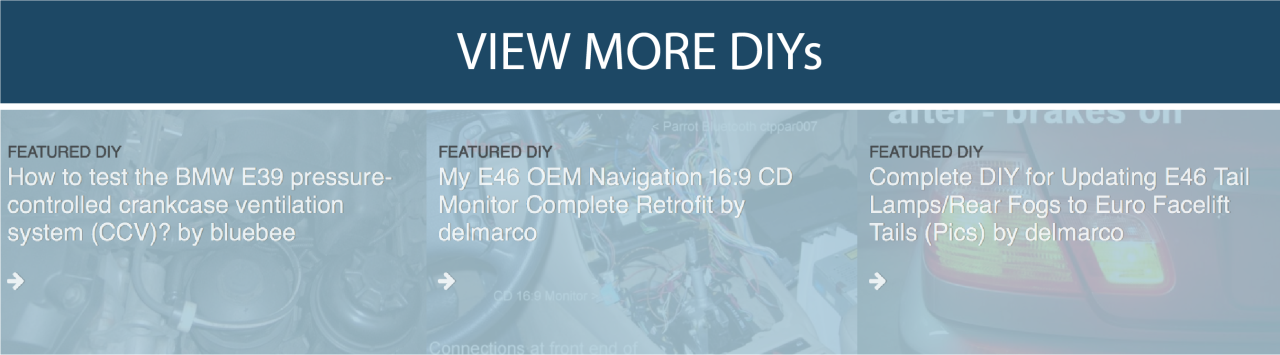
There are two different sections of the owners manual that you need to read before you do this. The first is at the bottom of page 78 of book 3.1.1. You will see a picture there, with an arrow pointing to the “Convenient Entry Button”. Before you can match seat memory settings to the key fobs, you must make sure this “Convenient Entry Button” is in the OUTposition. I cannot over-emphasize the importance of this. If that button remains pushed in, the car will not accept your attempts to match key fobs with seat memory buttons. This is the most commonly encountered problem when it comes to new owners programming settings.
So, make sure that friggin’ button is out, and leave it out. Now go and get all three sets of keys from the mechanic’s toolbox, and dump them on the passenger seat. It doesn't matter here if the keyless access system picks up the signals from all three keys. Furthermore, you don't need the ignition system on to do this step, this means none of the keys need to be in the ignition slot.
Now, go to the bottom of page 91 of book 3.1.1, and read what is written on the bottom of page 91, and also read what is written on the top half of page 92.
What is written on the bottom of page 91 is quite simple and straightforward, but, what most people (myself included) don't do is correlate the instructions on page 91 – “how to link up a seat memory with a key fob” to the instructions on page 92 – “how to break the correlation between a seat memory and a key fob”. If you hold the lock button of the key fob for 2 seconds or more, you BREAK the correlation. So, when you follow the instructions on page 91, only hold the lock button of the key fob for 1 second or less.
The instructions on page 91 are pretty simple:
a)Press the seat memory SET button
b)Press the appropriate memory button
c)Press the seat memory SET button again
d)Press the UNLOCK button on the key fob that you want to correlate with the memory button you pressed in step b.
If you do all this properly – and the convenient entry button is out – the car will confirm to you that it has made the correlation by blinking the turn signals RIGHT AWAY, as soon as you press the unlock button on the key fob. Remember, iff you hold the lock button on the key fob for longer than 2 seconds, you will be following the page 92 instructions to BREAK a correlation, not the page 91 instructions to MAKE a correlation. Also, if you don't have the convenient entry button out, nothing will happen.
For your information, the antennas in the interior of the Phaeton that notice the presence of the key fob (with keyless access) are located just ahead of the shift lever (below the wood trim), and directly under the garage door opener. So, if you hold the key fob anywhere that is visible to those two antennas when you are doing the correlation process, the car will pick up the signal.
This correlation process only needs to be done once, when you first get the car (Thank God).
Step 4 – Future Adjustments and Fine Tuning
As I mentioned earlier, the car will automatically track changes you make to your preferences for ‘things that don't physically move’, so no further attention is needed there.
To fine tune or update your preferences for ‘things that move’, just adjust everything the way you want it, then repeat step 2 again. In practice, this is quite easy, you can do it when you are stopped at a traffic light. Don't forget, at some point in the future, to put the transmission in reverse, then adjust the passenger side mirror to your preferred view in reverse. Then do the step 2 memory setting process (SET button, then the memory number button). Once that is done, the Phaeton will automatically tilt the passenger door mirror to your preferred setting whenever you put the car in reverse.
When you go home, go to page 89 of booklet 3.1.1 and re-read the info in the right hand column of that page – that explains how to set the mirror in reverse.
Conclusion
Don't feel bad about having encountered problems. You only had to go to 4 different places in two different books, and try to dig the information you needed out from amongst all sorts of idiot warnings such as “Each vehicle occupant must sit in a seat of their own” and “Always keep your feet on the floor in front of the seat”. It’s high time that the technical writers, and not the lawyers, took charge of the VW Owner Manual. The tail is wagging the dog in Auburn Hills.
Michael
This is the button that must be OUT when you do step 3 and 3.1 of the process above. To keep life simple, just make sure the button is out when you begin the whole process at step 1, and don't push it back in until you drive away from the dealer.
What this button does, when it is pushed in, is to cause the steering wheel to automatically move fully upwards when you shut down the car and take the key out of the ignition. This makes it easier to get out of the car. When you next get back into the car and put the key in the ignition, the steering wheel will go back to the position associated with that driver.
Problem is, if this button is left pushed in during the programming process, you cannot associate key fobs with seat memory buttons. I think this is either a software glitch, or a technical writer oversight, because it is not mentioned in any of the owner manuals.
Michael
Convenient Entry Button
Archival Note: Here are links to earlier discussions of this same subject, where all of us were trying to 'find our way' through the issue of programming settings on the Phaeton. But, consider the links below to be of historical interest only - the big explanation I posted above has all the information from these earlier threads consolidated together in one single instruction document.
Michael
Store Settings for the Seat Memory buttons
Store Settings Radio Stations - Matched to individual keys
Finally got the seats/mirrors moving to position when I use the key fob
4-11-2005
Archival Note: Related topic - Finally got the seats/mirrors moving to position when I use the key fob
7-13-2005
Welcome to the Phaeton forum.
Have a look at this discussion and see if you find any information in there that might be new to you: Store Settings for the Seat Memory buttons, key fobs, driver preferences.
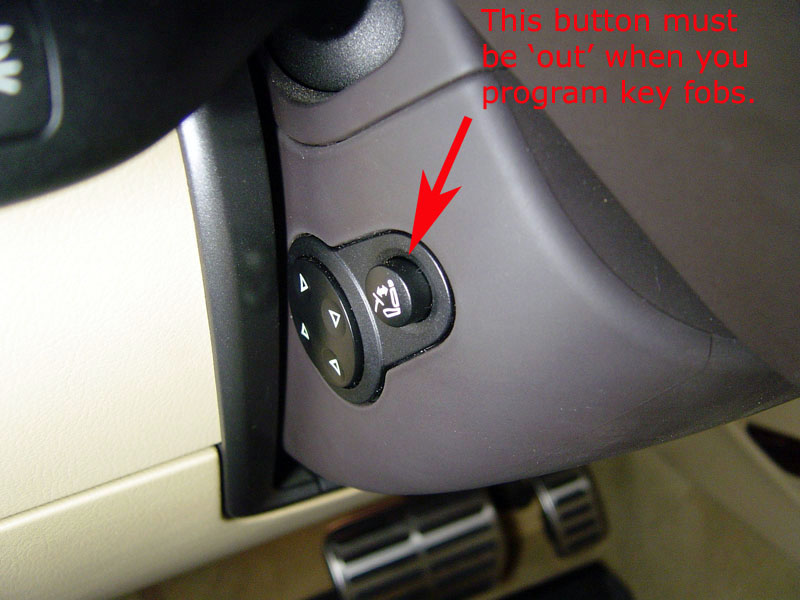
If you don't find anything in there that you think will solve your problem, take your Phaeton back to your VW dealer, and ask the technician to re-initialize the driver seat using the "Guided Functions" of the VAS 5052 diagnostic scan tool. There is a special function for the driver seat and the front passenger seat that resets the internal measuring system that the seat uses to determine how much travel remains in each of the 18 directions. Note that once this function is done, it is necessary to move the lumbar support button up, and hold it up for about 30 seconds while the lumbar support goes through a complete movement cycle. This is fully explained in the directions that accompany this process on the VAS 5052.
The driver seat on the Phaeton is controller address 36.
Let us know how it goes.
Michael
7-14-2005
Peter:
Below is an image of a page from the printout of a VAS 5052 diagnostic scan tool that shows the procedure I referred to. The correct name of the procedure is "Basic Settings for Driver Seat Controller - address 36".
This printout was from my Phaeton, documenting work that the Phaeton tech at my dealer did as part of the pre-delivery inspection of my Phaeton, to make sure that everything was set up correctly and working correctly before they gave me the car. I dug it out of the service file at my VW dealership.
Apparently it is a quick process, you don't even have to bring the car inside the building. The tech can come out to the car with the (portable) scan tool, plug it in, and get everything done in about 10 minutes.
I am 99.9% sure that this is all that has to be done to solve your problem. I am guessing that the seat in your car is a bit confused about where the far end of its range of motion is - so, it just needs to be re-calibrated. The recalibration is done automatically with the scan tool, and the only human intervention needed is operating the lumbar support button at the end of the procedure.
Michael
Basic Settings Procedure for Phaeton Driver Seat
4-15-2014
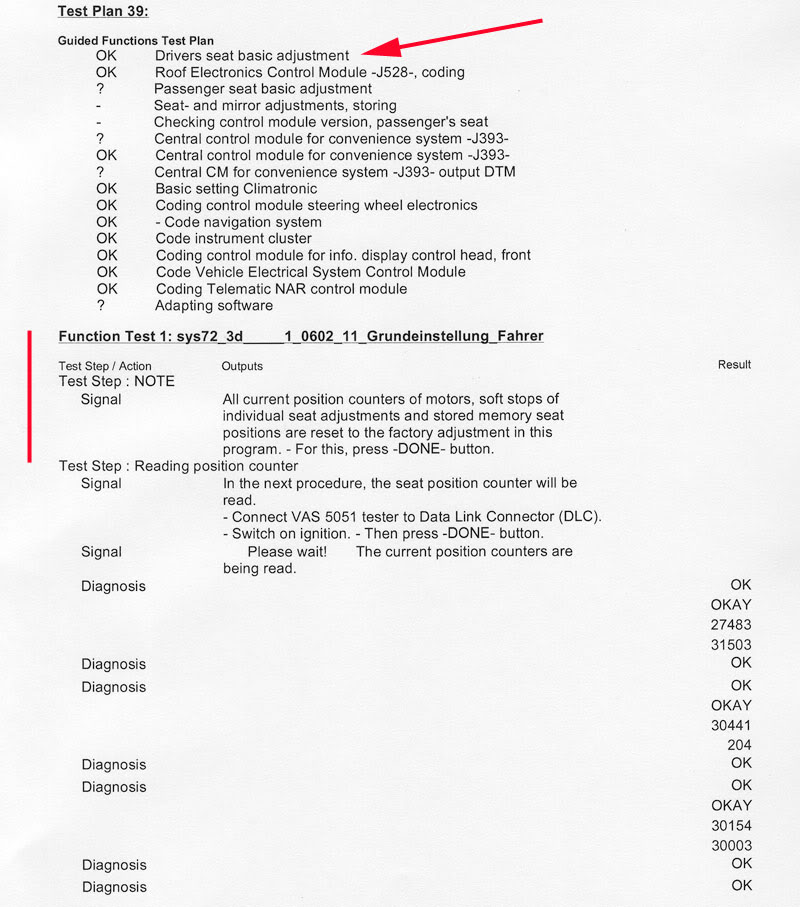
Is the little button on the left side of the steering column (not the steering wheel, but the steering column itself) pushed in? The button I am referring to is in the lower middle portion of the photo below, slightly to the left of center of the photo.
Michael
Steering Column Button
4-16-2014
Hi Chris:
The car is rather 'careful' about when it will move the steering wheel. My experience is that the steering wheel will move up and forward when the ignition is turned off, but this action is conditional on the status (closed or open) of the driver door. Offhand, I can't recall if the driver door has to be closed to permit the steering wheel to move up and forward when the ignition is switched off, or the door has to be open.
For the other direction, I am pretty sure that the steering wheel will not move from the stowed (up and forward) position to the saved position for an individual memory button unless the driver door is closed and the ignition is then switched on. It's possible that the driver seat belt may also need to be fastened before it will move.
The above prerequisites are all safety related, in the sense that the designers wanted to be certain that the driver was in a known position (sitting normally in the driver seat) before allowing the steering column to move of its own initiative. The key variables are the driver door (open or closed) and the ignition (on or off).
If you experiment with the system, keeping the above info in mind, I think you will be able to figure out what the prerequisites and triggers are. Naturally, the little button has to be in the 'in' (depressed') position to permit automatic movement of the steering column.
Michael