You must be logged in to rate content!
32 minute read
DIY how to test a BMW E39 battery & alternator (discussion)
Compliments of bluebee @ bimmerfest.com
1-5-2011
EDIT: Started with testing the battery & then added a section on testing the alternator.
EDIT: Ã…gent99 added a test for parasitic drain causing a dead battery overnight.
EDIT: RDL added wiring diagrams and a test sequence for the starter and charging circuits.
EDIT: Added how to best buy and properly replace the battery based on tribal knowledge.
I was helping out in another thread today ... and found myself jumping about from thread to thread to find a pictorial DIY for testing the E39 battery and charging system.
That's inefficient!
I'm inherently lazy ... so, I decided to write (for eventual re-use) this consolidated thread on how to properly test a BMW E39 battery and charging system.
Note: There is nothing new here (all the pictures and diagrams and discussions were culled from other threads).
However, I'm sure what I write below is somewhat inaccurate or incomplete - but I did try my best to be all inclusive.
So ... please add value so that we may point others to this thread in the future so they have a home DIY for testing their E39 battery & charging system in situ.
------
If you suspect a battery problem ...
Visually check the battery and cables for tightness, corrosion, or physical damage (be mindful of the explosive charge on the battery positive cable).

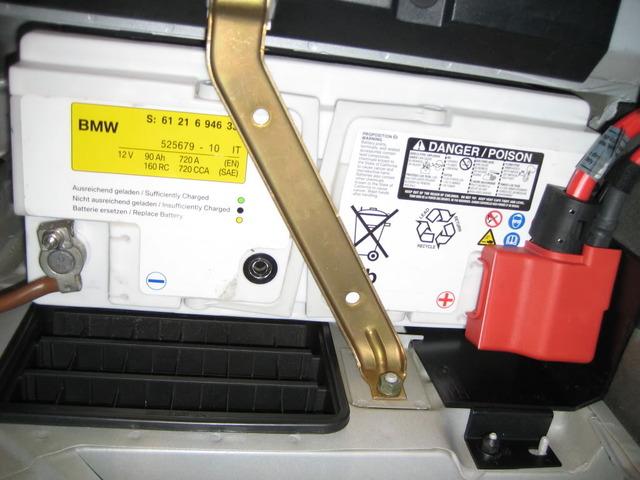
Note the color of the BMW battery indicator
black === inadequate charge
green === adequate charge
yellow === defective
Check the electrolyte level; if necessary, top off with distilled water.
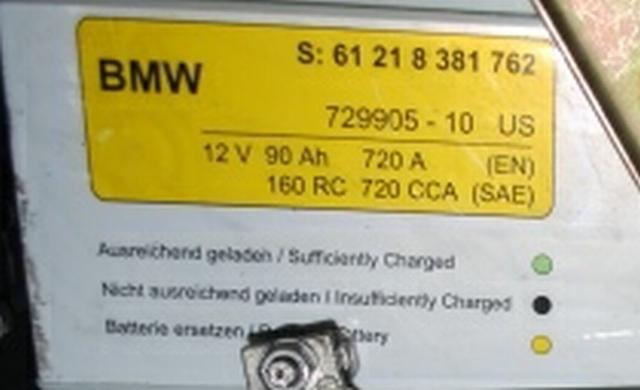
- Battery: A charged battery is 33.5% (volume/volume%) sulfuric acid (4.2 Molar H2SO4, ) & pure water, aka distilled, demineralized, or deionized water (Bentley 020-23) with positive plates containing lead dioxide (PbO2) and negative plates of lead (Pb), both mixed with calcium (Ca) to minimize gassing (i.e., loss of water) and other elements (such as tin, antimony, & selenium to harden the plates and simplify manufacturing) in a polypropylene case. In the discharged state, both plates turn to lead sulfate (PbSO4) as the electrolyte loses its dissolved sulfuric acid and becomes primarily water (which can freeze in cold temperatures and the lead sulfate may form insoluble crystals which, over time, reduce the capacity of the battery if it is not recharged immediately after discharge). [Total Volume: unknown but users have reported adding about 20 ml per cell after two years of use]. Replacement Interval: Lifetime fluid (top off only if needed, after removing steel strap, two stickers and then unscrewing the six cell caps, and filling to the fill line which is 1/4 inch or 5mm above the top of the plates at the very bottom of the internal black plastic depth indicator). The OEM battery has built-in hydrometer where green indicates a charged battery and black indicates a discharged battery, and yellow indicates a defective battery. Better to test at 27°C/80°F by loading battery with 15 amperes for 1 minute (or just turn headlights on w/o engine running) and then perform a 1.265 specific-gravity hydrometer test of each of the six cells (add or subtract 0.004 to the hydrometer reading for every 10°F/6°C above or below 27°C/80°F respectively); and a 12.6 volt open-circuit voltage test across the battery terminals (Bentley 121-5, 121-6). OEM specs are BMW 61.21.8.381.762, USA 729905-10, EN 12V 90Ah 720A, SAE 160 RC 720 CCA. Aftermarket batteries are NAPA #7549, Deka 649MF, Interstate MTP-93, Werker model???, Batteries Plus model???, East Penn model??? (need specific model info) with a stamped date code within the last month or two.

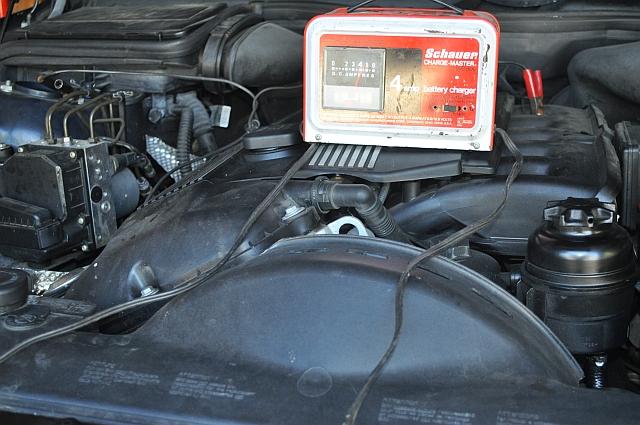
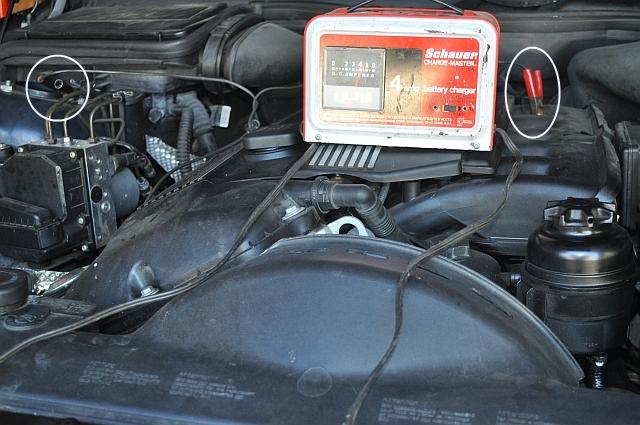
The Bentleys recommend removing the battery from the trunk but most people charge the battery in situ.
Connect a battery charger to the engine connection points. It's ok to leave overnight but use no more than 6 amperes of current maximum.
When fully charged, proceed with the specific gravity test below.

Specific gravity:
Load the battery with 15 amperes for one minute (by turning the headlights on with car off)
Remove the sticker on top of the battery covering the six cell caps
Remove the six cell caps
Test the specific gravity with a hygrometer of each of the six cells
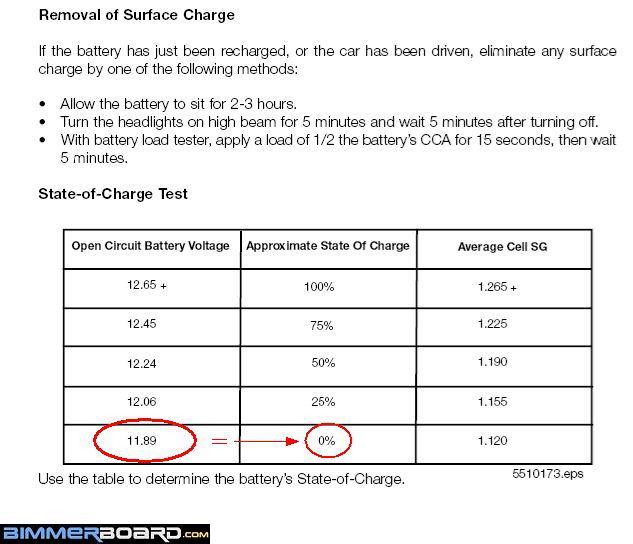
Refer to the chart below for diagnosis
Closed-circuit load-current voltage test.
Load the battery with 15 amperes for one minute (by turning the headlights on with car off)
Put a DMM across the battery terminals to check voltage
See chart below for analysis
Open-circuit battery voltage & charge test.
Disconnect the battery cables
Apply a 200 amp load for fifteen seconds
Check the voltage across the battery terminals
See chart below for analysis
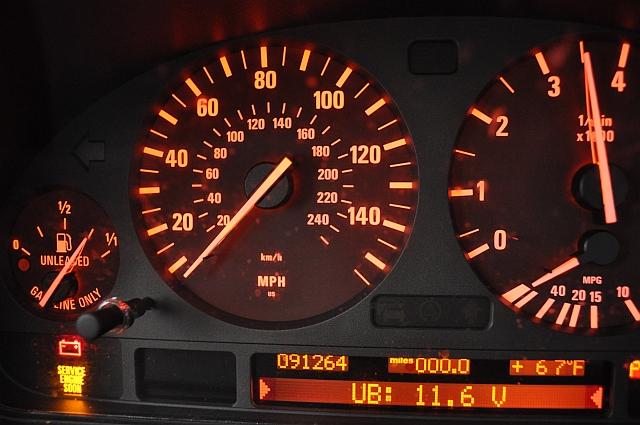
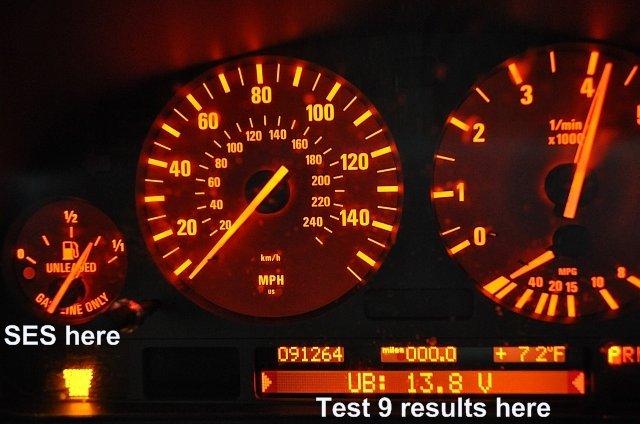
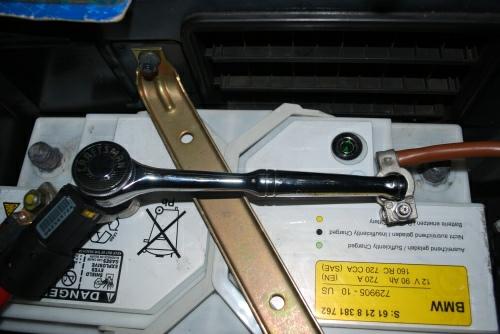
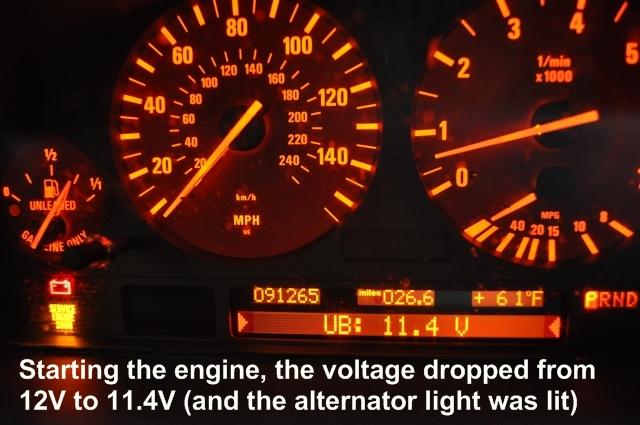
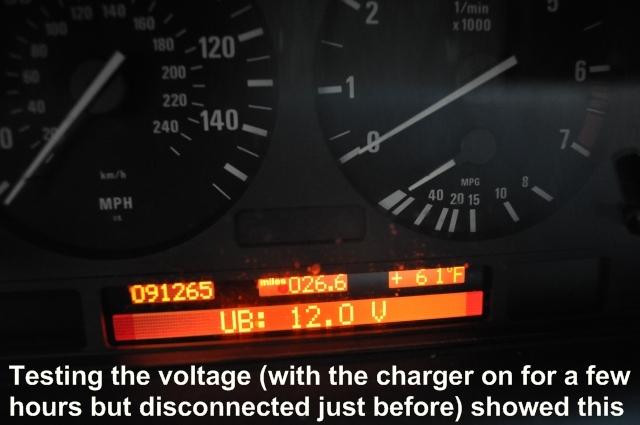
In addition, one can unlock the low or high instrument cluster and read closed-circuit battery voltage with the ignition on position #2 with the engine not running.
Note: This picture shows the engine running, which will test the alternator, not the battery ... but the battery-test procedure is the same (just without the engine running).
If the battery tests bad, then replace the battery.
- What battery (1) & what battery maintenance (1) & battery replacement DIY (1) (2) (3) & how NOT to change it (1) (2) (3) & battery electrolyte (1)

If the battery tests good, but you still have charging problems, the next step is to test the alternator charging circuit.
Check voltage across battery with key off
Check voltage across battery with engine idling
Wait at least 15 seconds for the alternator output to rise
Results should jive with the chart below
Note: Also check voltage from the engine + terminal to ground (it should be the same).
While I read elsewhere a test of the alternator is to disconnect the battery negative cable while the car is running, the Bentleys expressly forbid that. Curiously, they suggest not using analog multimeters in favor of digital multimeters.
The next step is to check for battery voltage at the alternator:
Completely remove engine air filter housing as described here.
Pesonally, I couldn't follow those instructions, so I wrote my own for my I6:
Steps to remove your air cleaner in preparation to remove the alternator in a 2002 BMW 525i:
- Set up your computer in your work area with Internet access to Bimmerfest
- Grab a box of nitrile gloves and a solvent cleaner & roll of paper towels
- Disconnect both battery cables with a 10mm box wrench (to be safe)
- Optional: Put battery on a charger of less than 16.5V, 6amps capacity
- Remove complete air filter housing
* Loosen intake duct hose clamp at throttle assembly with a 3/16th flathead
(or, better yet as I belatedly learned, with a 6mm socket on an extension)
* Spread plastic clip to remove remove 1/4" idle control hose from intake duct
* Spread open two metal clips holding mass air flow sensor
* I tried to disconnect idle speed control valve harness connector but
I just can't find it, not from the Bentley pictures, nor from looking
* Disconnect harness connector from mass air flow sensor (press & pull)
* Remove air filter housing mounting screw with a 10mm socket or box wrench
* Disconnect vent tube by pulling back on the soft rubber with your hands
* Loosen air intake duct clamp with a 3/16ths flathead screwdriver
* I had to remove the MAF sensor housing in order to gain room
* I had to remove the engine air filter in order to gain leverage
* I had to twist the hard plastic vent tube out of the way to gain room
* Nobody tells you there is an unclamped hose at the BOTTOM of the
engine side of the air intake hose just after the MAF that holds it all up!
* Since there was no clamp on that bottom hose, I was on my own
(no instructions in the Bentleys mentioned any of this!)
* I elected to remove the two hose clamps near the engine on the large
3-inch air intake hose with a 3/16ths flathead screwdriver (or better yet,
with a 6mm socket on a 1/4 inch ratchet driver handle)
* Only after loosening those additional two hose clamps was I able to lift
the engine air intake up and back over the engine.
* This engine air intake is still connected to the engine by a pair of
what looks like vacuum hoses which I couldn't get loose for fear of
breaking the plastic nipple, so I left it all connected draped over
the engine
* Optional: I dumped leaf remnants out of the air filter housing inlet
* Optional: I put the 10mm bolt back so as not to lose it
* Optional: I tightened the three hose clamps so as to not lose them
in the ensuing battle; it was then that I realized a 6mm
socket on a 1/4" socket handle would have been easier than
the screwdriver (and updated the appropriate step above)
* Optional: While the MAF was removed, I hit it with a dozen pulses of
special MAF cleaner (aka xylene) and let air dry
* For the first time, I was able to feel the alternator belt tension,
which felt solid
Once access to the alternator is gained (access for the I6 is vastly easier than the V8):
Check the voltage from the alternator #30 post and ground
It should be the same as the battery voltage
Now disconnect the harness connector to the alternator:
Check voltage from terminal 15 and ground (field voltage)
It should be the same as the battery voltage
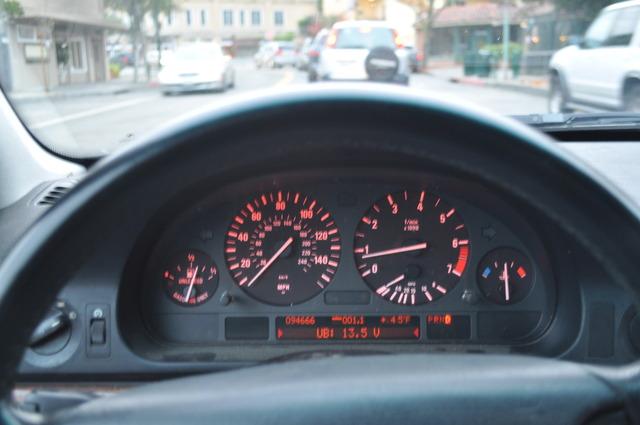
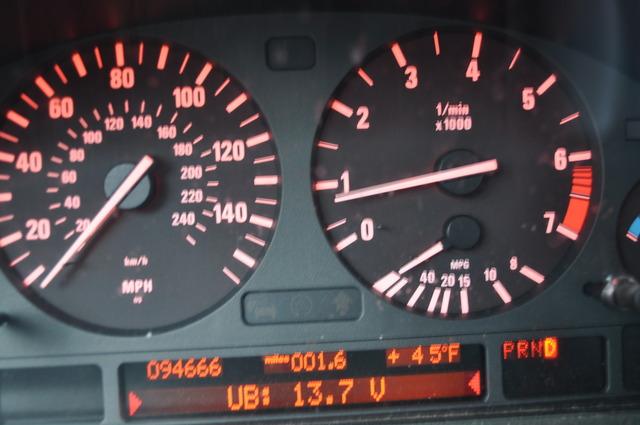
As with the battery, the instrument cluster can give you a dynamic idea of charging system operation.

Alternatively, you can drive your car to AutoZone (or equivalent) where they will run a free diagnostic test of both your battery and your alternator.
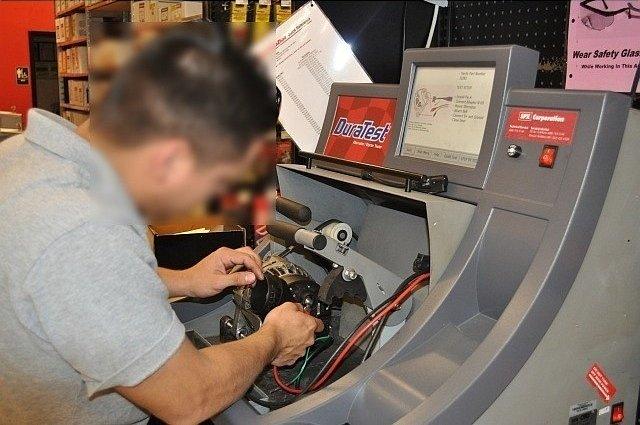
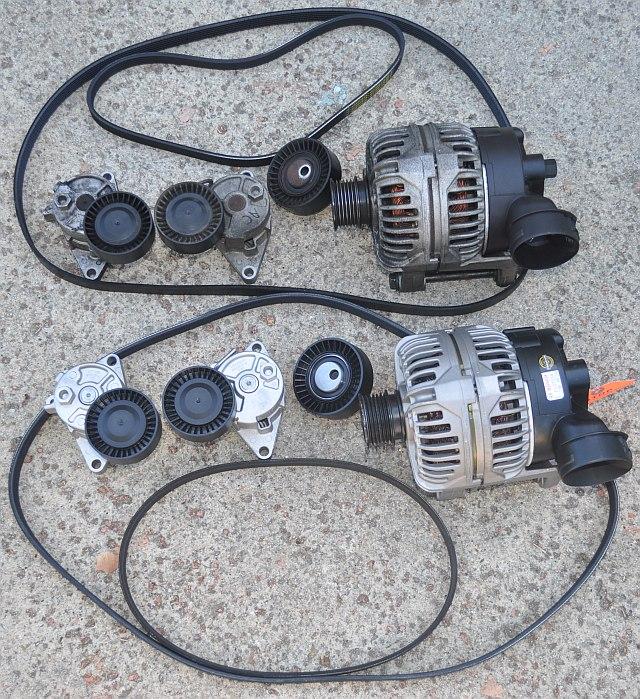
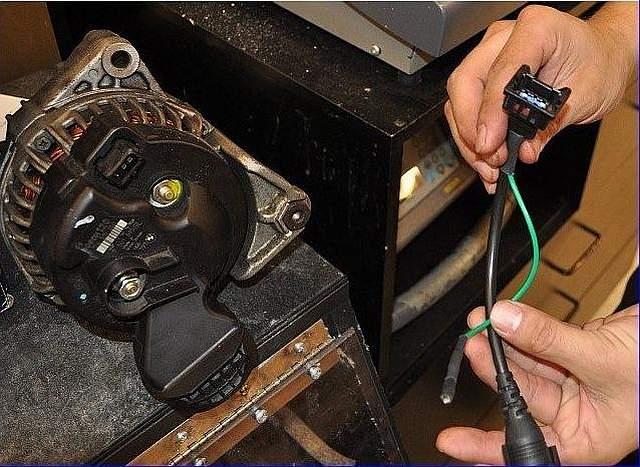
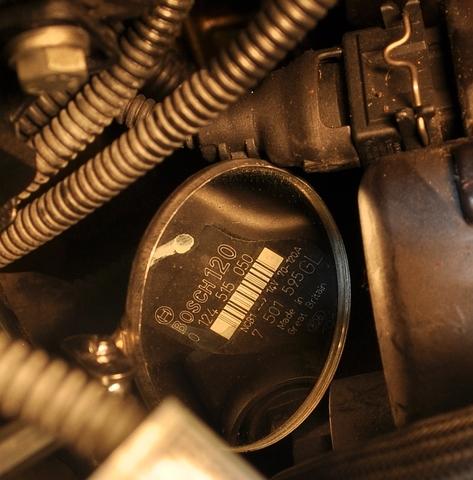
Be advised they must have the proper cables to test your particular alternator (mine, pictured here at an AutoZone in San Jose, was a Bosch 120 amp air-cooled model).
Bear in mind if you remove your alternator, you must leave the pulley on so that the alternator can be tested in vitro.
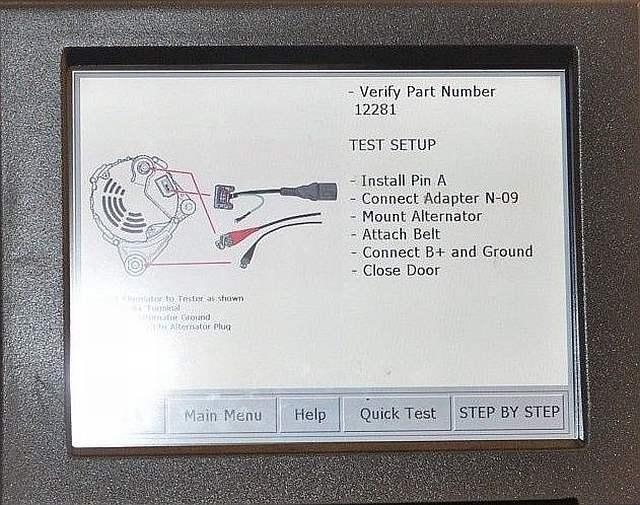
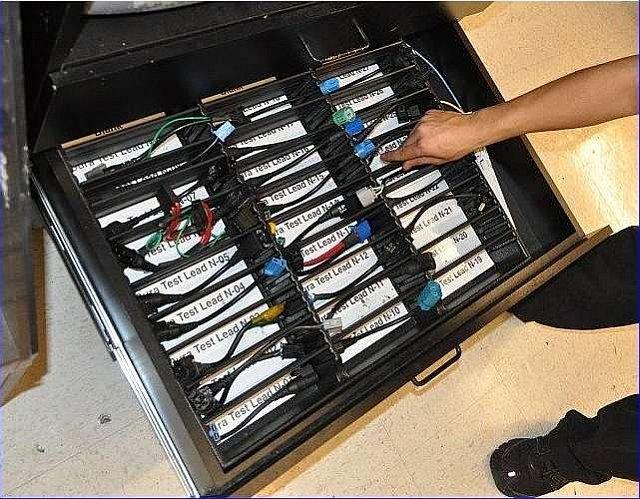
It took the parts guy a while to find the right cable for the BMW 2002 I6 ...
But the test is pretty conclusive as to whether the alternator is good or bad.
If your alternator is bad, then see these related DIY links:
- Removal instructions for the alternator & drive belt system of a 2002 525i
- Removal instructions for the fan shroud of a 2002 525i
- Alternator and Belt Drive DIY (1) (2)
- How to tell if you have spring-drive or hydraulic belt tensioners or both (1)
- How to diagnose noises coming from the drive belt system (1)
- One users' example of total electrical failure (AAA towed away) alternator repair (1) (2)
- Video of cold idle engine squeal (1)
- Recommended parts list for a complete belt drive system overhaul (1)
- How to make your own BMW special cooling & belt drive system counterhold tools (1)
2-4-2011
Originally Posted by CoreyMNK  If my car sits for about two days without being driven the battery is extremely dead. |
Here are some discussions of how to test periodic or parasitic drain:
- How to Measure Battery Drain?
- How to diagnose what's wrong with a battery that goes dead once a month?
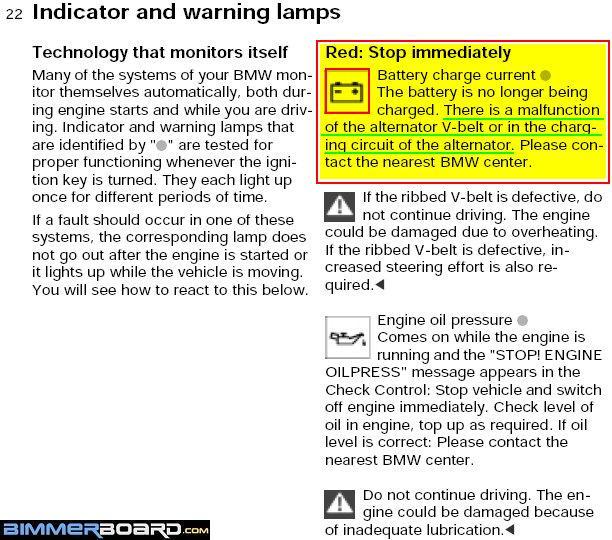
This thread posted today made me look here for the owners manual description of the "battery" warning light ...
- my battery indicator is red. What should I do?
It's interesting that the answer is "go to the dealer" but otherwise, the information below (highlighting probably from QSilver7) is correct.
Also, if you need to replace your battery, these threads will tell you all that you need to properly select & install:
- What battery (1) & what battery maintenance (1) & battery replacement DIY (1) (2) (3) & how NOT to change it (1) (2) (3)
From this alternator thread...
For reference, if someone comes here for a system reboot, here is how to properly do it (AFAIK) based on this thread.
Note 1: A full system reset procedure is as follows:
1. Pull down the battery access door in the trunk.
2. Remove the negative battery cable with a 10mm socket wrench
3. Remove the positive battery cable with a 10mm socket wrench
4. Touch battery cable terminals together (away from battery) for about 5 seconds (a small spark is said to be normal as this is said to be stored power draining from the system); on the E39, short with your wrench because the cables do not reach each other otherwise.
5. Allow cables to remain disconnected for about 5 minutes
6. Reconnect the positive battery cable
7. Reconnect the negative battery cable
Here's a method of surface charge removal from bimmerforums.
2-11-2011
Originally Posted by Ã…gent99  when you car sleeps (~20 minutes after turning it off), you can check the current draw and it should be in the 20-30 mA range. Any higher and you may have a parasitic load drawing current and depleting your battery that much sooner. |
Hi Ã…gent99,
That's wonderful advice. I'd like to collect, in this thread, the pertinent advice for others when the inevitable question re-occurs "my car won't start".
To that end, here are some cross references to the "battery drain" issue:
FAN CONTROL GOES HAYWIRE: poorly ventilated final stage resistor/final stage unit (FSR/FSU) modules that are practically sure to go haywire due to poor heat-sink design (1) (2) (3) (4) (5) (6) (7) (8) ... Autopsy (1) (2) often causing the battery to drain overnight (1) (2) (3) & how to isolate and replace the blower motor (1) (2) (3)
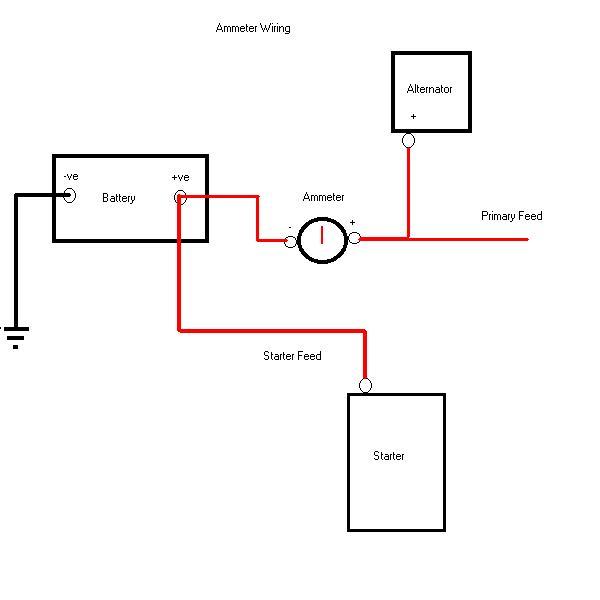
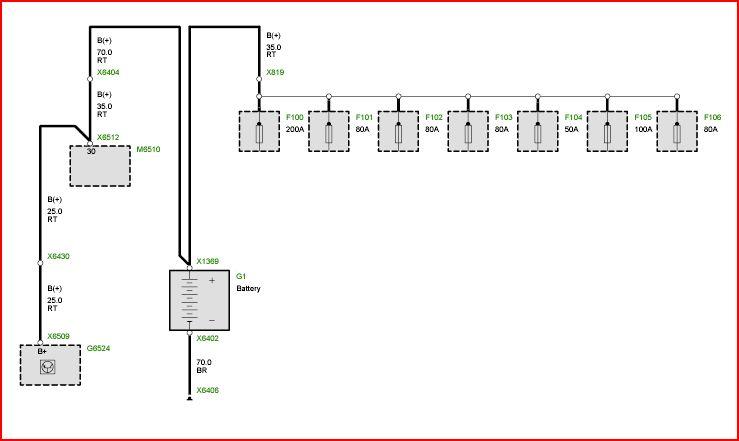
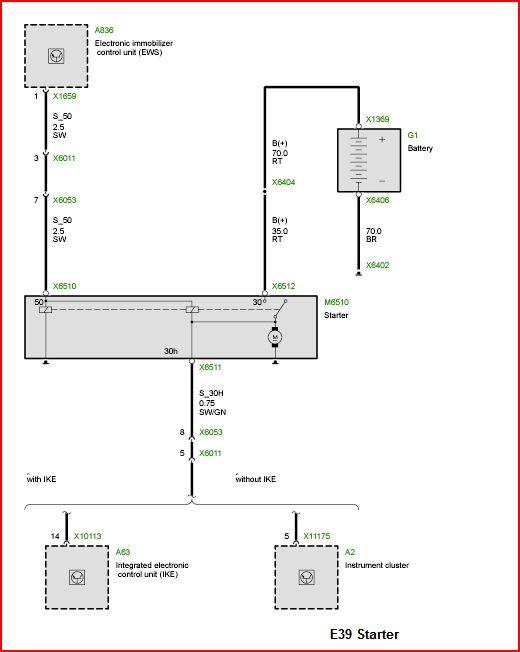
RDL posted today some nice charging circuit & starter wiring diagrams for the E39 in yet another ubiquitous car-won't-start thread today.
I reproduce his information below in the hopes that someone whose car won't start, in the future, who has determined it's not the battery, nor the alternator, nor parasitic drain, that it might be the starter circuit.
Quote:
3-23-2011
Today, 02BMW530 asked a question about the charging system:
And I pointed him to this thread which is designed to be a canonical thread for all basic battery and alternator testing questions.
One item I realized is only in the pictures but not discussed are the battery view window colors.
So, I took one of the pictures above and zoomed into the description to repeat here (sorry for the lousy pic but it was shrunk before I zoomed in):
Green = Ausreichend geladen = sufficiently charged
Black = Nicht ausreichend geladen = not sufficiently charged
Yellow = Batterie ersetzen = replace battery
If anything else basic is missing from this thread, please add it as it is intended to be the thread I never had when I had my charging system problems!
3-24-2011
I realized another trick was missing from this thread when I tried to help 02BMW530 today when the shop put in (apparently) a bad alternator.
Even if you have the shop replace your alternator, you want to know EXACTLY what alternator is in their originally.
The trick is to get a mechanics mirror BEHIND the alternator so you can read the label so you get a proper replacement:
For example, in this thread, I found realoem listed the following alternators for my 2002 525i:
- 90 amp Valeo alternator
- 120 amp Bosch generator <=== the Germans must use "generator" as "alternator"?
- 120/140 amp Valeo alternator
So I had to look and here is what I found:
NOTE: I reversed the picture because the lettering was backward in the miror.
This advice is useful to anyone who has someone else replace their alternator:
Quote:
|
To keep adding value to this thread, here is a response that should be useful to those who have to 'talk' someone (by phone) into unlocking their cluster:
Quote:
Originally Posted by bluebee  One by one, EVERY stumbling block you are running into, I've been adding the solution to the battery & alternator test thread so that the next person has all the answers. As for the cluster, we've pointed you to the unlock procedure, but, from memory, here's the simplest I can make it:
The only two tests I find useful on the display are test #7 (KTMP) and #9 (UB). |
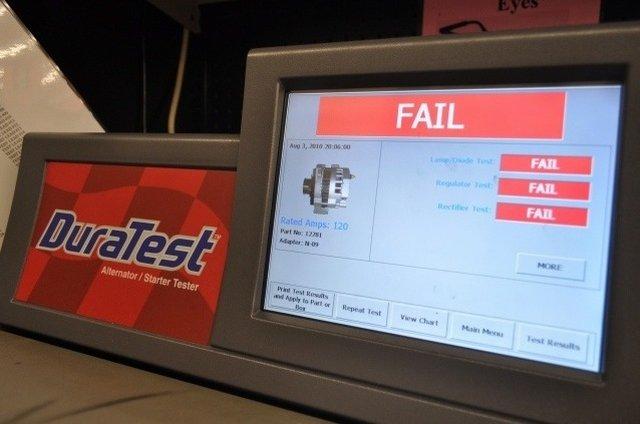
And here are some pictures of BAD results (all mine):
And, after the alternator was replaced, here are good results:
3-26-2011
For the record, it is sometimes necessary to telephone cluster unlocking instructions to someone stranded on the road.
To that end, QSilver7 has clarified over in this thread the procedure:
Quote:
|
QSilver7 clarified that going to 'any' locked display in step #4 (which is any test other than test #1, test #2, and test #19) actually sends you to test #19 automatically for the unlocking procedure. Interesting. Very interesting. That's good engineering.
3-27-2011
Originally Posted by alfonso12  Is it time for a new battery? Or could this be an alternator issue? |
You can't tell from what you told me anything about the alternator. What you need to do, in order to test the alternator, is jump start the car, and then do the test #9 to see what the charging voltage is (among other things).
As for the battery, you didn't say what the load test revealed, nor what the specific gravity was, nor what the color of the built-in hygrometer was, etc.
So, I'm 'guessing' ... but it sure sounds like a bad battery.
By way of example, my original 2002 battery, for example, acted just like yours sometime around 2006, in that, after an entire night of charging, it still wouldn't start the car. So I replaced it with the current battery.
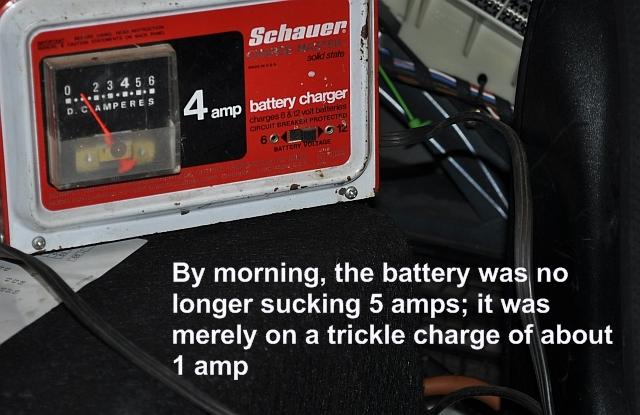
Then, years later, when my alternator failed in 2010, the battery was dead, but, it took about 6 amps at night which dropped down to 1 amp in the morning. That was a good battery. The voltage, after charging, was 13.8 volts.
So, you really need to do a few more tests to be sure ... but it 'does' sound like a bad battery ...
5-5-2011
| Originally Posted by Mikeb123 When i started the car the battery light and the transmission safety is still on. ... Do I have to have my mechanic reset these codes. |
I was hoping someone else who knows more would help.
By now, you should have empirically figured out the answer so let us know how it worked out.
My one 'experience' was that my red battery warning & the trans failsafe program went away with the new alternator. Nothing needed to be reset in my one case. The fact that yours are still on, makes me wonder whether the problem wasn't the battery after all.
However, that's what this thread is all about - definitively testing the battery & alternator to find which of the two is the culprit.
Quote:
| Originally Posted by Mikeb123 My question is when i checked the output voltage on my obc through diagnostic display it was reading 16 volts output with car running. |
That's a lot higher than the range of a good alternator listed in the charts above of 13.5 volts to 14.5 volts with the engine running.
Quote:
Originally Posted by Mikeb123  Will this higher output voltage damage the battery |
It's my understanding that heat (in this case, charging heat) is the enemy of the plates which buckle causing the lead-based paste to flake off and short out cells over time (that's why there is a chamber on the bottom to collect debris).
Quote:
| Originally Posted by Mikeb123 why did'nt the battery light go off or did i not wait long enough for the light to reset. |
It sounds like the answer may very well be the alternator ... so I ask ... how did you make out?
5-19-2011
| Originally Posted by Mikeb123 this forum has saved me a lot of money and time. |
Same with me! My alternator job 'still' took a few days from start to finish (I'm not the quickest one on the block); but the forum saved me every time I ran into a problem!
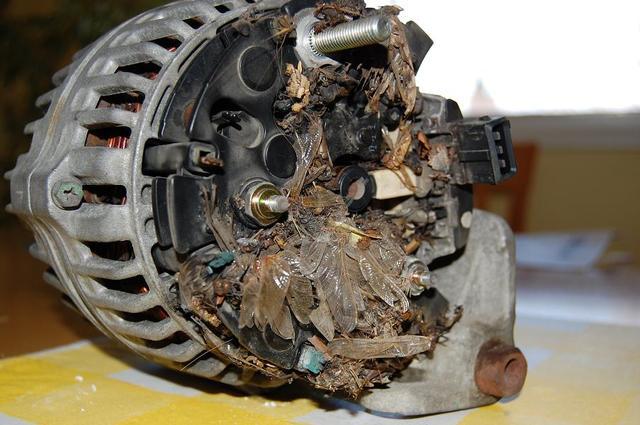
Likewise, with this poster who posted today that the biggest avoidable enemy of the alternator is the power steering fluid leak and the leaves blocking the cooling ducts:
Red Battery & Transmission emergency mode Symbols today
Quote:
| Originally Posted by dalekressin The alternator was full of debris from steering fluid and leaves from the air intake. |
Repairing the power steering leak is simple (see cn90 trick for same); but I wonder if there is a way to clear out the debris without having to remove the alternator itself?
6-23-2011
For the record, Joe kindly provided a good link in this thread today:
- E39 (1997 - 2003) > dead battery..
Quote:
Originally Posted by Joe@Bavarian  On any diagnostic on any car start with the obvious, when you come to a problem fix it and move on. Fix the battery cable, then do a Parasitic draw test. http://www.wikihow.com/Find-a-Parasitic-Battery-Drain |
Here is, for permanence, the text of that article (so as to help others):
Quote:
When your car battery goes dead overnight, usually either the battery is at the end of its life span, or you left something on, such as a light. Occasionally something is drawing power that's not of your doing. This is a parasitic draw, and it can cause the same result as leaving the headlights on: a dead battery in the morning.
|
6-27-2011
I'm not sure it's well documented, but, any good battery/alternator thread needs to be aware of the reputed 16-minute timeout period:
- How to prevent the BMW from going into transport mode (1)
Quote:
| Originally Posted by dvsgene 1) open trunk, 2) leave open, 3) To be sure, when light by the shift knob goes out [or the trunk light], that should be 16mins |
7-16-2011
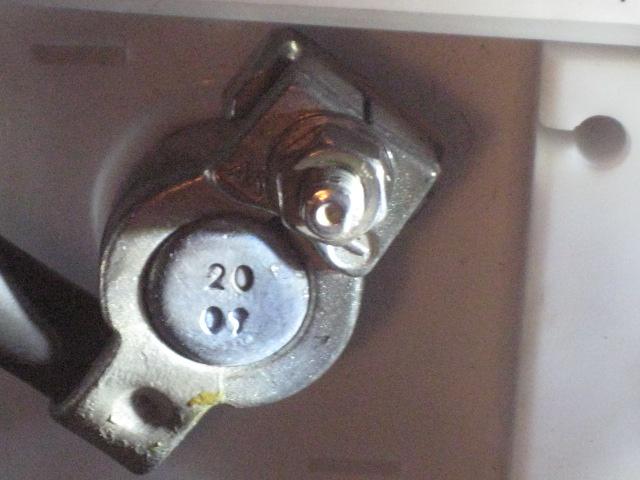
OEM BMW battery date code stamping came up in the E46 forums today:
- E46 (1999 - 2006) > How can I tell how old my battery is?
Does the OEM E39 battery have a similar stamping in the negative lead terminal?
Quote:
| OEM BMW batteries have a date code stamped on top of the negative terminal in XX/XX (week/year) format. eg: 25/02 = 25th week of 2002. |
REFERENCES:
- E46 Fanatics: Can You Determine The Age or Installation Date Of The OEM BMW Battery?
- E46 Bimmerforums: Can You Determine The Age or Installation Date Of The OEM BMW Battery?
Here's a BMW battery made the 20th week of 2009:
8-4-2011
Today, someone posted that their BMW battery didn't have the date stamped into the terminal lead:
- E39 (1997 - 2003) > Stranded won't start
Quote:
| Originally Posted by bwaysteve: There are no dates on my terminals.I bought the car in 2001...so I replaced with a BMW battery. |
My question, to the tribe, is whether it's only the original (factory) BMW batteries that are date stamped in the terminal lead - or - if all BMW-branded batteries are supposed to be date stamped in the terminal?
8-17-2011
Originally Posted by cn90  Here is another link to: Equus 3721 Battery and Charging System Monitor: |
Since Amazon links may die over time, I've taken the liberty of including Cam's helpful hint in a screenshot below.

In addition, I just referred (for the umpteenth time) someone to this thread and realized that my engine-mounted battery charging picture wasn't clear as to where the positive & minus connection points were.
So, I circled them to make them more clear to a newbie.
8-29-2011
For the crosslinked record, cn90 proposed a novel way to boost a dead battery when, for whatever reason, neither the trunk nor the hood can be accessed:
- E39 (1997 - 2003) > <