You must be logged in to rate content!
27 minute read
How to test the BMW E39 pressure-controlled crankcase ventilation system (CCV)?
Compliments of bluebee @ bimmerfest.com
4-11-2011
Long story short, we don't seem to have a comprehensive "How to test the E39 pressure-controlled crankcase ventilation system (CCV)" on Bimmerfest; and the parts to order are scattered about, as are the descriptions & videos of what typically fails in the BMW E39 CCV system.
Since there are a billion CCV threads scattered about, our first goal is to 'summarize' all the known symptoms of a bad CCV & then the reliable known methods to test the CCV operation. (This is not intended to be a how-to-replace-the-CCV DIY.)
CCV synonyms:
- BMW-specific E39 acronyms
CCV = Crankcase vent valve, see also PCV, OSV, CVV, & CPV but not Clutch Control Valve (should be CDV)
CPV = Crankcase pressure valve, the official name for the CCV, aka OSV, CVV, & PCV
CVV = Crankcase ventilation valve, see also CCV, OSV, PCV, & CPV
OSV = Oil separator valve, see also CCV, PCV, CVV, & CPV (not the same as the oil separator, OS)
PCV = Positive crankcase ventilation, see also CCV, OSV, CVV, & CPV
Quote:
| A properly functioning pressure control valve is designed to maintain a slight vacuum (approximately 10 - 15 mbar ) in the crankcase which assures reliable crankcase venting during all engine operating conditions. |
The intake manifold produces vacuum
Blow-by gases produce crankcase pressure
The CCV is simply a "middleman" controlled by intake manifold vacuum to maintain a slight vacuum under all conditions (1)
The positive pressure from the crankcase is removed by the CCV which separates motor oil and combustible vapor (1)
Oil goes back down the crankcase
Vapor goes back into the Intake manifold
? anything else ?
Physical Failure Modes:
The CCV sticks in the open position (1) due to the diaphragm tearing (2)
The CCV hoses clog, causing pressure buildup, especially during cold weather & short trips (1)
Water freezes inside the CCV below -15°C cold starts causing misfires, hard starting, & blown valve cover gaskets (1)
Quote:
Originally Posted by Fudman  I believe there are two primary failure modes in the CCV: 1. The CCV and/or hoses get clogged with the condensate which prevents proper flow of crankcase vapors back into the intake and/or liquid oil back into the sump. 2. The diaphram within the CCV fails creating a vacuum leak. Oil vapors get sucked into the intake creating the black smoke. If liquid oil goes into the intake manifold, you can have a very big problem (hydrolock). |
Reputed Symptoms:
After -15°C cold start, the engine misfires and stalls & will not restart (1)
Oil filler cap is blown off
Valve cover gasket leaks
Occurs more often on short drives
Some say a puff of smoke on startup (1)
Brown sludge (1)
Excessive oil consumption (1)
Engine runs rough
Check Engine Light (CEL) or Service Engine Soon (SES) light on
Possible DM faults stored: misfire all cylinders, oxygen sensor/mixture faults, etc.
Vacuum leak at the dipstick lower o-ring (1)
Too low or too high vacuum at the oil filler cap opening
Pressure inside the crankcase (instead of vacuum)
Blown valve cover gasket from excess crankcase pressure (1)
Blown oil filter housing from excess crankcase pressure
Dipstick blown out of its hole due to excess crankcase pressure (1)
Some say vacuum holds down the dipstick (1)
Hydrolock due to oil ingestion (1)
? what else ?
Diagnostic Procedures:
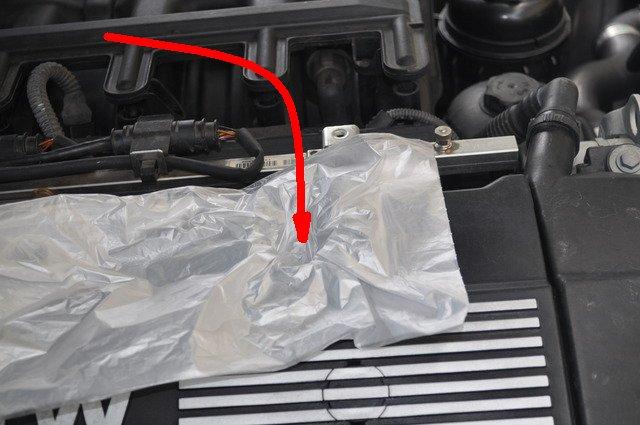
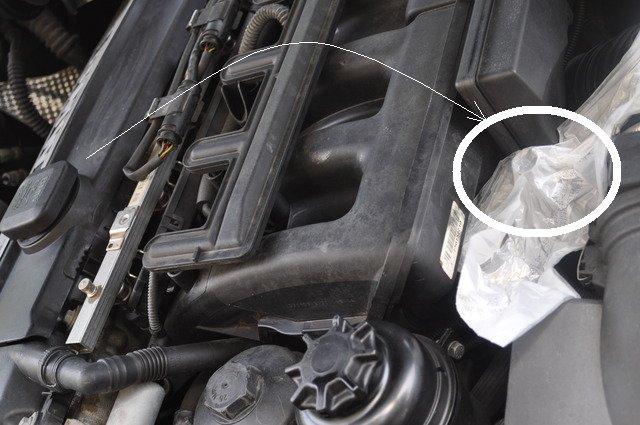
Paper (or a plastic freezer baggy) over the warm-engine oil-filler opening as a visual vacuum test (1)
Inflating balloon (or glove) over the dipstick as a visual crankcase pressure test (1) (2)
Removing the CCV "Vent pipe" from the front of the valve cover while the engine is cold and blowing by mouth to hear oil bubbling (1)
Manometer vacuum of 3"-6" of water at the oil filler cap opening (1) (2) (3)
Look for a visible hole in any of the hoses
? what else ?
Please improve this summary so that it forms a canonical reference for all of us now, and in the future.
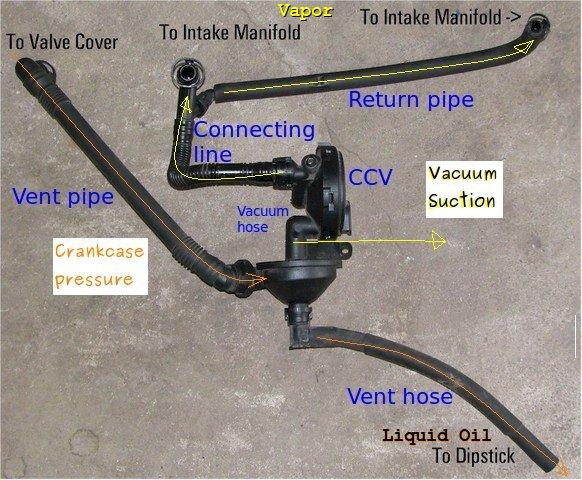
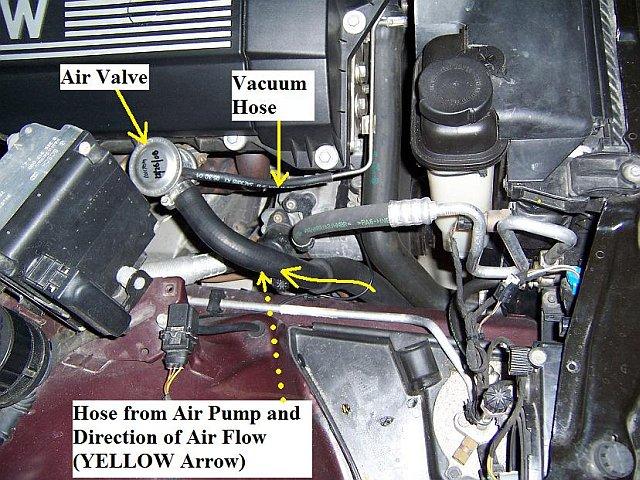
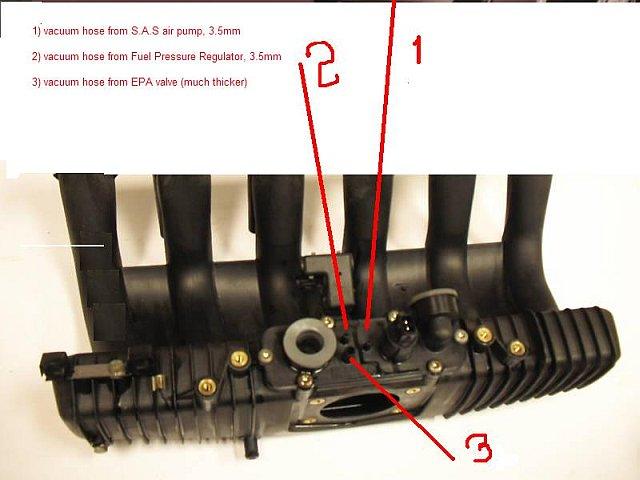
Note: This photograph of a BMW 530i CCV is from cn90, the original being here (Oil seperator).
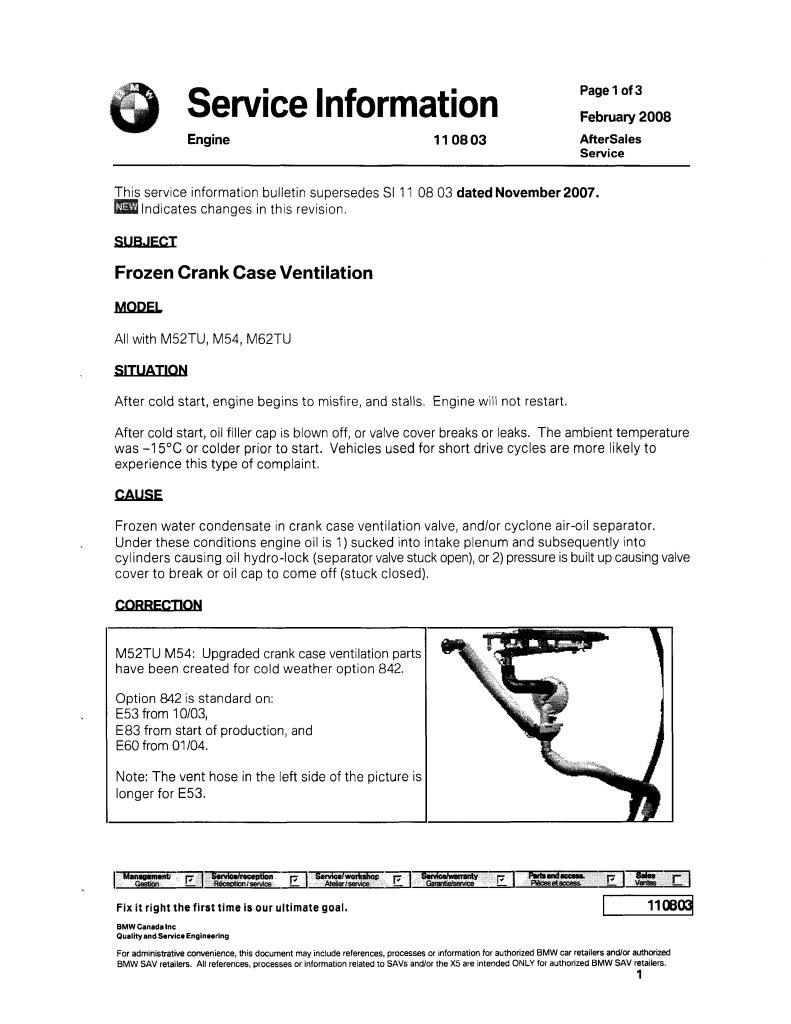
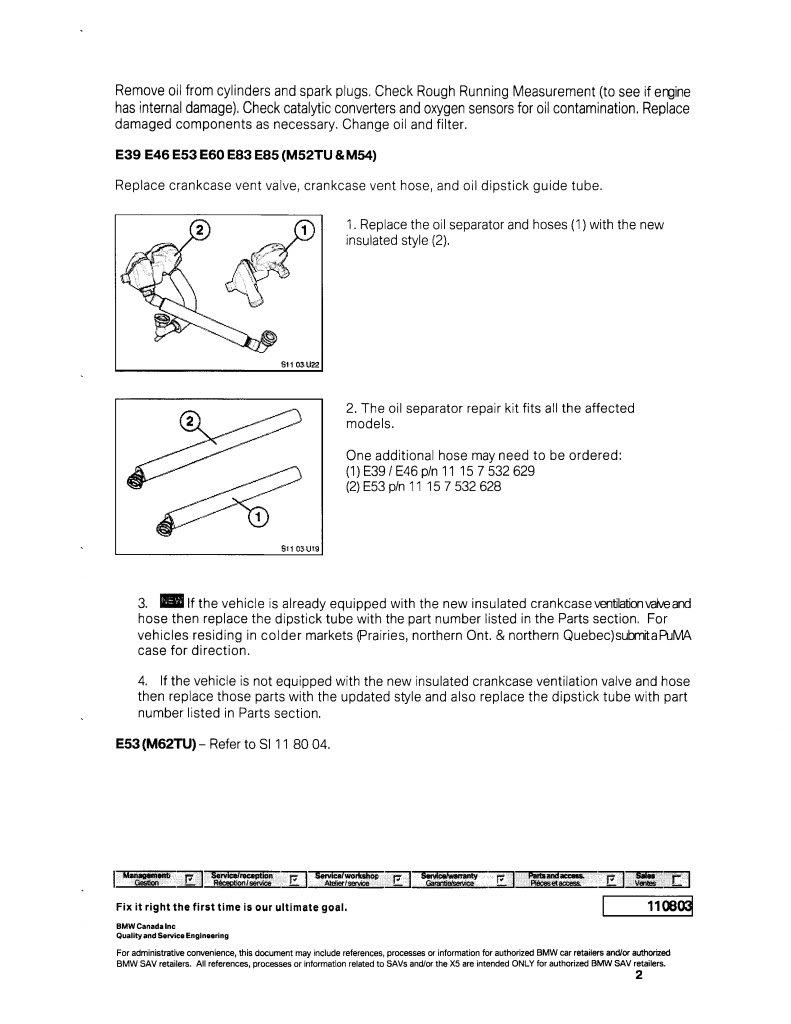
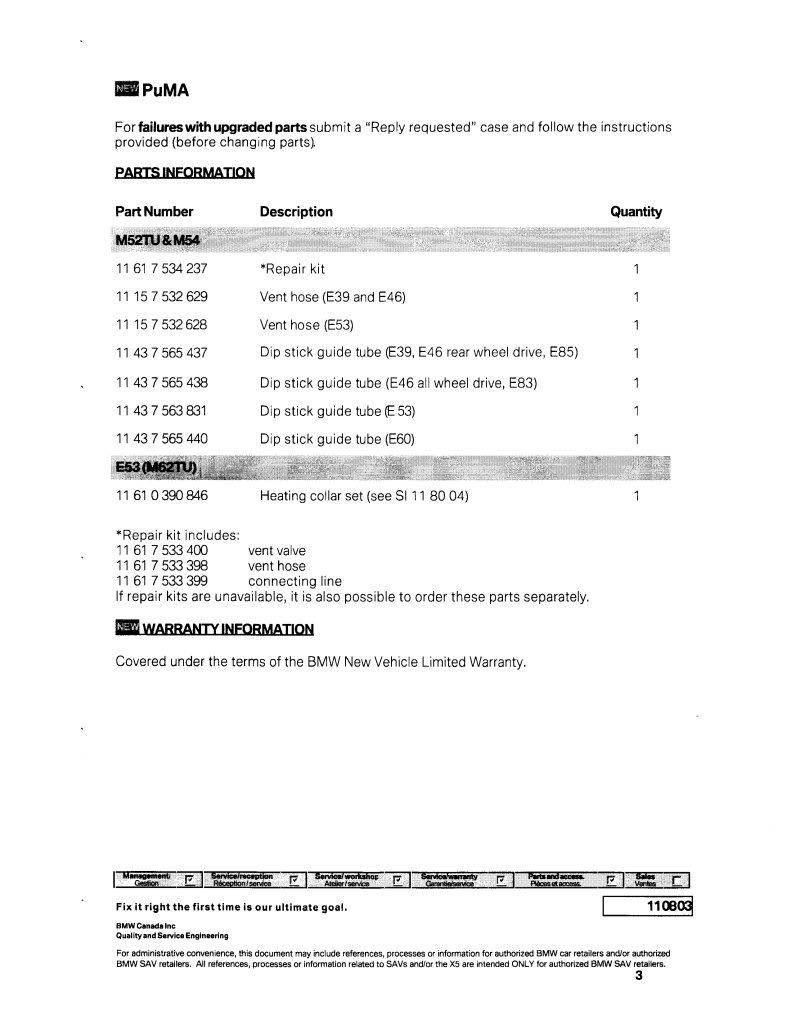
Diagram of the M54 CCV components (with annotation & corrections)
I have no prior experience with the BMW CCV system so I'm trying to identify all the components visually (for future reference).
Comparing the photo above from one of the DIYs to the M54 diagram in Realoem, a few questions pop up that others might be able to answer:
To me, the realoem diagram below has the #7 "return pipe" reversed in direction. Do you concur?
Fudman tells me his M54 does not have the small vacuum line on the ccv shown in Realoem. Do you concur?
For those with the vacuum line (aioros, for example), where does that #6 "vacuum hose" go on the other end?
What is the purpose of the #5 "oval head screw" on the CCV itself?
The realoem diagram has a #8 (removed from this diagram below for simplicity) that goes nowhere and has no description (it may be the clamp). Is that simply a typo?
This (slightly modified) post probably describes the CCV system the best:
Quote:
Originally Posted by cn90  0. The following numbers are arbitrary just to illustrate the concept.
2. [The] intake manifold [creates] vacuum. Scenario A: car warm and idling at 700 rpm: - Atmospheric air "zero" - Intake Manifold vacuum = "- 1" - Crankcase Pressure: goes slowly from "1" to "3" (from blow-by) At "-1" and "1", the difference is only 2, so the CCV is closed, but at -1 and 3, the difference is 4 so the CCV is open allowing vapor to return to the intake manifold. At the same time, liquid (oil) is allowed to flow back down the crankcase drop by drop (basically dripping, not a full flow). Scenario B: you are driving at 3000 rpm: - Atmospheric air "zero" - Intake Manifold vacuum = "- 3" - Crankcase Pressure: goes slowly from "3" to "5" (from blow-by) In this case, the CCV is always open because the minimum difference is still 6. |
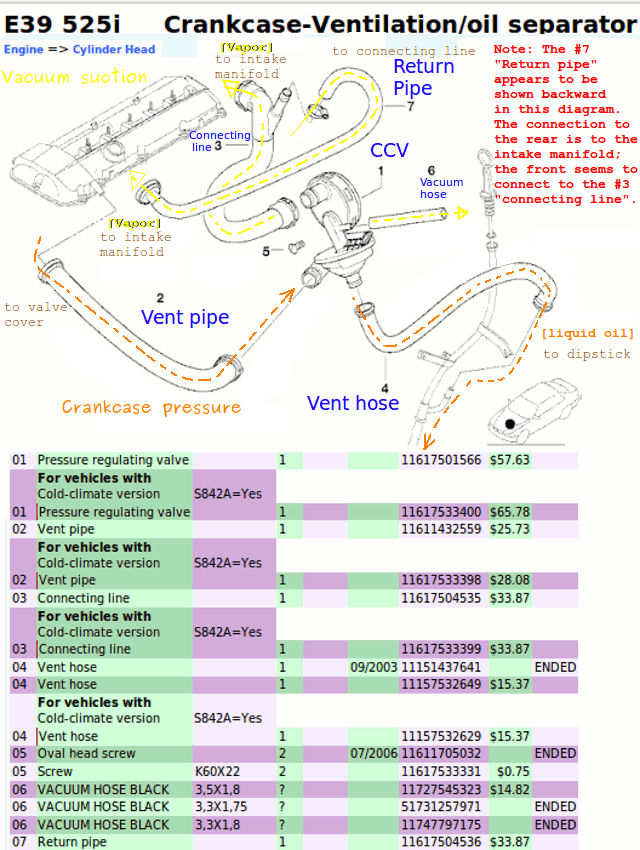
NOTE: Realoem may be wrong for the M54 because Fudman says, over here, there is no vacuum hose:
- Cute little trick to diagnose blocked CCV (see post #16)
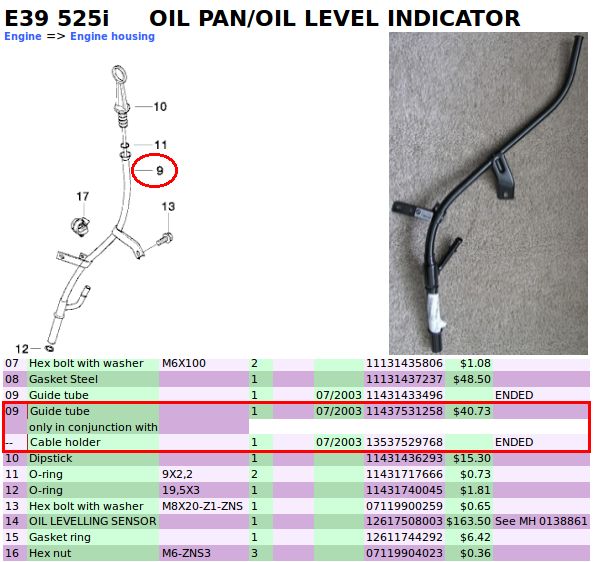
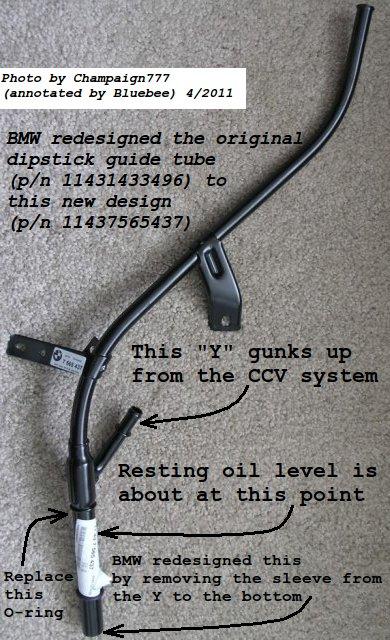
Also, note most people replaced the o-ring at the bottom of the oil dipstick guide tube, and, many replace the dipstick guide but with the newly redesigned one (it has the same bore end diameter without the concentric pipes).
From RDL in CCV replacement tips:
Quote:
| In the new design guide tube, the concentric sleeve/ring has been eliminated so the oil dripping from the CCV goes straight into the single large diameter tube & down into the sump. It is no longer routed into a narrow channel that can easily become plugged by cool, thick, sludgy oil. ... The overall diameter is unchanged. The new guide tube has to fit in the same hole in the lower crankcase as the old guide tube did. |
4-12-2011
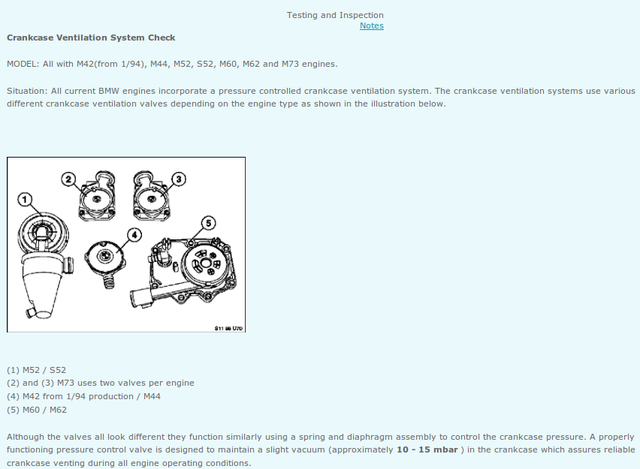
BMW CCV valves look different but function the same
According to this document, the BMW CCV valves differ in looks for the various engines, but all function similarly:
- Crankcase Ventilation System Check
Quote:
| A properly functioning pressure control valve is designed to maintain a slight vacuum (approximately 10 - 15 mbar ) in the crankcase which assures reliable crankcase venting during all engine operating conditions. |
This thread is NOT intended to be a CCV DIY; but for the record, it is nice to LIST the parts most often replaced by users performing a CCV system overhaul.
This parts list was compiled from the following sources:
• Cold-weather CCV parts list for M54 from Mark at EACTuning
• Generic CCV parts list first attempt by Bluebee
• CCV parts list from Edgy36-39 in Fudman DIY
• CCV parts list spreadsheet from VitaminXX
• CCV parts list from Jason5driver (includes air distribution piece)
• Parts list including CCV cold weather kit from rdl
Total $220 to $235 for the following 7 to 8 items:
- Parts required to be changed when replacing CCV
Pressure regulating valve (insulated cold-weather version, 11617533400 = $66)
Vent pipe (insulated cold-weather version, 11617533398 = $28)
Connecting line (insulated cold-weather version, 11617533399 = $34)
Vent hose (insulated cold-weather version, 11157532629 = $15)
Return pipe (stock version is already insulated, 11617504536 = $34)
Dipstick guide tube (redesigned version sans concentric rings, 11437531258 = $41)
Dipstick guide tube lower o-ring (19.5x3mm, 11431740045 = $2)
Vacuum hose black (not on all E39s = $15, e.g., not on the M54)
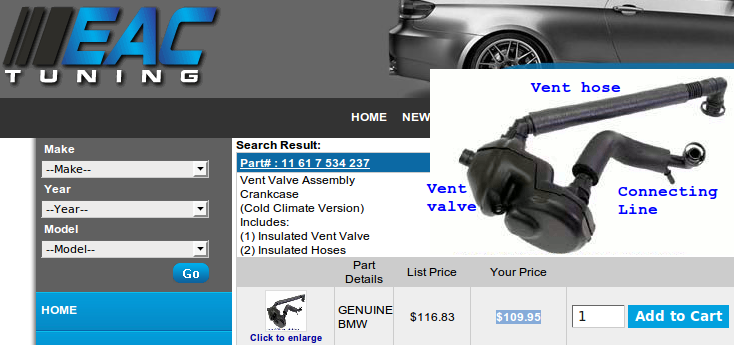
There is a 3-component 'cold weather CCV kit', PN 11617534237, (EAC Tuning $110, BMW Parts Source $93) which contains:
• $66 Pressure regulating valve (cold weather version)
• $34 Connecting line (cold weather version)
• $15 Vent hose (cold weather version?)
Ancillary items to consider replacing when doing a CCV overhaul:
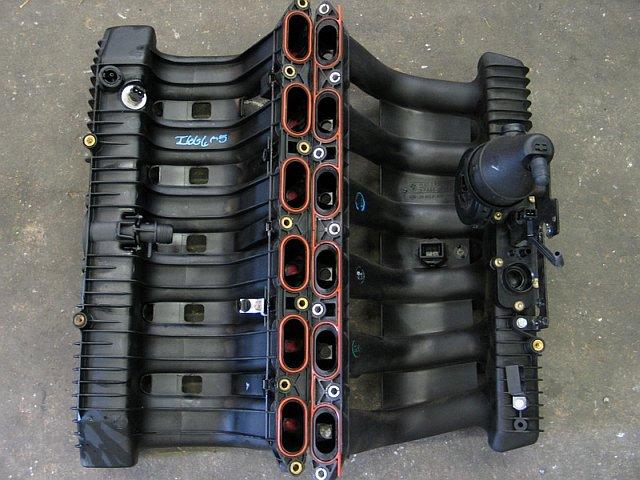
• Set of six air distribution piece o-rings 7x3mm, PN 11617502761 $0.88 each (see reference here)
• Set of six intake manifold profile gaskets PN 11611436631 $63.30 (see reference here & here & here)
• Air distribution piece PN 11611440318 $58.23 (see reference here & here)
• Throttle body housing gasket PN (see reference here)
• Valve cover gasket PN (see reference here)
When ordering less than the full complement of hoses, keep in mind what rdl said over here:
Quote:
| The drain hose and drain in the dipstick guidetube were plugged solid. In my case, I was able to remove the drain hose from the dipstick guide tube while in place. I used a small screwdriver pushed into the slip joint & ran it all the way around the circumference to break adhesion, then pulled the hose up & off the guidetube. It was the only hose that didn't crumble when disturbed during CCV removal. |
When deciding on the ancillary parts, keep in mind what Doru said here:
Quote:
| those 6 little O-rings go bad. Also the profile gaskets of the intake manifold start getting "cooked". The distribution piece, If the car is not needed for 24 Hrs, "could" be cleaned. It is hard to clean the inside where all the gunk settles, you will need to let it rest, filled with some sort of solvents that will not damage the plastic. I believe Jason said the new distribution piece was significantly lighter than the old one due to all that gunk build-up. Bimmerfiver suggested "Simple green". Maybe if one would pour brake cleaner inside, it might do the trick as well. It has to be left with the solvent until it breaks the gunk and can be cleaned out. The 6 openings are very small for a mechanical cleaning, and even the chemical cleaning "might" not be efficient. That's why Jason just changed it out. |
Tools required for a typical CCV overhaul:
• T-40, T-27 & T-25 Torx
• 6mm, 10mm, & 13mm sockets
• Ratchet -1/4" & 3/8"
• Extension bars, various lengths - 1/4" & 3/8"
• ¼" drive handle
• Small mirror (absolutely necessary!)
• Assorted flat blade screw drivers in different lengths
• Magnetic pick up tool (optional)
• Small blade knife or cutter (for old hoses)
• WD-40
This is not a CCV DIY, but, it is nice to LIST the DIYs for future reference about CCV operation:
- DIY: Oil Line --> Vanos, CCV, ICV and Alternator Air Duct, by cn90
- CCV Replacement FYI - M54, by Jason5driver
- DIY: CCV Replacement on an M54 & Replacement of the CCV on M54, both by Fudman
- DIY: change of the CCV / Pressure regulating valve / oil separator, 99 528i, by aioros
- Crankcase/Oil Seperator (CCV) (M52), by jamesdc4
- CCV replacement tips, by RDL
- Detailed DIY for CVV Overhaul for the M52TU Motor, by Graham_E39_528i
- DIY Supplemental: Crankcase Vent (CCV) Replacement Notes and Photos (97 540i), by cerber
- Crankcase/Oil Seperator (CCV) (740i M62)
- 1998 528i CCV(Crankcase/Oil Seperator Fixed!!! w/Pics!!!, by jfive96
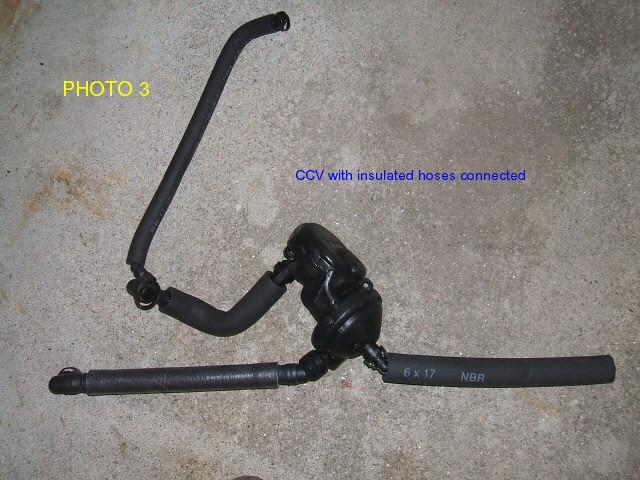
And, here are some closeup pictures of the COMPONENTS of the CCV system, in general.
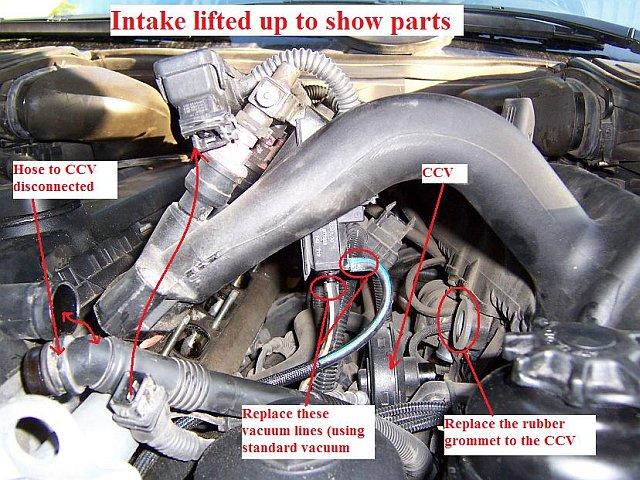
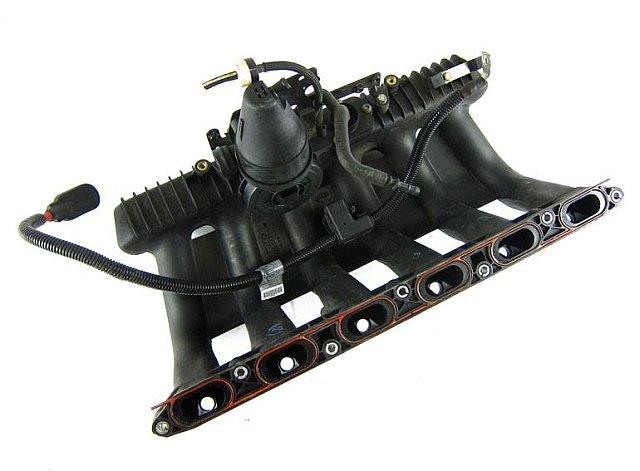
Aioros' CCV "pressure regulating valve" (with the enigmatic vacuum hose):
- DIY: change of the CCV / Pressure regulating valve / oil separator, 99 528i, by aioros
JFive96's 1998 528i CCV autopsy picture showing the diaphragm and spring:
- CCV(Crankcase/Oil Seperator Fixed!!! w/Pics!!!
Fudman insulated cold-weather CCV and associated hoses:
- DIY: CCV Replacement on an M54
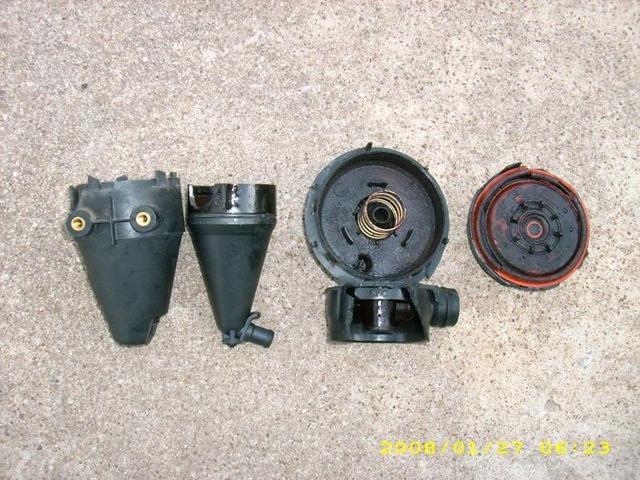
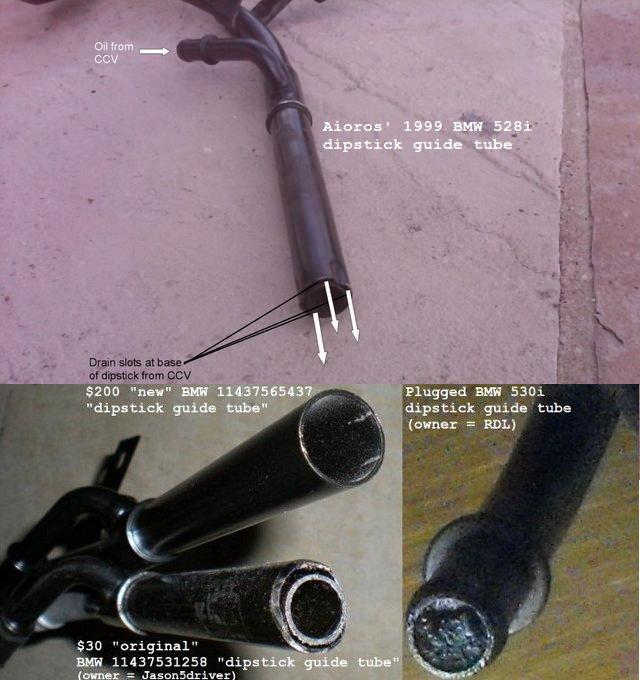
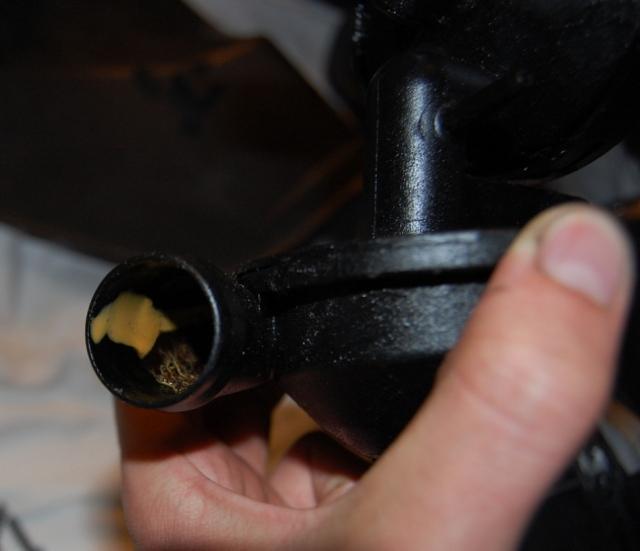
Aioros picture of the old (prone to failure) "Dipstick guide tube":
- DIY: change of the CCV / Pressure regulating valve / oil separator, 99 528i, by aioros
NOTE: BMW redesigned these "dipstick guide tube" drain slots (1)
Coupled with RDL's plugged "dipstick guide tube":
- E39 (1997 - 2003) > CCV replacement tips
Further coupled with Jason5driver's old-and-new "dipstick guide tube" photo:
- (E12, E28, E34, E39, E60, E61) > 1996 - 2003 (E39) > CCV Replacement FYI - M54
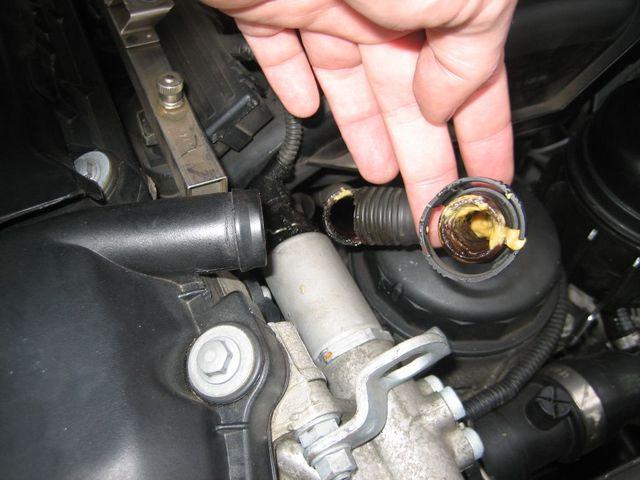
Fudman mayonaise in the Y portion of the CCV connection to the dipstick guide tube:
- DIY: CCV Replacement on an M54
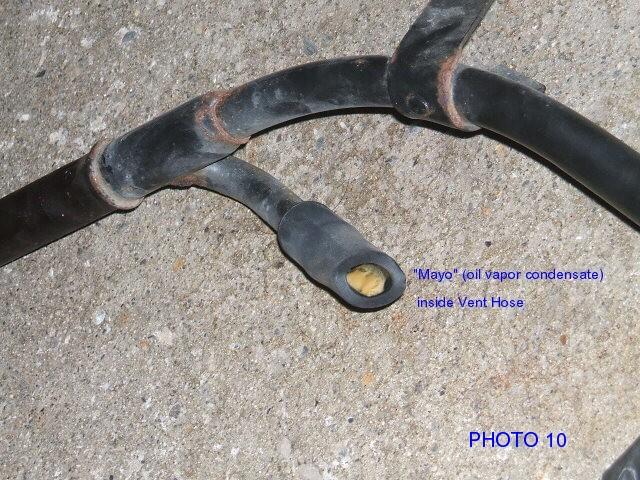
Spydrz mayonnaise in CCV line:
- DIY: CCV Replacement on an M54
NoMercy346 Mayo in the CCV itself:
- E46 (1999 - 2006) > CVV repair - my results w/ pics
Champaign777 picture of the new ($200 redesigned) "Dipstick guide tube":
- CCV Replacement FYI - M54 (see post #53)
Fudman's in situ "return pipe", "connecting line", & "vent pipe":
- DIY: CCV Replacement on an M54
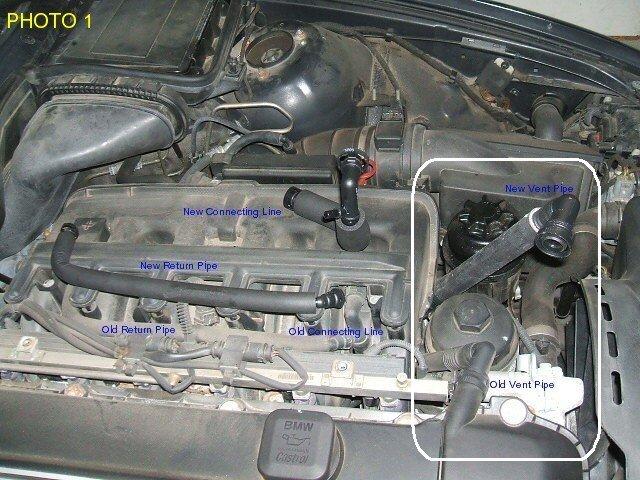
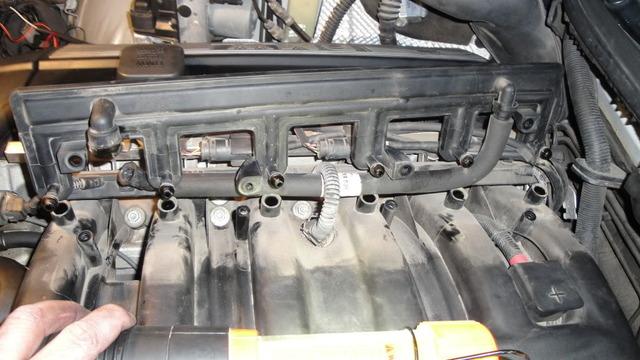
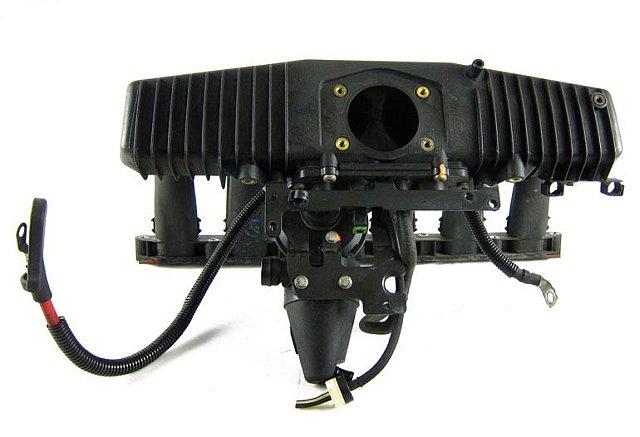
Here is a good shot of Jason5driver's "vent pipe" from underneath the 'air distribution piece", also showing the "connecting line".
- DIY: CCV Replacement on an M54
4-16-2011
Now that we've covered the basics of the CCV system, it's time to move onto the testing.
From:
- Cute little trick to diagnose blocked CCV system... (see post #4)
Quote:
| Originally Posted by Rajaie "The crankcase vent valve and 4 associate hoses fail and cause a vacuum leak. The valve gets stuck open and the hoses crack. These last 70-120k miles and usually fail 80-90k miles. Here are a couple diagnoses. At warm idle, place a small plastic freezer storage bag on its side over the oil fill hole. If the bag sits on top or gets slightly sucked in, ~1", the valve is good. If the bag gets significantly sucked in the hole the valve is stuck open and bad. With the engine off and cold, carefully remove the hose at the valve cover front corner. Blow hard into the hole. You should hear oil bubbling in the oil pan. If you don't hear the bubbling the top or bottom hose is likely cracked. The bottom hose often breaks just below the valve connection. There can also be cracks in the other two hoses." |
Here, by way of example, are my results of the oil-filler-opening vacuum test (very slight suction, maybe 1/2") from this thread with the dipstick in place & my M54 engine at idle:
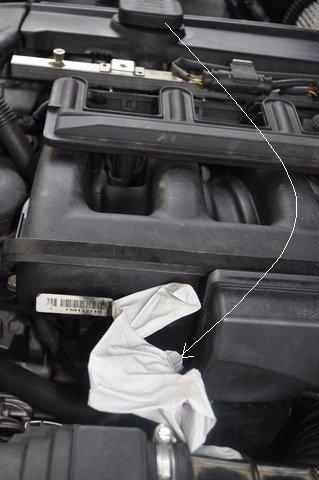
And, here is the same test on the dipstick guide tube with the oil filler cap in place:
Lastly, here's my attempt at rubber banding a nitrile glove onto the dipstick guide tube (sorry cn90, I didn't have any balloons handy).
End result:
Oil filler cap has slight (about 1/2 inch) suction
Also the oil filler tube "gurgles" when I remove the oil filler cap (what does that indicate)?
Dipstick guide tube has neither vacuum nor pressure
Suction seemed barely minimal or even non existent
Pressure seemed non existent
Does that seem 'normal' to you by way of testing the CCV vacuum & pressure?
7-1-2011
Regarding the little vacuum hose in the middle of the CCV, pay attention to the warnings from PhilH on another forum today (thanks Doru for pointing this out):
- Cold start issues, Indie VS. You
Read post #15 where PhilH says:
Quote:
| [The DISA] was a big problem, but not likely the cold start issue. The Crankcase Vent Valve was apparently changed by the previous owner/ mechanic, they did not change the associated hoses with it, although the hoses were not the culprit here I did have them replaced. When they replaced the ccv they did not realize that some of these engines have a small vacuum hose attached, and some get that nipple plugged, mine gets the nipple plugged but they did not do it. It caused one of the connections to overheat and melted the connection point, causing the small leak which wasn't enough to turn on the check engine light, into a big leak which did. And that is why the cold start issue progressively got worse, every time I drove it melted a little more. So for all four hoses, the ccv valve and the intake runner valve it ran me $676, not terrible I think. Indie told me the check engine light was out as soon as he started it, he didn't even have to clear it. |
Thanks for understanding the intent of this thread.
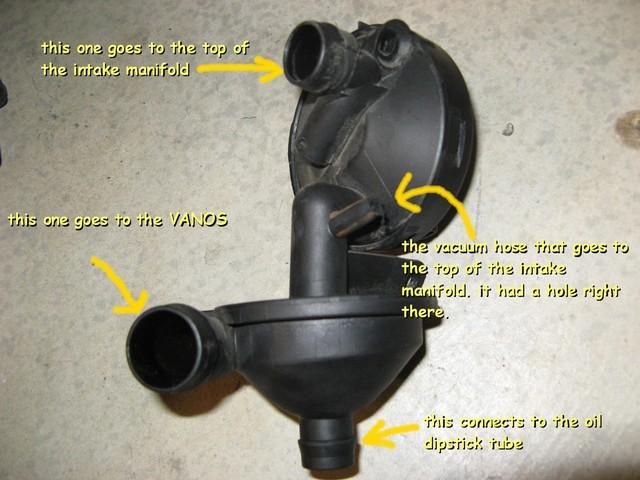
For the record, today, this cn90 thread came to my attention which contains very nice descriptive pictures of the older E39 CCV hose locations:
- E39 (1997 - 2003) > Need help with Vacuum Hose location on 97 BMW 528i
For consolidation, here are the (shrunken to 640x580) photos in that thread (in case the linked sites go down in the future).

7-28-2011
Quote:
Originally Posted by poolman  I've tried to find what the vacuum of the engine should be, but can't get a measurement anywhere. |
I think this post by RDL has a lot of good data on how the CCV works and what levels of vacuum do what ...
- Cute little trick to diagnose blocked CCV system...
Quote:
Originally Posted by rdl  The balloon test over the dipstick tube can be useful since if you find any pressure (i.e. inflating balloon) the CCV has failed. OTOH, I think the plastic bag over the oil filler is not precise enough to measure a failure on the too much vacuum side. From my experience it pays to do the test with accuracy - and pay attention to the results  . .For instance, I sarted getting a bit of a rough idle. I tried the baggy test & passed. I assumed the CCV was OK. Then I measured crankcase vacuum accurately & found 9 inches of water column vacuum; well outside the 4 - 6 inches specified by BMW. I knew the CCV was going south, but took a chance and hoped it would be "OK enough" until warmer weather arrived. A few months later I had ~45 inches w.c. (!) vacuum and most of the symptoms listed for a failed CCV. And weather around 0 F.  Here is a link describing how to measure CCV operation accurately, cheaply and in about 10 minutes. http://www.bimmerfest.com/forums/sho...42&postcount=8 Since there have been so many questions on the topic of CCV operation and failure, here is a description of how I think the CCV operates using Bluebee's picture for reference. The vent pipe, swirl labyrinth chamber and vent hose are always at the same pressure or vacuum - there is no valve or obstruction between them. The swirl labyrinth is the lower part of the CCV assy that the vent pipe & vent hose connect to. Further, they connect to the valve cover & crankcase without restriction and are at crankcase pressure/vacuum. The connecting line and return pipe connect to the inlet manifold which has a vacuum of ~20 inches Hg (mercury) at idle; ~260 inches water column vacuum. The portion of the CCV immediately beside the blue "CCV" label in Bluebee's picture is a vacuum regulator whose job it is to maintain 4 -6" w.c. vacuum in the swirl chamber. When the engine starts, the labyrinth is at 0 vacuum (i.e. vacuum is less than 4" w.c.) & the orifice/valve in the regulator is open. The gases in the swirl chamber flow through the regulator into the connecting line (which is at high vacuum), on to the inlet manifold and through the engine. Soon the vacuum in the swirl chamber (also the crankcase to which it is connected) is sucked down to 4 - 6" w.c. vacuum and the orifice valve in the regulator closes. The engine runs, more blowby gases from the combustion chamber enter the crankcase & raise the pressure (reduce vacuum) in the vent pipe & swirl chamber. The regulator opens again, allows manifold vacuum in the connecting line to suck them away until crankcase vacuum is back to 4 - 6" w.c. at which point the regulator closes again. And on it goes, cycling over and over. As the blowby gas travels through the engine toward the CCV, it picks up microscopic droplets/mist of oil. We don't want this oil mist to go through the vacuum regulator, into the inlet manifold and be burned: high oil consumption and air pollution. Enter the swirl labyrinth; it causes oil droplets/mist in the blowby gases to stick to the wall of the labyrinth and drain down the vent hose into the dipstick tube and sump while the "cleaned" gases carry on through the regulator. Now the problems that ocurr. One One of the CCV hoses ruptures with age and lets air into the swirl chamber. The regulator stays open in a losing battle to get down to 4" w.c. vacuum. Lots of air is sucked in through the hole, on to the inlet manifold and the ECU senses a vacuum leak - bad news. Two The regulator diaphram ruptures with age. Now it can't close the orifice and crankcase vacuum goes high. And/or the rupture is so large that we have enough of a vacuum leak the the ECU gets upset. Plus gaskets and seals are being pushed harder than designed may fail entirely. Three The CCV and hoses can get very cold in winter conidtions since they aren't heated or even insulated. Blowby gases have lots of water vapour as a product of combustion chemistry. If these gases get cold enough, the vapour condenses into water and we get sludge/mayo. The mayo/water can freeze and block the regulator orifice - either open or closed. Stuck open - high vacuum resulting in damaged gaskets/seals (or at worst, hydrolock according to BMW) EDIT 2 - had this sentence in the "stuck closed" paragraph: Also, seals and gaskets can start leaking air into the crankcase - a vacuum leak according to the engine. Stuck closed - high pressure resulting in oil leaks &/or blown out gaskets and seals. BMW warns pressure can get high enough to crack the valve cover. Four Again in cold weather, water condenses in the swirl chamber, sludges it up so it can no longer separate out the oil mist droplets. Then, the blowby with oil mist is routed straight to the vacuum regulator into the engine. High oil consumption and in the worst case, hydrolock. Five Again in cold weather, the oil draining down the vent hose toward the sump plugs up in the narrow channel of the dipstick tube. Perhaps with some mayo/sludge if the regulator isn't operating properly (see above) to get all the water vapour out of the swirl chamber fast enough before it condenses. The liquid oil backs up into the swirl chamber, oil gets sucked through the vacuum regulator into the engine. In the worse case, so much oil the engine hydrolocks. Three, four & five being good reasons for installing the cold weather CCV kit & insulated hoses. EDIT: six I occurs that if the CCV fails as above, oil mist and water can condense out in the distribution piece that the connecting line attaches to on the way to the inlet manifolc. One could then replace the CCV but have enough sludge in the distribution piece that a slug of it is pulled into the inlet manifold after the repair when the CCV is perfect. Bad news. Seems a good reason for at least checking the distribution piece when doing a CCV overhaul. |