You must be logged in to rate content!
25 minute read

Shift Boot Replacement
2001 Volvo S60 2.4T
With “Geartronic” Automatic Transmission (Should Apply to Model Years 2001-2009)
Removing the Old Shift Boot:
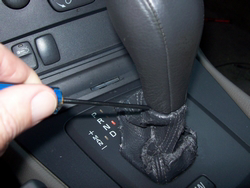
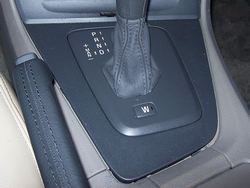
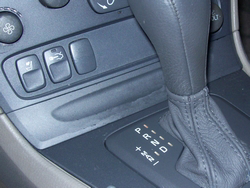
(1) Locate the small cover plate on the lower front of the dash, just above the shifter section of the center console. Using a small screwdriver, pry alternately on each side of the cover plate until it pops off.
(2) Remove the larger outer base plate that surrounds the shifter, as follows:
Pry up on the rear side of the outer base plate. There are two hold-down tabs in the rear of the plate).

Now, separate the smaller inner base plate from the outer base plate by depressing the four small tabs in each corner of the base plate.
Actually, if you can get three of the four tabs loose, the fourth one will drop right out. Here’s another tip: do the right front tab first, then the rear two tabs.
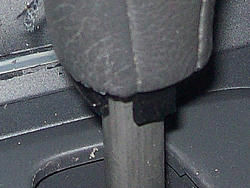
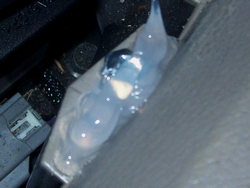
(3) Once the inner base plate is free, remove the outer base plate. Now, separate the top of the shift boot (at the opening on top) from the bottom of the shift knob by doing the following:
Insert a small flat-headed screwdriver between the top of the shift boot and the bottom of the shift knob.
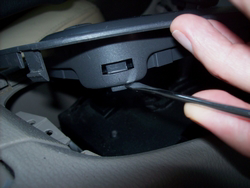
There is a small round plastic ring (about one inch in diameter, and about 3/8” tall), which is located inside the top of the shift boot, just below the shift knob.
This ring must be pried slightly outward and then down. To do that, you have to get your screwdriver behind the ring and carefully pry it out and away from the shifter shaft just below the shift knob. If you work at it a little bit, the ring should release from its holding tabs, and the top of the shift boot will slide downward.
(4) Once the boot is free from the underside of the shift knob, we need to remove the shift knob, itself. Before you attempt to remove the shift knob, it is recommend that you take the shifter out of the Park position, and put it into Neutral or Drive (with the engine turned off, of course) before pulling out the shift knob assembly. Also, engage (pull up) the handbrake lever before taking the gear shifter out of the Park position, so the car doesn’t roll.

The shift knob (and part of its shaft) will pull straight up and out of the of the lower shifter tube.
However, it will require a good deal of upward force to get it to move. When this happens, and the shift knob assembly comes flying out, you will likely think you have broken something. Don’t worry, it’s not damaged, and should go back together perfectly well. Once it breaks loose, it’s out instantly.
By the way, it goes back in much like it came out, but much easier. Just push the shift knob assembly down in as far as it will go, and give it good rap with the bottom of your fist. It will snap right down into position. Here is the procedure for removing the shift knob:
Grab the shift knob with both hands. Position your right and left elbows where you can get the most leverage on the shift knob. Now, put increasing upward pressure on the shift knob until it (and its attaching linkage) breaks loose from its moorings (which, I believe, is a little ball & socket arrangement). Unfortunately, there is no way to generate any upward inertia or momentum to help you; it’s just you, the shift knob, and whatever upward force you can muster.
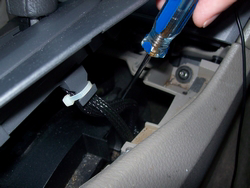
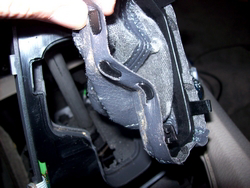
(5) Now that the shift knob is out, we can remove the shift boot, and its small plastic attaching collar from the inner base plate, as follows: First, you’ll need a little more slack on the wires that attach to the inner boot base plate. To do this, use a screwdriver to pry open the small wire fastener, and unhook the black wire loom, which is just below the inner base plate, on the lower-right side.

Do not actually unplug or disconnect any of the wires from the inner base plate; they will be left attached and connected.
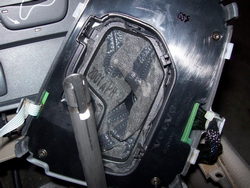
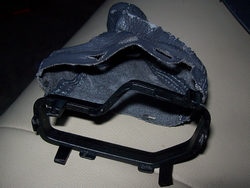
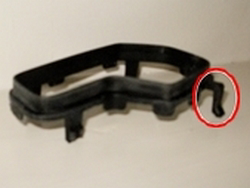
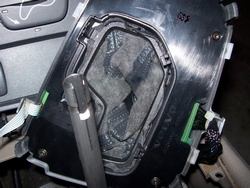
Now, lift the inner base plate off the shift tube, and turn it upside down to expose the underside. You’ll see the small black shift boot attaching collar, which holds to shift boot to the inner base plate.
Locate the four tabs on the attaching collar, and pry them away from the inner base plate, one at a time, to separate the collar from the base plate.
Once this is done, remove the collar (with the boot) from the base plate.
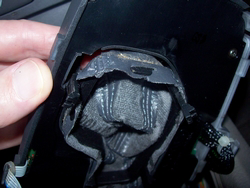
Pull the shift boot away from the attaching collar by unhooking the boot from the seven small retaining tabs on the collar. The tabs protrude through holes in the shift boot, and separate easily.
(6) Lastly, remove the small round plastic ring from inside the top of the shift boot. This was the ring that we pried down from the bottom of the gearshift knob in step #3. Be careful not to lose it, or drop it down inside the center console.
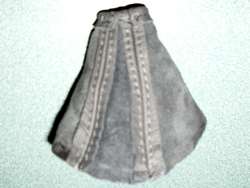
Installing the New Redline Shift Boot:
First, you will need a razor knife (or exacto knife), and some type of Super Glue, Crazy Glue, Gem glue or Jewelers glue (in other words, a glue that will glue a porous surface to a non-porous surface). In our case we will be gluing leather to plastic. If you are also going to be replacing your handbrake boot, you will be using the same type of glue for that job.
You should be able to find several different types of the super glue/crazy glue variety at craft stores or building supply stores. The two that I tried were Super Glue’s “Future Glue Gel”, and Aleene’s Super Gel Brush on Adhesive. I think I preferred the brush on applicator of the Aleene’s, but the Future Glue Gel worked equally well, accept the smell was much stronger. Use it in a ventilated area. Get a couple of bottles (or about four tubes) if you will also be replacing your handbrake boot.
A word of warning: The new leather boot is so much thicker than the old imitation leather boot, and Volvo’s tolerances in regards to the fitment of the shift boot are so tight, that the new boot will not fit into the assemblies (at least not very well) without a bit of modifications. For instance, in the case of fitting the shift boot (along with the attaching collar) into the inner base plate, we had to cut off every bit of extra leather, and even remove an additional one-eighth of an inch of leather from the base of the attaching ring to gain enough clearance for acceptable re-assembly.
Extra work and compromises also went into fitting and attaching the small, round ring into the top of the shift boot, where it meets the shift knob.
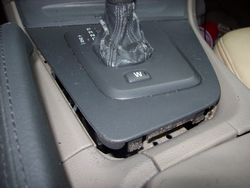
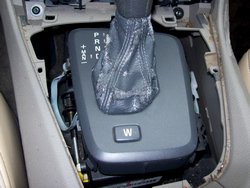
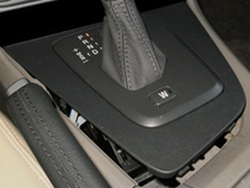
Last, but not least, the stiffness and thickness of the leather boot causes the base plate assembly (inner and outer) to shift forward (and squeak) when we put the gear shifter into Park
This happens because the extra thickness of the boot creates a slight log-jam effect when the shifter tube, in its travel to the Park position, gets close to the front of the inner base plate, thus causing the shifter tube to actually push against the inner base plate, via the folds of the boot.
Admittedly, the picture to the right represents a more extreme moment for our misbehaving base plate assembly. The actual movement is much smaller,
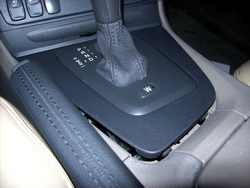
but it is still noticeable, and worthy of correction. Obviously, we do have some problems to work out before our efforts will yield a successful installation. The good news is, if you don’t mind doing a little extra work, the solutions are available and ready to be applied. So, let’s begin the installation:
(7) The first step in the installation process is to re-attach the new shift boot to the attaching collar. The goal here is to glue the boot to the collar so that the bottom of the boot will start (or be positioned) about one-eighth of an inch above the base (or step) of the attaching collar, and that the boot will be the correct height when installed.
The old boot was attached by seven small tabs or ears, which were inserted through equally small slits in the original imitation leather shift boot. The new leather boot did not come with any pre-cut slits to receive the tabs. Redline may have logically reasoned the slits would be more accurately cut on site, with the
attaching collar in hand. Actually, in the end, we did not need the slits, or even the tabs.
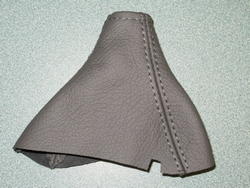
Fortunately, RedlineGoods did replicate and cut out a small square notch at the bottom of the shift boot.
This notch lines up with one of the four feet on the attaching ring. This particular foot sticks out further than the other three
so you will know right away that this foot fits inside the notch, and you will also know how to orient the shift boot on the attaching collar, including its depth.
The important thing here is to get the attaching collar properly lined up with the shift boot, and inserted (as best you can determine) to the proper depth. The notch and the leg will give you an indication of how far the collar should go into the boot, as will a close examination of your old shift boot.
As mentioned earlier, we will not be using those seven little tabs to hold the boot to the attaching collar. Instead, we will be relying solely on the glue to attach the boot to the collar. The reason we will be gluing the boot back on the collar instead of using the tabs, is as follow:
Because of the extra thickness of the new shift boot, it is extremely difficult, if not impossible, to get the attaching collar to fit properly into its finished position in the inner base plate, if you leave the boot hanging over the bottom of the attaching collar.
Unfortunately, even after trimming the bottom of the boot (so it does not hang over the edge of the collar), the boot and collar assembly will still not fit properly into the inner base plate. A closer look at the inside of the inner base plate (especially where the attaching collar seats) reveals a small ridge around the top opening of the inner base plate which, apparently, interferes with the thicker leather, and prevents the attaching collar from positioning properly.
Therefore, to remedy this interference or obstruction (if only partially, but acceptably), the bottom of the shift boot will have to be trimmed, and then glued in place in a slightly higher position on the attaching collar. By the way, since the fitting of the boot to the collar in the proper position is not an exact science, and involves a bit of approximating, it is better when trimming, to err on the side of leaving more material on the boot, rather than less.
For ease of explanation, imagine that a cross-sectional view of the attaching collar looks like an “L” shape.
The bottom corner of the “L”, where the horizontal riser, and the vertical step meet, will be our reference point for explaining where to cut the bottom of the
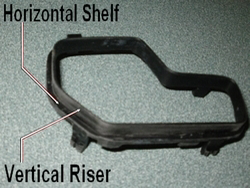
boot, and where to glue the boot on the collar. When you are done, the bottom of the boot should be, again, approximately one-eighth of an inch (1/8”) from the bottom corner of the “L”.
So, how and where do we mark the boot for cutting? There are two ways to do this: The first method is to position the boot on the collar in the desired position, and mark the boot all of the way around at the approximate position of the bottom corner of the “L” (as if the boot were going to fit down as far as it could go without going over the step). By the way, you will find it much easier to mark the boot (and to see the mark) if you purchase a pen with white ink.
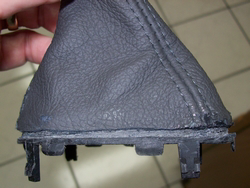
Next, cut the boot at this line, and glue the boot on the collar as far down as it will go; again, right down to the step. Finally, and very importantly, after the glue dries, take a sharp razor or exacto knife, and carefully cut away the last 1/8” of the boot, so the finished product gives you that small gap between the bottom of the boot and the step, as shown in the picture.
The second method is much like the first, except you will trim the extra 1/8” from the bottom of the boot before gluing the boot to the collar. This method may be a little easier, and certainly faster, but also may not be quite as accurate.
There are two more thing to do before actually gluing the shift boot to the attaching collar. The first is to take some #80 grit sand paper and rough-up the surface of the attaching collar where the boot will be glued, and wipe it clean with some lacquer thinner to further prepare the surface for gluing.
Secondly, after you have trimmed the desired amount from the bottom of the boot, now is the very best time (especially before gluing) to try to minimize the problem
of the thicker leather shift boot causing the inner and outer base plates (when fully installed) to move and squeak when you put the gear shift in the Park position.
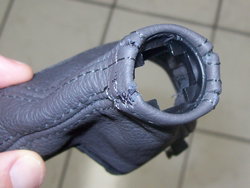
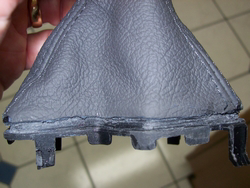
To do this you will need to remove as much extra leather from the inside of the boot as possible. You will notice the seams have extra material that can be trimmed-off.
Turn the shift boot inside-out, then take a small, sharp pair of scissors and cut off the extra seam material as close to the stitching as possible, while leaving enough material to adequately support the stitching.
Also, you will see one particular seam that has more material around it, and sticks out more prominently than the others. This, I think, is the last of the four seams to be stitched together, and is, by necessity, stitched a little differently that the other seams. Give that seam a little trimming to reduce the material, especially around the top of the boot where the ring will need to be inserted into the small opening. With the trimming done, let’s return to the gluing procedure.
When gluing the boot to the collar, use the super glue, or crazy glue (or whichever type of glue you have chosen), and apply the glue to the inside of the boot. Apply a sufficient amount and spread it thoroughly over the fabric where it will contact the collar. The inside of the leather is a little more absorbent, so work the glue sufficiently into the material as you go.
I recommend applying the glue quickly over the entire contact area around the inside bottom of the boot, and gluing the boot to the collar all at one time. You’ll have to work quickly, and you will probably not be able to move the leather much (if at all) once it has made contact with the collar. When you affix the collar to the boot, apply continuous pressure around the circumference of the boot until the
glue has dried. Later, for extra adhesion, you might consider running a bead of glue around the inside of the boot where the boot meets the color.
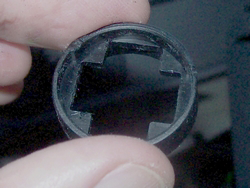
(8) Next, we need to re-install that small round plastic ring that goes in the top of the shift boot.
There is a problem here, however. Again, because of the thickness of leather, the ring will not fit into the boot and function as it did with the original thin imitation leather boot.
With the old shift boot, the ring would fit neatly inside the top of the boot, tucked up underneath the lip, where the thinner fabric of the old boot, even folded and stitched, would fit comfortably in the very small gap between the small plastic ring and the shift knob. This arrangement would very effectively hold the top of the boot tightly up to the bottom of the shift knob, as the plastic ring would lock securely around the connecting tabs on the bottom of the shift knob.
In our case, however, with the thicker leather of the new shift boot being somewhat less cooperative, a bit of stretching, and some silicon adhesive is required. Even though, at first, the ring seems too large to fit into the top opening of the boot, by pressing, prying, and working the ring into the opening, eventually the leather will expand enough to accept the ring. The ring will not be able to seat up under the top lip of the boot, as it used to, but at least it will fit into the opening, and stay in place long enough for you to finish the shift boot installation, and apply some silicon sealer/adhesive to insure the boot and shift knob will remain closely connected.
When you are actually pushing the ring down into the top of the boot for its final placement, it is very important to make sure the plastic protrusion (or small vertical ridge) on the outside of the ring (which is about 1/8” wide, 1/16” high, and runs the width of the ring, or about 3/8”) faces the front of the vehicle (when the shift boot is installed), and that it lines up with a corresponding slot in the connecting clip on the bottom of the shift knob. Don’t worry, you’ll see it. Finally, make sure the ring is pushed down into the opening of the boot until it is about 1/16” below the rim (or the opening) of the shift boot.
(9) Now let’s put everything back together, as follows: Slide the shift boot/attaching collar assembly back into the inner base plate, and snap the four retaining tab of the attaching ring into the slots of the base plate.
Even though we trimmed off the excess leather, the collar will probably still need a little bit of pushing and prying to get it to go all the way into the inner base plate. You might have to pull up on the leather at the same time to insure that it’s not binding on anything, but is settling into its normal position. Finally, make sure the four feet on the bottom of the collar are wedged securely into their retaining holes.
(10) Turn the inner base plate right-side-up and slide the whole unit over the lower shift tube.
Make sure the small round plastic ring is still attached to the top of the boot, as you slide the boot over the lower shift tube, and that the wires below the inner base plate are neatly tucked underneath, including the black wire loom that hooks back into its clip on the right-underside of the shifter.
(11) Even after going through all the steps and doing all the remedies, you still may have a problem with a squeaking noise when you put the gear shift into the park position. I think this might be movement between the inner and outer base plates. I have not tried this step yet, but if I have the opportunity to take the outer base plate off at some time I will probably do this: Before putting the inner and outer base plate together, apply a piece of electrical tape around the inside circumference of the outer base plate, where it will be making contact with the inner base plate. This might eliminated the noise, unless, of course, it is coming from somewhere else, such as one of the four connectors holding the inner and outer base plate together. If that is the case, there is not much you can do except perhaps apply some silicon lubricating spray to the connectors before assembly.
(12) Slide the outer base plate over the inner base plate (hopefully, the electrical tape you just installed will not interfere with this). Reach under the inner base plate with both hands and press it upwards into the outer base plate until the two pieces snap securely together, including all four corners.

(13) Situate the front edge of the outer base plate in place, then snap the rear portion of the outer base plate down into position.
(14) Install the shift knob back into the lower shift tube as follows: As mentioned earlier, it goes back in much like it came out, but much easier. Just push the shift knob assembly down in as far as it will go, and give it good rap with the bottom of your fist. It will snap down into its normal position.
(15) Make sure the small plastic ring (which should still be in place in the top of the shift boot) is still situated about 1/16” down from the top of the rim at the opening of the boot. Line up the indents (or slots) in the ring with the connecting tabs on the bottom of the shift knob. Also, there is a vertical grove on the inside of the plastic ring, which will face forward, and line up with a matching ridge (or key) on the front tab of the shift knob. When everything is lined-up, push the top of the boot (with the plastic ring) up over the tabs until the plastic ring locks tightly together in place.
Insure that the ring is locked in place all the way around the bottom of the shift knob. Sometimes it seems like it is locked in place, but only half of the tabs are fully seated in the slots. There should be no gap between the boot and the shift knob, or at least only a very small gap, which will later be remedied with a little silicon adhesive/sealant.
(16) We still need to correct the problem of the base plate moving forward as you put the gear shift into the park position. Fortunately, under (and integrated into) the outer base plate, at the rear of the plate, there is a small vertical tab. This will be an ideal device to hook over a post that we will be installing in the console under the base plate. This should keep the base plate assembly from moving forward when you move the gear shift into the Park position.
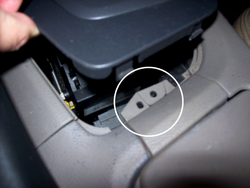
Let’s install the post: Under the outer base plate, in its rearmost position, you will see a small plastic shelf (for lack of a better word) that the base plate sits on. This shelf is about two inches wide, three-quarters of an inch deep, and has two small holes.
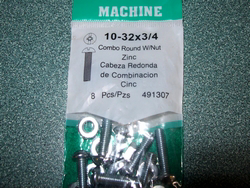
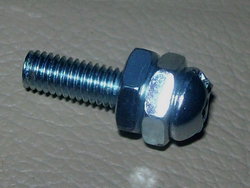
Buy a package of 10-32x3⁄4 machine screws and nuts, as shown.
Thread two of the nuts all the way up to the top of the screw, tight to the underside of the round screw head.
Insert the screw (with the two nuts) into the right side (or passenger side) hole, and secure it with two additional nuts under the bottom of the plastic shelf.
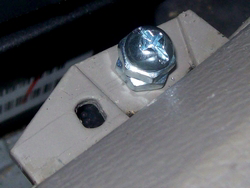
Using two nuts under the bottom of the shelf, instead of one, will lock the screw in to place.
Now, try pushing the base plate assembly down into place to insure the post fits nicely in front of the vertical tab on the bottom of the base plate. If it fits, and helps to hold the base plate more securely in place when shifting into Park, then all is well.
Finally, purchase a small tube of clear silicon sealant/adhesive, and cover the post (that you just installed), and the shelf with a generous amount of the silicon sealant.
Now, push the base plate assembly down into place again, but this time the silicon (once it dries) should help lock the base plate assembly to the post and the shelf, and offer a slight cushioning effect. Clean up any excess silicon. Be careful not to use too strong of a solvent when cleaning, as it can damage the paint on the plastic.
(17) Reverse steps #1, as follows: Reinstall the small cover plate on the lower front of the dash, just above the shifter section of the center console. It should just line up, and snap right into place.
(18) Lastly, to make sure the top of the boot will stay tightly up to the bottom of the shift knob, do the following: Take a small screwdriver and apply a liberal amount of silicon sealant in 3 or 4 places around the base of the knob, between the top of the boot and the bottom of the shift knob. In the future, the silicon should come apart very easily, if need be, so this is the preferable adhesive for securing the top of the boot to the bottom of the shift knob.
Hopefully, this will hold the two leather surfaces together securely, but if not, substitute a little super glue in place of the silicon. This will be harder to separate later, so if you do end up using super glue instead of silicon, don’t use more than a couple of very small dabs or drops. Clean up any excess silicon.
Congratulations! You are finished.