You must be logged in to rate content!
7 minute read
Alternative: How to Seafoam your car
Compliments of 91RS383 @ http://ls1tech.com
11-4-2009
Alternative: How to Seafoam your car.
Since the http://www.ls1tech.com/forums/genera...-your-car.html thread is over 50 pages now, it seems that people don’t want to read the whole thread. I understand. This is disappointing, though since such great arguments have been made for the pros and cons of Seafoam. Since people seem to only read page one and get only the positive arguments for Seafoam use, this post is dedicated to the argument against Seafoam as a top engine cleaner and the alternative.
First, I would like to say that I don’t know of any reason why you should not put Seafoam into your gas tank. There are plenty of people who have stated time and again that it does a great job of cleaning the fuel system.
Second, To ChocoTaco369: Much props to you for writing the famous how to thread. This is not meant to be an attack, simply an opposing viewpoint.
Engine Flush:
Many people have been putting Seafoam into their crankcase as an engine flush, then driving around for days or weeks before changing the oil. Please stop. Seafoam is a 100% petroleum product, or lightweight mineral oil. Pouring it into your oil is like diluting your oil with gasoline or sewing machine oil. You do not know how it will interact with the additives already in your oil. Then driving with this in your oil puts stress on the lubrication system possibly causing damage. To learn about engine oil and additives please read here:
http://www.carbibles.com/additives.html
http://www.carbibles.com/engineoil_bible.html
To flush your oil, if you feel it is necessary, you can buy Gunk Engine Flush, or use Seafoam if you must, but here’s the important part, it’s all in the technique. Do this after your top engine cleaning, (that will be discussed later).
1.Run the engine until it reaches normal operating temperature.
2.Add the engine flush to a full crankcase.
3.Start the engine and let it idle for 5 minutes then shut it down. You will likely be able to hear the oil draining back into the crankcase since it will be so thin.
4.Change your oil right away. Give the oil a little extra time to drain completely as you will likely get more oil out of the engine than normal.
Top engine cleaning:
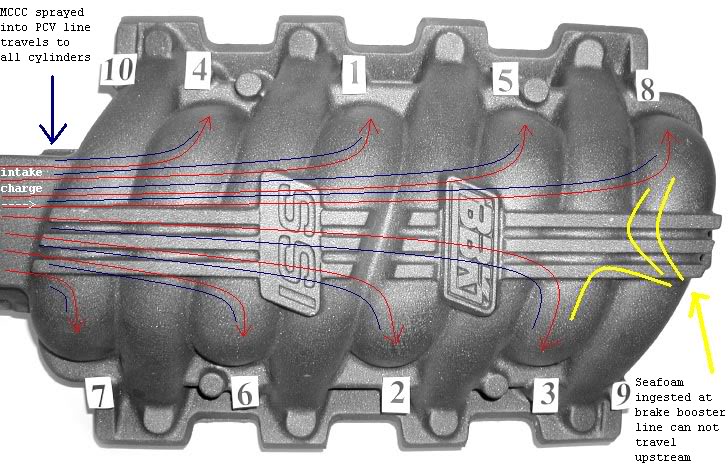
My problems with Seafoam as a top engine cleaner mostly stem from the fact that it is an old solution to a problem that has, in many ways, evolved. When engines were carbureted you could pour Seafoam into a running carburetor and it would be distributed throughout the intake just like the gasoline was. Our dry intakes don’t do this as well. The write up on how to Seafoam your car tells you to pour the liquid into the brake booster line. I’ve drawn a diagram on a picture of an LS type manifold that illustrates why this does not work for our cars.
My other point of contention with Seafoam is that it is a light-weight mineral oil that does not compress. When you pour it into the brake booster line you are flooding out the rear two cylinders and could cause significant damage to your engine if you are not careful. When the engine is shut down the Seafoam sits in the rear of the intake and those rear cylinders, but does nothing for the rest of the motor.
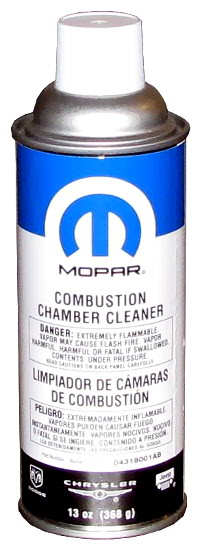
Enter the alternative: Mopar Combustion Chamber Cleaner p/n 04318001.
Here’s a picture:
MCCC is in an aerosol can and is an expanding foam product. You can buy it at your local Dodge/Chrysler/Jeep dealer for about the same cost as Seafoam. You spray it into your motor from the PCV port at the start of the intake stream. This allows the mixture to be evenly distributed to all cylinders. When the engine is shut off it expands to fill the combustion chambers, intake runners and plenum. It coats every surface to clean more thoroughly.
But, Dave, what about the cool Seafoam smoke show? MCCC when used properly does give similar results, but a much more effective clean.
Below is the Jeep TSB for proper application of Mopar Combustion Chamber Cleaner. I have inserted notes in BOLD that pertain to our LS engines:
NO: 18-22-98
GROUP: Vehicle Performance
DATE: Jun. 12, 1998
{I removed symptoms/vehicle specific data}
Here is the repair procedure.
1. Operate the vehicle until the vehicle reaches operating temperature.
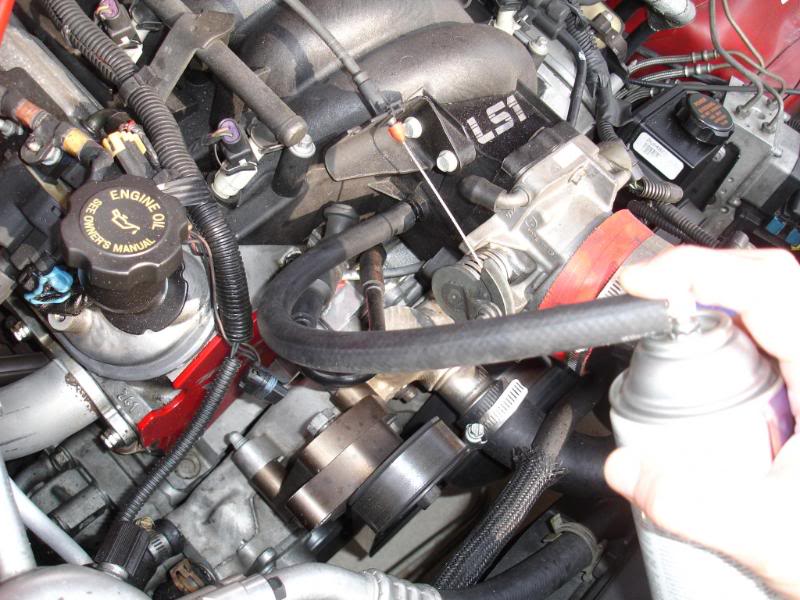
2. Remove the air tube from the throttle body. On an LS engine remove the PCV tube that attaches to the intake just after the throttle body. Add a short piece of emissions hose to the nipple to make things easier.
3. With the engine at an idle, spray the entire contents of Mopar Combustion Cleaner, p/n 04318001, directly into the PCV Port. Allow the vehicle to load up with the cleaner to the point of almost stalling out.
Here is a picture I pirated from LS6427 that shows how/where this is done.
4. Shut the engine OFF after the entire can is ingested. I like having a second person do this so that they can shut the engine off at the point where the can of MCCC starts to sputter, and I don’t have to run around hoping that I shut the engine off fast enough.
5. With the hood closed and the vehicle parked inside the garage, allow the vehicle to soak for two to three hours. This will ensure that the engine will maintain its temperature and will allow proper solvent penetration.
6. **Drive the vehicle to fully warm up the engine.
7. If the vehicle is equipped with an automatic transmission, place the gear selector into L, if the vehicle is equipped with a manual transmission, place the transmission into first gear.
8. On a suitable road that will allow the vehicle to be driven safely at the posted speed limit, accelerate the vehicle until the engine reaches 4500 rpm.
9. Hold the engine speed at this rpm for 15 seconds.
10. Slow down and pull to the side of the road, then allow the engine to idle for five seconds.
11. Repeat Steps 7 through 10 two more times.**
12. With the vehicle at operating temperature and within the freeze frame data recorded for the diagnostic test, verify that the misfire condition has been corrected.
Thank you for reading a long post,
David
Disclaimer: You have just read my opinions. They may not be the same as yours. Do your own research, and don’t believe the marketing BS, just because the salesman said it was so.


