You must be logged in to rate content!
8 minute read
97 3.0 CL, Wheel Bearing and Brake Rotor
Compliments of sporting @ http://acurazine.com
9-26-2008
1. Remove wheel
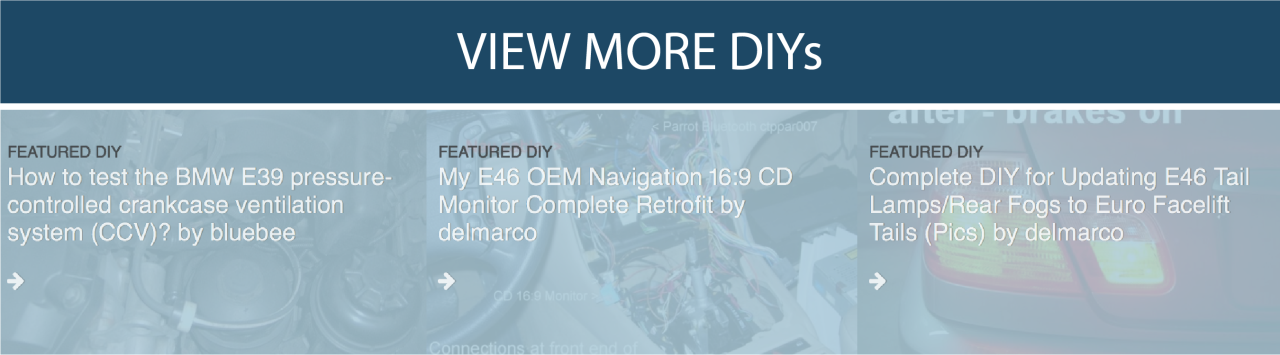
2. Here are the new parts for the front brake rotors and (front wheel bearings already pressed onto the hub assembly). If you take it to an Acura dealer to press it in, they will charge you an arm and leg for a 15 minute job.
I think they wanted $200 to press in and out for me when I went to pick up my parts.
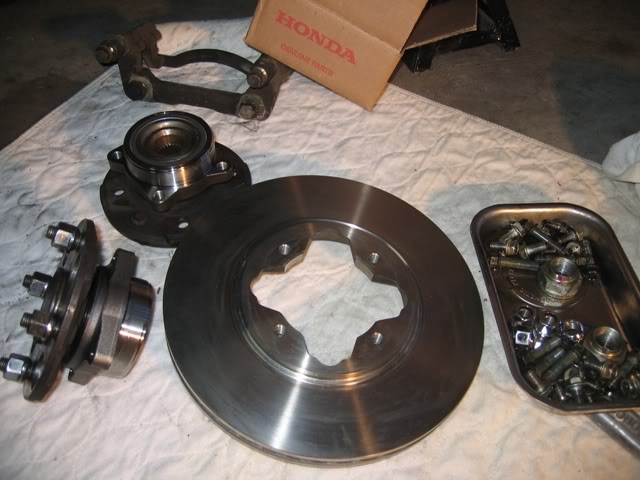
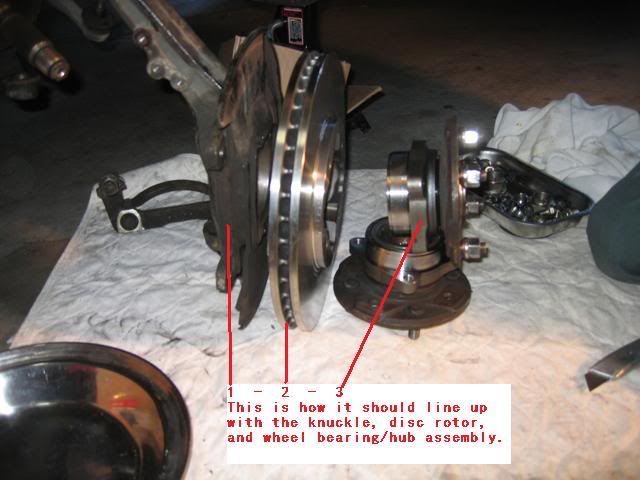
3. Remove the brake calibers and pads - there are 2 bolts that hold the calibers onto the brake frame and 2 more (bigger) bolts that hold the brake frame onto the knuckle (The knuckle is the long control arm thingy). Then Remove the 3 bolts that hold the knuckle onto the CL's frame. Listed as Knuckle 1, 2 and 3 in the picture.
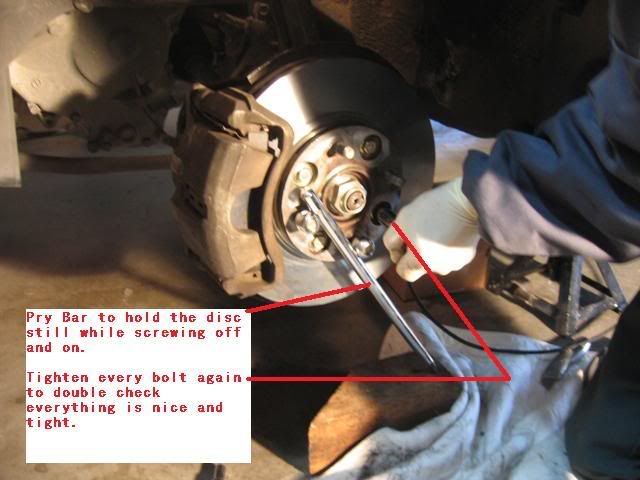
4.Then using a pry bar place it between two of the four wheel studs and the ground, this is to keep the hub from turning. Then using a 36mm socket with a long pipe for leverage, unbolt the axle nut.
-Hang the brake calibers with some wires onto the frame of the car or anything to hold it upright, you don't want to put a tear in the rubber brake line.
5. Now, part 3 is somewhat a PITA, because over time those 3 bolts get "stuck" on there, the trick is to take a hammer and pound on the outside hard metal to break/losen up the rust that is making the two metal pieces stick together after the bolt is taken out.
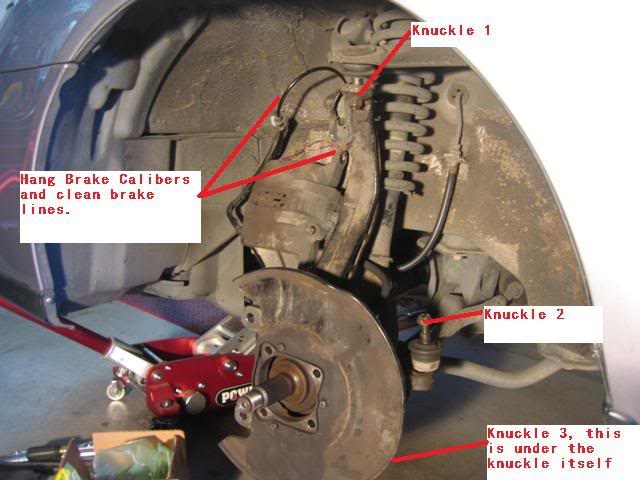
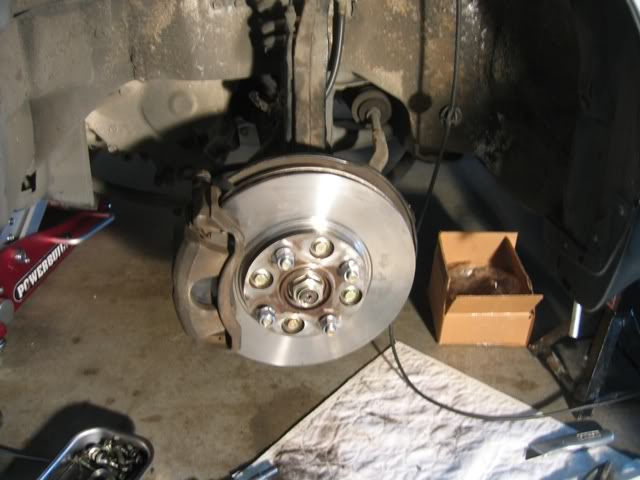
6. Here is what it looks like with parts 1-5 done.
7.Optional if you really care about your car - Once all parts are out, take the time to
clean the brake hose, screws and what not so that it wont sieze up next time if you decide to do this process all over again!
8. This is how the new parts should line up.
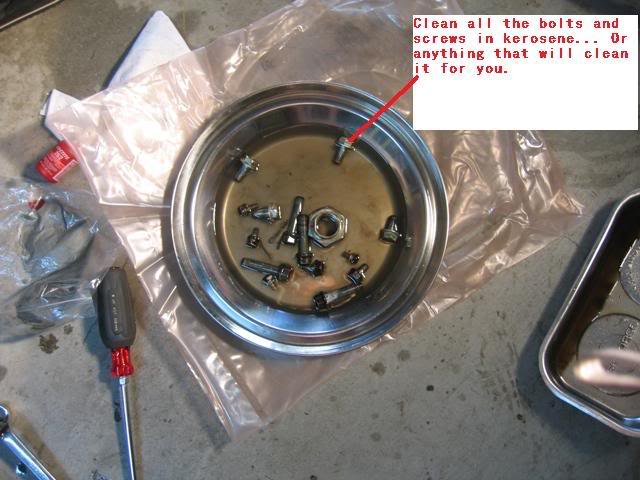
9. All the screws that I took out I cleaned, in kerosene or anything you prefer. Then I sprayed WD-40 on them to prevent rust in the future.
10. I didn't take pictures on this part, but in order take apart the wheel bearing you will need to have a press machine to press out your old wheel bearing and push in the new wheel bearing. In the first picture you see the wheel bearing and hub assembly already pressed together.
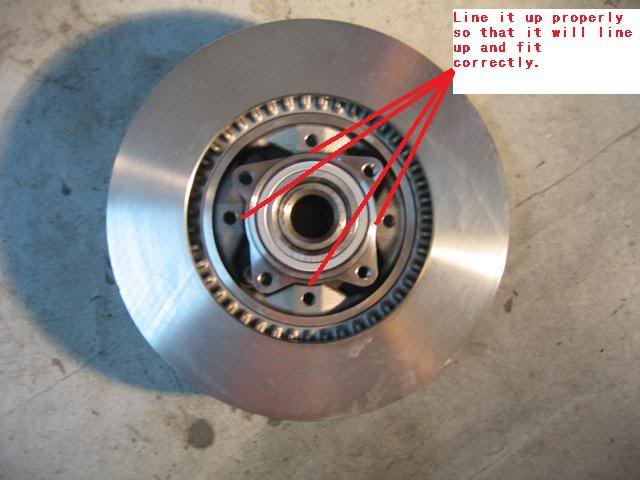
11. When it comes time to put it back together you should put the hub assemble that is already pressed into the wheel bearing down the the ground then put the brake rotor onto the unit, there is only one way of putting this on, so line it up carefully. Then screw the 4 bolts back onto the front side of the brake to hold it together with the hub assembly.
12. After part 10, put some anti-sieze lubricant onto the outter side of the new wheel bearing unit - to prevent future lock ups to the knuckle if you ever want to take it apart again. Tighten the 4 bolts on the back of the knuckle (put some lock tite on the bolts, since these are holding your wheels to your car!)
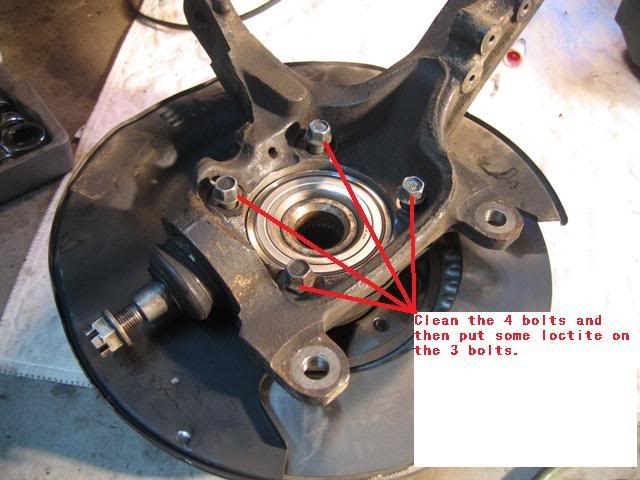
13. Put back the knuckle onto the car and tighten the 3 bolts.
14. Then just do the reverse to assemble all the brake calibers and brake lines.
Have fun and I hope this is helpful to whoever decides to do it!
9-27-2008
Thanks guys!
I appreciate it... Well, the instructions I made is missing some minor details but nothing you guys can't figure out when you're doing this job for yourself. All the major info is there.
By doing this job myself I saved a ton of money... It really helps to know someone who has a press machine (I do, and he did it for free ) Oh and now I know that the CL's disc brake is a two piece design, so that is cool versus a one piece.
Also, if you are going to change your brake rotors, most likely you will damage your wheel bearing because what you're suppose to be able to do is to lightly pound out the hub assemble/wheel bearing from the knuckle but 85% of the time the two pieces are "stuck" together (that is why I put anti-seize lub on the new wheel bearing unit) and you'll have to pound it out hard, which will damage your wheel bearing.
10-4-2008
Hi Minor,
Thanks for the comment, I got my bearings and rotors stock OEM for a 97 CL 3.0 from Acura of Lynnwood, WA (personally, I like to stick to stock), I looked online and found each part to be:
Bearing - List Price - $115 - Online Store Discount $66
Rotor - List Price - $115 - Online Store Discount $70
So the total was roughly $280 for the fronts.
I notice a big difference when I brake hard that my steering wheels doesn't "wiggle" any longer with the new stock rotors.
If you want to prevent the warping, just dont wash your car right after you drive it, since the rotors are still hot. Wait for it to cool down before letting water hit it.
Do you really need to replace the hub? All it's doing is just holding the lug nuts and wheels to your bearings.
2-11-2010
Update:
So I got about 20k on these new rotors and wheel bearings (wished they still look new!), no issues to report and it is still vibration free! Yippee!
3-13-2010
Iagent,
If it were me, I would go the OEM route... I've got 20k++ miles out of the new OEM rotors I replaced (For this thread) and still no vibrations and the thickness is still great!
I posted this thread back in Sept. 08.
8-6-2010
I pressed the bearing back into the hub right after I took it out with a press machine.
11-1-2013
^ Because that is where the majority of the force is coming from, the only side the piston is forcing pressure upon is from the engine side outwards... meaning the inner side of the disc.
If you do this project, lube up all moving parts, meaning the (don't know what the correct term is) "joint" where you screw the screw to hold the calipers to the non moving part of the caliper assembly. There should only be 2 screws top and lower. Once lube it would allow for movements and variations in the disc rotation. It will also lessen vibrations as well.
Good luck, I am still driving on the pair of disc rotors I replaced with this thread... still good and no vibrations.