You must be logged in to rate content!
10 minute read

Plenum Gasket Replacement
Compliments of TurboStixx @ dodgeforum.com
12-27-2011
IF THE PICS DON'T SHOW UP, PM ME. I WILL REPOST THEM OR EMAIL THEM TO YOU!
I know I have a thread currently still opened about this, but I wanted to make a new one to give you all the full run down on this. For those of you who don't know!
The Plenum gasket is actually very easy to replace. Some people don't want to touch it because you have to take off the intake, also known as the Kegger. But actually if you have any mechanical sense, you will be able to do this with ease as long as you take your time!
Before you start, make sure you have the following:
Intake Gasket Set - About $25 at you local Auto Parts Store
Gasket Scraper - About $6
New Thermostat - About $7
Thermostat housing gasket - About $2
Injector Seals (O-Rings) - About $6
RTV Black
RTV Red
Throttle Body Gasket
Air Hat Gasket
A Box of Tide
Large Bucket or Cooler big enough to submerge your Intake upon removal
Black Sharpie (or whatever color you want)
Something to mark wires and the intake with. (I used File Folder Labels. Small and Sticky)
Now, to start!
First you will need to remove your air hat. I recommend setting the air hat and the air filter somewhere together.
Once you have the air ha removed, the first thing I did was take the throttle body off. Make sire when you remove the TB to also disconnect the Kick down cables for the transmission and such. The cables will actually pop out of the brackets to make it a little bit easier to move the cables out of your way. I kept one cable on, so I knew exactly where each cable connected.
I then proceeded to remove the belt, the A/C Compressor, THEN the alternator. I say it like that because I found it much easier to remove the AC and move it off to the side, then remove the alternator. The AC lines were a little bit in the way with the AC still connected. Now, just remember, DO NOT remove the AC lines from the compressor. The lines flex enough to move it off to the passenger side without disconnecting them.
Once you finish removing the AC and Alternator, go ahead and remove the bracket that both of them sit on. There are 6 bolts to this bracket. 3 on the driver’s side, 2 on the passenger side, and one behind the pulley attached to this bracket.
After removing these, you are almost there! You are going to then disconnect the wires that run to the injectors. DO NOT disconnect the fuel line!
Removing the fuel lines from the fuel rails will just make a mess and give you something more to do.
With the plugs disconnected from the injectors, you are now free to remove the injectors from the intake.
WARNING
Be EXTREMELY careful when pulling the injectors. The fuel rails are not the thickest metal, and can be bent with no problem. This is why you only use your hands, DO NOT USE ANYTHING TO PRY THE FUEL RAIL!
Simply lift up on fuel fail while rocking the rail side to side to remove the injectors. It will take a lot of strength, but they will come out this way! I recommend pulling the passenger side then the driver’s side, due to the fuel line being disconnected on the driver’s side. Once you pull the injectors you are just going to want to flex them over to the driver’s side to get them out of your way.
Your next step is to remove the plugs from the sensors attached to the throttle body.
Once you remove these, go ahead and remove your Intake. You can either leave the throttle body on until after you remove the intake or you can remove it before. I kept mine on until I pulled the intake to try to keep as much dirt as possible out of the intake.
Once your remove the intake, make sure to put cover up everything like the picture below.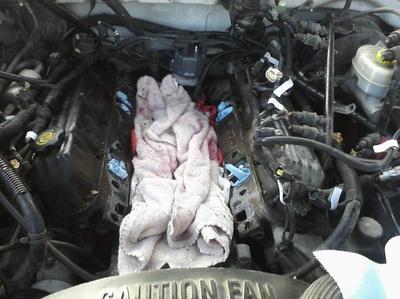
Now, be sure to clean up as much dirt as possible from around the intake before you remove it to ensure dirt will not drop into the valley. I had some dirt fall in, I simply took a vacuum and used the crevice tool and gently vacuumed the valley before re-installing the intake.
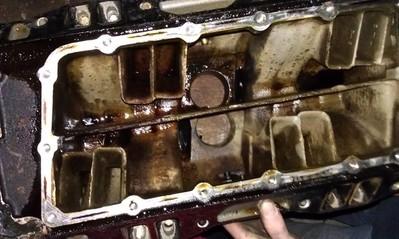
Ok, now you have the intake removed! Go ahead and take it somewhere you can set it down (preferably not on the ground, and begin to take the plenum plate off of the bottom!
With that removed, you can really see the amount of oil inside of the intake. Mine looked like this:
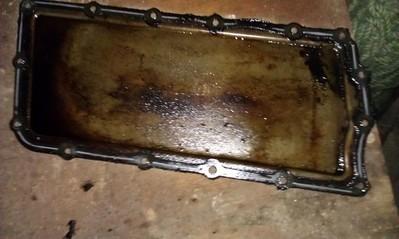
I spent about 3 hours cleaning the plenum plate its self, I suggest using a brass brush. I attached one to my drill and carefully buffed the plate and the outside of the intake with it. The plate looked like this afterwards:
The question I had when I did mine was how do you clean the injector ports and other places you can't really get into?
Answer: Plenty of ways. I was told Purple power, spray it on, and let it sit for 5-10 minutes then rinse it off.
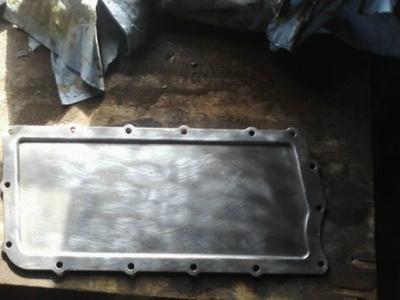
The way I did it: I had a 128qt cooler, so I knew I had enough room to completely submerge the intake. I filled the cooler with hot water, about 5 gallons of almost boiling hot water, then the rest just hot water from the tap. I then dumped an entire box of Tide laundry detergent into the cooler. Make sure you use powdered detergent, one that doesn't say "Good for the Environment" They just aren't as strong. I let mine sit for about 2 hours, then lifted it out and dunked it back it about 10 times to have the water finish getting as much oil as it could out. This is what it looked like after 2 hours: Tide laundry detergent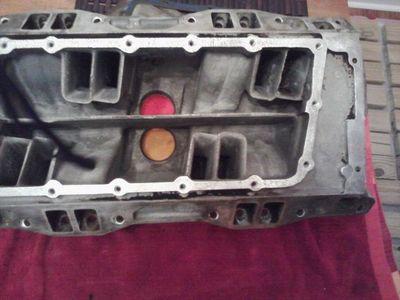
If yours isn't as clean as you want it after 2 hours, let it soak over night. Once it is done soaking, rinse it thoroughly to remove any excess dirt as well as the powder left over. To dry it, you can either bake it in the oven at about 100-125 degrees for about 30 minutes, or use a hairdryer. Once dry, wipe the inside and outside down to remove any excess tide powder left on the intake. You will be able to see the white powder so you will know when you have gotten as much as possible.
With all this done, you are ready to put the plenum plate back on the intake.
Get the plate, the gasket, the bolts and the RTV Red ready.
First, seal the Throttle body holes so nothing gets in the intake, because you are now sealing it back up. I used duct tape so that I could keep it on there until time to put the throttle body back on once I re-installed it. Put a thin coat of RTV Red on the intake, then the plenum gasket, then another thin layer of RTV red on the gasket then put the plate back on, you then want to Torque down the bolts to specs, which can be found at the bottom of this page. Let that sit over night to give it time to cure.
Now that your intake is patched up and repaired, you are ready to re-install it. Now, getting the intake gaskets on can be just a tiny bit tricky. To help you with that, I will give you the EXACT same advice Hydra gave me when I did mine:
When you replace the intake put the gaskets on each side, and front and back. At this time you will notice a slight place where the gaskets come together on all 4 corners. In this area you want to put a nice 3/16 inch bead of RTV sealant down to ensure they seal as one. When you place the intake down do yourself a favor and get some 1/4" wood dowels and place and cut them about 6 inches long and place them inside each corner bolt hole and as you lower the intake you place these into the holes so when you lower the intake it sits flat down and correctly on top of the block.
What I am trying to say here is you don't want to slide the intake back and forth on the engine because that will cause leaks on the corners you sealed with the RTV. You want to place it correctly down on the engine the first time and not move it. Then torque the bolts in sequence as instructed in the manual. I always clean my bolts and put a slight bit of gasket sealant on the threads to aid in keeping them from backing out once torqued and the sealant dries.
Once that is in place, you are good to go! Replace the O-Rings on the injectors and gently push them down while rocking to re-seat them. I put a VERY little bit of grease on the o-rings to help me seat them. After that just reverse everything thing to get it all back together.
I reset the PCM after I finished. I would just go ahead and do it! Not hard to do! Just disconnect the Negative battery cable, turn the truck to the on position, for 30 seconds, turn it to off, reconnect the cable, start the truck, let it run for 30 seconds without touching the gas, Turn it off, then start it back up and go for a little drive.
Last thing I need to share:
CHANGE YOUR OIL BEFORE STARTING THE TRUCK
I changed mine and got about a quart of water before oil coming out. No matter how careful you are, you are going to get coolant in the oil when doing this, so just do an oil change!
Torque Sequence and Specs:
http://dodgeram.info/tsb/2000/09-05-00.htm