You must be logged in to rate content!
6 minute read
Modification: Sway Bars
Compliments of 03neonRT @ dodgeforum.com
Manufacturers: Hotchkis, Progress, Eibach, Mopar.
Price Range: $50.00-$400.00
Where to Buy: TitanMotorsports.Com, ModernPerformance.Com, HowellAutomotive.Com.
Difficulty of Installation (1 as easiest 10 as most difficult): 2
Time For Installation: 1 hour 2 hours
Expected Gains (in WHP): N/A
Explanation of Mod: The sway bars purpose in a vehicles suspension system is to try to keep the car's body from "rolling" in a sharp turn. Reducing body roll is critical because during a sharp turn more weight is applied on the inside tires and less weight on the outside tires, reducing traction dramatically. A sway bar attempts to keep the vehicles body flat by moving force from one side of the body to the other.
**Installation Instructions**
Front
REMOVAL:
1. Raise the vehicle.
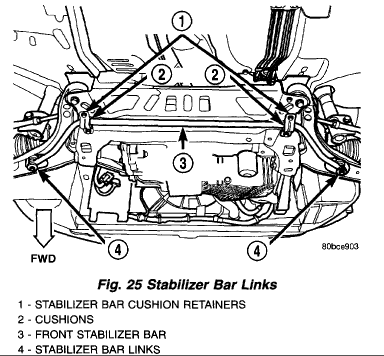
2. Remove both stabilizer bar links from the vehicle. Remove each link by holding the upper retainer/nut with a wrench and turning the link bolt.
3. Remove the stabilizer bar cushion retainer bolts and retainers, and remove the stabilizer bar with cushions attached from the vehicle.
4. To remove the cushions from the stabilizer bar, peel back each cushion at the slit and roll it off the bar.
INSTALLATION
NOTE: Before stabilizer bar installation, inspect the cushions and links for excessive wear, cracks, damage and distortion. Replace any pieces failing inspection.
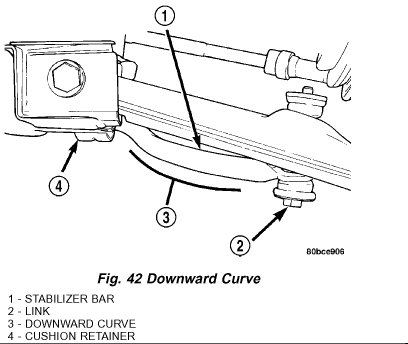
1. If removed, install the stabilizer bar cushions on the stabilizer bar utilizing the slit in each cushion. Position the cushions at each end of the bar's straight beam, just before it begins to curve.
NOTE: Before installing the stabilizer bar, make sure the bar is not upside-down. The stabilizer bar must be installed with the curve on the outboard ends of the bar facing downward to clear the control arms once fully installed.
2. First, place the stabilizer bar in position on the front suspension crossmember. The slits in each cushion must point toward the front of the vehicle and sit directly on top of the raised beads formed into the stamping on the crossmember. Next, install the cushion retainers, matching the raised beads formed into the cushion retainers to the grooves formed into the cushions. Install the cushion retainer bolts, but do not completely tighten them at this time.
3. Install both stabilizer bar links back on vehicle. Start each stabilizer bar link bolt with bushing from the bottom, through the stabilizer bar, inner link bushings, lower control arm, and into the upper retainer/nut and bushing. Do not fully tighten the link assemblies at this time.
4. Lower the vehicle.
NOTE: It may be necessary to put the vehicle on a platform hoist or alignment rack to gain access to the stabilizer bar mounting bolts with the vehicle at curb height.
5. Tighten each stabilizer bar link by holding the upper retainer/nut with a wrench and turning the link bolt. Tighten each link bolt to a torque of 275 inch lbs..
6. Tighten the stabilizer bar cushion retainer bolts to a torque of 250 inch lbs..
Rear
REMOVAL
1. Raise the vehicle.
2. Remove both rear wheel and tire assemblies from the vehicle.
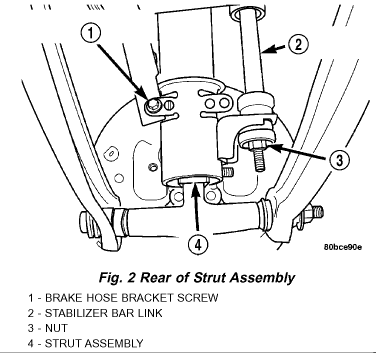
3. Remove the nut from the end of each rear stabilizer bar link bolt. Pull the bolt out through the top of the link and remove the link from each end of the stabilizer bar.
4. Remove the two bolts securing each of the two cushion retainers to the frame
rails, then remove the cushion retainers, cushions and stabilizer bar from the vehicle as an assembly.
5. Pull the cushion retainers off the cushions.
6. The cushions can be removed from the bar by utilizing the pre-formed slit in each cushion and peeling it off the bar.
INSTALLATION
.
1. Install the cushions on the stabilizer bar by opening the slit in the cushion and wrapping the cushion around the bar. When installed properly, the slit in the cushion should face in the same direction as the ends of the stabilizer bar, or toward the front of the car once the bar is installed. The flat side of each cushion should face upward.
2. Install the retainers on the cushions, matching the contour of each retainer with its cushion.
3. Install the stabilizer bar, cushions and retainers on the car as an assembly. The dipped area in the center of the bar must face down to clear the well in the luggage compartment.
4. Install two bolts in each cushion retainer and secure the stabilizer bar to the frame of the vehicle. Do not completely install the bolts at this time.
5. Reinstall each stabilizer bar link:
- Place the link center sleeve and bushings between the eye in the end of the stabilizer bar and the link mounting bracket on the strut.
- Start the stabilizer bar link bolt with bushing from the top, down through the stabilizer bar,innerlinkbushings and sleeve, and strut link mounting bracket.[/align] - Install a lower bushing, then the nut. Do not tighten the nut at this time.
6. Install both tire and wheel assemblies on the vehicle. Tighten the wheel mounting stud nuts in proper sequence until all nuts are torqued to half specification. Repeat the tightening sequence, this time, to full specified torque of 100 ft. lbs..
7. Lower the vehicle to ground level or curb height.
8. Tighten the rear stabilizer bar cushion retainer bolts to a torque of 300 inch lbs..
9. Tighten the stabilizer bar link nuts to a torque of 200 inch lbs..
10. Set the rear toe on the vehicle to specification if necessary.


