You must be logged in to rate content!
8 minute(s) of a 362 minute read
10-24-2020
Decided to pull all the temporary wiring out of the car. Connected all its own wiring and started to test a few things. As soon as I connected the battery up the horns started to go off ( damn near gave me a heart attack ). Hmmmm, considering the horn button on the steering wheel isn't connected is a bit odd. Anyhow, pulled the wires for the horn off the live terminal and that shut them up. Tested a few things....headlights tested ok. Looked a bit dull until I stood in front of them now all I can see are spots ! Tested the lights on the instrument panel, they look pretty cool. Interior light tested ok. The wipers didn't work, then I realised I haven't put a fuse in the connector. Did that and they worked too. So far so good. Rear tail lights lit up. ( can't check the brake lights as no brake cylinders on the back...still waiting for the painter to redo the backing plates ). Tried the indicators.....nope, nothing. Checked all the connections and still nothing. tested with my multimeter and got power everywhere. I'll leave that for another day. A milestone reached so happy with the wiring I've done and what is working.


10/26/20
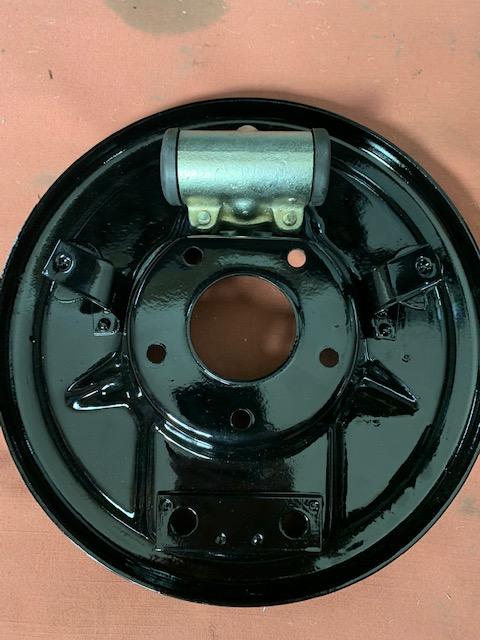
Got my brake backing plates back from the painter so now I can start reassembly when I get a bit of time.
Bit of a difference !
Since the car hasn't been driven yet, do you think I need to replace the gaskets ?


11/3/20
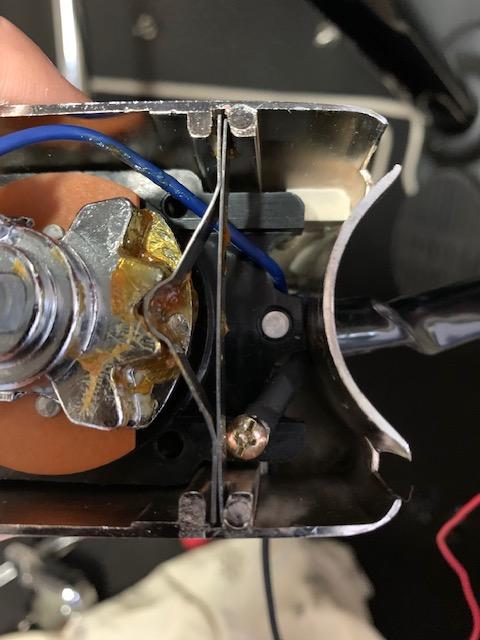
Ok, so today was "why the hell don't these indicators work" day !
Absolutely dead. Started with the flasher unit and found I had the L and the P terminals back to front....fixed that and finally I had the ticking noise from the flasher unit. No lights but the flasher was ticking. I actually had a quick look on Utube and found a guy installing a similar one on a 1950 Chev but what he said led me off to check. He said the switch assembly had to be grounded on the steering shaft. My shaft was painted and I had a rubber surround on the clamp to protect the paint work. I rigged up a temporary earth wire and I have lights ! I didn't want to have an earth wire screwed to the side so I pulled apart the unit and at the bottom you'll see a mounting screw. Again connected a temporary earth wire to check and this worked fine. Made up an earth wire and hid it in the base opening where the rest of the wires came out. Again set up temporary wires to the whole lot at everything worked except the two front indicators were swapped around. Got under neath the dash and found the wires that went to the front and cut, swapped and rejoined them. So now I've got to a point where only the front indicators are not working and this is only because of an earth problem. I do have earth where the bumper bar iron spacers are so I'll have to remove the bumper bar and make sure there is an earth contact all the way to the indicators.


11/8/20
Anyhow, my brother came over yesterday and we set about reinstalling the fuel tank. Blocked everything off and put a bit of fuel in it and swished it around. Only leaked from where the fuel guage mechanism is mounted. Removed that and thought I'd better make a new gasket. Cut one out and punched holes in it. I probably didn't need it but I put a very slight smear of aviation gasket maker on the top and bottom of the gasket and then screwed into place. Took a while to get the tank back in as I had to drop the exhaust but we go there in the end.
After that we tackled the front indicators as they wern't working. We did know it was an earth issue. The powder coating on the bumper bar irons were causing a non contact. Ground a ring around where one of the packing washers sits and after a few tries worked as it should. Funny thing was by doing that it must have grounded the front bumperbar so the other indicator work straight away.
Overall a few more things off the list. Next electrical thing to sort out are the horns then apart from turning over the engine thats the bulk of it done.


11/21/20
Been a little frustrating over the last week or so. Tried to install the rear 1/4 window garnish mold and found that when the upholsterer made the side pieces that run from the front to the rear of the car they just didn't curve down enough and there is a gap above the garnish mold. Also the window winder hole was made too big so he's been back and removed them and remade them. When I got them back he made to top too short and you could see the tacking staples so back they went again. Got them back again and refitted and this time one of the anchor lugs was in the wrong spot causing it to bow. Also he didn't adjust the height at one end so its covering over half the weathercord. Back they go again....hmmmmm.......they just don't listen sometimes. Anyhow I'm hoping to get them back this week coming and try again.


11/30/20
Started working back on the rear wheel brake pistons and backing plates. The stainless resleeving looked new so did everything else except the poor old pistons. I couldn't get the bench grinder scotch-Brite wheel Matt suggested so I went with the super fine steel wool. They actually polished up really well....bugger of a job but very happy. Reassembled the brake cylinders and used the Stat-O-Seal washers Taylormade suggested so now they are ready to reinstall.


Great build what a beauty! Fun family picture BTW
Posted by Diggymart on 1/31/19 @ 4:17:12 PM