You must be logged in to rate content!
18 minute read

308 Weber to TWM throttle body and electromotive
Compliments of cavallo_nero @ ferrarichat.com
2-22-2008
I have been with this project since October of last year. My car is a 1978 Euro spec 308 GTS with a custom dual exhaust and borgo hi comp pistons. My goal is to incorporate the twm throttle bodies with the least amount of modifications to the car and existing parts. I attacked this project in 2 stages. First stage was to install the electromotive TEC GT ECU, coil packs and trigger assembly, (program the ECU with basic parameters) fire up the car, then proceed to yank all the carbs, intake manifolds and fuel pump. Install all the sensors. Luckily I know of a good machinist, because we had to modify a lot of existing parts and fabricate new ones. Stage 1 is complete – fired up the car around Christmas without any issues. I was able to reuse all the throttle linkage on the webers for use on the throttle bodies – it took some effort – but it is silky smooth. So far, I have at least 120 hours in the project, I estimate at least another 50.
Parts that needed to be procured:
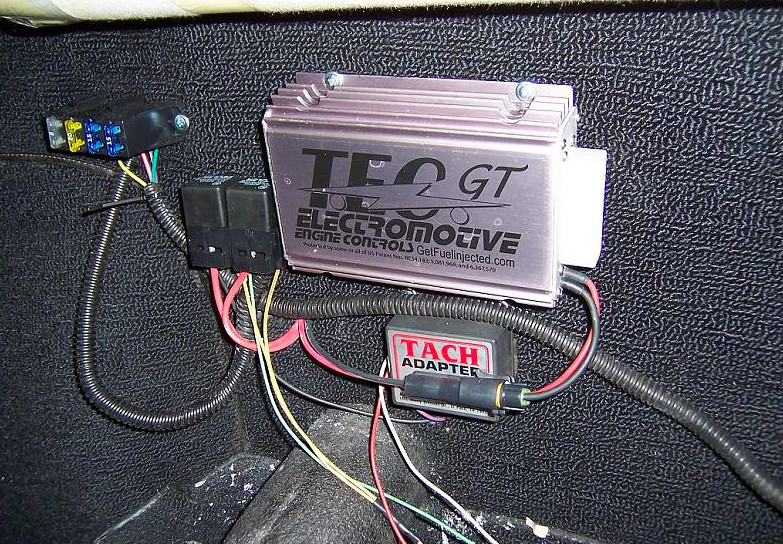
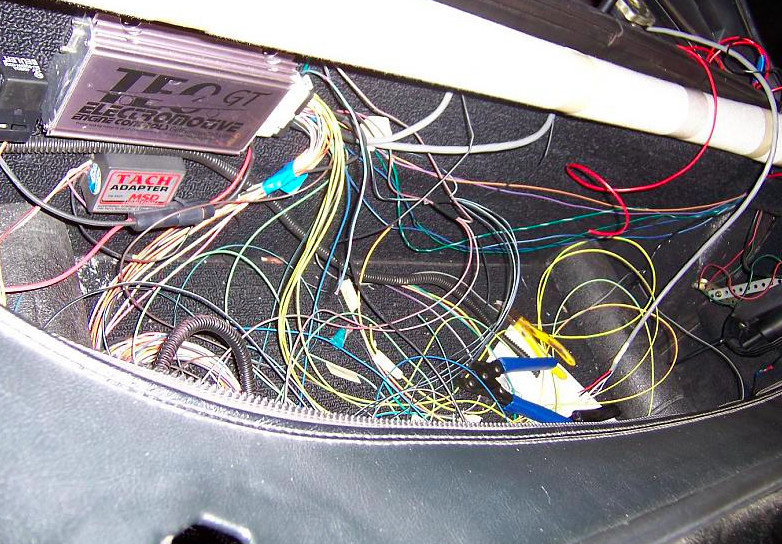
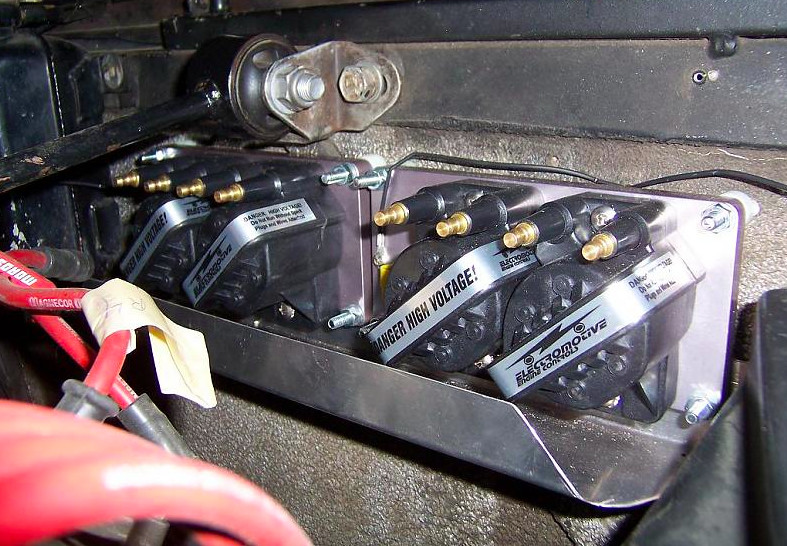
Electromotive Tec GT ECU, Direct fire coil packs, Wiring and Power Harness - $2500
Custom Terminal blocks (power and ground), wiring, connectors, etc. - $200
8 Custom spark plug wires - $200
8 new spark plugs – NGK BP5ES - $25
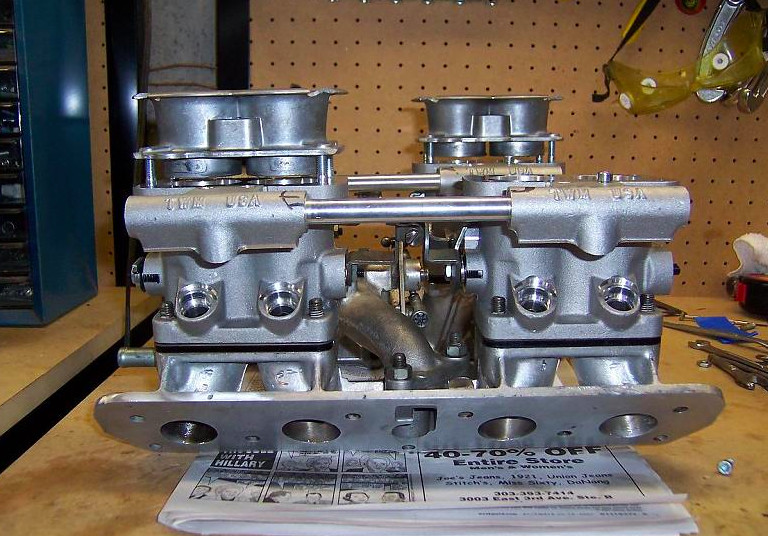
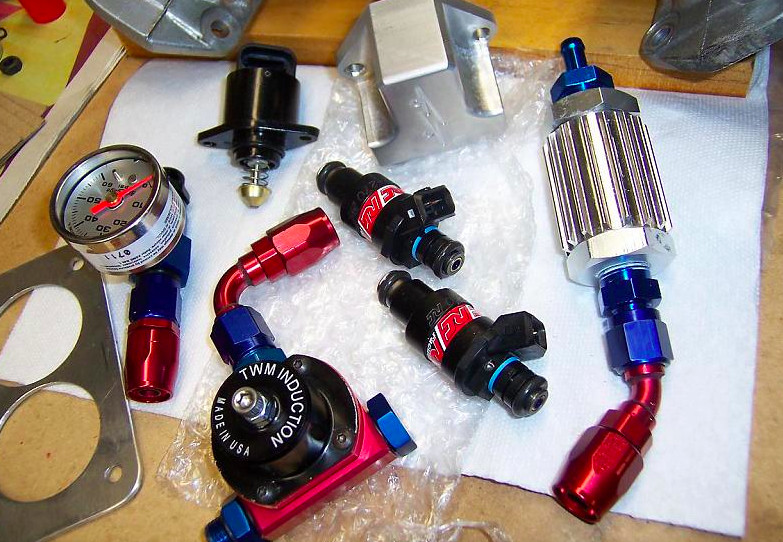
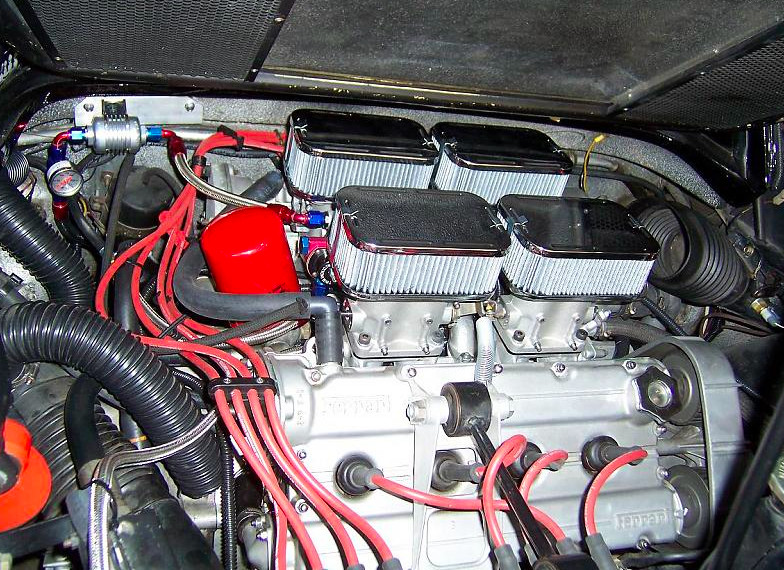
4 TWM throttle Bodies with custom fuel rails - $2400
8 RC 270 Injectors, about 26 lbs/hr. - $800
8 custom FI connectors - $100
Mallory 60 FI Fuel pump - $200
Hi pressure Fuel line and all the cool anodized aluminum fittings, - $300
Custom Fuel filter - $50
Fuel pressure regulator and fuel pressure gauge. - $150
Fasteners (intake manifold, throttle body top, new bolts for throttle body to manifold, and many many many others). - $200
Intake Manifold gaskets - $75.
TB base gaskets were hand made, TB to air cleaner gaskets (hand made).
IAC pump Motor and pump housing - $250
Push lock brass fasteners and tubing for IAC distribution - $150
Metripak and Weather Pak connectors for all the sensors, and the crimper - $200
Sensors that were bought and installed:
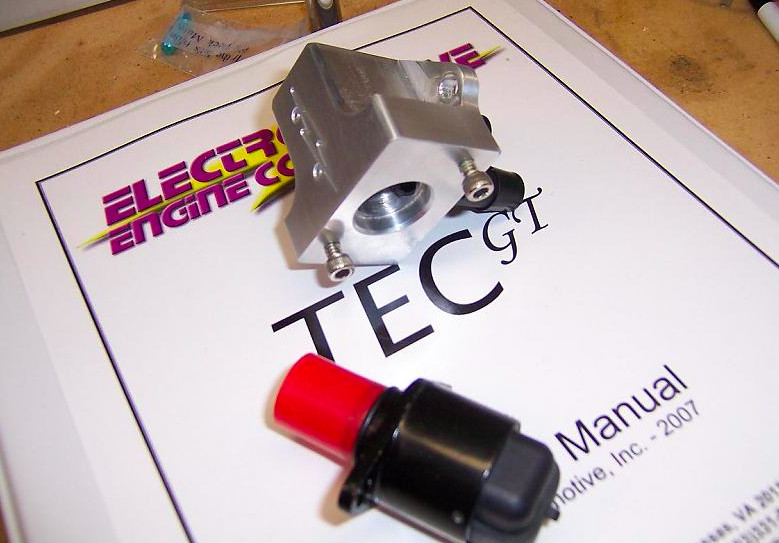
Trigger sensor for the direct fire coil packs - $100
4 wire heated O2 sensor - $120
Coolant temp sensor - $50
Incomming air temp sensor - $50
MAP sensor - $100
Throttle position Sensor - $125
Parts that needed to be modified: - $550
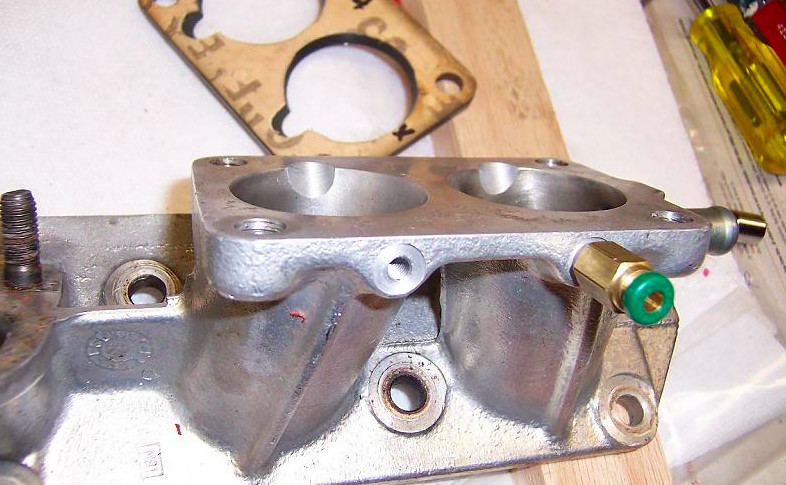
Intake manifolds needed to be bored on one side to accommodate the injector stream.
Plastic base spacers below throttle bodies were tapered from 42mm down to 40 mm and were bored with a notch like the intake manifolds to accommodate injector stream.
A lip needed to be carved out of the top of throttle bodies to accommodate stock velocity stacks.
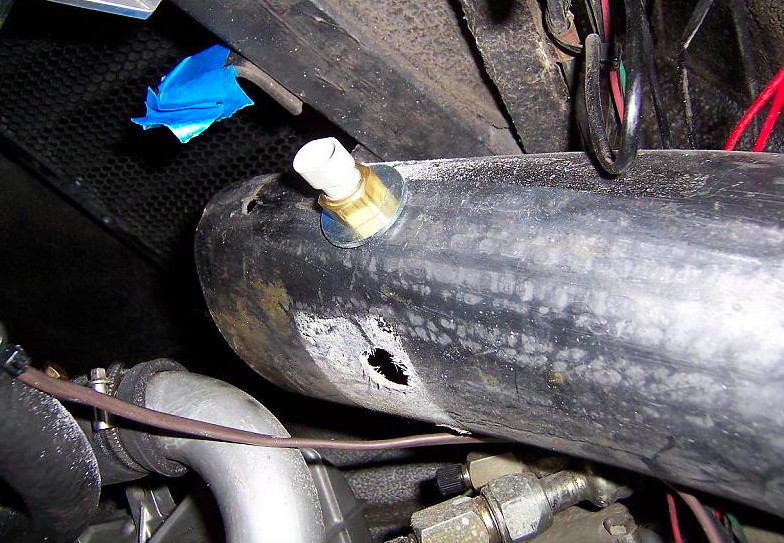
Drill hole in exhaust, weld in bung to mount O2 sensor.
Drill out crossover tube between intake manifolds to accommodate new coolant temp sensor, weld in new bung – right beside old coolant sensor – need two now.
Drill and tap holes in intake manifolds to accommodate Air injection for IAC.
Drill out all 4 velocity stack mounting holes for bigger studs.
Drill out all 16 stud collars that go inbetween throttle bodies and air box.
Resurface intake manifolds that were pitted and corroded on gasket side.
Fabricated Parts:
4 (1/8” thick) plates for the top of throttle bodies for use with stock airbox to cover opening left over from carb main jet air draw (the throttle bodies do not have this passageway). - $50
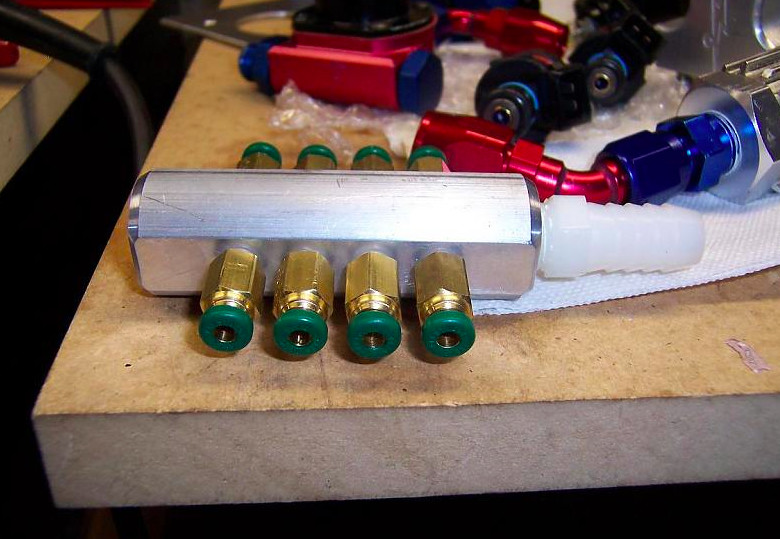
IAC distribution manifold to 8 cylinders. - $50
IAC mounting bracket. - $40
Mounting bracket for trigger sensor - $100
Custom heat shield for DFUs (direct fire coil units) - $25
Issues to date :
1.) What to do with intake manifold gaskets – do I leave them alone, or cut them to match the coolant passageway in the heads, as the original gaskets swelled and filled up the passageway. I think I am going to cut them to match the whole passageway..


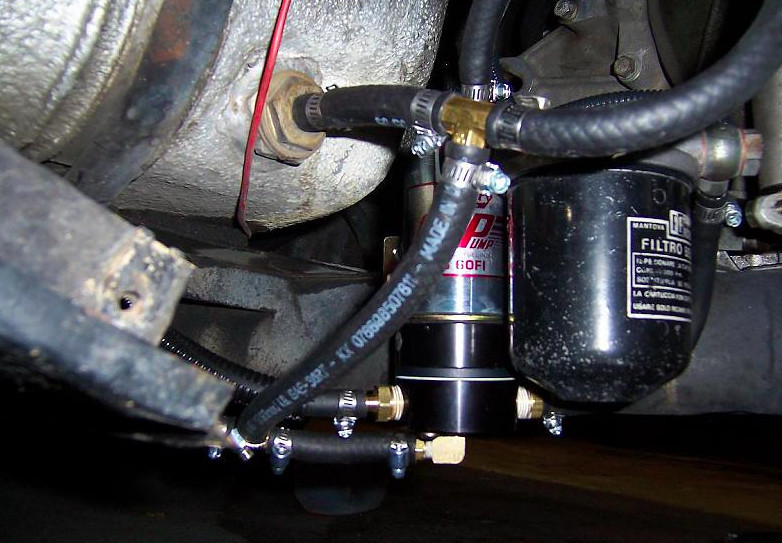
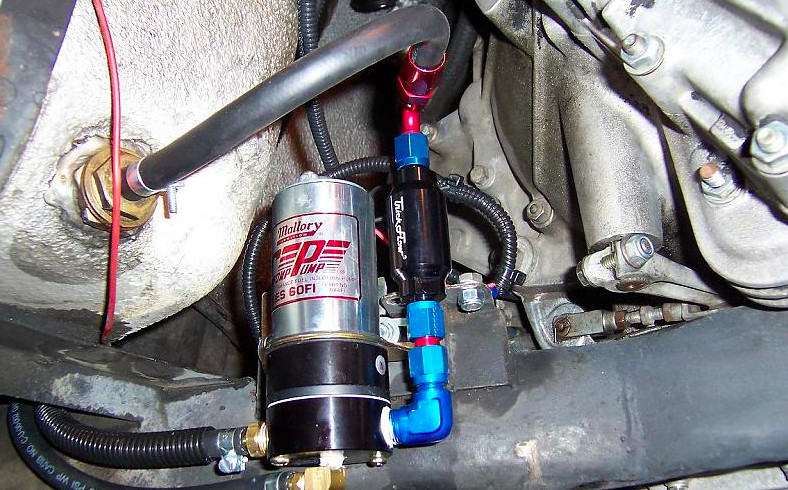
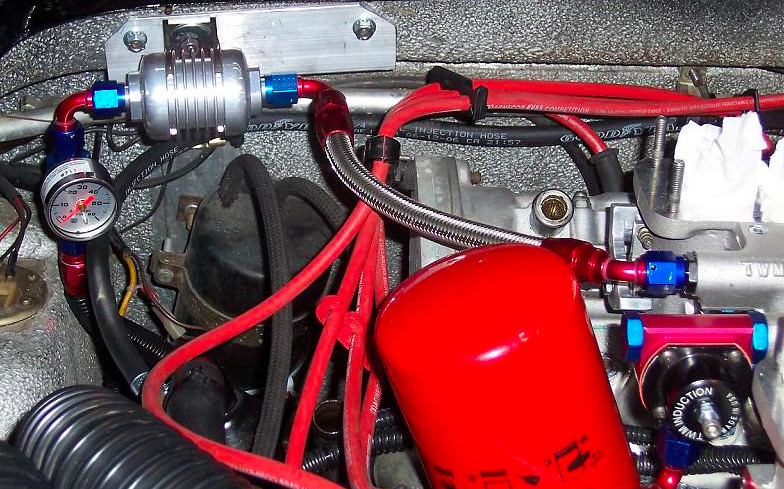
Mallory 60FI pump installation, complete with air bleed and return
2-27-2008
Time to regroup here a bit. Thanks for all the responses – either here or personal.
Here are some updates from the original post.
Gotta move the fuel pump up – no brainer.
1. Also need to plumb the return line from the fuel pressure regulator back in to the top of fuel tank 2, and not into the input of the fuel pump, although tthis will work as it is, but I will get hot aerated fuel into the pump. I still need to tee the bleed screw on the bottom of the new pump to the return line tho.
2. Intake manifold gasket is genuine Ferrari issue, and I will NOT drill holes in it or cut it out to match the water passageway – not enough supporting data or results set to determine if this is a viable solution for the gasket pulling away into the water channel.
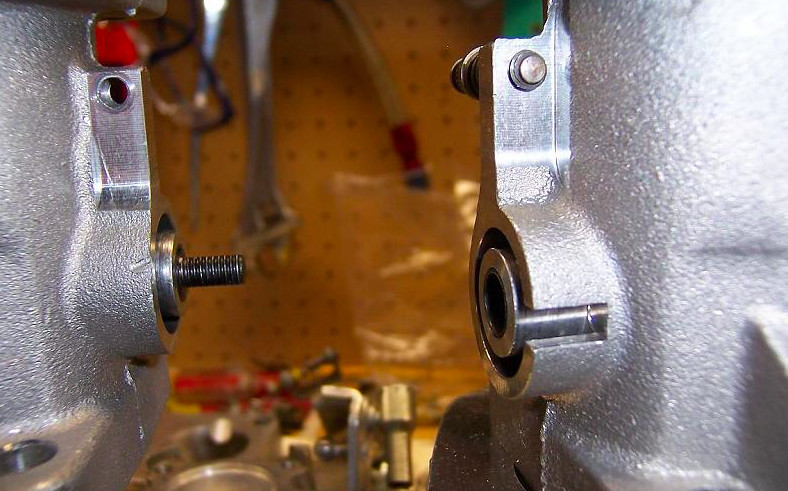
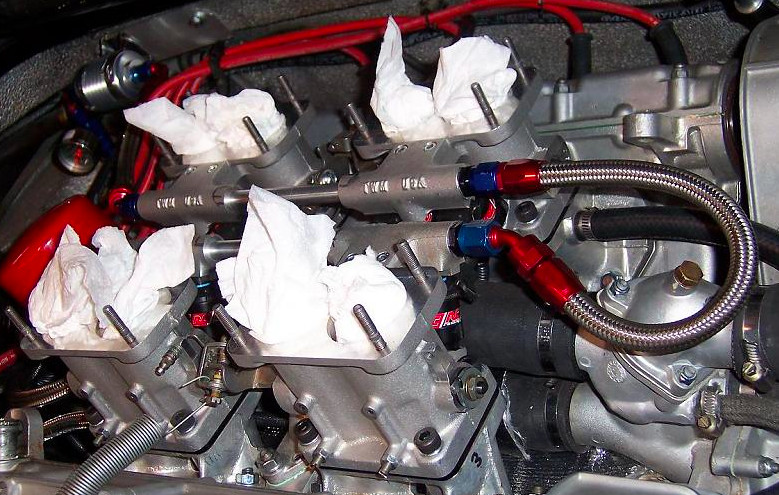
3. I need to change the configuration of the front bank of throttle bodies so the injectors are inboard – both fuel rails should down the middle of the two TBs. In the current configuration, the injector stream will be hitting the manifold wall instead of the back of the valve as it does correctly on the rear bank of TBs (thank you Dave H. for that catch – you rock!). This involves trying to fit the linkage completely different from what I had intended. So I ordered all new levers (4) from TWM – About $150. And am going to use Heim joints and rods as the connecting linkage between the levers. Need to carve out the same notch for the injector stream on the other side of the intake manifold for the front bank also – sheesh.
4. Also had top plates fabricated for all the throttle bodies that will cover up the gaps left with fitting the original air box – (the cutouts that expose the choke and main jet circuitry)
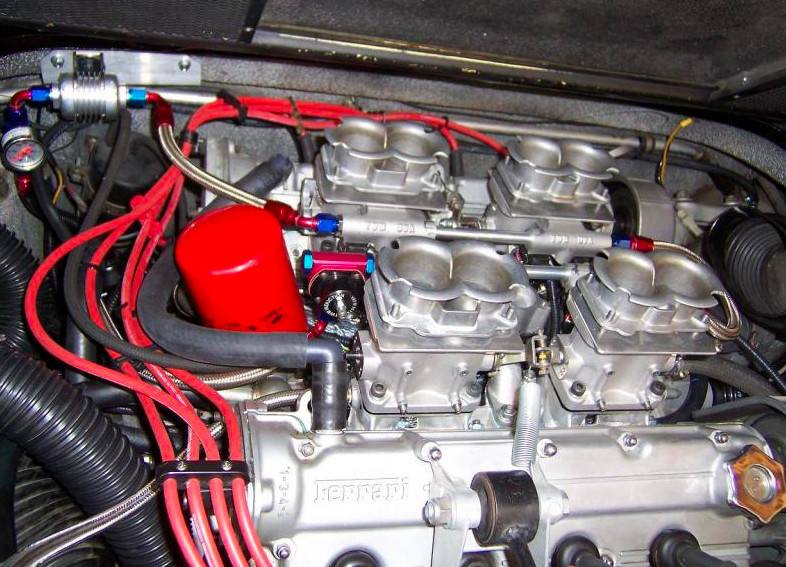
shiny go fast parts!!!
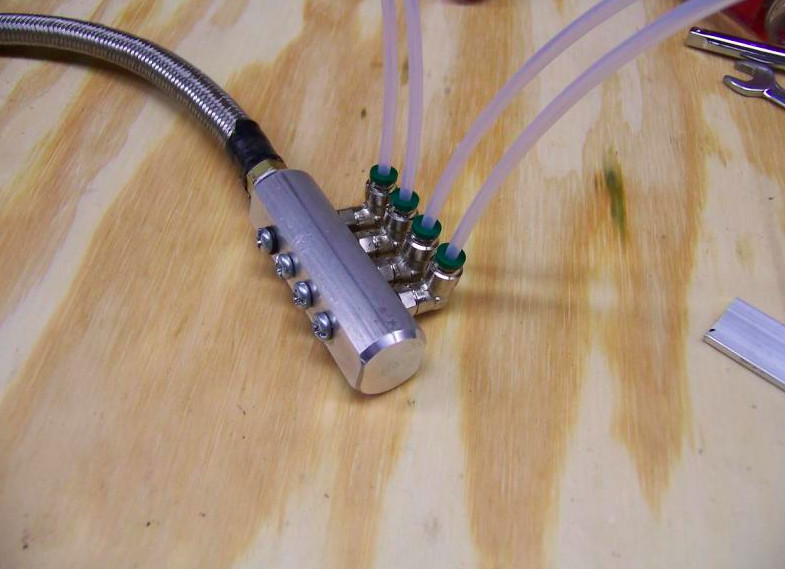
IAC distribution manifold
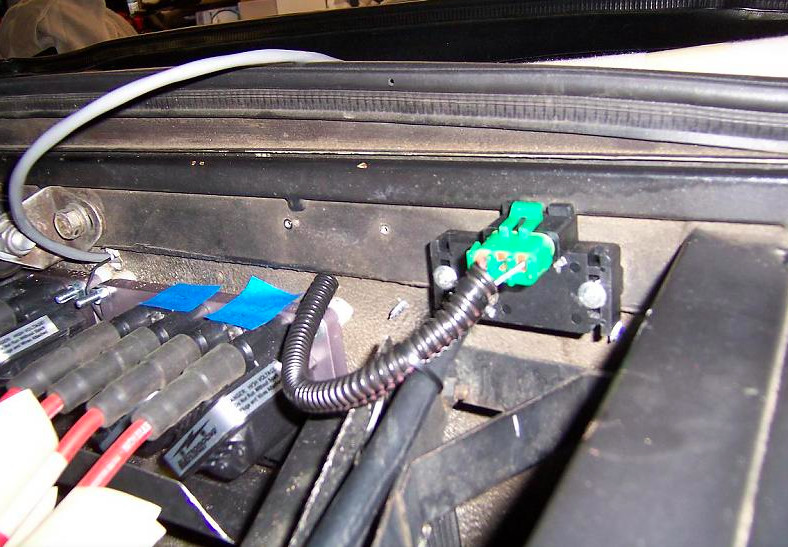
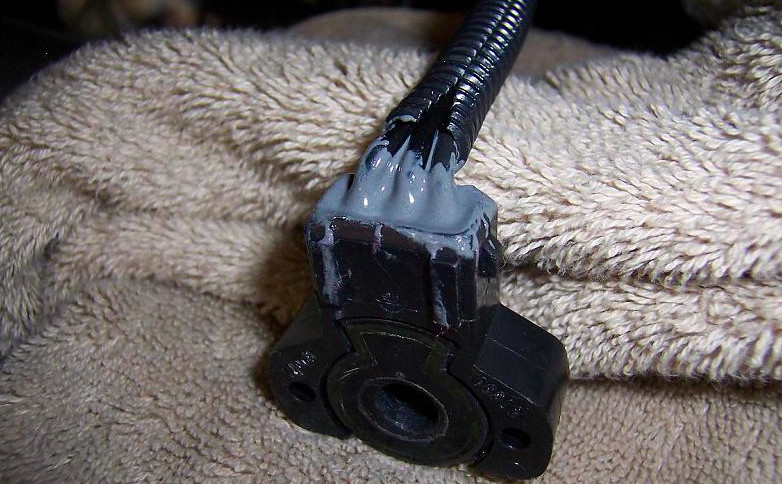
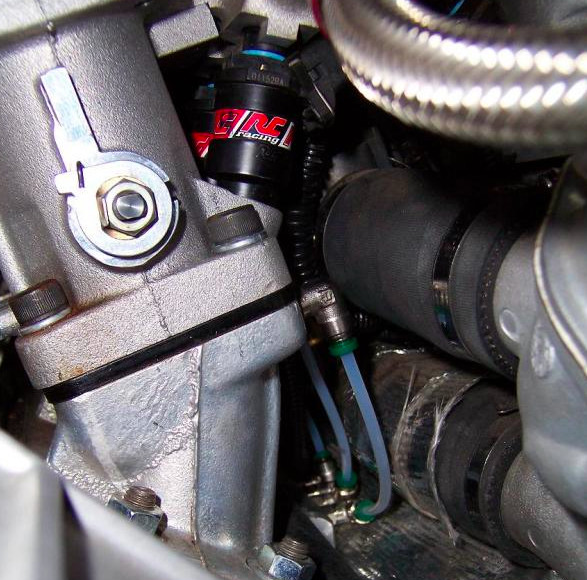
MAT (outside air temp) sensor mounted in inlet duct
new coolant sensor - alongside the old coolant sensor - one is for the tecgt and the other is for the instrument cluster in the 308
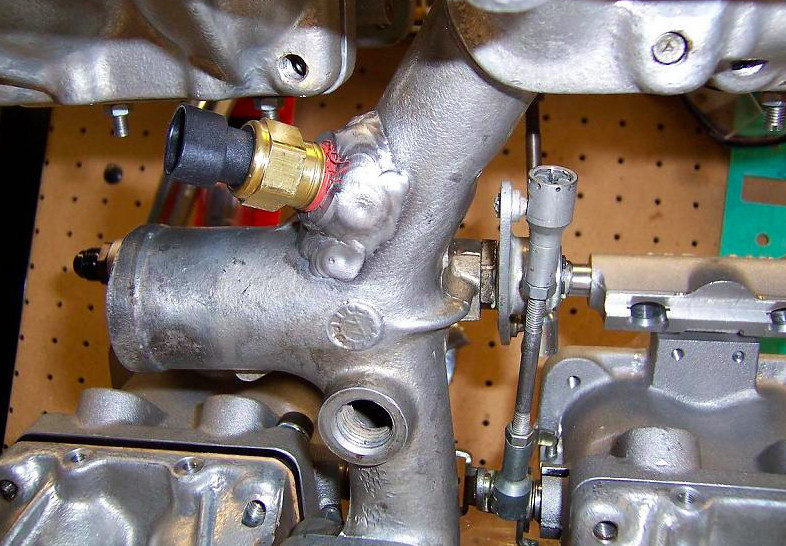
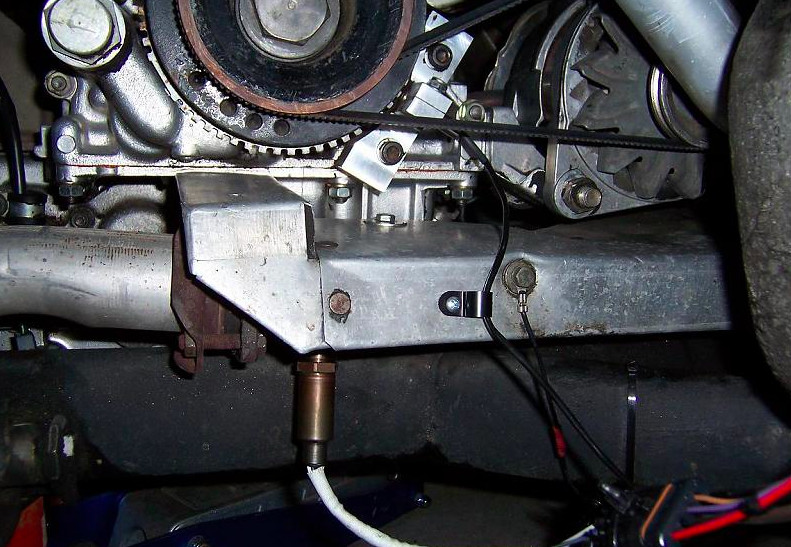
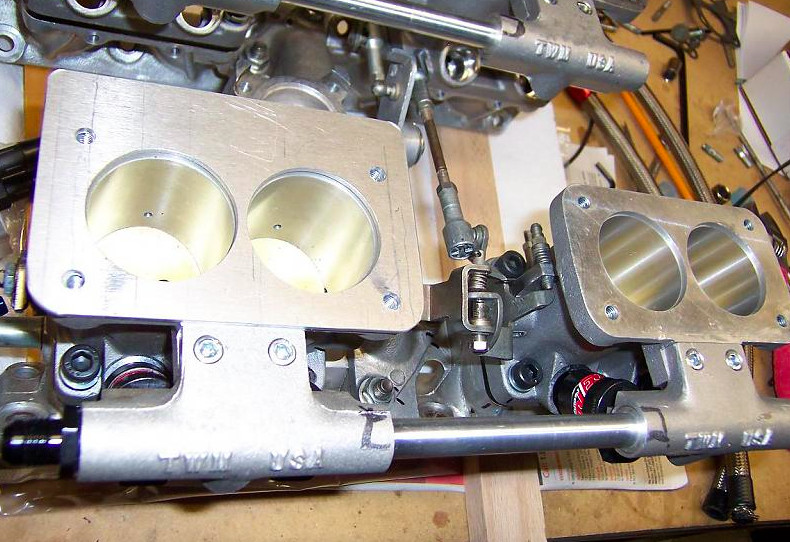
Throttle body work - tapped holes for IAC fitting. note taper in intake manifild cut for injector stream - these are the manifilds that need to be reworked, and have the taper cut on the opposite side for proper direction of injector stream to back of valve - instead of manifold wall.
3-11-2008
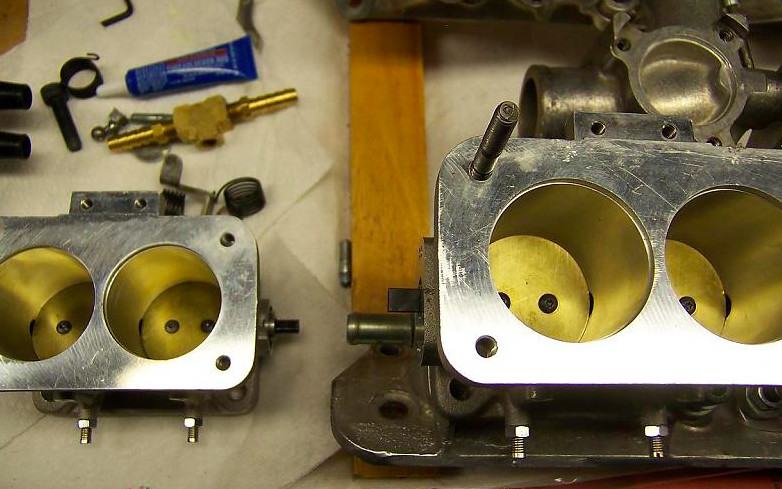
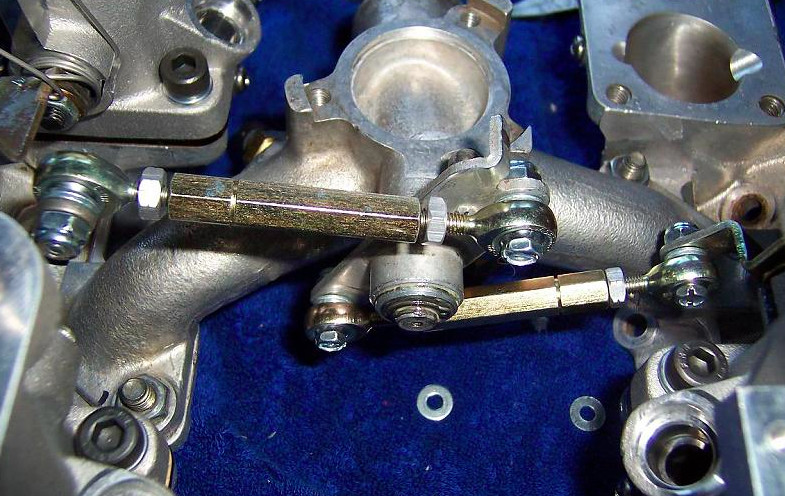
Time for another update. In order to raise the fuel pump high enough to be above the chassis, I had to dump the stock fuel filter. I then cut the bracket on the new pump to fit up higher and to the right of the fuel tank. The new trick flow filter flows 150 GPH (way more than I need), and has a reuseable 45 micron filter. In order for the correct injector spray into the manifolds, I had to rotate 2 of the throttle bodies (front bank) to orientate the injector spray onto the back of the intake valve. Once I did this, the linkage did not want to work correctly, and TWM was a few months out for making new levers for the throttle bodies – I don’t think they would have worked anyway – long story. So, I removed all 4 throttle plates and shafts from those 2 throttle bodies and flipped them so that the throttle plates open in the opposite direction – thus enabling me to use the stock linkage with hardly any issues (barely noticeable in the second pic). In doing this, I will only have one idle adjustment screw active as well as one throttle stop (which will not be a problem because I will use very precise heim joints. And, because of this, I will have to source new springs that rotate in the opposite direction to accommodate switching the throttle plates. We did however, grind down the throttle body casting where the shaft protrudes from the body – to accommodate a better connection for the throttle stop and idle adjustment screw. Heim joint rod ends are on the way, and we will most likely have to fabricate the connecting rod (long nut) in between them.
3-27-2008
some more updates: I am ready to bolt the intake manifolds and tb units to the car. been a long road. heim joint rod ends are incredible. My machinist carved out a throttle stop and idle stop lever for one of the throttle bodies since i lost that functionality by re-orientating the throttle bodies to accomodate the correct injector spray. see pics. Hopefully the next post (in a few weeks at least) i will have good news, ie: car fired up and is tuneable......

4-2-2008
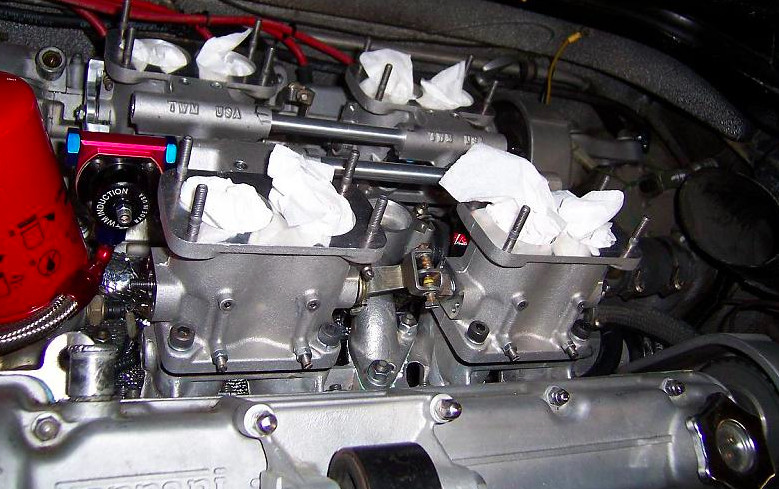
Intake manifolds and throttle bodies are mounted to the car. Fuel rails installed with injectors. Fuel pressure regulator and fuel return system is plumbed in to pasenger fuel tank and bottom of fuel pump (for priming purposes). Injector wiring harness is complete – had to daisy chain 12 volts and get a bit creative since 2 injectors are firing at the same time due to the staged sequential operation of the tec gt. Throttle position sensor had to be reworked because it had to work backwards due to turning around one bank of throttle bodies. Due to turning it around, drilled out the backside of sensor to be fitted on throttle shaft. But then the brake booster manifold fitting was in the way of the connector to the TPS, hence I did away with connector and directly soldered on leads , heat shrink wires and fill with jb weld. Getting there, got to plumb in fuel system input with filter and pressure guage. Need to rework PCV system as the fuel rails are in the way of the crossover PCV tubing – am looking into flex line for this – necessary if I want to go with stock airbox. But for now, I will fit the individual air cleaners for tuning purposes.

4-11-2008
More progress, Fuel return, pressure regulator, filter and gauge all installed. Fuel pressure test passed, pressure now adjusted to 43 PSI. fit check with stock airbox is perfect. Need to redo the PCV system because the fuel lines are in the way. throttle linkage clears everything and is smooth as silk. Injector wire harnes is connected. All sensor parameters (baseline and max) are programmed into the BIN file and downloaded to the ECU. I hope to attempt to start the car up this weekend!!!!!!
4-30-2008
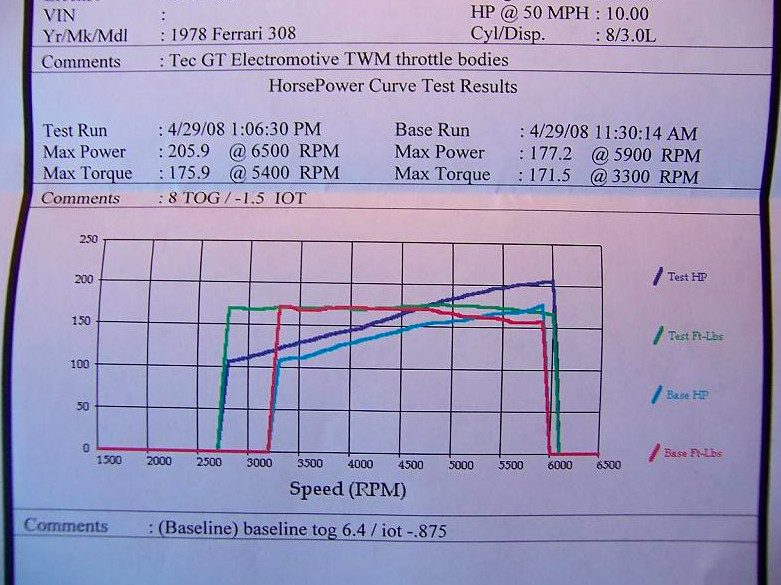
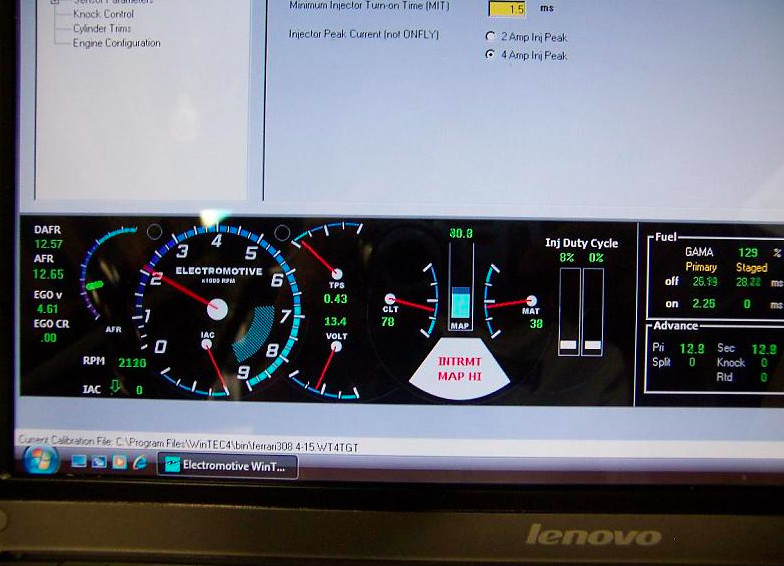
Hi folks. Here is an update on the car so far. Went to the dyno yesterday, and made a lot of tweaks to the software and the car itself (linkage). We backed off the throttle at 6600rpm for the pulls, but as you can see from the graphs, the car was still increasing in power at that point, so, I assume the peak power is somewhere around 7200 – 7800 rpm, since i can pull strong to 7800 rpm while driving. Anyway, the car made 207 HP at the wheels at 6600 rpm. Not bad numbers for a mile hi, although the mechanic said the dyno was normalized for sea level. I think I can make more power, but we had to quit for several reasons. Once the engine got warmed up, the linkage was sticking on the TWMs – I think I can fix that. Also, for driveability, I need to pull MAP from several ports on the intake manifolds rather than just one – so as to smooth out the signal – this fluctuation in MAP made it real hard to dial in. At any rate, I am pleased with my results – up a good 25 hp from my weber setup. The car pulls strong now up to redline – 7800rpm. Where as before I could only pull hard to about 6200 rpm at this altitude with the webers. Once I get these things resolved, I would like to go back to the dyno and do more tweaks. In the graphs attached, solid lines is the good run, and the dotted lines are previous runs the same day – noticeable improvements. Any suggestions on timing? I am starting at 14 degrees, linear to 4000 rpm with 40 degrees, and 40 degrees to redline. also, any comments on the A/F ratio????


6-11-2008
Time for an update on the conversion. The car is running sooo smooth, no lag or any flat spots in the throttle – runs right up to 8000 rpm at altitude without a hitch (the ol webers stopped pulling at 6200rpm at 5200 feet above sea level) – pulls like a mule. And the sound just blows away the webers – possibly due to no restriction in the throttle body throats. Car fires up just by bumping the key and no foot on the throttle. And there is absolutely no vapor lock, and the garage doesnt stink of gas anymore. I am very happy with the conversion, electromotive and TWM. I have noticed that spark plugs that run off the same coil and the same injector firing will have different coloring and I cannot figure out why. Different throttle bodies, but again, same firing from the computer (note electromotive tecgt has phased sequential – meaning I get a waste spark and a waste shot of fuel for the same 2 cylinders). Plug on one cylinder shows perfect tan color – while its sister plug shows much darker and sooty – any comments on that would be appreciated. Got the stock airbox hooked up and bringing in cool air from both sides made a big difference - at the dyno i had individual air cleaners installed and they were pulling in hot air - so i think i am making more power with stock airbox than when at the dyno. Still tweaking parameters with my laptop – starting, accel and decel enrichments, enrichments due to ambient air temp and water temp, but after the last dyno run – my mixture looks to be spot on. I want to hook up a barametric pressure sensor because I think that will work better than relying on the O2 sensor for altitude variations. Last dyno run – was making 221hp at the wheels at 7900rpm and was still climbing!!
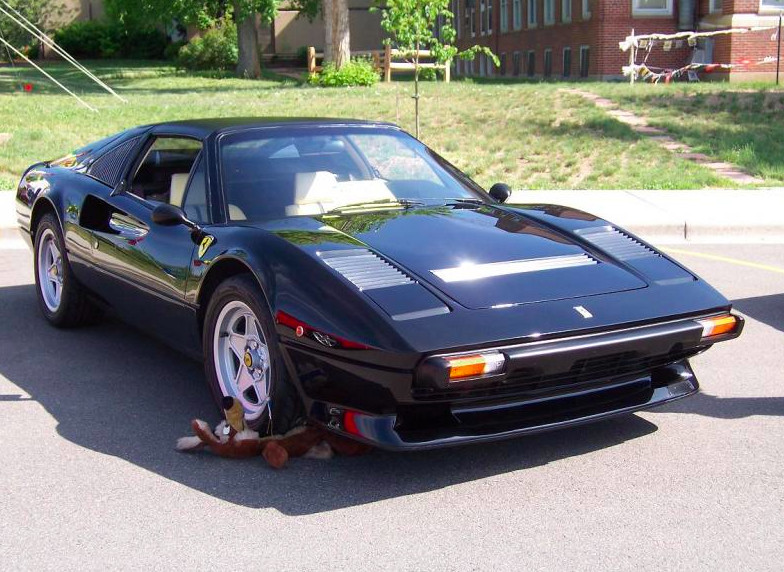
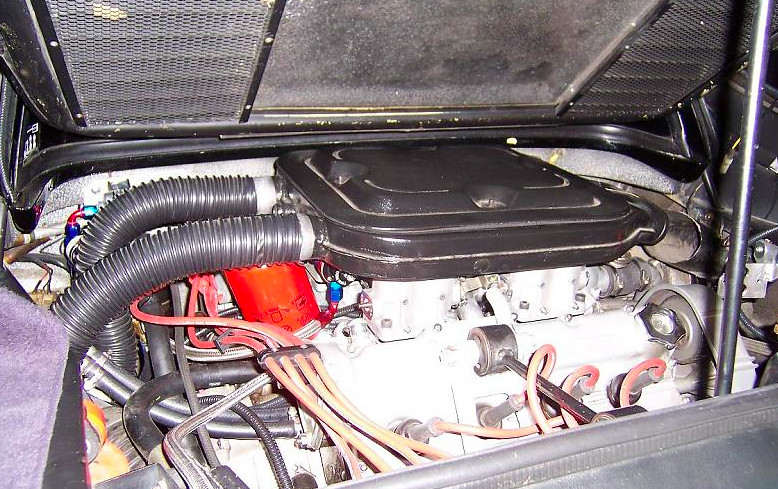
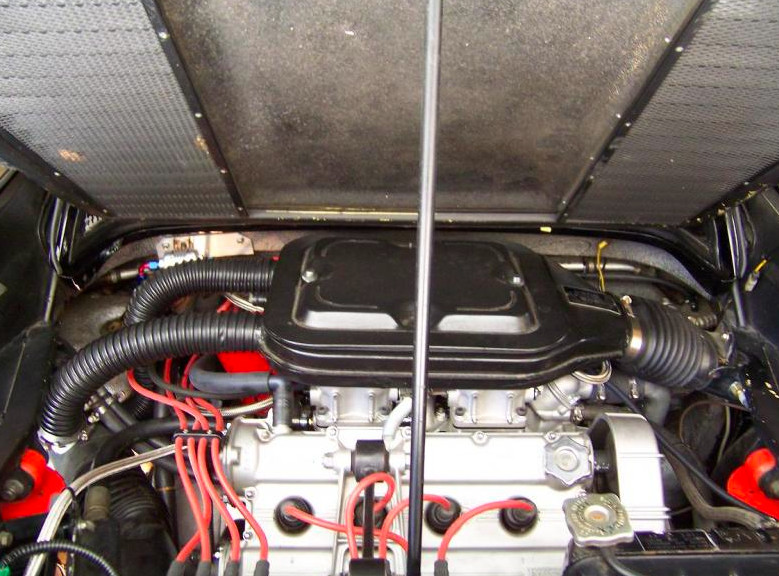
final installation - pretty clean. most folks at the shows couldnt tell i yanked the carbs. since i have the non US model, i had no insulation in airbox. tapping the airbox into the drivers side scoop is letting a lot of cold ram air and giving the driver the sound sensation that the passenger has, and everything clears the oil filter with those two ports instead of one down the middle. (see my thread on modding the airbox)
4-8-2010
Time for another update on the conversion. I have finally installed the vacuum manifold to capture vacuum from the rear bank (4 cylinders) for the MAP sensor. Before, I was only getting vacuum off one cylinder and that was playing havoc with the ECU. With only one cylinder connected, the MAP signal would fluctuate as much as 30KPa for any given load or RPM. Now, with this manifold plumbed in, the MAP readings are VERY stable (fluctuates 2-3 KPa max), which makes for a VERY tuneable setup.
My car runs fantastic now, I don’t think I picked up any more peak HP from before the manifold install because the car was tuned for WOT. But, the driveability is greatly improved, off throttle response, cruising, accelerating and starting are seamless. This has been a great project for me, I learned a lot and this has caught the eye of Forza MAG. Looks like this mod, my car and me will be featured in one of their issues. i will keep you all posted on that!
happy motoring!!!!!!

Great detail!
Posted by Diggymart on 1/10/20 @ 9:41:33 PM