You must be logged in to rate content!
5 minute read

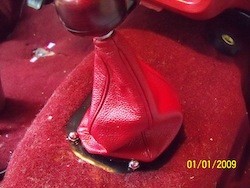
MUSTANG 74-78 SHIFT BOOT
1. To remove old shift boot, unscrew shift knob (counterclockwise) and unscrew and remove cap at top of shifter rod. Unbolt bezel at base of boot. Original bolts are 1/4" washer head bolts held in place on the driveshaft hump with clips and nuts.
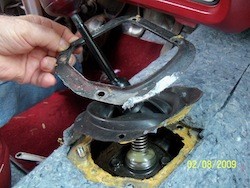
2. Slide bezel and old boot over the top of the shift handle to remove. The original boot has an interior smaller boot molded together with the outer boot. Mine was almost completely deteriorated so I had to improvise on installing the new boot since the upper or outer boot would be the only piece that could be fabricated.
3. Push back any carpet and padding around hole in driveshaft hump. Remove bolts and slide off clips from driveshaft hump. Clean any dirt or debris above and below the opening.
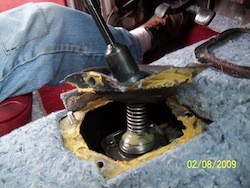
4. To install new shift boot, a lower boot is needed to seal out dirt and grease from getting into the cabin of the car and around the base of the boot on the carpet. A 1979 molded rubber lower shift boot can be used. It needs to be trimmed with a razor blade to clamp under the bezel and punch holes in the flange to match the bolt holes in the bezel.

5. Replace the original bolts with 5/16 x 1 bolts with washer head under surface of the driveshaft hump. Use epoxy to hold the bolts in place from underneath. (If undercarriage has been cleaned the bolts can be tack welded from underneath) DON'T TRY TO TACK WELD WITH GREASE ON THE UNDERCARRIAGE.
6. With bolts epoxyed in place, pull rubber lower boot over top of shift handle and gently past the bell in the handle. It will seal better and there will be less strain on the rubber if it is pulled below the bell. Position holes over bolts and seal into place. Make sure sealant is all the way around the rubber boot and press into place against the metal of the driveshaft hump under any padding or carpet. Follow sealant instruction on curing. Recommend Permatex Forma-gasket sealant - fast drying, hard setting.
7. Install washer and nut on 5/16 x 1 bolt on top of rubber boot. Finger tighten until sealant is dried and hard then tighten snug with wrench preventing rubber from bunching around bolts.
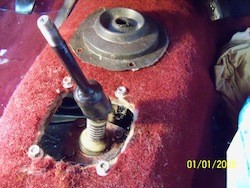
After rubber boot is secured into place, wrap with rubber tape top lip around shift rod as the hole in the boot that fits around the rod is too large. Replace any padding and carpet over rubber lower boot flange keeping close to outer rim of boot bellows.
8. To prepare for installation of the new leather boot, mark the front of the boot. This was decided by the slightly longer pleats. This side will be facing to the front of the car. Place the bezel on top of the flange of the leather boot and position so that the outer corners ease into the outer corners of the bezel. Trim with a razor blade the boot flange to fit under the bezel completely. Mark bolt holes and punch holes through boot flange.

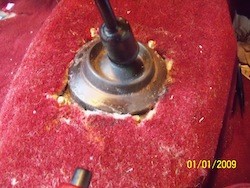
9. Slide new shift boot over shift handle and position punched holes over bolts. Place bezel over bolts. It will go on only one way. Use new acorn nuts to secure firmly into place. Replace cap over top of shifter rod. Screw into place. Screw shifter knob onto shifter rod (clockwise).
ENJOY YOUR NEW LEATHER BOOTS!
Useful tip
You have installed a product made out of genuine leather. As you know, to maintain a leather product in good condition, you should take care of it. We suggest occasionally (every 4-6 week for example) applying some leather conditioner/UV protector to keep your leather from drying up in the sun and cracking.
Redline Automotive Accessories Corp. will not be held liable for any labor, incidental or consequential damages of any kind. Proceed at your own risk.