You must be logged in to rate content!
3 minute read

MUSTANG 2015-18 KNEE PAD COVERS INSTALLATION INSTRUCTIONS
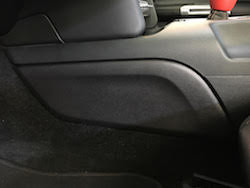
1. Remove the two plastic panels located in the driver and passenger foot wells on the vertical wall of the transmission tunnel. These panels are held on by magnets and plastic clips that are undone by pulling away from the transmission tunnel. Be sure to take your time and pull straight out to avoid breaking any clips. Starting at the forward edge and working your way along the top works well.
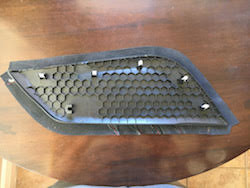
2. Reference view for clip and magnet locations:
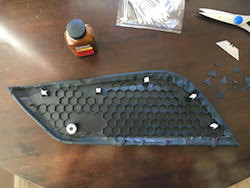
3. Position the new cover on the panel to determine ideal placement. Ensure you have adequate material to cover the corners, and make sure all overlapping material is even and straight.
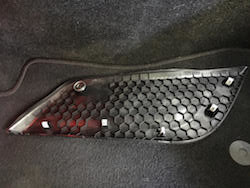
4. Adhere the cover to the panel. Finished panel is shown below for reference. A few tips on this:
-Make sure the adhesive you use is rated for high temperature applications. I prefer a contact cement since it forms a strong bond and the brush-on application is generally less messy than a spray. Make sure to read and understand all application instructions prior to beginning work.
-Start on a large straight section to keep things straight and secure. It'll make dealing with the curves easier.
-While gluing the visible side of the knee pad, only glue on the edges of the factory plastic, about 1/2 inch from the edge. Glue, when it cures, compresses slightly. If you glue the entire surface of the cover, leather will adhere to it and any thickness variations caused by stitching of the pleated panels (if you choose them during checkout) will be more visible. So just glue the outside perimeter of the front of the knee pad, and once either side is cured, make sure to stretch the leather while gluing the opposite side - this will stretch the product thus hiding any variances in thickness effectively
-Although not 100% required, use a new razor blade to cut small triangles in the material overlapping onto curved sections on the back of the panel. This allows the back panel material to sit flat which will result in an easier, more OEM reinstallation. Too much extra material behind the panel can cause it to push out and not sit flat when installed back in the car. Take extra caution and avoid cutting too far if you do this: you don't want these cuts to be visible from the front!
ENJOY YOUR NEW LEATHER ITEMS!
Useful tip
You have installed a product made out of genuine leather. As you know, to maintain a leather product in good condition, you should take care of it. We suggest occasionally (every 4-6 week for example) applying some leather conditioner/UV protector to keep your leather from drying up in the sun and cracking.
Redline Automotive Accessories Corp. will not be held liable for any labor, incidental or consequential damages of any kind. Proceed at your own risk.