You must be logged in to rate content!
3 minute read

ESCORT ZX2 98-02 SHIFT BOOT INSTALLATION INSTRUCTIONS
1. Unscrew the shift knob and pull out the cupholders. To remove the cup holders, grab both cups, and pull towards you and up.
On the side of the central console, take out the two interior clips from each side. Just pull out the central part and the whole thing will pull out.
On the rear part of the central console, there is a screw on each side you have to remove. Put the seats all the way forward and you can get at these easily.
2. Pull the rear part of the central console up and lift it over the emergency brake. Remove the two screws that you just uncovered on the remaining part of the central console.
Pull the last part of the central console towards you to remove it. It is held into the dashboard with pressure clips so use one hand to pull the panel towards the rear of the car, and use the other hand to push against the black part where the cigarette lighter is.
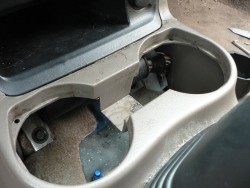
3. Flip over the console piece you just removed, and take out the four bolts holding on the plastic retainer for the actual shift boot. A 7/32 inch or 5.5 mm will work.
Pull back the tabs on the rubber shift boot, and pull off the plastic base. Put the holes from the leather shift boot over the same tabs. It will only fit one way.
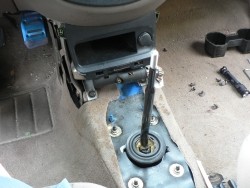
Turn your shift boot inside out, and push the shift knob as high up as you can. This is the tricky part, because you will have to use string to tie the leather the the actual knob to where it is tight enough to stay, but loose enough to where you can still turn the knob. I had to fight with mine several times and will probably end up just taping the boot to the actual knob as a simpler method than the string.
Turn your shift boot right side out, and screw the plastic base plate back onto the center console. DO NOT tighten them very much as you are screwing into pretty thin and possibly brittle plastic. Put the console back into it’s proper place, screw it in at the rear of it, and the clips at the front. Put the second part of the console back into place making sure to re-install the screws and trim clips.
CONGRATULATIONS - YOU HAVE SUCCESSFULLY INSTALLED YOUR NEW LEATHER BOOTS!
Useful tip
You have installed a product made out of genuine leather. As you know, to maintain a leather product in good condition, you should take care of it. We suggest occasionally (every 4-6 week for example) applying some leather conditioner/UV protector to keep your leather from drying up in the sun and cracking.
Redline Automotive Accessories Corp. will not be held liable for any labor, incidental or consequential damages of any kind. Proceed at your own risk.