You must be logged in to rate content!
8 minute read

88-91 HONDA PRELUDE SHIFT BOOT INSTALLATION INSTRUCTIONS
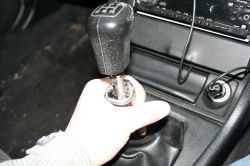
1. First thing to do is remove the shift knob, this can be a little tricky because you might feel as if your going to break something, but don’t worry the knob is made out of rubber and the prong are bi-directional so they will not break when separating the boot from the knob.
To remove the boot from the knob simply grab the upper portion of the boot that has the plastic and chrome coated collar on it and pull it down away from the knob. It will take a little force to separate the collar from the knob nut do not worry they will not break.
Just pull down with force and it should come right off. Notice the rubber tabs on the shift knob. That is what is holding the collar and the knob together.
Next step it to remove the knob itself. Just turn counter-clockwise and it will rotate all the way off the shaft.
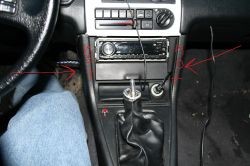
2. Now to remove the boot we need to first remove the plastic housing it is connected into. In order to do this we need to remove six screws holding it on. There are three on the passenger side and three on the drivers side.
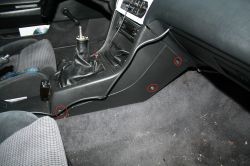
3. The three passenger side screws are located here circled in red. To remove them use a Phillips head screw driver and turn counterclockwise. Be sure to place the screws somewhere where you will not lose them.
Do the same for the driver side screws circled in red.

4. Now we need to remove the e brake housing. This is very simple. All you need to do is remove the two screws located under a small plastic cover on the very end of the housing. Here is the plastic cover covering the two screws we need to remove.
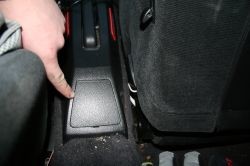
5. And here are the two screws under the cover. Use a phillips head screw driver turn counter clockwise and remove. Make sure not to lose them.
Now to remove the e brake housing pull the e-brake all the way up and pull up slightly on the end of the housing that the shift boot is attached too (the end facing the rear windshield) and slide the e brake housing back and pull up. It takes a little maneuvering but it will come out. This step may have to be done at the same time you remove the shifter housing.
6. Now to remove the shifter housing. it’s a simple pull and pop much like that of removing door panels, except there are no tabs to break. Put your hands on each side of the back part of the shifter housing (the side closest to the firewall). You are then going to pull slightly up and towards yourself ( towards the rear windshield) its going to take some maneuvering to get it all the way out. Grab at the points closest to the firewall. They are the sides opposite the side labeled NOT in red. Do not pull on the part labeled NOT (left and right of radio).
Now with all the housing removed we can remove the shift boot and e brake boot. You will not need to remove the e-brake boot because the boot made by redline is designed to slip over the stock boot for a better fit.
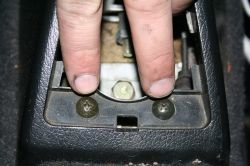
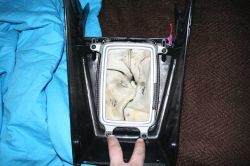
7. Now we need to remove the shift boot itself. Take your shifter housing in your house or wherever you want that has good lighting and will allow you to keep track of your screws. Turn over your housing and you will see a metal bracket holding the shift boot on. Remove the four screws and the bracket and boot will come right out. There are two screws on bottom (being pointed at) and two on top.
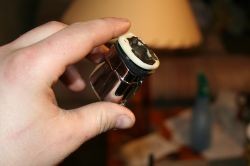
8. Once your boot is off your going to need to either cut out or pull out the little plastic collar that the stock shift knob attaches too ( if you plan on using your stock shift knob) I chose to just cut mine out with a box cutter being as I didn’t plan on using my old ratty boot ever again.
This is what the collar will look like when you get it out. If you lose the rubber seal or its all buggered up don’t worry about it. As you can see my collar has seen better days.
9. Once you get the collar out you need to put it in your Redline shift boot. This is not exactly easy but with some patience you can wiggle it in there and make a very nice fit. Start from the top of the boot and work the bottom of the collar in that way. It seemed harder to try to put the top of the collar in from the bottom of the boot. This is what you’re trying to do. Have patience it’s a tough tight fit but is very nice and snug once you get it on.

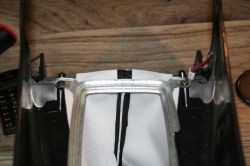
10. Ok now comes a tough part which requires even more patience and precision then putting the collar on. ( for reference the longer portion of the boot faces the rear windshield) We now need to fit the boot into the shifter housing, being sure that it is strait and even. Since one side of the housing is raised your going to need to set it on a table and get something to level out the smaller end. (The end where the shift boot goes) since the redline boot does not have the wire inside the boot we are going to just use the bracket that screws to the bottom of the shifter housing. First get the front most part of the boot set on (front being towards the taller end of the housing with the two screws set farther apart).
Line it up so your stitching is in the middle and is strait . Some of the boot needs to be hanging out for a better fit and for holding the boot down snuggly. Once you get the front screwed down start working your way from top to bottom working the boot through the bracket going down the sides and pulling it through. Do this until you get to the other side and screw it down. If you need to screw down the two bolts ¾ of the way and re position your boot to ensure it is strait and the seams are in the middle of the housing.
Now you're ready to enjoy your new redline boots. Just follow the directions in reverse to re install your housings.
Useful tip
You have installed a product made out of genuine leather. As you know, to maintain a leather product in good condition, you should take care of it. We suggest occasionally (every 4-6 week for example) applying some leather conditioner/UV protector to keep your leather from drying up in the sun and cracking.
Redline Automotive Accessories Corp. will not be held liable for any labor, incidental or consequential damages of any kind. Proceed at your own risk.