You must be logged in to rate content!
8 minute read

Window Regulator Replacement DIY
Compliments of mitch14 @ http://acurazine.com
2-7-2010
credit goes to BOBUTLER for the original write up and pics, and for starboy2nv for providing the link for it for a while
now that the website is down, i'm just gonna copy it back up here, since i copied all the writing/pics off of the website before
The Acura CL forum as been a wonderful resource for me, so I figure it's only right to give back by documenting my window regulator replacement. I am not the most mechanically inclined guy, but have learned over the years that with patience, forethought, (and the forum) I can surprise myself and actually fix something. It's satisfying, and nice to avoid being ripped off by the dealer.
Window Regulator Replacement - Driver's Side
6/3/05
A quick search on the Acura CL forum makes it clear that these go out a lot. This DIY was done on my '99 Acura CL 3.0. Some say this is a 30 minute job, and I might be able to accomplish that now that I know how. If you're not too confident, take your time and allow a couple of hours, maybe more for bandaids and beverages.
Parts: I got mine on eBay from "am-autoparts" seller for $37.95 plus $15 shipping. UPS shipping was 5 days across the country. It was listed as driver's side for a 94-97 Accord 2-door. A few concerns: It is slower up than my previous motor, by about 1 second. The one-click auto-down (driver's side) no longer works. There is a clanking sound when the motor activates which was not present before.
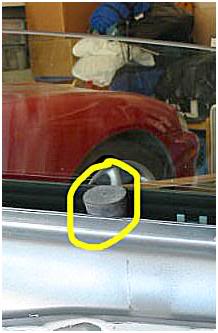
Step 1 - Remove / Drop Plastic Sheeting:
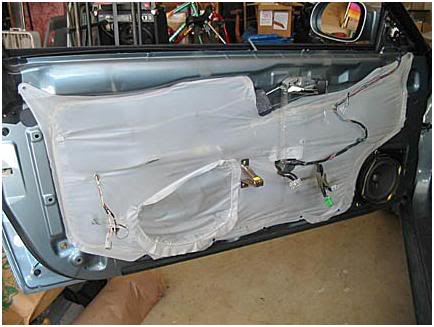
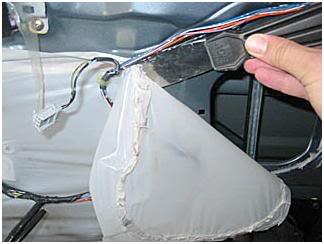
I was worried about removing the white plastic sheeting, but it was not a problem. I understand the sheet is an important moisture barrier that should be retained. I used a metal putty blade to slowly separate it (and the goopy sealant) from the door skin. The sealant remained flexible and worked just fine for re-attaching the sheeting. I only removed the sheeting from the areas I needed to access, and let it dangle down. The sealant is sticky, so watch out. There is a fastener holding the sheeting at each corner of the door. Some wiring harness retaining clips go through it, so I removed them with my putty blade and needle nose pliers. There is also an arm-rest bracket (pictured) that I removed (2 screws) in order to move the sheet. I immediately re-installed this, just to keep track of the screws and where it was supposed to go.
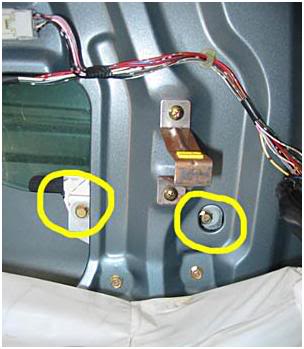
Step 2 - Identify the Regulator Bolts (4 in yellow circles), Motor Bolts (3 in squares), and Window Lift Bolts (2 yellow arrows). All are 10mm:
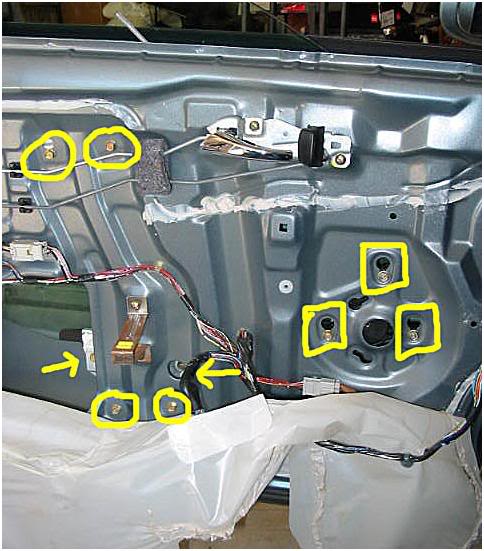
The window lift is the part of the regulator that attaches to the window with 2 bolts. Access to the right bolt is through a round hole in the door skin (right yellow arrow). Thus, the lift (and window) must be positioned so you can get at the bolt through this hole.
Step 3 - Position the Window:
From the big opening, you should be able to lift up the window to position the lift bolts for access. Some have suggested using a piece of wood to prop up the window from inside the door (I couldn't find a piece the right size), others have used wooden wedges between the window and top of window sill (I couldn't find any suitable wedges either). I had good success with a rubber stopper in the window sill. Make sure you get the window firmly stopped - you don't want it dropping down and breaking!
Step 4 - Remove Window Lift Bolts - 2, 10mm.
Step 5 - Raise the Window all the way Up:
The hardware will be easier to remove if the window is out of the way. Carefully raise it up and re-position whatever stopper you are using.
Step 6 - Remove Regulator Bolts - 4, 10mm.
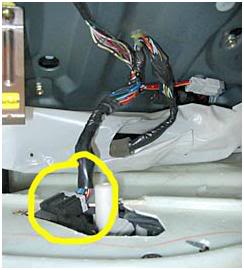
Step 7 - Disconnect Motor Wiring Plug and Harness Clip:
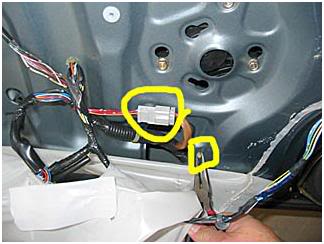
This wiring plug is easy to reach and disconnect (unlike some in the door panel removal). Notice the little harness clip coming through from the inside of the door skin (yellow square in photo). I used needle nose pliers to compress and push this clip through to the inside (where it remains attached to the motor harness). My replacement regulator/motor had this clip already attached.
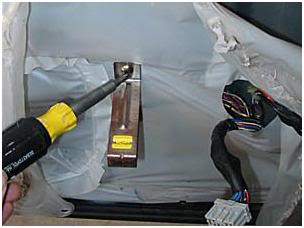
Step 8 - Loosen 3 Motor Bolts.
Step 9 - Remove Regulator and Motor:
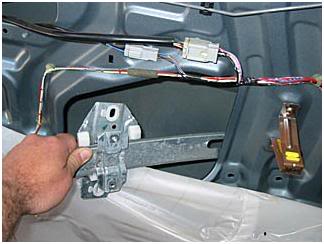

You can jiggle the regulator around and remove it from the large opening. It's cables will be attached to the motor, so you can only get it out so far.
Because the motor bolt holes in the door skin are "slotted," you can just loosen the bolts. The photo shows access through the hole to the right of the motor. When you're ready, you can reach in, and lift up the motor. Put your other arm in the big opening from the left, and meet the motor inside the door, and pull it out the big opening.
Remember to save all the bolts for the new hardware.
Step 10 - Insert and Install New Regulator and Motor:
This is basically the reverse of what you just did. If you pre-attach the 3 motor bolts and leave them loose, you can hook the motor into its location from the inside and then tighten the bolts. Connect the motor wiring harness and get that inside clip positioned and punched through. Positioning the window regulator and re-attaching the 4 bolts is a snap. I sensed that these bolts could be stripped if over-tighened, so I didn't overdo it.
Note: I was a bit concerned about binding, and did not fully tighten the regulator bolts until after step 13, just to let the hardware position itself. I'm not sure this was necessary.
Step 11 - If necessary, hook up the power window harness and position the window lift:
Looking from the top, you see the door skin and the inside of the door panel, with the power window harness re-connected.
My new regulator lift was not in the right position to line up the bolts, and I could not move it by hand. I had to bring the door panel over and hook up the power window harness, and then use the switch to position the lift. Then, unhook the harness, of course, and get back to the job at hand.
Step 12 - Lower the window by hand, Install the lift bolts:
Remove your stopper and line up the window with the lift bolts. I found that the window rested securely on the lift, and did not need any other support while the bolts were installed. Again, I don't think the bolts want to be over tightened.
Step 13 - Test the window by re-attaching the switch from the panel.
(Does your one-touch down still work? Mine didn't.)
If you waited to tighten the 4 regulator bolts, tighten them now.
Step 14 - Re-install the Door Panel:
(I have a DIY in the works for this . . . check back ;-)
Step 15 - Pat yourself on the pack, boast loudly to your family and friends, run the window up and down until you're sick of it, and then do something fun with that $300 you didn't pay to the dealer service!