You must be logged in to rate content!
10 minute read

DIY: 1st Gen Acura RL Instrument Cluster LED Bulbs
Compliments of 97_RLer @ http://acurazine.com
1-30-2008
DIY: 1st Gen Acura RL Instrument Cluster LED Bulbs
I would share the instrument cluster LED bulb conversion on 1st Gen RL. I bought the following T6.5 3-LED bulbs from an eBayer ID, warden_jp2002. The seller is an eBay power seller and lives in Hong Kong. The seller is an expert on LED bulbs and ships the bulbs so fast. The most of buyers can expect to receive bulbs in 2-5 business days.
Disclosure: I'm not related with the seller anyhow.
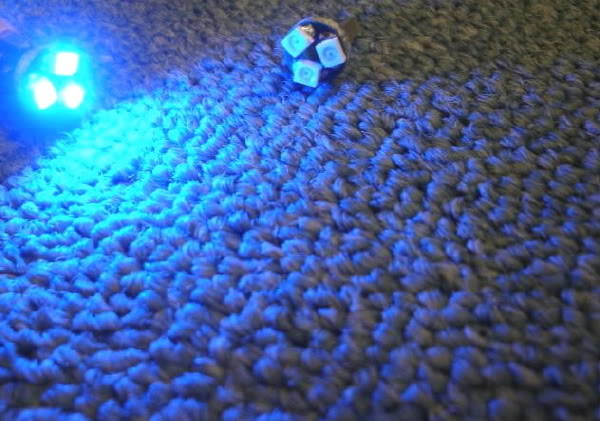
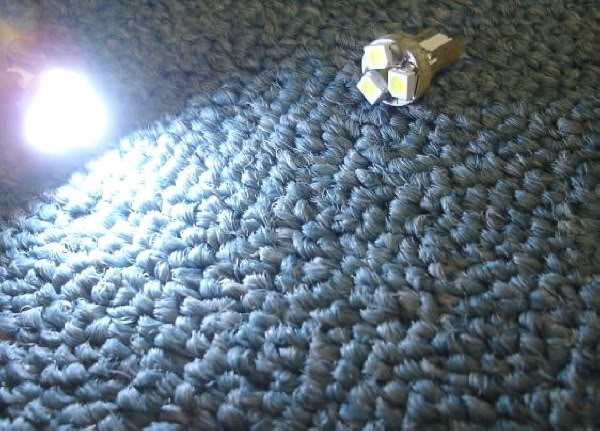
Anyway, I bought the 4 pairs of Spark blue and 2 pairs of Xenon white LED bulbs from him at $18 ($3 x 6 pairs) plus $6.80 (shipping). What a big deal?
The seller is no longer listing these bulbs on eBay, but you may ask him to list them or search on google to find the same LED bulbs. These are wide angle LED bulbs (Cross reference: #24 or T6.5) and 3-power LED wedge bulbs for using in instrument panel and gauges working at
12V. (FYI: #74 blubs (5 mm) are not right size on our RL, and single LED bulbs are not bright at all. They are not wide resulting a dim area. I learned it from a trial and error)
I'm not writing how to disassemble the instrument cluster in this thread. You can find a decent how to remove the instrument cluster if you search on this thread. (Caution: You must be very gentle to unscrew and tighten screws on the back panel of the instrument cluster. Otherwise you will mess up the whole cluster. And also there are two types of screws so you must memorize which one goes where.)
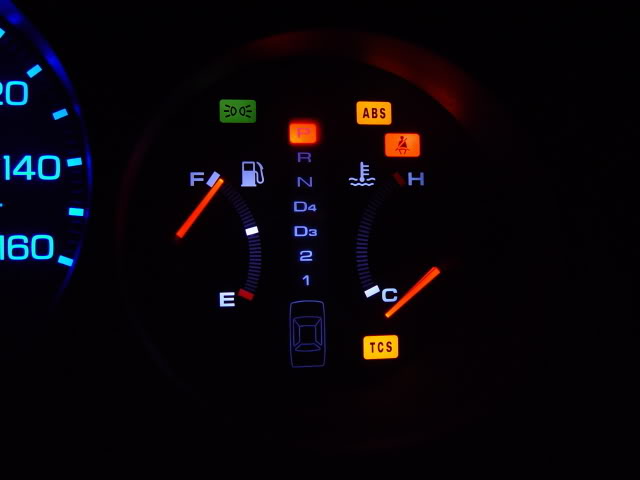
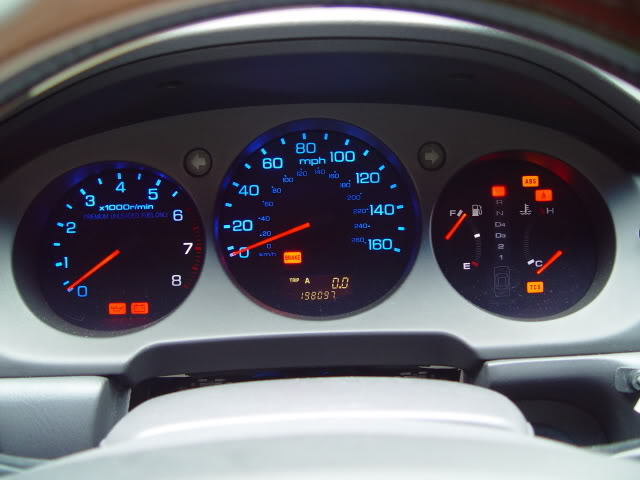
Here's some photo of the 3-LED dimension and installed photo on my RL.

2-1-2008
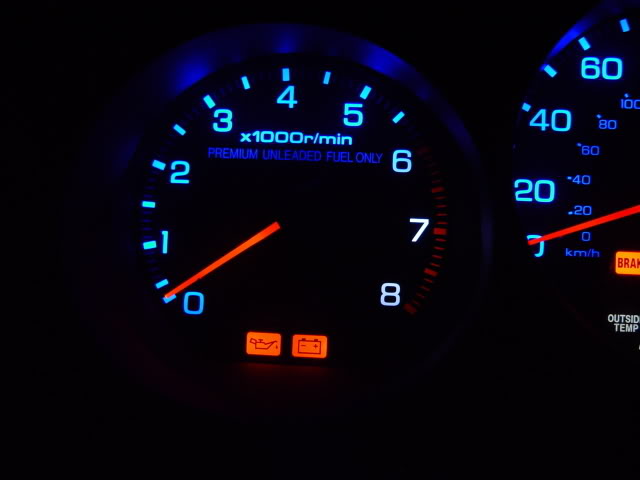
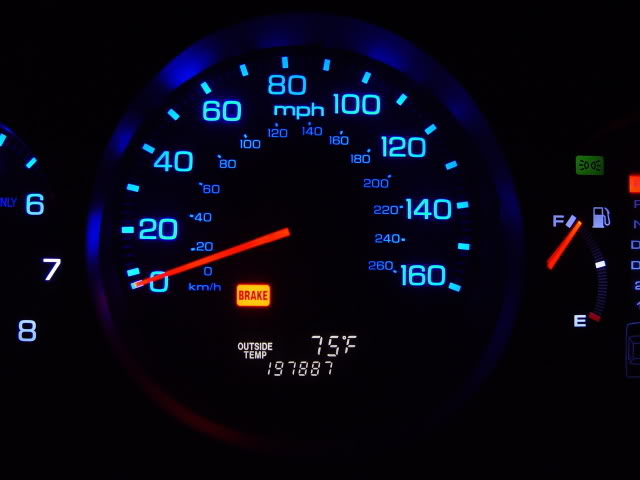
Basically, it is funtioning the same like normal filament bulbs. And yes, you can adjust brightness, and it is bright enough during the day too (it may not be the same brightness to the filament bulbs which gives all wavelength lights since the LED bulbs only emit very narrow wavelength light correspondent to their color). The brightness can be controlled by a control knob located below the TCS and Cruise control switch, not by the bulb or LED itself.
2-2-2008
Here are some more pics for your reference.........
2-3-2008
I had no time to write this procedure recently. But can't put it off since many of you asked............ And here it is!
It involves the removal of shift selector console, audio unit and climate control console, and instrument panel to remove the gauge cluster. You may need to refer the repair manual for better understanding.
1. Unscrew the shift knob.
2. Pop off the black gear select cover. There are four clips to pop off.
3. Pop off the wood console panel and pull it out to access the two bolts at the bottom (96-04). There also are four clips to pop off.
4-1. Remove the center air vent (96-98 only). There are eight clips totally. Four are up and the other are down of the center air vent. Insert a flat-head screw driver under the center air vent to pry the clips up and pull it then insert the screw driver upper the center air vent to pry the clips down and pull it gently.
4-2. Remove the two bolts on top of the center console, then, carefully pull the climate control and audio unit assembly out. You don’t need to pull it out completely (96-98 only).
4-3. Remove the center console lower carpets from each side (99-04 only). You can see a screw bolt each side. Unscrew them and then, carefully pull the climate control and audio unit assembly out. You don’t need to pull it out completely.
Now you can start to remove the instrument panel.
5. Remove the two screws located at the upside of the instrument panel.
6. Detach the four clips by gently pull the right and the bottom of the instrument panel.
7. Pull the instrument panel form the right side and top down. Use a flat-head screw driver to push the two clips from the left side air vent and pull the instrument panel.
8. Remove a connector for select and reset switch.
9. Remove 4 screws holding the gauge cluster.
10. Pull the gauge cluster and disconnect the two connectors on top back side of it.
Now the gauge cluster is out and you need to remove the back panel of it to access the 10 bulbs.
11. Remove three screws and pull the white plastic face back plate. DO NOT try to remove the front plate of the gauge cluster and DON’T touch any needle of the cluster. Otherwise, you will need a new gauge cluster.
12. Remove totally 20 screws from the back panel. There are two types of screws (6 and 14 screws). The description of the screws is shown on the board but you must not be confused with them.
13. Remove the board by pulling and swinging it.
14. Remove the 10 filament bulbs and replace with the amazing LED bulbs. LED bulbs have a polarity so you have to place them in right direction. You need to figure out which side is positive on the board. You’d better check which side is positive on each LED bulb by a 12V source even though the polarity is written on the LED bulbs. Manufacturers used to label the polarity wrong on the bulbs. It happened on me, and 4 out of 12 LED bulbs had the wrong polarity indication.
15. Installation of all things is reverse. (Caution: DO NOT push or over-tighten those 20 screws on the back side of the gauge cluster board when you unscrew or re-screw them. The plastic board is easy to be marred.)
FYI: Don’t buy the wire-lead wedge type LED bulbs. They are easy to be non-functional when you push them into the wedge base because the wire-lead between the resistor and LED is apt to be broken. The LED itself has 180,000 hours of lifetime. But all LED bulbs working on 12V directly have a built-in resistor which has 47K ohms. LED itself is only working at 3.2-3.6V, thus, it requires a resistor to work at 12V properly by ohm’s law.
Please correct me if I’m wrong. Pleae put up with wrong grammar if any........^_*
2-9-2008
A number of folk asked me where they can buy the LED bulbs. So I searched the internet for about half an hour. At first, I’m sorry but I had misguided you that the cross reference for RL’s gauge cluster bulb is #24 but #37 (6 mm) is right bulb. As I told you #74 (5 mm) is smaller than OEM bulbs. Anyway, you can search on the internet, “T6.5 3-LED bulb”, then, you can find the same bulbs that I bought. Google will show you a number of Chinese websites. I don’t know you can directly place an order at there or not.
Anyway, the best way to get the LED bulbs that I would recommend is email to eBay ID, warden_jp2002. I’m sure that he is the cheapest and fastest in the world.
Another choice is……….
http://cgi.ebay.com/PAIR-12v-T6-5-WE...QQcmdZViewItem
I found the seller on eBay (ID: brightlightautoparts) who are in Australia. The seller are selling the same LED bulbs and a pair of the LED bulbs at AU $8.50 plus AU $15.00 shipping to USA. So expensive!!!……..
Another choice is ………
http://cgi.ebay.com/T5-37-Wedge-12V-...QQcmdZViewItem
The eBay seller (ID: p0o0ohbear) is also from Australia. The LED bulbs are not the same type but are also 3-LED wide angle bulbs. They are selling at AU $3.95 as a pair plus AU $6.00 shipping to USA. Each additional shipping fee is AU $1.00.
Good luck to find good LED bulbs at cheap price……….
4-8-2008
Here is a good news!
Finally the eBay seller, warden_jp2002, lists the same bulbs on eBay at the cheapest price. The title is "2pcs 24 T6.5 Instrument Panel 3 LED Bulbs".
Here is the link.
eBay Motors: 2pcs 24 T6.5 Instrument Panel 3 LED Bulbs(Blue/White) (item 190212426319 end time Apr-12-08 03:17:18 PDT)
The seller is selling only spark blue or xenon white bulbs. To properly illuminate red color region in the gauge, you have to choose xenon white bulbs in that region. Blue LED bulb cannot illuminate red colored region making dark in that region.
5-14-2008
Your D4 filament light bulb is out of lifetime. The same thing happened to me because you agitated all the bulbs which were weakened by aging causing some of them broken.
In my case, I exchanged the D4 bulbs with 1st gear bulb which I never use it. You may swap the bulb with some other in the guage you don't use at all or buy an wire-lead bulb.
5-20-2008
You can check the LED polarity with 9V, 12V, or 14.4V tool battery. Don't worry about LED burn out. LED will do nothing even though you connect it in wrong polarity.
The only error and trial required is to figure out which side is positive on the board. You may install a LED bulb on the board and connect wire harness to light it up and then you will know.
Or you may install all LED bulbs on the board regardless of polarity and connect wire harness to light them up. Some of them will on and the others will off. Now you reinstall those LED, which were not on, in reverse.