You must be logged in to rate content!
4 minute read
DIY audio 'aux in'
Compliments of chusteveb @ https://acurazine.com
6-17-2005
I've had a lot of success with this version of an audio 'aux in' so I'll share it with you all.
Installing an ‘aux in:’
Obtain 4 relays all of them need to be 5 pole. You can find them at any car audio/ alarm install shop.
Also obtain a RCA cord with at least one side being a female end for both left and right channels (the other end will be cut off and discarded) long enough to go from your relay pack in the trunk to the desired location of your ‘aux in’ connection (up front under the glove, center console, etc.).
Don’t forget about the switch so get one of those if you haven’t already.
You will need to install a switch up front with one side of the switch coming from a 12V source (be safe and fuse it) and the other side going to the set of 4 relays in the trunk.
On the relays you will see numbers adjacent to each of the 5 prongs respectively: 85, 86, 87, 87a, and 30.
Take all 4 relays and jump all of the 86’s together and tie in the wire coming from the switch containing the 12V source.
Take all 4 relays and jump all of the 85’s together and tie in a wire that runs to ground.
On the backside of the right rear quarter panel in the trunk is the XM unit. Remove the trunk liner to access this unit and remove the 3 10mm bolts that hold this unit to the trunk support.
The XM unit will have 2 plugs, one is an antenna plug, and the other is the main harness. Remove or cut open a section of the black flex-lume and expose the wires connected to the main harness.
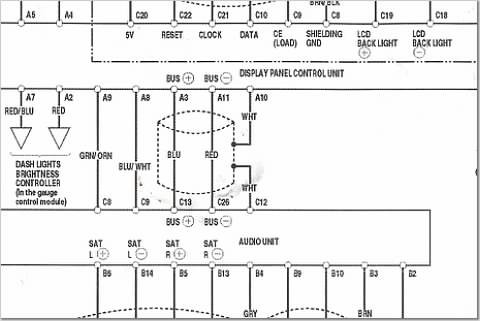
Using the schematics I’ve attached find and cut the appropriate 4 signal wires containing positive and negative for both left and right channels: red, green, white, and black.
Red is the left positive channel, attach the end coming from the XM harness to 87a on the first relay; take the other end of the red wire going into the car and attach it to 30 on the first relay.
Green is the left negative channel, attach the end coming from the XM harness to 87a on the second relay; take the other end of the green wire going into the car and attach it to 30 on the second relay.
White is the right positive channel, attach the end coming from the XM harness to 87a on the third relay; take the other end of the white wire going into the car and attach it to 30 on the third relay.
Black is the right negative channel, attach the end coming from the XM harness to 87a on the fourth relay; take the other end of the black wire going into the car and attach it to 30 on the fourth relay.
Take the RCA cord and from the relay pack route the female end of the RCA cord to where you want your ‘aux in’ to be located.
Cut off the end of the RCA cord by the relay pack to expose the positive and negative of both the left and right channels of the RCA cord.
Carefully strip both the positive and negative of the left and right channels on the cord to expose the bare wire.
Attach the left positive channel of the RCA cord to 87 on the first relay (relay with the red XM wires).
Attach the left negative channel of the RCA cord to 87 on the second relay (relay with the green XM wires).
Attach the right positive channel of the RCA cord to 87 on the third relay (relay with the white XM wires).
Attach the right negative channel of the RCA cord to 87 on the fourth relay (relay with the black XM wires).
Reattach the harness to the XM unit and carefully reinstall everything.
Testing your ‘aux in:’
With the source selected to XM and the switch in the ‘off’ position, XM radio should play as normal.
With the switch in the ‘on’ position, whatever is connected to your aux in should be heard.