You must be logged in to rate content!
15 minute read
BMW 650i / 645Ci / E63 / E64 Oil Change and Check Control Reset DIY (Do It Yourself) – with Pics
Compliments of Yorgi @ bimmerfest.com
12-27-2010
OK guys here is my first E64 DIY. Hope it helps.
BMW 650i / 645Ci / E63 / E64 Oil Change and Check Control Reset DIY (Do It Yourself) – with Pics
Disclaimer: I am not a BMW technician. This article is provided freely for entertainment purposes only and does not come with any warranty. Use the information in this article entirely at your own risk. Wear eye protection while doing any oil change –oil is HOT. NEVER work under a car that is hoisted by a hydraulic jack only. Failure to use jackstands or to use wheel chocks could result in serious injury or death. Ensure the car is on a level and stable surface.
The pictures below show a 2006 650i cabriolet with units in kilometers, US cars will have units in miles. The procedure for a 645Ci, 550i, 545i should be relatively the same. Part numbers are based on information available at time of article creation. Check with your dealer to ensure the correct filter and synthetic oil is used for your application.
I tried to include enough detail for the first timer DIY'er, the experienced DIY’er can probably make do with the pictures and bolded text only. If this is your first oil change it should take about 1 hour, an experienced DIYer can probably finish in less than 30 minutes.
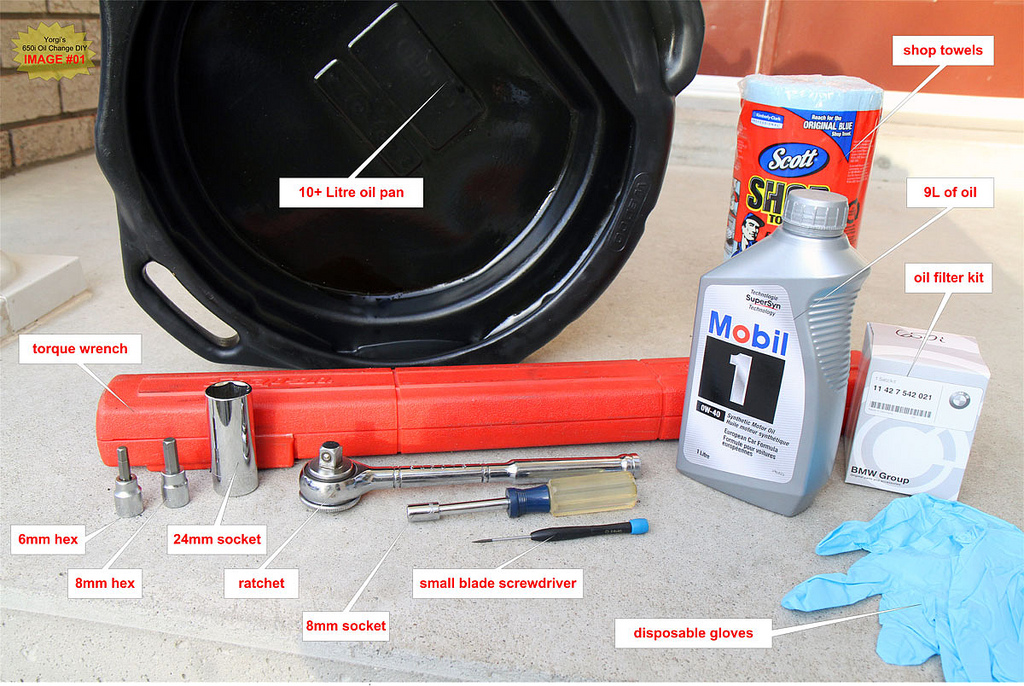
A. Supplies you will need to pre-purchase from the dealer or online:
Oil Filter Kit - includes: filter element, 2 O-rings, drain plug crush washer (~ $15)
For E63/E64 650i – BMW Part #: 11427542021 (also applies to: E60 550i, E65/E66 750i/760i)
For E63/E64 645Ci – BMW Part #: 11427511161 (also applies to: E60 545i, E65/E66 745i)
9 Liters of suitable BMW LL-01 approved synthetic oil (~ $5/Litre)
Examples of approved oil:
- BMW 5W-30 synthetic oil (available at the dealer - Part # 07510017866)
- Mobil 1 0W-40 synthetic oil - European Formula (available at Advance Auto, some Walmarts and many other locations. At Canadian Tire/PartSource in Canada)
- German Castrol Syntec 0W-30 (Available at most AutoZones and at some Walmarts in Canada) The bottle MUST say “Made in Germany”, do not use “Made in USA” Syntec.
B. Tools Required:
24mm socket – for filter housing (6 point preferable to prevent damage to plastic housing)
8mm socket – for filter cover
8mm hex socket – main drain plug
6mm hex socket – filter housing drain plug
Torque wrench capable of 10Nm and 25Nm (5 lb-ft and 18 lb-ft)
Ratchet wrench for sockets
Large 10+ quart oil drain pan – careful, many drain pans are not this large
Rags / shop towels
(A) Floor jack with jackstands or (B) Rhino ramps or (C) standard ramps with 2x10 “starter” boards
Wheel chocks
C. Optional:
Disposable gloves are a good idea
Needle nose pliers or jeweler sized blade screwdriver to remove O-rings
Funnel
Large zip-lock freezer bag for filter element disposal
D. Before you begin:
According to the BMW TIS (shop manual), engine oil temperature must be greater than 70°C before changing. Go for a ~10 minute drive and watch the oil temp gauge at the bottom of the tachometer. Note that oil takes a lot longer to warm up than coolant. Warming the oil speeds draining and also helps suspend any particles/sludge that may have settled in the bottom of the oil pan, which will then be removed with the drained oil.
E. Oil Change Steps:
1. Raise front wheels
A) Ramp method
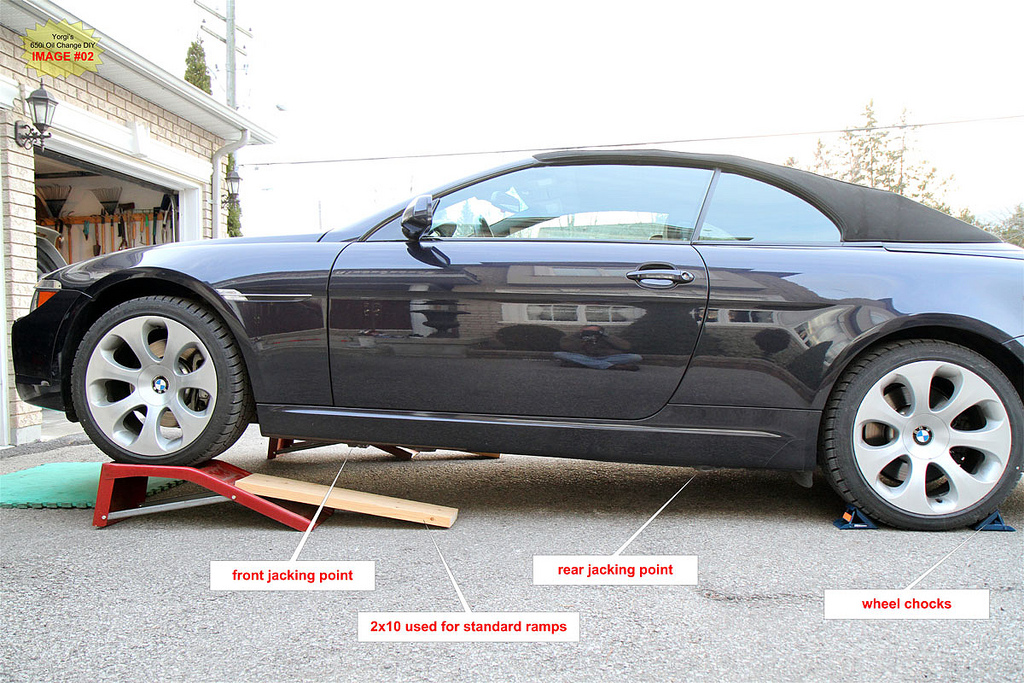
Drive the car up onto Rhino ramps. If you have standard metal ramps, use 2x10 boards in front of the ramps to avoid scratching the bottom of the front bumper. It is not recommended to use standard ramps on hot asphalt; they will sink into the soft surface. Some people like to use rubber floor mats under the ramps to prevent the ramps from slipping. (see IMAGE #2)
B) Jackstand method
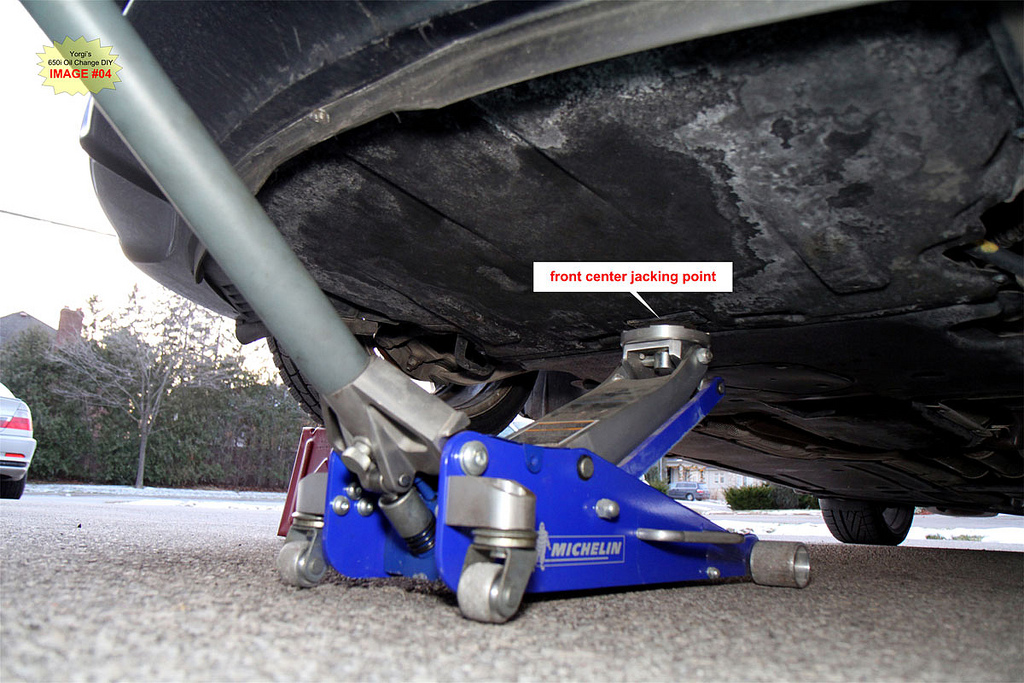
Putting the car on jackstands requires lifting from the center jack pad under the front of the car. Most jacks are not low enough to reach this center jack point. A second jack or a set of small ramps will be required to allow access to the center jack point.
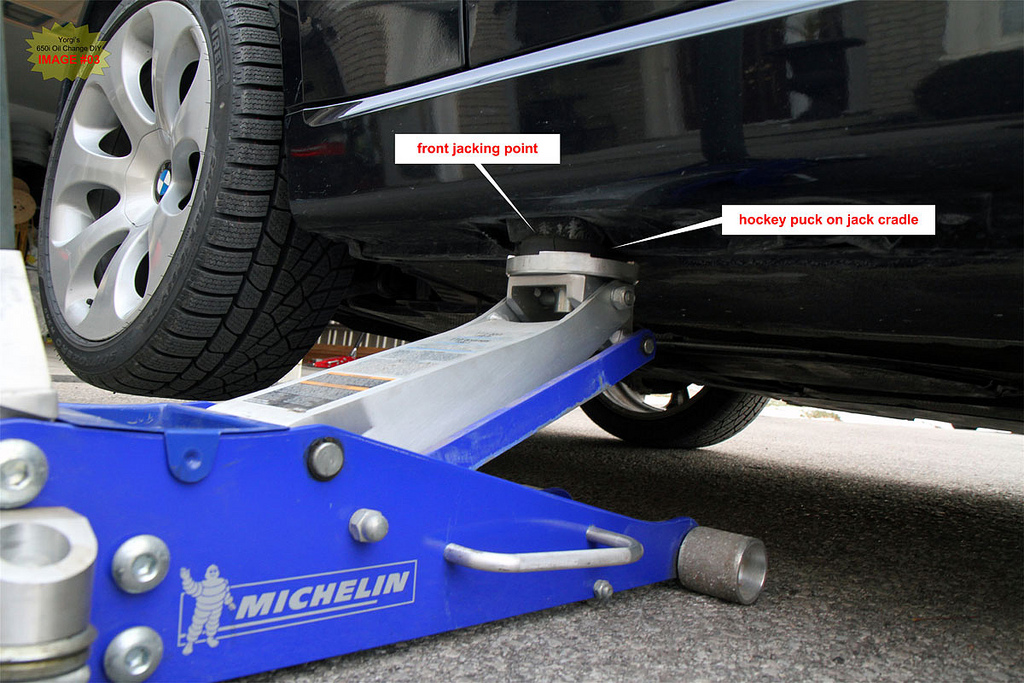
First raise the front of the car by using a jack on one of the front side jacking points. (see IMAGE #3) Use a second jack to raise the car at the front center jack pad (see IMAGE #4). With the car held by the front center jackpad, place jackstands under the two front jacking points and lower the car slowly onto the stands.
Don’t forget to engage the parking brake and chock the rear wheels and NEVER work under a car supported only by a hydraulic jack.
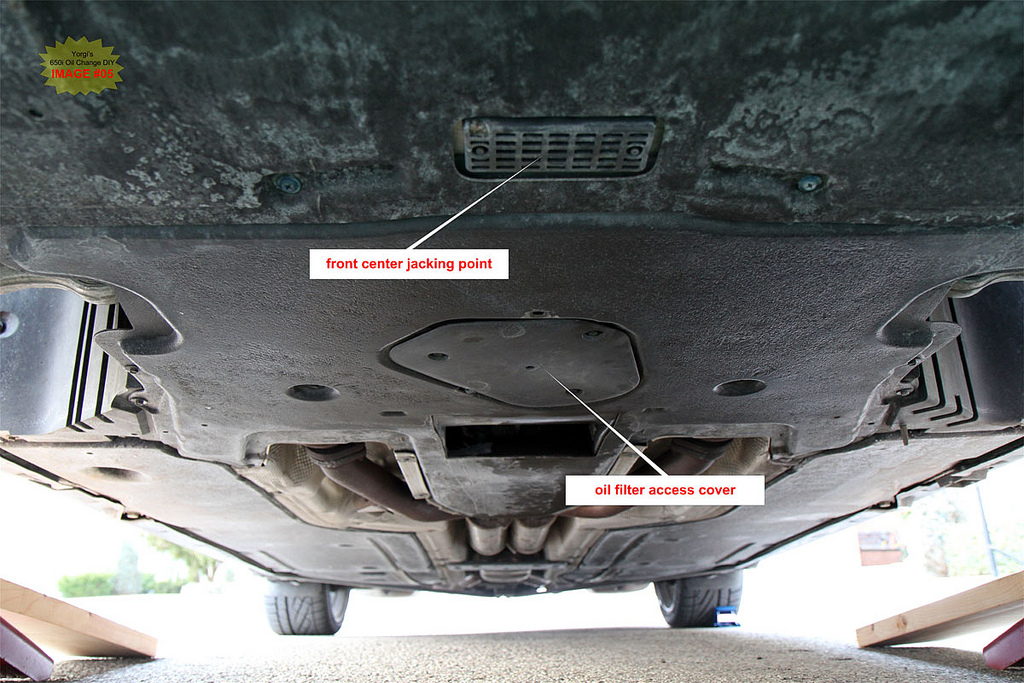
2. Remove the oil filter access cover with an 8mm socket
Located in the plastic undertray midway between the front wheels. Use an 8mm socket to remove the 3 screws and completely remove the cover from the undertray.
TIP use a creeper or large foam mat when working under the car. A sheet of cardboard also works.
3. Place the oil drain pan under the main drain plug
Have a few rags or shop towels ready under the car in the event of some oil spillage.
TIP It is a good idea to put on rubber gloves for the next step.
4. Remove the main drain plug using an 8mm hex socket
Loosen the plug with the ratchet (1 turn). Remove 8mm hex socket from the wrench. Holding the 8mm hex socket with your fingers, continue loosening the plug. When the plug is completely unthreaded keep upward pressure to hold the plug against the engine block then quickly pull the plug to the side to avoid getting hit by the heavy stream of HOT oil. ** Warning ** the oil is very hot and will burn you if you are not careful. Use eye protection. Use a rag to wipe any oil off your hands and to clean up the drain plug and socket.
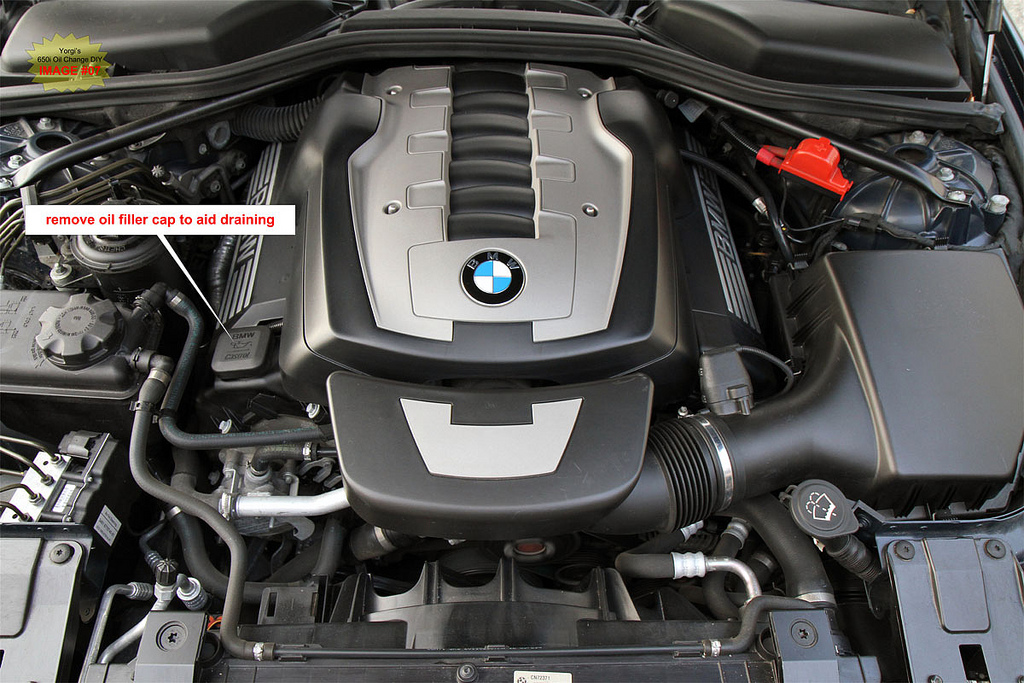
5. Remove the oil fill cap on top of the engine to aid the draining of oil
6. Remove the oil filter housing drain plug using a 6mm hex socket
Approximately ½ a quart of oil will drain from the filter housing. This oil is also HOT.
7. Wait for oil to completely drain – at least 15 minutes
Failure to wait for the oil to fully drain may result in an overfill when you add oil. You want as much of the dirty oil out as possible.
If the crush washer (copper in color) is not attached to the main drain bolt, it may have stuck to the engine block. Remove it once the oil has drained.
TIP go grab a beer while you wait for the oil to completely drain.
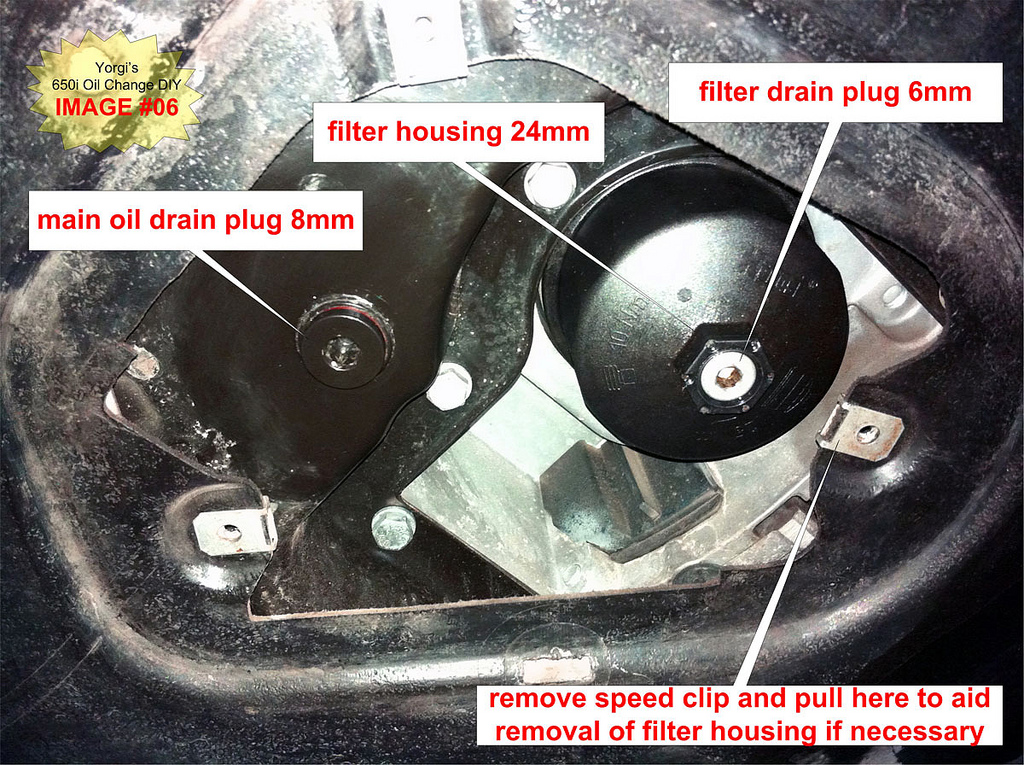
8. Remove the oil filter housing using a 24mm socket
If the filter element does not come out with the housing remove it from the engine. Be careful, the filter element is HOT.
TIP I put the element into a ziplock bag and seal it before discarding since the filter retains a fair amount of oil that will seep out later. I had to pull fairly hard to get the filter element out of the plastic housing. Wrap the bag around the element before pulling it off.
SIDE NOTE: In my case the undertray opening was not quite large enough allow easy removal of the plastic filter housing. I removed one of the speed clips used for the cover screws and pulled back on the undertray while removing the filter housing. (See IMAGE #06)
9. Replace O-rings, crush washer and filter element
Lube the new large filter housing O-ring with oil to aid installation. Remove and replace the large filter housing O-ring. Note the position of the O-ring before removing it.
Drop in the new oil filter element into the housing with the lettering side up. Make sure you push down hard enough to lock filter into the bottom of the housing.
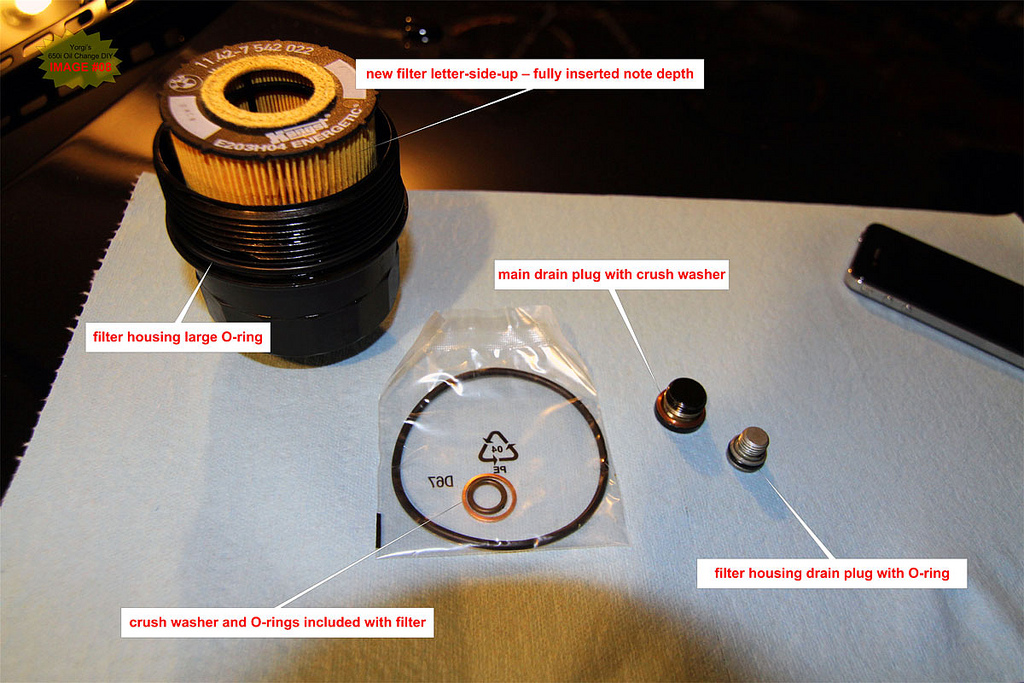
Remove the crush washer from the drain plug and place the new crush washer on.
Replace the small O-ring washer on the filter housing drain plug with the new small O-ring that came with the filter.
TIP I like to use a small blade screwdriver to remove O-rings. Small needle nose pliers will also work. Take care not to damage the plastic threads on the oil filter housing.
10. Reinstall the oil filter housing
Torque to 25Nm (18 lb-ft) or whatever value is written on the bottom of your housing. Clean the exterior of the housing before installing.
11. Re-install the filter housing drain plug
Torque to 10Nm (7 lb-ft). Clean the plug before installing.
12. Re-install the oil drain plug
Torque to 25Nm (18 lb-ft). Do not over tighten this plug and ensure it is clean before installing.
TIP Once you feel the washer begin to crush you will not need to go more than an additional ½ turn. 18- lb-ft requires very little force.
13. Wipe clean the filter housing and drain plugs
Ensure they are clean so leaks can be detected after the next step.
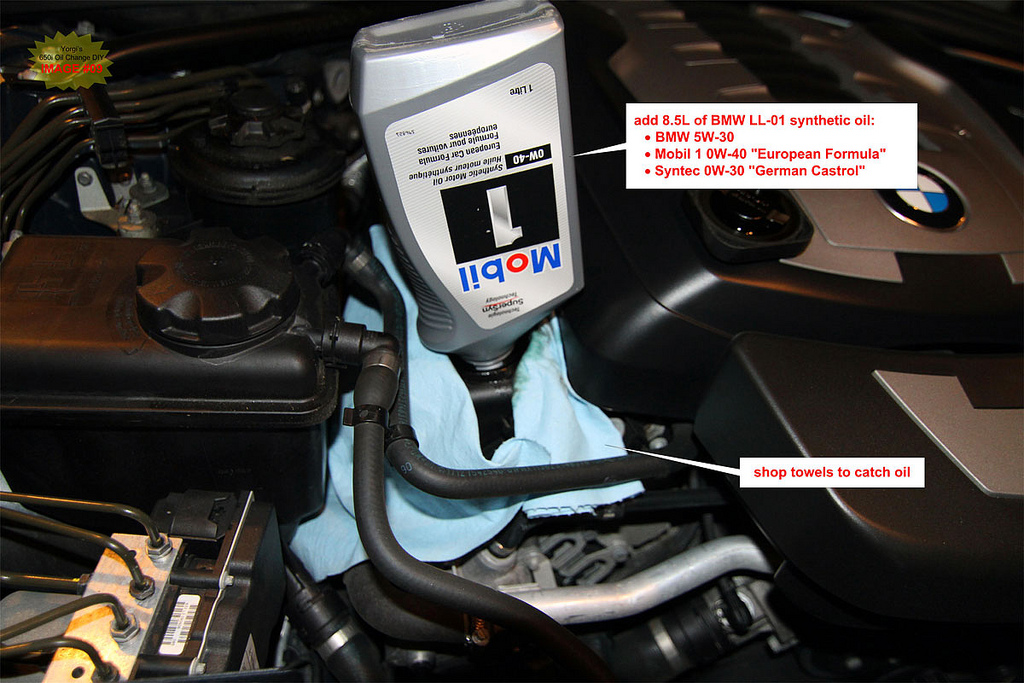
14. Add 8.5 liters of oil to the engine
TIP I place 2 shop towels around the filler hole to absorb any oil that misses the hole. You can also use a funnel during this step. Make sure the funnel is very clean before use.
15. Replace oil filler cap
Ensure it is fully locked before starting the car.
16. Start engine and run for a few minutes
Make sure you have cleared any towels or tools from the engine bay before starting the car. Turn off the engine immediately if you see any oil warning lights. You may see a warning within the first 10 seconds but that should go out almost immediately.
17. Stop the engine and check for leaks under the car
If no leaks are detected replace the oil access cover under the car.
18. Lower car and check oil level
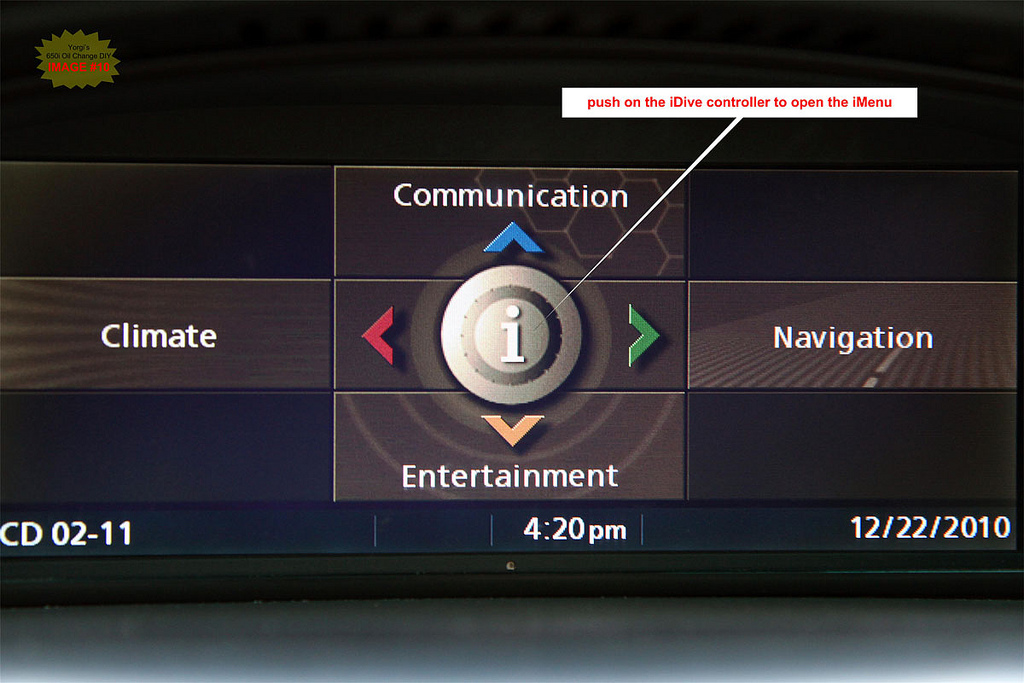
Remove wheel chocks and drop the car so it is level. Start the car and use the iDrive system to check oil level. Car must be running. Reading may take a few minutes to complete.
Press the {MENU} button
Press the iDrive controller to open the iMenu
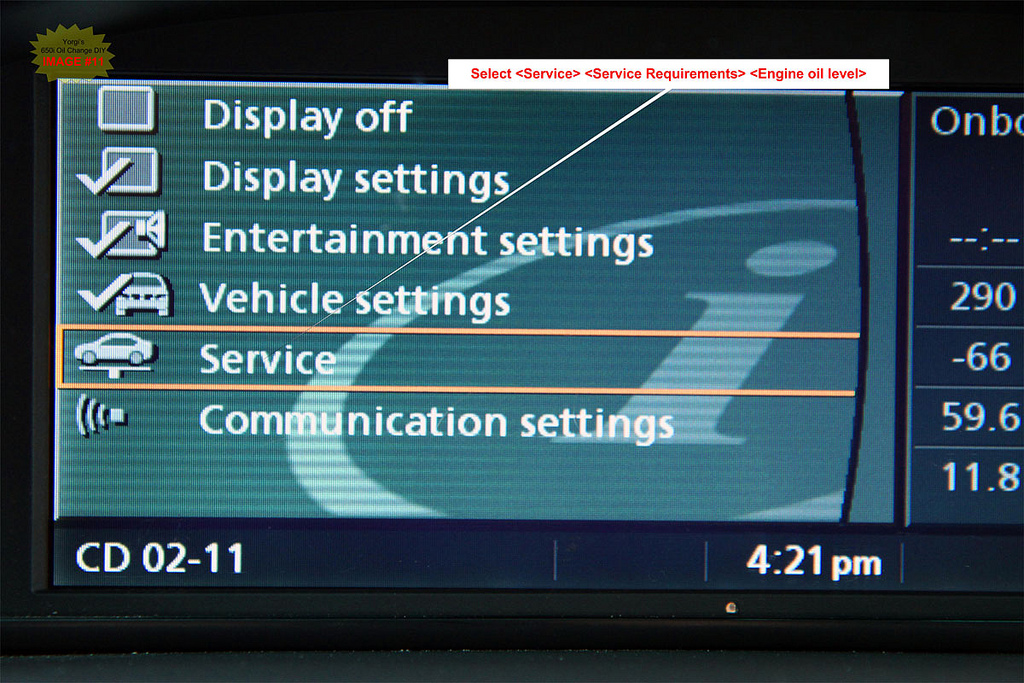
Select {Service}
Select {Service Requirements}
Select {Engine oil level}
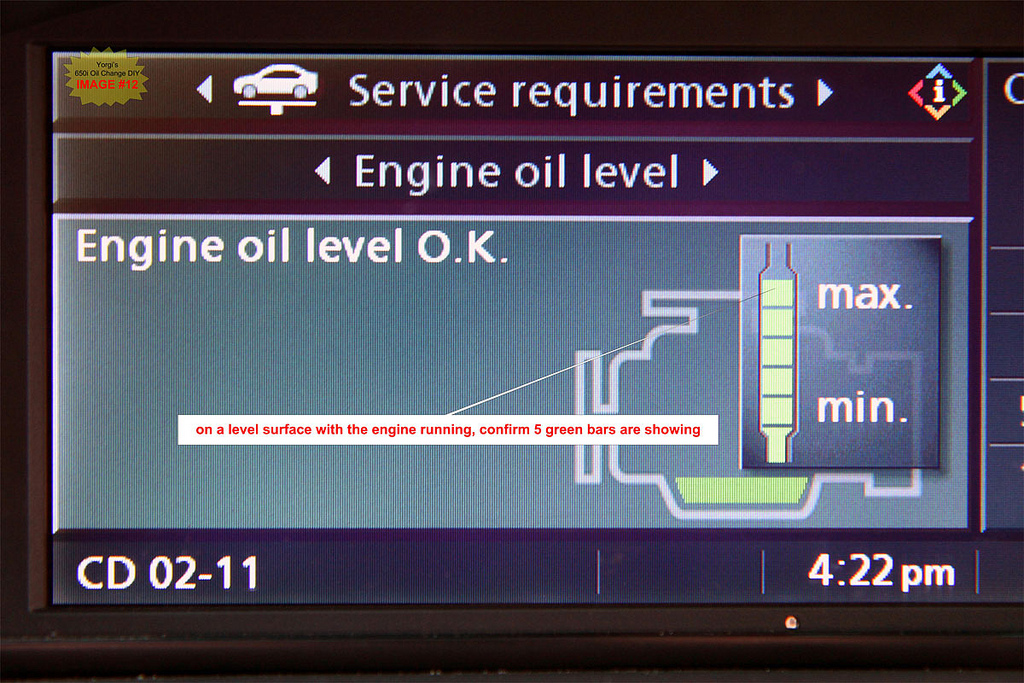
If more oil is required turn off the engine, add oil and replace the filler cap. Restart the car and check levels. Repeat as necessary. To give you an idea of how much oil to add, each green bar in the check oil screen represents 1/5 of a litre. Add a full litre if no green bars are showing.
DO NOT OVERFILL. If you get an “oil level too high” message you have to go back under the car and drain some oil using the oil filter drain bolt. Running with too much oil can damage the engine.
F. Steps to Reset oil service Check Control:
You can reset the Check Control oil service light with diagnostic software (e.g. CarSoft) or manually using the following steps.
Notes:
- Perform the following steps quickly. A few seconds of inactivity between button pressing and the car will exit the Check Control reset mode. It may take some practice before you get the hang of it.
- There are two buttons involved and two types of pressing. “Press” means press and release the button. “Hold” means press and hold the button down until the display changes to the desired mode.
- Pictures below show mileage in kilometers, US cars will be in miles.
1. Insert the remote key fob into the ignition lock
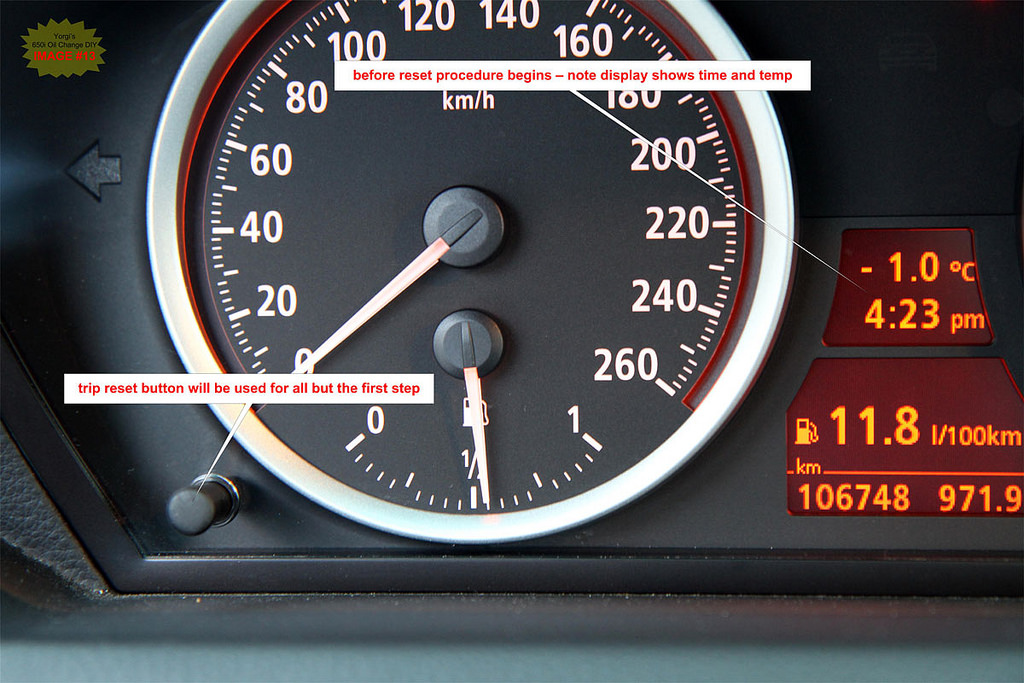
2. Press the {Start/Stop Engine} button to put the car into “ignition on” mode. Look for all the warning lights to come on in the instrument cluster; it may take more than one press. (for manual transmissions make sure you are not depressing the clutch, for auto transmissions keep your foot off the brake)
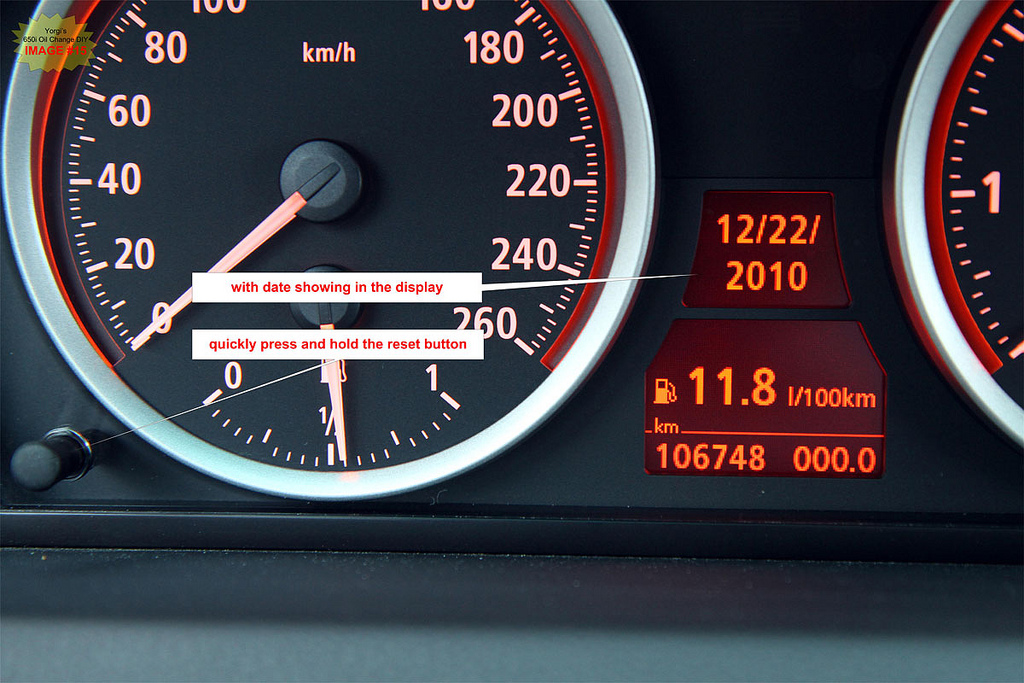
3. On the turn signal stalk, press the “CHECK” button repeatedly until you see the date displayed in the upper middle Check Control screen located between the speedometer and tachometer.
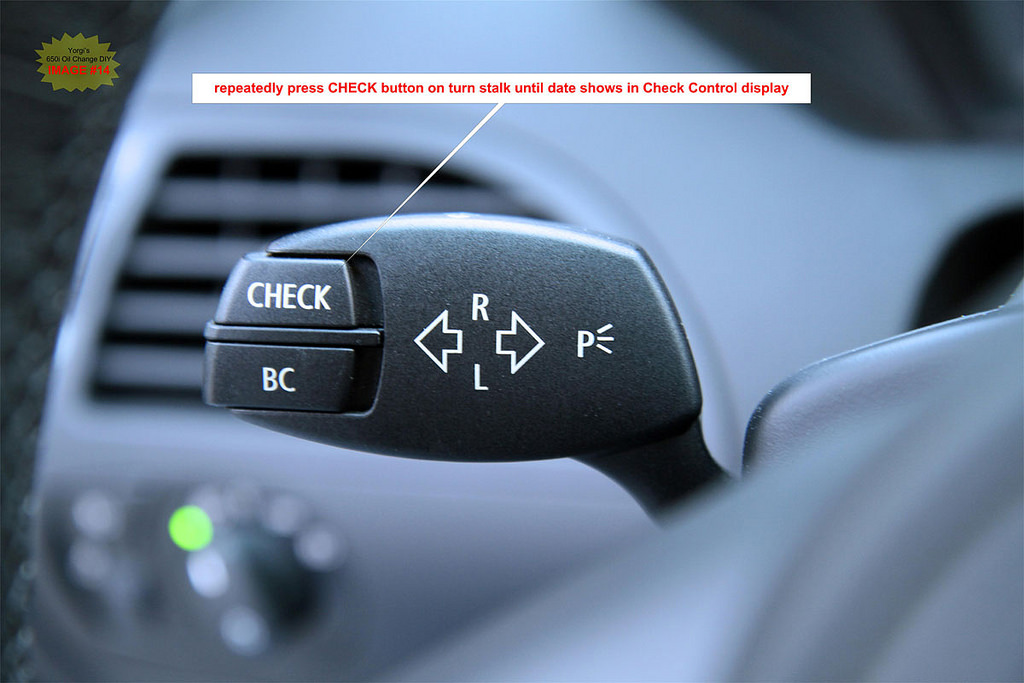
If you end up waiting too long and fall out of Check Control reset mode, start over at step 3.
4. Within 5 seconds of switching to the date in Step 3, hold the trip odometer “reset” button for approximately 5 seconds. An exclamation mark inside a triangle symbol will display followed by one of the 7 Check Control symbols (Check Control symbol varies).
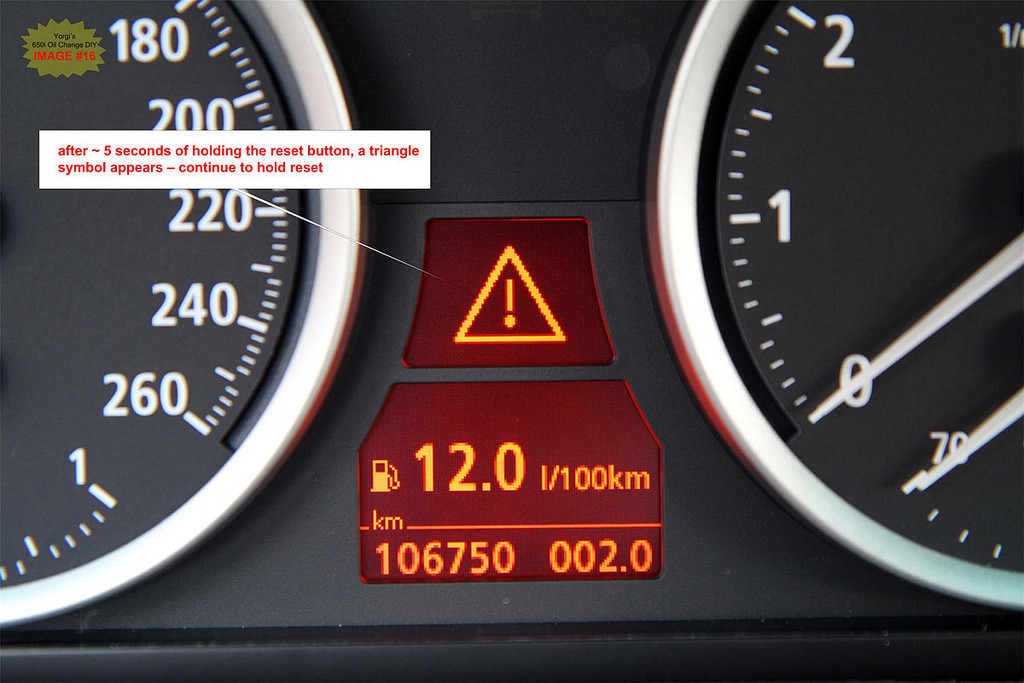
You have now entered the Check Control reset mode.
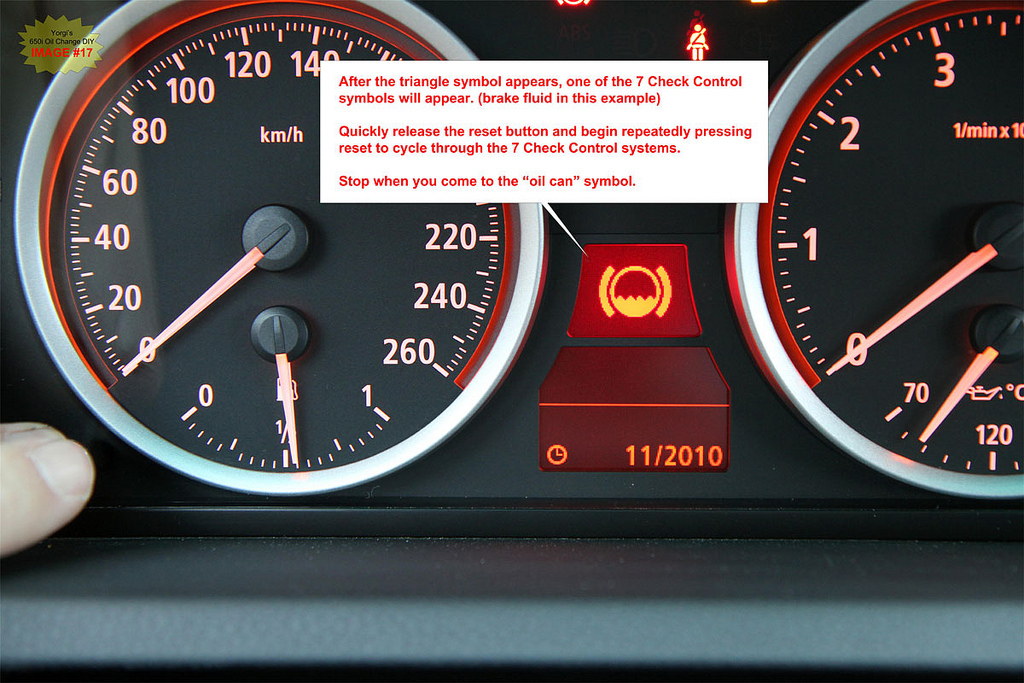
TIP If you see very small German text in the upper Check Control screen you held the reset button too long in Step 4 after the triangle symbol was displayed. Remove the key fob and start over at Step 1. Release the reset button immediately after seeing the first Check Control symbol that follows the triangle symbol.
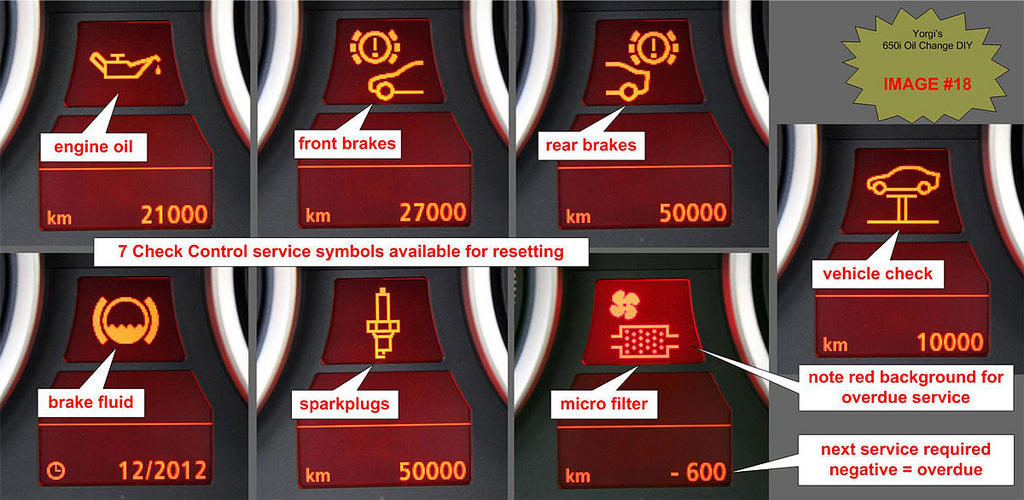
5. As soon as you see one of the 7 Check Control symbols, release the “reset” button and re-press it quickly multiple times to step through the various systems that can be reset. If the CheckControl symbol has a bright red background then service is past due. Systems available for resetting are as follows:
In this case you want to stop cycling when you see an “oil can” symbol.
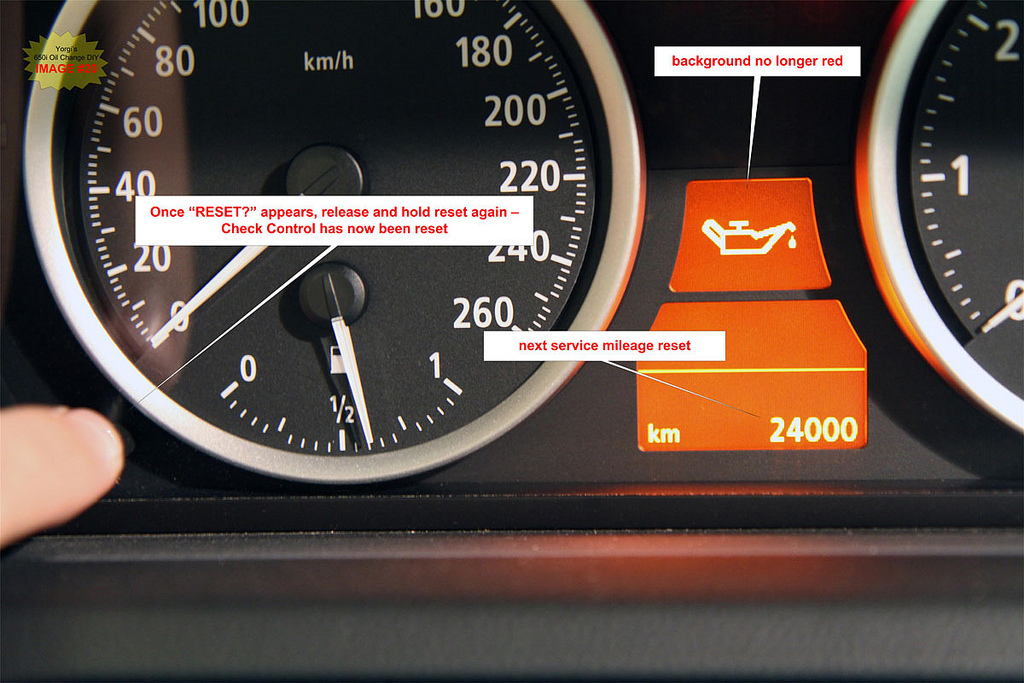
6. Once you have landed on the “oil can” symbol, release the “reset” button and hold it for ~5 seconds until the text “RESET?” appears just below the “oil can”.
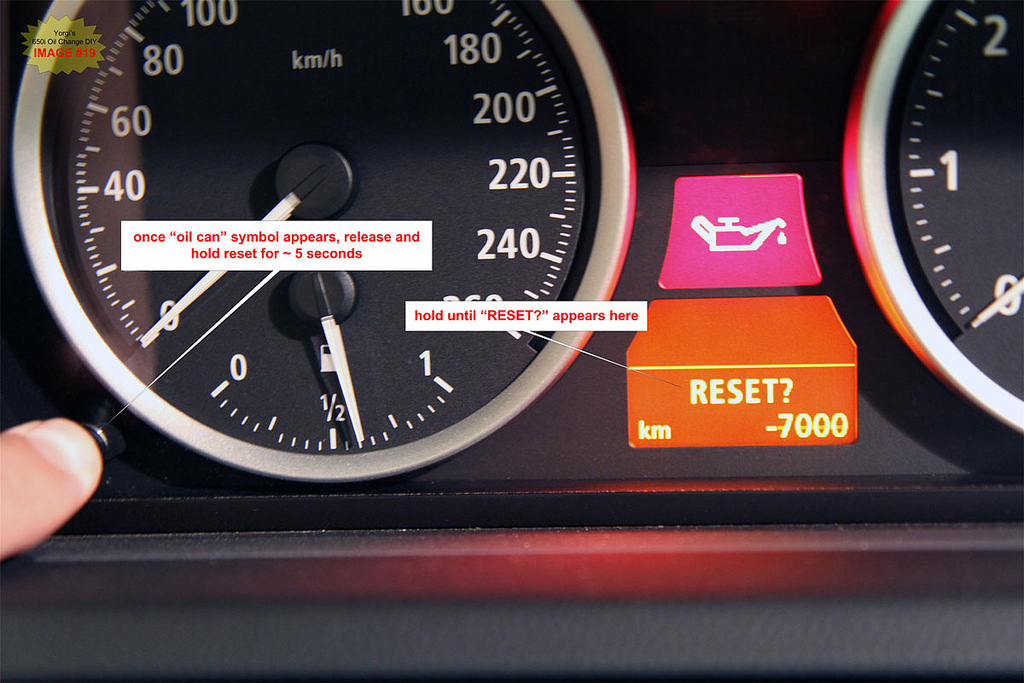
7. Release the “reset” button and hold it for another ~5 seconds. The red background will disappear and the “remaining distance (or date) until next service” will reset.
Congratulations you are FINISHED. Clean up and go grab another beer.

Nice DIY!
Posted by Diggymart on 1/21/20 @ 6:54:28 PM