You must be logged in to rate content!
6 minute read
Eibach Pro-Kit Install Part II
Compliments of BestCS @ miata.net
2-9-2009
Doing the Fronts
Eibach Pro-Kit Install II
We'll start with the left front. First read the Mazdaspeed MX5 Sport Spring Kit Installation Instructions. You'll find them somewhere on this site. They are a bit blurred but still readable. If you're reading this Captain, I'd suggest a good copy be put in the NC Archives. If you have a buddy that can assist you, that would be great. As the saying goes two heads are better than one.
I used a short handle 3/8 ratchet to remove all of the nuts and bolts. When I needed more leverage, I slipped a 13" piece of pipe over the handle. This worked out very well without any clearance issues. I also used 6-point sockets to prevent rounding any nuts or bolt heads.
To disassemble:
1. Remove the two bolts that hold wheel speed sensor to back of caliper. Hang it up out of the way
2. Remove bolt that hold brake line to A-Arm
3. Remove strut tower brace and the nuts from the top hat studs.
4. Remove two bolts from upper A-Arm.
5. Remove nut and bolt that attaches shock to lower control arm.
6. Remove the sway bar link nut from lower control arm. To remove the link, will require using a floor jack to raise the lower control arm. You'll see the bolt level itself. Then use a punch and hammer to drive it out of the lower control arm.
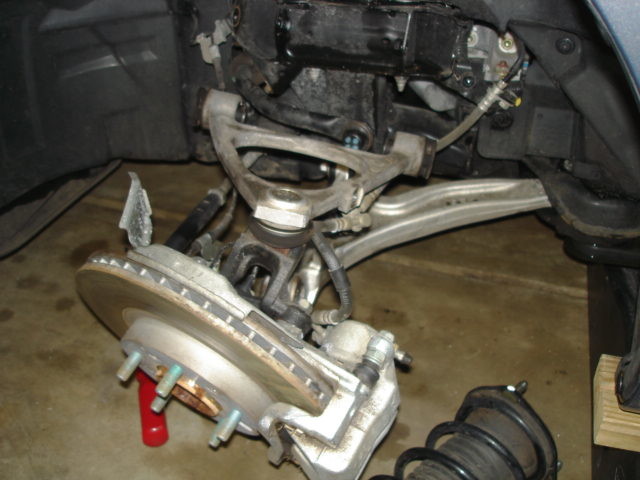
The order of disassembly isn't that important. After you have completed the above, push down on the damper assembly (the shock & spring) while pulling back on the upper A-Arm. A foot on the hub may be helpful. The whole business will drop down. You can then pull the shock off the lower control arm and then pull it out through the A-Arm.
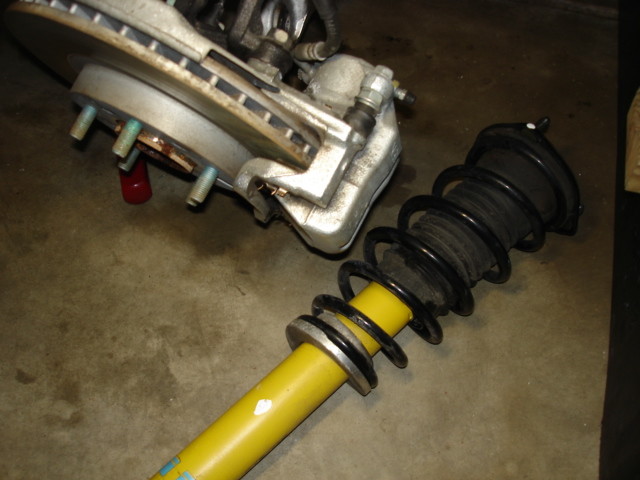
The next step is critical to the success of this venture. The top hat and shock must be re-installed in their original orientation. To do this, I put a dab of paint on the top hat and body of the shock (see pic). When I reassembled the damper, I made sure they lined up. I was able to do this by eye. I'll say more about this later.
I got a loan of spring compressors from Autozone for a refundable $50 deposit. Using them, compress the springs. Use a ratchet to crank the bolts down or you'll be there all day using a crescent wrench. When the top hat slightly moves, they are compressed enough. Remove the nut from the piston rod, the shaft sticking out of the shock. I had to take a 17 mm box wrench and beat on the handle with a hammer to loosen it up. If the nut and shaft both turn, use a 5mm alen wrench to stop the rod from turning.
When taking the damper apart, note the order of the parts. You also can check the instructions if you forget. Now slip you Eibach spring over the shock (use the short one). Make sure that the butt end of the spring fit snuggly in the lower spring perch. Compress the spring. Since it's shorter than the OEM, it won't require as much cranking on the compressor bolts. replace the parts making sure of the original order. Make sure that the rubber boot lines up with the bolt heads on the under side of the top hat.
I made a mistake, I think, on the rubber donuts getting one of them upside down. I'm not sure if this will have any consequence or not. Finally get the nut on the shaft and start tightening it down. Now make sure your paint marks line up. I didn't have a deep 17 mm socket so I used some hillbilly torque using a box wrench and a hammer.
Replace the damper in the reverse order you took it out. It goes back in pretty easily. You may have to step on the hub and shake it around a bit but it will go back in. Now when I tried to slip the yoke of the shock over the lower control arm, it didn't exactly line up. It was off a wee bit. There were two remedies fro this problem. Either take it apart and realign the paint marks or take a rod, from the jack kit, and twist the yoke. Guess which one I did? Again you'll need to use the floor jack to get the link of the sway back into the lower control arm. Snug up all the bolts. BTW, on the A-Arm bolts make sure that the nuts are correctly positioned on the metal lips that hold them in place.
Now you've got it all back together. I'll now deliver by lecture on torque. Don't use a torque wrench on 10, 12, & 14 mm bolts. If you do, the heads can easily be snapped off. These can be tighten sufficiently by hand. I only used the torque wrench on three critical bolts, the two upper A-Arm bolts and the bolt that hold the yoke of the shock to the lower control arm. Set your torque wrench to 65 Ft-lbs. These bolts have to tightened with the wheels resting on the ground. With the wheels on, it is almost impossible to get to them, so I used the floor jack under the lower control arm to simulate the vehicle resting on the wheel.
I have a couple of pics. One after the damper has been removed. The other shows the alignment marks. The RF is done similarily. Look for part III coming up. I believe I have covered all the details, but I'll let you know if I've forgotten anything.