You must be logged in to rate content!
16 minute read
Converting to a T-56 using the Mal-Wood Adapter
Compliments of WarShrike @ http://www.fullthrottlev6.com
11-1-2012
This is just a general outline for items you will need and tasks you'll need to complete in order to accomplish a T-56 swap for your 3.8 V6 F-body. If you use this on another site or even in a publication, please give credit where it is due. I spent many hours essentially on my own getting this project to come to a close and dropped some serious personal coin on it as well. This doesn't take into account the documentation and preparation of the write-up as well.
To take this and use it for your own personal gain would be an insult.
NOTE: There are differences in between model years, I do not take responsibility for any of your challenges or setbacks. I also take ZERO responsibility for your own shortfalls or screw ups. This is a general guide, if you haven't ever turned a wrench on your car, this is not something you should tackle alone, if at all!
I had to go through a lot of reading, research, phone calls and just bleeding in general to get the car to where it is today through all of my projects. It has been hard work, but I refuse to cut corners.
Most of the information that I will cover might cater a little more to the guys swapping from the 4L60E, so the manual trans guys can ignore some of the wiring and other tips...Some.
If you are swapping the T-56 and you are equipped with a 4L60E, please refer to these links which helped me in many ways. I didn't follow things verbatim, as I had to make some things work a little differently:
Meatyshells swap thread: LINK
GMHTP trans swap (please note, this car originally had a T-56, swapped to an auto and they swapped it back): LINK
LS1tech wiring help threads:
Wiring Help: LINK
Reverse Lockout Wiring: LINK
General parts list for T-56 swap:
•T-56 with bell housing sourced from a GTO (Recommended by Mal-Wood). This has something to deal with the input shaft length. If other LS1 f-body transmissions have the same length, that's fine. The LT1 T-56 will not work without extensive modification.
Unless you are using a relocation cross member or tunnel mount torque arm, you will need the torque arm mount and bushing that attaches to the tailshaft.
•Mal-Wood adapter plate: LINK [email protected] ~$465 shipped
•F-body shifter cup (for those using the GTO T-56).
•F-body T-56 shifter (your choice).
•Any Clutch & Flywheel designed for a 3800 V6 F-body. Yes, you can use a stock style clutch and flywheel. The spline count is the same between the T-5 and the T-56.
•New pilot bushing.
•Clutch install tool.
•New hydraulic slave cylinder (OEM is recommended, not the cheap knockoffs).
•Adjustable hydraulic master cylinder (I recommend it to help find the correct clutch engagement position).
•Modified transmission cross member (more info below).
•Bolts to mount bellhousing to adapter: 3/8” UNC and 1” long.
•1/2” to 3/4" Slave cylinder spacer (depending on clutch design, do your measurements).
•Reverse lockout pigtail GM part 12101857
•Reverse light switch GM 12085485
•Diodes for reverse lockout switch wiring. Radioshack part # 1N4001 (need two for reverse lockout switch)
•Automotive wiring (can get it from autozone or other parts stores, get multiple colors so you can differentiate between polarities when testing).
•Heat shrink wire wrap.
•Wire loom wrap to help cover up wires and add protection from the elements.
•Good soldering iron (I used a small butane setup, easier to use in tight spaces, less wires to tangle up on and burn myself on). You don't want to be chasing bad wire connections if you use the butt connectors.
•Voltmeter
•Wire cutter/stripper
•Caliper and other measuring equipment
•Torque wrench for both ft. lbs. and in. lbs. measurements.
•Chiltons/Haynes or more preferred is a GM service manual, usually found in the FAQ's since it has the torque specs as well.
•Trans fluid & GM synchro additive.
•Lock-tite
•Assortment of sockets, screwdrivers, extensions, rubber mallet, grinder, cutting tools, fabrication tools or a skilled shop to help in some aspects.
•Floor jack, ramps/stands or a lift, and a trans jack is recommended for your safety.
For those swapping to a manual from a 4L60E:
•Manual transmission pedal assembly for your specific engine type and with pedal switches (Important! more info below).
•Manual trans center console insert (can be pricey).
•Chassis shift boot (rubber boot that helps isolate the transmission from the interior of the car).
•Clutch fluid reservoir & hose.
•Other miscellaneous items as found in Meatyshells thread.
•PCM reflash or you can get more involved and do a T-5 PCM and wiring harnessswap (make sure it is the same year model).
First and foremost, disconnect the battery!![]() Remove starter, and put electrical tape over the connections. This will be important when you start testing the wiring later on in the install.
Remove starter, and put electrical tape over the connections. This will be important when you start testing the wiring later on in the install.
Before I could do any major work, I had to disconnect my longtube headers. The y-pipe is welded to my intermediate pipe so there wouldn't be any give for dropping the transmission and my collectors are slip fit.
If you have stock exhaust manifolds, you might have to disconnect them from the exhaust, but might as well install headers in there while you're at it. Those with mid length headers, you might be able to just disconnect your y-pipe at the collectors and work around them.
Some might drop the whole engine cradle to access the trans, but I dropped my trans out with a set of ramp/stands and a low profile jack. I would have killed for a good vehicle lift.
Automatic guys: It's a good time to drain the fluids from the trans. Disconnect your trans cooler lines at the radiator and use a catch pan. Next up, I took a small fluid transfer pump with a skinny hose and ran it down the trans dipstick tube. I put the other end in the catch pan, and went to work! Less mess than dropping the pan and, depending on the pump you use, it empties the 4L60E pretty quickly. If you have a truck pan on your 4L60E with the drain plug, go about it that way, go have a drink and come back later.![]() Remove your T-5 or 4L60E transmission. I'm not going in depth here with this and I'm not here to hold your hand. Get it the heck out, go read or get a friend to help you.
Remove your T-5 or 4L60E transmission. I'm not going in depth here with this and I'm not here to hold your hand. Get it the heck out, go read or get a friend to help you.
For manual trans guys, if you're going to re-use your stock flywheel this is a good time to have it inspected/resurfaced. Automatic guys will need to remove their flexplate and set it aside with all your nasty nasty automatic stuff.
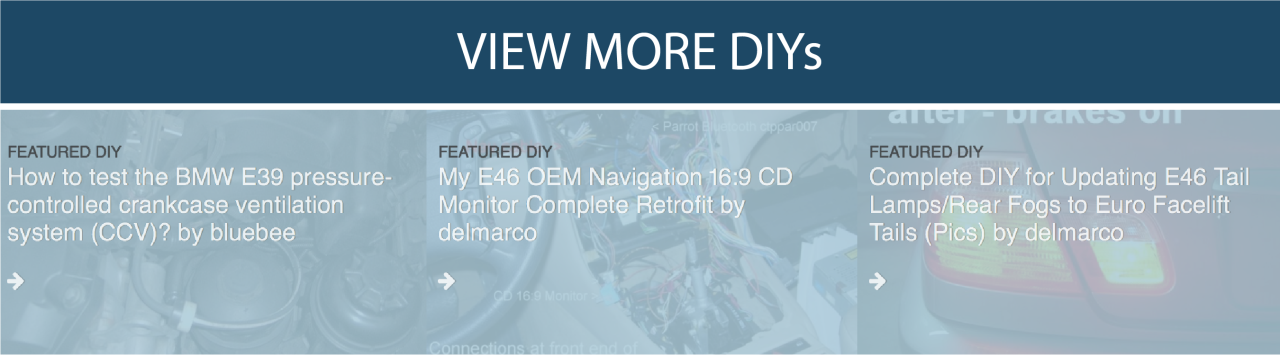
This is also a good time to inspect your rear main seal and address any leaks like your oil pan if it needs to have the bolts tightened. Also look at your enginemounts/brackets. A lot of guys have broken bolts on the passenger side (I did). Replace bolts or tighten them after applying lock-tite.![]() Okay, here's the first big thing you're going to do that is not reversible. You will need to grind a tab on the block. It even says so on the adapter plate when Mal-wood ships it to you. There's a little piece of paper zip-tied to the hole with the only instructions this plate has. The plate comes with counter sunk allen head bolts that attach the adapter to the block.
Okay, here's the first big thing you're going to do that is not reversible. You will need to grind a tab on the block. It even says so on the adapter plate when Mal-wood ships it to you. There's a little piece of paper zip-tied to the hole with the only instructions this plate has. The plate comes with counter sunk allen head bolts that attach the adapter to the block.
This dowel on engine needs to be cut back to 3.5mm longTake your time, grind a little bit at a time. This is best to do it while you don't have the flywheel or anything else installed. Afterwards, install the adapter plate, you'll probably need to tap it good with a rubber mallet to get it to seat properly, the dowels are tight for good reason.
![]() Install pilot bushing, flywheel and clutch with correct torque values and lock tite. The flywheel has to be clocked to the right position. If it isn't, the hole will not line up properly.
Install pilot bushing, flywheel and clutch with correct torque values and lock tite. The flywheel has to be clocked to the right position. If it isn't, the hole will not line up properly.
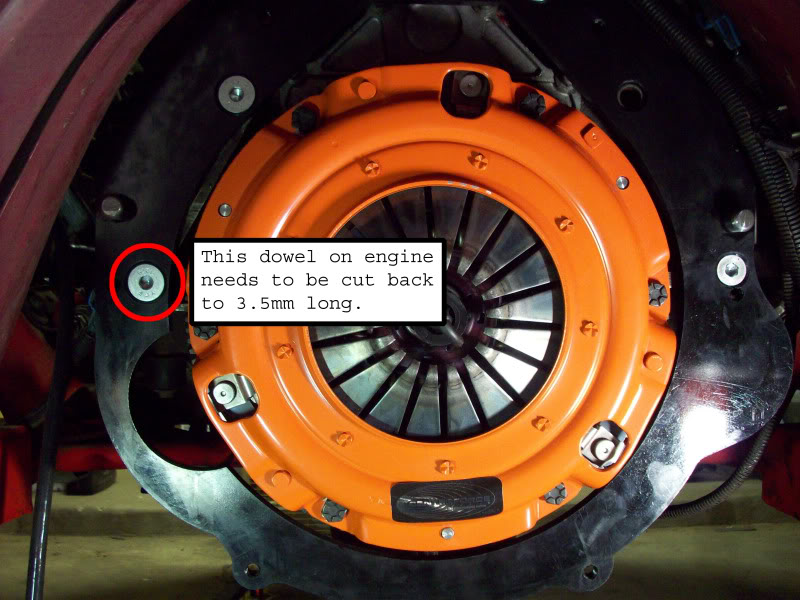
Automatic guys: While you can do this with it still in, I pulled all the interior out of the car so I didn't have to worry about igniting my carpet while cutting/grinding inside the car. There are measurements for the right location of the hole, you'll need to go back about a 1/2” to make it fit correctly, I thought I had room but I actually had to go and cut it further back and fill the resulting gap closer to the firewall with some more metal.
Don't go about cutting wires or anything foolish. Take your time.Automatic guys: After removing your pedal assembly, use the write ups on the swaps to install the master cylinder. Then you can install the manual trans pedal assembly. If you are running an electric throttle body car (i.e. 99+ body style, you only need the brake and clutch pedal). If you are running a cable throttlecar (i.e. 98 and earlier), you need the whole assembly.
Since I have the drive by wire/electric throttle body, I bought a full pedal assembly off an LS1 f-body and just cut the pedal mount off for the gas pedal as seen here:
Continue on with the wiring and extensions. You will need to get the correct connector for your clutch pedal switch as evidenced in the links, or just connect the wires and you won't have to depress the clutch to start the car. I used the switch just as a safety.![]() For GTO T-56's, remove pin from shifter lever and install offset f-body shifter lever/shifter cup: LINK
For GTO T-56's, remove pin from shifter lever and install offset f-body shifter lever/shifter cup: LINK
It can probably be had for less, just look around. Put tape over open shifter hole to prevent debris from getting in.
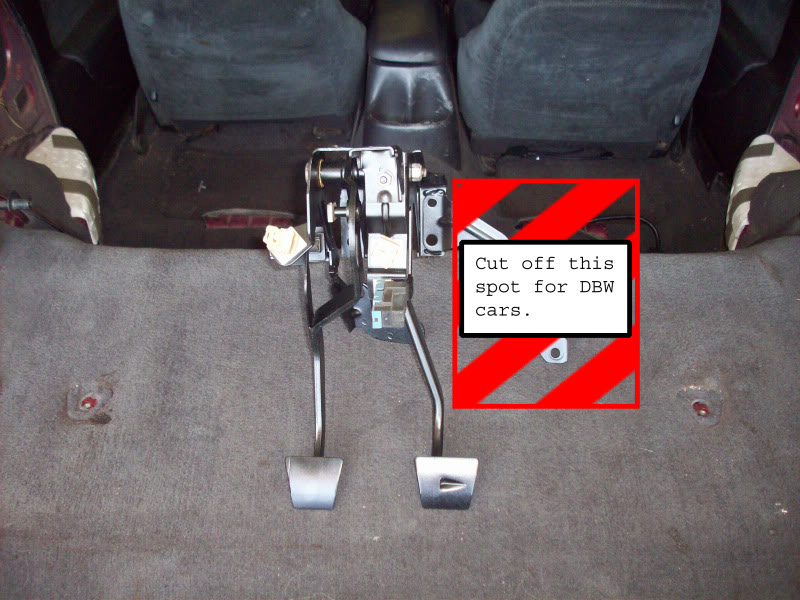
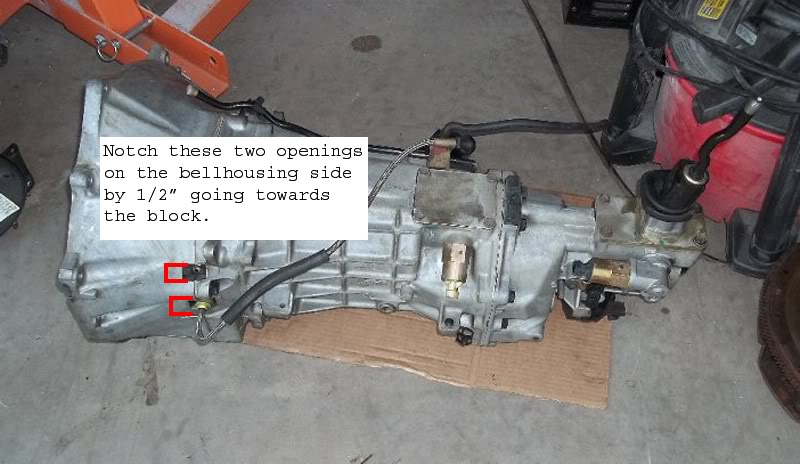
![]() You will need to do two major things fabrication-wise.
You will need to do two major things fabrication-wise.
•Extend the trans crossmember back 1/2”, you can see the change to the crossmember here. I'm using a relocation crossmember, use your imagination. The welder that did the modifications for my crossmember also filled in the holes on my setup after adding additional reinforcement plates to give that 1/2” extension. I had to drill new holes on the plates after measuring multiple times to get it right.
•Mill or cut 1/2” notches to the bellhousing where the hard lines for the slave cylinder go. This is because of the 1/2” spacer your will need to use. I lucked out and had a friend with a bridge port mill and we just went through and opened these notches in a few minutes time. Some machine shops will not touch automotive parts due to liabilities.
![]() Install 1/2” Ram clutches slave cylinder spacer on trans: LINK
Install 1/2” Ram clutches slave cylinder spacer on trans: LINK
Then the slave cylinder, and bolt down with bolts supplied with spacer.
Bolt modified bellhousing to adapter plate using 3/8” UNC 1” long bolts with washers (should be the right length, double check by adding depth of bellhousing where the bolt holes are and add 1/2” for the adapter plate to get total length). If you can get flanged head bolts, that's great but I got the high grade bolts and some washers. Add lock tite to threads.
Lube up the edge of the input shaft that will rest in the pilot bearing.
With the trans jack, or help from a friend install transmission, being careful not to force it into place.
Jack tail of trans up and install modified cross member, torque arm and driveshaft.
![]() The speedometer wire for the automatic is a different polarity than with the manual. Cut the wires, add extensions to where it will reach the new location of the VSS and then switch which direction they attach. Solder and cover with shrink wrap.
The speedometer wire for the automatic is a different polarity than with the manual. Cut the wires, add extensions to where it will reach the new location of the VSS and then switch which direction they attach. Solder and cover with shrink wrap.
![]() The reverse lockout is a good safety item on this trans, which will help prevent you from accidentally going into reverse instead of 5th under spirited driving. So you don't have to force it into reverse with both hands, this will need a powered source to activate the solenoid. I used the return side of the brake switch line to activate it, and grounded it to the chassis. You will need to wire in the diodes in the right direction as mentioned above as this thing will make a spark. You don't want it to blow your brake lights/fuses. Test it with the brake pedal depressed and you should hear the solenoid “click” and then you can easily slide it into reverse. It will be very hard to slide into reverse without the brake pedal depressed. This is also excellent because it makes it almost impossible for somebody to drive the car without knowing the ins and outs of the trans.
The reverse lockout is a good safety item on this trans, which will help prevent you from accidentally going into reverse instead of 5th under spirited driving. So you don't have to force it into reverse with both hands, this will need a powered source to activate the solenoid. I used the return side of the brake switch line to activate it, and grounded it to the chassis. You will need to wire in the diodes in the right direction as mentioned above as this thing will make a spark. You don't want it to blow your brake lights/fuses. Test it with the brake pedal depressed and you should hear the solenoid “click” and then you can easily slide it into reverse. It will be very hard to slide into reverse without the brake pedal depressed. This is also excellent because it makes it almost impossible for somebody to drive the car without knowing the ins and outs of the trans.
![]() I wired up the reverse lights using the wires that were part of the gear selector for my automatic (go look in Meatyshells thread again). Manual trans guys can do it however they need. Your connector might even be the same, but I'm not for certain. Check to make sure your reverse lights actually work.
I wired up the reverse lights using the wires that were part of the gear selector for my automatic (go look in Meatyshells thread again). Manual trans guys can do it however they need. Your connector might even be the same, but I'm not for certain. Check to make sure your reverse lights actually work.
![]() Not necessary, but I wrapped all the new wires in wiring loom to protect it all a little more.
Not necessary, but I wrapped all the new wires in wiring loom to protect it all a little more.
![]() Remove tape I told you to put on earlier. Add trans fluid in accordance to what the manual dictates. Put on a bead of RTV around the edge, install shifter. Fill clutch fluid reservoir and bleed clutch.
Remove tape I told you to put on earlier. Add trans fluid in accordance to what the manual dictates. Put on a bead of RTV around the edge, install shifter. Fill clutch fluid reservoir and bleed clutch.
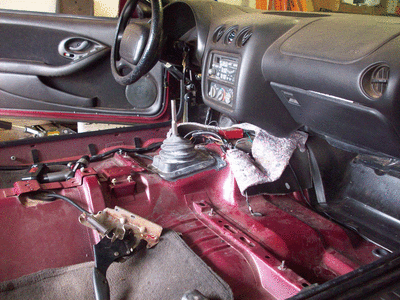
![]() I actually started the car up after this to make sure everything worked fine and drove fine, then started to install all the other components like the chassisshift boot, cleaned up the wiring, and installed my interior parts. Like so:
I actually started the car up after this to make sure everything worked fine and drove fine, then started to install all the other components like the chassisshift boot, cleaned up the wiring, and installed my interior parts. Like so:
![]() Calibrate PCM for new VSS settings. My untuned automatic pcm was off by ½ an mph. So I drove at 40mph, but the gauge only showed 20mph. That is fixed with the new PCM reflash and calibration.
Calibrate PCM for new VSS settings. My untuned automatic pcm was off by ½ an mph. So I drove at 40mph, but the gauge only showed 20mph. That is fixed with the new PCM reflash and calibration.
Automatic Guys: Go get your pcm flashed unless you switched pcms and harnesses to the manual setup. It was like $110 at the dealership. You'll need a full write performed and this will have a different VIN# on the pcm now, reflecting the manual trans setup.
![]() Perform proper break in driving as recommended by your clutch and flywheel manufacturer.
Perform proper break in driving as recommended by your clutch and flywheel manufacturer.
Enjoy whatever it is you're going to put your T-56 through!
11-3-2012
Yes. The spacer fits in between the transmission and the slave cylinder.
Image courtesy of GMHTP:
![]()
Well I got the T-56 for $700, quite the steal. The adapter plate is around $465 shipped. Another $100 for the spacer and then fab work for the bellhousing and crossmember.
The shifter looks stock, and I'm running an MGW shifter as well.