You must be logged in to rate content!
17 minute read

My Car Stereo Install
Compliments of 911TurboRules @ www.6speedonline.com
12-25-2008
Hi,
Just wanted to post my car stereo upgrade photos. Luckly I have the non-MOST system so adding a new head unit was basically plug and play. I didn't have to swap out the BOSE amp. By getting the Metra 70-1784 harness I just connected the wires from the Metra harness to the harness of the new headunit. Then plug directly into the radio harness on the car. On my Metra harness the yellow and red wires were backwards so I had to swap them (not sure if mine was made wrong). The red is the accessory and yellow is continuous power. When this is backwards everytime I turned the car off the stereo did not get continuous power and had to reset (lost the preset settings everytime I take the key out). When I swapped the red and yellow wires on the Metra harness now I don't loose the preset settings everytime I turn the car off.
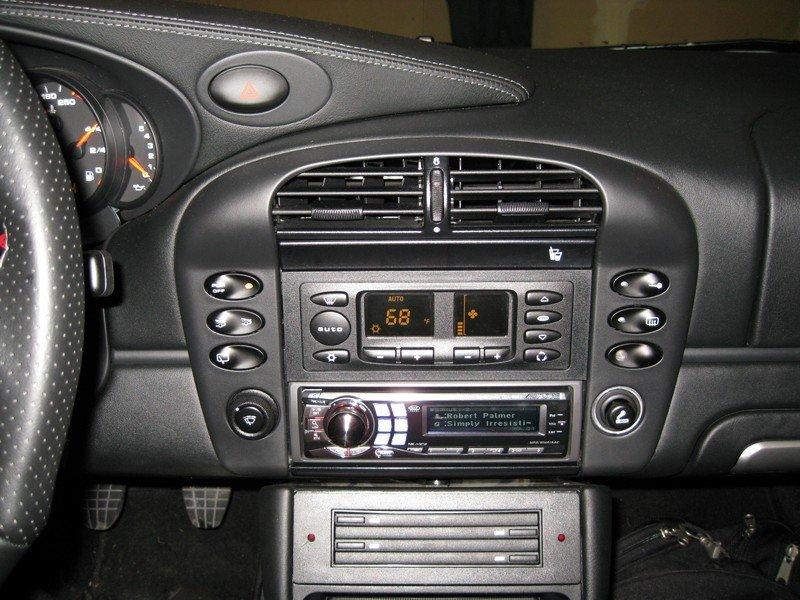
So here is the stock CDR-220: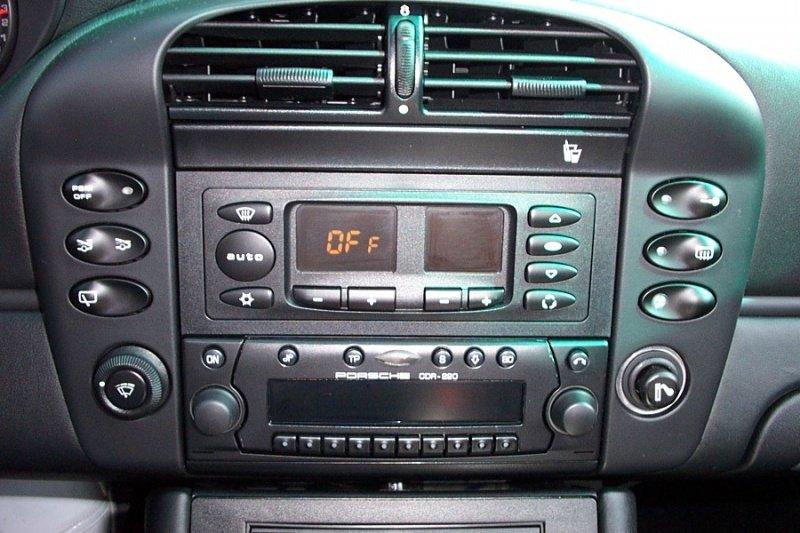
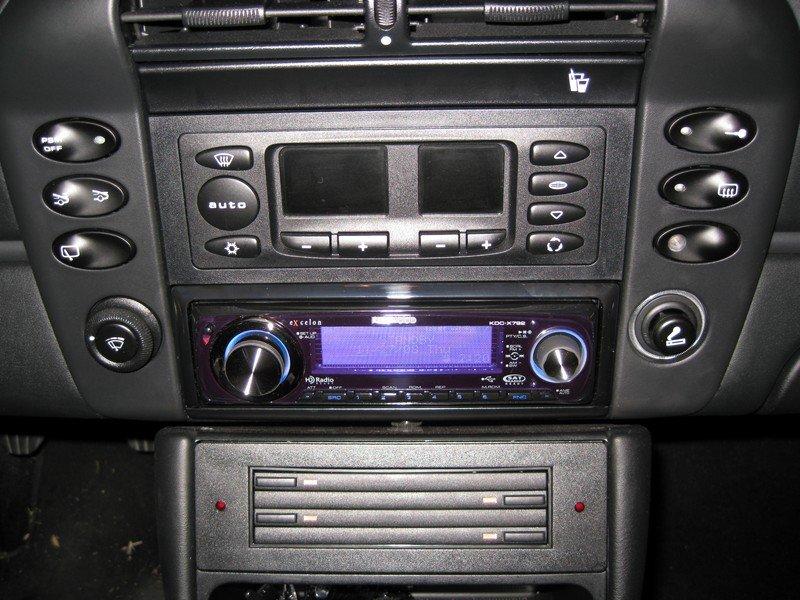
Here is the Metra harness connected to the new Kenwood KDC-x792 headunit. This unit had excellent sound but the display was horrible. The sun would block it out completely. The right rotory know if you turn it moves to the next song/playlist and then you push in to select the song/playlist. But you can also push this know right/left/up and down. Left and right to move to the next or previous song and up and down to go to the next/previous playlist (with the ipod). The problem is while you're driving if you want to select a song by pushing the **** in, it usually goes right or left/up or down depending on if you hit a bump on the road so it's difficult to use the **** correctly while driving. It became so annoying that I couldn't easily select the songs I want that I returned this Kenwood headunit. Also it did not match the orange/yellow of the Porsche interior.
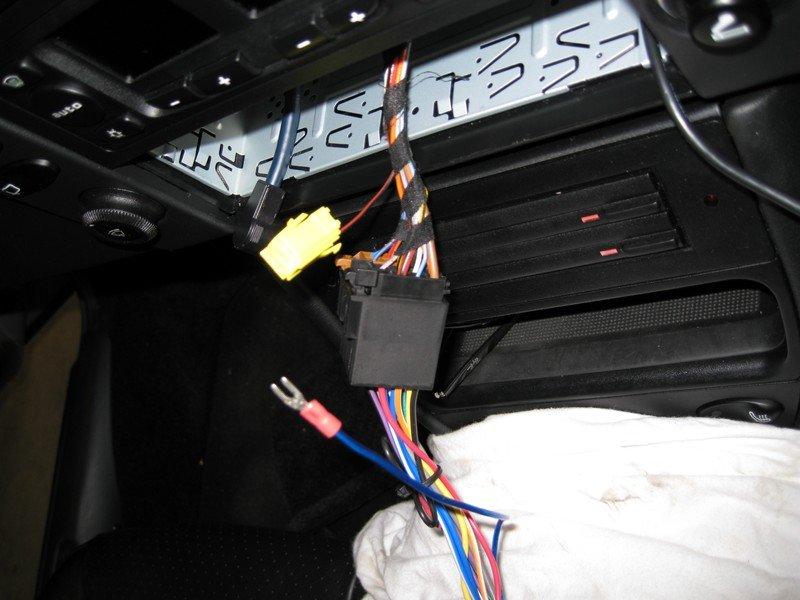
Metra harness:
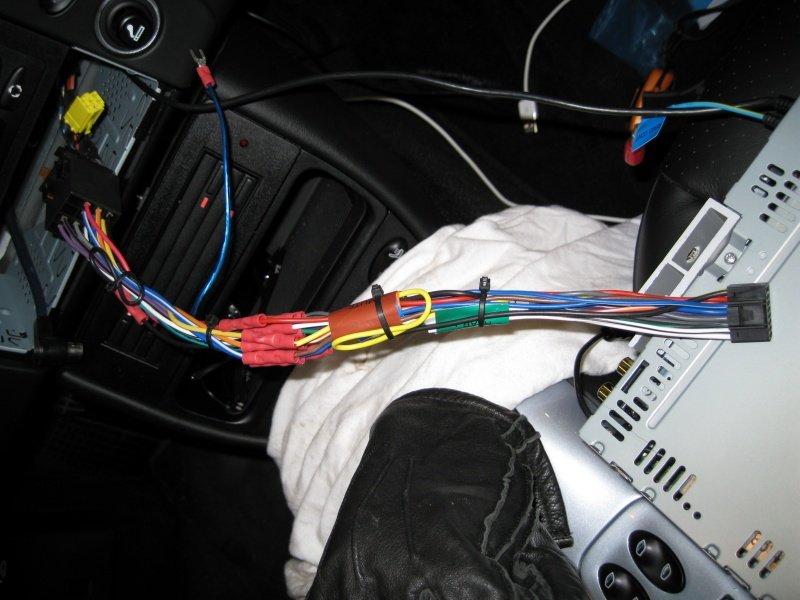
Metra harness plugs into the factory stereo cable:
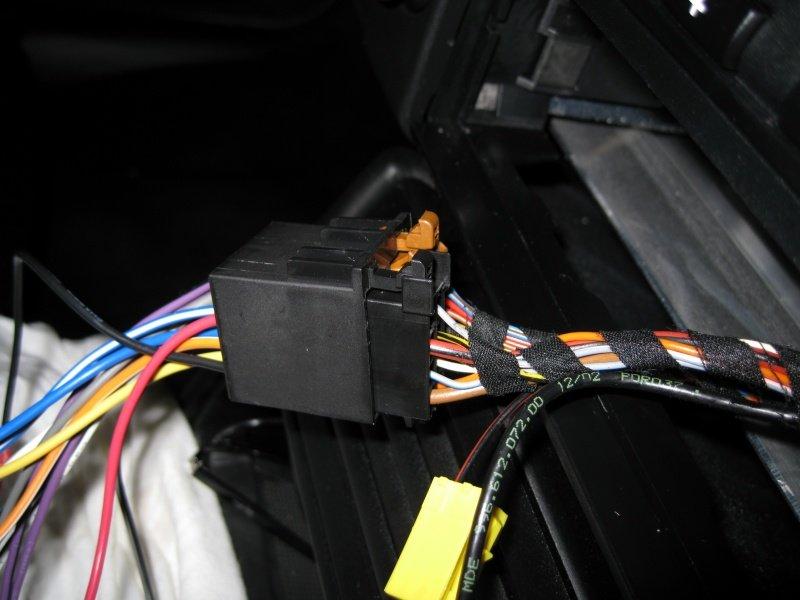
Remote Lead:
Final Install:
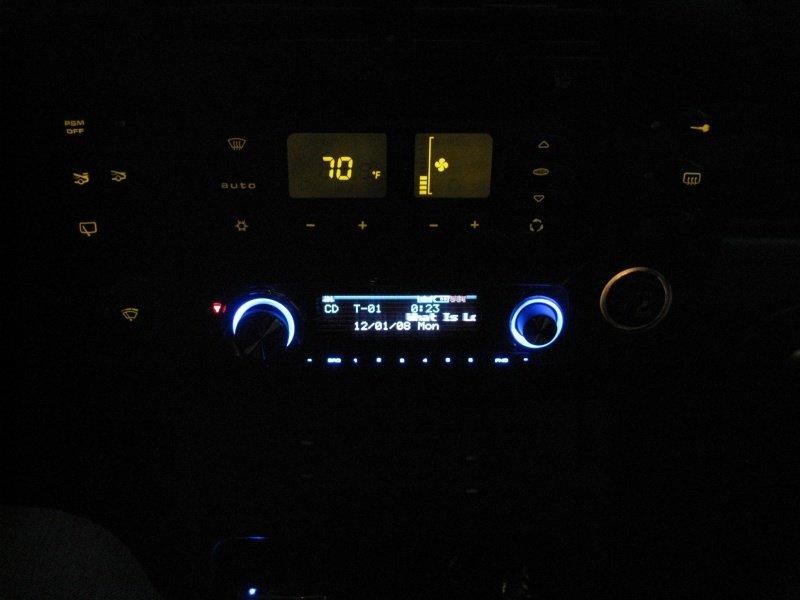
This is how it looks in the sunlight:
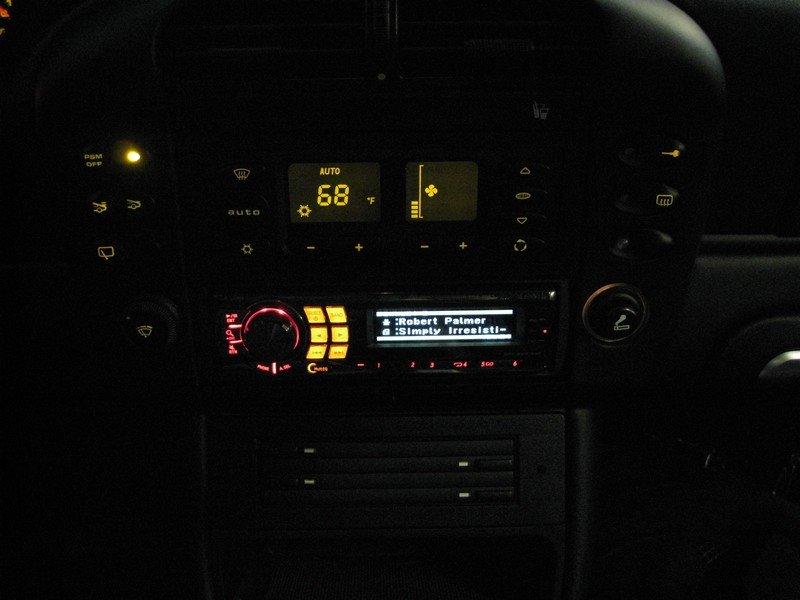
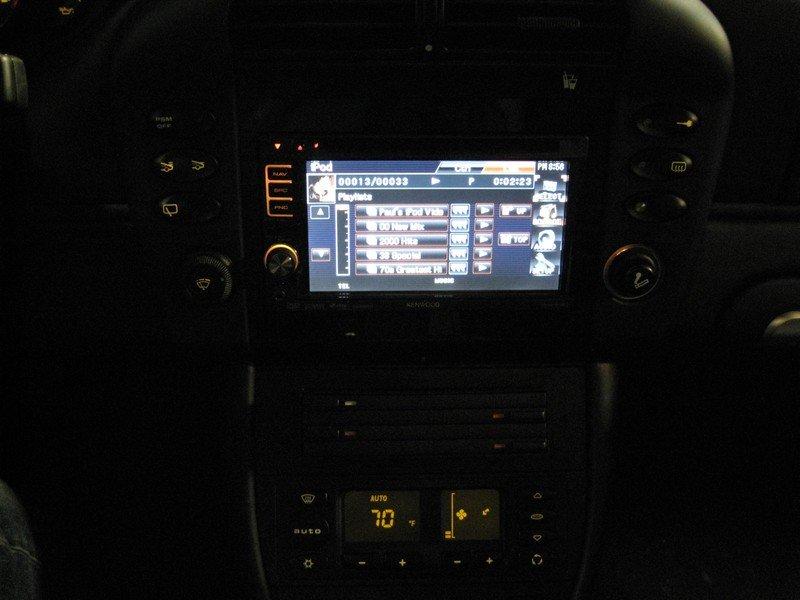
At night:

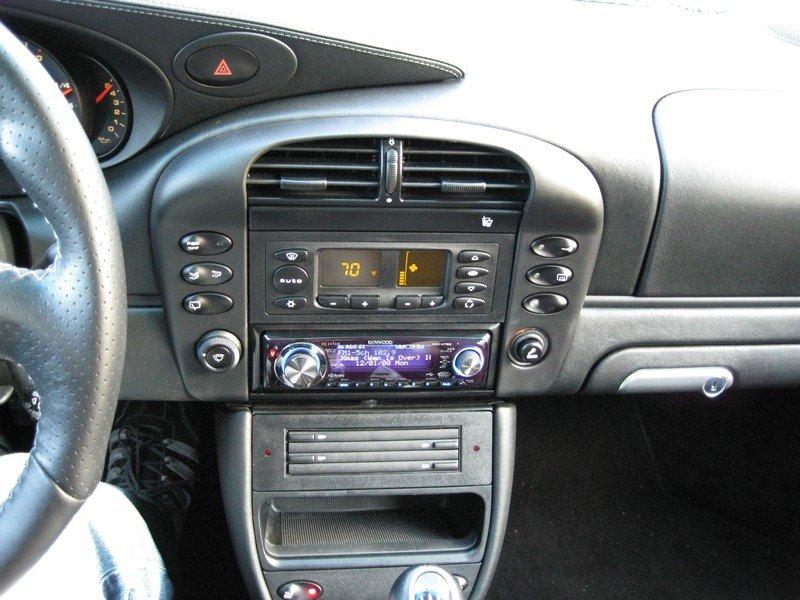
So I uninstalled the Kenwood unit (as simple as unplugging it) and got an Alpine CDA-9887 (their top of the line single DIN unit). This matched the color better in the Porsche but still not great. Unfortunately the sound quality is not as good as the Kenwood running through the BOSE amp. Also the install was not as simple. Each accessory component had to have it's own power (so the Bluetooth module, Sirius, etc... I had to connect a separate power and ground wire for each component). I piggy-backed it to the power and ground on the main radio harness. This created some alternator noise that whines with the revs of the engine. Also Alpine's bluetooth unit is completely worthless. No one could hear me through Alpine's microphone. The Kenwood design is much better. Each component gets connected to the next component in series and did not require a separate power connection for each component. And the sound quality of the Kenwood bluetooth is excellent - I think this is because Kenwood uses the Parrot bluetooth system.
So I sent this Alpine unit back too! Each time I pay a 15%-20% restocking fee unfortunately.
Here's the install:
Next I bought the Kenwood DNX-5120 double DIN with NAV and rear reverse camera. I have to say I'm very happy with this setup! Finally. This unit you can adjust the color of the lights to match the car (via RGB) so you can completely custom match the color to the car. The Alpine CDA9887 had orange but it was bright orange and did not match the Porsche. Also the sound quality on the Kenwoods is superior to Alpine (via the BOSE amp). The install on this is definitely not for the weak (compared to the single DIN units). I had to cut and Drummel the dash to make the double DIN headunit fit. I would say it took me about 12 hours to do.
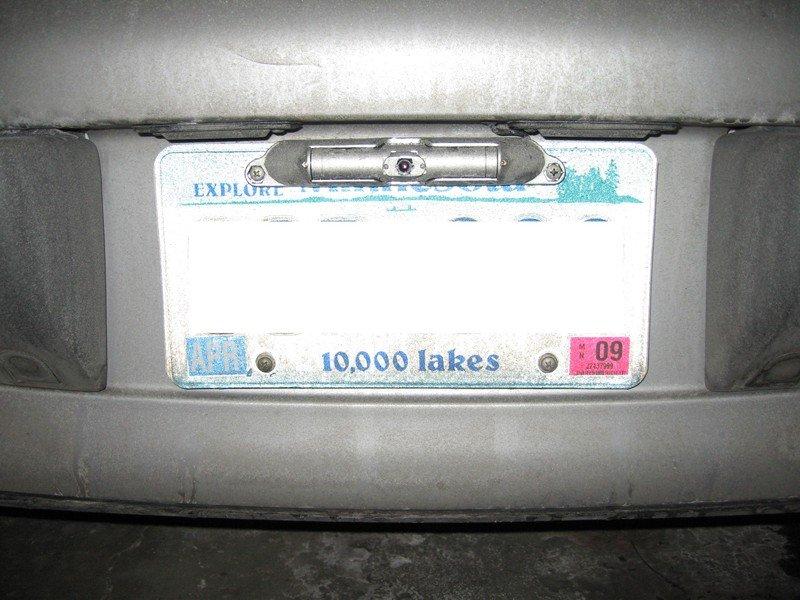
The reverse camera took about 12 hours too! I had to gut out the rear deck and find a grommet to pass the reverse camera wire through (this is the time consuming part). Mounting the camera is as easy and unscrewing the top license plate screws and screwing in the camera over the license plate. I had to drill a hole through the bumper to pass the camera wire through to the engine bay.
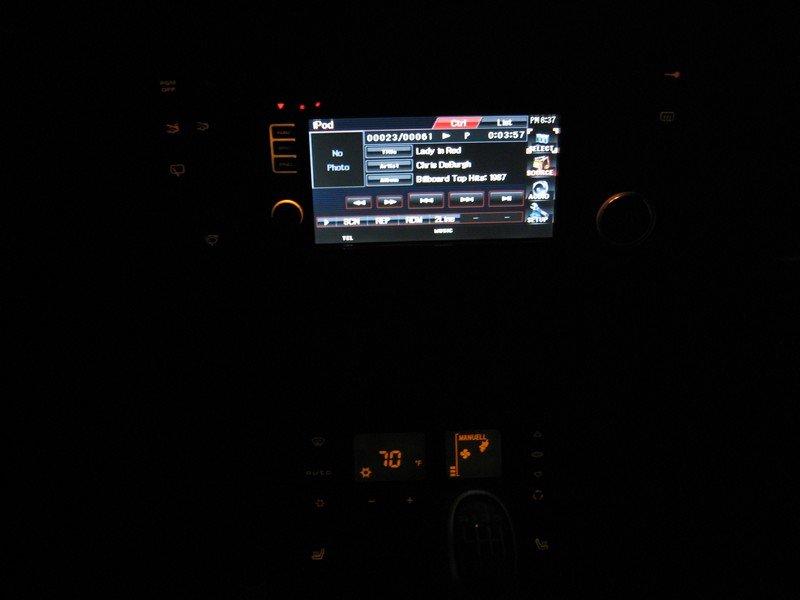
Also I had to move the AC control unit down by the shifter. In the process of moving this the LCD somehow got damaged. It started with 2 bad pixels (I don't think it's a pixel type screen). Then it kept growing in size. I'm wondering it's because of the cold weather here (it's been -10F on and off for about a week). Has anyone seen this? I didn't drop or hit the AC module at all. You can see the defect even when the car is off and the interior lights are not on.
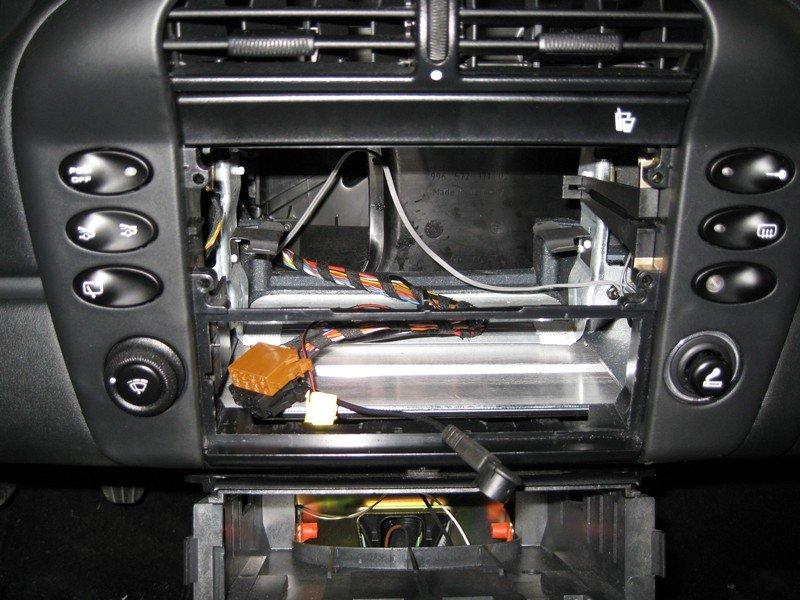
Removed the AC control unit and the radio:
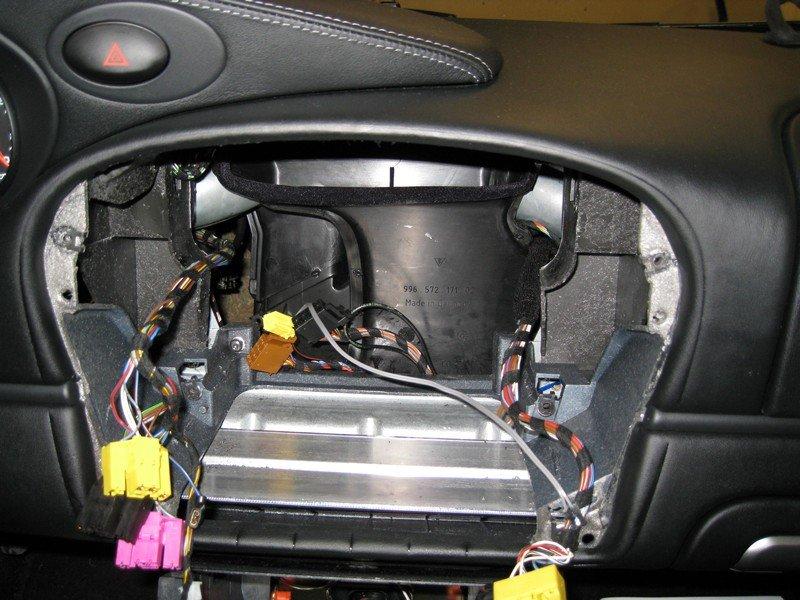
Removed the dash so I could modify it outside the car:
AC unit moved down (note no damage to the right screen here):

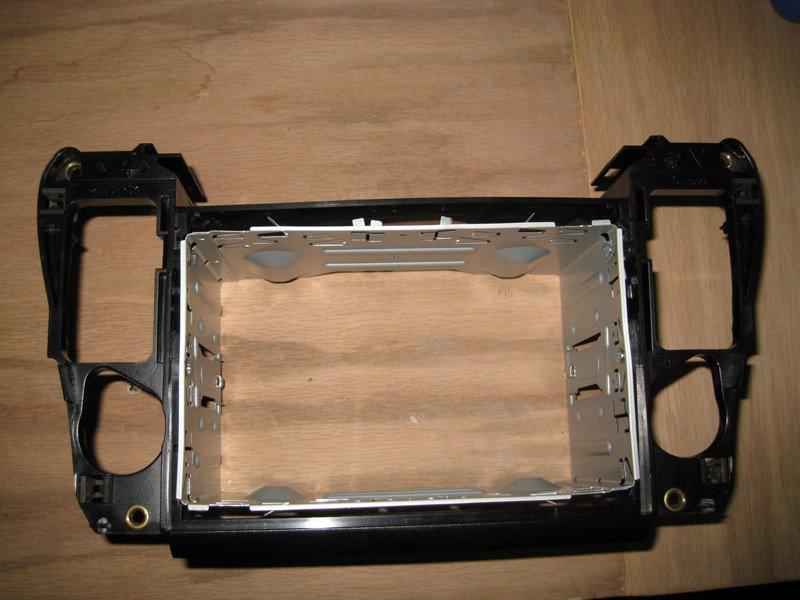
Here's the headunit cage screwed into the dash piece:
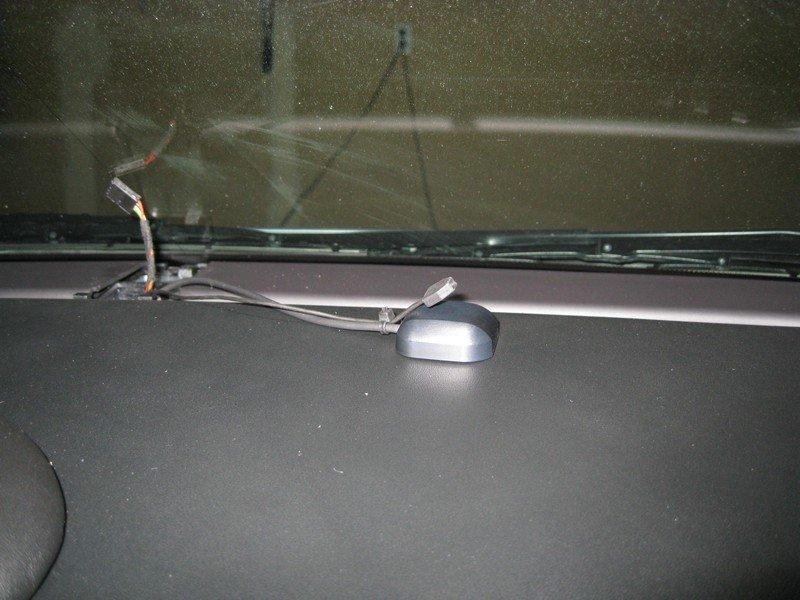
GPS antenna and the FM traffic antenna mounted under the windshield hidden under the security LED:
Underneath the driver seat I tapped into the Black/blue strip wire for the reverse wire of the reverse camera:

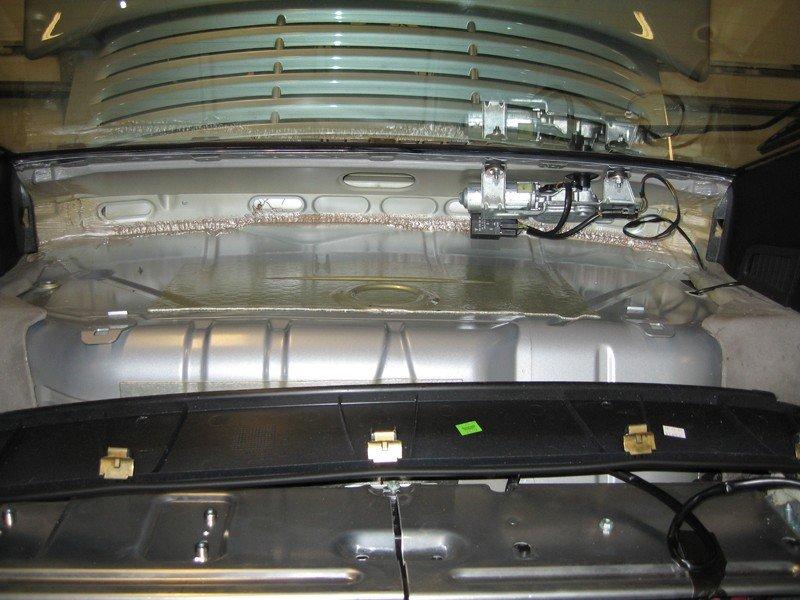
Rear deck apart. I cut through the grommet on the passenger side corner:
Reverse camera:
Here's the deck installed. I spent hours trying to modify the Kenwood faceplate to fit but it was time wasted! Don't do this on your install. I got this faceplate on ebay (Too bad they don't have a matte black one):
![]() http://cgi.ebay.com/ws/eBayISAPI.dll?ViewItem&ssPageName=STRK:MEWAX:IT&it em=220297708386
http://cgi.ebay.com/ws/eBayISAPI.dll?ViewItem&ssPageName=STRK:MEWAX:IT&it em=220297708386
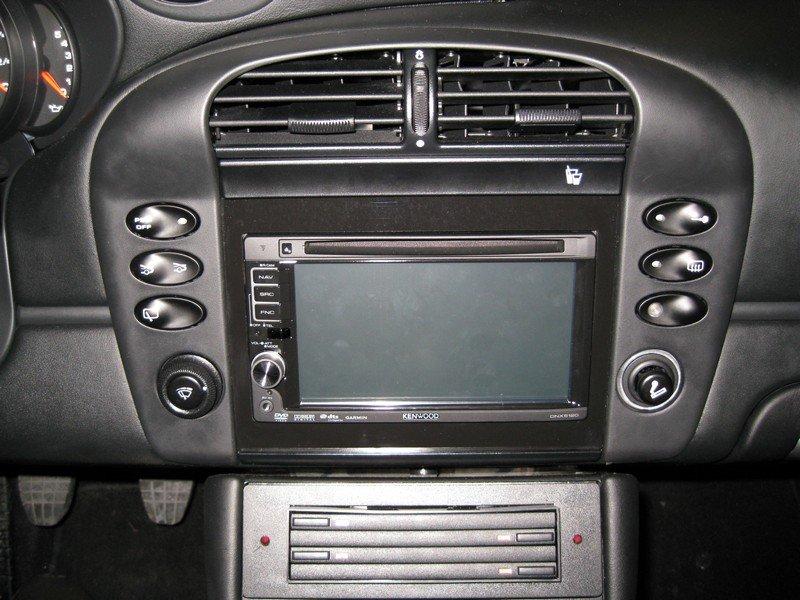
Final Look:

Final look in the dark. There are only 2 areas where the AC screen is bad. This is one of the earlier pictures:
Later picture shows the bigger defect in the AC screen:
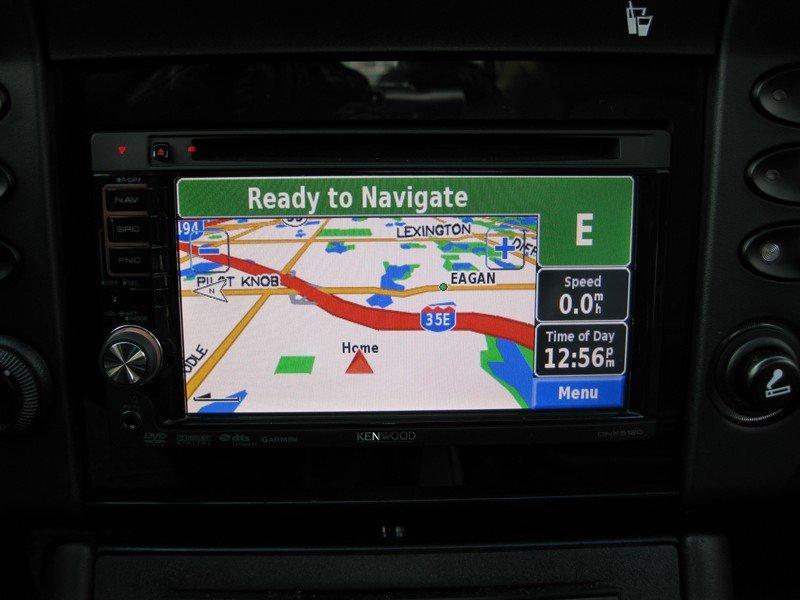
Garmin Nav screen:
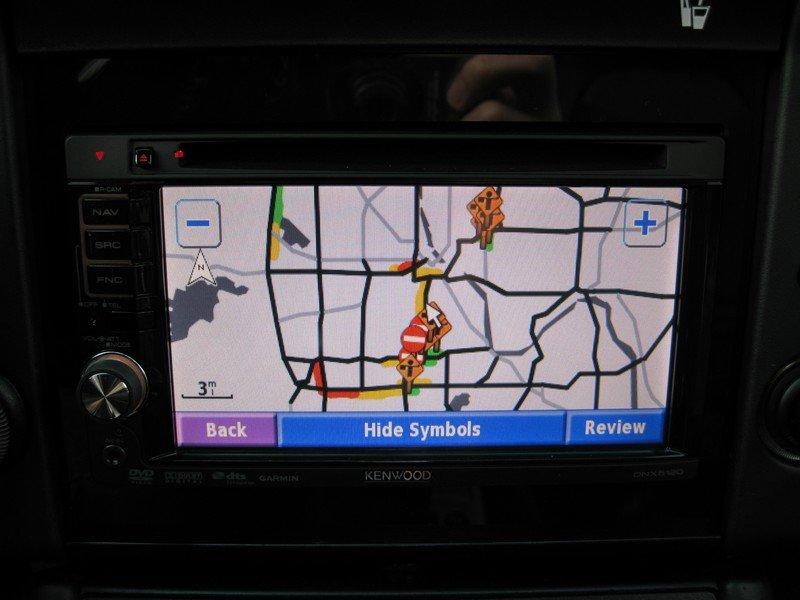
Traffic view. I love this feature. Shows where all the slow areas in town:
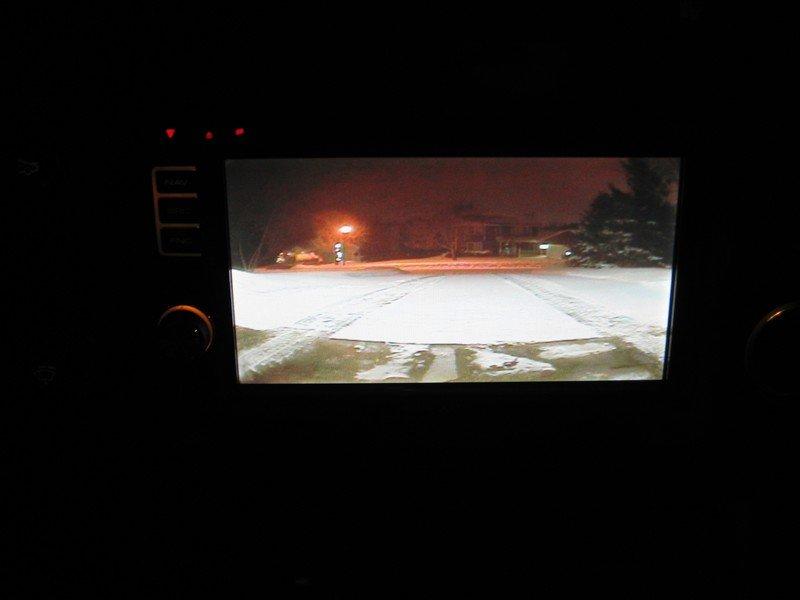
Reverse camera view:
I have to thank Kurt for all his help! I used his install thread as a guide:
FINISHED Kenwood DVD/NAV install and AC control mod- Pics and some DIY stuff
I was asked to write some more details. Here are the parts and links I used:
Kenwood DNX-5120 $624.95 from Amazon.com - Nav/Headunit http://www.kenwoodusa.com/Car_Entert...gation/DNX5120
Kenwood KCA-BT200 $102.81 from Amazon.com - Bluetooth Handsfree
Kenwood CA-SR20V $18.32 from Amazon.com - Kenwood/Sirius adapter cable
Sirius SCC1 - $47.55 from Amazon.com - Sirius module
Kenwood KCA-iP300v - $34.15 from Bestbuy - ipod video cable
BoyoVTL400 $80.49 - rear view camera. I would go with the VTX400 wireless for about $150 so you don't have to run the wire to the back. http://boyovta.com/products/vtx400.html
AC Trim Panel $3.99 from Suncoast Porsche part number 996-552-339-00-01C
http://e-partssales.com/Merchant2/me...T&Store_Code=P
Metra 70-1784 Wireharness $11.90 from Installer.com. You could probably pick this up at Best Buy Mobile/Circuit City. Installer.com won't allow you to return for a refund.
http://www.installer.com/item/displa...php?it=70-1784
Stock Pin-outs:
http://www.renntech.org/forums/index...s&showfile=548
http://www.renntech.org/forums/index...+radio+install
http://www.renntech.org/forums/index...hl=reverse+tap
Antenna adapter - $11.95 from Installer.com or Bestbuy
http://www.installer.com/item/displa...php?it=40-vw10
Faceplate - $63 from cvt929 on ebay
http://cgi.ebay.com/ws/eBayISAPI.dll...m=220297708386
Sears Craftsman External Hex Sockets $39.99 - needed to remove the driver seat to get at the reverse wire (under the seat Black-Blue striped wire).
http://www.sears.com/shc/s/p_10153_12605_00934570000P?mv=rr
Instructions to get at the reverse wire:
http://www.renntech.org/forums/index...se+wire+sensor
http://www.renntech.org/forums/index...t=0#entry13886
Here are some useful links:
Stereo Upgrade for MOST System
FINISHED Kenwood DVD/NAV install and AC control mod- Pics and some DIY stuff
Here are the steps:
1. Use the Porsche radio removal tool (I used my Audi tool but you can get this from any Porsche dealer relatively inexpensive) to remove the Porsche radio. It can be stuck in there and you may pull out the tool and not the radio. Be careful not to slip and scratch your interior. Mine seems to not lock on to the radio very well so I ended up pulling the tool out and not the radio a couple times.
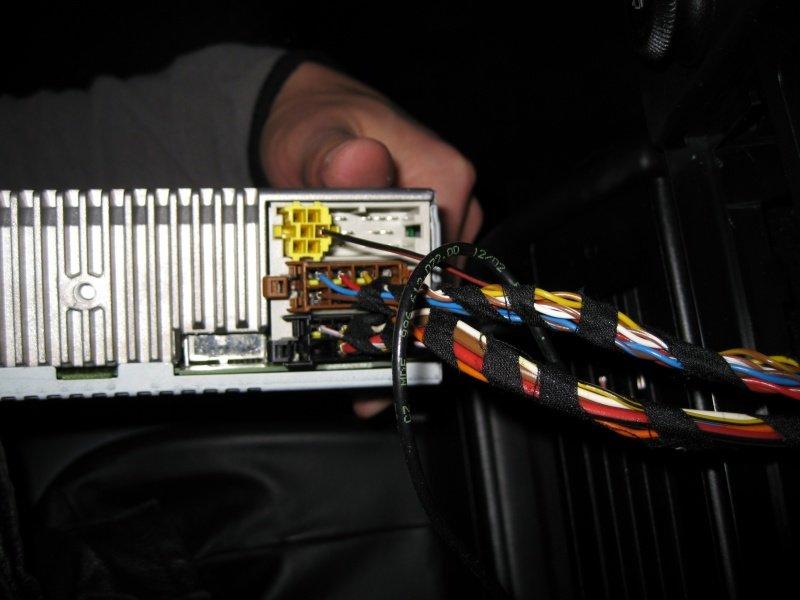
2. Unplug the 3 wire connectors (brown, black and yellow) from the back of the radio. Unplug the antenna.
3. Wire your new radio's harness to the Metra 70-1784 harness. The colors all match up (red on the Metra with red on the radio, etc.). On mine the yellow and red were swapped on the Metra harness. The remote turn on wire (for amps) connects to the yellow harness on the car. I just crimped a post on the remote turn on wire from the new headunit. This plugs into the yellow harness.
At this point your new radio can just plug into the factory harness and you have sound and basic functions.
4. Adding the Bluetooth unit, iPod and Sirius unit is plug and play. Plug the appropriate cable to the back of the new headunit. I put the Bluetooth Mic on the upper left A-Pillar with good results. I would like to run the same wire into the Porsche mic someday if I can find out how and where the factory mic wiring is at. The ipod goes in the glove box. The Sirius control boxes all go under the dash.
5. Adding the Reverse camera took me a long time.
- run the reverse wire down the driver side and under the carpet and to under the driver seat. I just removed the 4 seat bolts and lifted the seat back without unplugging the power wires to the seat. Find the Black-blue stipped wire and tap into that for the reverse wire.
- run the camera wire back from the passenger side. You have to remove the Bose sub and the rear deck:
http://www.imagineauto.com/tips3.htm
Poke through the rubber grommet on the left corner (you have to pull out a lot of insulation foam to get at it. Use something long and sharp. Pass the camera wire through it.
- mount the reverse camera on the license plate. I had to drill a hole by the license plate to pass the power cable from the reverse camera. Fish out this cable and connect it to the cable that you just passed through from the cabin.
5. Mounting the radio cage. This is time consuming also.
- remove the trim with the switches (this just pulls outwards towards you). Remove the 4 hex screws holding the dash trim in place. Remove the 2 hex screws inside holding a verticle bracket. Pull out the vent (there are 2 clips on top holding the vent in place). Now you can pull off the whole dash trim. You have to cut off the plastic bar separating the top and bottom of the dash trim. Smooth out the edges of the dash trim so the cage will fit. I lined up the radio with the faceplate and drilled in 4 screws to fixate the cage.
- put the cage and the dash trim back in place and fixate with the 4 hex screws. Then put in the vent. Replace the trim with the switches. Now you can plug all the wires in and slide the radio back. The faceplate trim from ebay just friction fits in place.
Done. Let me know if you have more questions.
1-7-2009
The DNX-5120 can take a Garmin GTM 12 Traffic receiver. https://buy.garmin.com/shop/shop.do?cID=203&pID=417
It plugs directly in the back of the DNX-5120. The GTM12 is basically an FM antenna. I tied this FM antenna with the Nav GPS antenna and put it under the front windshield sensor. You log into Garmin's site to register the antenna (once you plug the antenna into the DNX5120, turn the unit on and access the Traffic section of the menu and it will give you the antenna id). Use the antenna id to register it on Garmin's site. It's a $60 one time fee!
It works great! It's fairly accurate.
1-26-2009
I really like the Kenwood DNX 5120! I had an Alpine CDA-9887 non-nav top of the line Alpine and thought it didn't sound as good as the Kenwood. I also had the Kenwood 792 - bad display and controls but good sound. Also the Kenwood Bluetooth is better than the Alpine but I think the ear piece for $75 is better than either the Kenwood or Alpine Bluetooth. Another one where if I had to do it again I would not get the Bluetooth module.
I really like the DNX5120's Nav. I have a hand held Garmin and the 5120 is very similar to program and intuitive to use. The FM Traffic is pretty good although if you drive by an area of construction all the time everytime you drive by this area the FM Traffic will tell us again.
I would have a smaller screen for the rotory dial volume control and the 3 separate buttons for Nav/Source/Function but that's just me.
The DVD video is pretty good. iPod video is good but controlling the video with fast forward, etc. is not so easy.
iPod functionality is very good. You can quickly scroll down your playlists.
Sirius Sat is pretty good although sound quality from Sat radio (Sirius or XM with my previous cars also) is not CD quality.
I read in some review of slow boot up time - I have NOT experienced this. Boots up in less than 5 seconds.
Lastly I always thought touch screen was the way to go but it really is difficult to reach for the screen and try to push this small button on the screen while driving. Maybe this is where the bigger screen is better. Maybe this is why Audi and BMW's nav systems have a rotory dial. It would be nice to have buttons on the steering wheel. The 996 Porsches don't have this feature.
Also forgot to mention. Someone asked about the screen. The screen is very good. It's well visible in direct sunlight as well as in the shadows.
1-27-2009
Overall the install wasn't too bad. I would say a day to do it if everything goes well. You have to splice into the Bose amp harness to get to the speaker wires and the battery is up front so it shouldn't be bad for you.
Don't bother with the Kenwood trim piece (get the premade one on ebay) and skip the backup camera and it can be a really quick job. If your stock setup has the AC controls on top and a storage bin just under the AC control, there is a plastic trim that separates the top DIN and bottom DIN that needs to be cut and you have to shave off some of the sides of this plastic trim to make the double DIN headunit go in. Trimming this plastic piece can be time consuming too. I used a Drummel.