You must be logged in to rate content!
22 minute read
DIY Engine Coolant Change
Compliments of STI Sibb @ www.iwsti.com
6-25-2008
Scope:
The following process is loosely based on the 07 STI Owner's Manual and is intended to help you replace your Engine Coolant as part of your 30K service. Special Note: For 2008+ models, you may have the newer blue subaru coolant. This coolant has a change interval of 100K+ miles (see link). http://www.subaru.com/content/downloads/pdf/maintsched/2009SchedFed.pdf
Disclaimer:
When in doubt, have a qualified technician or maintenance shop perform your engine coolant change. The following procedure contains guidelines for changing your engine coolant and may not accurately reflect your particular car's coolant system. Read your Owner's Manual first when performing an Engine Coolant change. There is always a possibility that things will not go to plan. BoBoSTI contributed this youtube clip to the forum: 2005 STI Coolant Change - Lessons Learned - YouTube
Safety:
Engine Coolant or Radiator Fluid becomes hot when your car's engine operates. The radiator system becomes pressurized and can release hot fluid or vapor when a cap is removed. Be cautious and let your system cool down sufficiently before removing any caps and/or plugs. Your engine bay has many hot surfaces. Allow the components in your engine bay to cool off sufficiently before performing work to avoid getting burned. Wear proper safety glasses and clothing. If engine coolant spills on part of the exhaust, wipe it off as it has the potential to smoke and catch fire. There are fans located against your radiator tank that are used for cooling purposes. Don't allow any loose articles or clothing to get near the fans since they could become entangled. Last of all, engine coolant is toxic. Do not allow any pets or young children near the vehicle when performing an engine coolant change. Once the coolant change is performed, monitor your vehicle for any leaks that appear in the engine bay or underneath the vehicle before and after operation. The vehicle subframe and front undercover will catch most small leaks and they will evaporate without notice. If you have a strong coolant smell that does not go away in your engine bay or cabin (with the ventilation turned on), chances are that you have a leak in your system at a hose, cap, plug, gasket, or tank.
Disposal:
Antifreeze/Coolant is toxic and should be recycled, reused, or disposed of properly. If you are in luck, a local shop (or dealership) will allow you to pour your waste antifreeze/coolant into one of their bins. Automotive stores like Autozone or Advanced Auto do not typically have recycle bins for antifreeze/coolant, although recently I've seen them start to. If you have difficulty locating a recycle facility, you will need to research Waste Management Utilities in your city/county. The first link below is to an EPA page that provides information on antifreeze/coolant recycling. The second link shows an example of a waste management facility.
1. Antifreeze | Municipal Solid Waste (MSW) | US EPA
2. City of Winston-Salem, NC :: Hazardous Waste Disposal
What to Wear:
Gloves
Long Sleeve Shirt
Safety Glasses
Tools:
Low profile jack (optional)
4 jack stands (optional)
Head lamp or flashlight
10mm Socket (optional for removing air intake scoop for additional access)
12mm Socket (for removing the Undercover)
19mm Socket (for removing the wheel lugnuts; optional)
Torque wrench (3/8" drive recommended)
Rags
Funnel
Wide drain container (8 Liter capacity)
Thin tipped flat head screw driver
Small needle nose pliers (optional)
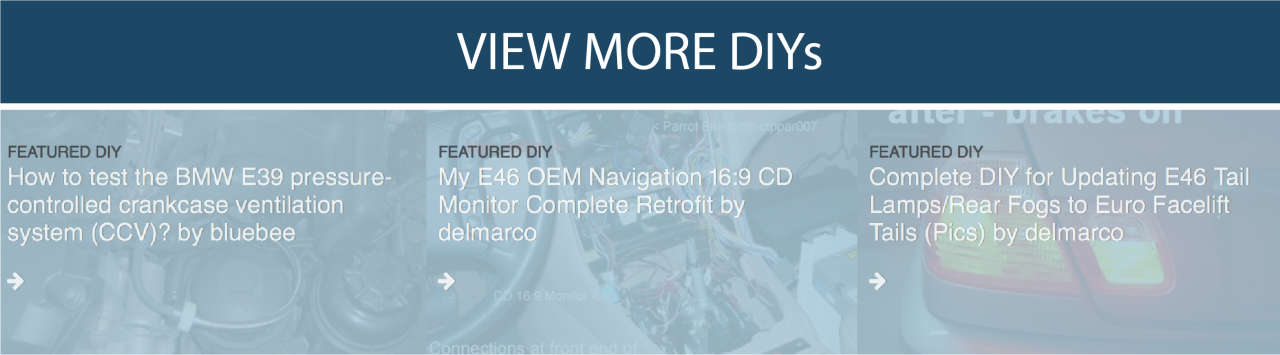
14,15, or 16mm socket with 1/8"-1/4" slot ground out of the end (optional)
Note: The socket in the picture was ground in a machine shop. It's only desired if you have trouble loosening the drain plug.
Materials:
Distilled Water (1 Gallon)
Subaru Genuine Engine Coolant Conditioner (1 x 125 mL bottle)
Subaru Genuine Engine Coolant (2 x 3.75 Liter bottles 50/50 Antifreeze/Water Solution) -or- (1 x 3.75 Liter bottles Undiluted Antifreeze Solution)
Note: There is a subtle difference between the diluted and undiluted bottles so know what you are buying. Either will work, though. Just make sure you have the correct mixture of coolant and distilled water (50/50 recommended) before you pour it into the system. The 07 STI Coolant system holds approximately 7.7 liters (8.1 US quarts). Caution: The new premixed coolant is a blue color. The dealership and others on here have recently informed me that the old green coolant should not be mixed with the new blue coolant. However, this thread has evidence that states it is ok to mix them: Blue & Green Subaru Coolant The new coolant is supposedly rated for over 100,000 miles before it requires changing. If it is mixed with the older green coolant, the 30k service interval should be observed for changing the coolant. In either case, the coolant conditioner also needs to be added to the system. Here is a Subaru link dlkswinger posted on page 16 of this thread which specifies the replacement interval for 2008+ vehicles using the blue coolant: http://www.subaru.com/content/downlo...09SchedFed.pdf

Preparation:
Please note that having the car put up on jackstands and removing the wheels is optional. You can perform the whole coolant change from the top of the engine bay by removing the OEM air intake which gives you access to the drain plug underneath. The front undercover is also removable without putting the car up on jackstands. You'll need a low profile drain container which is available at most supermarkets and auto shops. Optional steps are shown in the drain procedure section.
1. Park on a level surface and turn off the engine.
2. Secure the car from rolling by engaging the parking brake and putting the car in reverse after the engine is turned off. Use wheel chocks as necessary.
3. Loosen the front wheel lugnuts on the passenger side just enough that you can remove this wheel once the car is lifted up. I loosened them on the driver's side as well for the photo, but this is not necessary.
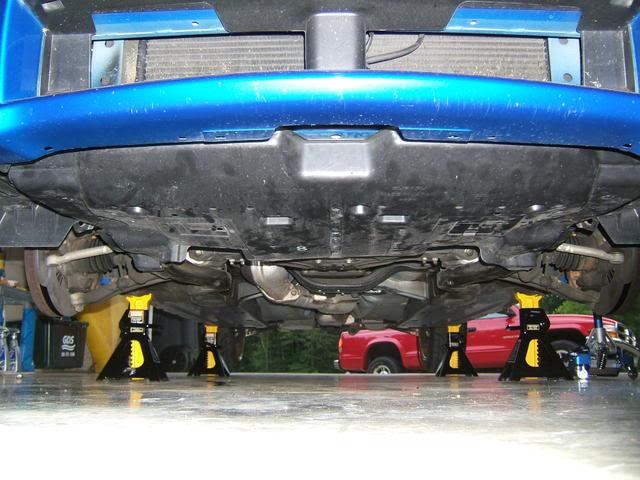
4. Put the car up level on all 4 jack stands. Reference the following link carefully as I do not condone all of the methods proposed here for securing the car: http://www.iwsti.com/forums/how-inst...ackstands.html. The car should be placed on jack stands at the reinforced pinch welds whenever possible. It will not hurt to put additional support under the car in the unlikely event that the car's weight should shift or a jack stand or support member should fail. Whenever possible, do not place your body directly under the car when it is elevated on jack stands. It's also a good idea to have someone else nearby when working under a vehicle.
5. Remove the front wheel on the passenger side. Again, this is optional. I also removed the driver's side wheel for the photo, but this is not necessary.
6. Pop the engine hood and allow the engine to cool for at least an hour.

System Overview:
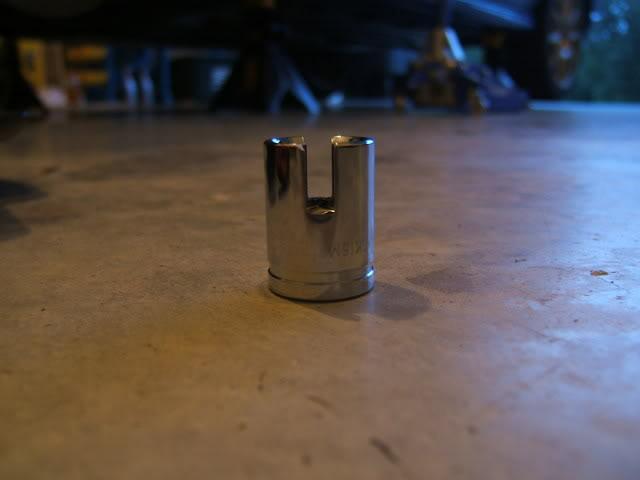
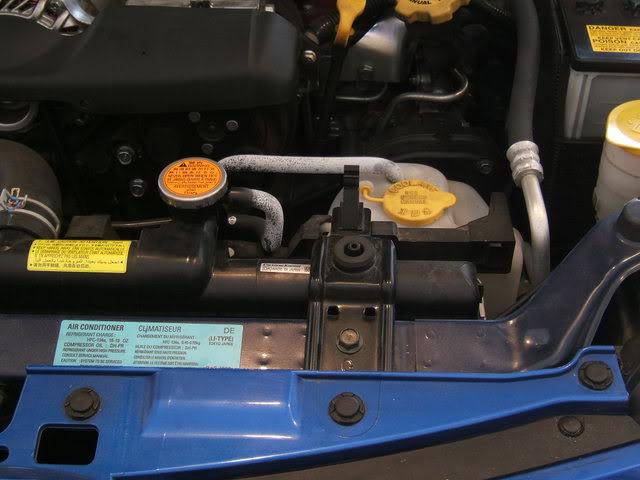
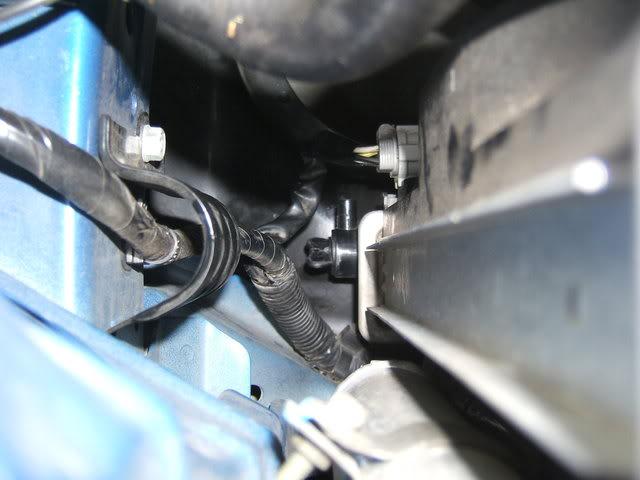
The "Drain Plug" sits at the bottom of the radiator on the passenger side. It sits directly over the subframe and is identified by its wingnut shape.
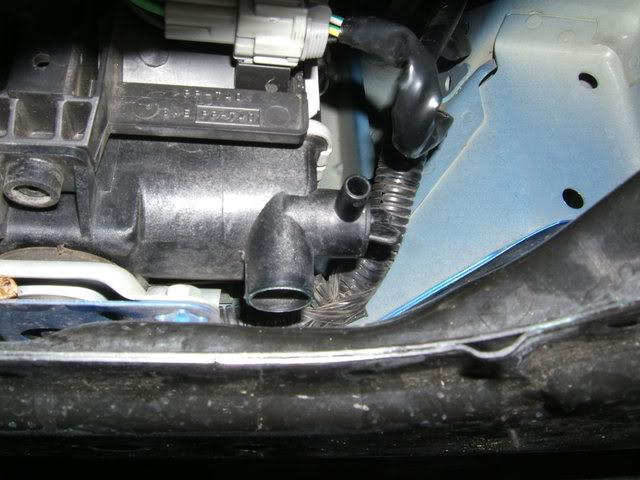
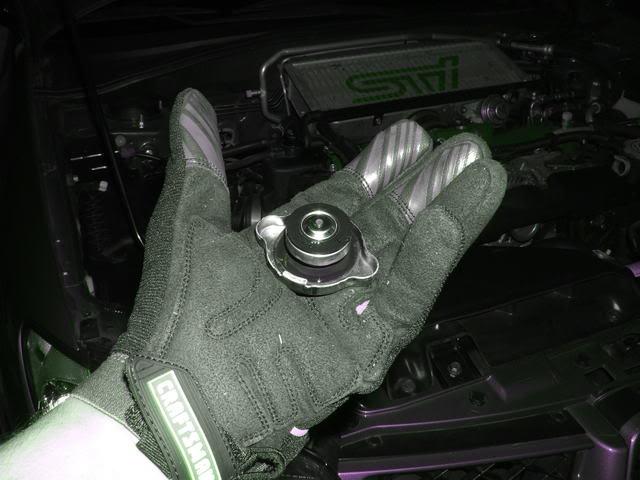
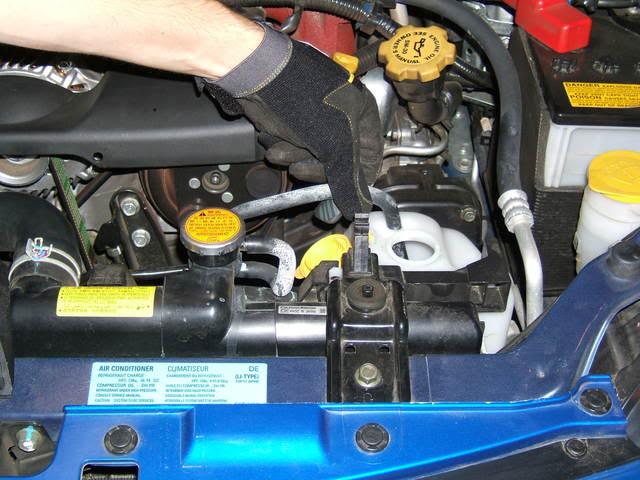
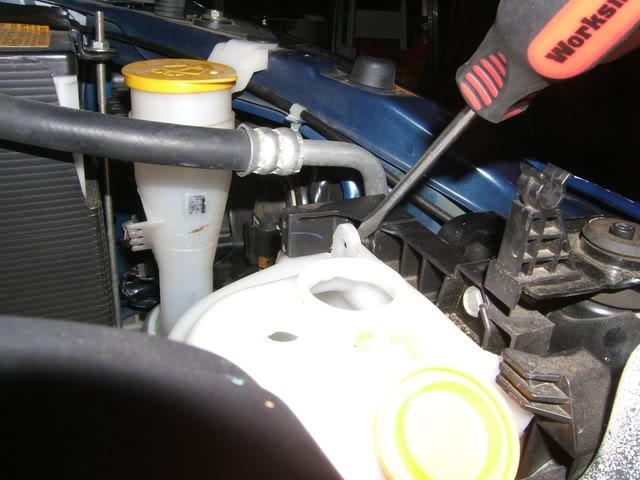
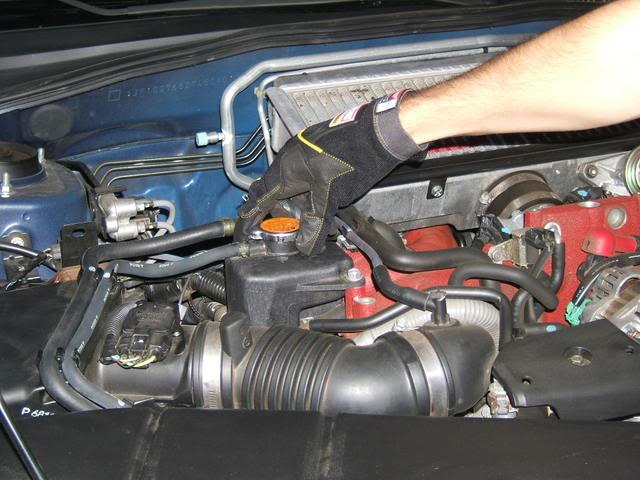
The "Filler Tank" is a small black plastic tank located over the engine between the air intake filter and the intercooler. It has a *tabbed* radiator cap. The Filler Tank is the highest point of the system.
The "Filler Neck" refers to the top portion of the Filler Tank just below the cap.
The "Radiator" is a large rectangular tank that sits vertically across the front of your engine bay. It has a *round* radiator cap. You do not need to remove the *round* cap at all during this process. However, it is an optional shortcut when you first fill the system during the fill procedure.
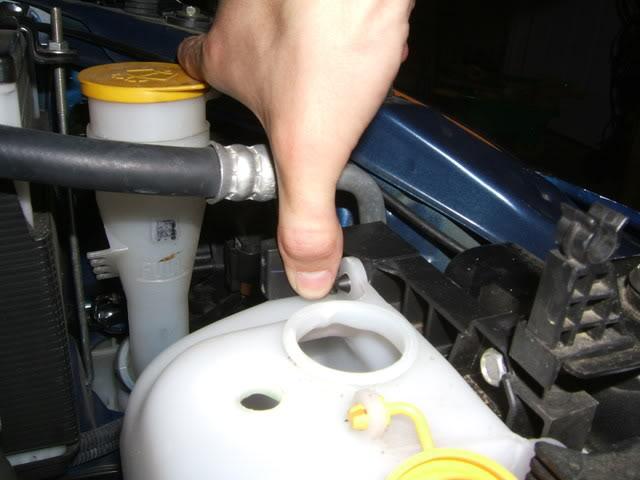
The "Reservoir Tank" is a white plastic tank that sits just to the right of the Radiator. It has a yellow plastic cap that reads "Coolant". For the 2007 STI, the part number is 45150FE000. The description is Tank Assy Reserve. This part includes the small coolant hose that runs from the radiator to the reservoir tank. The cost is approximately $52.44. I needed to replace mine due to a small leak at the tanks base. The small coolant hose was also leaking due to a small tear in the hose.
Drain Procedure:
1. Complete all preparation steps listed in the original post. If the engine bay is hot, wait longer before starting.
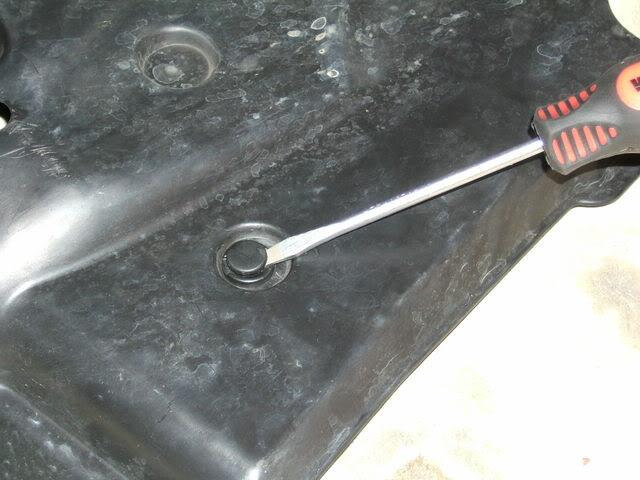
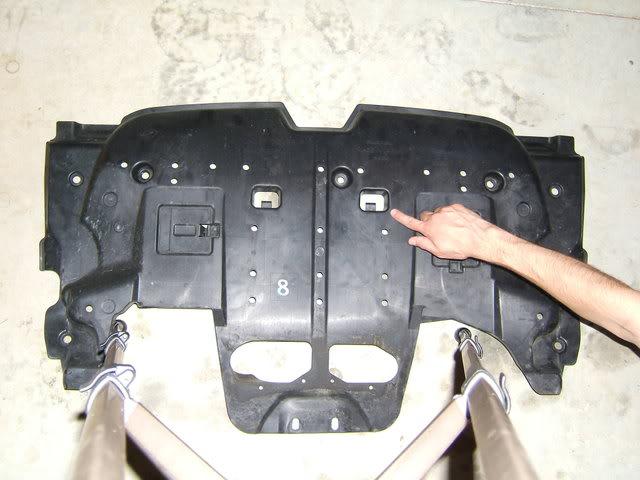
2. Remove the Undercover. Note the 3 bolts (12mm) at the front and 2 bolts (12mm) at the back. Also note the 2 push pin clips on the left and the 2 push pin clips on the right. Remove the bolts first. There is a trick to the push pin clips. Insert the thin tipped flat head screw driver into the clip's face groove and gently twist to pry the pin open. Don't be forceful with these plastic clips. See the second picture.
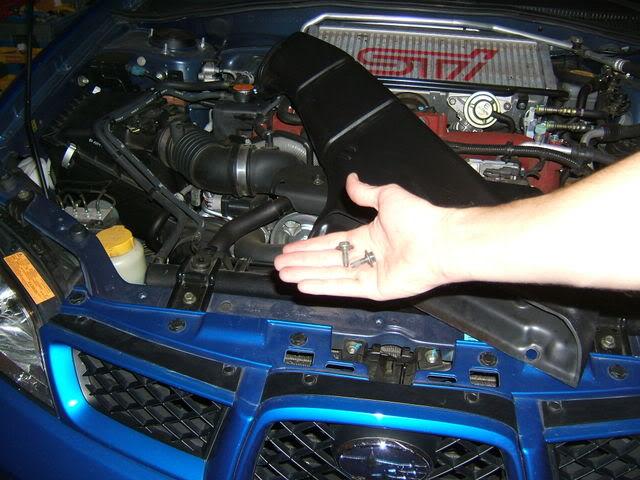
3. Locate the drain plug. Reference the picture in the first post. If you look in front of the passenger's front wheel well, you will find the drain plug sitting out of sight just over the metal subframe at the bottom of the radiator. You can reach it with your left hand without getting under the vehicle. Alternatively, you can remove the air intake scoop by removing 2 bolts at the front (10mm). Look down towards the bottom of the radiator's left side. The second picture shows the drain plug from above.
4. Place a wide 8 Liter capacity container on the floor below the drain plug and subframe.
5. Open the *tabbed* radiator cap on the Filler Tank. It is located just above the engine. Removing this cap will help the coolant drain more quickly once the drain plug is loosened. Check that the cap has a rubber gasket under the cap lip and near the tip.
6. Loosen the drain plug (turning counterclockwise / lefty-loosey on the 07 STI) to allow the coolant to drain. Turn the plug out about 5 to 6 turns to get a decent amount of flow. The plug can be difficult to turn by hand and it is located in an awkward position. A small pair of pliers can assist you to turn it from underneath the car. If you have a lot of difficulty turning it, take a 14, 15, or 16mm standard socket to a machine shop and have a buddy grind out a 1/8" to 1/4" slot in it that is 1/2" deep. Remove the air intake scoop and if your arms are skinny enough, you can reach to the bottom of the radiator and make small turns on the drain plug. The engine coolant runs out very slowly and can take 30 minutes or more to finish draining. Please note that after the draining is finished, try opening the drain plug 1 or 2 more turns to see if there is an increase in flow. If so, let it drain for longer. I've attached a picture of the draining process to illustrate why you would want a wide container. I also tried running tubes. Do yourself a favor and buy a wide drain container. You can do steps 7, 8, & 9 while the coolant drains.

7. Pull the small rubber line completely out of the Reservoir Tank. Nothing holds it inside the tank. If there is coolant in the tube, allow it to slowly pour out into the Reservoir Tank to avoid spilling it.
8. Remove the Reservoir Tank, empty it, and rinse it out with Distilled Water. There is a plastic clip that holds it in on the right hand side. Push this clip back with your finger (thumb location in the picture) and insert a thin tipped flat headed screw driver behind the white plastic . Twist the screwdriver to gently pry the tank free. When you pull the tank out, note the location of the "Full" line.
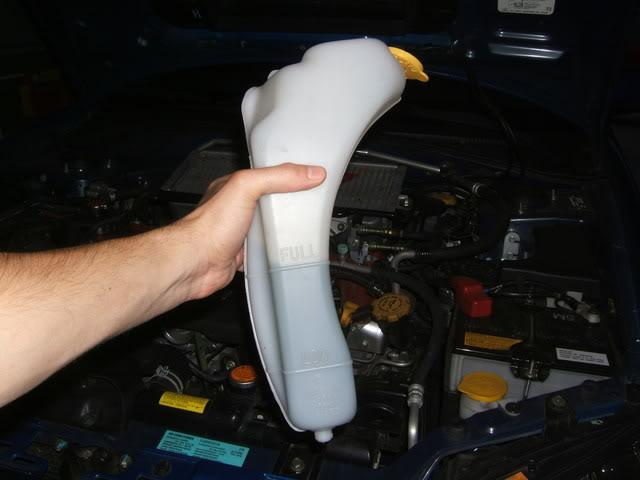
9. Reinstall the Reservoir Tank. Make sure that the knob at the bottom of the tank seats in the bracket hole it was removed from. Also, make sure that the top plastic clip holds it in place. Reinstall the rubber tubing through the hole at the top. The tubing should be pushed towards the bottom of the Reservoir Tank.
10. Tighten the drain plug and wipe the area clean.
11. Reinstall the Under Cover. Put the 4 Push Pins in place first. There are 2 recessed tabs located just behind the 3 bolt locations at the front. To bolt the Undercover back to the car, you need to make sure the tabs in these 2 recesses are pushed over top of the metal shelf under the car. I used the back of my ratchet to pry them into position. If you don't do this, the Undercover will hang low and not allow you to reinstall the front middle bolt as there will be a 1" gap between the Undercover and threaded bolt hole. Reinstall the 3 front bolts and the 2 rear bolts.
12. Reinstall the Front Wheels by hand tightening the lugnuts in a star pattern. Make sure there is no slop by trying to wiggle the wheel.
13. Lower the vehicle off of the jack stands.
14. Tighten the Front Wheel lugnuts to the proper torque specifications. Always tighten in a star pattern.
***If you removed the air intake scoop, make sure you put it back before running the vehicle.***
Your STI Engine does not have any Coolant in it now for all practical purposes. Do not go on a joy ride as your engine will immediately overheat and make some nasty noises before it makes 1 loud and expensive clank.
Fill Procedure:
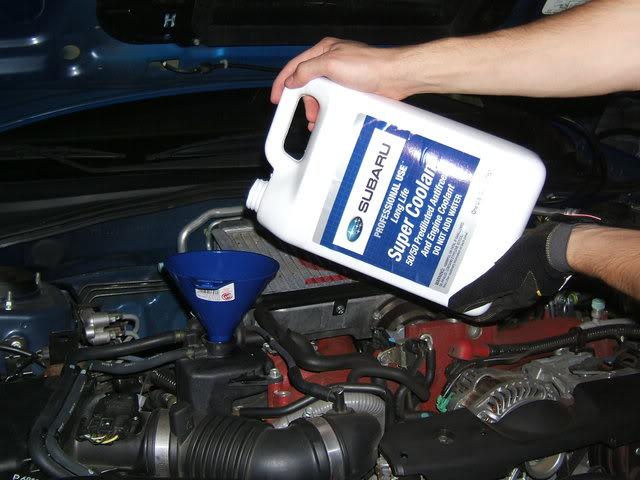
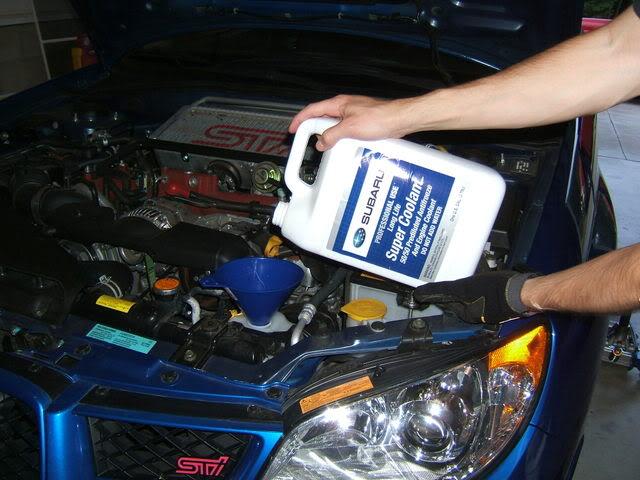
1. Place a funnel in the Filler Tank where the *tabbed* cap was removed.
2. Slowly add a 50/50 mix of Engine Coolant and Distilled Water to the Filler Tank through the funnel. Adding too quickly can force air into the system which will make the whole process take a little longer. We have to burp the air out of the system later. (If you have the 50/50 premixed solution, get to pouring. If you have the undiluted solution of Engine Coolant, mix it 50/50 with Distilled Water before adding it. Double check your bottles as it is easy for the Subaru dealership to accidently sell you one of each.) When the fluid starts backing out of the funnel, stop pouring and allow the fluid level to drop slightly into the Filler Neck. Note: Your Service Manual (not the Owner's Manual) will have a chart for different mixtures of coolant. If you want to run a more diluted solution, do so at your own risk. 50/50 will keep your coolant from freezing anywhere but the arctic circle.
3. Shake the Engine Coolant "Conditioner" well and pour some into the Filler Neck of the Filler Tank. Do not worry about pouring it all in the first time. You will get several chances to pour the rest in. Do not worry if it looks like shark chum with bits of chalk thrown in. These are all items that will dissolve in the system. Picture to be added soon.
4. Reinstall the *tabbed* radiator cap. It should screw on and stop. Double check that it is tight.
5. Remove the yellow cap on the Reservoir Tank and add Engine Coolant up to the "Full" line which is located halfway down inside the tank. Do not fill the Reservoir Tank to the top. Close the yellow cap.
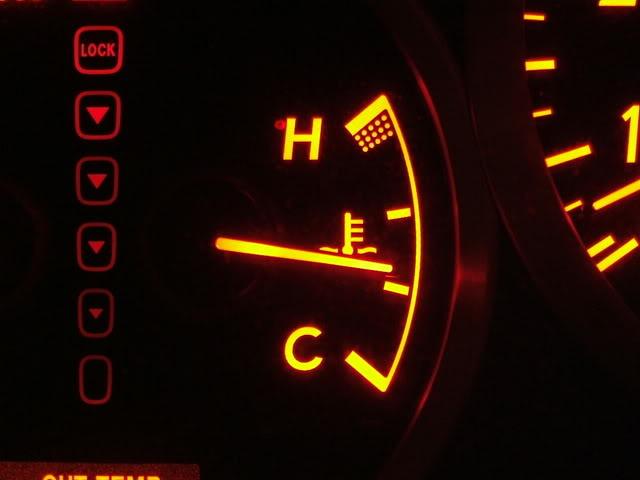
6. Start the car and monitor the coolant temperature from the driver's seat (The picture below shows an 07 STI's normal operating temperature). By idling the car, you are allowing the car's engine to heat up. There is a thermostat that will kick the cooling system on and pull the engine coolant away from the Filler Tank and Reservoir Tank you just filled. You will know that the system is on when the Radiator fans kick on. Let the car run for a few seconds after the fans turn on and then turn it off. Make sure to turn the engine off before the needle gets above the 2nd mark on the Temperature Gauge in the dash. If it goes much higher, it can cause the engine to overheat which would be bad. ***Warning: If you are in a garage, make sure that the garage door is open to allow the Carbon Monoxide fumes to vent out.***
7. With the engine turned off, let the car cool off for at least 10 minutes to allow the radiator system to lose some pressure and heat. I recommend waiting 20 minutes the first time and reduce that time as you gain some comfort level with what you are doing.
8. Remove the *tabbed* radiator cap, but be careful. If you feel hot vapor or pressure when removing it, let it sit for a few more minutes and then remove it. Part of the reason you are wearing safety glasses, gloves, and a long sleeve shirt is so that a release of hot vapor will be less likely to burn you if you did not let the system cool long enough. When you finally remove the cap, you will hear some gurgling noises because air is trying to exit the system at the Filler Tank while Engine Coolant is trying to make its way to the bottom of the Engine and Radiator. This is referred to as burping the system or bleeding the air out.
9. Slowly add more of the Engine Coolant to the Filler Tank just like before. Also add the Engine Coolant Conditioner to the Filler Neck once the Filler Tank is full. You will also need to refill the Reservoir Tank to the "Full" line with Engine Coolant. These levels have dropped since the fans kicked on. Replace all of the caps and make sure they are tight.
10. Turn the car engine on just like before and run it again. Monitor the temperature gauge on the dash. In a nutshell, you repeat this process over and over until the fluid levels no longer drop (It took me 10 times). As more and more engine coolant enters the system, idling the engine will not be sufficient to raise the temperature high enough to kick the radiator system on. At this point you will need to start revving the engine between 2,000 to 3,000 rpm to get the radiator fans to cut on. You should also operate the heater at the maximum hot position while having the fan set to the low position. Let off the gas pedal often to check if the radiator fans have turned on. Once they have turned on, let the car idle for just a bit. Remember to turn the engine off before you go above the 2nd mark on the temperature gauge in the dash since you do not want to overheat the engine.
Additional Note: You may find that you can't put as much coolant back in as you took out. The last time that I changed the engine coolant, I would have to check the Reservoir Tank each morning before driving to work. Here, I was able to add additional coolant each morning after the car had cooled over night. After a few mornings, the Reservoir Tank level will stop dropping.
That's all I've got for now. I'll update somewhat based on feedback. Good Luck!!!
Update 1: You can speed up the filling/burping process by filling up the radiator first. Put the cap back in place and do not remove it again since it is not the highest point in the system.
Update 2: Some users recommend running the engine while continuously pouring coolant into the filler tank until it overflows. This method is fast, but you run the risk of overheating the engine if you aren't monitoring the coolant temperature. Engine coolant can also catch on fire if it spills onto any part of the engine exhaust.
Update 3: Commercial flushing systems can be detrimental to your cooling system. They often use chemicals that can react with the coolant and deteriate the aluminum. You also run the risk that they can damage the thermostat if they are not careful. If you want to flush your system, the safest option is to fill it with distilled water, run it, and drain it again. The more times you refill and drain it, the better the flush.
Update 4:
I'm in process of studying to change my timing belt and ran across these youtube videos. Some of you may have posted about these videos already in the threads following. In any case, the videos contain helpful information and ideas on changing your engine coolant. "Meaty's" procedure is a little different than mine, and it is probably more efficient if you know what you are doing. My method is more in line with the service manual, but slower. I recommend following my method until you know what you are doing. Videos 1, 4, and 5 contain the information.
7-4-2008
I popped my AP on to test this since you asked. It read my operating coolant temperature (07 STI) at 188 to 190 degrees F after going WOT on an on-ramp. I would still monitor the system by the needle gauge on the dash when performing the coolant change as an added safety measure.
Here is what my Service Manual (07) reads from the General Section on the Coolant System concerning Temperature.
"The engine cooling system consists of a down-flow radiator which features high heat-dissipation performance, an electric-motor-driven fan, a water pump, a thermostat, and an engine coolant temperature sensor. The ECM controls the operation of the radiator main fan and sub fan depending on the signals from the engine coolant temperature sensor, vehicle speed sensor, and A/C switch."
There is a chart in the Service Manual (07) that says the radiator fans will turn on high speed if the Coolant Temperature reads 203-207 degrees F. That should give you an indicator of when the system will definitely cut on if it hasn't already. If you turn your A/C on, it will turn on much sooner (196-201 degrees F). The reason I've given a temperature range is that the Service Manual chart has more detail than can be described in a few sentences. I've left this portion out of the write-up as it's more technical than necessary to perform the service. It's still good to know that you can check it with the AP.