- Hot Glue
- Eight (8) - #12x 1/2" Sheetmetal screws
- Eight (8) #12 flat washers
- Blue tape (optional)
- Spray adhesive (optional)
- Phillips Screwdriver
- Extra small flathead screwdriver
- Drill and 1/4" bit
- Panel remover/panel popper (optional, but makes door trim removal much easier)
You must be logged in to rate content!
5 minute read

1. Use flathead screwdriver to remove screw covers from door panel in the armrest and door handle.
2. Push in with the flathead and pry out.
3. Remove phillips head screws from armrest and door handle.
4. Using small flathead screwdriver, push in the tab at the front of the armrest. There is a small notch that you can insert the screwdriver into. Press in while pulling up

5. Turn the armrest over, and you'll see the plugs for the power windows and locks. You'll need to use the small flathead screwdriver to push in the tabs and remove the plugs

6. Remove the armrest and you'll see two more Phillips Head screws holding the door panel to the door
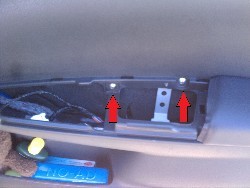
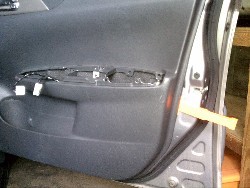
7. Using a panel popper or other long flat wedge, pry the door panel up from the side. Use your fingers to pry the panel off the door, popping the individual pins from the door. Short, quick jerks work best
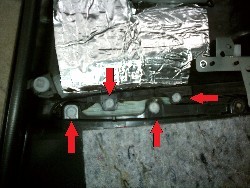
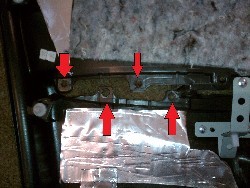
8. After prying the panel off, remove the door lock and door pull cables from the door panel. Remove the plastic door panel and lay it on a stable, soft surface, with the back side facing up. (Be careful not to scratch the other side - the plastic is soft and gouges easily!) Locate the 4 white plastic rivets which hold the stock vinyl armrest to the door panel). Using a drill and approx 1/4" bit, drill these rivets out. Only drill out the flared white part - you don't want to go all the way through!
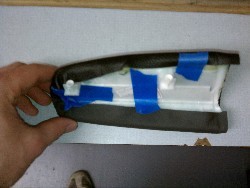
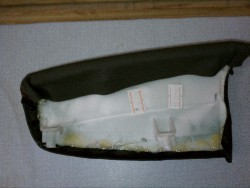
9. Remove the vinyl armrest - you'll see the white plastic nubs that we'll use to reattach the armrest later

10. Using your fingers, gently pull the stock vinyl covering off of the armrest. Try to leave as much of the underlying padding and cheesecloth material intact as possible. Dry fit your new leather cover to the armrest. Use Blue tape to hold it in place and align it as best as possible. You'll have to do some folding of the leather around the curved end. It shouldn't be necessary to trim any of the leather.
11. Once you're satisfied with the fit, glue it down one section at a time with hot glue. ***You can also use spray adhesive you attach the top, but it is not necessary***
12. Note that the leather overlaps two of the mounting points. This is not a problem, and you do not need to trim the leather (unless you really want to!)
13. Install the newly wrapped armrest back into the door panel. Align the mounting nubs with the rivets you drilled out previously. Mount the armrest using the #12x1/2" screws. Depending on how much you drilled out, you may not need the washers. Hand tighten until the armrest is flush and there are no gaps . Hand tighten until the armrest is flush and there are no gaps. Proceed to other door.
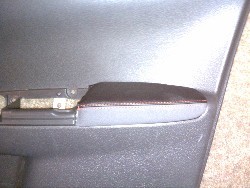
CONGRATULATIONS - YOU HAVE SUCCESSFULLY INSTALLED YOUR NEW LEATHER BOOTS!
Useful tip
You have installed a product made out of genuine leather. As you know, to maintain a leather product in good condition, you should take care of it. We suggest occasionally (every 4-6 week for example) applying some leather conditioner/UV protector to keep your leather from drying up in the sun and cracking.
Redline Automotive Accessories Corp. will not be held liable for any labor, incidental or consequential damages of any kind. Proceed at your own risk.