You must be logged in to rate content!
9 minute read
The End of the High is Nigh! Say goodbye to two inches. [How to lower any fox ~2" using rabbit front strut inserts]
Compliments of the brit @ http://forums.vwvortex.com
7-6-2007
This Thread was previously locked to preserve it's information, but has now been re-opened to help answer any questions in the future. Many of the old photos have gone, but the information is all correct still, and many of the photos do remain.
Here is the information you need to build your own Ultra-Low Fox strut housing:
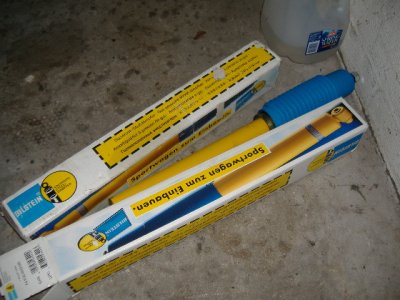
This method of lowering foxes involves replacing the stock front inserts with shorter ones. The key ingredient here is VW Rabbit A1 inserts, I personally chose Bilstein Sport inserts. These should be easy to locate new for a decent price from any major retailer; if you have any issues feel free to ask me. You then need to remove a section of your strut housing to match this change, which will require cutting and welding of a key component of your car; please do so carefully!
Here is the original information that is reposted from later in this thread:
>> 46mm is the key. This will leave you a little +/- which will be absorbed by the insert nut at the top of the housing.
>> Before you cut anything, score a straight line on the housing where you will cut. This will allow you to use the line for alignment when you are welding. It's important to keep everything lined up.
>> There is +/- 1-2mm space inside the housings for penetration of welds.
>> This is all basically untested. Don't blame me when you crash / die.* Do blame me when your car is slammed on the ground and looking oh so sweeeet.
*Editing 3 years later; my suspension is still running great, but has limited miles. Several (many?) other people are now running struts modified by myself, by other people and by themselves (Dean, Jonathan, Banned etc etc), and have had good success with no reported issues. However, again this is only a guide and no-one can guarantee anything so please use your best judgement.
>> Hints for cutting and marking: Use masking tape wrapped around the housing as a guide for a nice straight cut when removing the 46mm section.
>> Really do score the body to show a straight line for keeping the steering arm at the correct angle. This angle is pretty critical - a bit can be overcome with tierods, but not a lot.
PM me if you have questions or need help.
This is what can be achieved with some coilover perches added into the mix:

Modified by the brit at 11:40 PM 9-27-2007
Original first post:
Finally, after months, if not years, of much talking and a little researching, it's started.
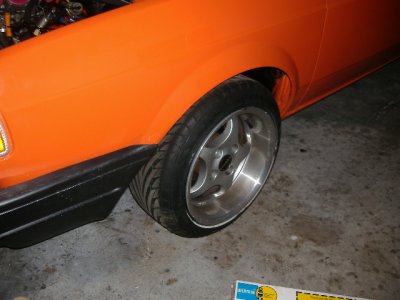
These are the struts, this is the arch gap. Soon one will be fixing the other.
More photos when i start work tonight.
7-10-2011
Can someone change the title of this thread to "say goodbye to two inches"..
I've done welding the first strut, and am waiting for it to cool before i put the insert in, then go test fit. Not really sure at this point what it's going to do to the steering components yet, it's all theory right now 
Photos to follow.. Be warned though, when i'm worried about welds being strong enough, they tend to get less pretty - i have a habit to doubling and retouching parts, for better or worse.
I finished one side (and am not amazed with the drop yet), but while building it, i did notice that the stock arm is angled inwards from the factory. I never noticed this before.
I have never needed extra clearance from the steering arm, so changing the angle was not something that i considered. In fact, i took great care to try to keep it as close to stock as normal (although it can be adjusted via the tie-rod while on the car).
In the end, all this work for about 45mm is sort of a PITA. At least at the same time i'm going to Bilstein Sports and new mounts etc. I feel as though i'll still have wheel gap with my stretched tires..
Oh, and you heard it officially here first:
Rabbit fitment Bilstein Sports inserts are ~46mm shorter than fox inserts.
Cut off 46mm from your housings, and reweld. You can be +/- ~2mm due to the the size of the threaded cap that holds the insert inside the housing.
I got my Bilstein Sport inserts for under $100 each, PM me if you want some.
7-21-2007
Oh. I'm sorry, my bad.
I meant three inches.
And that's all I have to say about that.
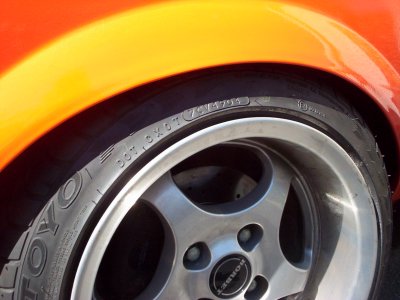
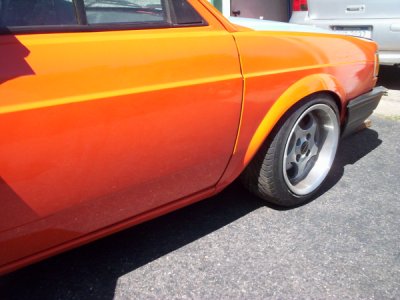
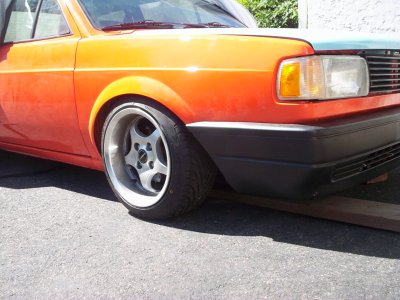

They are 14x8 w/ 195x45/14"s stretched on them - so tiny tires basically.. The exhaust is 0.5" off the ground, the frame rails are under 2" off the ground. The bumpers are well below my knees, the headlights are at knee level.
7-22-2007
For answers for a few other questions:
> No, I won't be offering them for sale in the forseeable future due to liability reasons. Having done no testing yet and due to it being a pretty important part (strength of welds etc) I'm not up for that at the moment. I'll happily help any locals out if they want me to help, want to use my welder etc though. I'm just not going to be shipping them off around the country. You should know who the foxers are around the country that will also help, or your local metal fabrication shop should be able to do it start to finish in a couple of hours.
> And, no, i have not put my fender liners back in - i have no fender lips anymore, and my car will not be seeing too many winters etc. I do however still have to finish painting the inner fenders, underbody etc.
> There is no more adjustability to lower the car. With it all the way down, there is about 1-2" of insert movement available (including internal bumpstops). There is no room for external bumpstops at this height. With it raised, it rides very nicely from what i've driven (not much) and would still TUCK a normal wheel with a normal tyre.
edit: for more answers, and to post a correct link to a parts reseller.
7-24-2007
This thread is going to be locked for the benefit of future generations.
Final thoughts?
>> 46mm is the key. This will leave you a little +/- which will be absorbed by the insert nut at the top of the housing.
>> Before you cut anything, score a straight line on the housing where you will cut. This will allow you to use the line for alignment when you are welding. It's important to keep everything lined up.
>> There is +/- 1-2mm space inside the housings for penetration of welds.
>> This is all basically untested. Don't blame me when you crash / die. Do blame me when your car is slammed on the ground and looking oh so sweeeet.
>> Hints for cutting and marking: Use masking tape wrapped around the housing as a guide for a nice straight cut when removing the 46mm section.
>> Really do score the body to show a straight line for keeping the steering arm at the correct angle. This angle is pretty critical - a bit can be overcome with tierods, but not a lot.
PM me if you have questions or need help.
12-2-2014
Here's the process for the front:
- cut spring perch off front housing
- cut down front housing
- replace front insert with bilstein sport rabbit insert.
- install coilover sleeve on front housing.
Here's the options for the rear:
- Run mk1 rear coilover
- Run mk1 rear bilstein shock with coilover sleeve
- Run mk2 rear coilover SLAMMED (not good).
- Run lowering springs or other choice.
The rear is the easier one, just run a rabbit rear. I run Bilstein sports with Eibach coilover sleeve springs IIRC, but i've run a bunch of different stuff. Wagon rear mounts might be slightly different than my coupe, but I really don't remember anymore sorry.