You must be logged in to rate content!
10 minute(s) of a 124 minute read
4-28-2011
I've been slacking on updating this thread, but I have not been slacking off when it comes to getting this done.
If you didn't like the routing of my brake likes, you're going to hate the routing of my oil lines to my dry sump tank and my fuel lines. I'm quite happy with the outcome, but I will be working on some sort of drive shaft loop / shield to for the CYA factor.

Driveline is in for the final time. Wiring is 99.6% done. Still have to finish up the fuel sending unit, loom some wires, and trouble shoot the radiator fan (manual switch) and wiper switch.
Intake is mocked up, just need some 4in hose clamps.
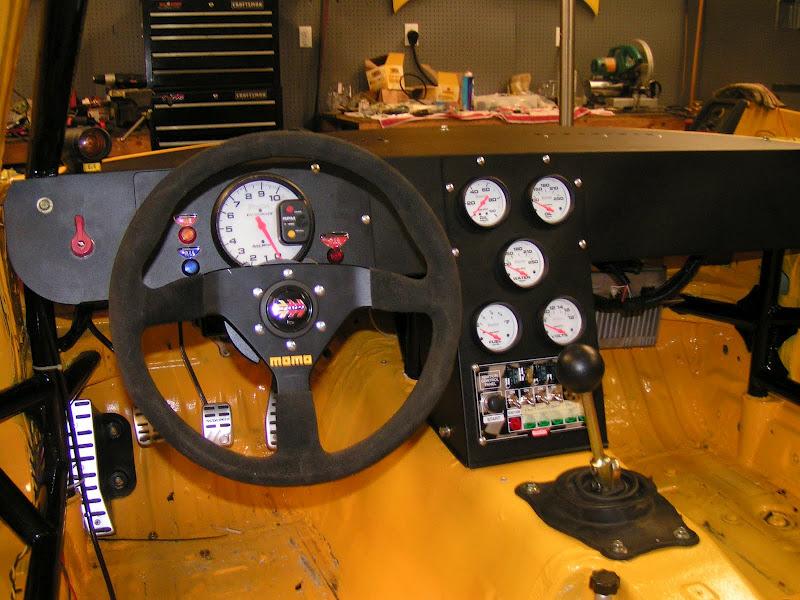
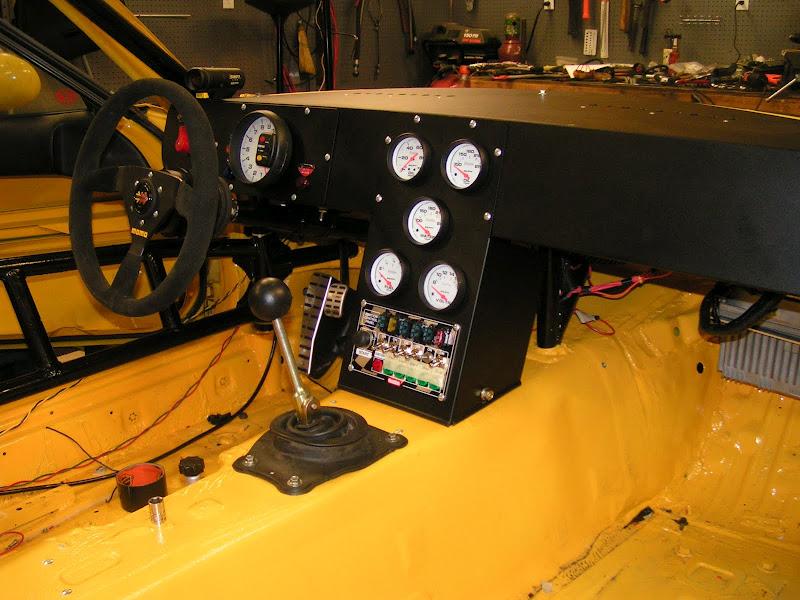
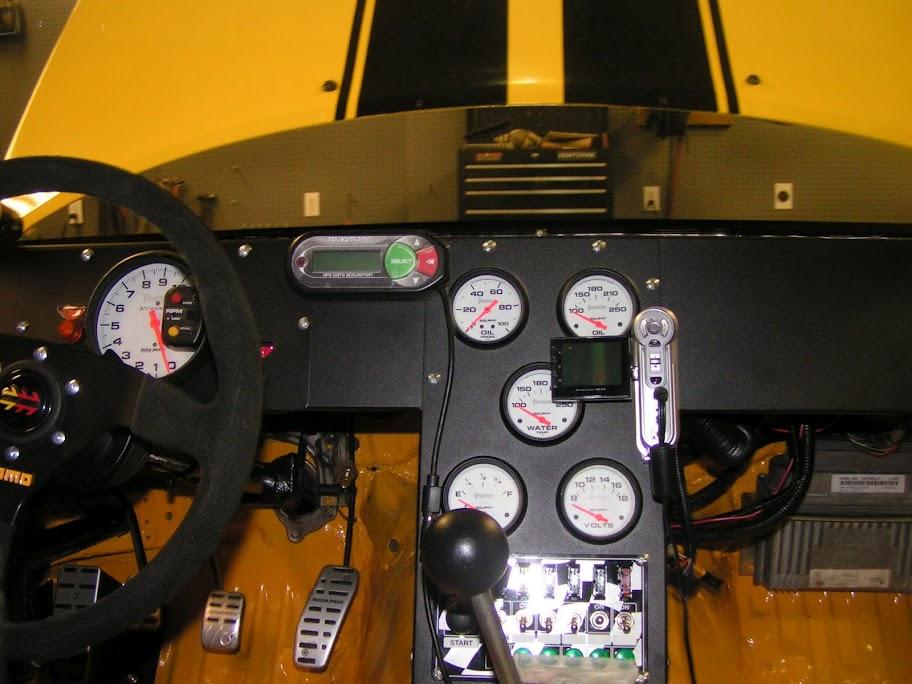
Dash is in for the final time. Everything was tested as it was installed.
This is my favorite part of the project so far. The dash turned out better than I expected. I'm stoked.
I have to finish plumbing the remote oil filter, get some fluids in everything and I will be ready to see if it will fire this weekend.
5/2/11
Spent all day Saturday tying up loose ends and finishing up the remote filter plumbing.
I was ready to begin the start up sequence late Saturday night. It had already been a long day, so I decided to sleep on it and start in the morning with a rested clear head.
Sunday morning, I checked everything one last time and started the initial start process.
Power on, ignition on....No fuel pump.....Shit!
Chased fuel pump issue, manually tested and everything was good.
So...PCM?
After several hours of trouble shooting, I found that my 12v constant power to the PCM was missing. Wire was there, just no voltage. Feed wire went into the harness, but I'll be damned if I could figure out where it came out. I check everything I could think of.
Trouble shooting by myself sucks. Alligator clips and 10ft of wire with a meter inline to check continuity. I was at a point where I just need to walk away and call it a day.
Slept on it and headed back out to the garage again after work today.
I finally gave in and cut the wire going into the harness and ran it to a constant 12v source.
Power on, ignition on, fuel pump running, but no pressure....Shit!
Simple fix, tank line were backwards. Swap lines. Pressure.
Next up....Oil pressure.
Remember this is a dry sump system, which I have never run. Filled everything up. 3qts in the engine 8 qts in the tank.
Pulled the plugs.
Cranked over the engine to build pressure, but no pressure. System needs to be primed. Problem is: I don't know how to prime this system, being that it uses both the factory oil pump and the sump pump.
This is where I am tonight. Time to do some homework on dry sump systems. I will call the pump manufacturer tomorrow and get some tips.
Close....very close...yet still far away.
5/26/11
Another milestone for the BEE!
I'm sure this will be really insignificant when I look back on it, but it definitely put a smile on my face today.
I was finally able to move the car out of the garage under it's own power. I still have few things to buckle up before I can take it for it's inaugural test drive, but nonetheless it was a milestone.
The last time I sat in the driver's seat and let the clutch out was Nov, 2009.
Two weeks from now will be the first local autocross. Not anywhere to really stretch it's legs, but close to home and good for a shakedown.
5/30/11
Goals for today:
Bleed brakes, install new PS pump, corner weight, test drive
Goals accomplished:
25%
Not that I didn't work, just that nothing worked for me.
BRAKES:
Couldn't get them bled. Tried every option I could and nothing worked.
Ended up being a mechanical issue. Shaft on MSM brake booster is too short for Wilwood master cylinder. I was only getting about 3/16in travel. Enough to make me think it was working, but not enough to actually work.
Easy fix, just need to find a shaft off NA booster.
CORNER WEIGHT and TEST DRIVE:
Never made it that far.
POWER STEERING PUMP:
I did accomplish something. I put in a new GM power steering pump which was pretty straight forward. Everything went really well till I tested it.
The pump worked great, but it showed me that the extra universal joint that I added to my steering column was not going to work. I was not able to smooth out the steering regardless of how many adjustments I made. I could never get the rid of the feel of the u-joint. smooth-stiff-smooth-stiff...Not horrible, but not something I want to deal with.
Options:
Rework / build a new driver's side header or buy a set of Flyin Miata or Sanderson headers.
I'll have to sleep on this one.
1. Rework / Build new : Time****, Cost*, (1.625 primary)
2. New : Time**, Cost*** to ****, (1.5 primary)
One step forward...two steps back. I think that is the theme of this build.
6/18/11
Update....
Steering issue: RESOLVED
After several iterations, I finally figured out something that works. I ended up building a new mount for the rod end which moved the location of the shaft a little. The original design had the shaft running beside the header (9 O'clock). The new shaft is located a little higher up (10:30) and it works. This is a much straighter shot which reduced the angle on the universals.
Brakes: DONE
Made a new shaft for the brake booster and re-bled everything. 15 mins of bleeding and everything is good to go.
Test drive: DONE
Was finally able to take it out for a run around the neighborhood. I ran without a hood, bumper, or fenders. I don't have windshield in the car yet, so it was truly an open wheeled Miata. Stick Hoosiers threw rocks into the interior during each turn.
First impression: WOW!
This thing is NASTY. I was only able to cruise around the block , but I did punch it a time or two to see what it had. Needless to say, I am very impressed.
Spent the rest of the afternoon and evening putting the rest of the car back together.
Hood, fender, bumpers installed.
New hood pins installed.
Harnesses installed.
Seats installed.
Foam installed on the cage in the crucial spots.
Garage alignment done
Tomorrow: AUTOCROSS
Loading up in the morning and heading to the local autocross. The site is rather small, so I don't know how much I will get to open it up, but it will be a fun shake down.
6/20/11
Autocross: YES
Success: KINDA?
About half way through the first run, the clutch started slipping so I shut it down and loaded it back on the trailer. I think I found the problem, but need to retest to verify.
Pedal linkage had the clutch MC depressed about 1/4in when fully released. Problem is I don't have any more adjustment with the Wilwood MC. I need to make a new turnbuckle to hook to the pedal that is 1/4in shorter.
Should be an easy fix.
Casualty: I broke a front fender flare over the weekend. This is the 2nd flare I've cracked, but what can I expect out of fiberglass flares. It was my own fault for halfass installing my front bumper. If I would have put in the bumper supports, I wouldn't have had any issues. Tire caught the bumper and broke the flare.
I did take a video of the run. I will post something up later.
First impression: Holy chit is this thing is quick. My suspension changes are going to need some tweaking. I had a slight push on corner entry, but I never had a chance to adjust shock settings or tire pressure, and the car hasn't been corner weighted or properly aligned.
6/22/11
A friend (Craig Kimberly) took the video for me and had to add his professional touch to it.
8/7/11
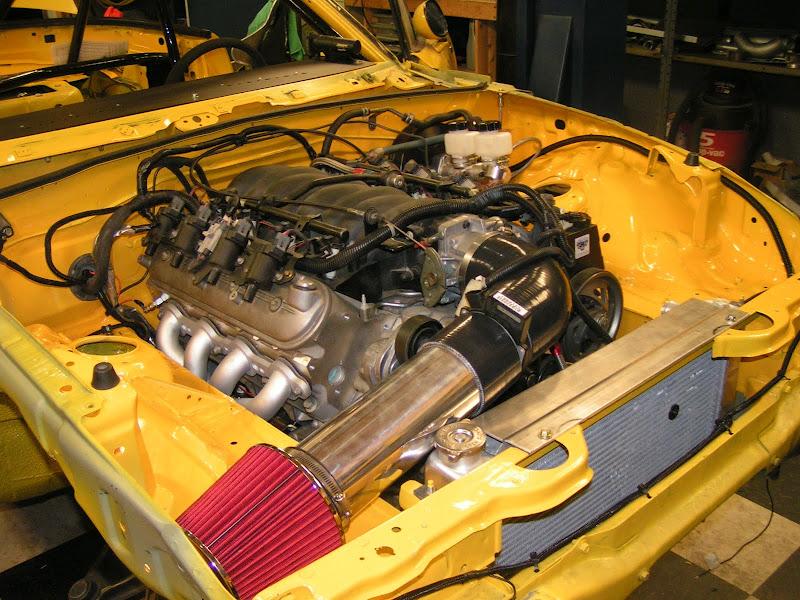
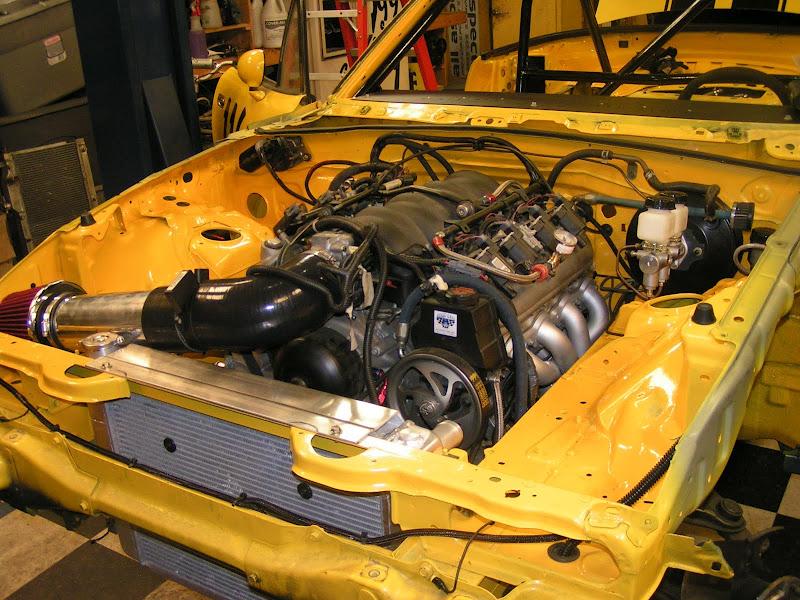
Haven't been out to the garage with the camera in a while. I've been having too much fun driving the car. I was out prepping the car for it's debut track event next weekend and decided to snap a few pictures of things I have done lately.
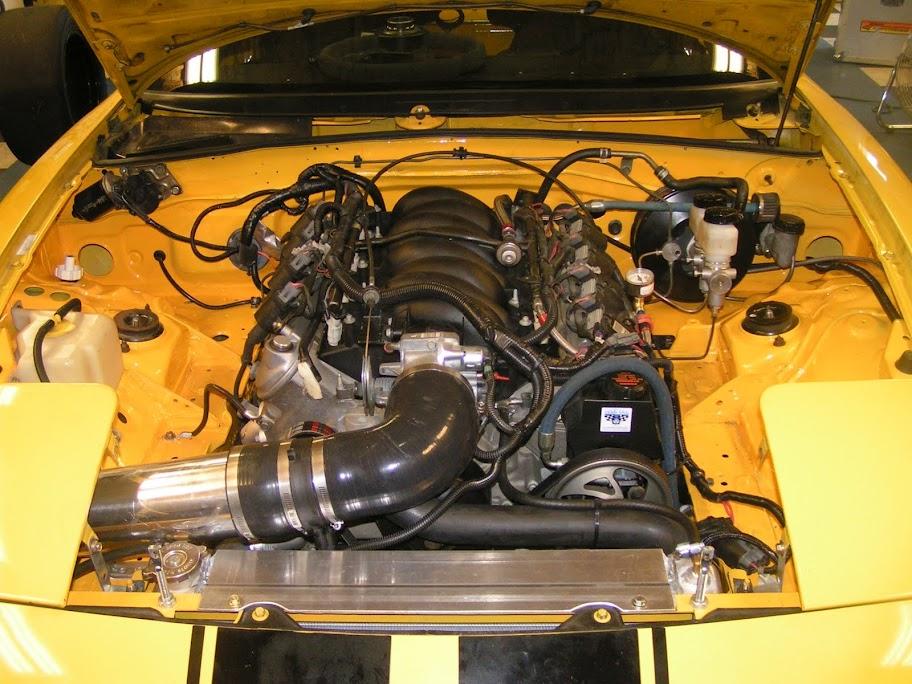
Here's the current state of the engine bay. I installed a LS6 intake manifold today and will get the car back on the dyno this week to ensure a safe tune for the track.
I still plan to build an air box under the passenger headlight cover, but haven't gotten to that just yet.
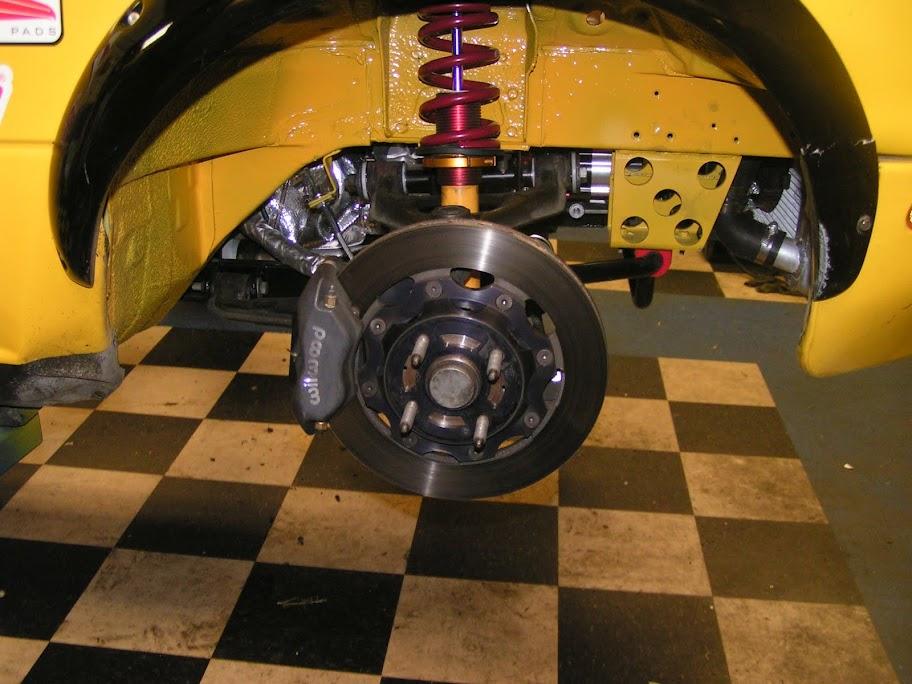
V8R Brake Package mounted on all 4 corners. (11.75 Rotors with 4 piston Wilwoods) You can also see a peek of the E36 BMW sway bar mounted. (Forgot to take more pictures of that)
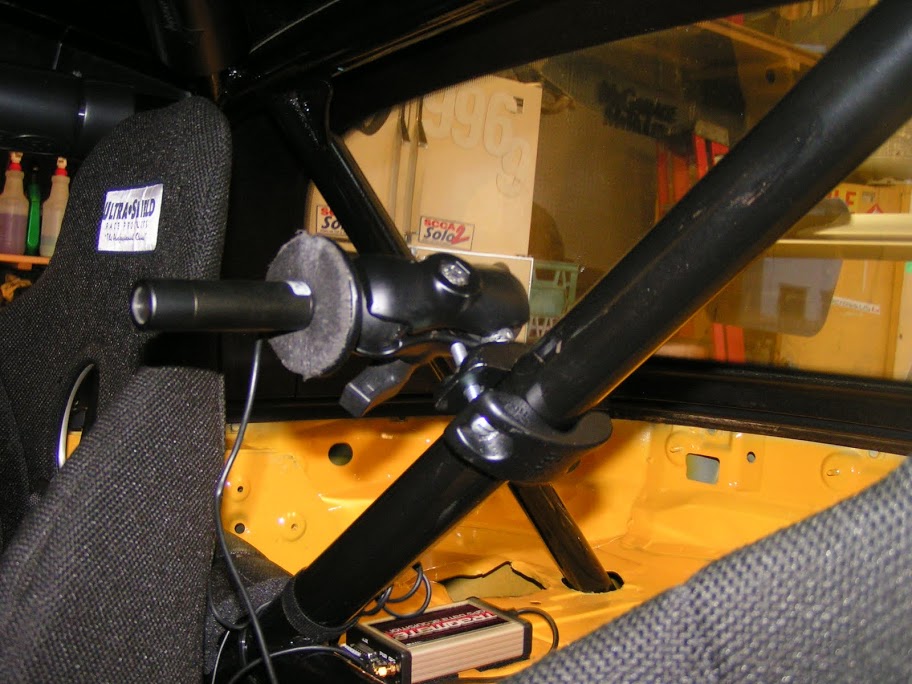
In car camera and traqmate. I use the camera on the dash to record the video from the roll bar mounted bullet camera. This allows me to easily start and stop the video and I don't have to re-setup the camera angle every time I pull the camera out of the car to view the video. I can also easily watch my autocross video between runs if need be.
[IMG]https://lh6.googleusercontent.com/-_6wMCGLZ_8c/Tj8yHTCJU6I/AAAAAAAADBE/eMP5tscLdS8/s912/PICT5486.JPG[/IMG
 ]
]
My only complaint so far with the car is lack of traction, imagine that
I have only run 10in Avon road race slicks on 15x9 wheels so far. The grip is not bad, but definitely not where it needs to be to be a competitive autocross car.
I bought a set of 16x11 (6in BS) 3 piece Real Wheels a while back, but the bolt pattern was wrong. They were made for a 4 lug Fox body Mustang (4x4.25), so I had my local machine shop redrill the wheels to a 4x100 bolt pattern offset 90 degrees.
I got the wheels back last week and will get the tires (23.5x11x16 Hoosier radial slicks) mounted this week. From the looks of it, I will need to do some more trimming up front to get them to clear, but it shouldn't be too bad.
I'm sure I will still be traction limited, but this should work much better.