You must be logged in to rate content!
191 minute(s) of a 391 minute read
12-28-2020
DarkLighter Tuning Kamei Wabbit build!
Compliments of T3Bunny @ VWVortex.com
January 08, 2009
Well people I am finally building her! I have threatened to build another Bunny for years. Its tons of fun putting together cars for friends, enemies, customers and everyone else in between, but my own projects have suffered from lack of attention.
After helping Patatron out several years back while he built his tan bagged bunny, I knew what I was looking for for my next project. I wanted an older German built golf between '75-80.
Since at that time I lived on the East Coast, it kept getting put on the back burner. Your simply not going to find one of these cars out there. Heck finding a rabbit of any vintage in even okay shape is expensive. Fortunately a move out to Utah made this dream finally become a reality.
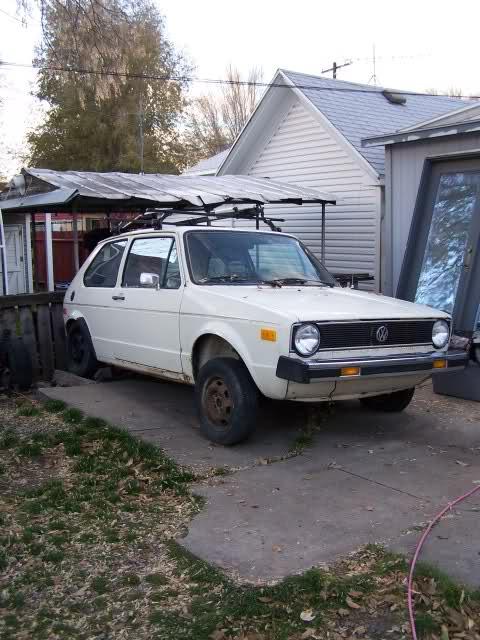
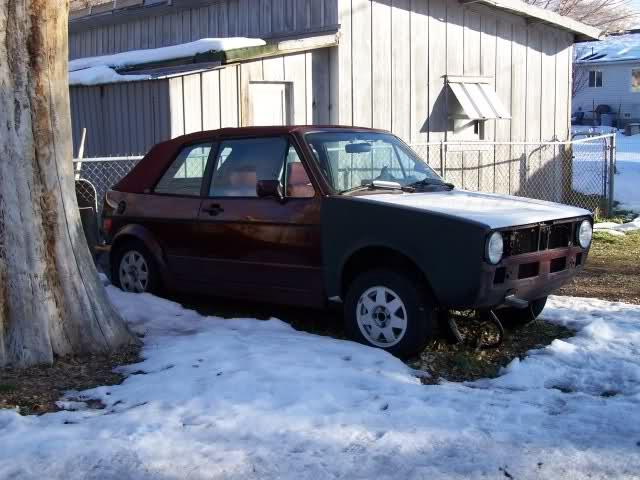
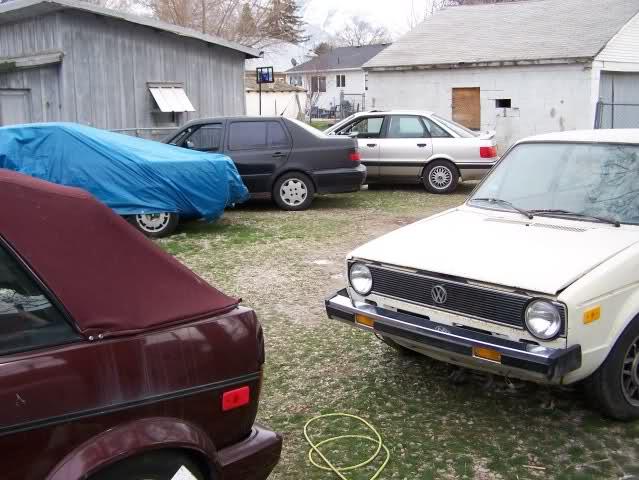
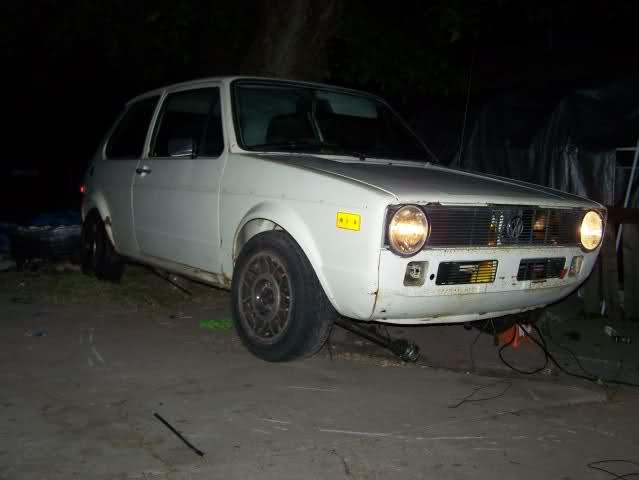
Last summer I finally got the call I had been waiting for. "I know where theres a clean '77 in need of rescuing." When I got there I found this gem.
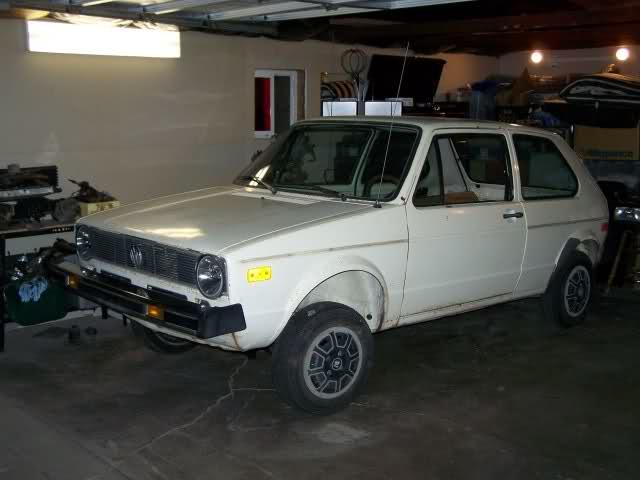
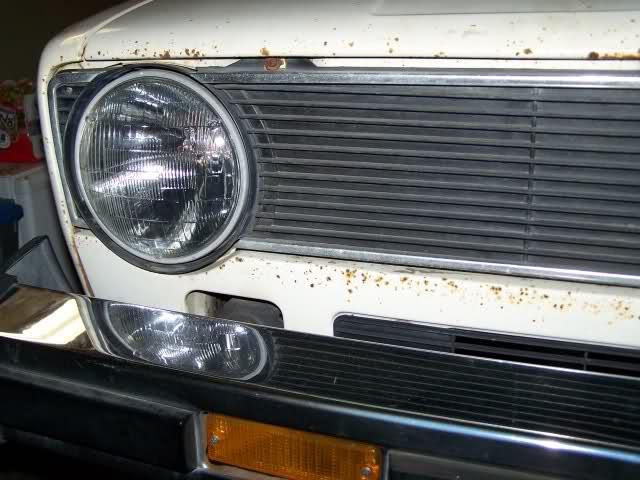
I LOVE the external hood latch release!
Pictures realy don't do her justice. The body on this car is in damn damn good shape. Dents and dings total out to be three of them. Two you realy have to look for and a third thats still an easy fix. My buddy gave her this stamp of approval.
We were quickly off to gather up the neccisary funds and to gas up the ford. Soon we were leaving with this!
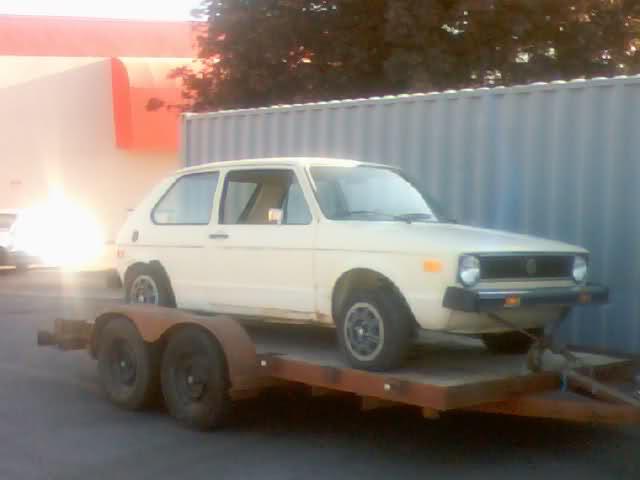
I know that pics not the best but oh well. The ride home was actualy a little too eventfull with a broken strap causing a few moments of panic.... All is well that ends well though and we managed to get pulled over quickly enough.
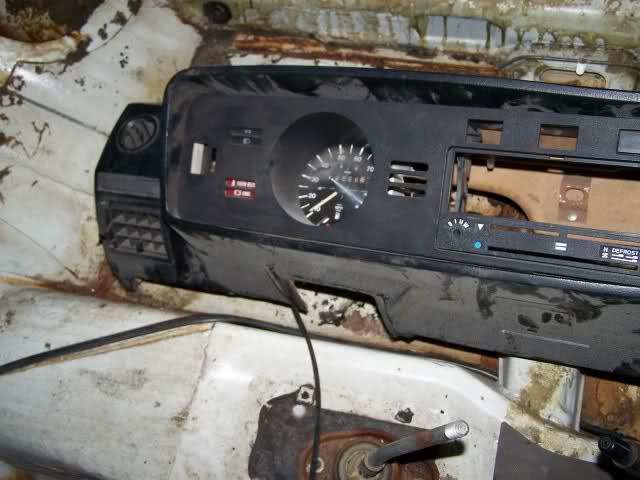
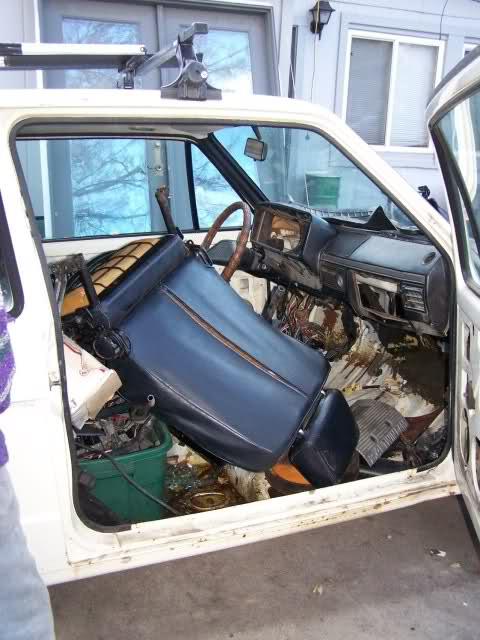
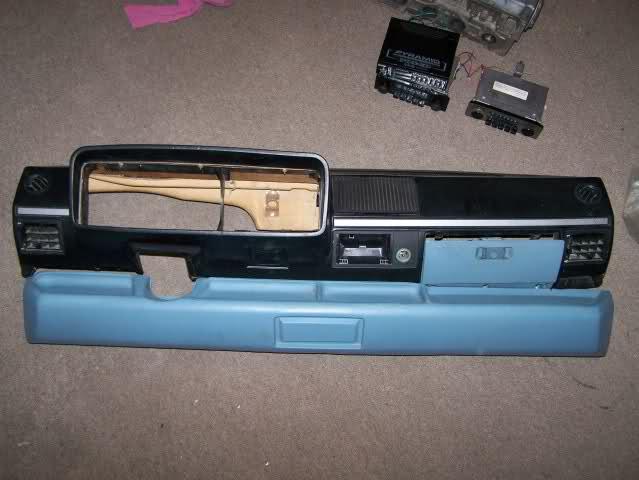
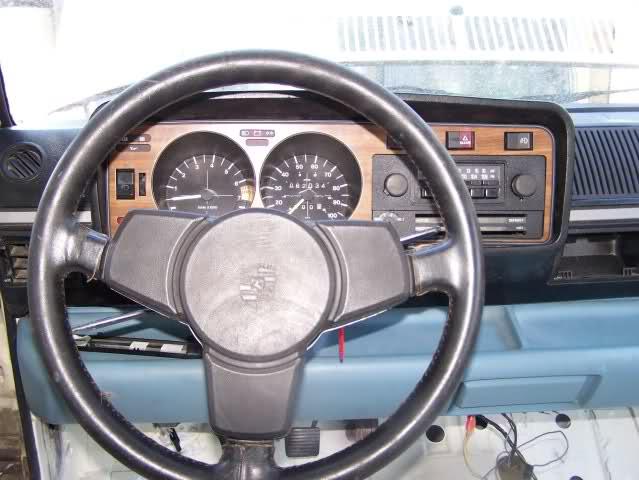
She came with an interior FULL of cool and rare old parts. Some old 4 speed trannys, a 1.6L motor, old pre lambda CIS setup, a couple distributers with the dual vaccume cans and my favorite.... The dash! This was a large part of the reason I wanted one of the older rabbits to begin with.
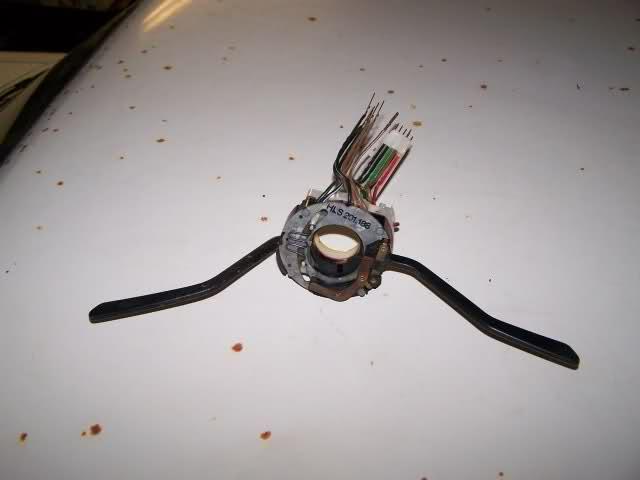
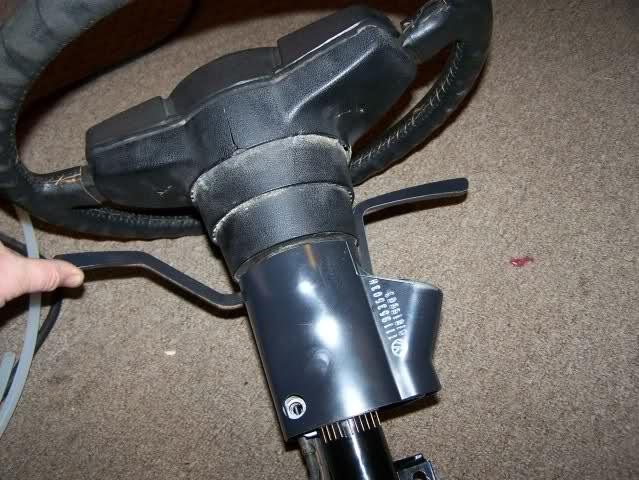
And another cool little gem found in the car. For those not in the know, the early bunnys have metal stalks. This car actualy came with two sets. Supposedly they can be polished up nicely. Might just have to give it a try!
So it was time to start collecting parts. Wow it was a good summer too. I scored so many little goodies I can't wait to post up pictures of everything. But to do so tonight would take me hours. I litterly have a nice shed full of bits ready to go now.
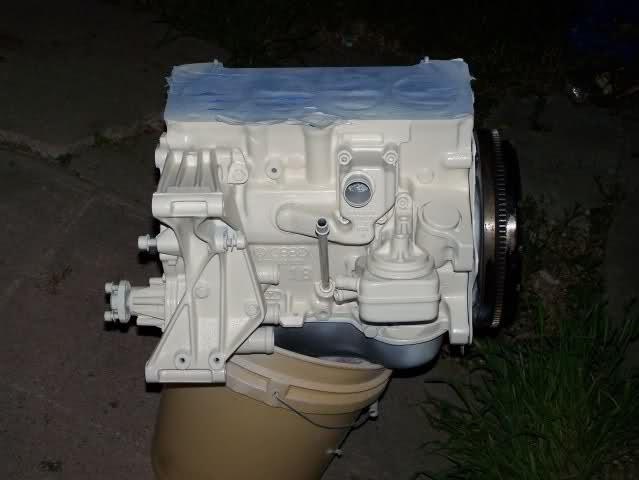
I have a very defined gameplan of how she will be built and what the final outcome is going to be. As always I will be boosting. Nothing too insane as this will be my daily driver. So heres the setup going on her.
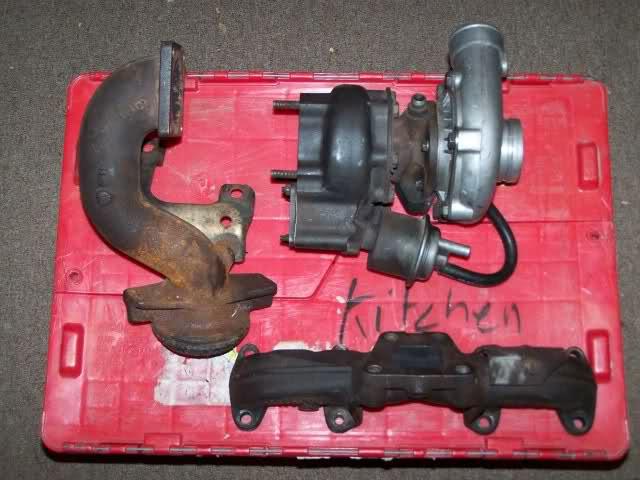
Nothing insane, but OE and RELIABLE. After living with my turbo cabby for over 4yrs... those who know the stories will laugh and understand why I fell in love with a turbo setup stamped with vw part numbers...
Monor issue discovered though is this does not bolt onto a counterflow gaser head. It interfears with the intake manifold. Oh well. I already have a solution to tackle this anyways in the works.
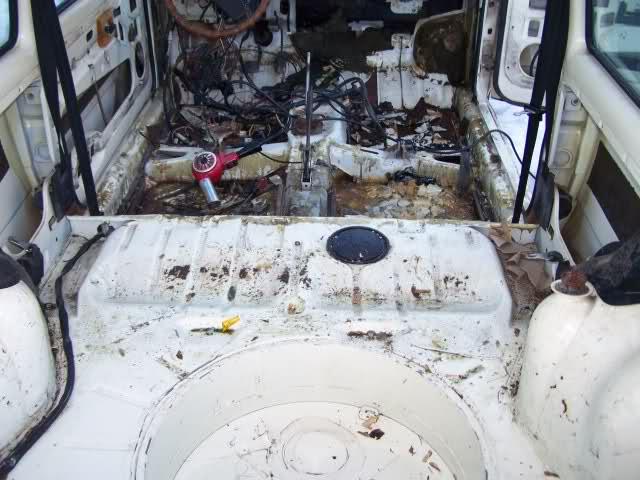
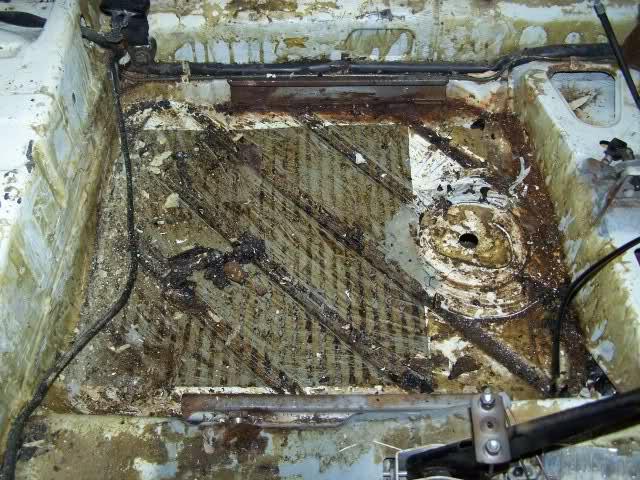
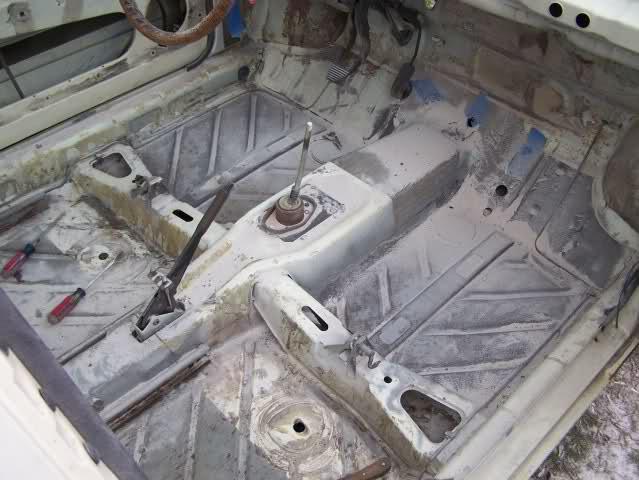
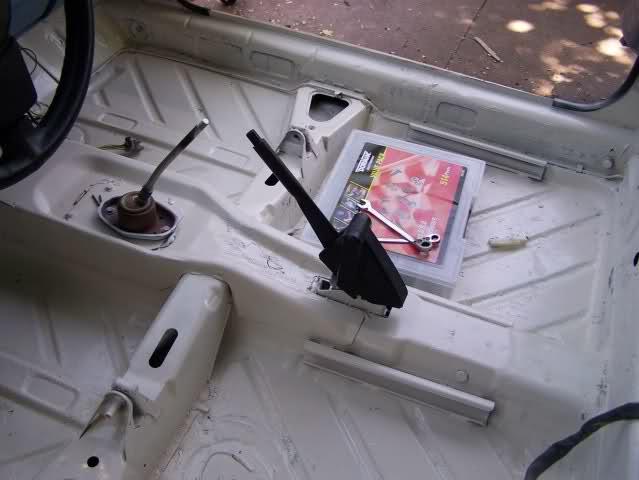
Mmmmm so so much to do. Problem is where to start? Well first off I needed to clean out and inventory what was inside her.
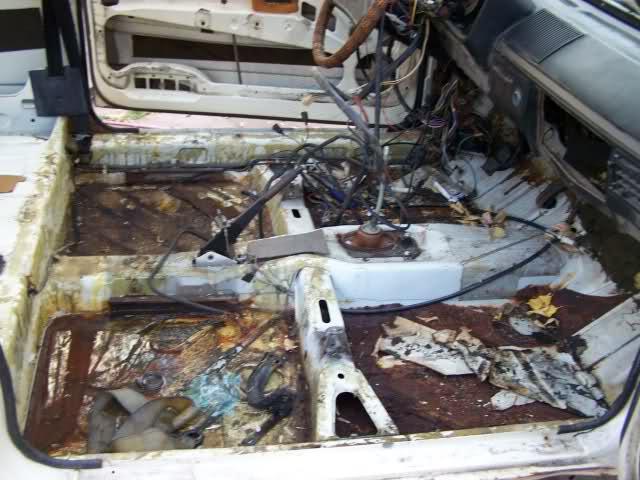
Cleanup reveals suprisingly decent floors. Theres lots and lots of rust. But poking and proding reveals its all just SURFACE rust!
Unfortunatly my generous nature had bit me. When I went to get my pressure washer out, I discovered one of my freinds had apparently broken it. So cleaning the interior out further to get a closer look at the floors has been put off for now. I am hoping I didn't put it ff for too long though as now winter has set in and I have a nasty greasy and icy mess.
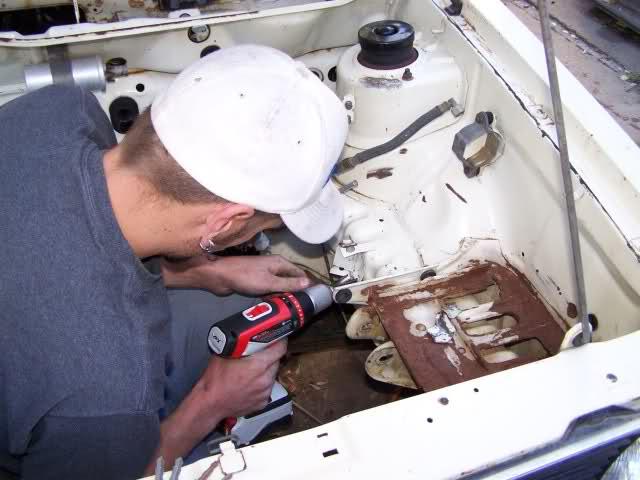
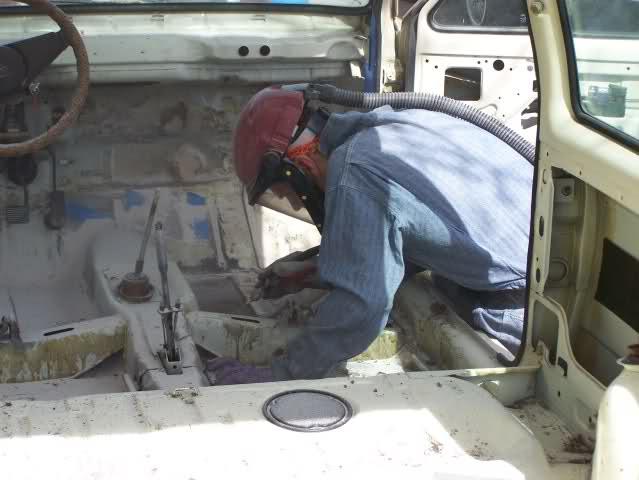
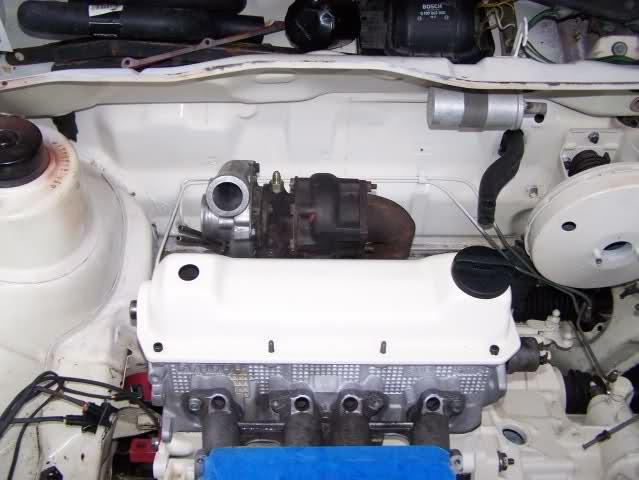
Well it was time to do some more cleaning. Ed was bored and decided to remove some brackets in the engine bay. Fortunatly the PO had been kind enough to hand us the car with the engine mounted here....
So it was realy easy to get into the engine bay and start cleaning!
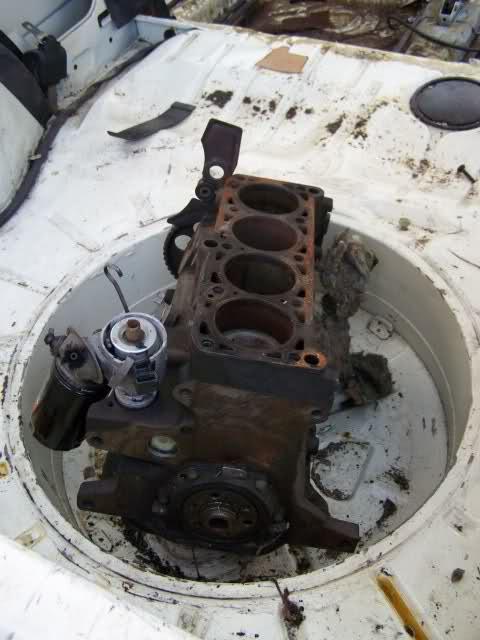
I am realy tempted to run this little GEM. But I have other plans for it and ts unlikely to end up in this Bunny. Still.... Tempting.
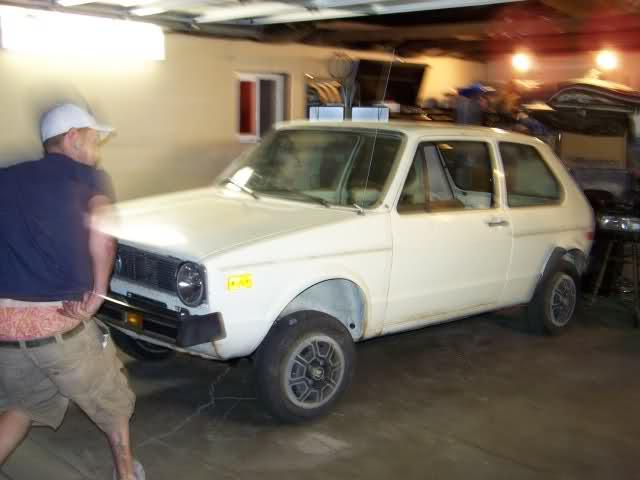
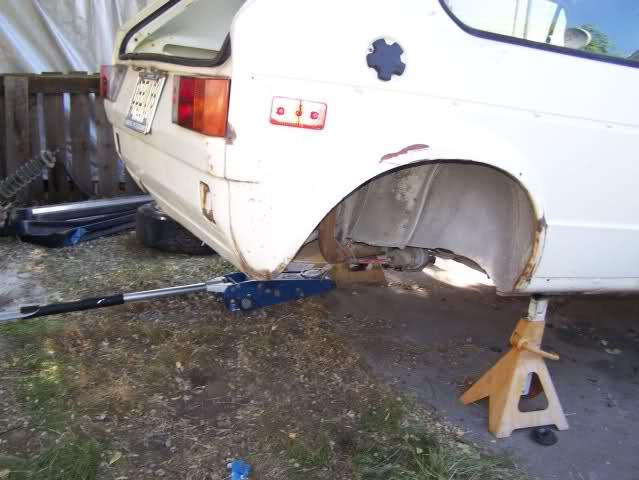
I didn't get much more done until winter set in and I decided to tackle the suspension so I could move her. This stance was just too much...
Attacking the front....
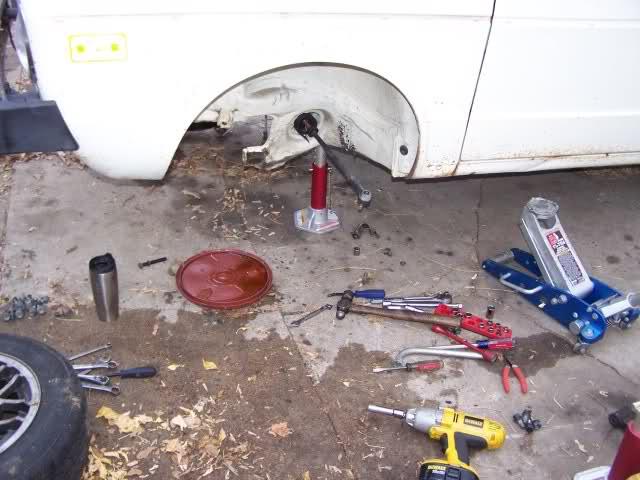
I know "pics or it didn't happen" but hey I had so much fun I forgot to take pictures of the H&R coilovers after I put them on. But I did snag some after shots.
I know she needs to be lower. Have no fear there we will be going a LOT lower. In fact in this last picture only the front has the coilovers on. I still have some tricks to pull out for the rear axle and I realy am not sure what one I will even run as of the moment.
Lemme toss this out there. I am going as low as I can with regular H&R coilovers. When I swapped the front suspension out I put front a-arms on it and brackets for an OE swaybar. I am exactly reproducing the suspension I ran on my cabby for YEARS and loved it. My thought is to swap in the rear setup also.
I wanted to change up for ultra low H&R's but decided to body drop it some instead if I need to. I think I can still get away with running the swaybars as I am realy more interested in handling than in the end getting it another half inch closer to the ground. Handling has to come first.
I dought I will change my mind on the swaybars, but I am willing to listen to experianced opinions on this as I have seen some people saying that they are actualy a bad idea...
Well I got lots more goodies to post up shortly! Stay tuned for more pictures!
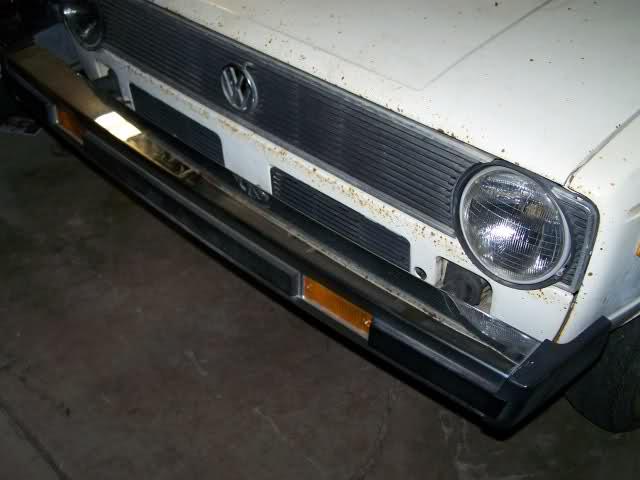
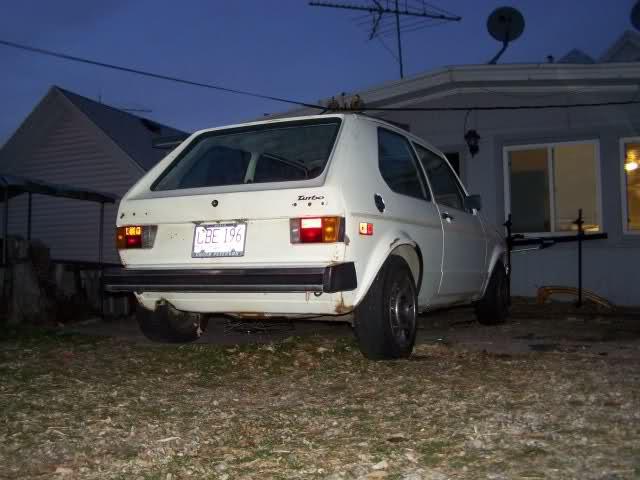
It actually came with that badge! I pulled the others off for the time being. Might keep that one, but probably not. To badge or not to badge is one of the few questions I am not really decided on.
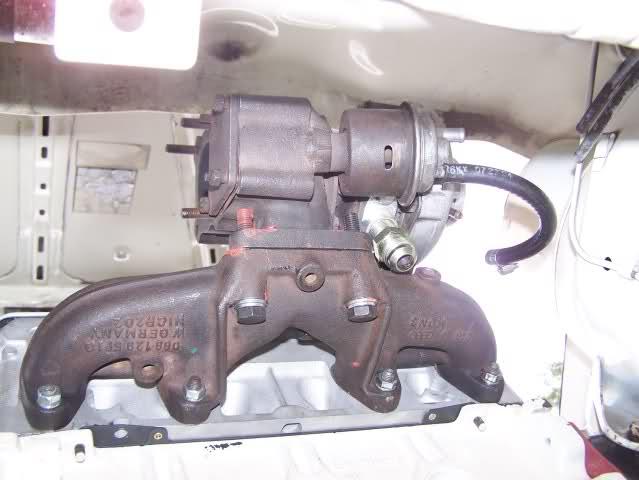
Mmm I am not sure on the turbo actually... I don't know much about it other than its "supposedly" off a MK2 TD and I know its not a T3. The Mad Scientist looked it up on his fresh ETKA install last night and proclaimed it to be a K24 turbo. I have been wondering about that wastegate setup myself.
A quick search only finds this picture...

Doesn't tell much but the angle of the wastegate actuator is a lot different from the VNT setup. I would like to know more about this particular turbo though.
January 09, 2009
I will fix the problem by never having a counterflow clearance issue to begin with. No flipping or clearancing will be required.
I want this engin bay clean and bare. Theres not goign to be intercooler piping going everywhere, or anywhere actualy.
I have a few tricks up my sleeve to pull this off.
So I have gotten a couple IM's and emails about the turbo setup. I never intended to run the TD setup on a counterflow. I actually got it in trade for a new SPA manifold I had because it didn't fit on the counterflow.
It is possible to it this on a counterflow, but not easy. It requires flipping it over then a CRAPLOAD of clearancing of both the flanges for the exhaust and intake manifolds. Then the reinforcing ribs on the bottom (now top) of the exhaust manifold need to be cut off.
After doing this it changes the location of the turbo outlet to the undesirable passenger side. Its a pain to clearance the DP over here. Oh and the turbo now needs to be reclocked. No big deal here. But the final kick in the pants for me was the fact that flipping the turbo and manifold makes the OE bracing brackets useless.
I had a lot of downpipe reliability issues with my cabby setup and I really wanted a complete OE setup.
Another possibility on a counterflow would be to reuse the diesel intake manifold and simply relocate the throttle body to a different location. On my setup though I am trying to eliminate all extra piping and plumbing not absolutely needed. A remote TB would be awesome though and if I used that I would retain the OE diesel blowoff valve on the manifold and add a second one between the TB and intercooler. Would give a killer dual/sequential BOV hit!!!
Mmmm okay I am not sure what type of turbo this is but its not a T3. Or not a standard one anyways. The bolt pattern is wrong. I have always understood that "t3" primarly refers to the bolt pattern and the basic spool cartridge type. As for the cartridge though I am thinking a T3 one would interchange with the K24. For now I am going to go with the assumption that this is a K24.
Lets pull up the ETKA information on this and see what it says.
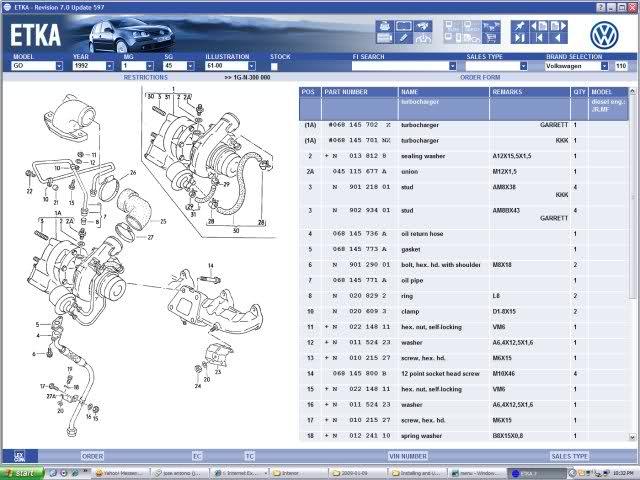
That doesn't tell us much. Anyway simply adding a t3 weld on flange to space this out isn't going to do the trick. When I get a chance I will take some side by side shots with a T3 for comparison.
January 12, 2009
Yeah I think its a K24 also. Not sure nor am I really too concerned about it. I think I might be able to use a T3 spool in the middle. When I get around to fiddling with that I will take some pictures and toss out some more updates.
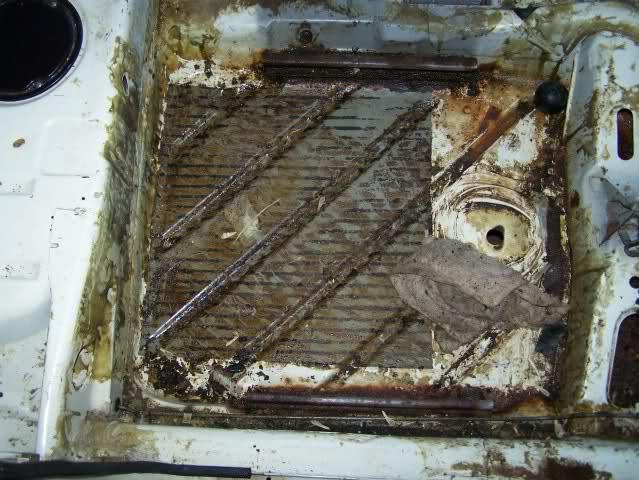
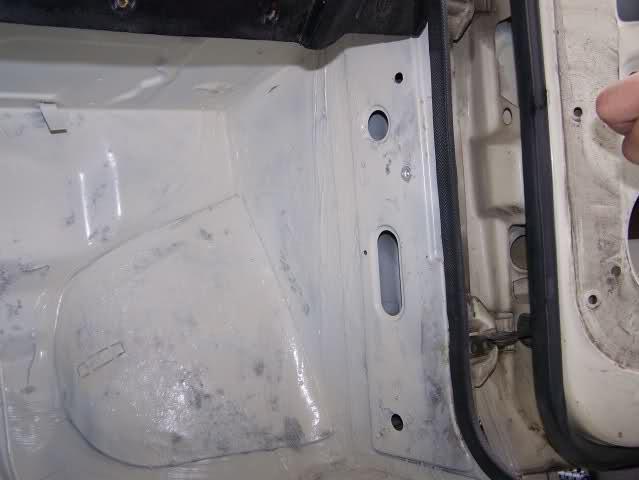
Speaking of updates, this weekend was very productive! The plan was to tear into the floors and see how bad the damage was. Need to prep it for blasting in the next week or so and see if we are going to need to weld in any patches. Here was our starting point. Can't really see how messy the floors are here though.
After chipping a crapload of ice out of it.
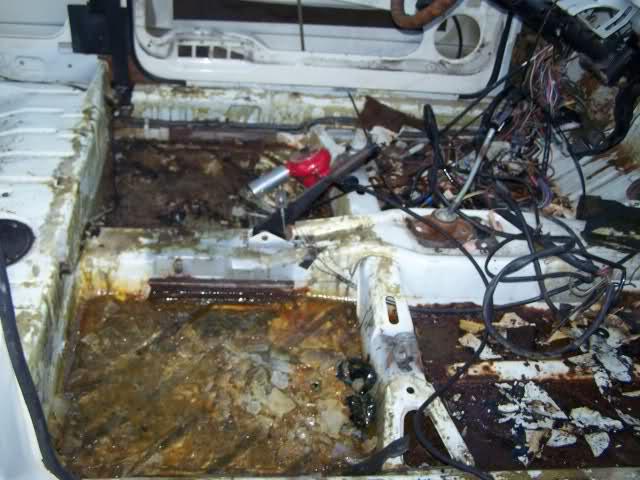
The worst is the passenger side. Behind the seat area there was about two inches of standing water that had frozen hard. I was REALLY concerned about this area. But when we brought the car home one of the 4-speed trannys puked all its gear oil out. Turns out the gear oil probably prevented any damage from happening. It took a LOT to get it even this clean though....
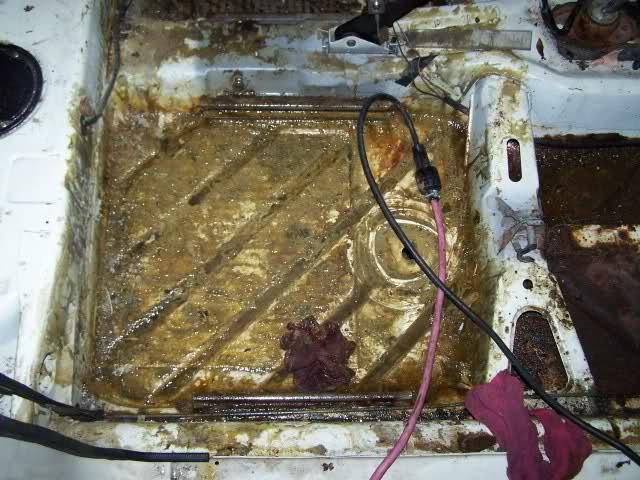
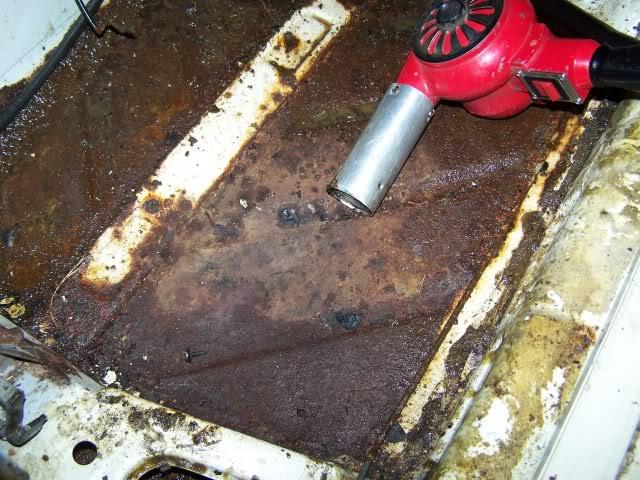
I stuffed a heater into the car to get everything nice and warm. Hopefully that will help with getting this oil cleaned up the rest of the way. Once I get all the oil up, I will tackle the sound deadening on this side. Cooking gear oil STINKS. The sound deadening is bad enough as is.
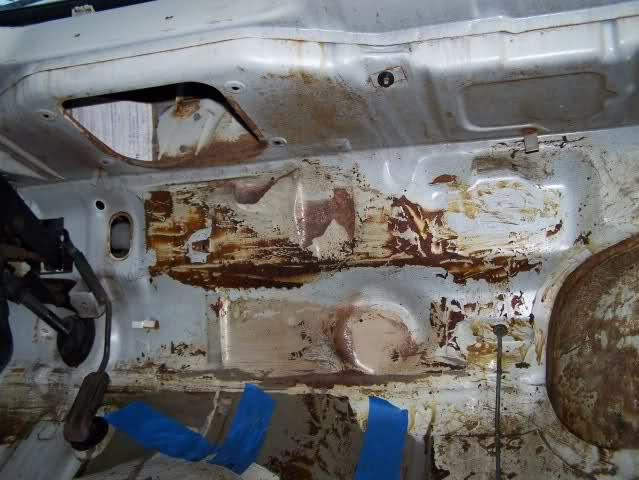
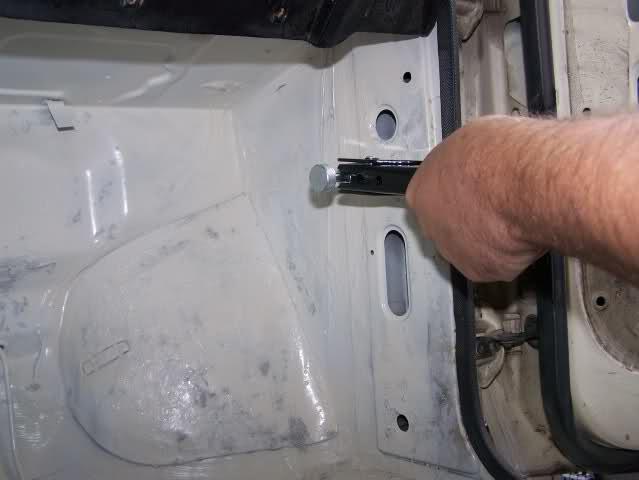
So the worst of the rusty areas on the car is the foot well on the passenger side. Pictures really don't show this well but its not anywhere near as bad as I would have thought. So far it seems its all very minor surface rust. Just lots of it. Soon as I scrape it and get the rust off its actually smooth and not even pitted.
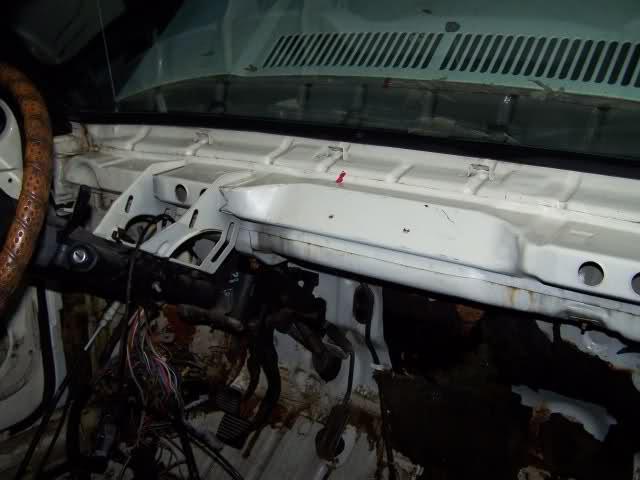
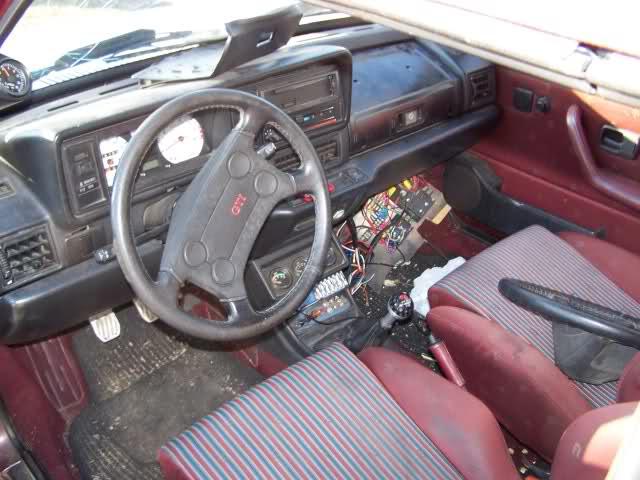
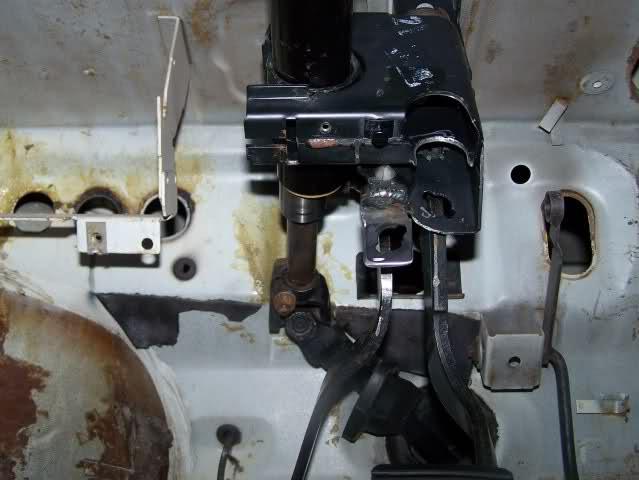
Onto the drivers side. It was pretty clean over here. Still had to drill a drain hole to let water out. But mainly it was just cleaning up the mess here. The scary part is actually going to be the OE wiring clean up. Theres a random circuit board and a rheostat attacked to the steering column that I am completely lost a to what its function could possibly have been. No matter as I am dumping ALL the OE wiring from tis in the garbage. Updating it with the harness I pulled out of the 83 unless I manage to score an inexpensive CE2 cabby harness.
Anyways the damages, or lack thereof.
The back of the car cleaned up very nicely. Only a few areas with very minor surface rust. Still have some random leaves and stuff back here we will ave to get rid of after blasting. We will have to give the whole car a super thorough cleaning then anyways.
The dash area looks even more amazing! I am betting the windshield on this car has never leaked. All the areas where I usually see rust damage are spotless.
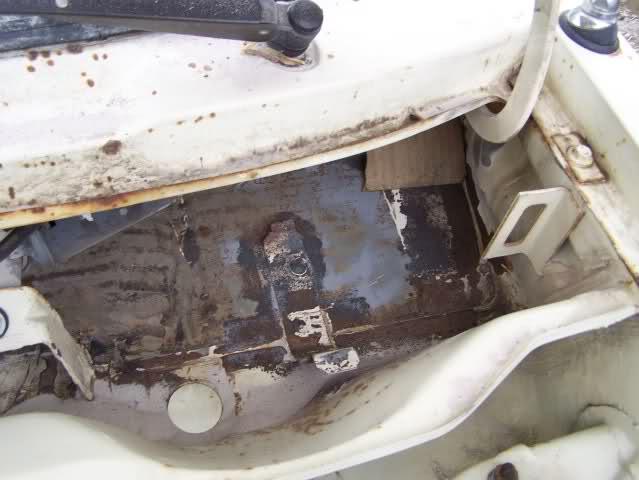
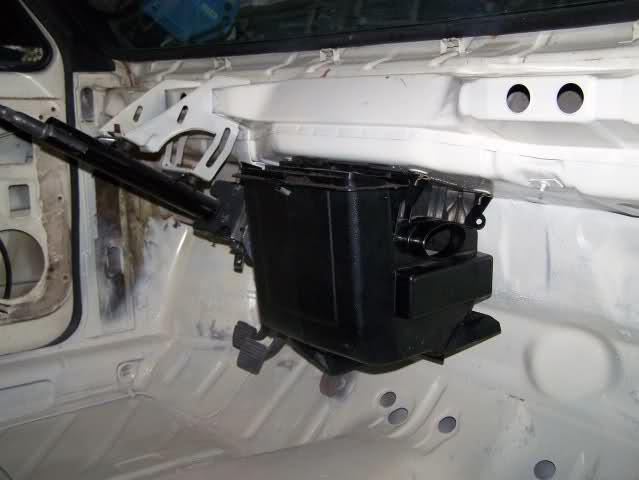
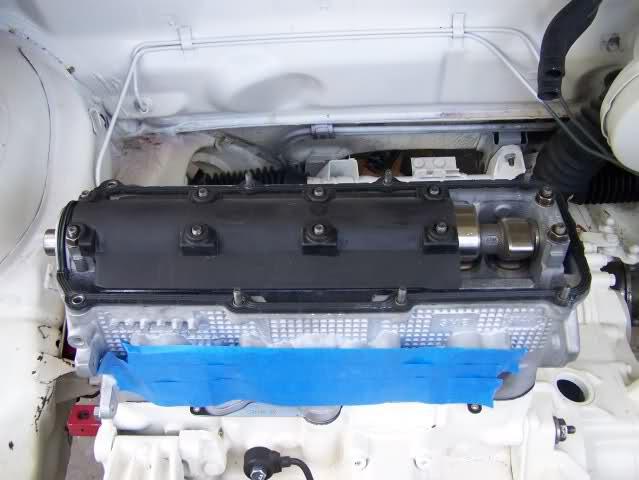
Since I am working outside and don't have a MUCH NEEDED garage I needed to tackle the area where much of the water was getting in the car. Where the heater box goes. Cleaned it up and taped it off. Nothing fancy for now, but this will defiantly slow the ingress.
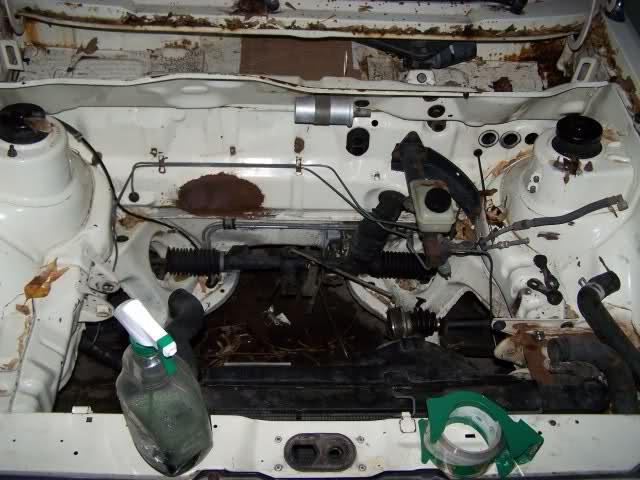
As soon as its blasted the heater goes back in and this should solve the rest of it.
A question though. On the newer rabbits I have always seen a drain tube off the bottom of the heater box. Granted most of these cars have AC, so its pretty much a necessity. I am wondering though if putting a drain tube on the bottom of this is a good idea though? I guess the rain tray plastic cover SHOULD keep the water out of there, but I am not counting on it. Any thoughts here?
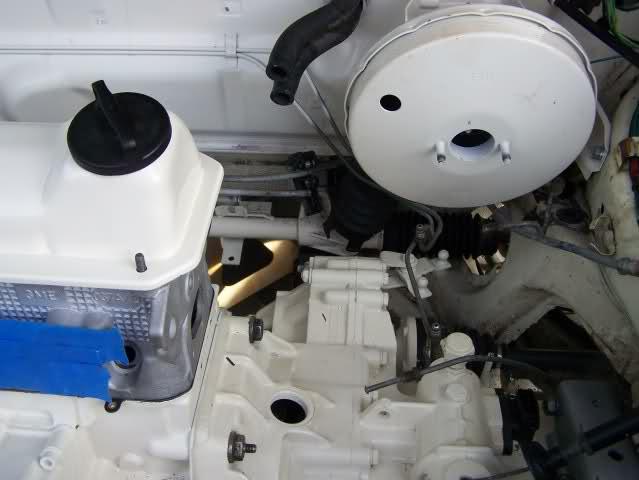
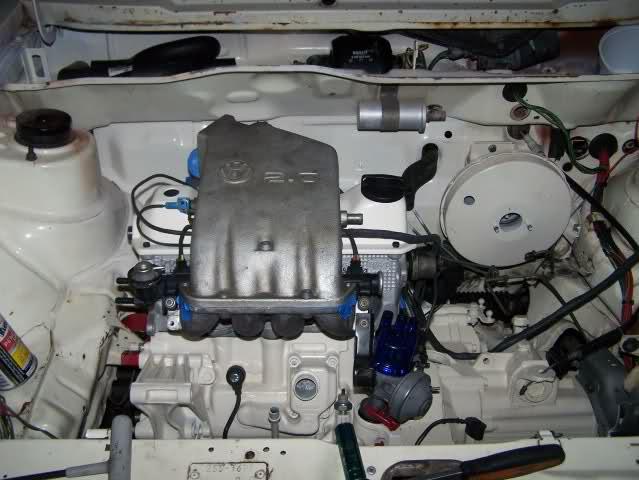
The engine bay has been cleaned up and most of the unnecessary brackets removed. I still have a few more to pull out. Trying to decide where to put the washer reservoir... I really don't want it in the engine bay, but relocating it to the back of the car is silly too. So far I have left that bracket in place. I will need to run another reservoir The bracket on the drivers strut tower is perfect for the adjustable fuel pressure regulator so it will stay unless I end up using an OE FPR in the rail. I really like having an adjustable one though.
So far I am very happy with the progress we are making. Most of the engine bits are done and ready to go. Just need to paint the motor and tranny and start bolting it all together.
One of my best freinds is a body and restoration guy. He gets tons of practice as his father builds enlish cars. Hes picking up the car sometime in the next week and doing it. Not sure what media he is going to use. I think he said garnet.
Once its blasted the floors are being done in Por-15. Less critical CLEAN areas will be hit with Vari-Prime primer and then painted. ANy non critical areas that still have a little rust will be hit with Rustoleum and then painted. The plan is to not have ANY rust left on the car.... But still going to need to keep time and material costs down and "the plan" usally never goes accordingly.
Price? I am giving him a Toughbook in exchange for materials and labor. Cash rarely changes hands. So far for this project I am only into it the cost of the shell and a single can of clear engine paint.
January 13, 2009
GODS I hate the smell of gear oil in the morning. Or any damn time for that matter. I think ALL that stink was the burned gear oil that had soaked into the floor on the passenger side. Cleaned up most of it but its still soaked into the sound deadening in that area. Thats coming off in the next day or so though...
FalconFixer and I rolled out to the JY today and came away with some good stuff. I only had time to get about half of my shopping list, but everything on it was there.
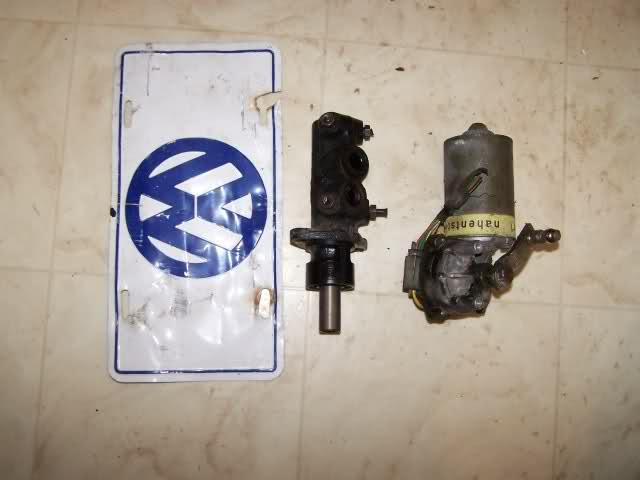
Got the first part of my braking system, a 22mm master cylinder off a Passat. Scored an A3 wiper motor assembly easily enough to upgrade my crappy stock A1 setup. And found a cool plate hidden in a rain tray.
Theres pretty much nothing reusable for brakes on this car. I am hoping the lines themselves are okay, but not even betting on that one. This car doesn't even have power brakes... I will be grabbing a booster tomorrow since I have to get a steering column bracket anyways.
Since I needed to inventory my brake parts and see what else I needed, I went and dug into my hidden stash. I found some goodies!
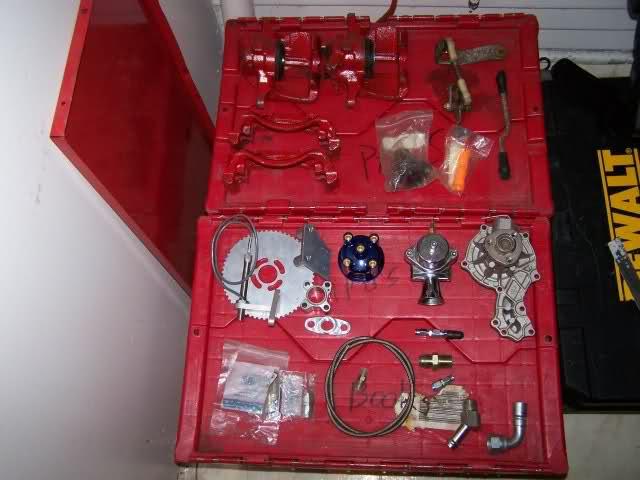
Turns out I already have a full rocco 10.1 setup other than pads and discs. Found a 5-speed shift linkage set and all new bushings for it (not shown). Found my clear blue EMPI dizzy cap. One of the first 16v prototype crank sensor setups from 034efi. Most of the turbo plumbing bits needed including a special metric adapter turns out I will need for the top oil feed. New waterpump. Dipstick tube and wateroutlet also new. A crapload of gaskets and I think all new engine mounts.
And these goodies got all cleaned up today.
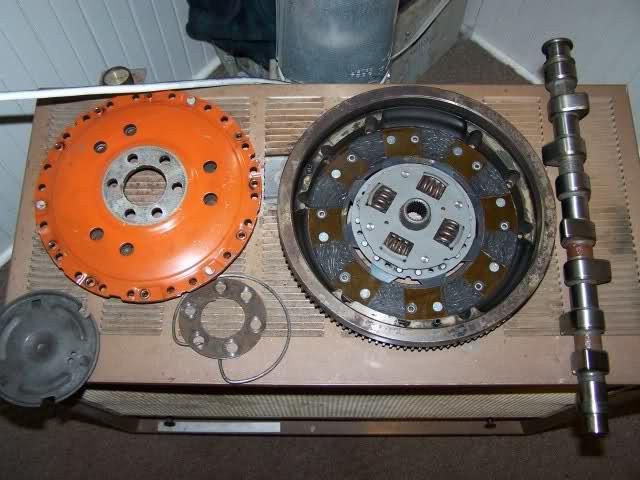
We have a REALY nice Centerforce Dual Friction clutch setup thats served me well so far. An Autosport Turbo cam and a stock flywheel that I will probably exchange for a lightened one. Well I am off to bed as I have a VERY long day ahead of me tomorrow. Have to make another JY run and then bust ass cleaning and getting the car ready for blasting.
January 14, 2009
Like if I don't put my cars back together soon I will run out of places to put everything. Many a conversation has begun with somebody going "Damn I need x rare part." and me going "Fug now where did I stash that?" I need a metal detector lol to keep parts from vanishing. Today somebody thought they would be funny and hide one of my race pack clutches...
Last summer I lent somebody my GTI flairs to testfit them. A perfect set. I can't for the life of me figure out who I lent them too and they not come back home yet.
Oh well.
Oh yeah so check out them calipers! Lightweight aluminum MK4 and they bolt right on. Sexxy as hell too! I didn't get much done today other than grabbing those, a pedal assembly (the 77 doesn't have a brake switch on its pedal assembly), and a cabriolet booster compleat with master cylinder and proportioning valves. I took a few minutes to clean the calipers. They are cleaning up nicely. Oh also -=cough=- found a bunch of random bolts in my toolbox that I proceeded to clean up and stick on top my heater for drying out. Was missing some stupid parts like ball joint cinch bolts and the like.
Tomorrow will be a very busy day though! If all goes according to plan, the Dub Cartel will be picking up two cabriolets. One might be rebuilt. But the other is being cut up for parts. And before anyone asks NO you can't have the fenders and core.... They are already called for on the next 5-6 cars they have a talking too.
January 15, 2009
My parts stash is top secret and under heavy guard! Besides it would probally take days to photograph it all....
Wheels and interior are going to be two realy cool treats I have for the car. My wheels are already sitting here. They are still brand new in their boxes too!
As for progress over this weekend, unlikely to do much if anything to the Bunny. Theres a few projects that need my attention and I am suddenly in dire need of a second car. The infamous cabby is in sad sad shape right now.
Shes missing a few small parts....

So a bunch of the guys are promising to stop by and looks like we will be making an impromptu party out of the ordeal. As of the moment I think we will be putting a 1.8L 16v into her. I am just trying to scrape up a few odds and ends parts to make it happen. I am torn though between that and a 1.6L 8v. I have enough 1.6L's around that I have no issues with seeing how hard and high I can spin one. If it blows up its a short ordeal to drop another in. If I had a second turbo setup for an 8v, I would do the 1.6L and boost it.
Shes been sitting a while and the interior needs some attention too. But fortunately its dry and nothing serious.
Engine, tranny, and MegaSquirt in one day! Should be entertaining, So anyways I will stop hijacking my own thread. Maybe I will post up a short build thread on that car.
January 16, 2009
It is an Etienne Aigner Edition Cabby! I love the interior. REALLY want to put it in a rabbit. But its too much a piece of history to do that. Its bad enough that my plans for the cabby will take it in a different direction. Nothing major but the damaged clipper kit is coming off and shes getting the chrome bumpers from the '77 flushed.
I have been torn on the cabby. Tried to sell her a bunch of times but could never get an amount that would let me sleep well. Heck I paid $2500 for her 5yrs ago with a blown motor and dying automatic. Then I turned around and immediately dropped the same right back into her to get her on the road.
Anyways shes been a damn good car and is getting put back together for the missus to eventualy drive. Maybe I can finally get the keys to my Audi back long enough to send it to my fabricator and finally get its fuel rail made and turbo installed...
Well not to steal the thunder from the bunny as this is her thread and shes a jealous little thing... So I have the coolest VW friends anyone could ask for! Last night I hear a knock at the door and my buddy FalconFixer walks in bearing gifts. Not sure what I will do with this first batch, but it never hurts to have spares and options! Theres a few things I wanted to try too, but not on my only grill!!! Now I can play.
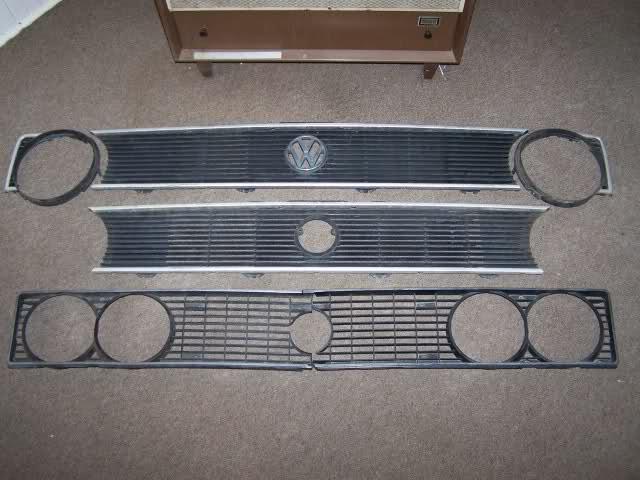
As cool as those are though, that wasn't the real suprise. He had hinted to the surprise a few days prior in a side comment "I have a windshield banner you have to put on your car!" I was all "Mmm okay." and thinking internally "Why would I ever run a windshield banner?" So I just let it slip from my mind until he handed these to me last night!!!
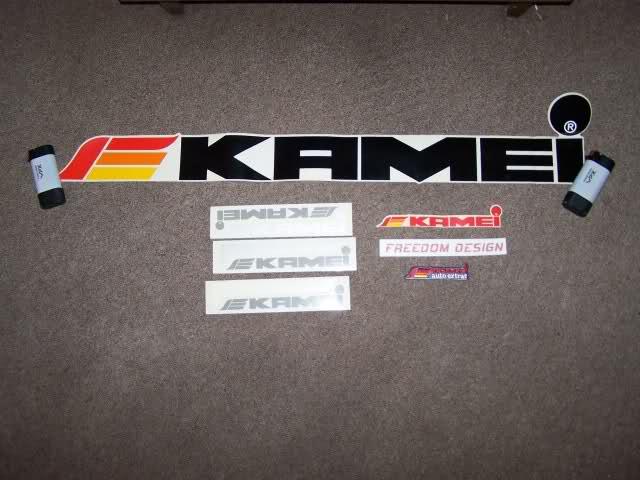
As some of you know, I used to live out on the East Coast. For a long period of that time I lived in Northern Virginia. Home of Electrodyne / Racing Dynamics. Well in the fall FalconFixer had found himself on some sort of top secret mission in an undisclosed location on the East Coast and wanted an adventure. He calls me up and I suggjested he check them out. So he drives a few hours to their location, just to find out they are closed for a holiday. Luckily there was still somebody there in the warehouse and they let him in to look around and score some goodies! I can't say enough good things about this company. They are truly run by enthusiasts that really love their jobs. And their customer service is out of this world. I have spent thousands with them.
Anyways they are the sole authorized importer for Kamei products in the USA. Anyone getting Kamei goodies, they come through Electrodyne. I have found some SUPER cool and rare stuff sitting on their shelves in the past, and this adventure was no exception.
In fact a discovery at Electrodyne started this whole idea for a project about 7yrs ago. I found this sticker and just thought it was the coolest ever. Its kinda been a good luck charm and has been moved to about 4 different tuning laptops since I got it. A little worse for wear but awesome none the less.
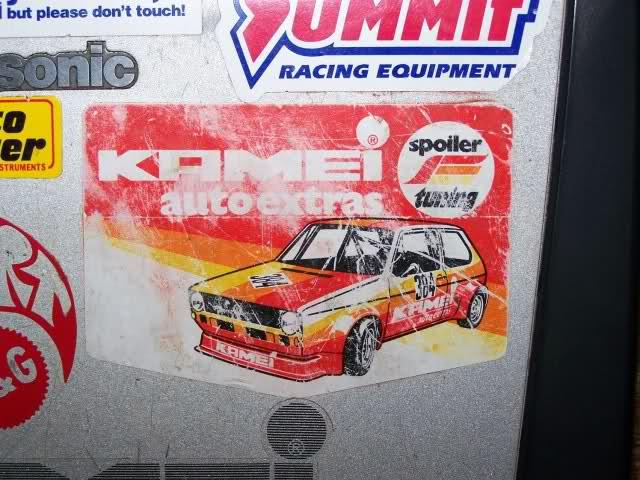
Anyways it was a while before I stumbled across some pictures online and discovered some of the history behind the car depicted on the sticker.
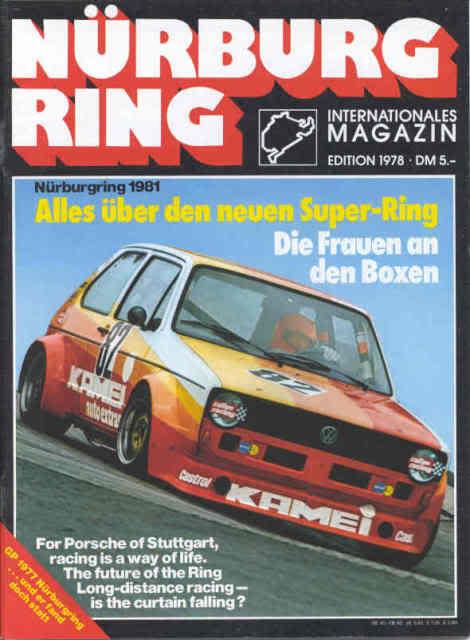
Needless to say I started looking for the parts I would need to build said car. I have since found sources for everything including a full repo of the Kamei bodykit. This was the direction I was going with the car. A lucky break on a set of wheels I had searched long and hard for though, has kinda changed the direction of the build ever so slightly.
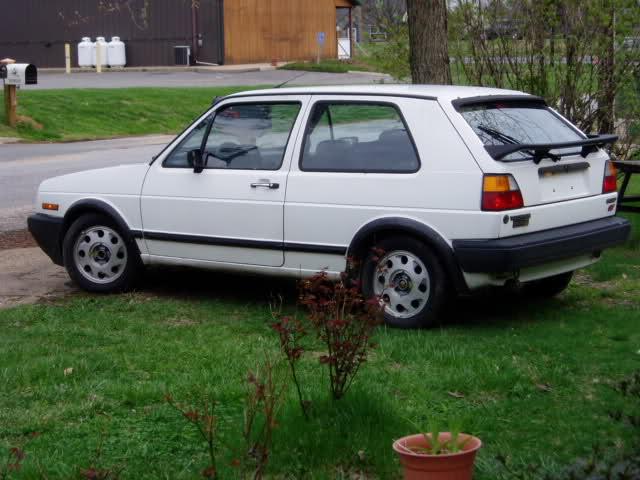
Building the full on Kamei replica is going to take some time to save up for, and honestly this particular rabbit is too clean to cut up and abuse for building the racer. I am going for a clean Old Skool Euro look for now. Playing around with Dubmodder and P-Shop gives me this.

This is really close to the final concept. We have a few more goodies going onto her. I am pretty sure FalconFixer has a Kamei hood scoop hidden in his stash.... But hes holding out on me!!! Oh well, if he does when we get to that point I am prety sure I can convince him to lend it to me long enough to make one up. If I can't find a decent original.
January 19, 2009
Que paso Antonio?!
Yeah it was time to get her (the cabby) back online. Nothing really happened this weekend though... FalconFixer and I discovered that mi Bonita had never been to the junkyard before. So it became an adventure to the junkyard instead. She had fun going through everyones junk left in the cars...
FalconFixer and I discovered that old beetles have metal signal stalks and scored 1 1/2 sets. I think we have enough colum parts to make the swap work too. It turns out I only had ONE rabbit metal set (the ones I gave FalconFixer) and the ones on my car were plastic.
We got a bunch of other goodies, but for now I am keeping them under wraps. Borrowed her parents trailer though, and finally picked up the engine for the cabby. And it came with two cans of engine paint! Seems the colors will be black and red.
Most of the rest of he weekend was spent reorganizing mi casa and labeling piles of bolts for use on both cars. SO much fun...
January 21, 2009
The cabby isn't allowed to steal the thunder away from my bunny. Wanna see it? Well come on out here and help me throw the engine in!!! The sooner she is back together the sooner I am busting out the bunny!
Engine plans for the bunny? I want decent fuel economy, performance, and reliability. To all the “naysayersâ€Â out there this is actually easily accomplished with the right combination of parts, engine management, and proper tuning.
The head is a modified ABA crossflow for better flow and the ability to run the OE TD setup. Its already finished and just waiting for me to pay off the bribes on it. I choose this mainly for ease of access to the turbo. Reliability goes way up with this combination too since it will eliminate heat soak caused on the counterflow, and also has the sodium filled exhaust valves from the G-60. The G-60 valves are a little beefier too with 8mm stems instead of the ABA 7mm ones.
Actually Antonio (1.8T16vhead) and I were brainstorming tonight about the bottom end. Turns out the engine that was supposed to go into my cabby over the last weekend was a bit questionable anyways. So I have it all pulled apart and found out a few more tricks and parts interchangeability that I hadn't thought about before. I LOVE 8v engines. They are near indestructible. The 16v engine on the other hand while peppier out of the box, comes with a price. Its not as reliable and once you boost it and tweak it that reliability really falls. My plan was to put a relatively unmolested 16v into the cabby. A decent combination of power and reliability but without the cost and aggravation of setting up a boosted system.
The older 8v's (pre ABA) have horrible oil breather systems... Never having built a 16v, I hadn't realized that I could simply dump the 8v PG block, and use the 16v 1.8L block instead. The 16v block will give me a MUCH BETTER oil breather setup, still has the oil squirters, and should fit the PG internals.
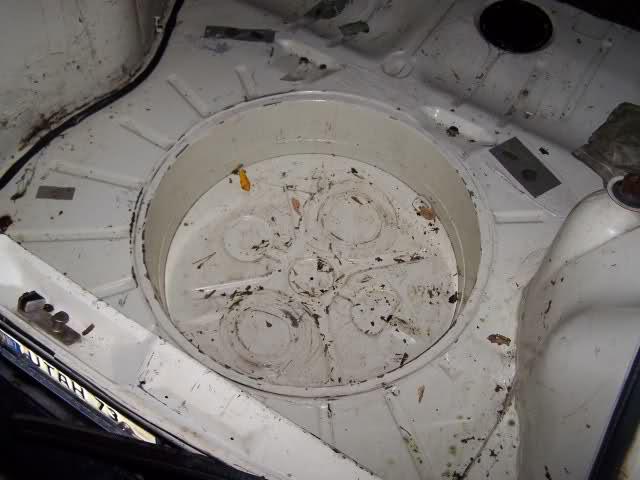
I really want this bunny online and running soon though. I am tempted to throw the 1.6L engine into her that was sitting in the tire well. Setup with a solid lifter head and no boost temporarily so shes drivable and doesn't need to be trailered everywhere.
February 05, 2009
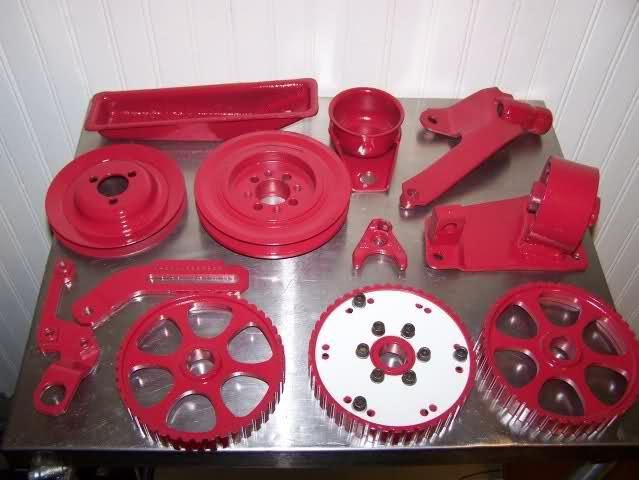
Progress is slow, but very steady. Right now I have been slowly cleaning and painting all the engine bay parts. First batch is now done and the second batch is ready for painting. First batch came out really nice!
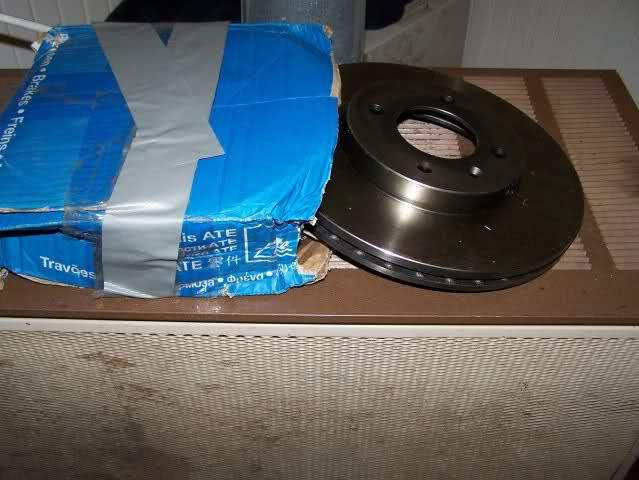
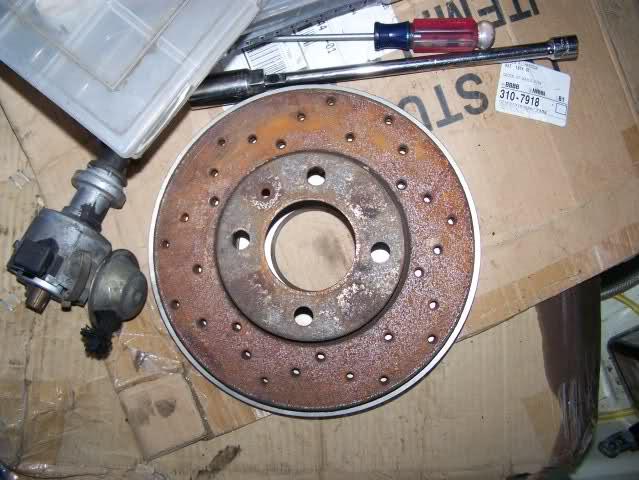
I have collected a lot more parts for the build. Braking system is complete except for a few small bits here and there. A week or so ago I got a heads up from one of my friends. Somebody was selling new VW rotors for $10 still in the box. Called up and got a little more info and cross referenced some numbers, turns out they were what I needed for my front discs!
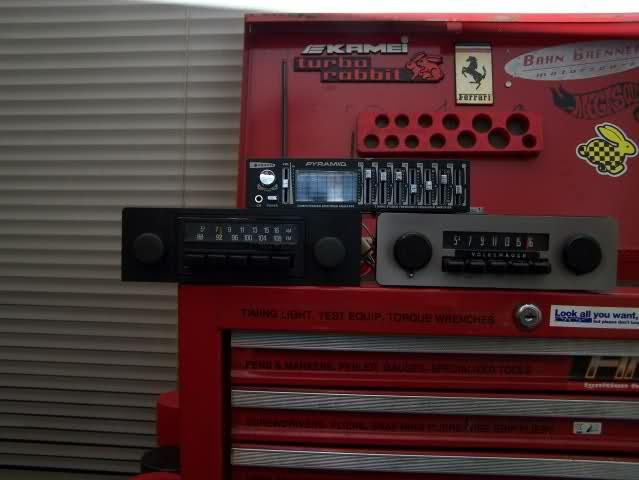
I now have another radio choice. The plan was to run the one on the right... But I just found the black one. While the Volkswagen badged one is way cooler, the FM reception on my MP-3 player sucks. I am going to use the early '90's tacky yet BRAND NEW Pyramid EQ to jack my MP3 player into the system. The black one will go with the rest of the theme slightly better also. And it is still an OEM VW radio.
Got a few more goodies. Found the correct kneebar for the car and a spare glovebox. I wanted another box so I don't feel quite so guilty about having to cut out the back of it for the Pyramid EQ. As neat as it is, having it visible would defiantly detract from the rest of the interior concept. Obviously I will need to re-dye everything, but that was already going to have to be done anyways.
But the best I saved for last! The steering column will be pretty trick! Turns out that the 62 beetle stalks fit nicely onto the rabbit column. The trick was to use the ignition switch surround from the beetle setup. Nice because that is also metal and I can't wait to see it polished! And then there is the steering wheel, but we will leave that goodie for later...
So for the most part the progress has been in collections lol... We waited on the blasting due to bad weather and low temperatures. Need it to be warm enough within a couple days of blasting for the Por-15 to dry properly. We are about two weeks out on the blasting. By the time I get it back and painted, should be ready to drop the engine in!
February 06, 2009
No, but I WOULD for the GTI stripe setup with a red GTI in it.... MK1Autohaus sells the GTI stripe kits, but no red GTI in them. Originally the plan was to go with a full Kamei Widebody Racer setup. A lot of research finally found me a place that actually has true Kamei Widebody repo kits, not the Berg cup look alikes, but the original Kamei setup.
Unfortunately this company has some bad press in the forums and its questionable if I can actually obtain the kit from them. Cost is another big factor. To do the racer right I need three things that are all very pricey. Widebody kit. Appropriate wide wheels. And a rollcage. The wheels used on the original are BBS, no need to elaborate further there on how pricey that would be... The rollcage isn't too bad though. But dropping $500-600 on the widebody kit with no guarantee that I will get it worries me. To do the Kamei Widebody car at best would be setting me back $1500 plus paint. More like $2500-3500 though.
Anyways this build is about using the resources readily available to me that I have on hand. Looking at everything I have, I decided to go with a mixture of the early Euro GTI with a few small bits from the USA version. Especially the front spoiler. Our roads are crap here in Utah and they like sharp angles on the driveways so a duckbill was really a bad idea. I like the USA GTI spoiler anyways. And I think the bumperless look is super clean.
As for the Kamei bits? I have a small pile of goodies I am going to be using. Kamei was a name to mainly sell interior and some body accessories. They were successful because years later their widebody racers have burned a spot in our minds and we still will pay stupid amounts for old Kamei parts. With what I want to do for the interior, going full on racer is pointless anyways and wouldn't mesh well with the interior theme.
For a widebody racer I would go all out and not care about it looking a little outlandish with all the proper decals and such. With the Euro/GTI/Kamei theme I want the look to be a lot more subtle and clean.
Again I wanted to build this car inexpensively, so in the end cost was probably the biggest obstacle to building the full on Kamei Widebody. So far though we are well on track for doing this. As of now I have probally at least 75% of the needed parts. For amusement sake I went and added up my receipts. I only have one! Its $5.44 for a can of clear engine paint. As for the junkyard runs? I am always getting parts for friends and pay for mine out of those funds. Our local community is awesome too. Rarely more than a few days go by that a friend doesn't call in need of some random part. If I have it, its rare for money to change hands. It always comes back though cause its very common for friends to randomly stop by with parts I need. And most of my rare bits have been gifted to me by these same people. These were given to me a few days ago in fact!
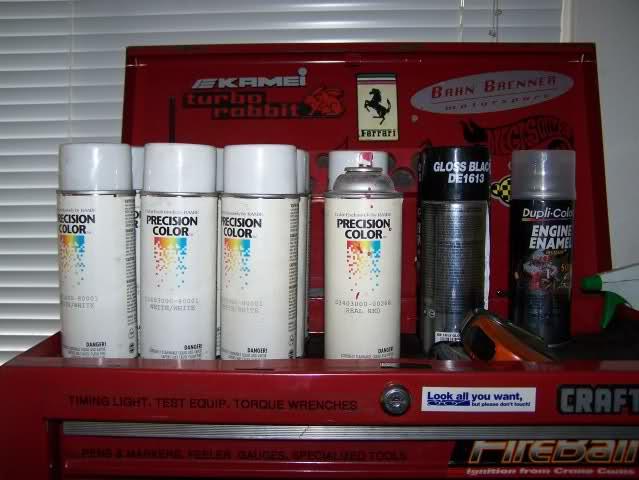
Nine cans of white, three of red, and two black high temp engine enamel. Theres a lot more where they came from too... Easily enough to do the whole car if I wanted to. For now they are just being used in the engine bay.
Last night a friend dropped this off for me. I had almost bought this same setup from a junkyard a couple weeks back, until the counter guy told me he wanted $200 for it and a valve cover...
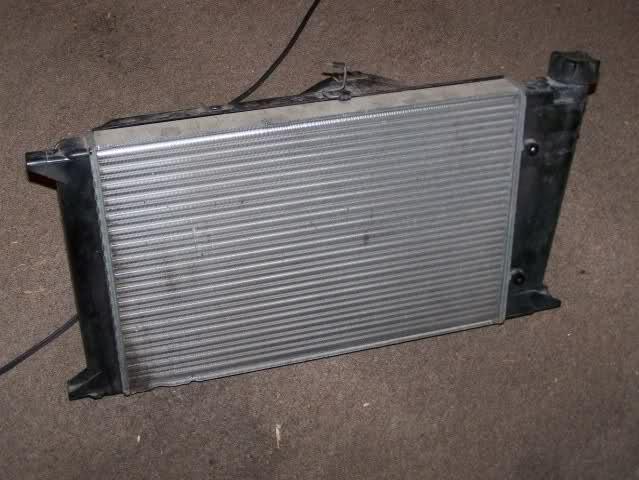
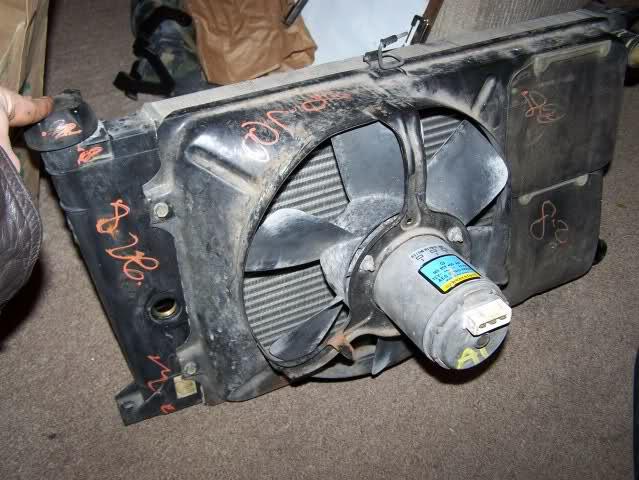
The practically brand new early radiator part is pretty obvious. Not so much is the MK2 fan setup. This price was much much cheaper. A couple weeks ago my buddy had stoped by needing a MK1 radiator setup for mocking up some insanity in his project and I happened to have it. Trading parts always works out well!
So I need to figure out how the MK2 setup originally worked. The main difference is it has a high and low fan speed. Since the car is being MegaSquirted, I will likely use the ECU to kick the high speed in. The big hurdle will be sorting out how I want it to operate in conjunction with the AC and Intercooler setup....
What can anyone tell me about how the OE MK2 fan setup originally worked?
February 23, 2009
I seriously don't think I have ever heard a second speed kick in on my Etienne Cabby... Hence I forgot that car also has that. Still have a lot of questions about HOW exactly the setup works, but I can likely decipher that with a little study of the cabriolet Bentley wiring diagrams. I am pretty sure the AC was linked into the high fan speed operation also.
Progress has been very slow. Lots going on, but nothing easily shown in pictures. Unfortunately most of the real work has been happening on the Etienne. Her engine is finally ready to go in. I have actually been using her as a testbed to work out some ideas for the Kamei. I have learned so much from living with the Etienne Turbo Cabby setup for the past 5yrs. While shes going back to a much less extreme mode, I am using what I have learned to take the Kamei bunny to a much higher state.
So by now I am sure most of us know the trick the Honda boys use for repairing and upgrading their engine mounts... If not google “homemade poly mounts and you will come up with a couple DIY's on the subject. A couple months ago I used this repair for a friends project. He grabbed a poly adhesive and while it worked, it wasn't really what we were after. It looked horrible and while functional, was not something I would want to see in my own cars.
So I decided to try again. This time I used 3M Windo Weld urethane. It came out okay but kinda messy... I was cleaning up the paint with some mild 71% rubbing alcohol and decided to try it for smoothing out the urethane also. Poured a little on the partially cured urethane and was happily surprised with the results. It did WONDERS for smoothing it all out. While it doesn't look store bought, it came out good enough to use in any of my own builds.
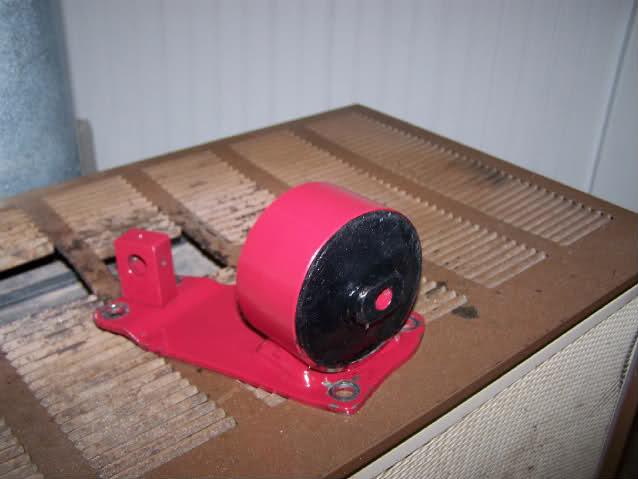
Yeah I know I stole one of the mounts for the bunny... I ended up snagging a few of the parts in that pile for the cabby.
Lots of progress is happening in sorting out the electrical for the Kamei. I managed to score the early rabbit Bentley on E-Bay. Shipped for $15!
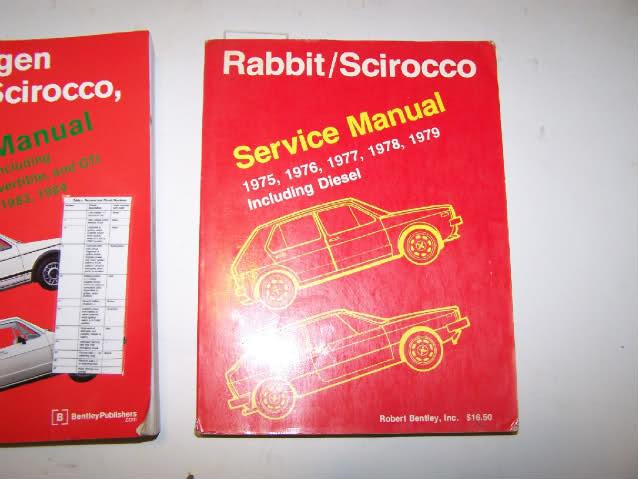
It has the fold out wiring diagrams in COLOR and is a way cool find. While the plan is to rewire the car from the ground up, likely using an '83 westmoreland harness, I still need to decipher the early instrument cluster wiring. I have a couple directions I can go with the instrument cluster setup, including a proper OE setup complete with tachometer.
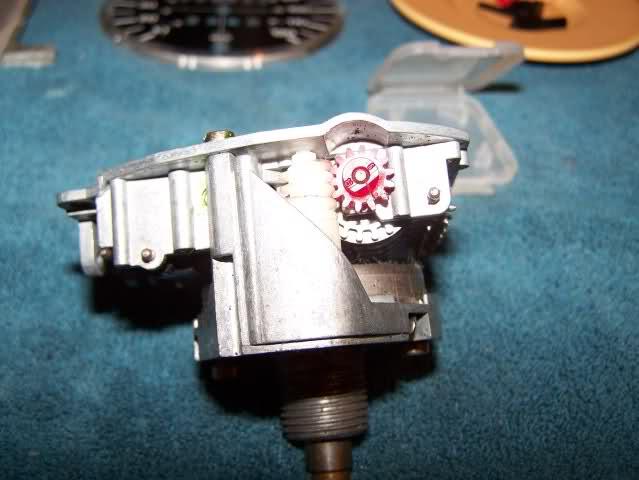
Speaking of instrument clusters and speedometers, I have learned some new tricks in this department. In the past I have repaired many (read ALL of my cars..) speedometers with broken odometers. There was a lot not addressed in the write ups I have seen here on the tex though and so I decided to take some videos of the process. I had some questions I attempted to find answers for here, but couldn't come up with anything so I decided to tear into my pile of speedometers and see for myself. The biggest question I had was in regards to calibrating the speedo on reassembly.
The only references I had seen were to lift the needle over the stop peg before disassembly and to note where it rested. Well if anyone has taken enough of these apart to notice, the VDO ones (not sure about any other brands installed) actually have a couple tick marks along the bottom. I suspected that the one between 8-6 o'clock was the OE calibration point. Turns out I was right. But even more interesting... On closer examination I discovered something very very interesting. At the very least on the 85mph, 100mph and 120mph speedometers the spring assembly is the same. The difference is ONLY where the needle sits un-tensioned. So to make an early 85mph speedometer a 120mph speedo only requires swapping the face and pre-tensioning the needle correctly. This opens up a whole new interesting world of speedometer swaps. Custom gauge faces are nothing new, but until now I have never realized that most if not all of the speedometer assemblies BEHIND the faces were the same.
I really want to sort out a VSS setup in the back of one of these early speedometers. In the later cars these were available for cruise control. I am interested in using them for a different application.... I may have to resort to a homemade output flange VSS setup, but the back of the speedometer is so much cleaner.
As soon as I have some more time, I will post up the speedometer repair videos for anyone interested.
March 19, 2009
So I have been slacking horribly about posting up pictures, but we have LOTS of progress happening on the car. I have been slowed down somewhat by the cabby, but shes basically done now other than hooking everything up and some small parts needed.
We finished prep for sandblasting yesterday. I am absolutly AMAZED at the condition of this car. So far only ONE small rust pinhole to be found on it. Everythign has cleaned up so so much better than I could have hoped for. The only depressing part is the tar covering up every bit of rust and the damn glue everywhere.
The dash area has cleaned up pretty nicely. Only real issue in there is the steering column bracketry. I really want one out of a cabriolet with cruise control as I need a brake and clutch bracket switch. I snagged one fron the JU but it wa missing the clutch switch bracket and turns out it was also missing the clutch cable bracket. Time for some welding it seems...
The biggest suprise so far is the floorpans. I knew they were pretty decent, but damn for a 77 they are MINT. The worst area was the passenger side and its cleaned up really really nicely.
We are ready to sandblast FINALLY!
March 20, 2009
So yesterday there were a couple VAG's in the driveway....
It was an eventful day that ended with my Audi deciding it hated its master cylinder. It was mad apparently at all the time we spent on the Bunny.
So after a lot of this:
We ended up with a lot of this:
There's sand everywhere.
The floors looked horrible but they cleaned up super nicely. The pictures don't show a lot as the clean up process has barely begun, but you guys can probably get the idea. I was afraid the floors were going to be the one place that got us on this project. Nope. They are really solid and we only found a couple small pinholes here and there. We suspect they occurred during the scraping/blasting process.
Only found one actual rust through hole up in the raintray. Its covered by the piece of cardboard in this picture. We are thinking of welding in the patch in such a way we can use this area to drop the engine management harness inside.
I finally got the rest of the OE wiring out f the car. Theres a lot of decisions to make about exactly what goes back into it, and how. I don't have a lot of room in here since I am planning on keeping the interior clean and minimal. So its possible I will be mounting the MegaSquirt in the raintray. I am a little hesitant on this idea as obviously it will need a waterproof case. I can mount in an OE VW case easily enough, but its a pain and limits future internal mods.
Anyways more thought on the whole electrical system revamping is defiantly required. By the time I am done I may not even be running a fusebox.
The other side of the raintray was pretty clean. Just scraped and blasted and all is well. When I got the car sadly one of the parts I really wanted and needed was missing. The early strut tops. I blow out a set of the later ones about every 6-8 months. The early tops had been taken off the car and resold before I got my hands on her. So either I am going to need to find another set to rebuild, something I haven't had much success in yet, or I will figure out a way to get a set of the Bonrath reproductions into the states.

Engine bay was really clean to begin with so again only minimal work was required here.
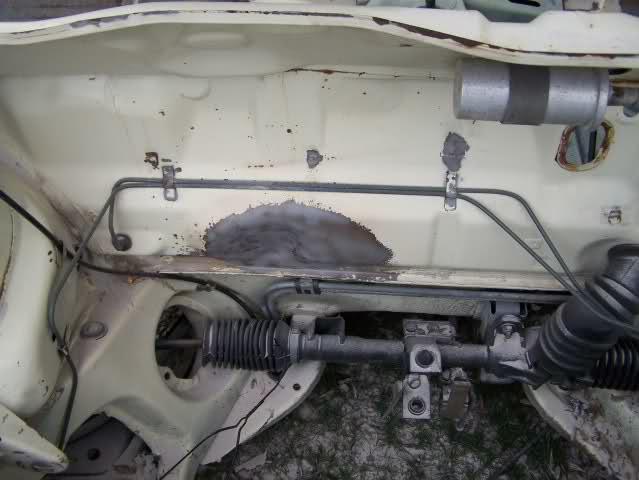
At the moment my biggest decision to make in the engine bay is what holes to fill in, and what steering rack to run. It seems the quiafe quick ratio internals fit inside the early style rack. But to do so means pulling both racks apart and trying to find some new seals. Since these never really go bad, thats likely to be a tall order. The easier course of action is updating the mounts so I can just bolt the later rack right in.
We have some more fun things going on. I have been working on a lot of little items for the interior while waiting for the weather to clean up enough for blasting and painting. In my winter junkyard adventures I found this little gem:
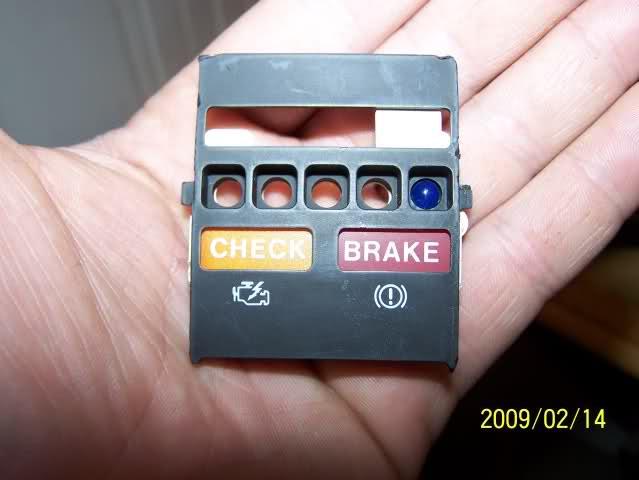
I am after the check engine light. I mean what VW can claim to be tuned if this light isn't on? But since I will never run any OBD system, I am thinking I will actually have to find some useful purposes for this light...
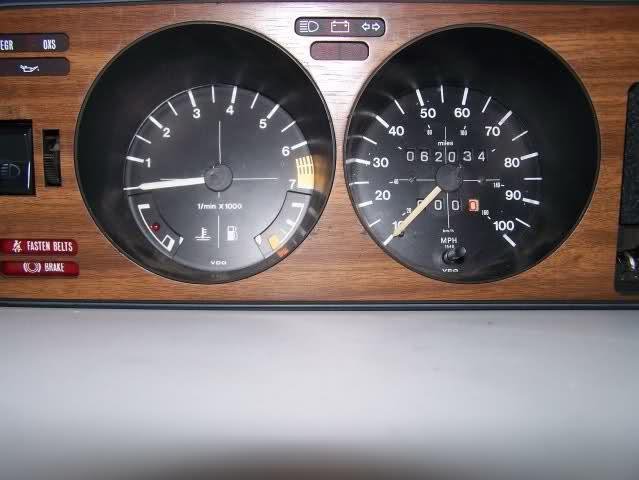
Heck yeah! I love the "base modle" ness of this car. Not that there was much left by the time I got it to tell it was a base modle.... The only clues were the single gauge pod cluster, the hoodlatch on the front, lack of swaybars (but not sure ANY of the bunnies back then had them), and a few other minor detailes. This car had no intermitant on the wiper. No rear wiper. Oh and the coolest is the blanked out glovebox lock!
The first thing I had to do when bulding this was to get rid of the single pod cluster. I am almost done with the first stage of rebuildign the dual pod I got. I will post up some pictures shortly.
March 21, 2009
Thanks Jeremy! Hey I wanna give a shout out to this guy for being a damn good seller and person. Other than stealing some early strut tops off my poor car... And then posting the pictures to prove he had them... As for the pile of parts you still have, lemme know and I come by sometime to get them. I have had NO LUCK finding a short shifter surround so I really could use that. I have a piece to run in there that means I can't use the long one...
Lol my buddy Ed and I ended up buying BOTH cars in those pictures. The corrado is sitting in an undisclosed location. I will have a new harness in her in the next week or so...
The VW community out here kicks @$$!
Anyways so onto some more pictures I promised.
I got a really nice hook up from "My Old Roc" a few weeks ago. He had a much needed tachometer and 100mph speedo, along with a cluster surround that was in much better shape than the one I had. And he had a broken speedometer. We had a deal!
So I rebuilt his speedometer and went through mine while I was at it. I have rebuilt countless VW speedometers, but this was a nice pleasant change as these are the first early speedos I have gotten to play with. I learned some really interesting things about them in the process.
Just like the newer speedos, these gears are prone to cracking. But fortunately they are the same as the later style gears so getting replacement pars isn't hard. I happened to have a few new ones in my stockpiles.
The interesting surprise is that the early speedometers are basically identical to the later style. Okay they are in a different case with a different face, but most of the internal parts are identical. This means the parts that break are swappable. It also has me wanting to swap in a MFA setup... but thats slightly more complicated as I need to sort out how to get the VSS assembly onto the back. Its worth doing though to get the newer style speedo cable in there as well.
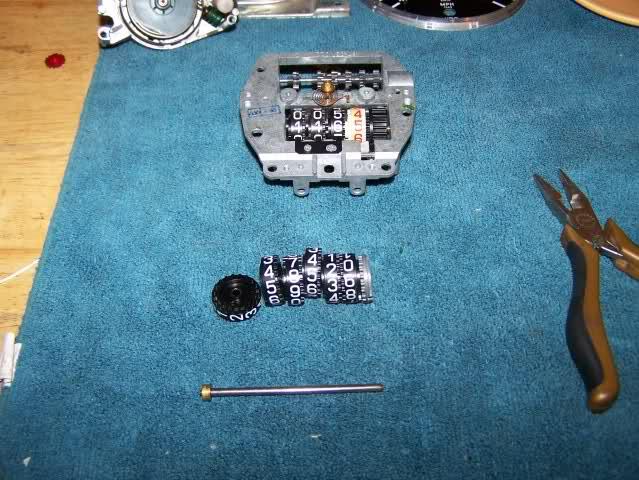
So here we are reassembled into the cluster.
I took videos of rebuilding the speedometers and finally got my laptop fixed so I can actual watch them... I will try and get those posted up shortly.
And here you can see how clean the woodgrain on this thing is! He even had a heater controls bezel in matching woodgrain for me. Thanks Andy!
Oh and got the check engine light installed in there. That was a HUGE pain to make up. The early plastic is super hard and rubbery at the same time. It was not easy to work with and shape/file into submission. But I finally got it to where I am happy with it and it looks like it belongs there.
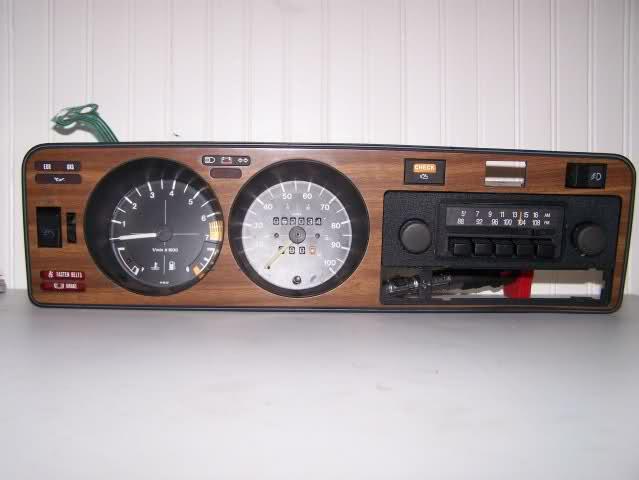
And check out the fioglight switch! I wish I remembered whee I found that gem. Probably out of an old Porsche. Yeah I know the headlight switch is goofy... I had to disassemble it again and put it back together correctly. In playing with my piles of old switches I discovered that some of them actually light up like on the later style. I guess these are fairly rare though. I want a full set really badly...
I did a power up test of the cluster and I am not very happy with either the amount of backlighting, or the very small amount of adjustment range on the headlight switch. For the backlighting issue I am planning some really cool LED mods to get it a lot brighter. For the switch, I think I might modify a newer one to get a larger range of adjustment.
Finally I just finished building this:
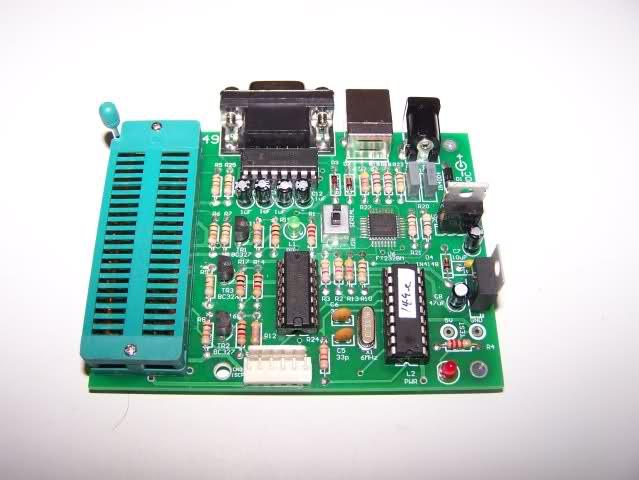
Almost had to get the light box out to get a good picture of that, I am hating my camera right now. Anyways its a very versatile PIC burner. It will burn just about any type of PIC out there and apparently a pile of other processors too. Why?
Well there are a few projects in the works. First off I am building an intelligent turbo timer to get a feel for working with PICs. Then comes the fun application. I can use the MegaSquirt as is to operate the CEL when a couple events occur, but all it will be capable of doing is turning the light on. I want a little more intelligence to it than that. A PIC can be programed to interface with the MS ADC lines to create a much more intelligant CEL.
I want it to set the light if the sensor parameters go low, or too high. I want it to blink if the IAT goes high, yet go out as soon as its cooled off. The other sensors can also be monitored and have certain conditions set the light. Codes I want to see:
1)Battery voltage too low
2)Battery voltage too high
3)Coolant -40, or too low. -40 means open circuit
4)Coolant too high, probably 230
5)Intake temperature too low, again -40 means open circuit
6)Intake temputure above 150 sets blinking until it drops. This will likely be a different color LED inside the CEL.
7)MAP reading flat lined to atmosphere pressure during running
8)AFR lean out triggered while under load, this will be hooked up to a buzzer too
9)Knock detected for more than x-seconds
I am sure I will think of a few more. The setup I envision will have a plug to access the codes. A simple switch will tell it to go into blink codes. Another will clear them out. Its a pretty ambitious little project, but something I have wanted to do for a long time. For years now I have heard this feature will be added to MS, but never seen any progress on this.
So after about 5hrs of cleaning, most of the sand is out of the car now. Got a little more to do today. We are expecting rain tomorrow, so I have to get it finished and tarped up. Maybe even get a little painting done and get the heaterbox back into her....
May 15, 2009
Time for an update! Progress has been slow... But there is progress. FalconFixer and I been super busy past couple weeks finishing up his truck. It should be rolling under its own power by the end of the month so we turned our attention back to the Bunny.
Got the steering colum and pedal assembly modified and back together. I needed a brake switch on th pedal to clean up the engine bay a little more, and also a second switch on the clutch pedal for flatshift setup. The pedal assembly we found earlier in the winter actualy had a broken off clutch cable holder, so I ended up using it for parts to modify the original '77 pedal assembly. And chopped up a corrado pedal cluster in my scrap pile for the clutch switch. A little cutting and then I handed the parts over to FalconFixer and he welded them up. Turned out really good!
I had thought there was a pedal assembly with a clutch switch. I swear I remeber seeing such a beast... But further investigation hasn't found one. And making one up was just a matter of chopping up another assembly or two for the bits needed.
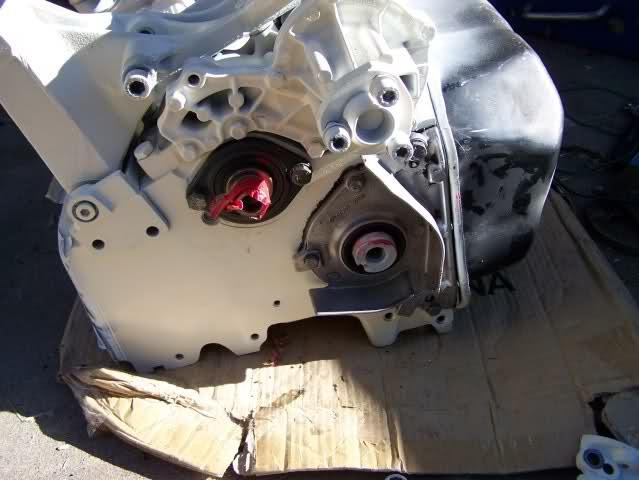
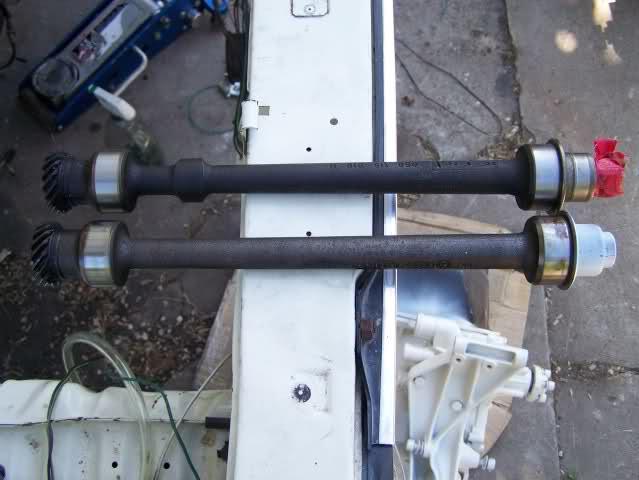
Another issue was the steeing rack. I wanted to use my quaife quick ratio rack from my cabby in the bunny. But the newer racks don't bolt into the older cars. Installing the newer rack would involve finding a donor car to supply the passenger side mounting bracket.
But thinking about it I realized that the hard mounted early style rack probally won't make much differance over hard poly bushed later rack... Caerfull examination of the two racks brought me to the conclusion that the Quaife bits would likely fit in the earlier rack. So I pulled them apart and sure enough the parts fit! There were some minor issues, but it went together easirly enough.
So after reassembly, cleaning, and painting, the installed rack looks prety good!
The brake booster and brackets are all painted up and ready for re-install once we source a few missing bits tomorrow.
Theres a lot of other bits finished up and waiting for reinstall too. We are hoping to also have the buny online by the end of the month. And at this point we are well on the way to accomplishing that too!
May 20, 2009
The pictures immediately above are from Double0SevenGti that he took before I got my paws on he. Shes likely sitting on her tires in the pictures as he had snagged the struts and top mounts out of her.
The pictures earlier in the thread that I took, shes sitting on H&R coilovers. Or at least the front is. Back still has the OE stuff on there. I ran these coilovers on my Etienne Aigner for a few years and I SWEAR by H&R coilovers. They ride absolutely amazingly awesome! Firm but not bouncy or too harsh. But you gotta pay to play...
So theres been TONS of progress past couple days. Not really a lot to see for pictures, but here ya have it.
Interior has been "rust converted" and all sealed up then painted now. Not perfect, but doesn't really need to be either since she will be running carpet before too long anyways.
Got the blower assembly back in there. Its actually starting to look like a real interior now!
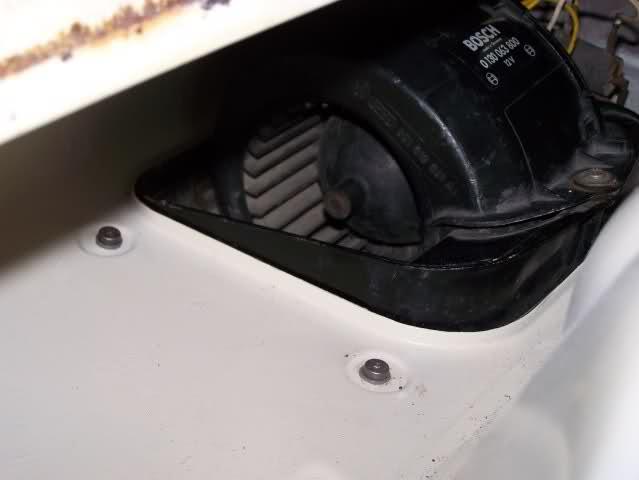
Of course I couldn't find the original screws and mounting hardware, but digging through th piles f goodies I found some nice bits to hold it together. And big surprise, had to solder a wire back onto the blower resistor. That sucked even with my nice soldering station.
The best part though was discovering that using my soldering station in the car, was painful. Damn thing has a grounded iron and well my extension cord apparently isn't quite so well grounded. I kept shocking the crap out of myself.
Got The raintray mostly repainted before I ran out of paint, again. The sections not finished though I can do with the blower covered up. Engine bay is cleaned up a lot more too.
The biggest things not in my pictures above though are the dash and wiring. The dash is one of the better ones I have come across, but it still had some damage and cracks in it. I managed to plastic weld most of them up and got it a fairly solid dash again. Still needs a lot more cosmetic work, but I am not sure how I am going to proceed quite yet.
The wiring is going to be lots of fun! I want it online FAST so for now at least I will be running the wiring harness out of an '83 rabbit I had that was in really good shape. A few things will have to be adapted over, but I really don't foresee that being too hard. I am really stoked about the instruments and the turn stalks though! Got some pretty cool tricks going on there....
Laid the several wiring harness I have out tonight and sorted through them. Its going to take a little bit of cleanup and I will be rewrapping and recovering all them. But I have enough to get it done and nicely too. Getting pretty excited here! I am hoping to actually be powering up systems in the car by Friday!
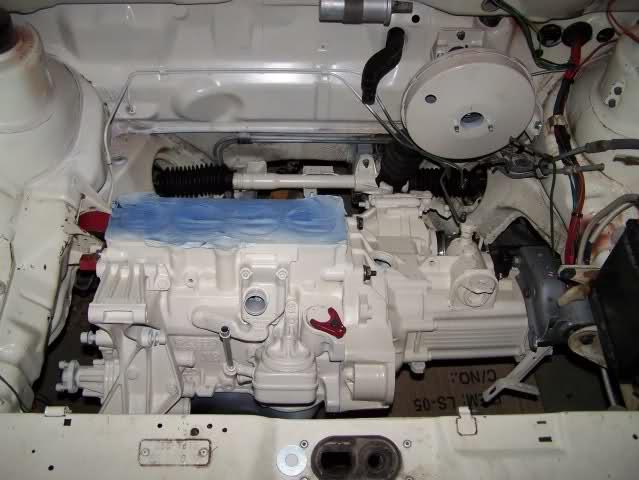
Found another picture I haven't posted up yet! Tranny is done and looking pretty sharp. I am very happy with how its all coming together here.
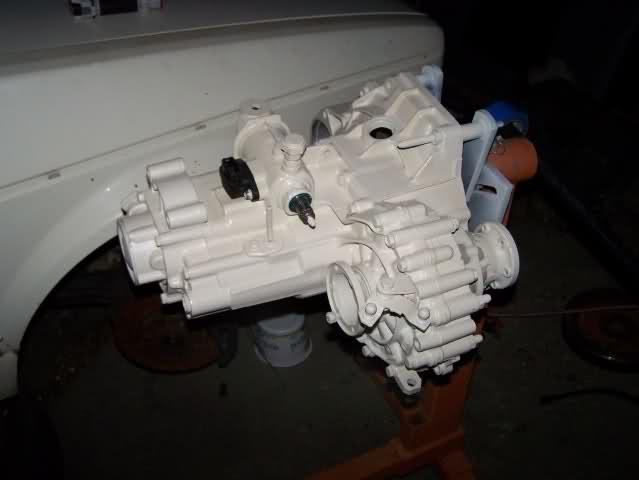
I keep wiping out the local Autozone's of Wimbelton White paint though...
May 21, 2009
So test fitting the wiring and trying to get the electrical systems all online today. Started with finishing up the steering column. Not a big surprise but the rabbit ignition switches fit right into the switch section on the older beetle column. So I now have a metal column surround and metal signal stalks!
The wiring for the column isn't fully sorted out yet but the contacts happen to be the same for the porsche signal stalks and the rabbit. All the contacts are labeled too, but not sure they all match up yet. Quickly going through it I only found one common wire to both.
So I went ahead and set the dash and kneebar into the car. Needed to get an idea of where the wiring needs to run.
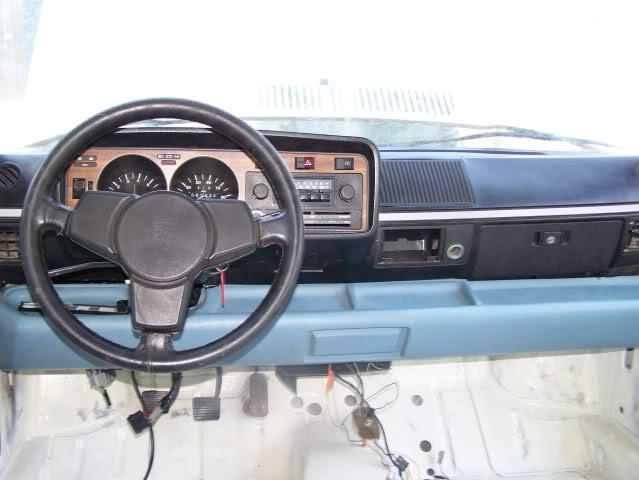
Looks okay I guess, but I swear the dash looks bowed... Had a really hard time trying to get it to fit in there too. The holes to mount the kneebar are there, but they aren't threaded. Guess I will be using SAE hardware there as I don't have metric nut rivets.
The instrument cluster area looks really sharp. I am happy with how thats all turning out. Turns out I have a plug for the cluster so wiring that in just became a lot easier.
This little beastie looks cool so I had to pop it on and snap a picture of it.
So I was looking for the horn wire in the engine bay harness. Couldn't find it, then discovered my horns were also missing. So I went and got a set of these.
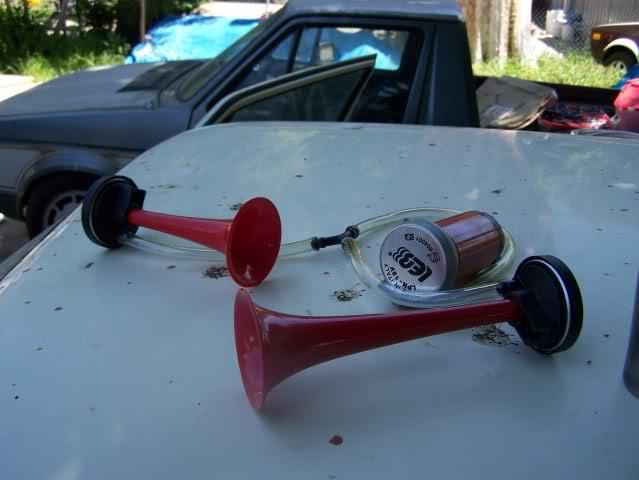
They are loud and sound way old school. They take a second to air up though... Oh well. Not like I really use my horn very often anyways. But its giving me ideas about an air tank setup....
Thanks deathhare! Means a lot and gives me hope! I wanted Fiam or hella horns, but I had $40 credit at AutoZone for purchasign too much paint... Do yours also have a small delay from hitting the button to operation?
There is a local GTG in Salt Lake next Sunday. We are planning on rolling to it with the bunny.
Impossible? Nope but its going to be a blast trying to get there. Lets see where we are...
1) None of the wiring is really sorted out yet. Engine managment is easy, I can do that in my sleep, and probally even have a premade harness sitting there ready to go. Engine bay lighting and everythign else is mostly sorted. We will be rolling with the harnesses unwrapped and raw, or maybe electrical taped together for the moment though.
2) Brakes... Rears not installed yet and fronts may be the wrong stuff. Still can put that all together in 2-3hrs at most unless I decide to paint them (I probally will paint too...).
3) No engine. The one going in isn't built yet. But I have a compleat 8valver ready to drop in donated by FalconFixer. So we will likely be running that as I don't see havign enough time to finish everything else AND have the engine built and rolling.
4) Suspension not done. Will eed to bolt on the rear coilovers. Easy enough but then theres an alignment needed. Still might need some tie rod boots too.
5) Interior nowhere near done. But we will pop the seats in and roll as long as I have instrumentation.
Hoping to have brakes done, susension, and the electrical systems powereing up tomorrow. If we finish all that we are on task for having everything online and should be ready for the show!
May 23, 2009
Well main power is finally online!
If it wern't for the fact I didn't want to spend a small fortune on wire and then the time to wire in VW's wonderously fun relays.... It would have been faster to just start all over from the beggining.
HOPING to have all critical systems fully operational today so I can start on getting an engine and tranny into her then wire the engine up.
No picture updates yet but I do have a couple things I can shoot later.
May 26, 2009
Lots and lots more progress! Other than random bits here and there and the engine wiring, the whole electrical system is online. There was a small misshap trying to diagnose weird issues caused by a damn blown radio fuse....
A lot of the un-needed wiring from the '83 is still run through the harness.I want everything online before I start pulling wiring out that I might be able to use for other things anyways.
I brainstormed with my fabricator today and we solved the final engine issues. Engine is being cleaned and assembled tomorrow.
Rewiring the whole electrical system proved to be loads of fun.
Not sure if I said this anywhere... But I am using a full front to back wiring harness out of my old '83. The wiring in that car was virtually unmolested and the westy fusebox sadly is a massive upgrade from the old one. And honestly the old wiring in this beastie was a heap of junk. The '83 harness had every relay contact in it happily smeared with grease and all the relays checked out good too.
I have lost count of how many later rabbits and cabriolets I have MegaSquirted... So I am very familiar with the westy setup and I know it can easily be converted to run a MS system with VERY MINIMAL mods.
1.8T16vhead heres the information you texted me for yestereday. Sorry I didn't see your text earlier.
And for anyone else who might be able to use it, this is the pinout information for the "77 and '83 instrument clusters. It is biased towards the '77 information since thats what I needed.
'77 pin/color '83 pin/color purpose
1 Empty
2 Blue/Red 9 Green/Black Turn signal indicator
3 Blue/White 10 White High beam
4 Red 5 Red/Black Tachometer
5 Brown 7 Brown Duh, ground
6 Grey/Blue 6 Grey/Blue Dimmer controlled lights
7 Black 13 Black Switched power
8 Purple/Black 4 Purple/Black Fuel gauge
NOTE: I have seen Purple/Black as both fuel AND coolant temp gauge on some instrument clusters. On this setup they both had different colors though.
9 Blue/Yellow 18 Blue/Yellow Coolant temp gauge
10 Blue 11 Blue Voltage regulator, charging indicator
11 Blue/Black 16 Blue/Black Oil pressure
12 Black/Yellow 17 Black/Yellow Catalytic system
NOTE: Officialy this isn't wired according to the Bently, but my '83 harness had it in there still. Can't guarantee its supposed to be or where it actually goes as I just hooked it up for possible later usage...
There were some left overs in the '83 stuff not used on the '77 plug. Some are used elsewhere some not. I am mainly including these for Antonio.
3 Red Clock power
8 Grey Upshift circuit (see current track 86)
12 Grey/Green Park light indicator
14 White/Pink Seat belt relay
15 Yellow Upshift circuit (see current track 38)
I am not sure why 12 and 14 are needed in the '83 cluster, but don't have an '83 cluster around to bother caring to look into it further. Just can't think off the top of either of those actually being IN the instrument cluster. Or maybe, is there a green light that goes on when the lights are turned on? Its been so long since I have owned my '83 and '84 rabbits....
So the trick is to tackle one section at a time. I went through and got each system online one at a time in the car. Only place it bit me was the burned out radio fuse when I powered up the instrument cluster. I pulled out all the funky splices, repaired a couple broken wires, and pulled out some of the excess crap. I have also lived with these cars long enough to know the weaknesses of the rabbit electrical system and made changes where needed. Also it gives me the opportunity to change every detail of the system that I don't like. Made a LOT of subtle changes, and a few not so subtle ones.
I am leaving the harness open and uncovered for now until I have engine installed and the whole car finalized. Theres some extra stuff I will be running to the rear of the car for my water injection system, and a couple other things. Opinions wanted here... I can easily get a super clean rear hatch with rear wiper assembly, and the wiring is already there for this setup too. To run a rear wiper or not to run? I will be running a rear wiper reservoir anyways for the water injection. Not sure how I would nicely and cleanly activate the rear wiper without running the rabbit stalks. And I discovered the rabbit stalks being able to pull forward and push back screws with the programmable wiper relay. Like more times than not kicks it out when you program it. I really like the rear wiper setup, but not sure the extra weight is worth the small added convenience, or trouble wiring something up to bump it on.
May 28, 2009
Today was a good day! Changed out the rear brakes, suspension, and axle.
Got the short block painted and ready to slide in. I am probally going to be putting the motor and tranny in tomorrow minus the head. The head still needs to be reassembled and I don't have a cherry picker handy to do it all at once.
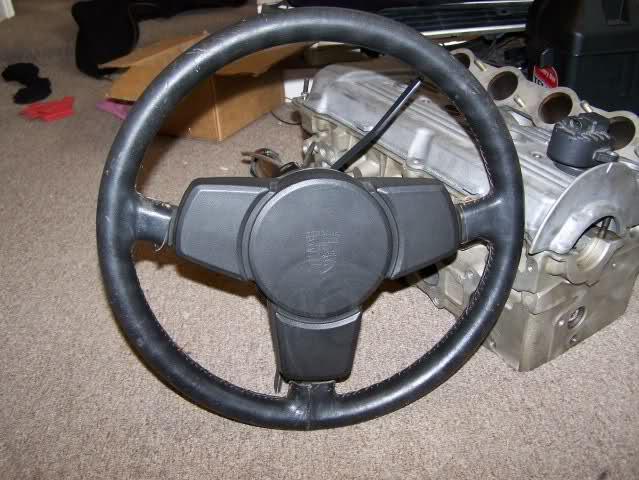
Did a bunch of other little things. Fought with the steering column again getting the steering wheel on so I could move the car aound a little. Shes moved back now ready to lift up and forward over the engine/tranny combo tomorrow morning.
I know before anyone says it "Lower it more!" I want everything in the car first before I do. And these coilovers haven't been adjusted in AGES so lowering them is going to be fun. NOT.
And I decided to stare at my wheels I had tucked into my closet. I have had these hidden away for a while now. In fact I bought them before I even had a car to put them on!
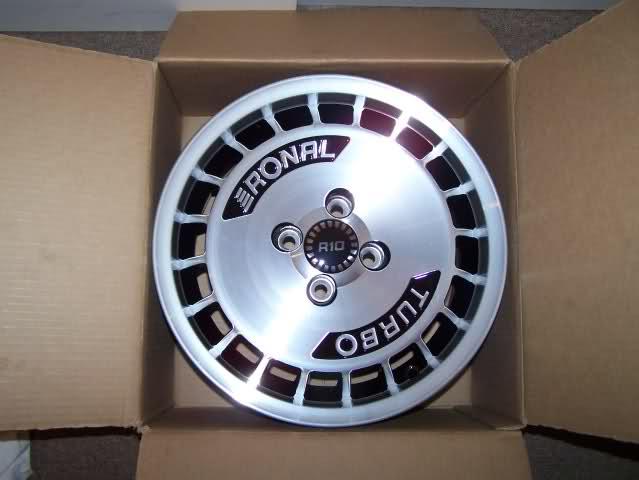
They are 15". It may be a while yet before I actually get them on the car as I still am not sure what size tires to run for the look I want. Speaking of, heres a P-Shop with them and the final concept idea.

I have several people who have promised me a GTI airdamn, but so far none in my hands yet. All the other bits I have collected and have ready to put on. Probably won't be bothering before the GTG this weekend. I mainly just want her online and running/driving.
Still have to collect a few odds and ends parts. I think the only critical thing is a downpipe. Theres a few diesel bunnies in the junkyard down the way from me. Supposedly the diesel toilet bowl flows better than the gas one.
Everything is really coming together quickly! I am pretty stoked! Tomorrow I go get the registration and finish putting the engine and tranny in. Engine harness is already 90% built and ready to go. I will need to add a few things as I lay it in, but the primary section is complete.
Oh a question for you guys. Does anyone know of a source for the headlights with fogs/turns? The autoloc snake eyes just look cheap to me, and are WAY overpriced. I would pay that monie for all glass ones, but the yellow section on the autolocs just looks wrong to me. They used to make them for the old beetles, but I can't find anyone with them in stock or avalible....
Well we are getting closer to D-Day! The bunny is now legal and registered.
Have a small issue to deal with today before I can tackle putting the engine in. Stole some parts off the cabby yesterday and discovered when I went to move it back, a drum on that axle is frozen up. Couldn't even budge the car.
But I can drop the axle in 5 minutes now, except for messing with the evil brake lines from the axle to the body. Those suck. Fortunately I just need it to roll off the parking pad.
May 29, 2009
We are dead in the water. I have lost the whole day now. Got up early this morning and grabbed the head to take it over to The Mad Scientist for assembly of the valves and springs. My 8mm viton valve stem seals are missing. I had them yesterday morning and sat them on the kitchen table. Yep. She cleaned.
Nobody seems to have the right set. Even if they do, I am not sure I can recover from the lost day at this point.
On a good note, the engine and tranny are in. Not without misshap though unfortunatly. FalconFixer got into an argument with the drivers side mount and it slipped. His wrist is very unhappy now.
If anyone local has some, we are in dire need of 8mm valve stem seals, viton preferably so I only have to do it once... My valve stem pliers are also missing so pulling them out would be a pain once its all on the car.
The Mad Scientist came through for me. I have to give a shout out to him. Brent Savage over at TAS Goodyear is da man. And lemme give a shout out to the boys at Bug Craft for having a set of the 8mm seals sitting on the shelf and donating a killer EMPI sticker for the project. They are now known as BC Autoworks cause VW's marketing department sucks my.... Um never mind. And most importantly FalconFixer and the missus for putting up with my sh!t today when I was having a really bad day. Today sucked monkeyballz.
Anyways today was a comedy of errors from the beginning. Cept I wasn't laughing much. I am likely shelving the bunny for a few days. Unless a miracle happens there simply is no way the bunny can be together and running by the show on Sunday. I probably can, but at the cost and or possible risk of neither FalconFicer or I making it. We still have an ECU to setup on his baby and a little wiring to finalize here and there.
Whatever the case, I am wide awake and the missus and I are cleaning some G-60 forged pistons. I want to swap these in before I bolt the head on. If I bolt the head on before I go to sleep... there's still a good hope it can be online in the next 24hrs.
May 30, 2009
So I broke a piston oil control ring putting the nicely cleaned pistons together last nght.... The bunny is sadly shelved for the weekend at least. We need to get FalconFixer's caddy online for the GTG tomorrow than busting @$$ on a doomed bunny. I will get back to her early next week. Shes registered and I have 13 days left to get it all together and through safety and emissions.
I might post a teaser pic or two of this caddy later... If you guys are good lol!
June 02, 2009
So theres been a lot of progress over the past few days I haven't gotten pictures posted for yet. Due to not having a garage and my apartment already being overrun, I was building the engine mostly "in the car" per say. No not an ideal method, but it works and I have had to work in worse conditions. I have actually had to rebuild a bottom end while it was snowing before... That sucked. That was actually my MK2 golf though. My rabbits have only killed fuel pumps and timing belts in the snow.
I miss that car....
Well anyways not MK1 content. So heres the engine right before slotting it into place. Check out that OLD SKOOL lower crank seal cover. The timing belt shields are just the thing needed. I was sad, we were all ready to drop in one of the 1.6 litter bottom ends I have sitting here. I have one stamped 1.6 and one with just an H on it (likely a Chrysler motor). Unfortunately neither were in good enough shape to inexpensively rebuild. So I stole off them what I could.
The block is a frankenstein. Its a 16V 1.8L with 8V 1.8L internals. Heres a comparison between the 16v aux shaft and the 8v one.
Now theres a few good reasons for doing this. Mainly because I can and have the motors sitting here and the 16V was rebuilt recently... But more importantly I wanted a better breather system, and its a cleaner way around the block off plate issue on the PG block. Oh and the 16v block also has the needed oil squirters and had already been cleaned and painted. Even though I repainted it...
For simplicity and lack of garage, I set the block in resting it on a jack stand, hen slid the tranny onto it and bolted it all in. Then we had a solid "engine stand" to change out the rest of the stuff.
So here I am getting ready to set the head in with the ABA headgasket taped into location.
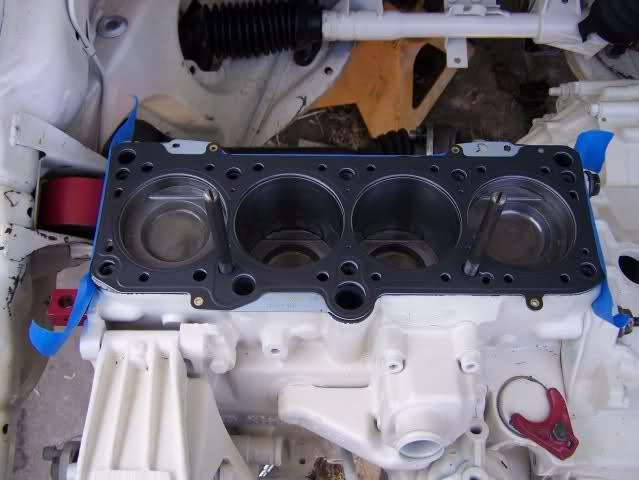
Freshly machined parts look so so nice! The ABA head needed to have the valve guides changed out so it can run the beefier 8mm valves from the PG head. These exhaust valves are sodium filled. Machine shop cleaned the head, cut valve seats and resurfaced it. I then hand lapped the valves and the Mad Scientist put the springs and keepers in. I finished up dropping the buckets and cam into it.

Bolting it on was easy enough. The tape trick worked pretty well to keep the headgasket centered, or at least it lets me sleep better thinking it did.
Normal M.O. on my cars is to cut down the splash guard where the oil fill cap is. I hate seeing those things when I fill with oil as they always look dirty and I can't see how clean the engine is... Retains most of the benefit and eliminates all the disadvantage of running them.
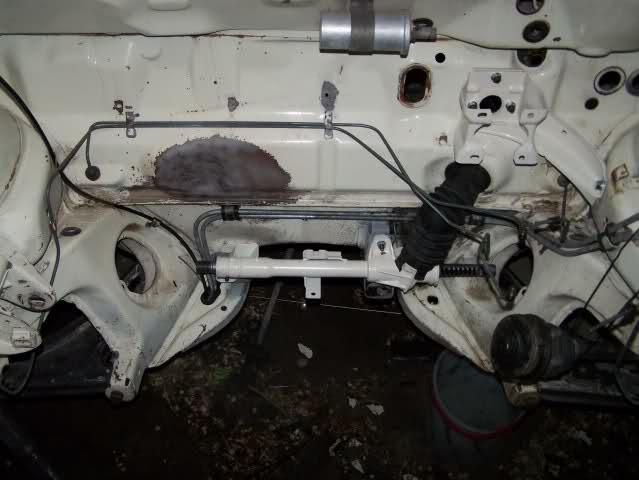
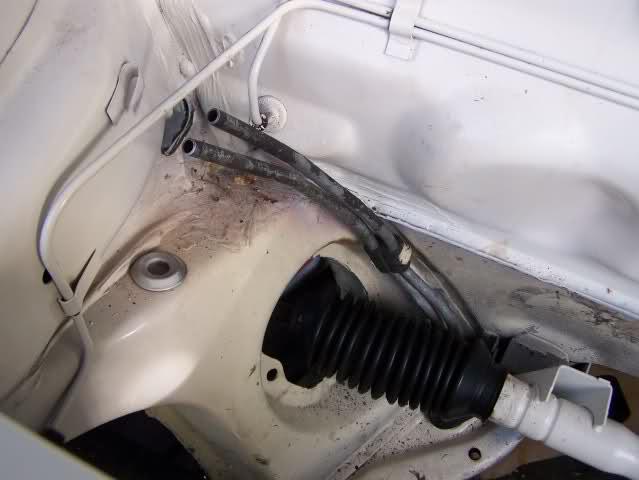
Cool, so finally onto "MegaSquirt" related goodies. When converting a MK1 over from CIS to EFI, the first thing obviously is removing all the CIS stuff. Long gone on here except for the fuel lines routed the wrong way. So the trick is to unclip the fuel lines on the drivers side and then behind the brake booster. A good yank sally pops this one. After doing that I pull the lines away from the wall far enough that I can get a pipe cutter into there. Use a good one, but keep it small.
After doing that, carefully bend them up and over to the passenger side. I tuck them behind the brake lines. Theres a clamp down there PERFECT for catching the lines. I reused one of the rubber holders from the side we pulled them off of. Now getting the clamp around it takes creativity and is always a pain to do... Sometimes I have to go in through the hole for the tie rods. Usually it takes two people, one holding the lines in place and the other finagling the clamp and pulling it over with an assortment of weapons. Pliers, prybar, screwdrivers (that of course are NEVER to be used for "prying')...
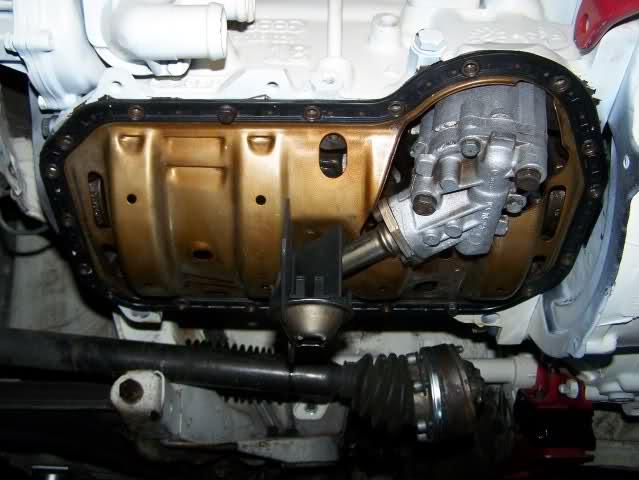
So after sorting out fuel line routing, down to the bottom of the motor to finish up a few more things. Contrary to what I have seen elsewhere online, you CAN run a windage tray gasket setup and a baffled oil pump pickup. You just have to use the right pickup! I am not sure what engine this one came out of, but I have been abusing it for a few years now. Hope it doesn't rattle as I broke off the final clip... Now it will just be held in by being pressed against the windage tray.
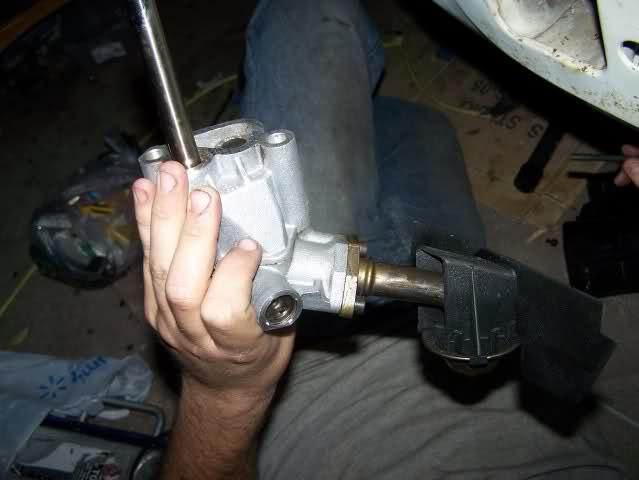
When I do this, I spin in 2-3 bolts to hold the tray up and out of my way so bolting the oil pump in is a little easier. Then its time to bolt in my modified 8v oil pump! Its made with a 2.0L 16v oil pump with the shaft swapped out for the 8v one. This was the trick I used a few years back for the most flow and pressure... But I think theres actually a bolt in 8v pump that would do the same. Again parts I had on hand I made do with. And here we are all bolted up!
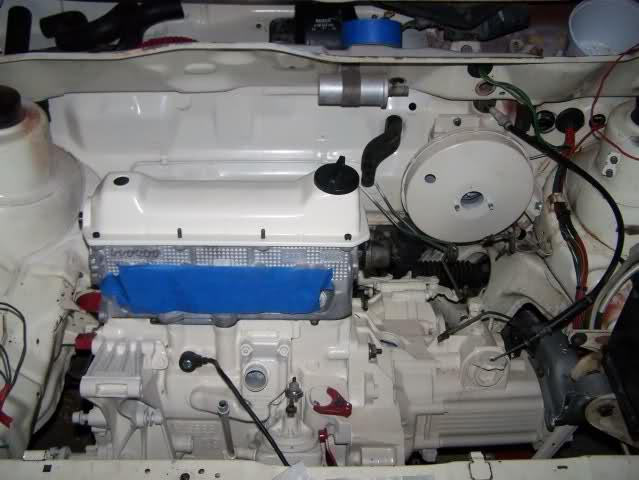
Engine bay is really starting to look like something finally!
Not sure what if any progress will happen on this today. I got work, and some other projects, to attend to. I am hoping to have the final bits ready to be bolted to the engine though.
We didn't make it to the GTG last weekend for those who aren't local and watching this. FalconFixer's caddy is all online and ready to go, but having issues getting the COP setup to work. We have a really crappy RPM signal going into the ECU that needs to be sorted out. Unfortunatly my dialy driver Audi 90 has also developed what sounds like a rod knock at low load and rpm. The bunny pretty much has to be driving by the end of this week or I am likely to be carless...
June 03, 2009
Lol yeah I wanted to be a little different. Besides in all the installs I have done, my harnesses just disappear into the engine bay. I WANT it to pop out and be all "BAM here I am!" I like the color on the car (for now anyways) and figured that color matching most of the engine bay to the car would give me that extreme minimal look I am going for. I want the minimal look without actually smoothing the engine bay and removing anything. So far its defiantly working.
Later on I would LOVE to change the whole car to panama brown, when I get around to a perfect body restoration. But the white works and works well. The Panama Brown would detract from the old Euro GTI, turned Kamei theme I am going for.
So amazingly enough yesterday was super productive! With a few questions rapidly answered by fellow texers, I got my front brakes sorted out. I am not 100% sure what these came off of, but I think it was a scirocco 16v as they bolt right up. I do remember I got them on ebay a few years ago for under $50 shipped! Calipers and carriers. They been in storage since I really had no need for them.
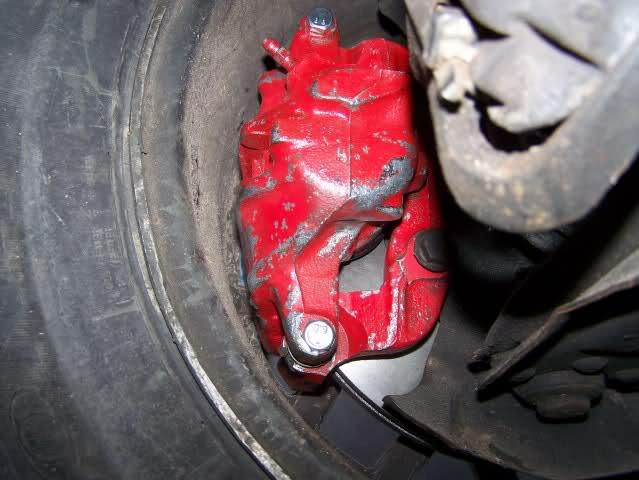
Honestly though I can see why I never bothered to upgrade to the 10.1". I had crossdrilled zimmermans all the way around. These are a really minor upgrade in size when set together. The calipers look a bit meaner, and possibly even bigger. I just might see if they fit on the smaller carriers and 9.4" disc setup... Dunno yet.
So onto other details. The OE fitment turbo setup, didn't fit so well! I am probably missing the one piece needed to make it work perfectly. The OE drain tube setup. I had to tweak, cut and grind, pulling the turbo on and off 5 times for a couple hours before I got it to fit well enough. Ended up grinding a good chunk off my drain fitting flange and the back retaining bolt so it would rotate far enough to let me put the drain fitting on. Its hitting the wastegate. Overall not too bad though. I can pull the turbo off in less than 30 minutes I estimate when everything is hooked up and completed. Takes about 5 minutes now.
I need to purchase a fitting and have a line made up for the drain. Its going to be a nice straight drop with a 90 going into the pan. Simple and clean. I already have the oil feed line made up and ready to go. Actually going to be reusing the one from my turbo cabby setup. The fitting on the top of the turbo? Its a 1.8t adapter I just happened to have kicking around that I bought from ATP Turbo 3-4years ago when I turbocharged the cabby. Props out to ATP! Love those guys!
I know, not running proper exhaust nuts. Thats fine for now. The washers will do most of it. I hammered 7mm washers onto the 8mm studs. Should hold nicely until I have time and money for the proper nutz. And lemme tell you, those washers aren't coming off then!
So turbo is in and looks pretty nice sitting there. I am ready to bolt on the final bits and fit the harness. Its going to be a full harness setup as I am running all the OE engine wiring through it. I will separate out the starter, reverse lights, and power though as I have seen this section get fried before.
Anyways I am hoping to have the harness fitted today and to finish re-painting the brakes. Maybe even get as far as getting the radiator and fan shroud cleaned and painted.
Whats left? Lets see.....
1) Got to button up lots of minor suspension things. The damn OE fuel lines will have to be moved I discovered last night. They are going right through where the bracket for the front swaybar goes. And this car has larger studs holding the rear control arm bracket in. So I have to drill out the swaybar/control arm bracket holes to fit on this car. Surprised at this...
2) Need to fit in the harness and finish it. Getting the MS system online after that will only take a couple hours. But I still need to sort out and run any extras in the engine bay I need now.
3) Finish painting everythign I need to have painted that can't wait until later. IE most of the engine bay stuff going in. May wait on things like the alternator and starter for now that are quickly removable.
4) Finish installing whatever brakes setup I will be running. I need to clean the rear aluminum calipers still. Sort out rear brake lines for the lightweight calipers. Paint and install the master cylinder and reservoir, and decide if I will run a warning style brake cap or not.
5) Cooling system sorted and installed. Probally fairly easy, but I am not sure how the earlier system without the overflow tank is setup. And I am running the OE oil cooler setup for now since its simple and clean.
6) Fan wiring upgraded. I am running the MK2 fan setup to compensate for running the cleaner but not quite so efficiant earlier radiator with cap.
Once the car is online, the final stage of cleaning the OE wiring up will commence. I want everything in the engine bay integrated into the engine or main harness. No seperate harnesses running in and out. All the alarm wiring will be in the main harness. The main one will be left “raw and openâ€Â for a little while to make sure I have it all sorted out and together.
Alarm you guys ask? Hells yeah, the look on peoples faces when they hear the alarm beep on a beat to crap looking car is just way too priceless NOT to do it. Besides I integrate a few other evil tricks into my alarm systems that make my life easier. Girlfriends really shouldn't "borrow' my car... I did alarm installs for a few years and hate living without those little conveniences and amusements they add. Besides, again, I already have all the parts... Except a programable talking alarm module. I need that one.
Dude you RULE! I am sitting here having a stupid moment trying to remember what question I had to ask.... Thanks for the reminder!
So no unfortunately not. I am actually wondering about the downpipe I need to run. Making up a flange to fit right onto the turbo would be cake though. And I have a feeling that ATP Turbo either has this, or can make it quickly. I want to run OE style here though as the ball joint toiletbowl setup does work nicely. Even if it doesn't flow the best. My car needs boost sure, but its not really going to be about ultimate power. I want daily driver and OE reliability more than extreme power.
June 04, 2009
Didn't get a lot done yesterday, but enough to be happy something was done.
So first thing was fitting the harness and getting a few more items set into the engine bay. As always a perfect fit.
What I am not happy with is the nasty intake manifold. The 2.0 on top has to go and it just looks out of place on an otherwise clean engine. Don't feel like putting the effort into welding it clear and polishing it down though as its gong to get cut out soon enough anyways. I am thinking JB-Weld and painting it white...
Yep theres a vacuum advance dizzy with the hard to find retard can sitting in there. And yep that is an EMPI beetle cap! I am very tempted to run that dizzy mainly because I can. While a locked dizzy is required or recommended for MS, an unlocked one simply means the timing maps are left at zero except where you need to change and modify the timing.
Well fitting the harness and MS required putting some of the interior back in. So I tackled this little project. I have fallen in love with this little tool from Harbor Freight!
Wish it came in metric, but since its Harbor Freight it comes in cheap. I like cheap even more than Metric. Its a nut-rivet tool. My car had the spots for mounting the kneebar, but nothing in the holes.
So after a good cleaning and some vinyl painting I had this.
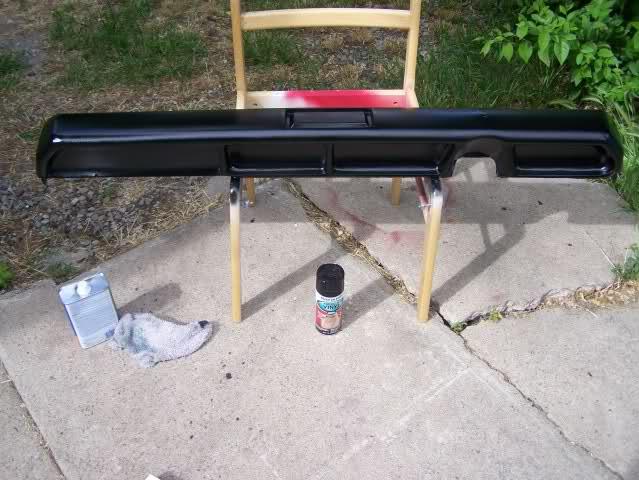
About this time Rein shows up since he was in the area. He suspected I was holding out and wanted to see some of the goodies I had in store. I am hoping he was properly rewarded for his efforts. While it may seem I post up everything, I do have a few tricks and surprises in store still! While here he helped my put the kneebar in. Its a fiddle to do with one person. Still a bit of a fiddle with two but so much easier...
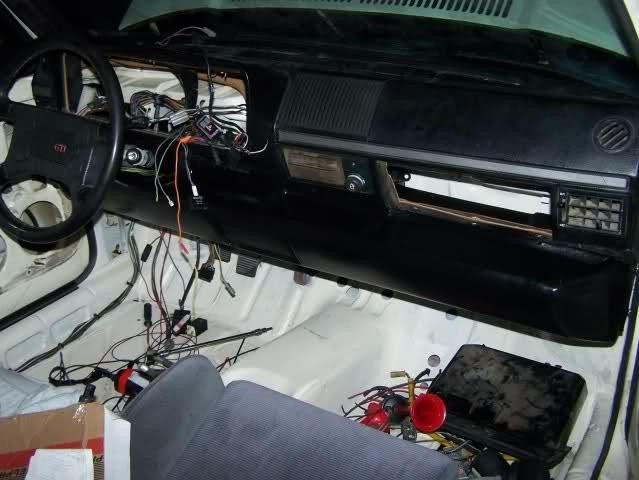
Pretty stoked about how nice it looks sitting in there! Going to HAVE to paint everything else now though... Oh well. No its not a perfect kneebar, but neither is the dash and its just beat up enough it doesn't look out of place.
Today will hopefully see the secondary engine harness installed and the MS powering up. I need to check the fuel pump and see if it works. If so, might even be starting her today or tomorrow.
MMmmm I DIDN'T know about that one. Theres a rare (so I have been told) one with the VW logo and no size stamped on it. My buddie has one of those. He says hes seen them go for $200 and more in the classifieds here though. Cutting that up would be criminal if so.
This might simply be a case of run with what I have, unless somebody local has one they don't want. I have JB-Weld and paint... And if it loos bad, more incentive for me to get the top manifold half over to myk fabricator and let him... Nevermind.
June 05, 2009
This evening saw me busy finalizing and building the secondary harness portion.
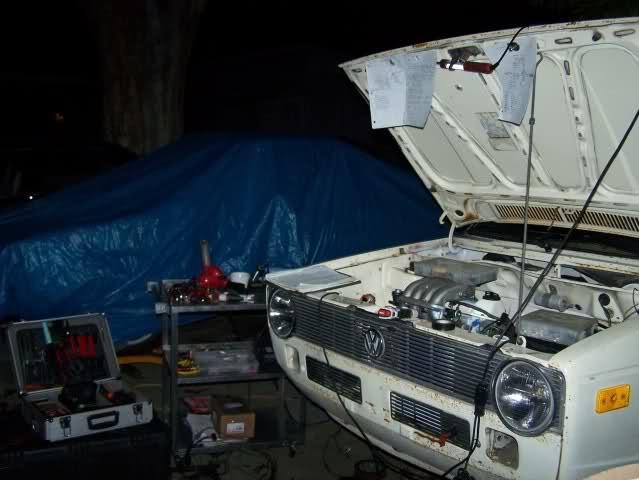
Harness is out now and sitting on the bench. I have to wire the relays in and sort out how I am running some interior stuff like CEL, Shiftlights, flatshift, and a few other things.
Shes coming along nicely! Theres a lot of small things to sort out now, but really nothing major. I will be powering systems online tomorrow most likely. Should have everything online and by Saturday be buttoning up the final details before first start.
Not sure if she will be driving as of this weekend, but it will be due to running out of budget as opposed to running out of time.
Only things left to sort out that I need to still get/purchase are:
1) Water outlet on the side of ABA head. Might cause issues too with the VDO pressure sender/switch...
2) Rear brake caliper lines for the lightweight calipers. Can run whats there for now though.
3) Alternator setup. Need a belt and a VR6 waterpump pulley.
4) Might need a coolant hose or two, but I seriously dought it.
5) Engine oil, tranny oil, and coolant.
6) Turbo drain line
6) A downpipe... This is going to be what screws me most likely. Supposedly we can hook up to a regular gasser DP for the time being. But nobody seems to know for sure. Techtonics Tuning claims the MK1 gasser will match up, but ETKA claims the gakets are differant. We shall see soon enough...
Seems like a lot but the only thing on that list that will require more than an hour to sort out is the alternator setup. I could and may well have to run a regular type belt setup for now. I have a few older 8v setups if I can make them work with the ABA head. Almost there! Or at least to running/driving stage anyways.
And just because this picture as soo cool, I have to post it up! For some reason final stages of any of my projects and tuning always seem to occur in the wee hours of the morning.
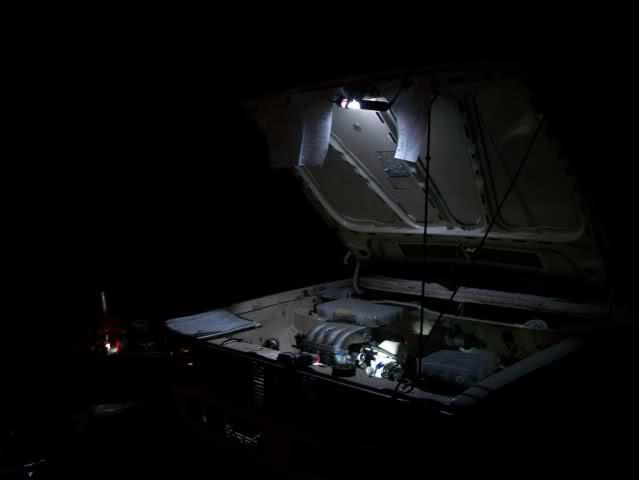
June 07, 2009
UPDATED LIST!
So made a junkyard run yesterday. Scored a complete second heaterbox with heatercore, blower fan, wiring, connector section, cables, and heater control sliders all attached still. I was just in need of the connector between the dash and box and the wiring section. Also got a spare ABA intake upper half with OBD-1 throttle body attached. A couple piles of random hardwares for the above items. All this for $20!!! Oh, and there was a cardboard/vinyl cover for passenger side I got too. Its rough, but in good enough shape to use as a template for a new one.
I also snagged all the necessary fluids needed for startup today, other than gas.
What I forgot to get though sucks and kills the car from being truly running today... The damn head water outlet. So my updated list is as follows...
1) Water outlet for head, will swap the sensors out for the ones I need most likely at the JY.
2) A downpipe of some sort
3) Alternator setup sorted out
4) Still need all rear mounting bolts, hardware and hose lines for the MK4 calipers. But not really mission critical... Just easier to do now before I button up the brakes.
I will probally be making another trip to the scrappy tomorrow or in the next few days.
The harness is 90% done now. I am going to go get on that now and get it finished and maybe even installed tonight. I will post up some pictures of it for you guys before I install it.
June 09, 2009
So first and now the second stage of the wiring is all done. First stage was getting all primary systems in the OE wiring online. Second stage was the engine wiring and management.
FINALLY finished the harness tonight! Its taken me longer than usual since I am running EVERYTHING for the engine through this one harness. And I don't want to be opening it up later to add stuff into it or have additional harnesses running everywhere in the engine bay. The only additional harness the engine bay might see would be the water injection stuff. But that will most likely be added into the main lighting/horns/other randomness harness.
So a couple pictures!
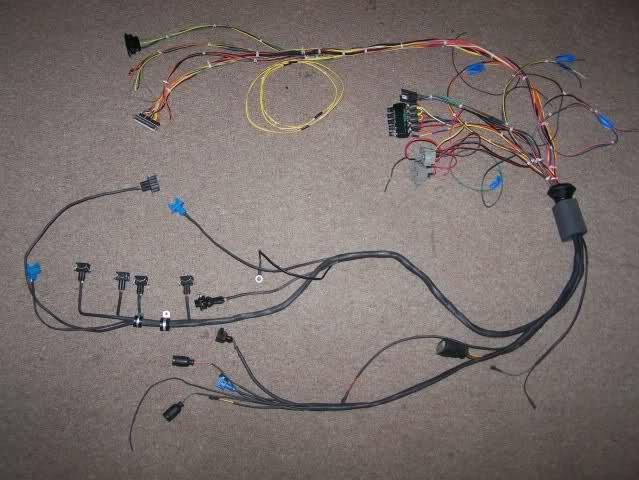
And a closeup of the injector section.
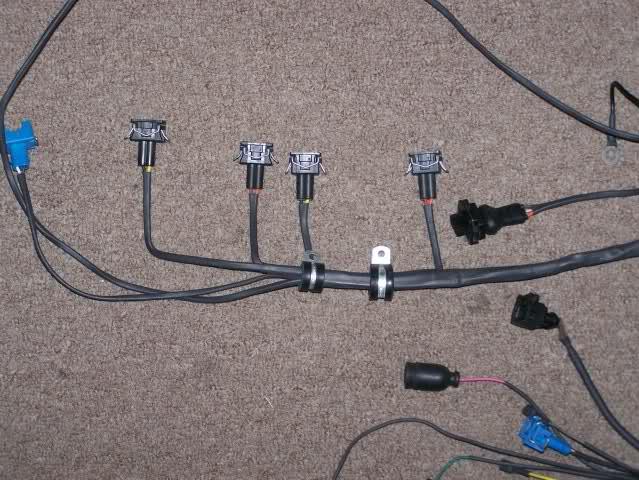
This is actually a pretty simple harness compared to many others I have made. But in some ways its made more complex by the compleat integration with the OE setup. I did separate out the power section for the engine management though.
In building this harness I have taken a few cues from a couple aviation mechanics I know, my cousin Franz and FalconFixer. I have always been intrigued by the Dutch company Spyker. Tin their cars they have replaced all the normal automotive fuses, with aviation breakers. Spyker was originally an airplane manufacturer.

Anyways, I managed to find some aviation style breakers and wired the engine management up with those. Then FalconFixer taught me how to lace the wires together. Took me a while to get the lace knot correct and tight, but I finally managed to get it! Its a fairly simple clove hitch, but then its secured with a double knot on top. And both of those have to be placed in the correct orientation... I also found this really interesting document online that explains that and a few other lacing procedures. http://www.casa.gov.au/rules/1...8.pdf Not sure it will entertain anyone else as much as it does me, but hey.
Stage 3 of the wiring will be to get harness installed and ALL SYSTEMS fully online. I will be driving it for a while with the engine bay and interior harness left open. Mainly to get all additional wiring in and sorted. Once thats done, I will close it up. Under dash wiring will be loosing all the OE crappy tape and lacing it instead, after I pull out all additional excess wiring.
Stage 4 is going to be getting rid of the rest of the fuses, and placing a nice big order with Aircraft Spruce for some more breakers! Since I can, I will go OTT wth the wiring.
EDIT: Psst ignore the few remnants of electrical tape on the harness. I usd that to get everything laid out first. That section is for the electronic boost controll and will have the tape removed and heatshrunk. I have to install and route the harness first though.
June 10, 2009
Got the harness in last night... It was not fun.
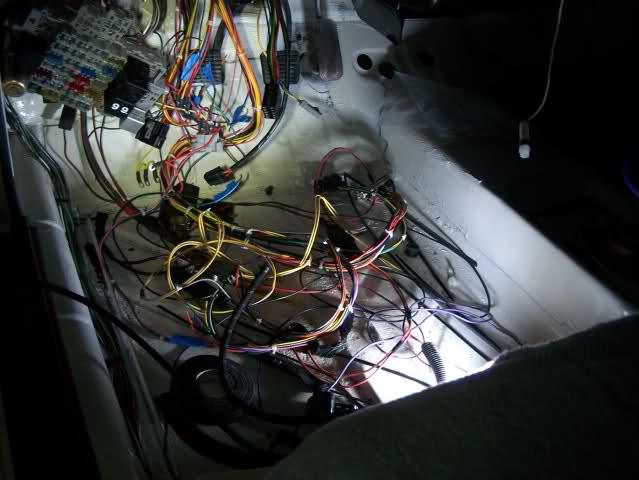
So yeah my harness fits perfectly. The OE one? I had to pull it out and reroute it twice.
The worst culprit is the steerign column stalk plugs. And the OE tape wrap coming off everywhere. And getting it properly routed. And the mess where somebody installed the radio....
To make it even more fun, the heater duct interfears with installing the engine managment relays up on the top of the box. I ended up breaking the clips on both of the relay sockets. I may actually have to rewire those and just mount them to the side. I really didn't want to do this as I liked how clean it was looking with the OE setup.
So in a nutshell, I am unhappy with the fusebox area and the OE wiring in general.
Oh and before this I got my butt kicked by the cooling system. All the bottom hoses are easy enough until the upper radiator hose comes into play messing it all up. I wanted simple and clean. The only hose that seems workable for the upper though is an ABA hose. And that uglifies the engine bay fast.
Not to mention thats the one hose I don't have, its spendy, and then I will have to still cut it to make it fit in there right. Painfull.
So heres what I want to accomplish.
1) I want a close fitting hose first off.
2) I will need the heater online.
3) I want to be able to quickly eliminate the VW oil cooler.
4) No overflw tank.
If I can find the upper ABA hose without the oil cooler branch off, I will use the waterpump to heaterpipe hose with oil cooler branch off. Run the other oil cooler line over to the heaterpipe outlet by the head. Easy enough to cap this off and swap out that hose to remove the oil cooler.
This leaves the upper waterpump inlet, the upper rad hose and the side of the head to contend with. For this I will probally just have to cutup an ABA hose without the oil cooler line on it.
But then I want to "clean up and minimize" the look of the ABA hose. Getting rid of the big ugly tee section would do wonders here. And if I cut that out I saw a tee section somewhere on E-Bay for another VW application that would allow me to solve the finall problem. Straightening the hose out and shortneing it to fit the narrower radiator.
Does anyone know where I can find an aluminum version of that tee junction? Mmmm I see another idea here now too. I could run my coolant temp sensor in this tee and possibly clean up the outlet on the side of the head this way... Mmm fabrication.
June 11, 2009
No progress today... Other than I found these sitting happily in pile as if they had been there for months. And they probably have. I also discovered I have a complete set of bolt in wing windows! I completely forgot I had them.
To wipe or not to wipe? I can't decide if I will run rear a rear wiper on the bunny. While I love the uber simplified version of this car, some things like vent wings just are too nice not to have. And a rear wiper might also be one of those. The '83 harness is already got the wiring in it.
This is going to end up being a battle of style, versus weight, versus convenience. Since I don't have a white rear hatch sitting around with rear wipers, probably not going to run them. The other small issue to sort out would be how to activate it. I discovered that the programmable wiper relay doesn't work well with the newer rabbit stalks, so I will be changing to the Porsche ones once the car is fully online. Doing this will probably mean I loose the switch in the stalks.
June 17, 2009
Last week I have been fighting constant rain.
Shes really close to the first startup now. Got the bad fuel pump out and just have to replace the short 90 hose from the tank to pump and put the replacement one in.
The worst part of whats left is simply trying to get all the small pieces that are left painted and put back on the car. Shifter levers, some brackets, alternator. Small stuff.
Unfortunately its the small stuff that can just drag a project down and kill you.... The GF can't understand why everything needs to be painted and cleaned...
June 18, 2009
Almost ready now! Finished painting everything today, sorta. Went to install the new fan shroud and fan, didn't fit. I had randomly grabbed one from my cabby not realizing it was about an inch too long. Got another one and cleaned it up. Ran out of paint.
The MadScientist ordered me a couple replacement head outlets. We will see which one fits tomorrow. I am hoping I can get the newer style to work, its nice! Its likely I will have to pull the harness out and open it up though. Where I put the dual pressure and low switch sender can on the side of the head though simply doesn't fit. Or look very clean. We will see what works with the new housings.
So all thats left before startup is bolting on a bunch of little parts. Possibly some minor reworking of the engine harness (but may simply wait for later here). Bolting down the ECU and ICM. Reinstalling the fuel pump. Bleeding brakes. And then initial power up and systems checkup.
Oh and final color coat on the damn fan shroud....
Once its all online, I am going to probably roll with it like that for at least a couple weeks. Not to worried about interior being perfect yet, that will come. Main engine bay harness will be the next thing tackled as soon as all systems are sorted and cleaned up. Still planning to run alarm wiring and everything else through the one harness.
I will HAVE to relay the headlights before buttoning it all up anyways. I also need to run the 120amp VR6 alternator....
Soon as engine bay wiring is all prettied up, then I am tackling the rest of the interior wiring. Thats a MUCH bigger project as I got some pretty cool things going on in there.
All in all she should be driving by this weekend. Hopefully Friday as she still needs her safety inspection. Hahaha no emissions needed! But she will likely go onto the emissions machine anyways... I like to still have my cars run clean and its only a few mouse clicks away with a MegaSquirt installed.
About the only holdup right now is my downpipe... Still waiting for it to arrive.
June 19, 2009
Stumbled across mostly issues today. Got everything ready to go with only super small things left until I went to time up the timing belt.
Wheres my timing marks? Oh they are about 15-20 degrees out they are. Apparently the damn flywheel can go on in more than one direction. I had lined everything up before buttoning it all down, but had to pull it back apart to fix something.
So either I am dropping the tranny to fix the flywheel, or having to remark the flywheel... Since the next bit puts it out of commission for at least the weekend, I am probably dropping the tranny out.
So I got all systems powering up and went to power the fuel pump up to verify feed and return lines. Nothing. Go get gas and pour it in, vent tube seems to be clogged as the gas doesn't want to drain down the filler neck after a short fashion. Since I drained the old gas out, I wasn't too concerned. It came out nice and clean, just SUPER stinky. Smelled like it was about 2 years old.
I am getting worried though cause I can't get the pump to bleed and pressurize the system. After a couple minutes I go take another look at the filler neck. Only put about 1 gallon in and its still not dropping down.
So I open the access hatch. Had to fight with it for a couple minutes and when I finally open it pressurized air poops out at me and I almost throw up the gas smells so bad. Wait did I say gas? I meant jello....
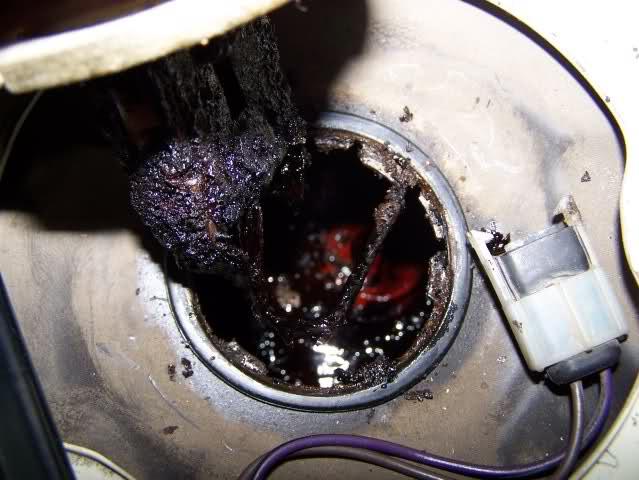
So I am hoping that I can retrofit a newer cabriolet style tank into her. Otherwise I have run out of funds and am dead in the water for a few weeks. I need a car for work to obtain said funds. And my daily driver Audi is HATING life right now with gods know what ailing her. Shes dead in the water until I decide I no longer hate her and go figure out whats wrong there.
But on a good note goodies arrived today! The company is called PartsPlaceinc and I am impressed. They were recommended to me by deathhare when he found out they carried the TD downpipe.
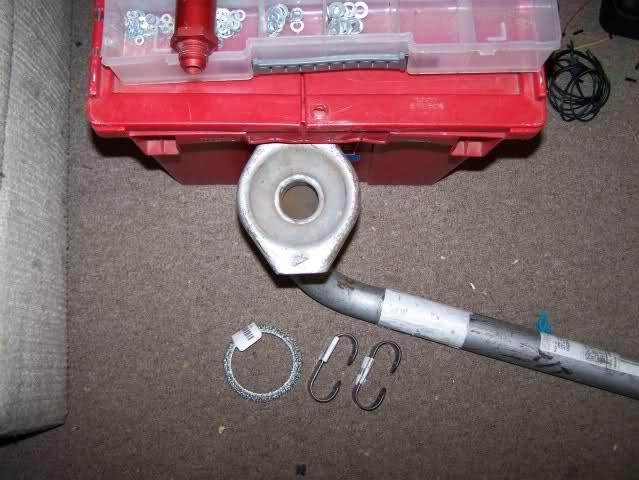
And this takes me back..... My car may never run now.... ANSA makes exhausts for many italian cars too. they made the performance exhaust that was on my Fiat Spyder 2000.
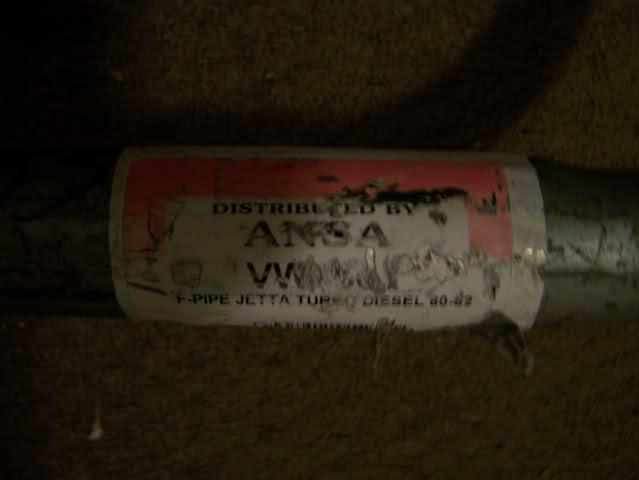
Yeah that ones not very "performance" though... Deathhare is waiting for his TD DP to arrive also from another source. Its going to be a better performance option. In the meantime I just might drop that one off at my fabricator and have him chop the top off and use the rest as a template to make up a bigger flowing one. But I am sure it will suit my needs fine for now anyways. Besides with a clogged up gastank I am not going anywhere anytime soon...
If only I could share how bad it smells.... Three showers later and I can still smell it. And I didn't get anything on me other than a few drips.
June 21, 2009
I want to thank everyone else for the help. Blown020 has offered a tank or cost of shipping. Soon as we find out what hat is, I will proceed forward. A new tank off E-Bay is $100 shipped. I prefer to recycle the used bits though and give them new life if at all possible. We shall see.
My neighbor suggested washing it out where it sits with a pressure washer. I am almost tempted cept keeping it from getting everywhere in the interior would be hard to do. Not to mention environmentally irresponsible. The tank doesn't look rusty...
Other problem with that is that most of the cleaners I can come up with locally and quickly, would require resealing the gastank once I was done. I bet I could wash it out well with muriatic acid... But it HAS to be resealed if I do that. Resealing it means pulling it.
Any clean up effort is going to cost me about $75 and a headache to deal with. Used clean (hopefully) tank maybe $50. New one $100.
I really wish that a cabriolet tank could intelligently be made to fit. It solves one big problem with the Rabbit tank. No loss of fuel under hard cornering. They do this by returning the fuel to a smaller reservoir and by use of two fuel pumps. The small pump sends gas into the reservoir where the undercar pump sucks it out of. Also the gas being returned from the fuel pressure regulator is going into this. Effectively it keeps a constant gas pressure at the main pump thats not effected by cornering starving if for fuel. I might try and come up with a swirl pot of sorts to get around this later on.
Really thats the only major thing I have left to deal with. I am going to go try and get the other details sorted and then fire the car up using a gascan today weather permitting. Its super nice out there now but we have severe thunderstorm warnings in effect.
June 24, 2009
We are now down to all the small details. I am thinking I have an evening of work at most left before she ready to fire up. Had to tap and machine the turbo housing for the water jet. That was a huge pain as I really didn't have the right size drill bit for the tap so had to go too small. I still need to sort out the weirdness that is going on with the dual ports on the wastegate and the dual ports on the compressor housing.
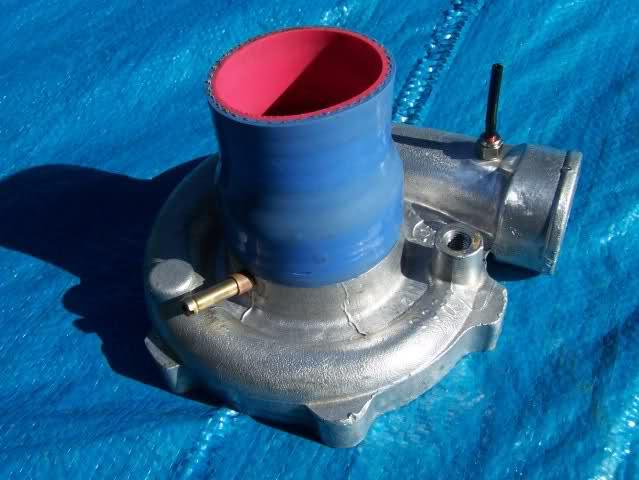
Gotta LOVE OE VW parts, especially when they are made by Garret!
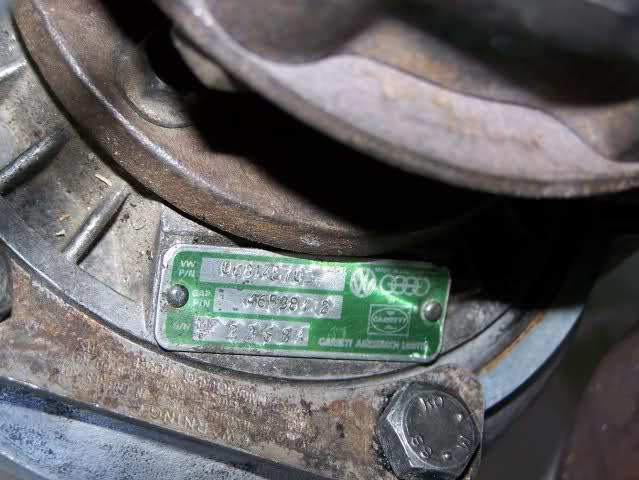
Timing "should be all sorted out now. Belt and all the marks are perfect at least. I am not 100% sure that the zero timing mark on the flywheel is accurate though. I was playing with this neeto little tool today. Basically it has a roller on the dial indicator shaft that sits on top of the piston to tell you when it stops moving.
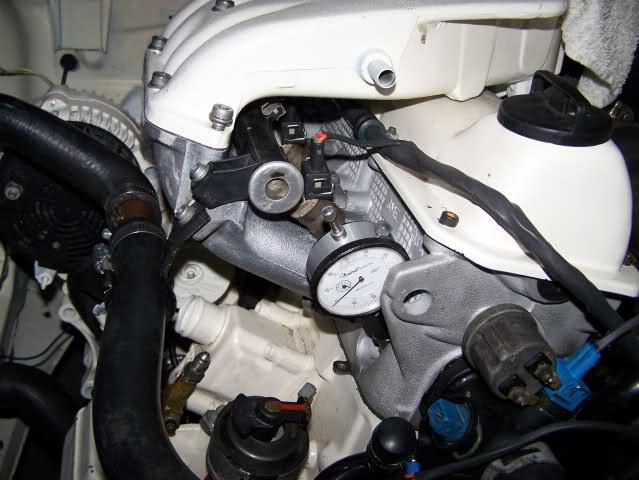
On the crank nose you place an indicator so that you can dial in zero perfectly by seeing how long it sits without moving. You usually dial it in 10-20 off on either side of a pointer. Most of the time this all falls on a single belt tooth and ends up being irrelevant. Zeroing the dial indicator usually gets it close enough.
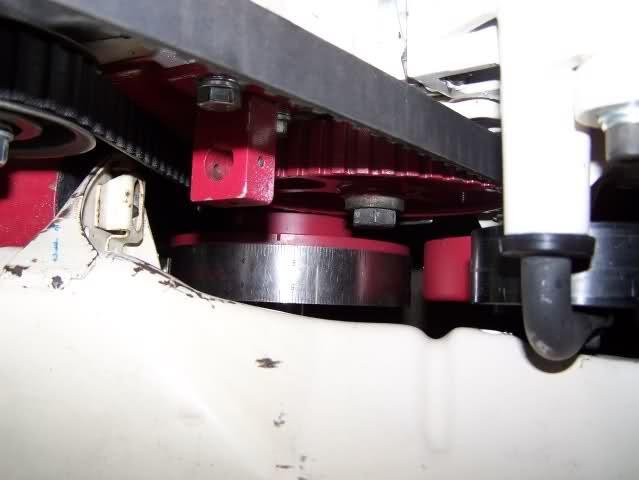
Unfortunately my indicator was acting up. Unknown to me the roller ended up breaking off... I didn't realize this until I pulled it all out and ended up having to fish it out with a magnet. I am not sure if the issues I were having was because of this or what. Oh well. According to the VW marks, everything is perfect. So unless I have obvious timing issues when I start it up, I am going to leave it alone.
Still have some small things left to deal with. And at this point the only thing really stopping me from starting the car is the situation with the gastank. The only thing I still need to sort out is the fuel filter location, and getting the fuel system all online.
Oh and deciding where and what to do about an air filter...
Making wires up is always fun! Usually I am making wires for wasted spark setups. This is the first set I have made for a normal dizzy setup. I needed to do this as the ends to fit the EMPI cap are different. So I just made up a whole new set. First thing to do is start with a decent set of donor wires for the ends. I then disassembled them to save the bottom. These twist off. Takes about two turns. Its important to remember when reassembling the new set.
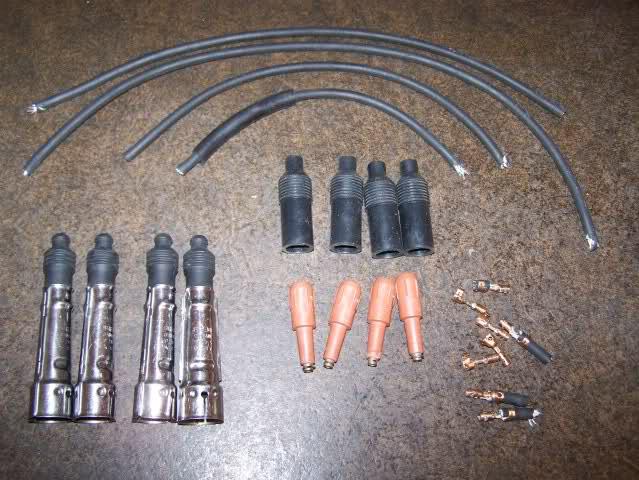
The twist ends will have to be reused. I destroyed one, but fortunately both ends of the plug wires had these. I used a pair of round nose pliers to gently and evenly open them up. Then I cut the new 8mm wires to length using the old wires as a guide remembering to add a little to compensate for folding the core over.
Next I strip the ends. Being careful to not cut or nick the core. The trick to not cutting the core is to not necessarily cut all the way through in one shot, but to slowly work the stripper around the wire. I use Blue-Point PWC-12A pliers for this one. I prefer them to the Moroso ones.
Next I crimped on the OE twist ends. Folding the core around the backside from where the end gets crimped over. The OE ends are for smaller 7mm wires, so crimping all the way down will cut the silicon jacket.
After crimping on the ends, I used a liberal amount of dish soap to pull the Bremi covers over the twists. This could be done pulling the other ends through too. And they are probably less likely to tear the wire jacket. I replaced the protective cover on #4 before putting the other ends on. Took a little work and some Simple Green.

Then comes time to crimp on the other ends.
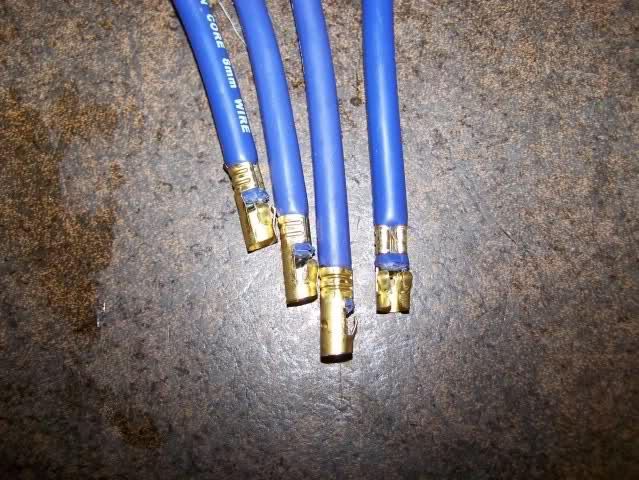
And finally pulling the covers down, SLOWLY as to not pull them off. Now we have athe finished wireset (minus the coil wire). Not too bad for half an hour of work. Took me more time to find a donor set of wires and figure out how to take them apart than to make up the new set.
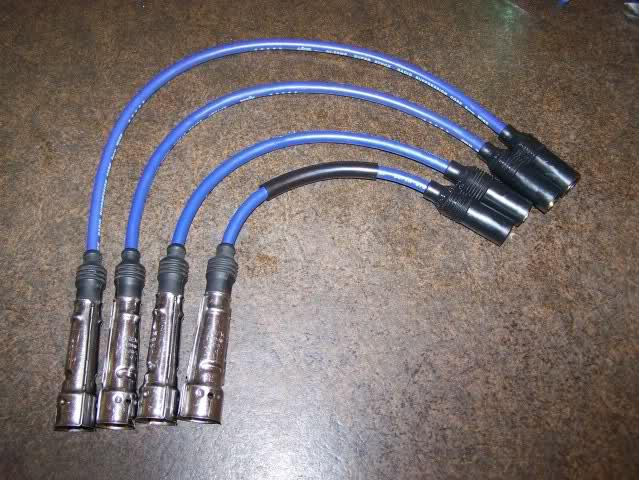
Performance gains? Who knows. I am already running a MSD Blaster 2 coil. Thinking about the OE ignition system though the limiting factor is not really going to be the coil but probably the ignition module as its controlling dwell. So last night I found a brand new ignition module in my parts bin and got curious. I drilled out the rivets for the backing plate and opened it up. Since I will be running a V2. MegaSquirt ECU, it does not have built in direct coil control. But it looks like it will be easy enough to get an ignition driver and mount it inside the OE ignition module. This should allow me to get a hotter spark out to the spakplugs.
June 25, 2009
Well no new pictures as I was too busy working, but the car powers up fully now. Engine, alternator, and starter all online. Car cranks over. After 2-3 weeks of evenings working on her while the droplight was still bright, there wasn't any bump left in the battery. So shes charging up.
If I get a chance to work on her tomorrow shes ready to plug in the coil, power relays, and ecu then should start right up. The only thing that hasn't been powered up yet is the MS system.
There's a few more evenings of little things and she will be all back together and hopefully fully road worthy. Only major system left is fueling. Blown020 has offered a gas tank for me, or I may be ordering a new one this weekend.
June 28, 2009
I got fuel system sorted out otherwise. I am cocerned about fuel starvation under hard cornering though... Been staring at some solutions for that but we wait for it to be an actual issue first.
Sorting out OE electrical crap right now. Have a bunch of extra stuff in the '83 harness I am figuring out, then ripping out anything not needed. I bet I can save 20lbs removing this excess wire and crap.
I almost have the full power grid up for the MegaSquirt and fuel pump rerlay. I am actually reconfiguring the OE FP relay right now. Or at least I was before getting distracted with the Vortex.
What the hell did I come inside for anyways???
June 30, 2009
Yeah I originally wanted to build a Kamei racer replica... I had everything except the bodykit lined up. But I had found a supplier for it at a very reasonable price. Unfortunately I also found a lot of bad internet press about said supplier not delivering and keeping monies etc.
As soon as I started building her, she kinda took on her own life and personality and the build went slightly different direction. Kamei was always about selling interior and exterior accessories. So instead my build became a car that would have been inspired by seeing the Kamei racers in action and "I just have to have all them cool parts now!" buying sprees from the 80's!
Accessories we have! While I have yet to post any pictures of said goodies.... They are stashed away. Interior comes last.
Besides, there were other themes I wanted to do and as cool as a racer theme is, it simply wasn't going to mesh with the rest of the style I was goign for on the car. Not to mention BBS wheels are stupid expensive. Getting my Turbos I have wanted for many many years was the defining part that completely changed the build.
But the pictures above have sparked a cool idea I am just gonna have to consider implementing...
Progress? Today? It was hot. I blame the heat on turning my brain to stupid. I did manage to bolt the TPS onto the car. Thats all.
Oh and I was waiting for a delivery of fuel injectors that sadly didn't arrive as expected. For now I am going to have to run digi injectors and boost... that should be fun. Not. I did sell the cabby today though clearing out my inventory of cars and parts a little bit more. Didn't let her go for much, but I can at least afford a tank of gas, inspection and maybe a new carpet set...
But last night on the other hand? Oh yeah! All systems are online and the MegaSqurt is fully online, except for plugging in the TPS. Wait I go do that now and do TWO things on it today... So TPS is now plugged in! I see one more thing I should do so parts don't get lost or broken, then I am calling it a night.
Theres a lot of minor details still to sort out before shes roadworthy. But first thing after my morning coffee tomorrow will be installing the coil wire and firing her up! Tomorrow is the big day for sure!
Did you ship that full of gas? No posting without morning coffee!!!!
Thanks Blown020! Trading parts usually seems to work out nicely!
Translation? I didn't sell the cabby for very much. But enough that filling her up and getting her inspected is doable. Once the cabby has becoming a parts car, it was just time to move away from that. The bunny will be an ongoing project, but other than that I am done with too many of my own projects sitting around. Anyways the cabby went to a good home and I will miss her.
Speaking of gastanks.... Hey Antonio, Jose left the spare cabby gastank sitting on my neighbors lawn. Dude was pissed and accused me of running a junkyard.... Didn't help that we had both the basically uncorked caddy, and a certain fox revving up trying to outdo each other. I mean checking timing,,,
Actually that picture gave me a killer of an idea that I will impliment here shortly. I just HAVE to get car running first before pulling anythign back off to clean and urmm... -=cough=- nevermind.
I may actually be able to help out on your project. I know where the guy who built/painted the first of the Kamei cars lives and works. At the moment his name is escaping me, but he shouldn't be too hard to find. When he heard what I was doing he volunteered his help. In the way of pictures. To the tune of several ALBUMS full of pictures. And as we know theres very few pictures of the Kamei racers out there.
In fact thats how I met him! he had a bunch of old photogrphs up on the wall of his shop of some Kamei cars I had never seen before.
Ugh... so she fails preflight tests. Engine won't turn over. I put a breaker on the crank nut and kicked it a few times. Shes tight. Starter tried to work, but then quickly said "F-U!" to me. I think am going to take a walk to the local supermarket and get me a basting bulb or some such. Some oil down the holes should free her back up.
Oh well at least I know why.
July 01, 2009
Quote, originally posted by fthaimike »
do you mean the US build?
Honestly don't remember. Its been 3 or 4 years since I spoke to the guy. Almost to the day in fact as my laptop warranty is about to expire. I am going to have to look his information up and try and track him down! But on to way more important news...
So here ya go!
She fired and ran. Almost even on the first try. At least on the first try I had the power all turned on....
The smokescreen? Yeah the video doesn't do it justice. I had neighbors even show up to make sure we were all okay. I had struggled and fought with the car all day to simply spin the motor over. Not 100% sure what the damn issue actually was... But a call to the MadScientist and he suggjested the starter locking into the tranny and not disengaging. I had already changed out the starter twice....
So T3Raposa gets back on the crank bolt with the breaker bar and suddenly the engine is moving. He spins it a little, and then I crank her over. Shes suddenly spinning over like nothing happened. Then FalconFixer reads off the part number on the fuel injectors and I look them up on my specs sheet. Fugging injectors are low impedance. I have NO IDEA where these crappers came from.
So a hunt around and about half an hour later I have a full matching set. With bad seals, and only three sets of new seals. We find a usable set and go to rawk them in. Not so fast. One of the old plastic caps came off in the injector hole. Go to pull it out, falls in. Of course.
FalconFixer came to the rescue after I spent a good 10 minutes just getting frustrated. It helps to have a best bud who spends his days working on jets. He had it out in 5 minutes. And then we popped the injectors in and viola she started right up!
Theres one maybe two days left of little things before she can actually drive under her own power. Short shifter has to be made, or I need to go get my Tech Tonics Tuning shifter... Or I just drop any old one in and drive it over to my buddies shop... Exhaust needs to be hooked up from the DP back. Axles need rebuilding and painting. Damn coolant neck needs to be sorted out.
OE underdash wiring still needs a little work too. I will likely install the alarm and radio in and wire up before I finish under there. Brake reservoir installed and brakes bleed. But all in all a good day!
hehehehehe not sure what I am more excited about. The gastank that will be here any day, or whats in the second package your shipping out!
Its JUST what was needed to make this car back to what it was, and should be.
Speaking of packages arriving, these came all the way directly from China!
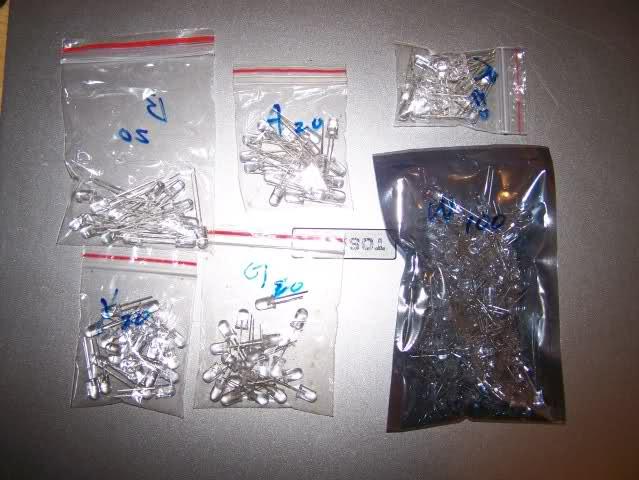
Okay while a lot of people may not care about copious amounts of LED's, I am as much of an electronics geek as I am a wrench. And thats 200pcs shipped for $12.
I have plans for these bad boys too! I simply refuse to do funky color LED light conversions in my instrument cluster. But I refuse to live with a dim cluster or pricey VW incandescent bulbs that go out every bump you hit. So middle of the road compromise. I will use the white ones for the backlighting. I have some pretty wicked plans for the rest, but we shall see soon enough!
July 02, 2009
The gastank arrived yesterday! Looks good Blown020! I am going to try and get motivated before the heat is too bad to deal with the smell from the old tank...
I sorted out a bunch of small details yesterday. Don't really have much left on the car now other than the gastank and a few small things left. Biggest item other than the tank is brakes... The stup on there is all done except for filling and bleeding. Or deciding to run the bigger pretty ones.
My upgraded brake bits are all prettied up, painted and ready to go, but untried ETC. I may simply run with the setup now I know is good, then upgrade in the next few weeks. Sad cause the new bits look so so good... I am missing mounting hardware though.
I will post up pictures later when all is finished and sorted. Once I get the gastank in, its all downhill and easy. I will be more motivated to git her done.
July 07, 2009
Short but fun update here...
Shes running and driving!!!! Just moved her around the driveway for now, but thats enough for me.
I have TONS of little details to sort out lke needing much larger injectors. Got 16lb ones in her now and she hates them. Have 24lb or something to put in now, and probably getting 40lb ones tomorrow.
Anyways I will post up some more information and pictures later. Maybe even video!
July 08, 2009
It will likely be a few days... She didn't start today first try. Hooked up laptop and was getting zero RPM. The dizzy plug was corroded. Shouldn't have been since its all new parts. But a dozen or so clips in and out and she was all good. As for staying running? Nope refused to do that either. Being paranoid I am worried its the fuel setup, but its likely just a fueling and tuning issue. I have spent ZERO time working on the maps and all that. Hell, I doubt the dizzy is even perfectly timed!
Spoke to The Mad Scientist today about getting the safety and apparently emissions done on her tomorrow. He gave me a laundry list to take care of. I knew about most of it, but I have to have a “workingâ€Â heater/defroster setup. The list is long enough that it might take me a few days to get her ready. But should be 100% legal and aligned by this weekend.
So theres a bunch of little stuff to do.
For safety the list is pretty long. Need horn installed. Bumpers back on, also solves front turns for now. Parking brakes hooked up, missing a few bits there. The blower/defroster. NONE of the wiring or cables are in the car...
I have to finish sorting out the cooling system before anything else is done. Fans not even hooked up yet. Head outlet still needs to be changed out and oil canister removed or relocated.
Injectors swapped for larger ones.
Instrument cluster back together and in the car. Speedometer wasn't mentioned on the safety laundry list, but having that working is simply a must anyways.
And everything else is simply finishing details and not really critical but will be done time permitting. Alarm, radio, sheathing front wiring. Relaying the headlights.
By the time I got back from dinner, it was dark and too late to take any pictures. So we will have pictures and probably video to upload in the next couple days. And let the fun begin! I will be doing some videos for seting timing and basic setup, then some more advbanced ones for tuning and the like.
His turbo is dead... Nobody knows what happened to the good one I gave him.
There may or may not be any other issues. Hard to say at this point. Eliminating one known issue at a time. I am hoping my turbo is good. I am still getting some smoke out the back, but my engine hasn't been run long enough to get it past 130.
He earned that nickname... But I guess you can tell the ones of us who been doing this a while. The parts manager at my old VW dealership knew better than to ask me what make and year my car was. He would ask me What part do you need and off what car? There was even a special training session when he was teaching a new parts counter clerk. I walked in and he was around the corner. Guy asks me what model and year my car is. I tell him and then hand him a part. He proceeds to tell me that part isn't on my car. By now parts manager is smiling in the background and trying not to laugh. I insist it is in my car and he tells me thats impossible (it was a cabby with some random 1.8t piece in it). After a couple minutes of this the manager sends him out to look at my car. Then tells him I am one of the special cases and to ask me what to look up. And that if he can't find it to have me come behind the counter and look it up. You might even learn something from him! Priceless!
The VW parts guys are no where near as much fun as the local Autozone parts counter ones though. I usually have to stop and think when they ask me what model and year. Had one the other day insist that I had to tell him when I was trying to find a serpentine belt. I kept telling him that I just needed a belt This length and handed him a cut belt. Finally I tell him and he looks up my 1977 and for some reason is baffled that he can't find it. Then he realizes what I have been telling him and that no '77 came with a serpentine belt.
July 09, 2009
Well my fueling issue was as expected, no actually a lot worse lol. I pull the injector numbers off them and found that I had 15lb injectors in there somehow.
Yesterday I found my stash of injectors finally and so I started going through them. I got a nice range. Everything but what I want. I am looking for 30-40lb high z injectors. 45lb would be about the biggest I would put in there.
That are even in a possible range to use... I got a set of 23lb, 24lb, and a set of 30lb. But the 30lb are low z.... I can get a set of 60lb later today. But those are likely going to give me idle headaches.
I am running a 4 bar pressure regulator. So that bumps each injector value up a little. Its good for about 3lbs extra on a 23lb injector and about 4lbs on the 30lb injectors. The 30lb ones would be perfect, if they were high-z....
I don't like running low-z injectors on a MegaSquir V2.2 ECU. While it can be done, its not quite as reliable. And its a bit of an initial tuning headache. To do so reliably, a flyback or peak and hold board need to be installed.
July 10, 2009
We are running good and stable now. Ready for safety and emissions. Except for a really bad oil leak, and an easy to fix but bad fuel leak.
Couple oil leaks, but the big one is out the filter flange to block. I hate the fiber gaskets on these older engines. The ABA get a nice metal gasket. I also have a leak near the rear main seal out the oil pan gasket. itsmissing the bolts there as my flexi 10mm socket is MIA. Easy fix.
Fuel leak is also an easy fix. I only had three sets of injector seals. So of course its leaking out the last injector...
Hoping to get some of the instructional videos taken over the weekend. I need a way to take video of the laptop monitor. Like from inside windows... Any thoughts here?
July 11, 2009
Leaks are all fixed and shes driving now. I have a god awefull noise coming from the left side though. Could be a bad axle, less likely a bad wheel bearing. And possibly a few other things.
Wasn't comfortable going further than around the block twice until this noise is found out and either discounted as nothing (doubtful I will get so lucky), or fixed.
Brakes suck without the booster hooked up. I am going to have to attack that before driving her again. Easy enough though.
Tranny feels weird too, can't determine if shes moving away in third gear or first. Tuning right there defiantly isn't even close to dialed in.
July 12, 2009
WOW this is one angry. PISSED OFF little bunny!!!!
The brakes suck without the power booster hooked up though....
As for tuning, not even close yet. I can only imagine once its all dialed in. Not sure whats going on with the shifter... Seems as if its not adjusted right yet. I don't think I am getting it into first. Haven't drive her too much, but most of the starts are difficult like a third gear start. Then there was one that just had her launch hard squealing tires all the way into second gear with zero traction.
The worst is over though. Monday should easily see her ready for safety and emissions.
Safety requires all the lights working. Here in Utah for some reason I don't have to have reverse lights. Good thing too as I got to figure out the correct pins on my plug there... Almost everything else is basic things. Parking brakes, check. Headlights legal and aimed, check (for now lol). Horn, check. Wipers, kinda...
I only have a few small things to deal with. First off all my dash wiring needs to be tucked up and away. Not a safety as much as a practical thing I guess. But for safety I need my wipers sorted out better and the washer isn't working. . Wipers were working, but I cut the wires to reroute the plug differently. I haven't fixed that yet as I want to just put in the upgraded mk3 motor anyways. Hoping that reinstalling the wires there sorts out the washer.
Another surprise was I need my defroster working. Thats a little harder to manage as all that wiring was missing. I have what I need to redo it, but its a couple hours of sorting it out, changing the blower box most likely (has a broken bottom vent) and other random monkey business.
Emissions? For a car as old as this I am not required to have a cat. I also don't have to blow super clean. We will probably tune it much cleaner than we have to though. The Mad Scientist and I have tuned many a car on MegaSquirt to fly through emissions. Usually I can tune a car even with an empty cat to blow as clean as its supposed to.
July 14, 2009
Passed both emissions and safety without too much problem. The car was far from close to being dialed in on emissions... Took The Mad Scientist a while to dial in those areas. But I had zero tuning in on her too.
Last night we managed to process a few datalogs and dial her in a bit more. Shes already running hard!!!
Not really a lot of interesting pictures to put up right now. The biggest hurdle in this was the not expected issues with the gastank. So far, no cutouts in hard cornering. Hard to tell though as there's some gas in the tank too. But I suspect that installing this little gem helped immensely.
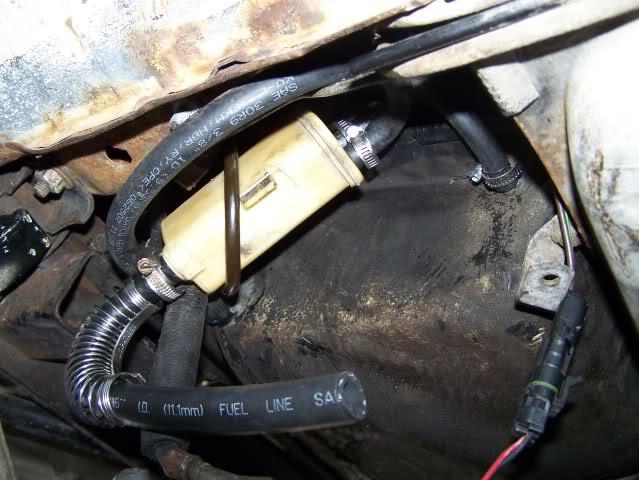
It took a few tries to get it right, and get everything tight and not leaking. But a half tank fill up yesterday seems to be leak free finally. There was a few other minor issues. No way a button head bolt would have given me enough clearance on the serpentine belt. I had to take everything back out and attack the frame rail with a hammer again to get enough clearance. First start up had it bouncing off the frame.
Next on the agenda? Probably going to mostly just drive it for a few. Theres lots of small things I have to finish up. The OE engine bay wiring and rats nest under the dash being the worst offenders. Got to work on getting the videos made and online. Lots of little projects here and there. Todays will be getting the wiring around the fusebox cleaned up some more and working on setting my lights up the way I want.
Lol what side?
What the local mechanic will do differently is reach into his tool box for his Snap-On wrenches. Hes going to use some line wrenches first. Line wrenches could even be good craftsman ones. But seriously 90% of the battle with stuck junk is to use HIGH QUALITY wrenches.
I ask what side, because I couldn't get the passenger side off, and I had them off a week before. Most of the reason here is likely simple, too much tug on the line from the axle. This time around I was able to get enough room to pull the tank simply disconnecting the drivers side and dropping the axle out of the way as much as possible.
The other secret weapon I use? PB-Blaster. Forget WD-40 for a job like this. PB-Blaster gets in and penetrates a LOT Better. I also take the time to prepare for the job as much as a week in advance ESPECIALLY on brake line connections. I soaked the joints multiple times starting about a week before. I HATE frozen brake lines.
Do yourself a favor and get a new filler tube to tank line... The old one will almost defiantly leak.
So in summary, soak with PB-Blaster and get line wrenches. Don't cheap out and at LEAST use Craftsman ones. Use high quality wrenches for the rest of it. I used Craftsman line wrenches and Snap-On stubby wrenches the last time. Oh and be prepared to have to fiddle and move the axle around. Use a good floor jack and get the car up as high as possible on GOOD jack stands. I left the front on the ground to get more rear end clearance.
Finally? Take your time. I was a professional tech for years. I had to walk away a couple times on this one.
Priorities are sorting the OE wiring. Getting some upgrades in, finalizing it all and heat shrinking the rest of the engine bay. Then I need to get my water injection online, alarm and radio installed and finalize all the interior wiring.
Brakes are a big issue too. Feels like my booster is bad. I have almost zero booster assist happening for some reason. I need to figure out that and maybe get the upgraded brakes onto her. Soon as thats sorted out, we will be finishing up the suspension. Probably dropping her some more and then putting some extra goodies onto her.
July 15, 2009
So I been fighting with my shifter adjustment. Stumbled across this thread the other day. http://forums.vwvortex.com/zer...33208 Theres some really really good information in it! And following the links in there I stumbeld across my problem.
Apparently VW made a change up on the shifter box / gate itself. The 4 speed one is differant from the 5 speed one. I never bothered to change that as nobody ever mentioned it. But the metal stop plate on the 5 speed is narrower to allow for more alignment room.
Well leson learned. I will take pictures of the differance when I get the new bit and have the parts sitting out.
July 18, 2009
So, shes running pretty close to tits now. I have a few concerns. Mainly bad knock in this heat when under sustained boost. Heard it a couple times and of course when the computer wasn't datalogging...
I suspect the intake temps were too high. I had this issue before with a similar setup in my cabby. The hazards of running without intercooling.
Other than that shes running hard and strong! I haven't done a whole lot thats easily noticeable. Slowly getting the OE wiring sorted out a section at a time.
Phase 1 right now is to get my KnockSenseMS sorted out and wired into the car. Then I can datalog where and if I am getting knock. The ABA serpentine setup sounds like it sometimes too. Not used to that quite yet.
Phase 2 of this is to get the Aquamist water injection system fully online. I want to rig it up with the MF2 controller for now to just verify everything is working. But I will then get it fully integrated with the MegaSquirt by next weekend.
Phase 3, finally I am going to modify the MS to activate my CEL when intake temps are too high. This will help with the times I am not monitoring the temps on the laptop. I really hate not having a lappy connected and datalogging at all times... AFAIK there still is no plug in datalogging solution. I am not a programmer type, but I think I can get one of these to work. http://www.sparkfun.com/commer...=8627
That reminds me, I have to figure out why my coolant gauge in the cluster isn't working...
July 21, 2009
Today I got a few little things done and mainly drove the snot out of her for half an hour or so. The 5 speed shifter setup did the trick. Feels better than new now. And I found out what those little bushings I always have leftover from rebuilding my shifters are for... Duh bottom of the shift lever.
Turns out the dirty shifter assembly I got from the JY? It was brand new as soon as I cleaned it for a minute. It couldn't have been on that GTI for long. I am gonna have to go take a look at the rods and see how they look!
I am going to post up a seperate post inna minute here for a small DIY.
July 22, 2009
Older VW's frequently have an interesting problem where they will continue to run after the ignition switch is turned off. If the car is a gasser, then a very common reason for this is of all things a bad alternator. I have seen this on 5-6 cars easily where the fix is something not at all expected.
Try unplugging the blue exciter wire from the alternator. If this cures the problem, the fix is super easy. What happens is the diode array will start to break down inside the alternator. When this happens it will leak enough voltage back that it keeps enough power on the ignition switch. I see this MUCH more often on the cars I have MegaSquirted than CIS cars, but it applies equally. While replacing the alternator is the best solution, theres another one that also protects the car. Lets put a diode in the exciter wire!
The fix is simple. Find a good location to get into the harness going to the alternator. Its better to do this in the engine bay for space and longgevity reasons. While under the dash would look cleaner, its more prone to getting broken. Probably the best location is going to be close to the alternator.
1) Open the harness up and give yourself at least 6-8 inches off the alternator.
2) Cut the blue wire
3) Slide several pieces of heatshrink over the wires. I use three usually. Going from a shorter smaller one to a little bigger in size and length each time. The heatshrink will protect and the multiple layers will add strength and stiffness back to the wire.
4) Strip 1/2 to 3/4 of insulation off each wire
5) Find a 4001 diode or equivalent. A 4002 would work just as easily and so would many others. Radio Shack is a fine place for this. You want a standard diode rated at 12v and about an amp or so. A standard one will be black with a grey or silver band on one end.
6) The band will be on the side of the diode facing the alternator. Solder the ends. I usually twist the diode lead around the wire and then wrap the excess wire right up against the side of the diode. DO NOT just twist and think you will be okay. Solder.
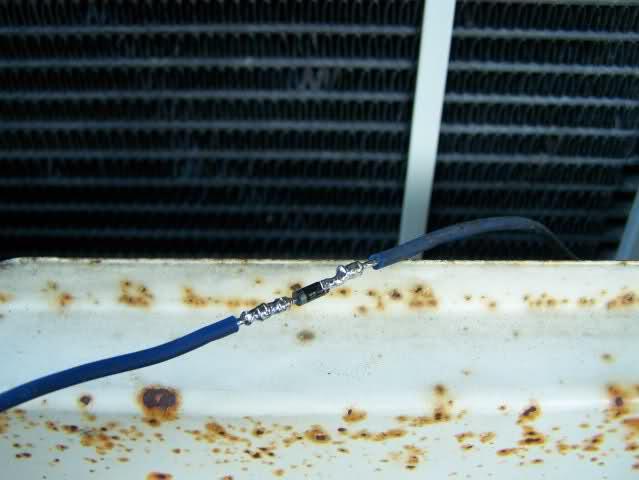
7)After a good solid connections here, then I will go ahead and slide the first piece of heatshrink over and shrink it. Keeping it centered. Then the next, and finally the last piece. Again this is to protect and add strength back into the wire so it doesn't break off next to the diode.
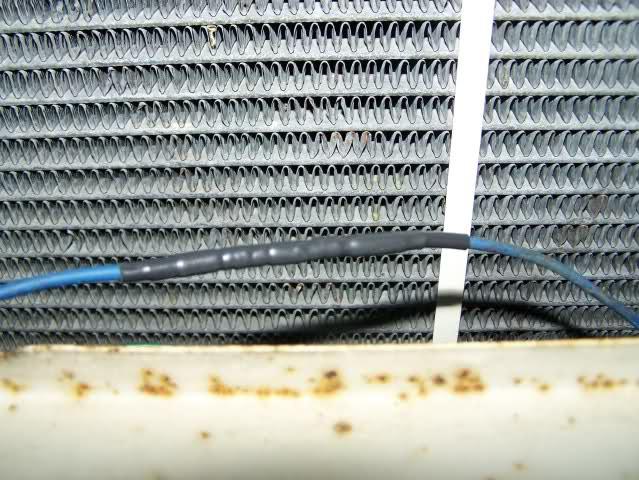
8) Your done except to test it. Make sure the battery light comes on when you turn the key on and goes off when you start the car. And most importantly that your car now turns off when you turn the key off!
On my car I did this mainly to prevent this from ever happening. Its said that without this exciter wire hooked up the car actually will not charge. I guess it depends on the alternator. My 120amp VR6 one I ran for about a week without the exciter hooked up and it kept the battery 100% charged. I choose to place mine in the area in front of the radiator where I have my OE harness running as it will be deep in the wrapped section of that once I finish cleaning it all up.
Hopefully this helps somebody else out!
Ugh I need to straighten some fins on that radiator and it would look better with the center repainted nice and black, instead of slightly oxidized grey.
Oh well. Can't really see it with everything back together.
So I have gotten more than a couple IM's asking about how she drives. Like a freaking shifter cart! The alignment is dialed in almost 100%. If accelerate with my hands off the wheel she does pull slightly to the right. Goes mostly straight the rest of the time. I think I need about 1/8th degree more camber on the right. As of yet I haven't even set my gauge against the wheel though. I had it dialed in 110% on my cabby. When I pulled the coilovers off her I left the hubs and everything attached and unmolested. The lighter weight on this car is likely the culprit to my slight imperfections to the alignment.
Oh and the steering wheel is two teeth off....
Hard to say how much we got at the wheels. This car is a lot lighter than all my previous mk1's. I think the german shell alone is 200-300lbs lighter. Maybe I will go weigh her in tomorrow.... Anyways I have driven 200whp mk1's that were not this fast. So I am pretty confident we have at least 150whp on tap.
I am running @ 8-13psi. Max boost in my datalogs seems to be pretty inconsistent. Probably would help if I hooked up the wastegate hose and boost controller. But what would be the fun of starting off with minimum boost?
August 14, 2009
So I have been out of comission for a few. Had somewhat of a crisis on the homefront that ended up with my beautiful Toshiba Tecra M5 smashed into more than a few peices by the now ex.
Then an unexpected trip to pick up my best freind from Orgeon. That was a 1500 mile adventure to say the least. For some reason I was only averaging 30mpg instead of the 37mpg I was getting around here... But I have shaken most if not all of the bugs out of the car.
Water injection became my biggest priority. Followed very closely by the absolute NEED to drop a .75 fith into the tranny. Its very hard to stay out of boost even on level ground at highway speeds.
Boost is another minor issue. This turbo happily spins to 18psi, starting at about 2500rpm... Once I finally got its wastegate setup working right it still makes a solid 10psi. I was hoping for 6-7psi instead. Oh well 10 is managable. The engine is built to handle the 18psi easily, but the hot piped turbo, no intercooler, and no water injection (yet) don't get along well enough to survive 18psi without serious issues.
My biggest concern is the fuel grade. I CAN NOT run anything other than 91. I am hoping that again the water injection will be my ticket here.
Another problem I came across was running out of gas three times in the middle of nowhere. The tank in the bunny is only 10 gallons. This is a serious issue when combined with the currently crappy fuel economy. A 300 mile range just won't cut it.
Why? Well most of my freinds know about my plans to drive through Mexico and down into Central America. Its taking a lot of planning and will take a lot more, but I am getting there.
I did a lot of things on my build for reliability and simplicity more than performance with this in mind. The minimal engine bay especially helps with keeping track of any leaks (laready been there) and making working on everything a lot nicer.
August 30, 2009
Fuel economy has been a very interesting problem... So newest update there is around town I am getting 37mpg. But on the highway its dropping to the 30mpg. Pretty simple explaination actually. At highway speeds right now shes sitting on the edge of boost or in mild boost most of the time. In dire need of that .75 5th gearset for sure.
My buddy Ed and I spent most of Friday playing with a nice little tool from Eastwood. Fender rollers are cool! After rolling the fenders we dropped it a couple more inches. Her stance is much better now. I am exactly 20mm from as low as I can go in the fronts before I run out of threads on the H&R's. Any lower is going to require cutting, welding, and other fun fabrications.
My biggest problem has been getting the fuel delivery setup correctly. Depending on where I look my fuel injectors are listed as 35lb - 38lb. On a standard 3bar regulator. I had upgraded from my 25lb ish ones. Mainly because these fuel injectors match the white engine...
Problem is I was running a 4bar fuel pressure regulator. So basically that would make my injectors about 44lbs. Even with setting my MegaSquirt for a single pulse and simaltaneous firing, I was at only 1.4ms pulswidth at idle. This was causing all sorts of nasty idle problems and off idle issues.
Swapped in a 3bar regulator Thursday. Still have to go retune the car yet again but at least now I can get her ti idle perfectly! Sometimes one has to suffer for the sake of art. SPeaking of art, the white engine? Its awesome! It makes it SO MUCH easier to track down leaks! Not that any VW rabbit woud EVER leak ANYTHING right?
Well I am off to go retune.
September 28, 2009
Well its been a depressing past month. I was on my way to the drag strip after some very successful tuning runs when I wrecked the car. She is not too bad off, but they put a doctors order on my license until I am fully checked out. I don't remember anything of the accident, but there was no signs of head trauma either.
Not being able to drive for a month has SUCKED for me big time. Fortunately my best friend is still here from Oregon.
Damage to the car is mainly hood, fender, and bumper. Sad about my hood, theres a lot of stickers on it I can't replace. New fender will have to be rolled too. Bumper is just rubber trim and end caps it seems. Alignment got whacked, no big surprise as I ended up offroading it across railroad tracks. Lost a front brake line either the cause, or caused by the accident. And destroyed a snowflake wheel. The tire is okay but I don't have any extra snowflakes.
So finally put the Ronals on. Need to space out the fronts as they rub the coilovers. But otherwise they look the trick. Getting lots of little things done to the car though waiting for the rest of my appointments. The kneebar is modified, painted, and in now. Looks damn nice!
Not sure how much more I will get done on her before winter sets in. I will probably end up taking her off the road for winter and just drive my Audi Quattro. I am sad as I didn't get my last drive of the year in yet.
I will try and get some pictures up shortly of the accident and the new progress.
November 17, 2009
deathare, you were asking what gaskets I used on the turbo setup. Head to exhaust manifold I used the single piece corrado metal gasket.
For turbo to manifold I used 034motorsport's high temp turbo loctite. This stuff is expensive, and worth every damn penny too if you have ever had turbos fall off your car....
I usually do not use gaskets on turbos as honestly (in my opinion) they tend to blow out much easier than a properly torqued setup. The experts can never seem to agree on this, so honestly it tends to be my wallet that wins. "Proper" gaskets always seem to be impossible to find too.
For the turbo to wastegate cover deal, I left the ones that were already there in and just replaced the studs.
The ONE EASY gasket to get was the turbo to downpipe. Seems that that is a standard toiletbowl gasket. I got this, the wonderfully restrictive OE downpipe, and the metal spring clips from PartsPlaceInc that deathare recommended to me.
As for the downpipe, I simply needed the car online immediately. Eventually, I will let my fabricator have the car for a day to make up a bigger DP. I knew I would end up needing the toilet bowl end anyways.
So today I got a couple projects ahead of me! I need heat in the bunny. The heater controls and box were missing a lot of parts. I finally got the wiring, another full heater box assembly, and all the mounting hardware to swap the whole deal out. Its cold outside, so I am hoping I can be lazy and pull it off without disconnecting the heater core already in the car.
After I get heat, time to solve my tuning issues. Haven't figured out what the exact issue is yet, but I am suspecting my IAT temp readings are not accurate. And I verified that she is boosting a lot harder than supposed to be, or tuned for. Need to fiddle with the rev, launch, and over boost cut settings so they don't load the engine up as badly. And get my boost controller workign again so I don't pop the jug!
Well found the overboosting problem! Damn generic MBC was setup according to the directions I found on the wonderfull internet. The directions were wrong.
I had it working right over the summer. But accidently pulled the hose out of my turbo. So I am guessing it got hooked up according to the directions when I was putting it all back together.
And my turbo is spooling out 19.2 psi according to the last datalog! YIKES! Shes tuned for 10psi...
Good day so far, I just fired up my latest MegaSquirt project, a 1987 Toyota AE-86. Got my boost issues sorted out. Now time to go get some heat in the bunny!
Ugh well final update for the day. Pulling the heater box out proved to be a headache. Had to pull the wiper assembly, speedometer cable and a bunch of other little stuff to get it all out. To add insult to injury, the replacement setup is damaged. So I got to rebuild the current one with the parts needed from the former replacement.
And since the wiper assembly is out, time to finally do the MK3 motor swap onto it.
So she will probably be offline until the weekend. But at least I got another few weeks out of her! Not sure how long I will be able to drive her around. Once it starts to accumulate snow around here, I will have to put her up until it melts. Way to low to even get out of my driveway.
Time to finally MegaSquirt my Audi 90 Quatto! Its CIS hates the winter as its cold start and a few other things are bad. I think its Motronic is actually cooked.
November 19, 2009
Although I gotta say I have cut up, wrecked, and otherwise destroyed a few more than I have saved... But as they say some must die so that others can live!
For this project I cut up a '83 that was in BAD BAD shape. But its wiring was perfect, go figure?! I plugged in all the relays and powered it up, the door chime started going off!!! Not sure I have ever even HEARD a rabbit with door chimes before! I also scrapped my '91 Etienne Aigner Cabriolet. Although that one I was good and sold the shell (with intact interior) to a friend. It will be saved eventually.
Well today was somewhat of a success. I got the heater all reassembled and the blower is working. I ran into four issues though. First is the '83 harness wiring is still somewhat of a mess especially in the upper dash area. Most of the changes between the '77 and '83 occurs here. This hit me from several angles. There was no heater blower wiring as the '83 had AC in it and a completely different setup. So I ended up having to use a few different harnesses to make that section up. Turned out well other than the spade connection for OE grounding point. I have nothing to plug it into...
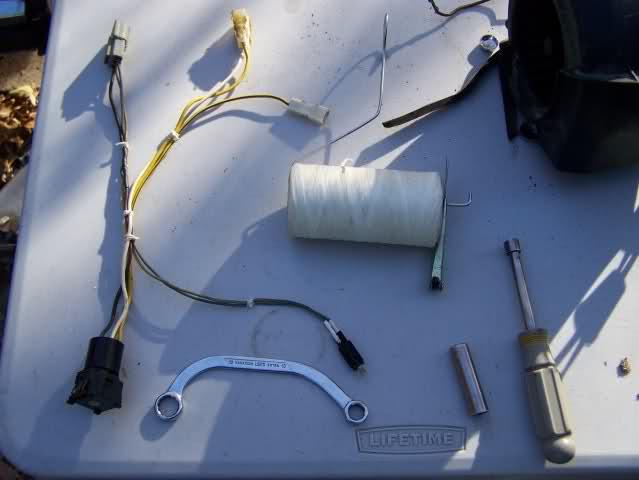
The worst part of the wiring up there though is all the switches that had to be converted over, and the mess previous owners have made of the radio wiring. I have it mostly cleaned up now though. I have to reroute a lot of stuff so it doesn't interfere with the heater controls.
As far as wiring goes I have one major decision left to make. I really want to convert all my bulbs over to LEDs. The idea is that hopefully I never have to change them or deal with them flaking in and out like the incandescents are prone to doing. Theres 14 bulbs that dim with the instrument dimmer, and another 6 assemblies for interior lighting (of which I have none working right now). I converted the radio one already, but I used white LED's and I think they lack the vintage feel that incandescent bulbs have. Its way too white. I am hoping that yellow bulbs fix that.
My second issue is all my instrument lighting blinked on and off a few times, then died the other night. SO I may end up having to go through it all and if so then its a good time to make the changeover.
The third problem today was the freaking heater cable. I have routed it several times and just can't find the right path for it to either not be too long, or too short. I need another early car to take a look at where the cable is routed. My Bently isn't divulging this info.
Fourth and finally I seem to be missing all the wiring for the door contacts and overhead light...
Anyone want to chime in about heater cable placement and where the wiring for the door contacts plugs into?
November 29, 2009
Some updates!
Okay I am procrastinaing horribly today. I need some fellow vortexer motivation to get cracking on this....
I got the heater all back together and working. Everything wired in. And then I went to start the car and somehow the heater core is now fouling with the gas pedal. WTF? Figures.
I was struggling alone to get the box back up in place and the hoses are a super tight fit through the firewall. Might leak through EVERY OTHER gasket in the car, but not that one.... So I left the core loose and the side cover off. Thought I had got it correctly repositioned as it all slid into place, but I missed something.
Hoping my buddy T3Raposa will stop by inna bit and give me a hand so I am not pulling it compleatly back out! If so, as usual, I am sure mayhem will insure!
While I had the wiper assembly out, I went and paid WCHLVR's MK1 to MK3 wiper motor upgrade DIY some attention. Got the motor swapped out for one of the MK3 motors I grabbed for it. AMAZING UPGRADE! And we learned a thing or two too!
As fate would have it, I killed the maingear for the MK3 wiper. But VW's are big Lego sets and turns out that the original MK1 gear swaps right back in.
Also I got bored and opened up the motors to take a closer look at them. The motor windings are SUBSTANTIALY bigger for the MK3 motor.
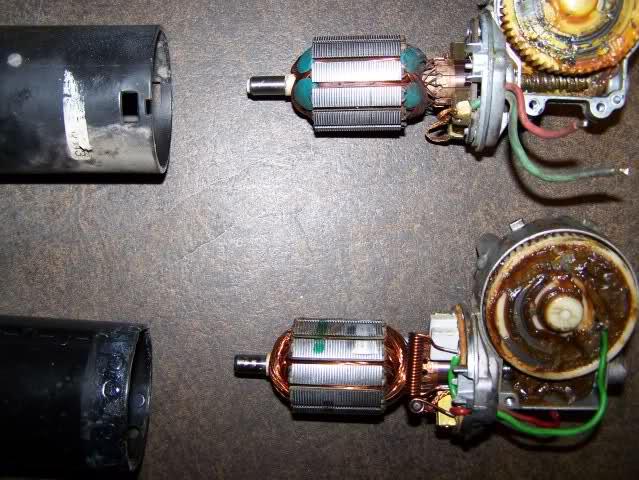
The one with the green putty is the MK1 motor.
A couple days before I pulled this all apart, I lost all my instrument lights. Now I have lost ALL my lighting. No parks, headlights, everything is out. Not sure what happened. Obviously I have checked fuses, but something is goofy. Hoping to get this sorted out and everything back online today.
Hope everyone had a good Thanksgiving!
Anywho! Pushing buttons was way helpful! Dan (T3Raposa) and I managed to sort out the wiring issues in under 30 minutes. There is a lot of "randomness" going on in there but short version is the wiring going to the radio shorted out and did some weird things. It was hooked into the parking light circuit somehow.
There were a handful of blown fuses too. Once the wiring was sorted, things rewired correctly, and more fuses replaced (including all the ones that I had ALREADY CHECKED grr) we were all back online.
Here is what we started with today and would explain a few of the weird and random issues I was having.
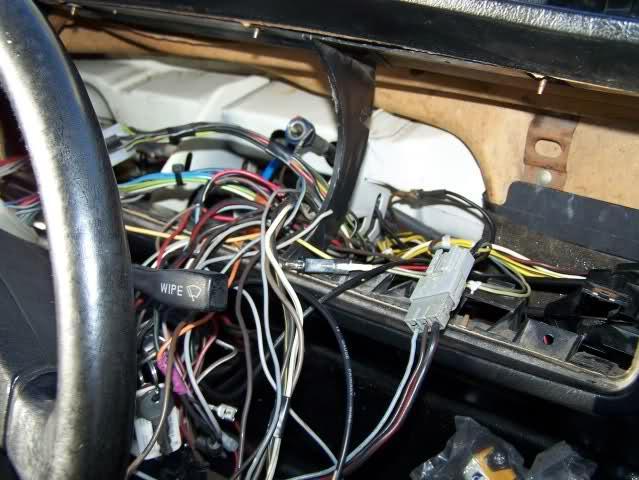
This is one of my favorite wiring tools now! Aviation wire tie tape! Its a freaking pain to do and I have MUCH MORE respect for the sadly underpaid aviation techs. Its difficult to do good ties in an area like this where its still relatively easy to get to everything.
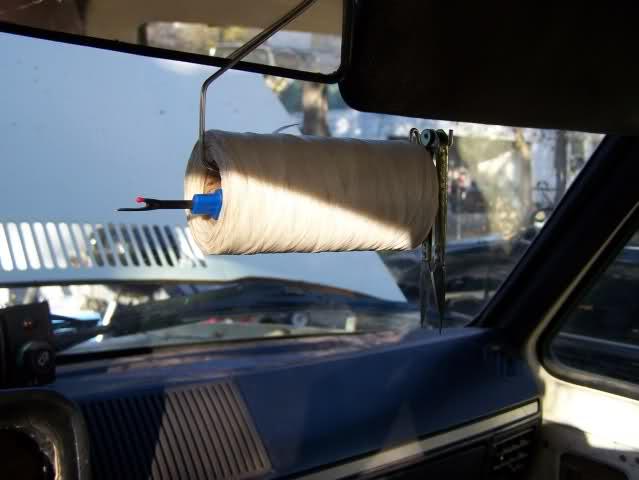
A hour or so with that and taking time to reroute a few things got me here:
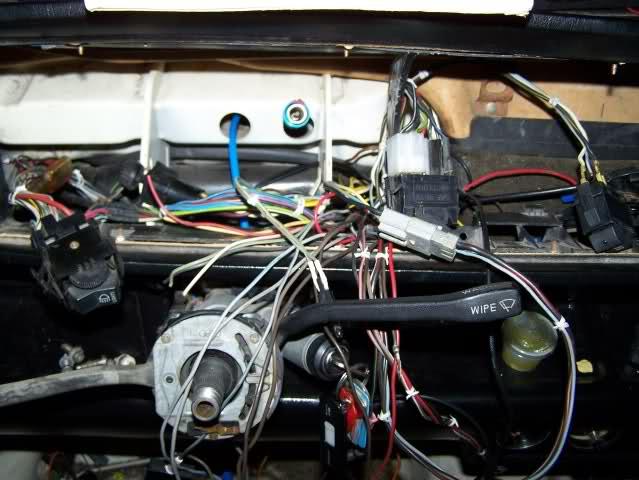
Still a small bundle of wires left snaking across the column switch assembly, but a zillion times better! Dan and I then went through and retested a bunch of the wires to see what was powering what up. Several things need sorting out and wired in a little better like the radio and lighter socket. So the above picture still isn't the final for sure.
Overall a VERY productive day I must say!
Only downfall was finding out that the fox is only seeing 2.7psi of boost, being able to hear the boost leak, but not being able to find anything actually wrong. The BOV seems a bit suspect, but it passes the operational tests with a mityvac...
December 11, 2009
Today gets a very big and depressing FAIL stamp across my forehead. So I have been meaning to modify all my instrument lights over to LED's. I finally got around to doing it. Working on it for the last few evenings while dinner is cooking.
First though I wanted to get my dimmer setup working. So I spent some time diagnosing why my crappy dimmer switch was so crappy and what readings I needed to have on it with a little help from some friends!
So lemme show the results.... First to modify a few of the bulb holders. Starting off by carefully pulling out the metal clips inside it. These tend to do damage to the circuit foils over time, so its nice to be able to eliminate this especially on the older foils like the '79ish one that's in this car. I used a 7/64ths bit, but that is fitted for the 18g wire. Smaller wire could really be used and then a smaller bit would be in order.
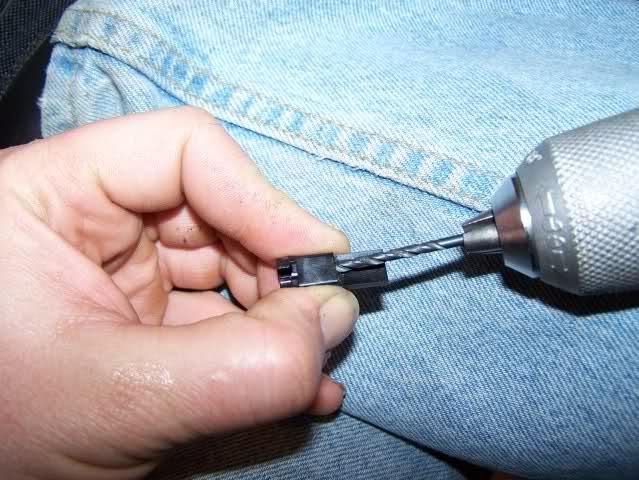
Of course be careful holding onto it like I did... Not the safest way but I didn't want to clamp the holder down in my vise and risk breaking another one.
Now setup the LED for running in a 12v environment. I bought a bunch of 470ohm 1/8 watt resistors a couple nights ago. We start off by attaching one to the positive lead of the LED, then soldering a wire onto it. I used 18gauge cause that's what I readily have on hand, way overkill!
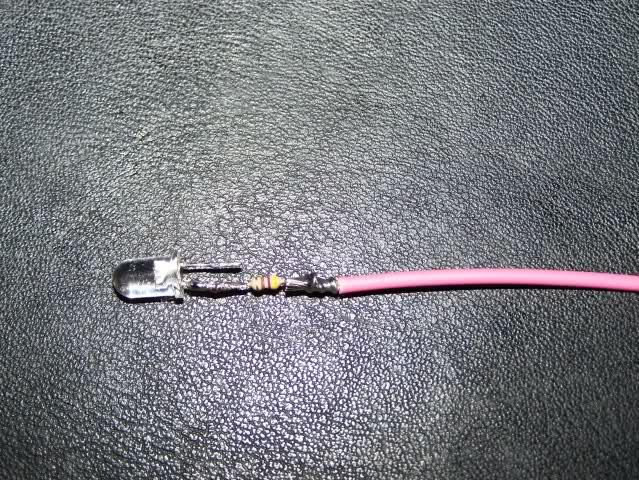
Then I heat shrink the resistor and next solder the negative side together.
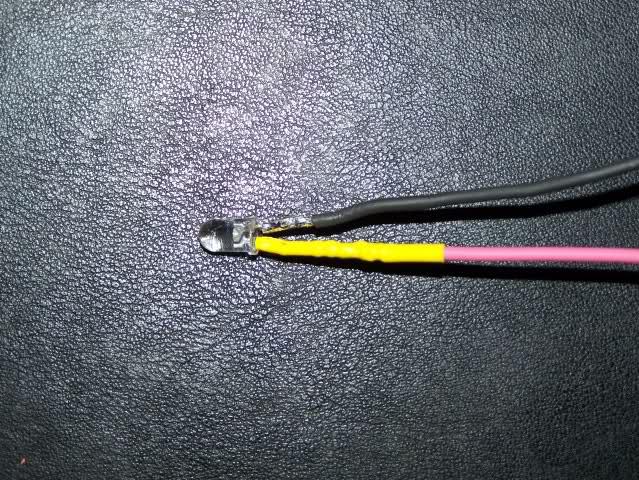
I then heat shrink that side together. Next I pulled the wires through the holder. I pulled the LED base as far in as it would go for support and stability. They could be left a little further out and the light pattern might be better. If I get bored I may experiment with this.
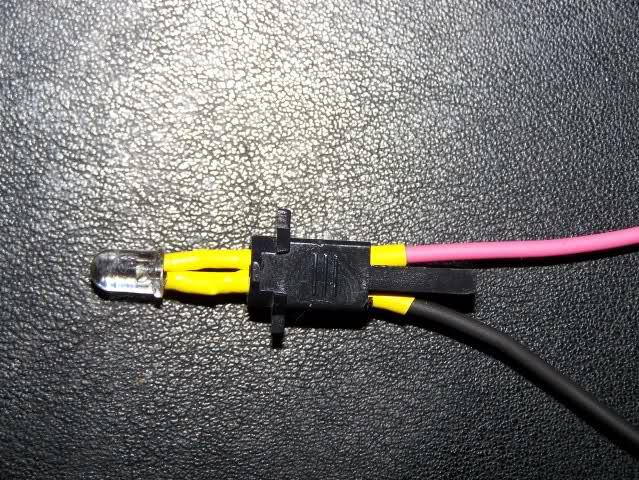
After that I then finished it off by adding a little more heat shrink to the outside to keep the LED at the height I set it.
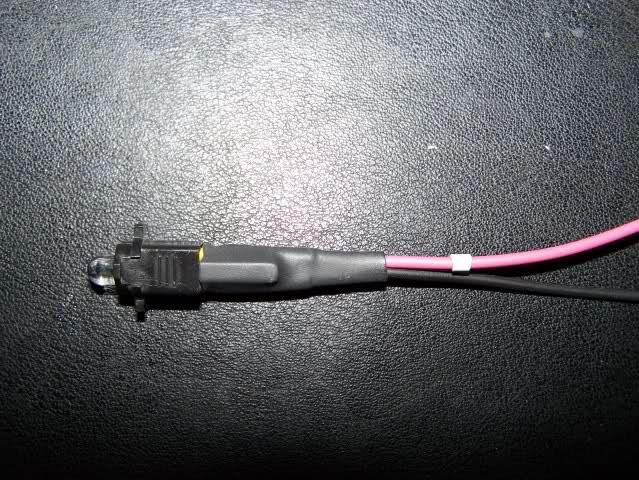
Now they are ready to wire into the cluster. I soldered eyelets onto them and attached them to the light output going over to the speedometer bulb for the dimming positive side. The negative side I attached to a speedometer screw. When installed I plugged the grounding tab on the speedometer into one of my loose spade grounds on the harness so as not to ground and overload through the voltage stabilizer. Here they are attached to the instrument cluster.
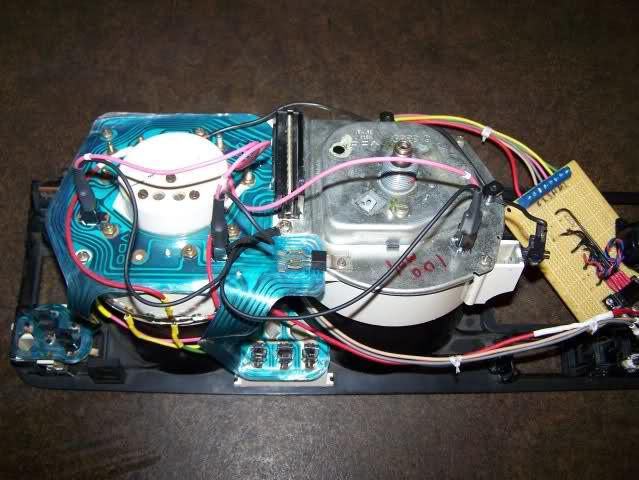
So now time for the critical test. I started off with some white LED's. First at the dimmest setting. For dim, these are pretty bright!
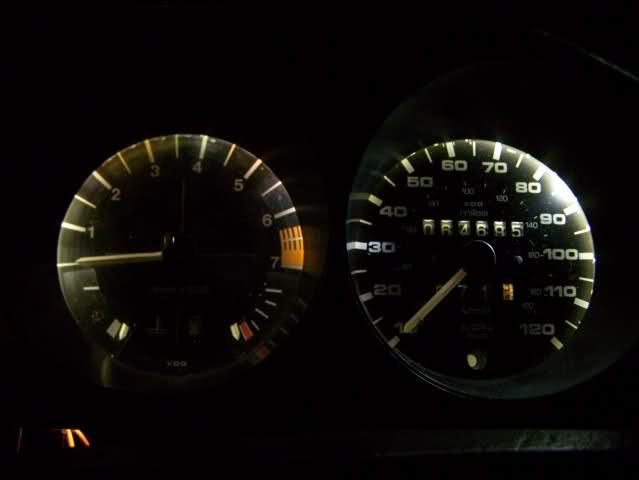
Then at the bright setting...
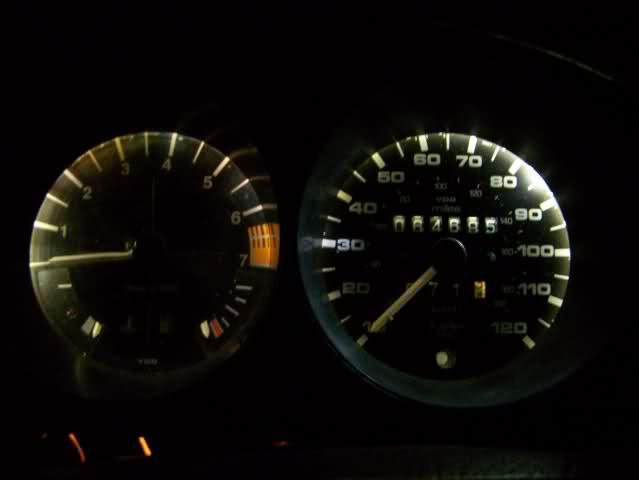
Yeah there is almost zero change. I took all the pictures with the camera's settings locked in to the same. I fiddled it to try and get the best representation of what I was actually seeing. Came pretty close too. Well not feeling that color. Its a "cold'Â white that has hints of blue in it. So I started again with a new set of yellow LED's. For the dim setting:

That color is spot on. Nice and warm. So for the bright setting:
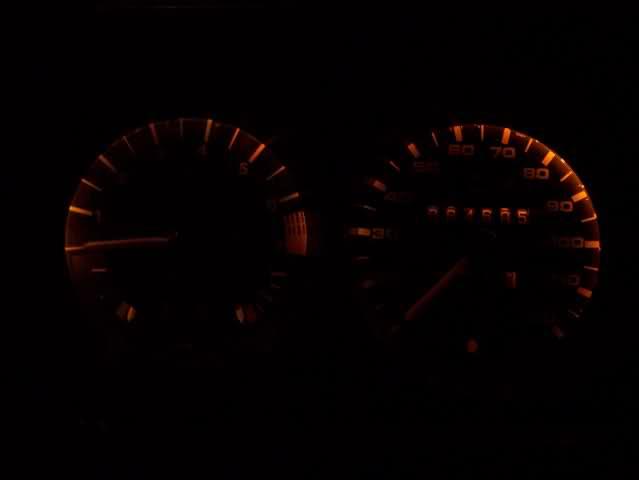
The yellow is super dim. Not cool. Okay I did default to the 470ohm resistors here too since that's what I had for the 1/8 watt babies. I should probably used about 320 ohm ones here, maybe 360 or so. The yellows have a lower minimum voltage too.
So... Not really liking the white, its super bright but not feeling the color. And the yellow is very dim. Not to mention almost zero dimming on both options. So for comparisons sake I put the regular bulbs back in. On dim:

I couldn't get the color quite right. These look redder in the pictures than in person. And at the brightest setting:
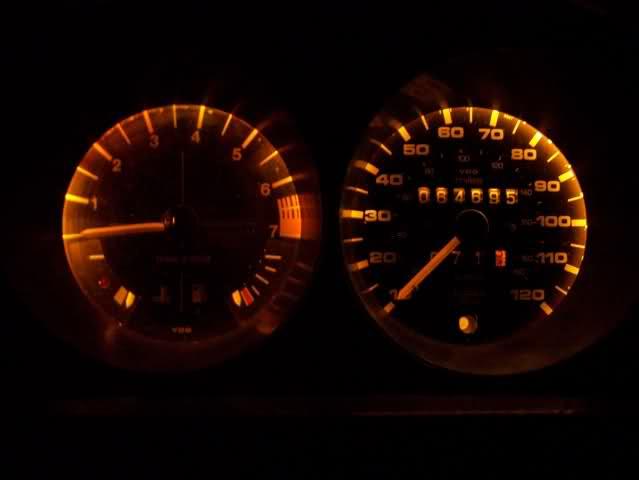
This is when I went back and looked at a few things. Still not getting a lot of dimming range, but these had a lot more than the LEDs did. Humm, back to the drawing board. So I test voltage change again. And not seeing any more change on my new test switch as I did on the old bad switch. As I think it over I realize that without everything hooked in, the resistance load across the whole circuit lowers causing less of a voltage drop. I hate Ohm's Law!
So I braved the cold and went out to Autozone and bought some bulbs to replace the radio light and a few others I had changed out a while back...
The whole reason to use the LEDs wasn't to lower the load on the circuit as much as to get bulletproof reliability into everything. I HATE changing these bulbs out all the time. Coilovers seems to kill them a little more often than I would like.
Well at least the whole theory behind it mean that using LEDs for the interior lights will make sense and put a lot less drain on the battery! I had started a couple days ago by modding these up to go into my glove box.
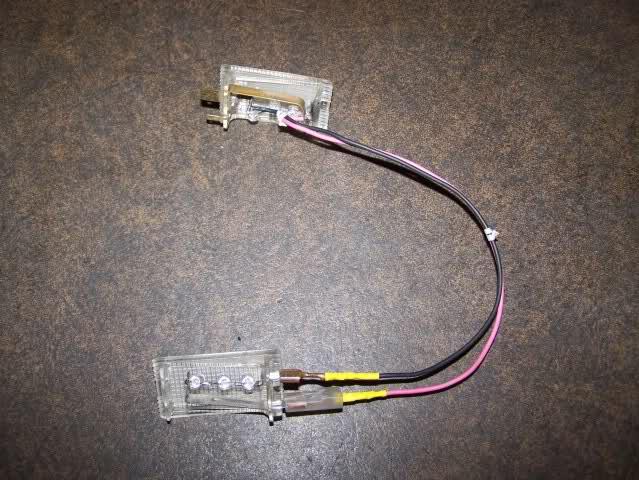
I am going to do my overhead and a couple under-dash/foot well lights up the same way. Using 3 LEDs in series seemed to be the best compromise for a safe voltage drop and not making them run hot. They still run warm, but 4 was a bit dimmer than I wanted. For the glove box that's not being used for long periods of time, this will work. For the rest of the lights that will be on for longer times, I think I will play it safe with maybe 3 parallel sets of 4 in series per assembly.
In the end, I am liking the incandescent OE bulbs functionality and color best for all the instrument lights. I also took my radio apart and figured out why it was doing strange things to the lighting. The small plug on the back I had originally thought was for the back lighting is bridged to the main power input. I am pondering cutting it from the bridge and wiring it up for the back lighting I thought it was for... To do it the way I feel is right though I need to build a simple circuit inside. The radio light turns on and off with the power switch. But wiring the back lighting in would mean its on whenever the parks are on. What I want is the radio completely off with the switch off, and the back lighting also off. With power on, I want the dimmer controlling the back lighting too. A small solid state relay, or a simple TIP121 transistor should cover me for this application though.
Maybe I will try out some red or blue LEDs. But I am not really feeling any of the colors so far. Perhaps green? Not sure. I like the original color a lot.
December 12, 2009
Lol, somebody IMed me noticing that I wasn't running a speedometer glass face and asked if I needed another one.
Correct, no glass there. And I got a pile of spare glasses here. Suprised it took this long for someone to notice actually! Theres a reason behind it though. I have been trying to get my speedometer to read correctly. Been employing the use of my handy GPS, speedometer gear swapouts, and changing the preload tension on the needle.
No real progress reports, but I scrounged up a few new bits. Got some random electrical parts from the Rat Shack and a new antenna. Can't wait to see how good this old radio works!
Hoping to get them on tomorrow. I was busy getting the Audi all sorted out for winter driving fun. With bald (almost) tires she still grips like nothing else.... So much fun! Realy want some studded snow tires (cause I can) but fear it would take ALL my winter driving fun away!
December 14, 2009
Glad to entertain! For being out in the cold as long as we were, T3Raposa and I had fun! Thanks for the help!
So got a little more time into her tonight. Started off by opening the radio back up and making some small mods to it. I finally got the lighting mostly working the way I wanted it to. I started off by cutting the wire that was going to the backlight. I then soldered a new wire to it and fed it down under the circuit board then out of the case. To be safe I capped off the original wire. I could have unsoldered it or cut it, but I have plans to use it later.
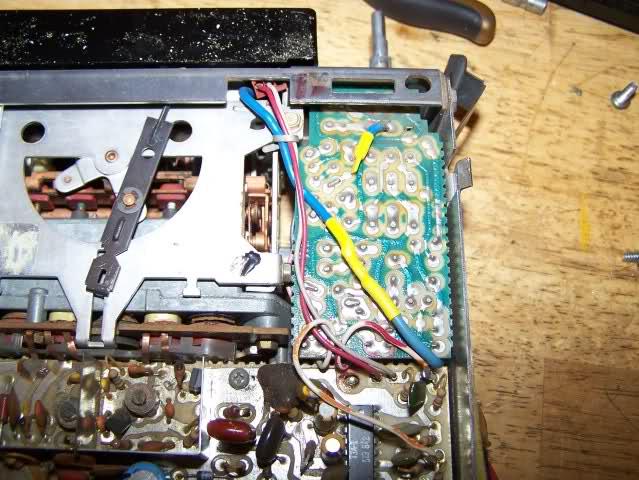
Then I modified the power grid on the back of the radio. I got into it with a Dremel and cut the smaller pin off the strip. Pulled the pin out and soldered my extended backlight wire to it.
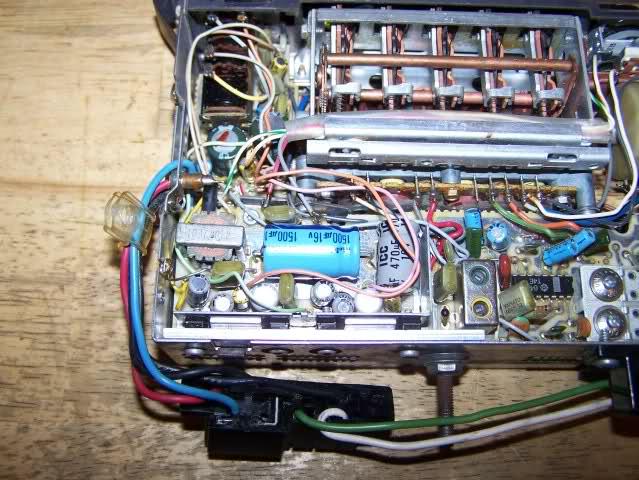
The finished and reassembled case looks completely stock and unmolested.
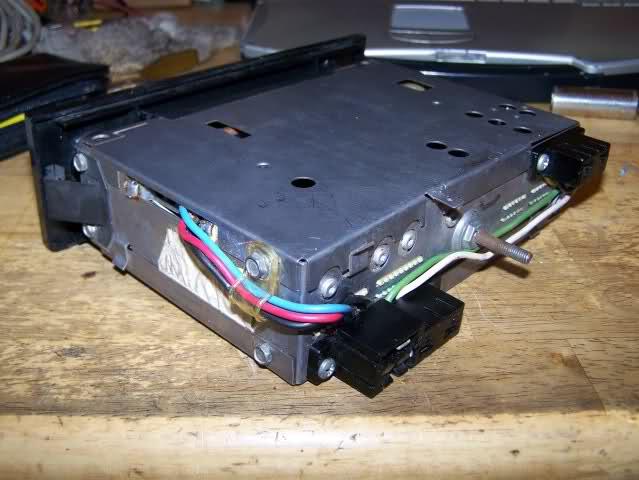
And a top view showing that it actually is an OE radio! The electrical tape I added to make sure the face surround stays in place. It was a little loose.
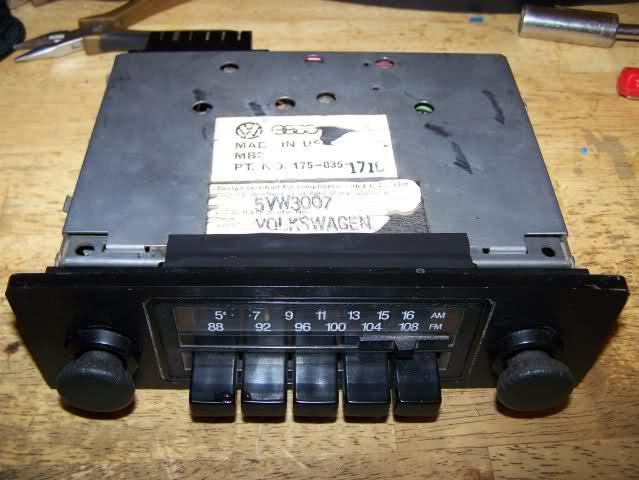
I then went and ran the new antenna and powered it up. I was pleasantly surprised at how crisp and clean it is for a 30yr old radio! I discovered the small LED is for stereo/signal strength when it locks on a station. I thought it was a simple power LED.
So I am mostly happy with the mods, but I am likely to be back into it sometime soon. I would prefer to have the backlighting only on when the radio is on. I need to relay it internally to the blue wire I capped off to accomplish this. I think I may also carefully mod in another LED to indicate the radio is powered on. Just because I can... Overall I am much happier with the radio.
Gods I would hate for somebody to steal my $5 radio though....
So while I was in there I took the time to sort out more lighting and wiring in the dash. Couldn't get my rear defrost switch to light up the indicator on the side at first so I went and grabbed a pile of other switches. I finally figured out I needed a ground to the light instead of parking switched. Then I noticed the other switch I had there was different. Studied it for a minute and got it plugged in. Turns out it has a translucent rocker and lights up the whole thing from behind. I suspected these switches existed! I wish I knew what it came out of so I could get a similar headlight switch...
All my dash wiring is figured out now other than whatever is wrong with my EQ. Its doing super strange stuff now. Its power is disconnected, but if I pop the ciggy lighter in somehow it powers up. WTF? I had to reroute some of the wire bundles. I will get them retied and sorted out then hopefully that solves whatever oddness the EQ is doing now. Something is likely just touching where its not supposed to be. Should have that sorted out in the next few days and maybe have the dash in a finished state by the end of the week! I can't wait to post up pictures of the final result!
December 17, 2009
Well the EQ seems to be okay. Turns out it was something stupid. The ground circuit going to it somehow got cut at the other side. I am not sure how it was powering up at all actually.... I figured out what was going on when at first it was only lighting up, then came alive when I plugged the antenna into the radio.
And the radio is definitely not going to work the way I want it to without some more fiddling inside.
Overall the dash wiring is coming along, just MUCH slower than I would like. But at least I have been able to put some serious miles on this project! I can't imagine how you guys keep going on these projects that have lasted for years. With some of you never even having driven the car, or any rabbit for that matter, before.
December 30, 2009
Still no intercooler. Since winter hit the car has been parked though and nothing much will be happening to it without a garage. My primary goal for the winter is simply to get all the wiring 100% the way I want it. And even thats not happening right now due to her being snowed in!
I am mostly limiting myself to indoors projects right now. Currently I am making a combination laptop/camera bag. I will do a test tun on it hopefully this evening and see how it goes. If my maching can handle this, the next project is going to be recovering the seats and doing the interior up a little bit.
I am out of time for lunch, I will try and get on tonight with a small writeup and some maps posted up for you guys!
January 01, 2010
Okay time for a lesson in MegaSquirting here people! Let me start off by saying that the below are not my best examples of maps. These are just whats currently in my bunny. Use at your own risk as always.
My fueling table, or VE Table 1:
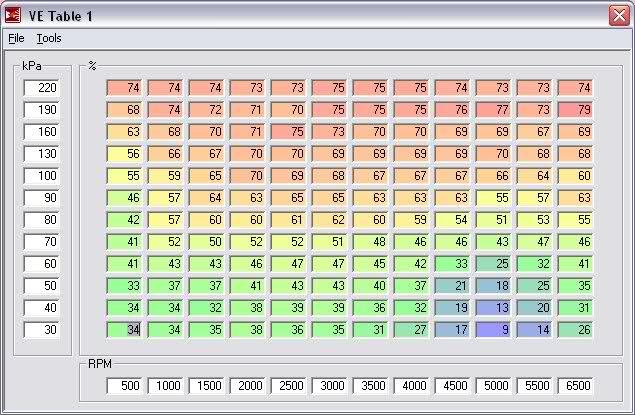
Fairly boring. And let me tell you guys a big secret. It means VERY LITTLE. What? Yep. Its pretty useless for anyone but my setup. How come?
Well first even though these tables are "supposed" to work perfectly loading from one motor to another, they never do. There are way too many variables. The biggest one being required fuel being setup incorrectly. In theory if required fuel is perfect, and lets say you make an injector size upgrade, the VE or Volumetric Efficiency table would remain unchanged. All your cold start settings would need to be changed as they are based off pulse width, but the VE "should" stay the same.
In practice it never seems to work that way though. So whats the important table for fuel? The AFR targets!
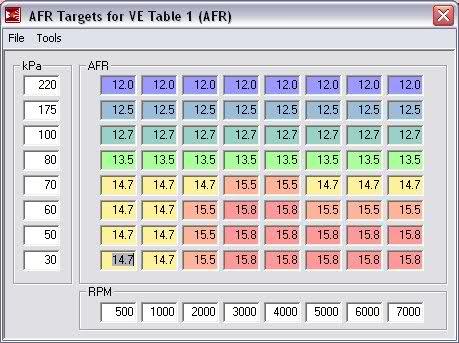
The reason these are so important is when processing the datalogs and dialing the engine in, these are what does almost ALL the work. If the VE tables are off, its going to dial it slowly closer to this table.
Most of the real work in tuning actually is in the setup stages. A good set of maps takes me usually a few sessions of about an hour each to build. First time I go in and rough it all out. With VW's this usually is simple and I grab an existing map set. Then I will dial it in for specific requirements and setups. Details like different transmissions actually change the ideal rpm bin points! After a tuning session or two I may see a couple areas I want to change around and will rebuild the appropriate sections accordingly, then go tune again.
Excluding cold start tuning, actual on the road tuning time is rarely more than 3-4hrs. And almost always in a few different tuning sessions. I will have initial fuel maps dialed in in about an hour. Turbo setups can take a little time to slowly build up boost and verify good fueling, but not much longer. I ALWAYS tune turbo setups with a manual boost controller first so there's less to go wrong. Its usually a good idea to tune first in the cool of the night. After its well dialed in that way then I will tune it during the day. Winter doesn't matter as much as your still tuning in the cool either way. A winter tune will ALWAYS have to be redialed back in in summer for safety.
Well lets move on the the ignition table. This is a lot more critical to get close out of the box. The example below is for the '77. Keep a few things in mind, this car is not intercooled! I have to pull a good bit of timing out of the upper boost areas to keep it safe. Took T3_Raposa and I at least 3-4 tuning sessions to get it dialed in last summer to where it was safe. All done out on the street. On a dyno we could have gotten it a lot faster, at the cost of much less fun, more strain on the car, and a heavy hit to the pocket.
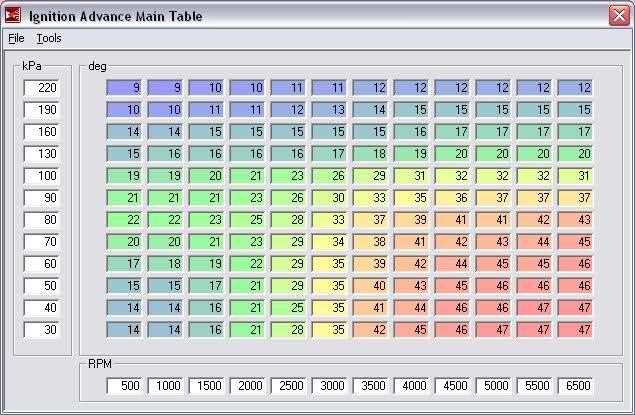
Lets go over the critical points where I see a LOT of mistakes made on maps posted everywhere in the internet. If you have an 8v motor your almost NEVER going to see less than 30 kPa at idle. A good idle number is 32-34 kPa. So there is no reason for kPa bins of 10. I have seen it many a time...
Then lets "box in" our idle bins. If the engine is setup right, it will idle happily at 800-900 rpm. I can get my bunny to sit at a nice 600rpm idle, it seriously messes with people! So lets start off with a 500 rpm bin followed by a 1000rpm bin. It will never see less than 500rpm at idle, and should never be much above 900rpm.
kPa is next. Again an 8v will like @ 32 kPa. So we set the next bin at 40 kPa. Since a 16v flows more air, it doesn't like to idle as low. Its going to like to see 36-37 kPa if my memory serves (I would have to pop us some maps from the other computer, its been a while!). Now what about a car with ITB's? If you can get one to idle at less than 45 kPa, your a wizard! At least in all the setups I have tuned. So an an ITB car your unlikely to use a lower bin of 30, but more likely to use a 40 bin.
What do I mean by "Boxed in"? Well we make a "box" at idle. MS will interlopiate between bins. So to keep a perfectly smooth idle, lets not give it that choice. The lower square of 4 bins for all of our tables will be set identically. Keep the numbers in the VE bins, the spark bins, and the AFR target bins the same. This will keep the ECU from hunting either spark or fueling during idle. Above 1k RPM and 40 kPa all bets are off though!
When tuning and processing datalogs, the fueling will usually get "tweaked" by processing in this square. You have a couple options, its easy to filter out these areas in the settings, or simply select them and revert back to original value before accepting the new tables. I usually just revert them back. Or write down the original number and see how the engine wants to idle as I am tuning it in with the new settings. Sometimes it will idle better, so I will average the new settings out and again level them all to the same number.
That's pretty boring to look at, but the same map in 3-D tells us a little more!
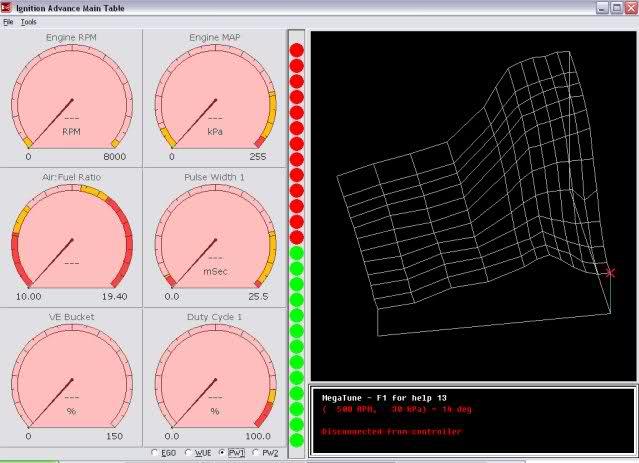
This is where you can tell my tuning really isn't done. Once everything is verified for safety, I like to go into this view and smooth out any holes. You can see such an odd hole at 40 kPa / 2500rpm. The rest of the map is not smoothed out as perfectly as I would like either. The big thing when looking at the VE or Advance maps is to avoid big holes in them. Pulling them up in 3-D mode lets you quickly rotate them around and smooth them all out.
Lets go over bin spacing a little more as its VERY critical and done wrong can cause odd tuning problems. First have the bin spacing be the same for both Fuel and Timing. If the Target tables do not match (impossible since it has fewer spaces), then make sure its top and bottom kPa bins match, and the max rpm bin is the same, or bigger. The same is better (I see mine is 500 rpm above).
Why? When processing datalogs if your target bins cover more area than your maps do, you will get some WHACKED readings and cell changes back. Since you use the max cell change as a good gauge of tuning, this will mess up the process.
Next lets talk about the important areas of the maps. I am at a pretty high elevation herein Utah. I think my base kPa reading is 82 or 83 kPa. IE my atmosphere reading. At see level it will be closer to 95 kPa. So we are going to make a dead spot in our bins between 80-100 kPa. This is the transition stage between vacuum and boost, so its really not important.
Next how do we space the other bins out? Well if the car is naturally aspirated then why have a bin for 250 kPa? Pointless. Space the rest of them out and maybe have a max bin of 80. For boosted cars no need to have bins above the max boost you will run. Sure on a turbo car you can give yourself room for what your turbo can do, even if your going to usually run less. but your never going to run 20psi, always keep it at 10psi even though your turbo can hit 20psi? Set your overboost protection boost to slightly above your max bin.
You do not need as many bins in boost as you do in the NA sections. You really only need a spread up there for timing as fueling is going to stay pretty consistent Still, I usually bump more fuel into the upper regions for safety.
To tune for fuel economy your going to need to pay attention to the rpm range your engine sits at on freeway cruise speeds. The tranny will determine if you need an extra 2500rpm bin in there or the like. Even more critical is the kPa range its sitting in. Make sure to have smooth transitions in and out of that area in your target AFR table. You can pull a lot of fuel out of these economy areas. You can also fiddle timing in this area differently from the rest of the maps to gain economy.
Well for now I think that covers Basic Map Building 101!
January 28, 2010
All of the tables for Fuel, Spark, AFR Targets and a few other things in table format can be exported into whats called a .vex file format. This allows you to yank just tables out of a tune file, or .msq. To do this open the appropriate .msq. You do not need to be connected to the ECU if the file is saved offline.
Then go to whatever table it is you want to grab, and upper left corner select File/Table Export. I leave the first part of the default file name alone and dump the number portion for whatever car it is out of. The numbers are date and time the file was made. Useful too if you only are dealing with the one car.
I go through and save all the tables like this that I am using.
Now to be safe close down MegaTune and then reopen it with the file you want to put these tables into. Or just make sure to open the new file. Doesn't matter really....
In the new file you changing the .vex tables over go to the same place, say Spark/Spark Table 1/File/ but this time select Table Import. Select the appropriate table and ban there you go.
You can put the "wrong tables" in here. For instance your being lazy and want to have all you spark and fuel rpm and kpa bins matching. You could easily load a spark table into a fuel table. But your center section will have whacked numbers... I usually just manually fix KPA and RPM bins instead.
Another cool tool to not only grab maps out but to load them into other sections is to go to the Tools/Review Mode and start running through all your .msq pages. For instance when you get to VE table 1, export it. Eventually table 2 and 3 come up and you can quickly import matching tables into these spots to have a quicker starting point.
But there is one place that due to software and different settings between computers I frequently see problems where doing the table export/import becomes very important.
For some reason the way AFR target tables are saved and translated gets easily confused. If I send somebody an .msq made off my computer that's setup for the LC-1 Innovate wideband sensor, and their computer is setup wrong for narrowband, or even a different wideband sensor, when they load the .msq up the tables can end up in volts and backwards, or just way off.
The fix is easy though most times. In this case we go into configurator, set it for LC-1, accept changes, load MegaTune. Make sure the AFR table looks normal now, then export it. Close MegaTune and reopen Configurator, set the correct wideband, close, accept, open MegaTune. Go into AFR Targets, Import the table you just exported, save .msq. Shut MegaTune down, reopen, reopen the ,msq, and make sure the table is now reading correctly.
When tuning and processing datalogs its VERY IMPORTANT to have all the oxygen sensor settings correct in the ECU, in MegaTune, and in MegaLog Viewer. MegaTune "software" settings are all setup via Configurator. ECU settings are via MegaTune. Be careful to have the sensor type set correctly. And I never tune with the oxygen sensor having any authority enabled. It can mask problems enough to be more of a problem than a help. If I have a new car without any fuel maps, I will level everything and then give the sensor maybe 50% to get a very rough map. The car will run horrible for the first two runs. I then dial it down to 20%, then usually turn it off. Only "maybe" turning it back on after the car is fully dialed in.
February 21, 2010
There was a LOT more to the story it turns out. I rarely take a customers word for what a specific component is, like say the size of the installed injectors. But in this case I had grabbed the numbers off the injectors and couldn't find anything. So I had my buddy verify what size they are. He swore up and down that they were 450cc injectors.
So the MegaSquirt was programed accordingly. To almost disastrous results... I kept adding fuel trying to get warmup and starting dialed in. Finally got it going after putting more than double the "normal" amounts into it. The car was smoking badly but I had a decent idle and cold cranking finally. The car warmed up and was sitting at 190 running beautifully. So I went for a short drive. About a block away the temperature suddenly climbed to 220 and then problems hit. There was so much fuel in warmup that at 190 it was still adding fuel it seems. At 220 it wasn't and the engine went dangerously lean. by the time I got the car back to the house I had flames coming out of the shifter boot.
So I had a while to process everything while cooling the car off with a hose and decided to check the injector numbers again. This time I got lots of hits on them. Turns out they were 240cc injectors and NOT 450cc ones.
And the other odd issues were being caused by the fact that the Toyota fuel pump can't reliably deliver more than about 50psi. So I can't compensate by turning the fuel pressures up enough.
So looking around for performance calculators and trying to figure out a couple more details on this I stumbled across this gem of information.
Air/Fuel Ratio Limits
6.0:1 Rich run limit
9.0:1 Low power, black smoke
11.5:1 Rich best torque at WOT
12.5:1 Safe best power at WOT
13.2:1 Lean best torque at WOT
14.7:1 Chemically ideal
15.5:1 Lean light load, part throttle
16.2:1 Best economy, part throttle
18-22:1 Lean run limit
I found this and some really good calculators here: http://www.stealth316.com/2-air-fuel-flow.htm
In bunny news, I lost my brakes. Specifically the master cylinder took a crap on me. It had been acting up a little bit the week leading up to it so it was not a complete surprise. Time to overhaul my setup. Last night I got the new MC painted up, and a spare. I am hoping to get it on later today!
March 01, 2010
Crap... So my basket is not a THULE one like I thought but actually a Yakima. Only badging on it was "Subaru" on the fairing. Well the Subaru has been gently rubbed off with Ajax and replace with proper (or imporper I guess) THULE sticker.
I am NOT a fan of Yakima, but I like the way this basket looks so I will live with it since I can't complain about how much it cost me.
Hopefully I will get caught up on all my projects tomorrow so I can get back to installing my alarm. I am damn tired of fumbling with keys in the dark.
March 07, 2010
Today we had an adventure in alarm testing. I am tired of not having power door locks. So I got out all the goodies and decided to figure out how to wire it all up. The problem was my lock control unit has no markings as to what it is and hence I can't find any wiring information.
I am using a Jaguar door lock actuator since it also has internal switches to activate the locks. After about 2hrs of fiddling with everything, I now have door locks that lock and unlock with the alarm, and with pulling or pushing the lock pin on the door!
At the moment nothing is actually wired into the car, and in fact I stole the car battery to power it all for testing. Its sprawled out over my living room floor looking like somebody murdered a couple wiring harnesses.
I think I want to setup a trunk release for the hatch. I should be able to get an actuator to pop the hatch, but I am not sure yet. Also not sure if I want a door switch actuator on the passenger side too. My second actuator/switch combo one seems to be missing at the moment, so that may make up my mind for me.
Well we shall see! I made LOTS of progress today on it! Once I sort out mounting locations for everything, I am ready to put it all in permanently. Already have the door lock actuator mounting all sorted out and lock rods made up.
March 27, 2010
We should see some serious progress on her this weekend! The weather has mostly turned for the better. I am about to go get cracking on her and see what I can get sorted out. I am hoping to accomplish a few key key things today.
First I need to get my headlights properly relayed. Also I want to get both speeds on my fan working and then start cleaning and heat shrinking the remaining OE engine bay wiring. I should be able to have that all wrapped up tonight or tomorrow.
At the moment I am not sure what course of action and control I want to take on the second fan speed... The wire is not available in the plug to just wire it that way. I may decide to control one of the speeds via the MegaSquirt so that I can change the kick in and out temps.
If I decide on the MegaSquirt control, then I think I will use that on the low speed where programming it is most likely to make a noticeable and usable difference. I can also use this to kick the fan on in a few other operation conditions....
March 28, 2010
Wantacad was asking me for some sensor placement information, specifically the placement of the OE gauge sensor in my setup Its not very clear from the other pictures in here as to what I did and where it is, so here is a good picture of it.
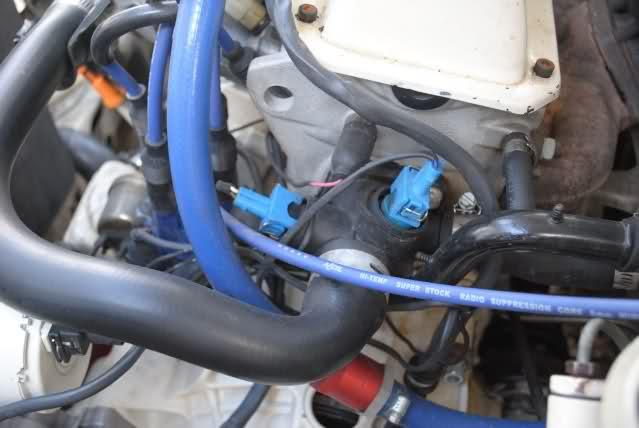
The right blue sensor is for the MS and the left black one is for the coolant gauge.
Yes I am using the OE Bosch sensors. Its MUCH easier and way more accurate to use the GM sensors though. How so? Setting up the GM sensors only requires basic hardware modding. While running the Bosch ones requires modding the ECU slightly, modding the internal code, and some basic file hacks. While its fairly easily accomplished with Easy Therm, I still find most people have much more trouble with this than with modding the car for the GM sensors. Did I mention that the GM sensors are MUCH more accurate?
Why did I use Bosch then? I had a harness on hand already built for the Bosch sensors and didn't have any spare GM sensors in my inventory. And I have modded the code so many times I can do it in my sleep!
So to use the GM sensors with these black plastic water outlets all you need is a simple adapter. They are sold on here for about $25 made out of aluminum. But I found a much better way to make them that satisfies my 'Must have it NOWâ€Â dilemma I usually have. You start off with one of the VW block off plugs. Some of the time a new water outlet comes with one. Otherwise they are only $2 from the dealership.
1)Flip it over and carefully center punch the very center of the bottom.
2)Starting off with a small drill bit, drill through it. You should be able to keep the drill going through the very center of the reinforcing cross hairs on the top side.
3)Slowly go up in bit size to keep it centered.
4)Once you drill out the center to the edges you need to grab a 3/8ths NPT tap.
5)Tap it slowly, it is a pain to start. Beveling the edge slightly will help.
6)Once your going slowly tap and test it. You can get the GM sensor to screw down flush with the top of the block off plug.
The IAT sensor will require either pulling the intake manifold and tapping it, or to find the metric GM sensor that screws into the Bosch hole. They do exist. Its for a Saturn or something.
As for the gauge wiring, I used a two wire ABA type sensor. The early gauges only use one wire. But the resistance curve is the same. The other is simply a ground. The older sensors are grounded through the head. Since I made the whole harness for the engine, I simply ran the ground for the newer style coolant sensor into the harness and the signal out to the gauge.
Not sure how accurate my gauge is compared to the original setup, but I ignore it most of the time anyways. Its a decent reference not much more. My CEL I programed to monitor water and intake temperatures. It goes one color for water temp warning and another for IAT temp warnings. Since its programmable through the MS, its easy to adjust. Also most of the time if I need to monitor temps I am doing so in MegaTune.
April 04, 2010
Well today's first update is not a good one... Thursday I went to start her to get to a meeting. Nothing. Several tried later I realized that the fuel pump wasn't kicking on and a funny smell had me looking down at the fuse box to see plastic drip off it.
The fuse area for the fuel pump fuse had melted and deformed. The plastic itself came from the still unblown but completely melted fuel pump fuse.
I been dreading digging into it and left it alone for a few days. So this morning has me poking at it and well everything at the fuse-panel and breakers is working as its supposed to.
I am stuck at this point until I get another set of hands to test it out, or maybe jumper the EFI power on. I need to test power delivery down at the fuel pump. I have a bad feeling its not an electrical problem but a dead pump. Hoping for it begin an electrical issue... It so I will have the car back online today. If it is a pump I am likely in trouble.
April 05, 2010
So I got into it last night and got it back online and found a likely cause of the issue. First I hooked up a special little tool that for this type of stuff is invaluable!
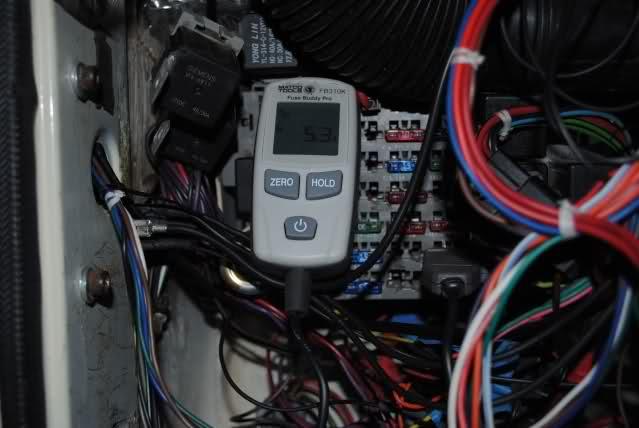
It plugs into the fuse slot breaking the circuit to do an amp draw reading on it. According to it we are only seeing about 6amps. This is well in the allowable limits. But looking closer at it revealed some corrosion issues occurring that could quickly cause the fuse to overheat, yet not blow. Pretty sure this is what had been going on.
I checked over the rest of the setup and had gone about it the smart way. The fuel pump on this setup is simply controlled via another relay setup. Then there's an EFI relay for injectors and coil, and of course the switched MS relay. The issues were likely just caused by the corrosion and increased resistance at that point. And the broken wire.
April 07, 2010
But I do have an idea... I am going to get one of the pictures of the blue bunny all cut up and stuffed onto the trailer printed out and like stick it in the car. As a reminder to what happens to "uncooperative cars" around here...
Today was a comedy of errors. Unfortunately I wasn't laughing. My cat fell in the toilet though, that was very funny.
So hopefully this nice new enclosure solves my parking lights shorting out.
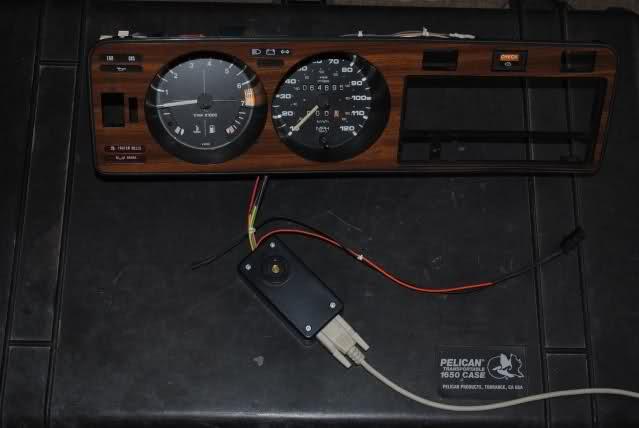
Seems the power grid on my control board for flat-shift, CEL, shift buzzer, and sequential shift lights was shorting out to the steering column. It had gotten moved from its original safer location, and also unwrapped the last time I was in there. I am HOPING I am done back there now.
I have all my lights mostly working as they are supposed to. I still need to diagnose my dynamic oil pressure system though. I think its not getting an RPM signal as the high pressure/rpm switch isn't kicking the buzzer on.
Also want to get the brake and seat belt warning lights working... Overall lots of progress made, but it still doesn't feel like enough.
Oh I didn't mention the cool mod I made that will cause my car to fail emissions now (if the inspector is paying attention)! The OXS light hole now has the LED for my LC-1 stuffed into it. So the OXS light blinks during startup then goes solid once the LC-1 is heated up.
Thats okay cause next inspection time I will program the CEL to be on and see how much trouble that causes. Should ask them to scan it and tell me what code is in there...
Its come a long way, but I have VERY high expectations of where Kamei still needs to be, and she needs to be there in only a few more months.
The secrets to getting a build this far this fast are actually pretty simple. First off simply start with the best base you can get and collect everything you can before you start. I looked for several years for the right base before this one came my way.
Then go into it with a very clear idea of exactly what your going to do, and how your going to get there. ONLY change directions to suit something that's not going to work like you planned. Fortunately I have been wrenching on dubs long enough that this isn't usually an issue.
Know your limitations, but more importantly accept and admit your limitations.
Limitations.... Here is my hangup on this project. My sewing skills are fair, but once I calculate the amount of time it will take me to recover my seats, materials, and my own perceived skill level..... I am seriously liking the idea of some Wet Okole seat covers.
I do not have a clear and defined idea for the interior yet either. Nothing exactly felt right that I came up with. So this may well be one time I simply spend the money, and use those covers to help define the rest of the interior. Yeah I could do it all myself, but I really don't want to, or want my car down that long.
April 21, 2010
Lots of little behind the scenes stuff happening. My turbo wastegate actuator is crapped and no reasonable way to repair it. My fabricator could likely make a bracket and modify somethign to work but I also have an exhaust leak and two broken off bolts in it now. Time for a new one.
Got the engine bay cleaned up and tydied a bunch of little details up! Ran a bunch more wires. Including properly running and hidign the alarm antenna wiring. Its stuffed up in the roof so I lost some range I am sure. But I mainly have it for a remote door unlock/lock anyways. And for the funny looks people give it in a parking lot when it chirps.
Not posting any pictures of the alarm or some of my other "secret mods" I have in there for obvious reasons.
So she is back together and an oil loss disaster narrowly avoided. Now I need to go retune her for 20psi since the turbo isn't getting fixed properly anytime soon.
June 28, 2010
It was a very long weekend... I started in earnest on the remaining main front harness Friday morning. It took all day Friday and a good part of Saturday to get it sorted and out of the car. But it paid off!
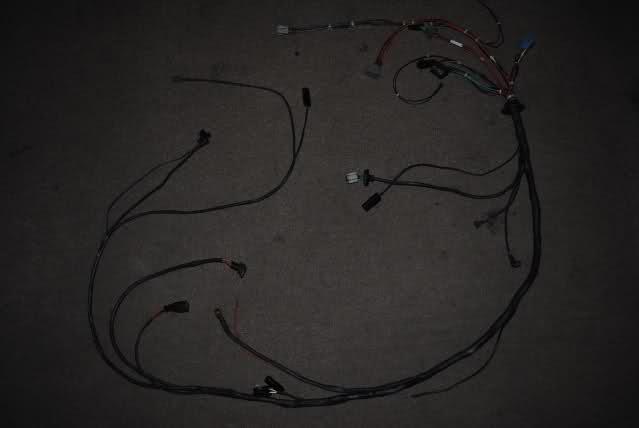
I absolutely LOVE using aviation ties to snug it all up and organize it! Almost everything not attached to the engine is run through this harness. The extra relay and fuse are for the high speed on the MK2 fan. Most of the rest of it is simply stripped down and organized OE stuff. I saved the gray plug as it has a diode and feed in it to kick the fan on. The stock fan setup is controlling the low speed. But I can easily use this to kick the fan on sooner via the MegaSquirt, or a manual switch. The other wires in the plug I retained for the power grid going to the Aquamist water injection.
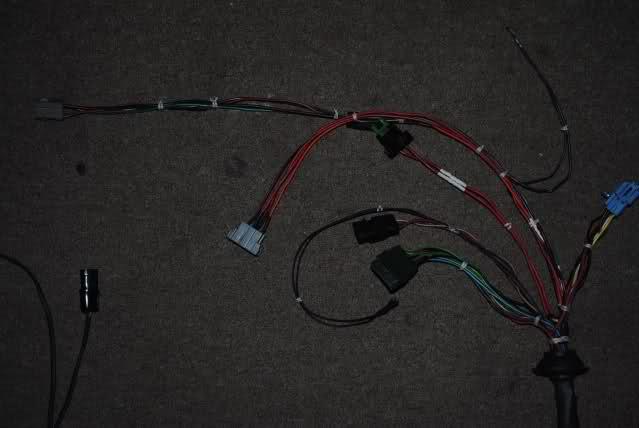
I still need to finish a few small ancillary harnesses for the lights and headlight relays. There are a couple more tricks in there. I setup the headlight relays so that I can unplug them and bypass them in a moment if I ever lost a relay. It has happened before...
Probably not the most exciting update for most of you... But it makes me very happy to get it 100% the way I want