You must be logged in to rate content!
50 minute(s) of a 214 minute read
5-3-2012
1968 XR7-G Hertz Restoration
Compliments of XR7-Gry @ http://classiccougarcommunity.com
5-3-2012
The beginning
As some of you might know I had a story about the restoration of my XR7-G going on the other forum, but for several reasons I decided to stop posting there after the new ownership of the forum took place. My plan was to continue the story here and link to the other forum so readers could get the first part of the restoration there. Well, I changed my mind and decided to move all my posts to this forum to make it easier for readers to get the full story. Before I go on with the copy and paste I have decided to start with a short summary on how this unique car came into my hands.
The new posts will be at page 6 or 7.
My car started its life February 27 in Dearborn, Michigan. I assume it was built into a XR7G-Hertz car soon after that. According to the Marti report it was released from Mercury on April 10 as the 43rd Hertz car built and went to Van Nuys Motors INC in California. Since the car is a Hertz-car it is obvious that it served as a rental car for its first part of its life. After that I know little about the car until the mid seventies. Fast moving forward, I noticed the car being for sale on Craigslist, and it was also discussed on MC.net for being a true Hertz car or not since it had a 302 engine. to make a long story short, I called the owner, who had very little knowledge about the car, and after some negotiation we had a deal. It turned out that the car had been in his family since mid seventies and that his dad had restored the car back then and also replaced the 390 with the 302.
Here is the car at the port in Long Beach, CA, ready to be shipped to Norway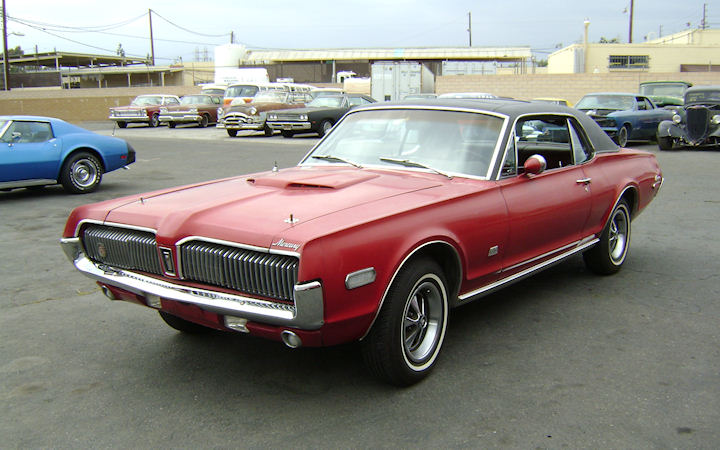
First year in Norway
After some time the Cougar finally arrived Oslo, Norway. After paying the taxes I was ready to drive my red dream the 40 miles home. It started right up and home I went. 40 miles does not seem to be a long drive, but with this car and all the problems it had it turned out to be a long trip.
Back home I started to look over the car and found that it would need new brakes and everything in the front end replaced to pass the inspection to get its Norwegian plates. I also made a few small fixes to it, like making the sun roof operational again this first summer. Then I drove the car and had a lot of fun with it. My plan was to keep it like this for a few years before I started to tear it apart for a full restoration ![]()
Here is a couple of pictures of the car from the first summer and fall I had it . The first picture is from when I fixed the sunroof. My green sun roof 68 XR7 had to donate some parts.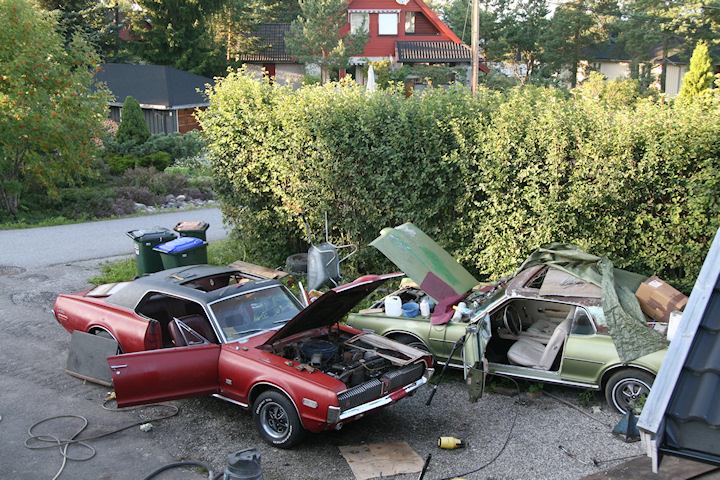
April 16th, 2010
The restoration
From now on it's a lot of copy and paste![]() Most of you have read this before so I guess you can just jump to the new post when I get time for those. I will just copy my own posts as I feel I have no right to copy what other people wrote in my tread. So here we go:
Most of you have read this before so I guess you can just jump to the new post when I get time for those. I will just copy my own posts as I feel I have no right to copy what other people wrote in my tread. So here we go:
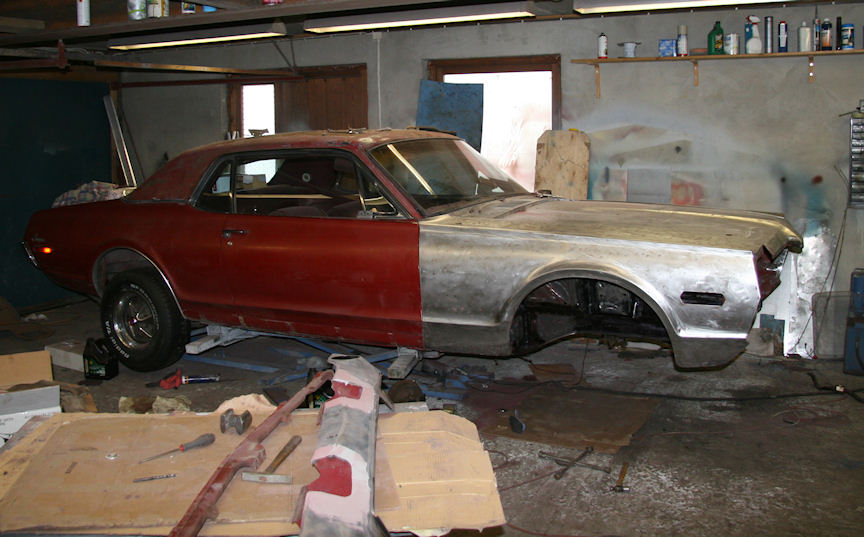
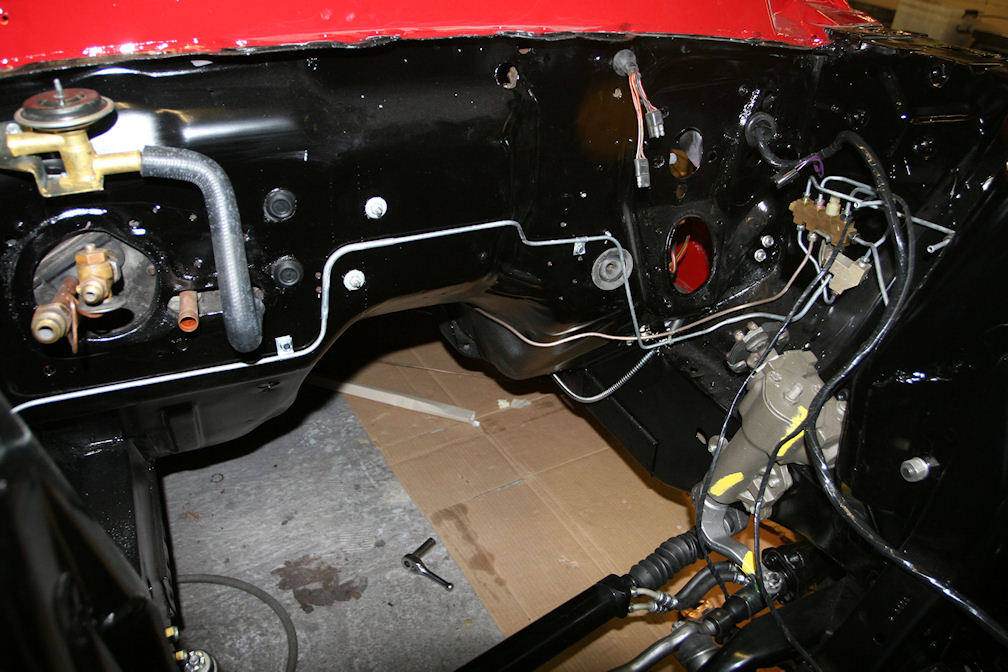
When I started to work on the car in November 2009 the intention was to have the engine and transmission replaced. So I got the 302 pulled, just to realize that I just could not put the 390 into a dirty bad looking engine compartment like this. 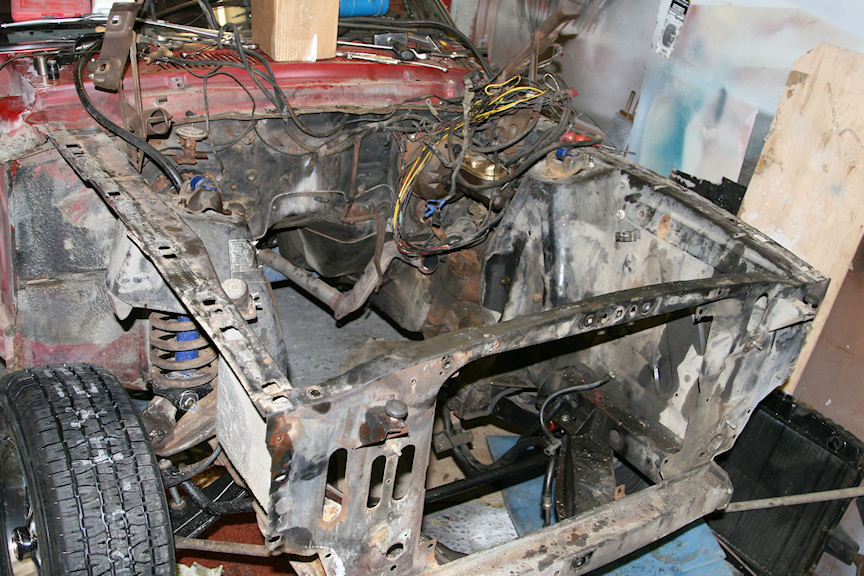
I also found some rust under the battery shelf and while I had the engine out I wanted to reinforce the shock towers to avoid them to crack. The steering gear was also worn out, so I decided it needed to be replaced at the same time. Then I discovered that the wiring system was junk too. OK, I still had a long winter ahead, so I figured I could just as well pull everything in front of the doors apart and have the engine bay done properly. So after a few more visits in the garage the front looked like this:
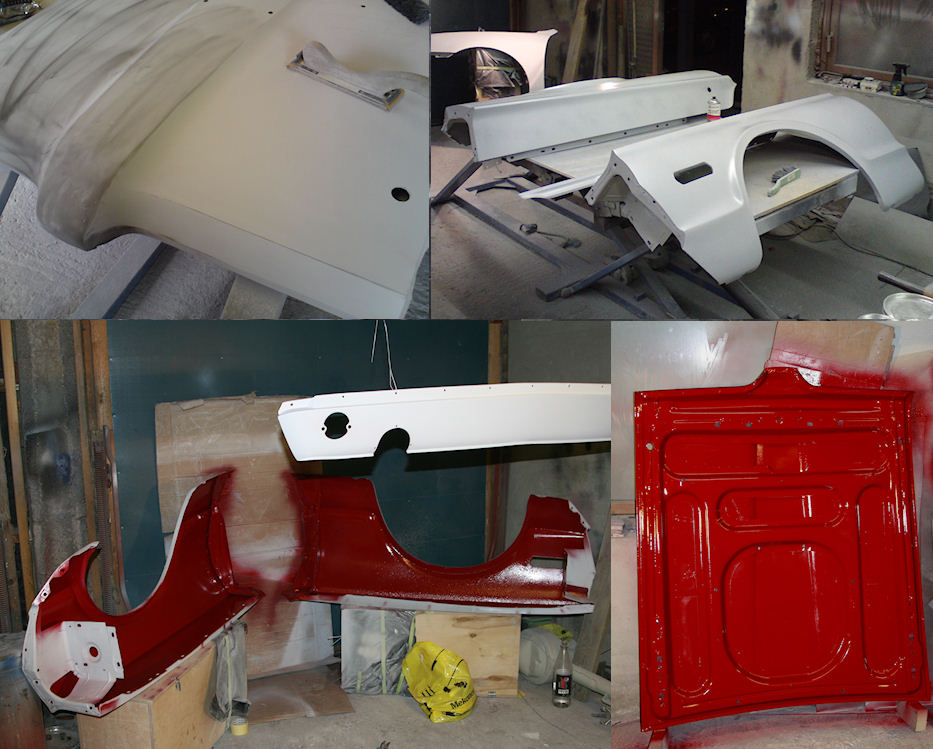
Of course I discovered that the front fenders had a few older dents that I wanted to straighten out, and the front valance was also no good and needed to be replaced. I could just as well take care of those problem now. Just because I was eager to see what the vinyl on the roof was hiding (there was a few bubbles) and how the car would look like without it I ripped it off. Suddenly the car looked like this. ![]()
Removing the old vinyl top revealed some common rust problems in the lower parts and corners of the rear window frame. Otherwise the roof was rock solid :icon16: A couple of nights later that had been taken care off. 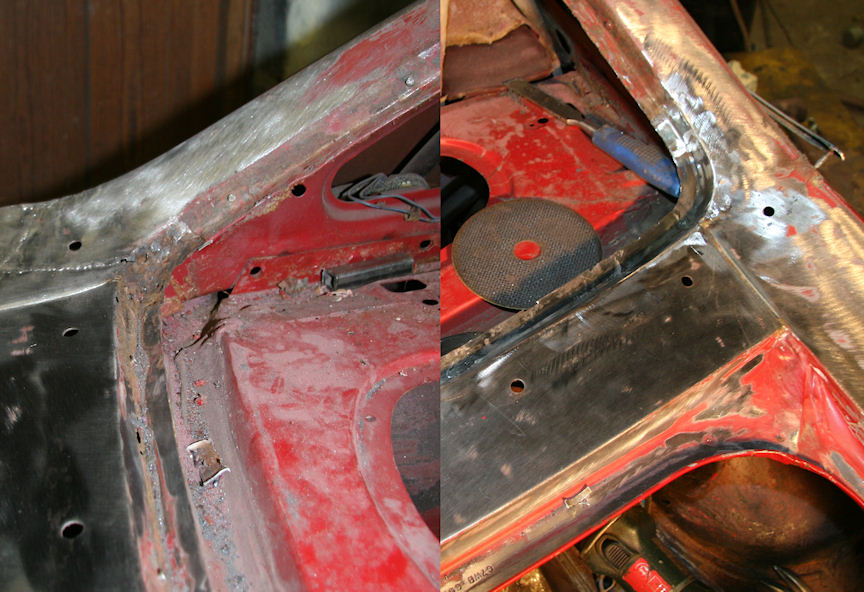
Then I started to look at the trunk floor. I had never been able to examine the work that had been done after the collision damage because the trunk mat was glued to the floor. I decided to pull it as well, just to realize that it covered less desirable work. First of all, everything under the trunk mat was covered with a sprayed on asphalt like goop that was really hard to get off. Then I found heavy layers of bondo and then 2 layers of trunk floor over the frame rails. Of course there was also some rust there. When they replaced the rear floor they did not cut away all the old floor and just had the now floor put on the top of some of the old. That is an interesting way to do it ![]() but not recommended.
but not recommended. 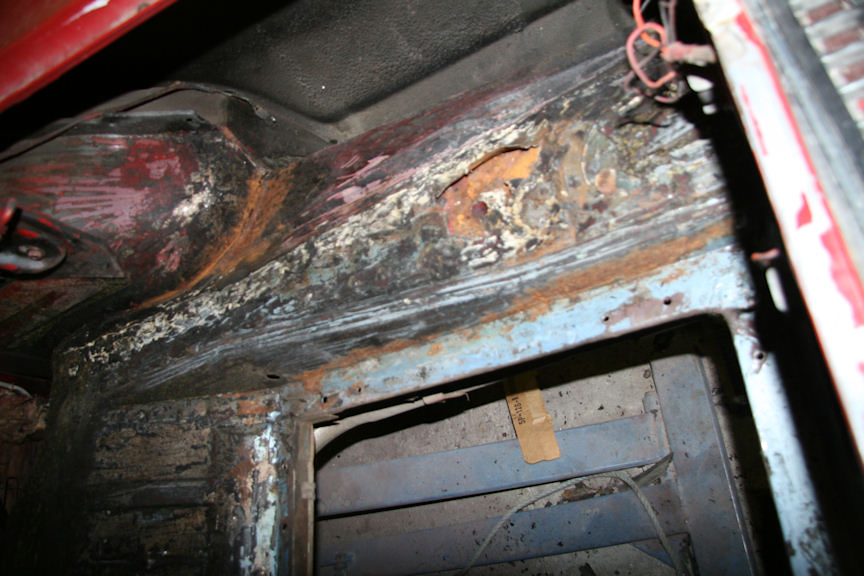
The trunk lid that was put on the car after it had been hit in the rear was rusty as well. Now I need a good one, so if you have a rust free 68 Trunk lid please send me a PM ![]()
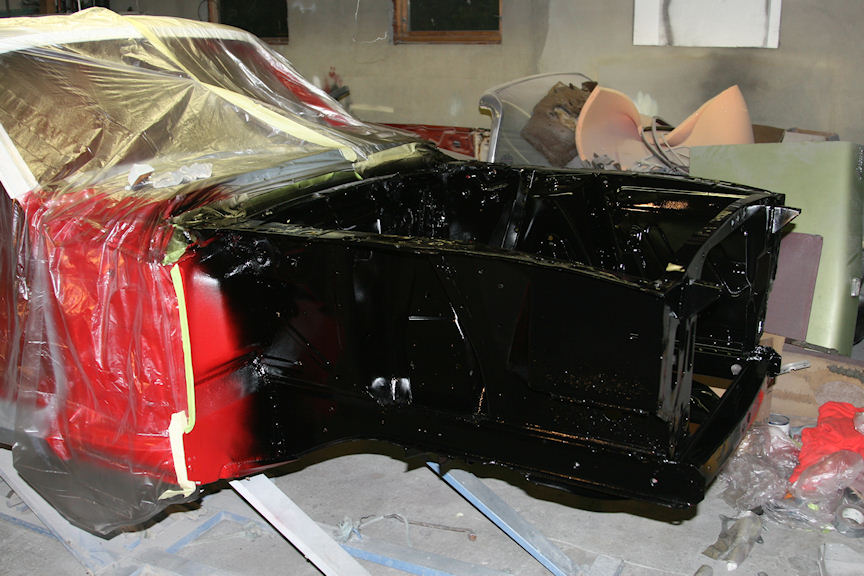
At this stage I decided I could just as well strip the whole car down to bare metal to see which other secrets the red paint was hiding. I can tell you that it was really exciting to take off all the bondo, which in places was almost 1 inch thick. The conclusion I have made is that bondo must be incredible cheap in the US, while a hammer to knock out the dents must be extremely expensive. I also found some patches welded on the top of the rust in the front and rear of the rear wheel openings. But otherwise it is a solid car.
Here you can see how it looked. Notice the front patch that covers the groove: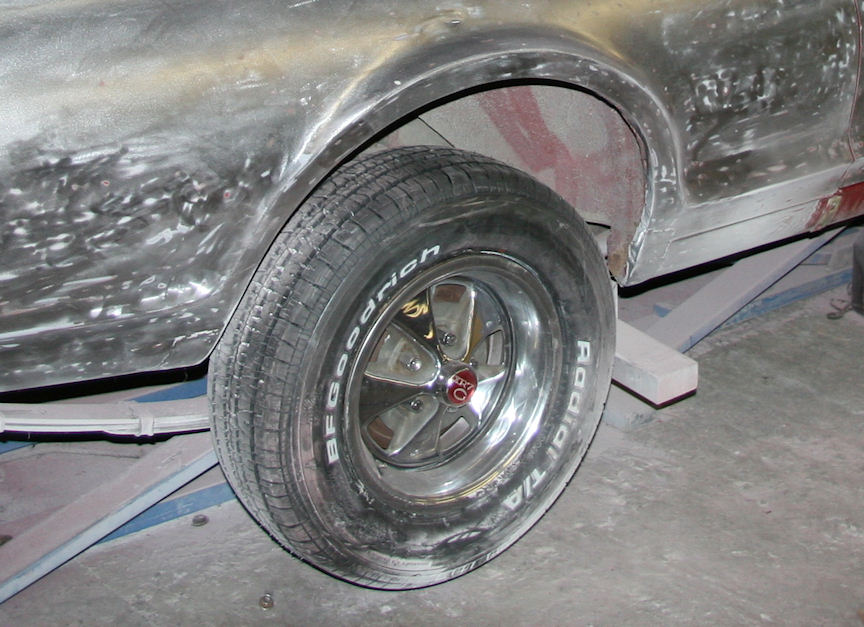
And here is how I like to do it ![]()
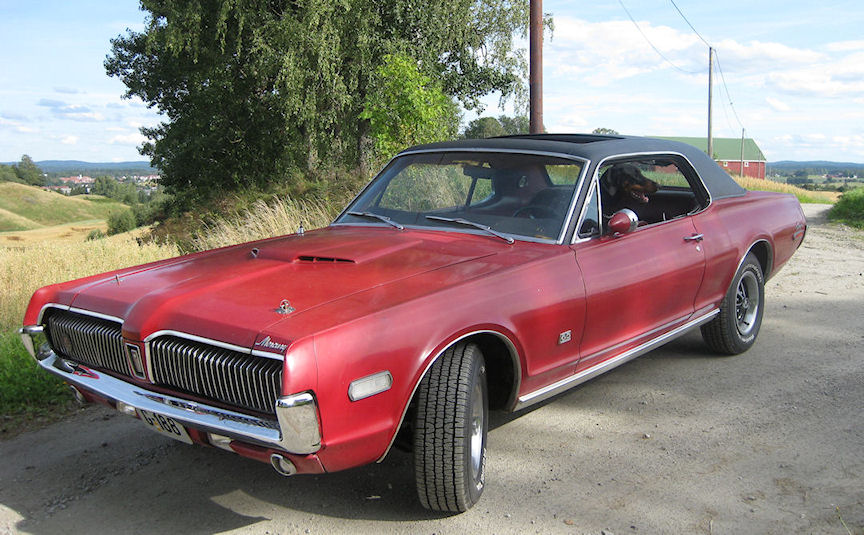
This is how the car looks today, April 17.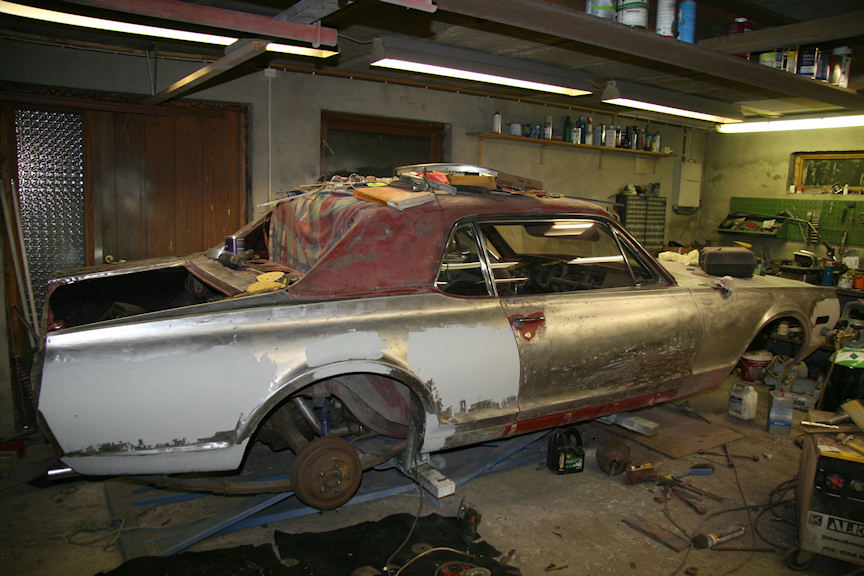
I did not do any major changes to the shock towers as I am not going to race this car. From the factory the heavy braces are just spot welded to the towers, and the cracks always starts out of these spot welds because of structural stress. This small modification will not really make the front suspension any stronger or add much to how the car drives, it will just prevent the shock tower from cracking. I will also put on the export brace instead of the cheap factory braces, which I think will add enough stability of the towers to make me pleased.
Another thing the sharp eyed reader will notice is that I've also done the Shelby drop. 
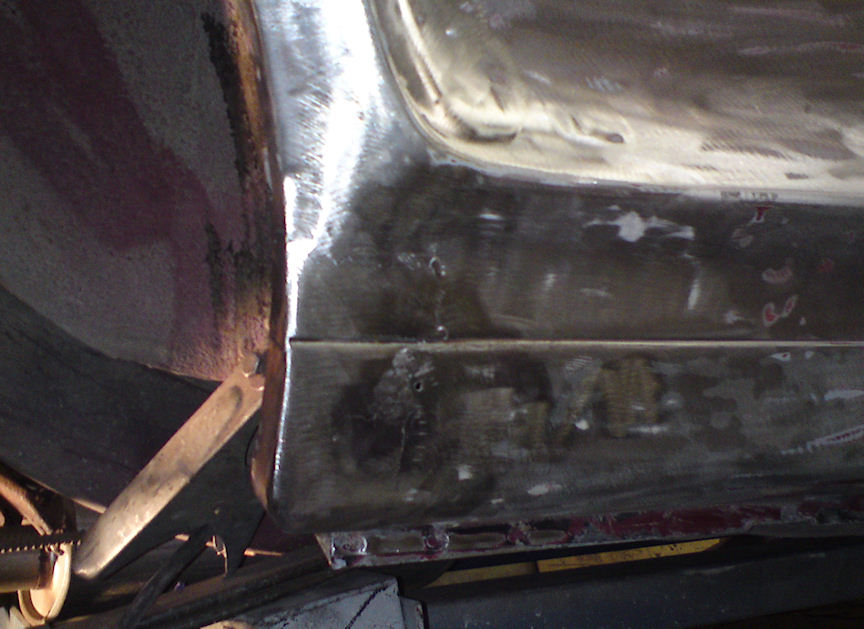
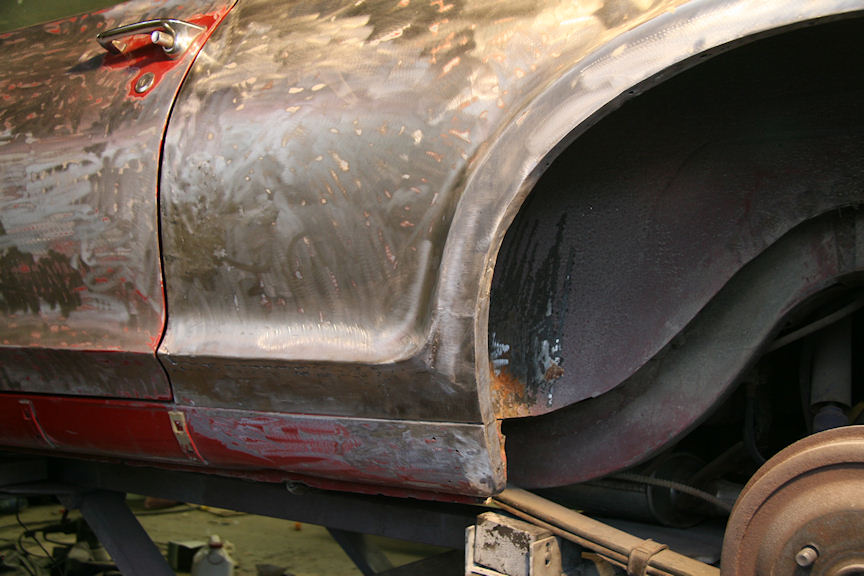
The left hand quarter panel did not line up good at all. It turned out that when it had been replaced years ago it was not done right, as they had the outer skin welded outside of the old skin at the door post and under the quarter window. I also found that the quarter panel was located about 1/4 inch too high on the car. As a result I decided to cut the panel off, cut out the old original panels where there was to layers and relocate the newer panel. There was also some common rust in the front of the wheel opening that I had to take care of.
When I started working on the car I was hoping to have it done before spring, now I hope to have the car painted in June and finished in July, but I am not sure if that will happen. 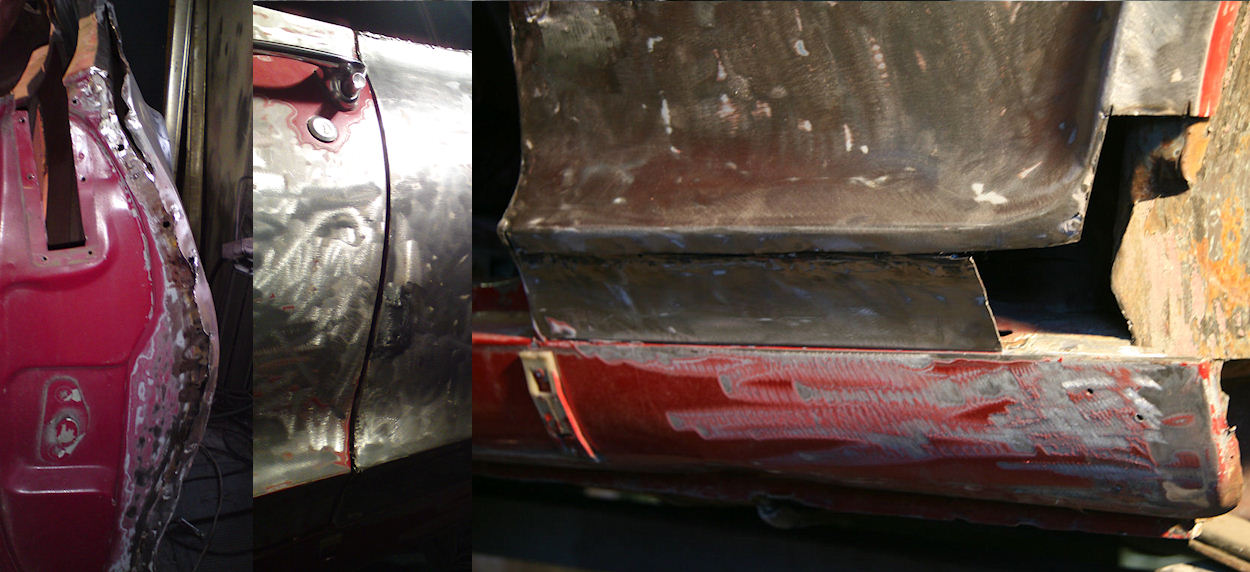
I am kind of picky when it comes to the bodywork, so even if I make plans for when I want to have the car done I take the time needed to become happy with the result in the end.
Anything else would be a waste of time and money.
Anyways, here are a couple of new pictures showing some finished areas. ![]()
Since I found some common floor rust and a bent rear frame, I decided to do a total restoration job on the car. That means taking the car totally apart, have the underside sandblasted and to do all the detail work on the underside as well. ![]()
Here are some pictures showing some of the misery. RH front floor was rusty as a result of a leaking AC and most of the floor under the back seat was bad too, most likely caused by mice living in the back seat.
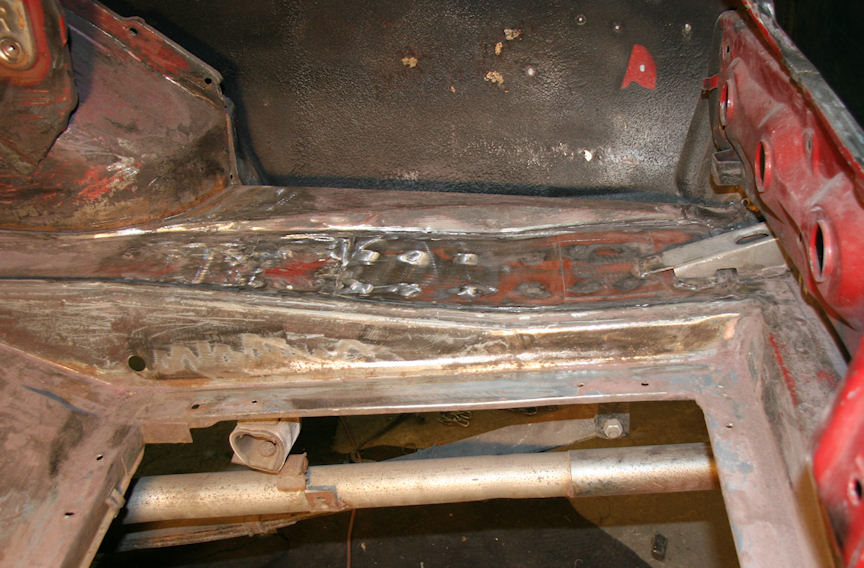
But the worst part was not the rust but a bent frame frame rail and lousy previous work in the trunk after the rear hit. Instead of trying to straighten out the bad floor sheet metal I decided to cut away everything that was bent and deformed and to make new parts . This also gave me the access to the frame rail from above so it could be straightened out properly. 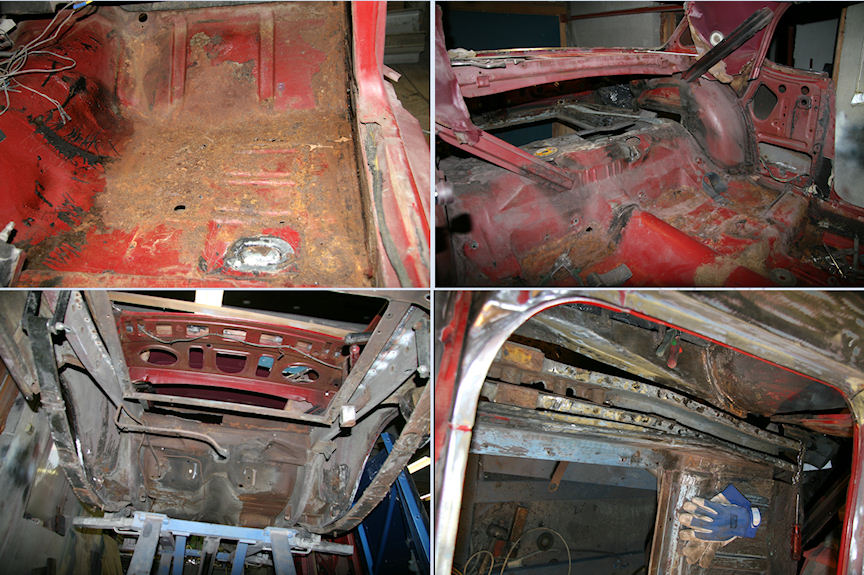
I bought the floor pan from WCCC and it is made out of nice and heavy sheet metal compared to some of the other floor pans you find out there. It still needed some massage in my hydraulic press to improve the profiles to look more like the original floor pan. 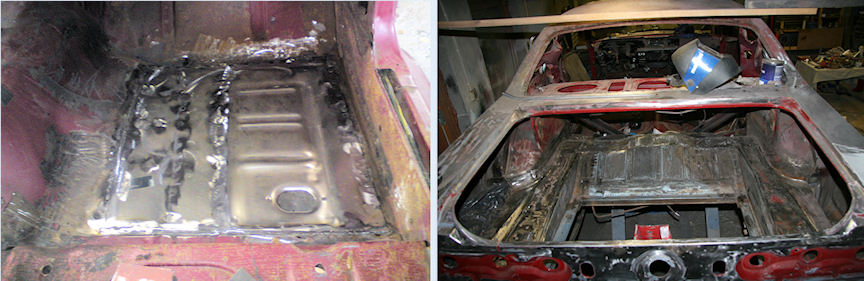
After I was done welding I had the body sandblasted.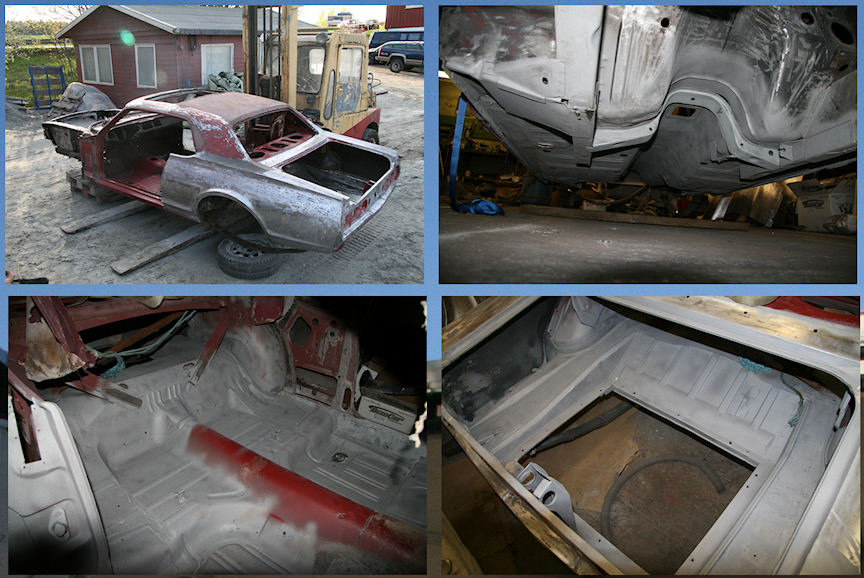
6-1-2010
I guess it is time for some updates again. As expected the sandblasting discovered a few more spots of rust rust, so I had to take care of that before anything else. When that was done I brushed on an epoxy sealer on all the welds to seal them 100%. The stuff I use was made for the off shore oil industry, and it is really good stuff ![]() Then I painted the trunk floor, inside , and under the body with a good epoxy primer. After the epoxy primer had dried I used an acrylic sealer on all the body seams to prevent water to get into places where it can cause rust. Then it was time to paint the underside of the body with a red original looking primer.
Then I painted the trunk floor, inside , and under the body with a good epoxy primer. After the epoxy primer had dried I used an acrylic sealer on all the body seams to prevent water to get into places where it can cause rust. Then it was time to paint the underside of the body with a red original looking primer.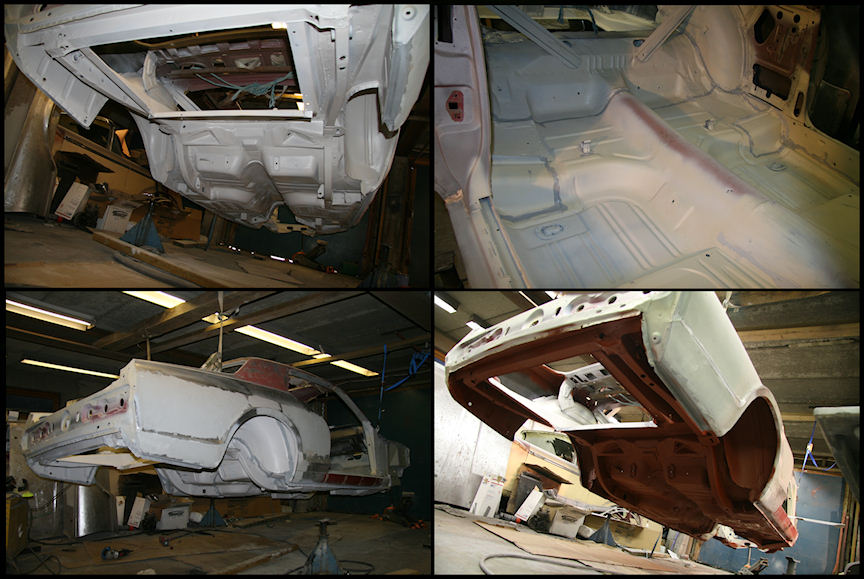
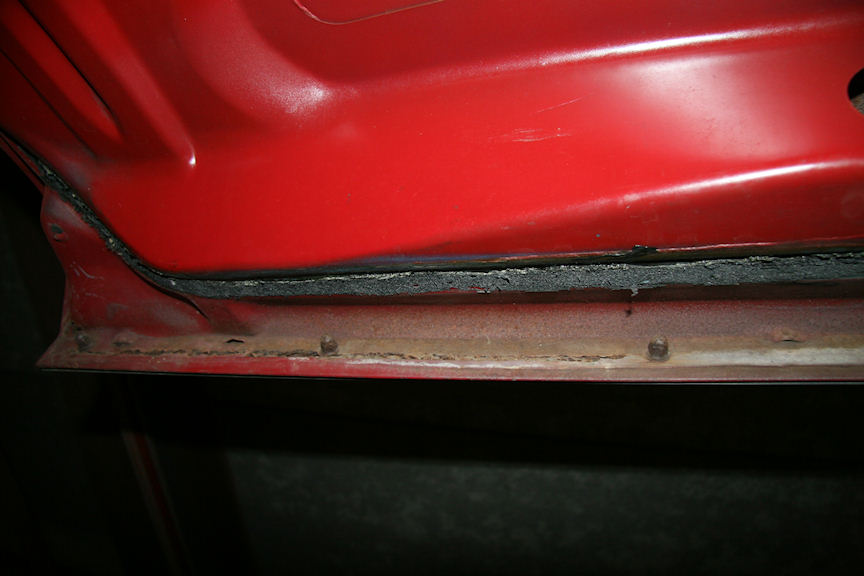
Both doors have been sandblasted here at home and while the drivers door was very solid, the passenger door had some common rust in the lower front corner. Both doors had lots of old dents that had to be taken care of and then I could start the paint prep work. I prefer to put the bondo directly on the steel and then paint the epoxy primer before the surfacer.
he trunk lid I found for my car is actually from a 69 Cougar that also had an Eliminator wing on it. As a result I had to relocate the key hole and wld the holes for the wing. Otherwise the lid was in good shape and just needed the regular paint prep work. 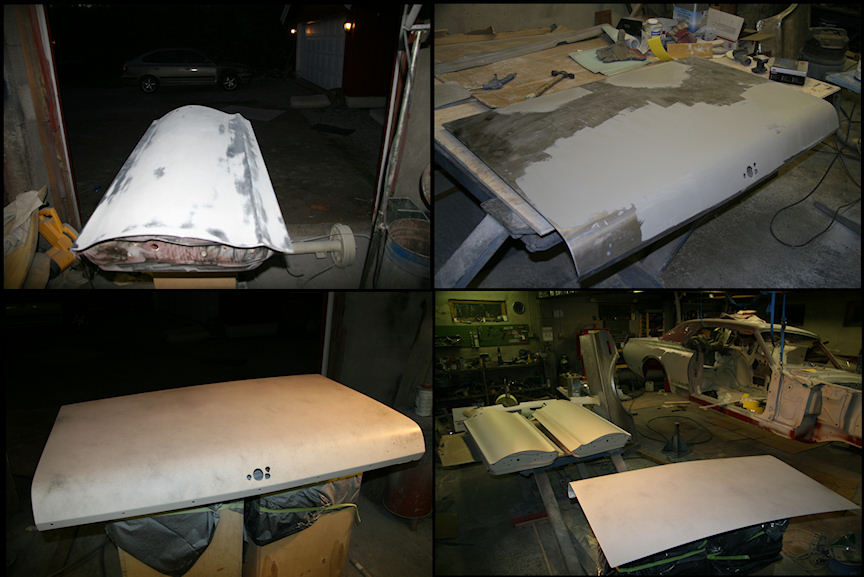
June 11th, 2010
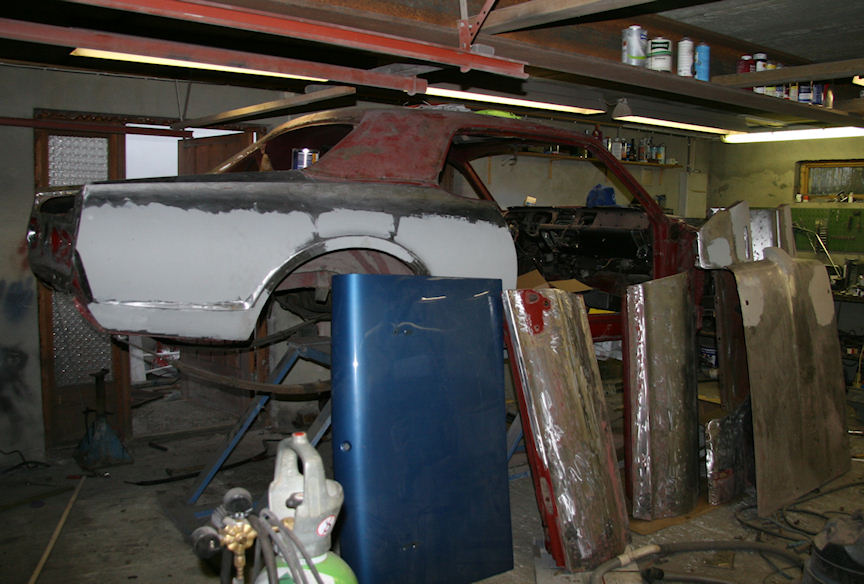
Things are going fine on the project and at this point doors, fenders, hood, trunk lid and valances are ready for the paint shop. Unfortunately it seems like the car will have to wait until August before it is getting painted as the painter got trouble with his back and now he is way behind. At least I can paint the underside of some of the parts here in my garage, so that is what I did tonight ![]()
June 27th
I guess it is time for an update and a few new pictures of the restoration work on my cat. But first of all I would like to answer the question from my friend down the street; Finding another painter is easy. Finding a another painter as good as the one I use is impossible ![]()
Since I posted the last pictures I have finished the bondo work on the quarter panels. It took a lot of work to make them nice and straight again, but I think they came out pretty good.
The roof, and especially the sun roof lid and the area around the sun roof had some pitting. I don't like to sandblast the roof of a car, so I decided to remove all the deep rust with citrus acid. I made a mixture of acid and wall paper glue and got a pretty sticky goop that I brushed on the rust and then covered it with plastic to prevent it to dry up. I then left it there for about 12 hours before it was removed and I washed the steel with lukewarm water and could brush off the remaining rust. Not too surprising I found a few pits that were so deep that I needed to add some metal with my welder. Then I brushed the clean steel with the special epoxy before the roof and quarter panels got a nice layer of epoxy primer.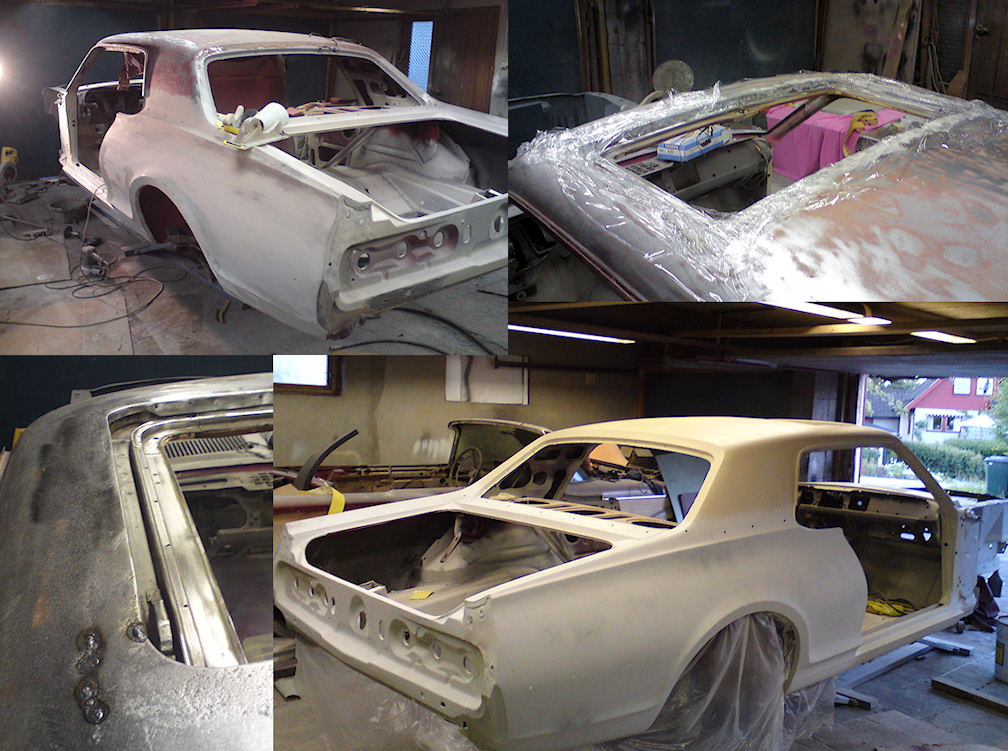
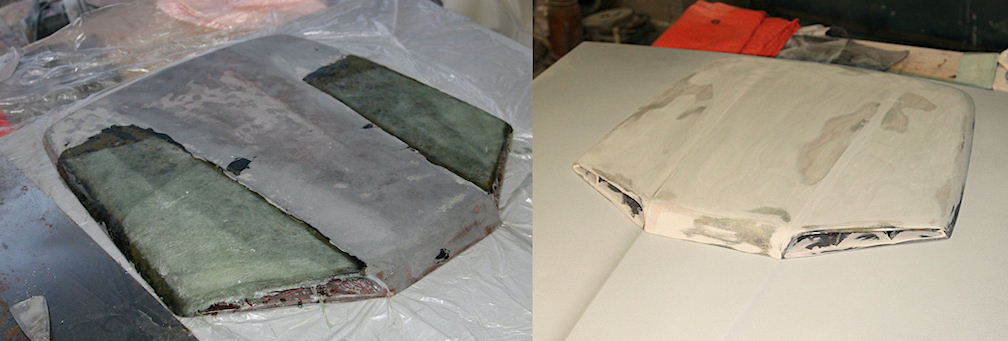
The hood scoop on my car was in miserable condition, and I have very little experience with fiberglass work. The problems was that it was heavily cracked and it was warped totally out of shape with most of the scoop sagging.
Some previous owners has tried to compensate for the sagging with a lot of bondo, which of course made the scoop more heavy and likely made it even worse in the end.
After a some thinking I decided to grind away most of the original fiber glass so the remains of the original scoop was a very thin shell of the scoop and the front simulated air intakes. Then I made some supports that I put inside of the scoop to press it back into shape and bolted the scoop to the hood. That way I had a perfect base for making an almost new scoop with fresh new fiberglass and resin. I used 4 layers of fiberglass mats and a quart of resin, and after it all cured (and a lot of sanding) I got a perfect looking scoop for my car ![]()
June 30th, 2010
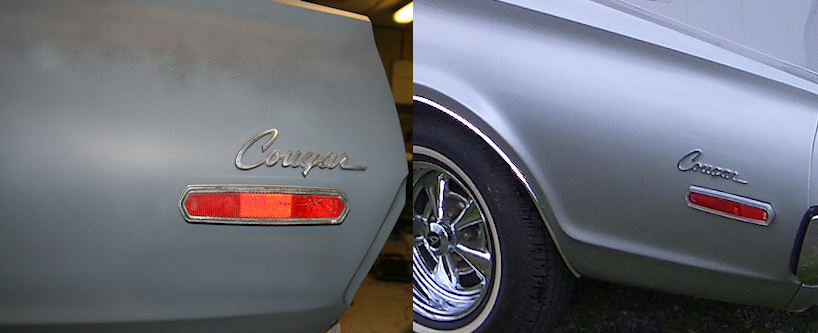
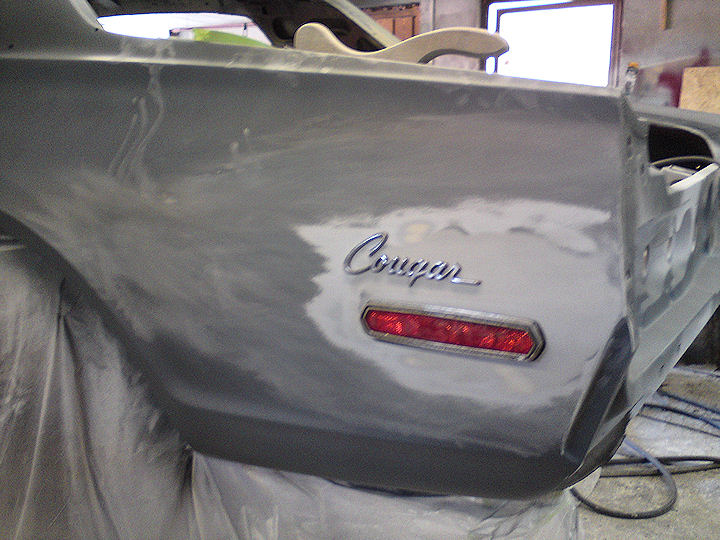
Well, nobody is perfect, and tonight I realized that I had overlooked one mistake that has been made on the car by the person who replaced the left hand quarter panel a long time ago. The emblem on the quarter panel isn't located where it is supposed to be. Of course I found this out after I put on the final primer coats. . . Now my dilemma is, should I weld the holes and relocate the emblem to the correct position (which will be a lot of work at this stage), or should I just leave it as it is and pretend that this is the way my car was built ![]()
July 1st, 2010
The first thing I was thinking about when I woke up this morning was the Cougar emblem... And I immediately knew I didn't want to wake up another day thinking about it being in a wrong place. Well, it turned out that the reflector also was misplaced so I had to move it 1/2" up on the quarter panel and about 1/4 inch backward.
Now I am happy again ![]()
July 2nd, 2010
Finally time for some paint. Because I am so cheap I decided to paint the roof with some left over paint from my shelf, all the time it later will be covered by the vinyl anyways. Well, one thing often leads to another... Does anyone know if all the Hertz cars had a black top? Right now I am tempted to go for a white top as I think it looks a lot better than the black one. Unlike my other 68 Cougar where the Marty report says black vinyl top, the report says nothing about that on this one. 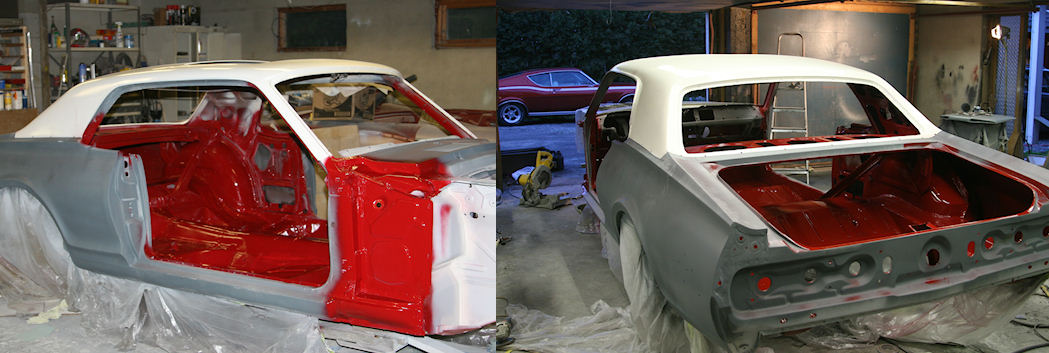
July 3rd, 2010
Here is the buck tag. I have a feeling that this car never came from the assembly line with a vinyl top as the drip rail moldings are the same as on cars without a vinyl top. My green 68 with sunroof has the other type moldings for cars with vinyl top. Or maybe the moldings something on cars from a specific date? :thinkuh: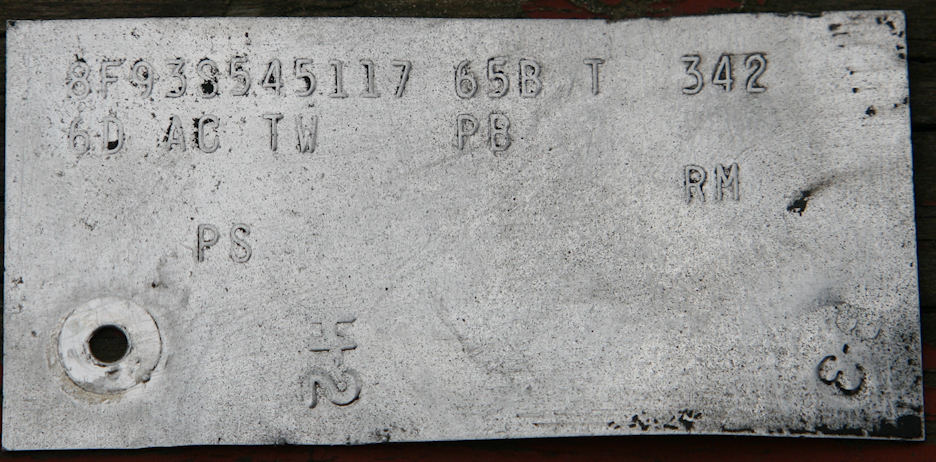
Painting is fun, and I started the day painting he underside of the trunk lid and to apply the red "overspray" under the car to kind of make it look like it did from the factory. Then I painted the front of the engine compartment semi gloss black. Finally I also had the rear axle painted, but before I did that I took it apart draining it from old oil and putting in new seals and gaskets. I believe that this is always needed as 40+ years old oil, seals and gaskets usually are no good and that it is just a matter of time before you get into problems which again might make some of you think your cat is cursed :1poke: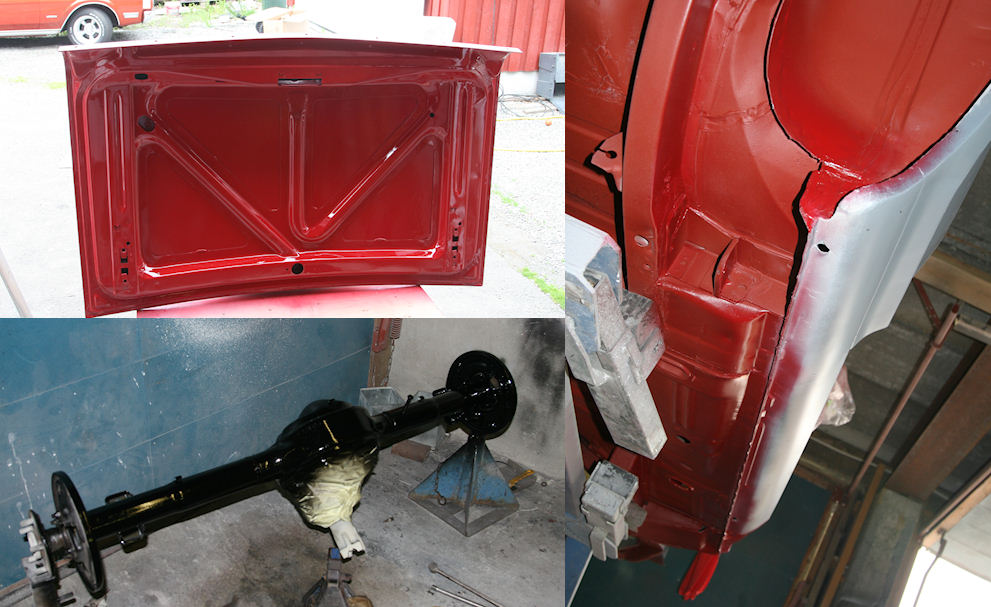
July 11th, 2010
As you might have guessed, the Cougar XR7-G is not my first restoration ![]() I started to restore my first car, a 1961 Monterey convertible about 33 years ago. There has been a few since then, and this is my second Cougar.
I started to restore my first car, a 1961 Monterey convertible about 33 years ago. There has been a few since then, and this is my second Cougar.
Now for some updates. In the picture below you can see most of the suspension and steering parts with fresh paint and ready to be installed. The front suspension on the car was totally worn out when I bought the car, and everything is new except for the front springs. For the steering I have rebuilt the steering gear and the power steering. The tie rods are still the originals that were cleaned and painted before they got new grease and dust caps.
You can also see all the nuts and bolts on the pink sheet that I had restored and electro plated. This helps giving everything a more authentic new car look. 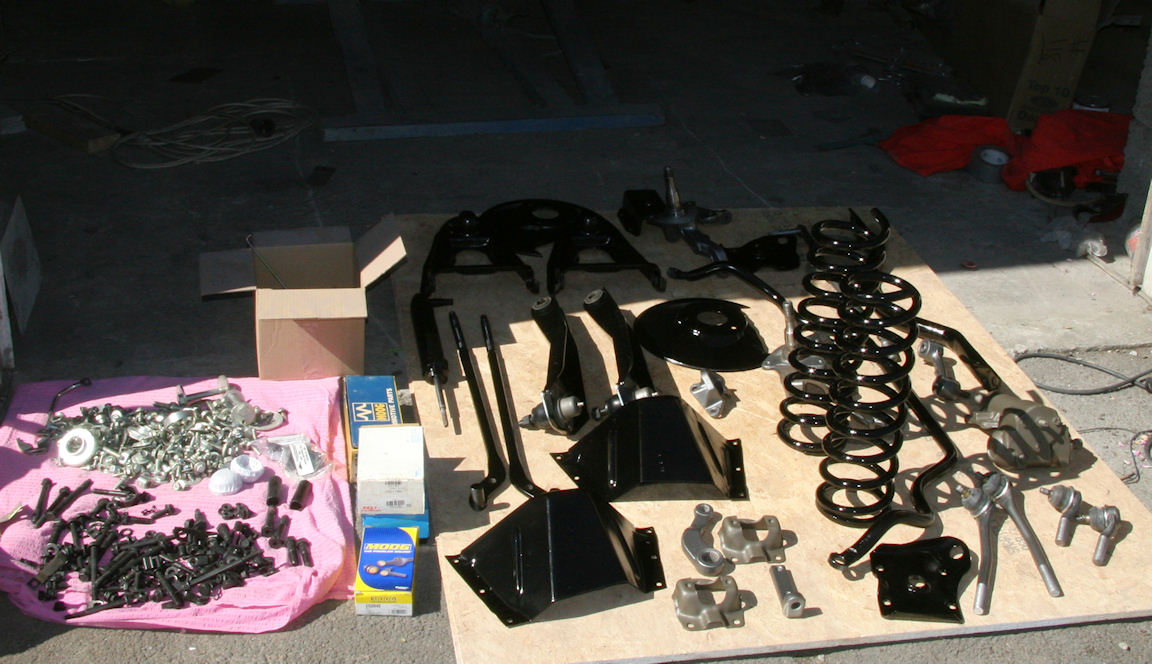
Here is the rear axle ready to be installed on the car.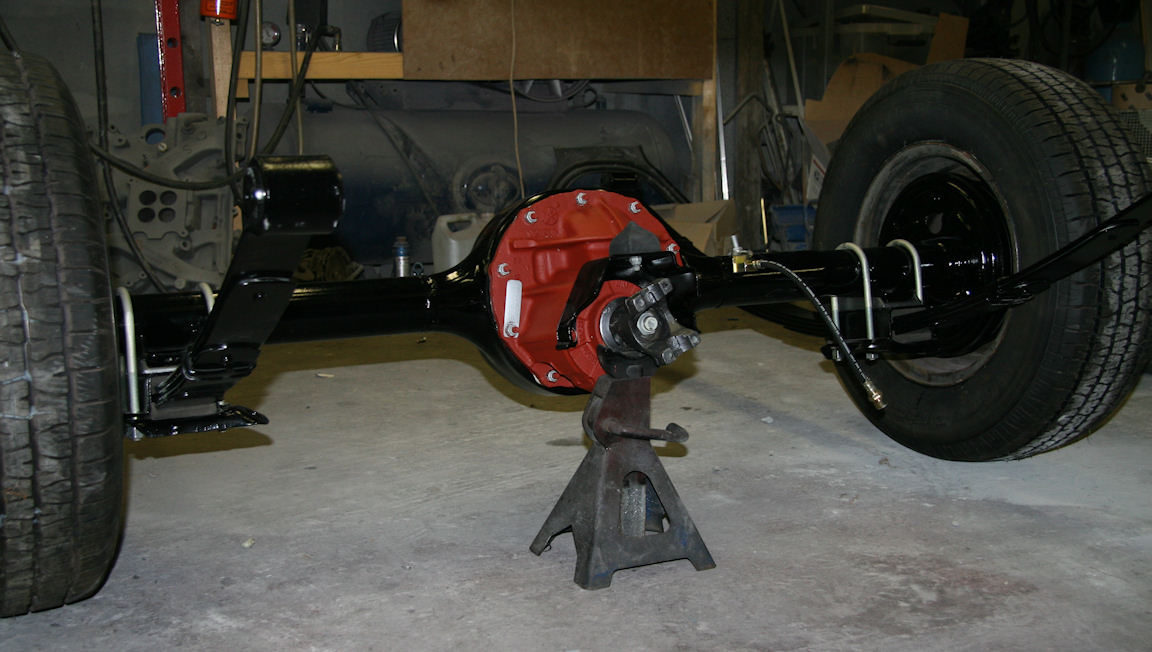
Here I am more or less done with the suspension, steering and front brakes. 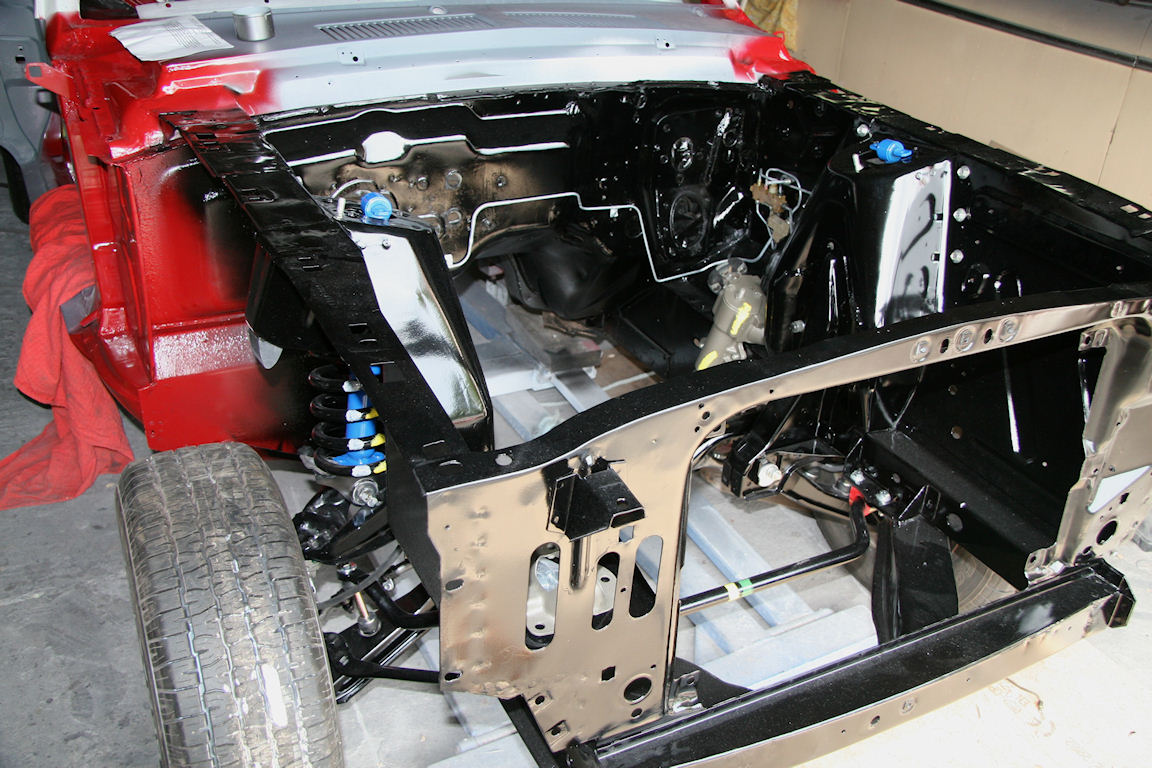
July 26th, 2010
Things are going rather slow on this project right now. I am waiting for the paint shop to get time to paint the Cougar and I am also waiting for parts like exhaust system, gas tank, side glass, fuel and brake lines, new parking brake cables and so on to arrive from the US. Here is a picture showing the boxes that is on their way to me by container freight. Living in Norway and restoring old cars takes a lot of patience as shipping of parts takes time. 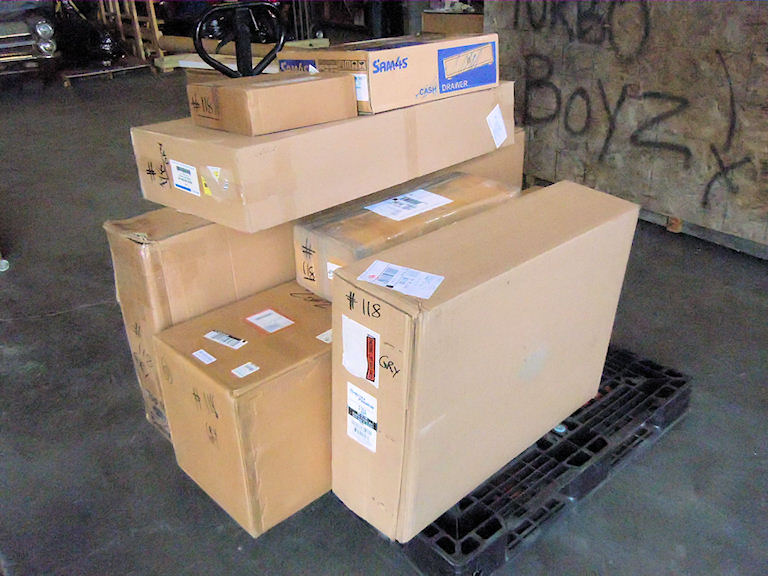
FFR428 asked what plans I have for the engine. Right now I am thinking about building a 428CJ for the Cougar. I will use the 390 GT heads, manifolds and probably also the original "light weight" ![]() intake , so when I open the hood it will look almost original. That is with one exception, I will not put on the smog system as I don't like the look of it at all. Some years ago I restored a 67 Mustang with a similar engine, and it was very fast and a very fun car to drive!
intake , so when I open the hood it will look almost original. That is with one exception, I will not put on the smog system as I don't like the look of it at all. Some years ago I restored a 67 Mustang with a similar engine, and it was very fast and a very fun car to drive!
To be honest, I am not really much into building engines, but I am trying to put something together based on advices and what I have read on the Internet. So far my plan looks like this:
TRW Speed Pro forged pistons.
Original rods with ARP High Performance Series Connecting Rod Bolt Kits
Clevite bearings
Melling HV oil pump
Cloyes timing chain.
So far I have not been able to figure out is what cam shaft to use. In fact I have found it extremely hard to find out what to go for, so maybe some of you guys have some great suggestions? I have been wondering about a Lunati Voodoo 62001 or something from Comp Cams. . . I need good vacuum and something that will work with the original converter, but I also want POWER... LOTS OF POWER :lolani:
So now you know pretty much what is going on here.
July 29th, 2010
I bought the 428 CJ block and crank yesterday. Royce suggested Comp Cams 268H or 260H. Unfortunately I don't have a ton of money right now as the restoration of the Cougar has become so much more than I planned in the beginning. Anyway, I am sure I will be able to build a nice engine that will bring the Cougar up to the speed limit in a timely manner. :lolani:
August 20th, 2010
Finally I can show you some new pictures. The car had now been resting since June and it was ready to be sanded until the surface is ready to be painted. Even if the Cougar is a rather small car, it takes some time to get it finished. I prefer to wet sand the primer using a block wherever it is possible. That gives me full control of the result and the perfect result a show condition paint job requires.
Here you can see the hood and the scoop done and ready to be painted.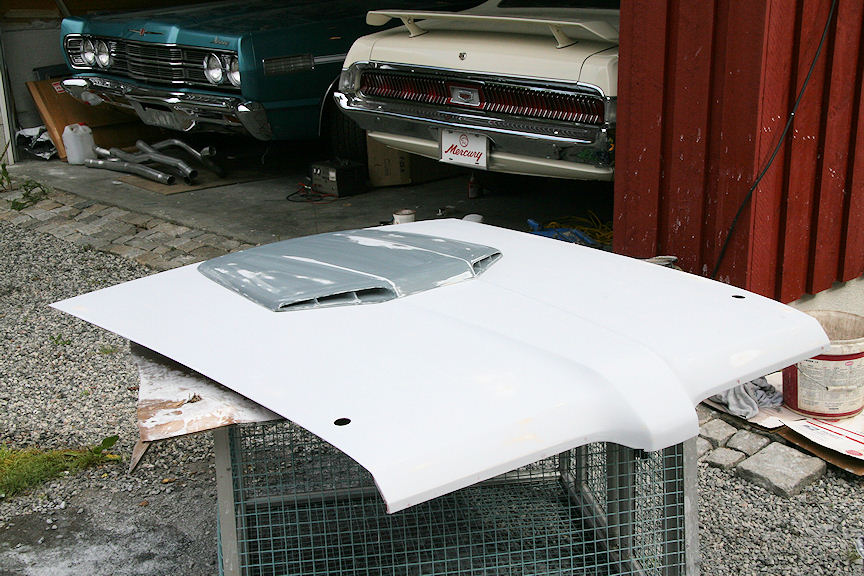
Then it was time for paint. For paint we decided to go for Dupont Centari 6000 base coat / clear coat system. Now the car and all the painted parts will be resting over the weekend before the clear coat will get block sanded and several new layers of clear will be sprayed to give it an even greater depth and shine.
So here is how it looks tonight (Norway time) 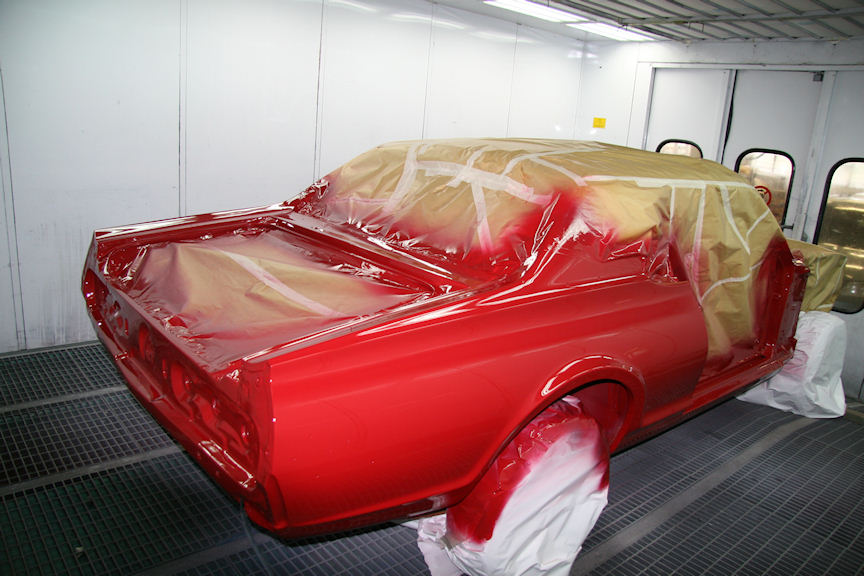
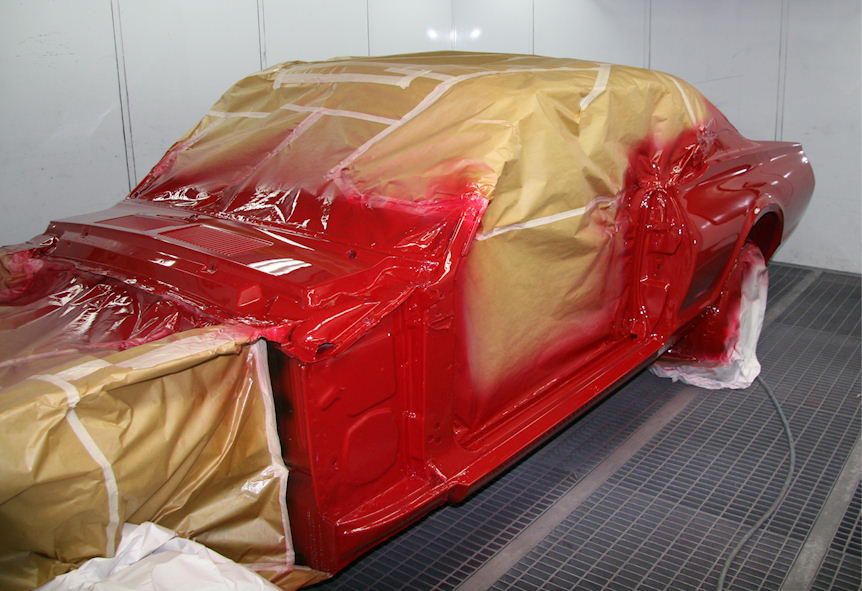
To see the cardinal red fresh and nice like this made me change my mind about the color. I was not too enthusiastic about in the beginning, but wow, it sure looks awesome.
I also forgot to mention that my 428 is being built at the engine shop right now. Now I will have to start to hunt some parts I am missing for the car. At least I need new wiring for the doors, new emblems, new front and rear side markers and also a far better looking grille. I think I also will have to find a set of NOS wheel opening moldings and new rocker panel moldings to match the shiny paint. Anyone here who can recommend a good place to print some fresh dollar bills? ![]()
November 17th, 2010
It has been a while since my last update, so I guess it is time to show you what I've done since August.
First of all, I went to the US for my much needed 3 weeks vacation together with a good friend and also Cougar owner. On our round-trip we visited Bill and Debbie Basore who has a nice collection of XR7-G's and a few other rare Cougars. It was extremely interesting to study these cars and I also want to say thank you to Bill for sharing of your vast knowledge and information about the 67/68 Cougars to me and the Cougar community in general.
The picture is showing, from left to right, XR7-G 428, Debbie , Bill, Me and finally the red Cougar GTE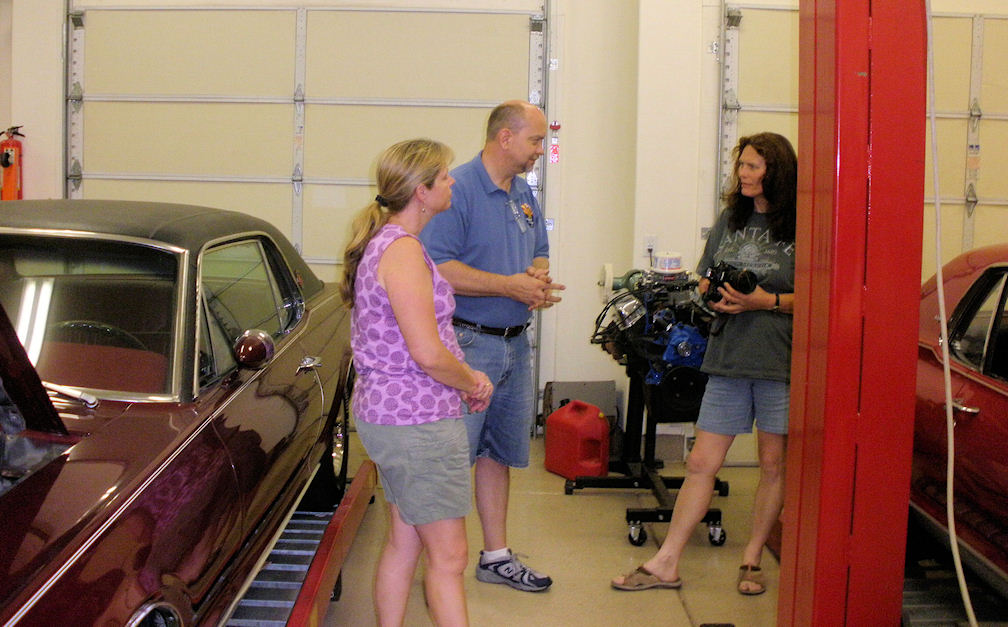
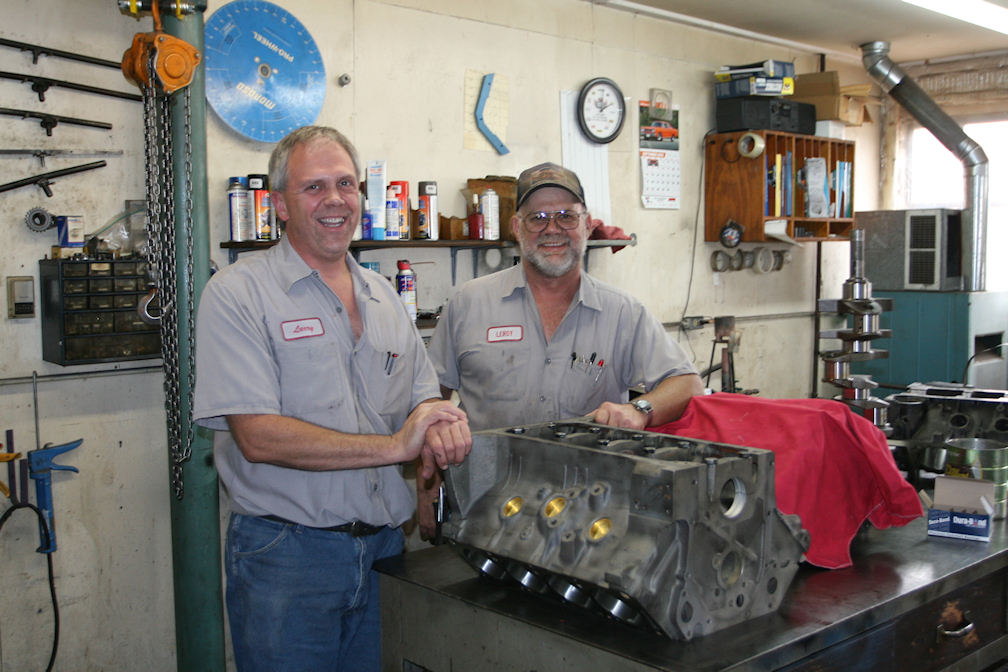
We also went to Kansas to see the shop that was building the 428 for my Cougar. At Walt's repair and Machine shop they were preparing to install the crank when I came there, and everything looked really good.
Back home again I decided to start with the heater and AC. After an inspection I found that it needed a new heater core and new gaskets before I could put it back in place under the dash. 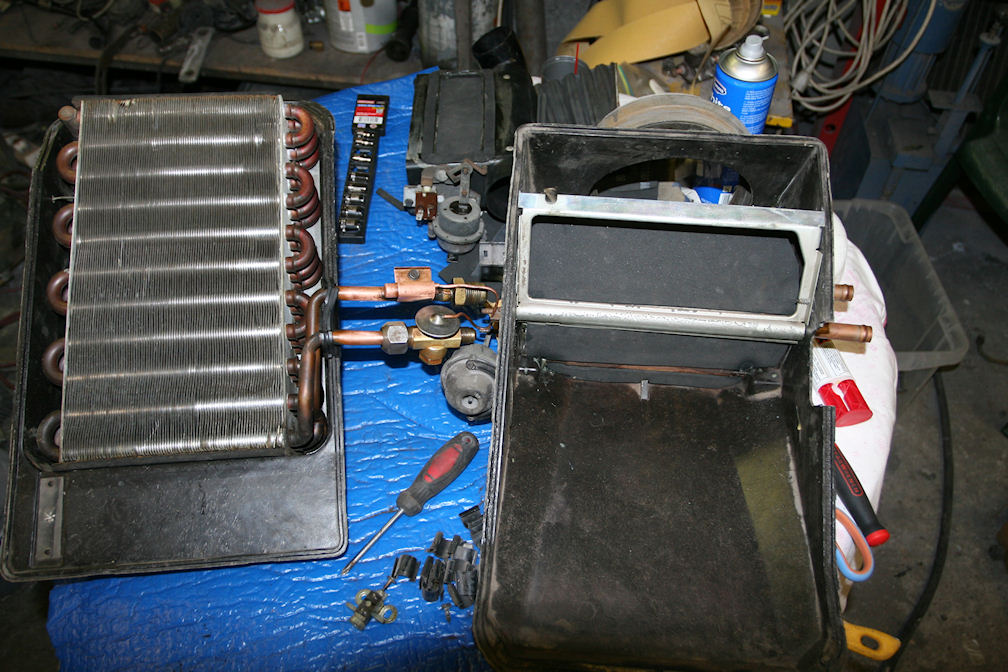
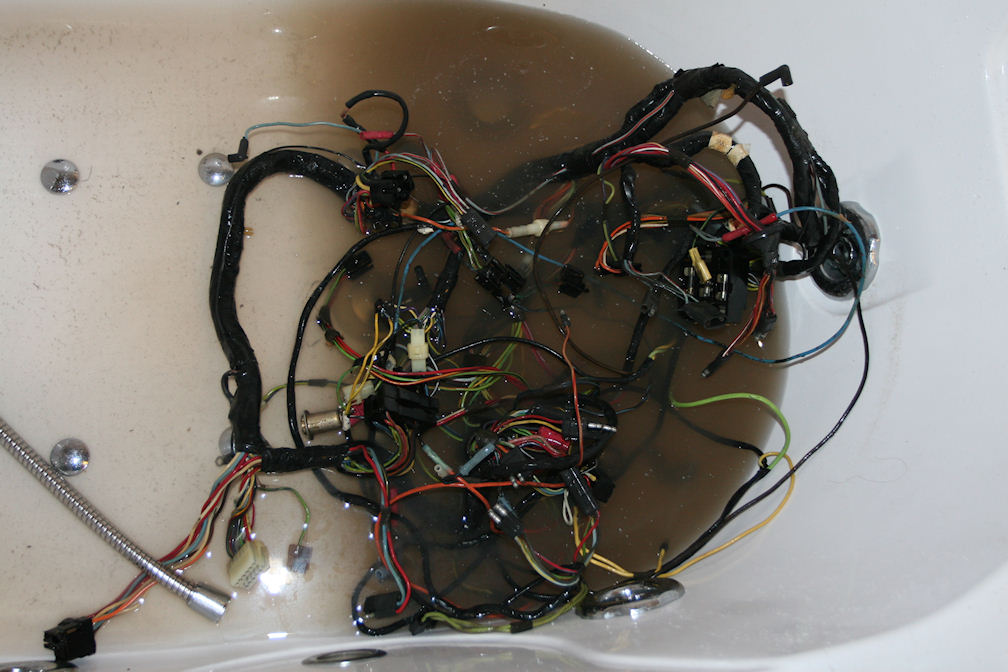
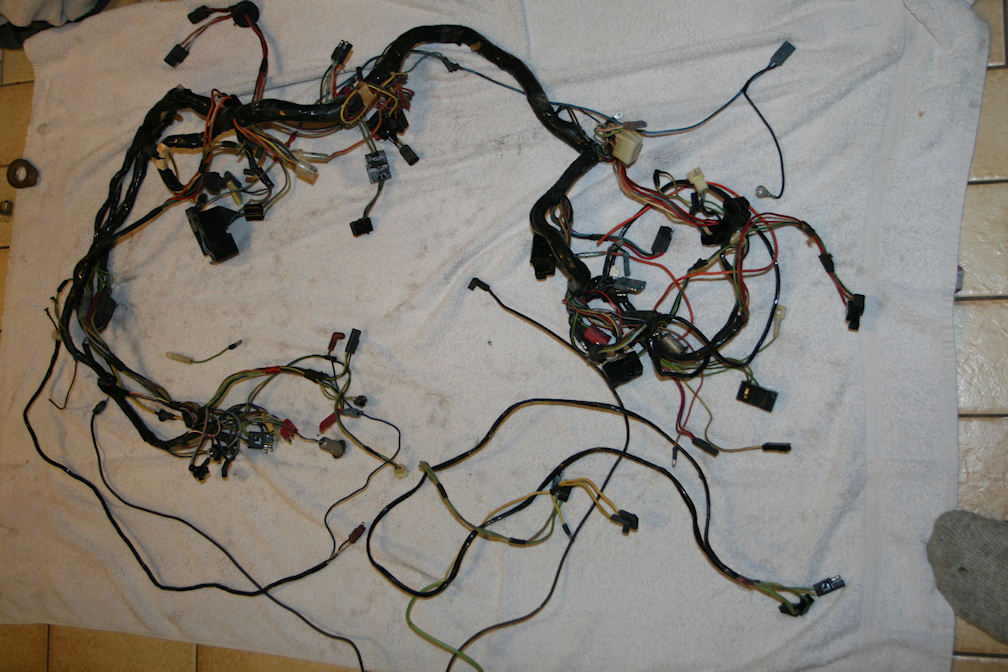
The under dash wiring was really dirty and greasy. In fact everything under the dash on the car looked like it had been covered with a thin coat of oil, probably oil damp from the engine coming through some holes in the fire wall. I decided the put the whole loom in my bath hub with hot water and detergent. Then I flushed it with warm water and dried it and it looked like brand new again ![]()
Here is the Heater and Air conditioner and the wiring back in the car. It sure takes some time to get everything right. BTW, I also had the dash painted the correct carcoal grey metallic before I installed everything. 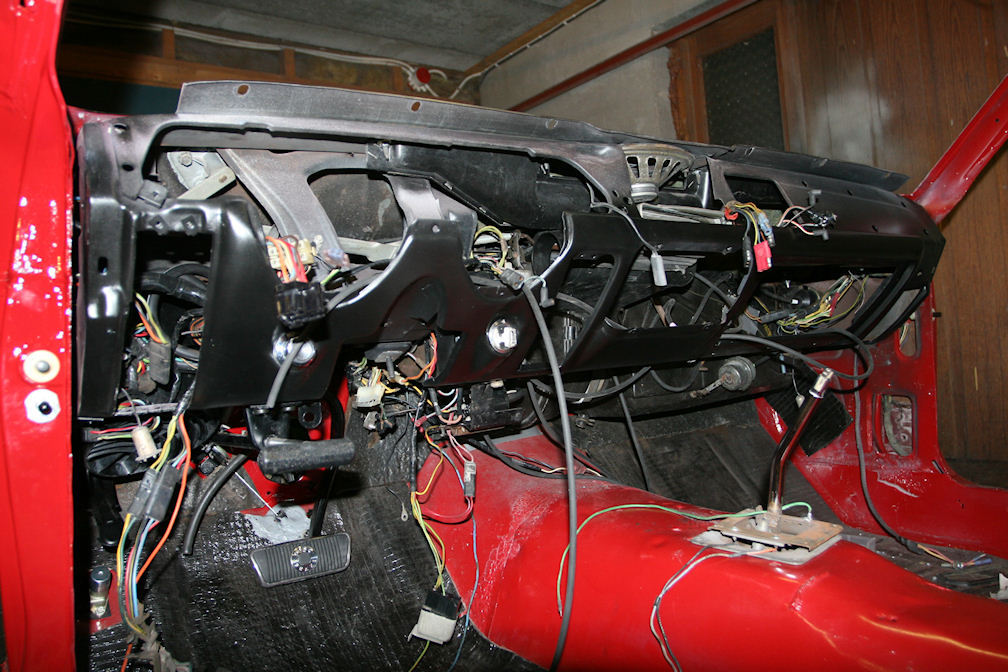
The head light switch turned out to be defective and I did not have any extra Cougar switches here. What I did have was a few new Mustang switches, so I just transplanted the switch part on to the Cougar switch plate with the vacuum switch. This is really easy and it is exactly the same (also waty cheaper than a Cougar switch ![]() ). All it takes is 3 small screws to replace the original rivets that I had to drill out.
). All it takes is 3 small screws to replace the original rivets that I had to drill out.
The picture is showing the rebuilt cougar headlight switch and an original Mustang switch. 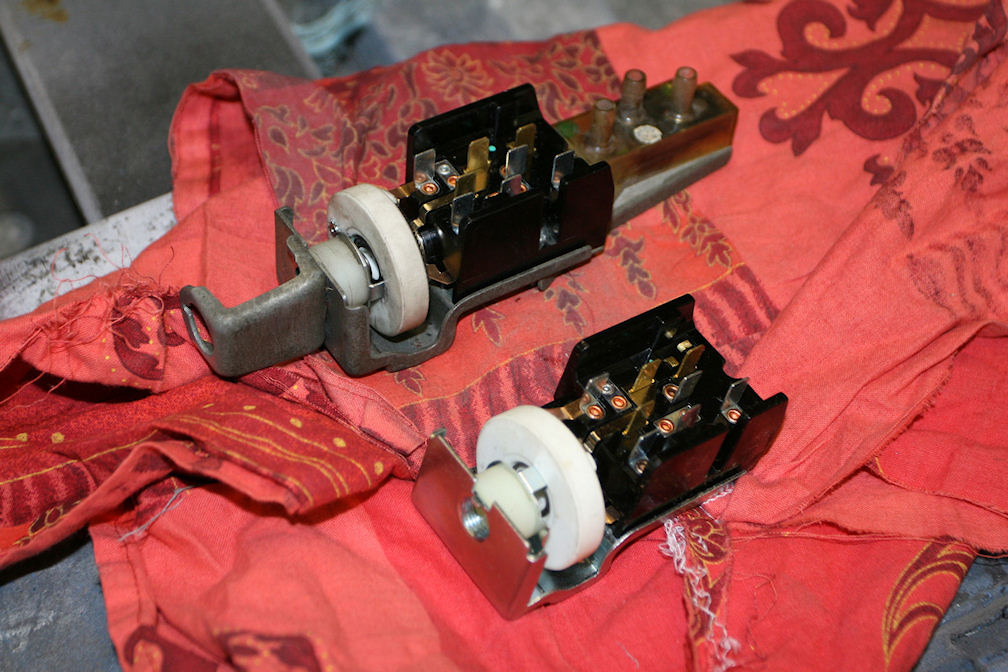
When I sent the car to the paint shop I had to put in a defective power steering valve to be able to steer the car. The original power steering valve housing was also worn out, so I bought a rebuild kit for it and had it rebuilt before it was installed. 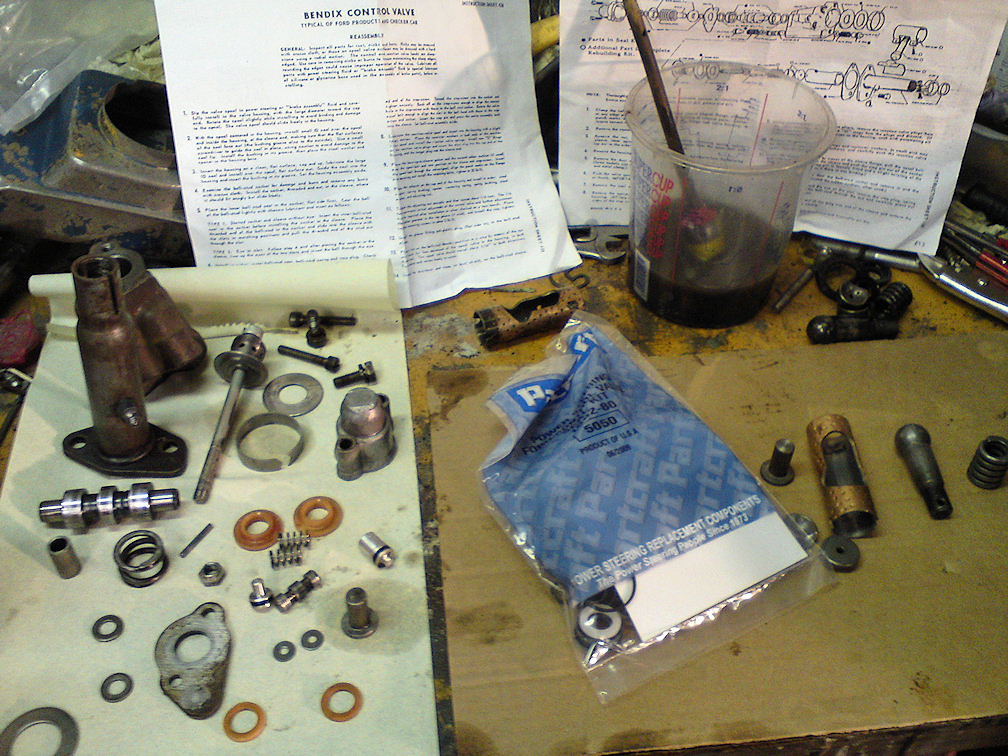
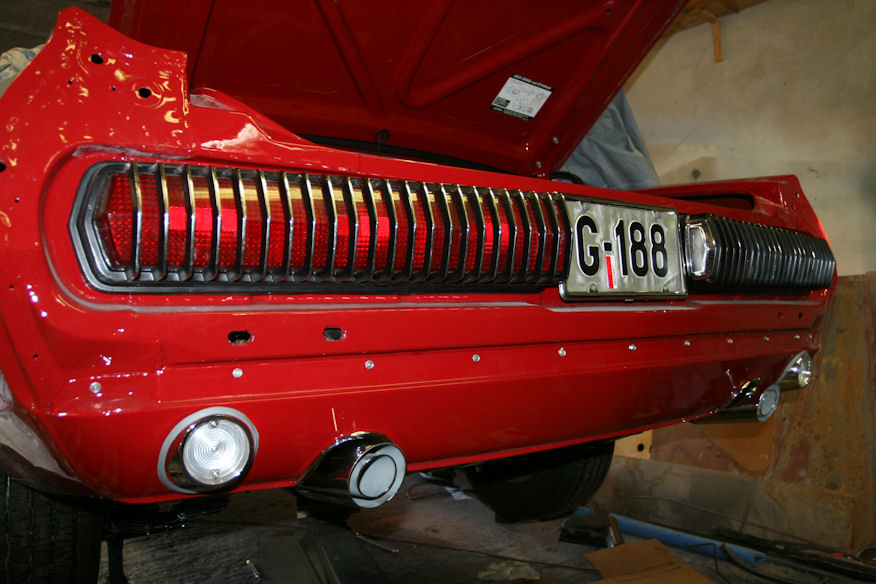
When I was playing with the wirings I decided to repaint the taillights and to polish the lenses. They came out good, but I will probably replace the lenses later. As you can see here I have also installed the deck lid and the lower valance. When I bought the car the original valance with the exhaust cut outs and chrome was missing. Now it is all there and it sure looks better this way ![]() The emblems on the trunk and the chrome for the lower valance are new excellent reproductions from WCCC.
The emblems on the trunk and the chrome for the lower valance are new excellent reproductions from WCCC.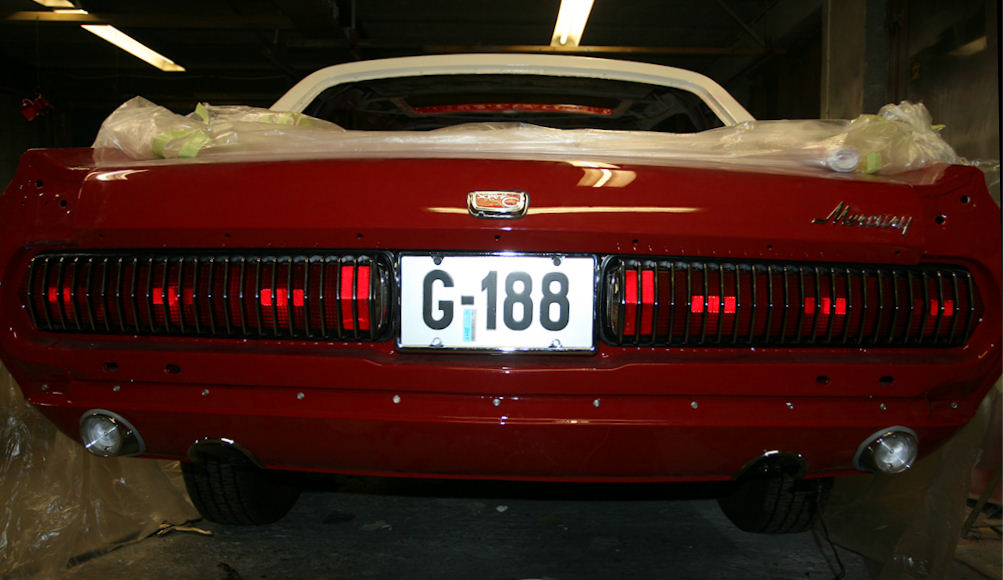
Under the car I have installed new original looking emergency brake wires. I really dislike the more common style with the black nylon housing and when I found a supplier for the original looking ones it made my day. The brake lines and new and made in stainless steel. Same thing with the fuel line. As you can see I also had a new gas tank installed. 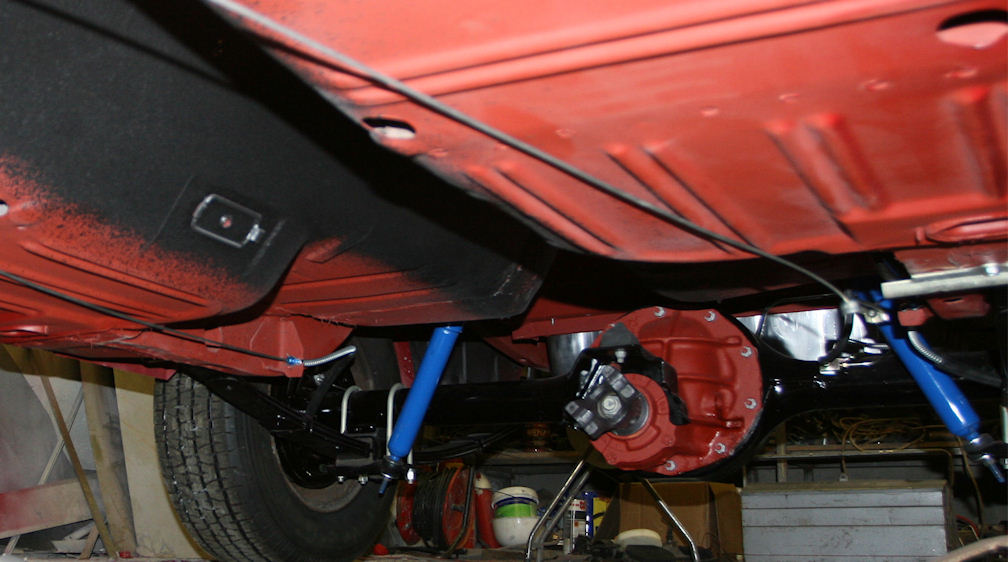
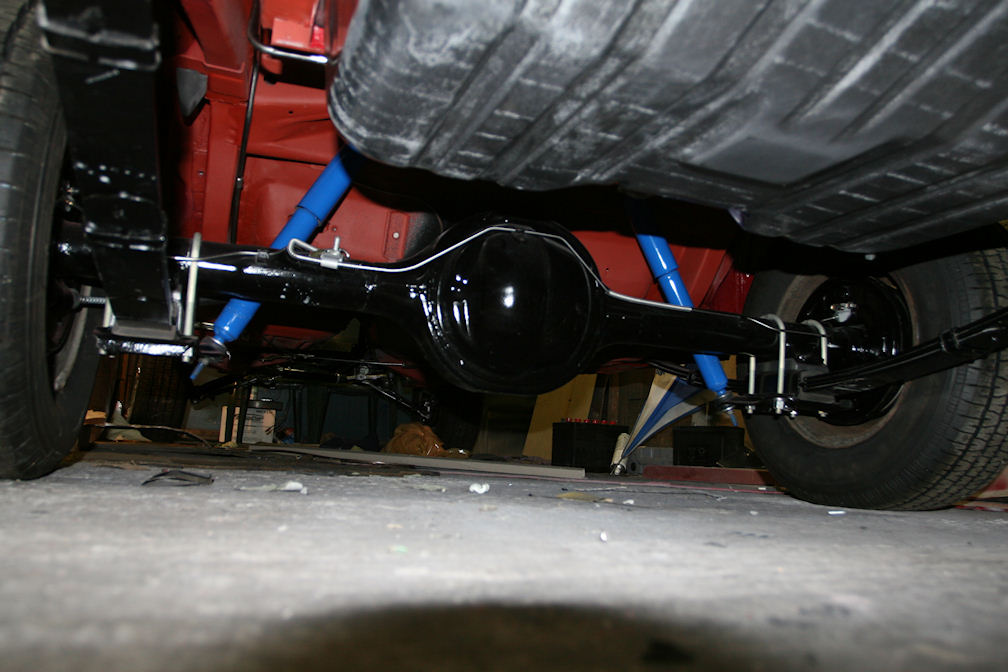
At the same time I had the rear brakes done. New wheel cylinders, shoes and installation kits should give me brakes good enough to stop the car. 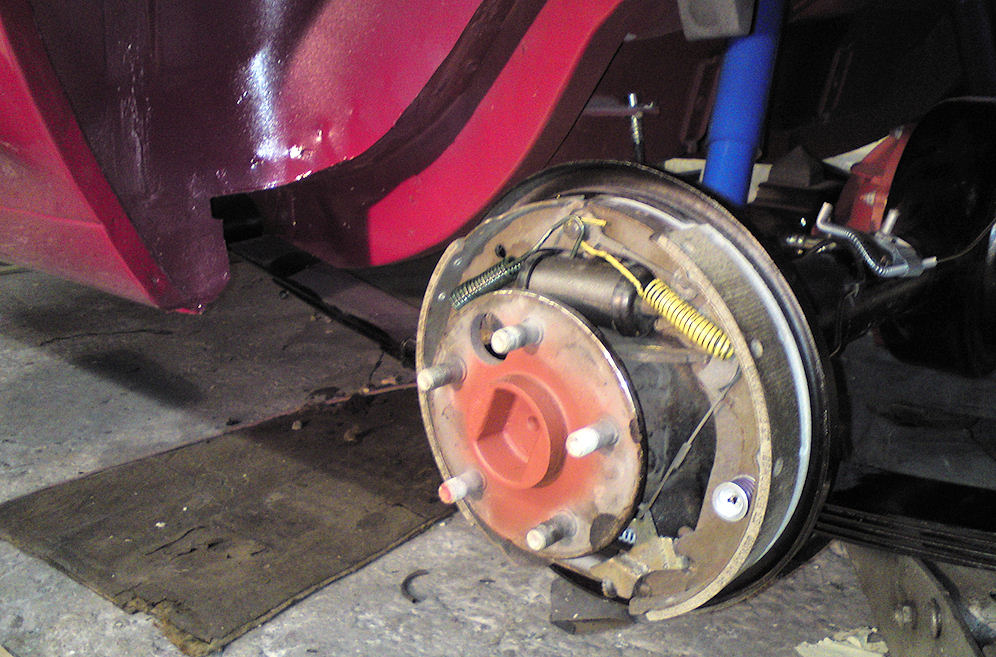
When I was going to install the reproduction parking lamps in the front valance I found that the wirings is totally different on the Mustang and Cougar. As a result I had to remove the bulb sockets from the lamps and install the sockets and wirings from the Cougar lamps. Small things like this makes it more challenging to restore a Cougar vs a Mustang. 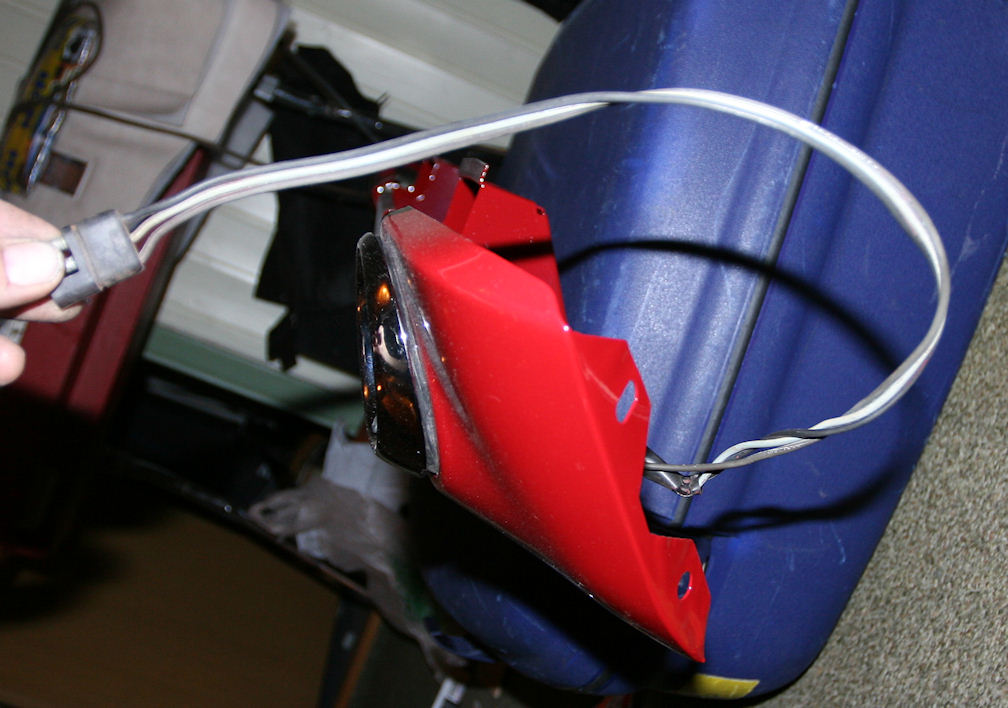
When I had the car painted there was a few parts I was not happy with. Both the quarter panel extensions I had were cracked and dented and the center grille piece was really twisted and out of shape. As a result I decided to put these parts on hold until I could find NOS parts. Finally I have them and they are going to the paint shop this week. Even NOS extension does not fit perfectly, (maybe because the car had been hit in the rear? ) so I made a few minor adjustments to make them line up perfect. 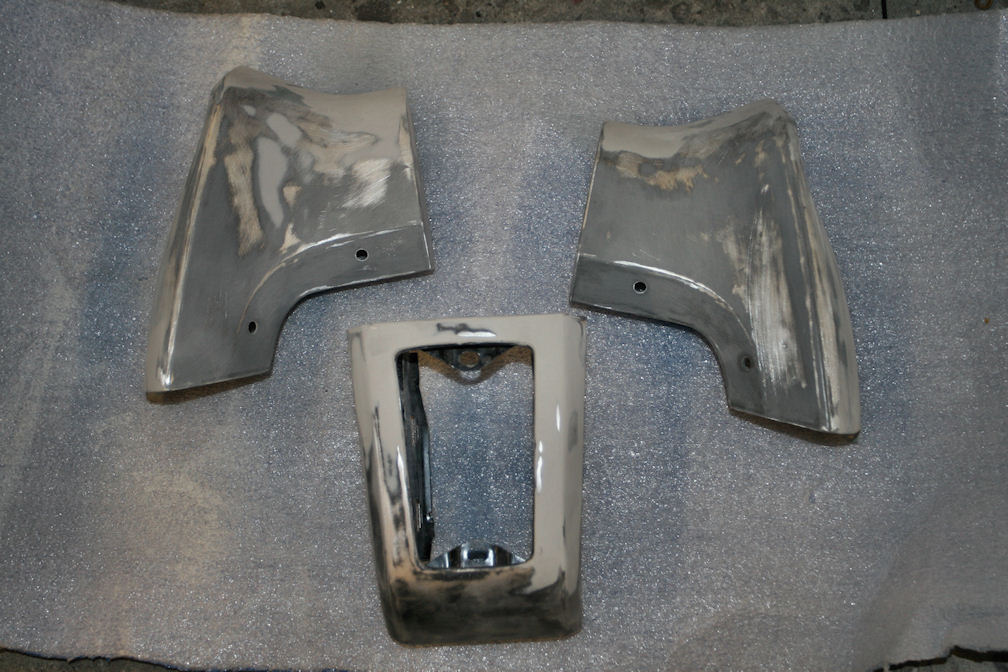
The paint shop forgot to paint the underside of the roof rails and the opening for the sun roof so I decided to do it myself. I also rebuilt my door hinges and had them painted at the same time. 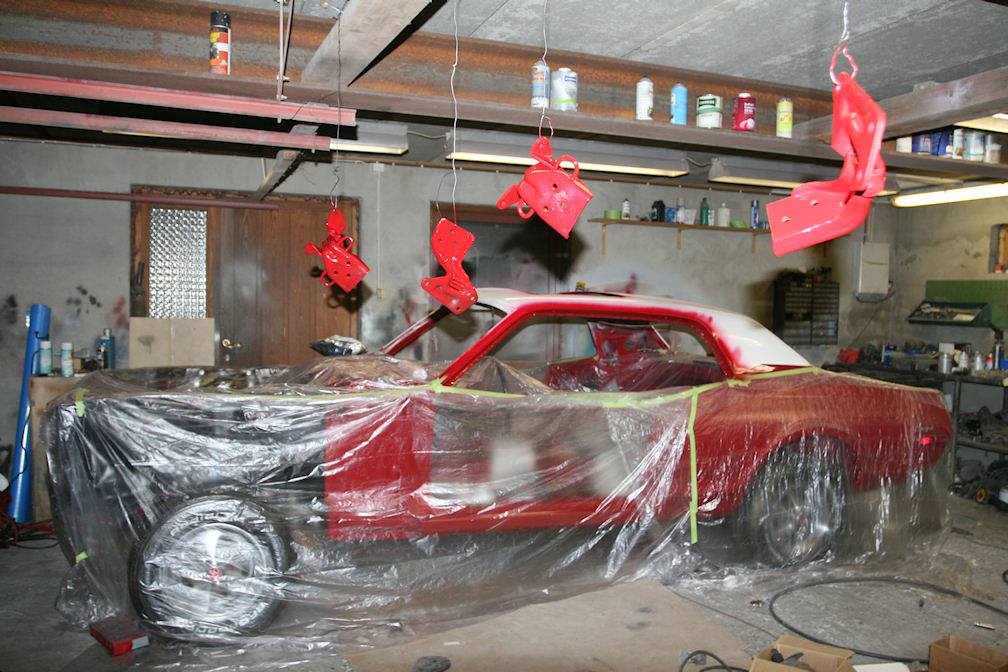
The tilt steering mechanism had seen better days and was more or less worn out. Luckily I had a spare tilt column so with the best parts from both I had a really nice working column to put in the car. Now I just wish I had a good steering wheel to use or restore. The one that was in the car was badly cracked and started to separate from the steel core after years in the southern California heat, so I consider it junk. Please let me know if you have one for sale. 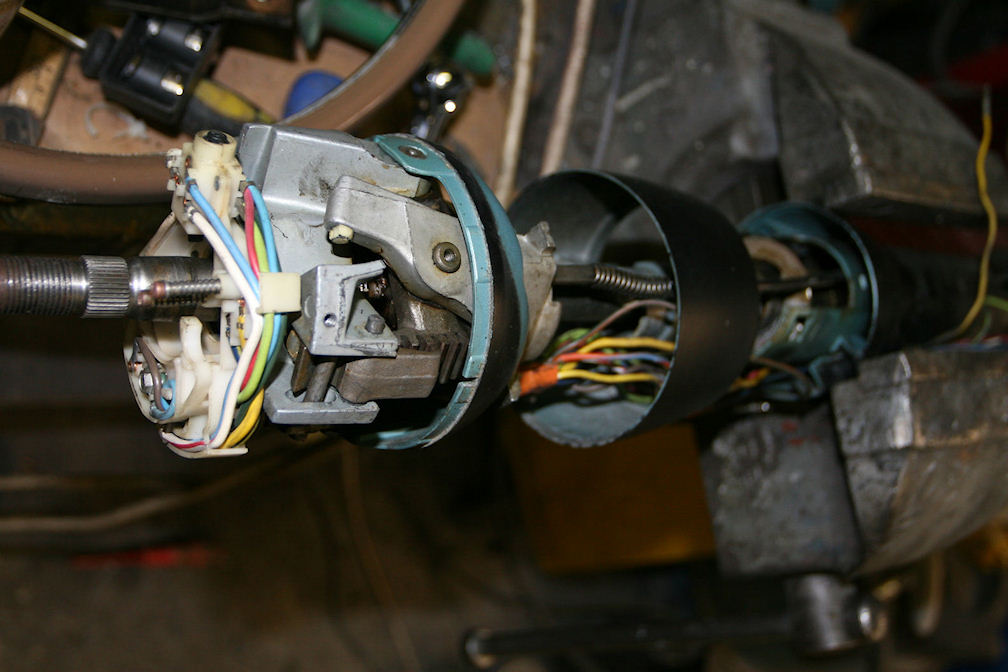
March 25th, 2011
I have had a few people asking for updates on my XR7-G restoration, and here it comes ![]()
For the last 5 months my Cougar has been sitting under a cover and I have not done anything at all to it. The last thing I did last fall was to try to install a new vinyl top, and I screwed up totally and had to order a new one from WCCC. 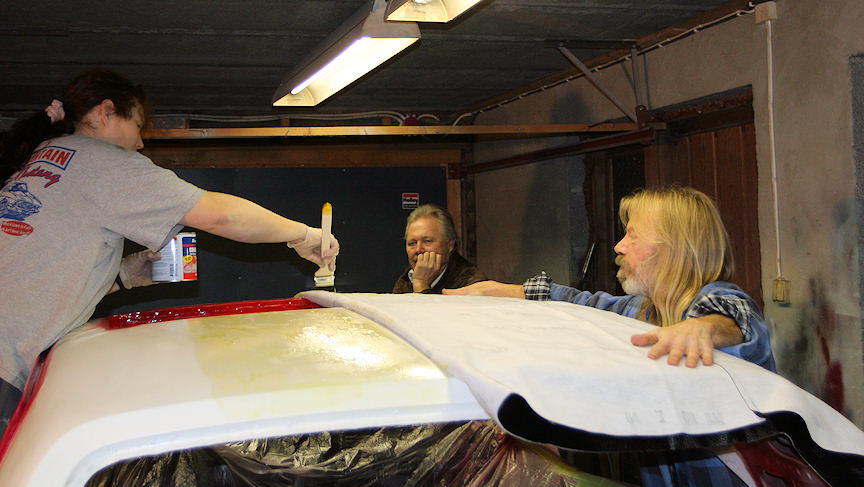
Late November my near 10 years old Doberman got cancer and died and then we got an unusual long and strong winter making it kind of hard to get much done to the car itself.
That does not mean the xr7-G project has come to a halt. The winter is a good time to hunt for good parts on the internet. Also my rebuilt 428 engine block has arrived from the US.
And I have got a new puppy, a wonderful brown Doberman girl named Hera, which of course takes a lot of time ![]()
Regarding the engine I had the 390 GT heads rebuilt with new K-line stem bushings and the valve seats reconditioned. When I got them back from machining I installed 16 new valves and they were ready to be bolted on the engine block. 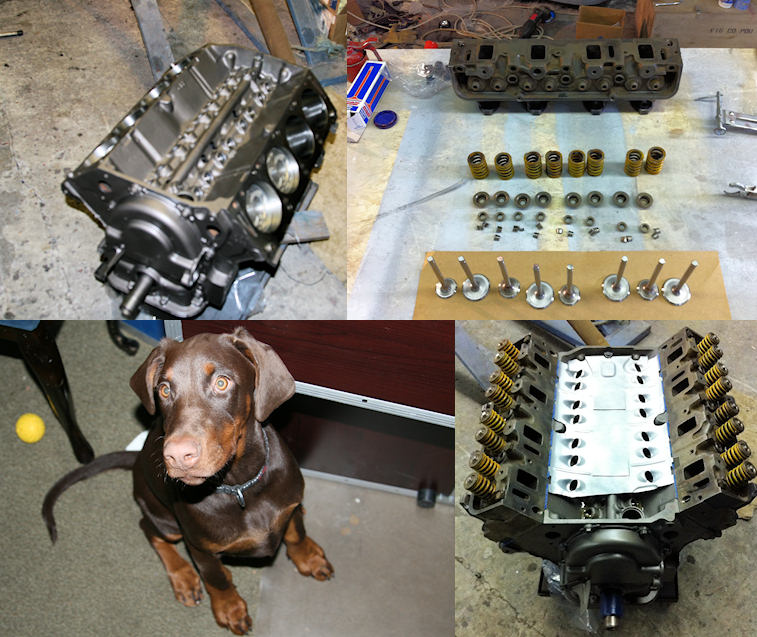
While searching the Internet for Cougar parts I was lucky and found a 1968 Cobra Jet C6 transmission for sale in Oregon. The seller was asking $500 so I figured I would just as well upgrade to this transmission instead of a regular C6. The seller was very helpful and delivered it to a transmission shop where it has been totally rebuilt with a few improvements, a new torque converter installed and finally it was bench tested before it was shipped to Norway. As you can see the drivetrain in my XR7-G will be a little more fun than I planned, but I think this will be a nice upgrade to the car. 
And there is more to tell, but that will have to wait until later ![]()
July 17th, 2011
Finally here are some updates on my Cougar. As I have mentioned before this restoration takes directions I did not make plans for just by coincidences. While I was waiting for my C6 CJ transmission to arrive from the US, I stumbled across a set of date correct Cobra Jet cylinder heads and exhaust manifolds for my car. So even if the engine was built and ready to be installed in the car I decided to replace the 390GT parts with these parts to make it even more fun to drive.
When I bought the CJ heads I was told they had been rebuilt not long ago. It turned out to be true, but the job were far from the quality I expected so I had to take them to the machine shop and had the work done right this time.
Unfortunately the intake that came with the heads was for a 390GT so I had to start looking for a matching intake as well. Original CJ intakes are not easily found around here, but I knew that a local guy with a 58 Edsel had a CJ intake on the top of his FE engine so I called him asking if I could buy it back. He did not want to sell it, but if I was willing to give him an Edelbrock Performer RPM intake in exchange he was willing to give up the CJ intake. Fortunately I had a RPM intake laying on my loft....
While the heads were at the machine shop I also had the exhaust manifolds sandblasted and painted. 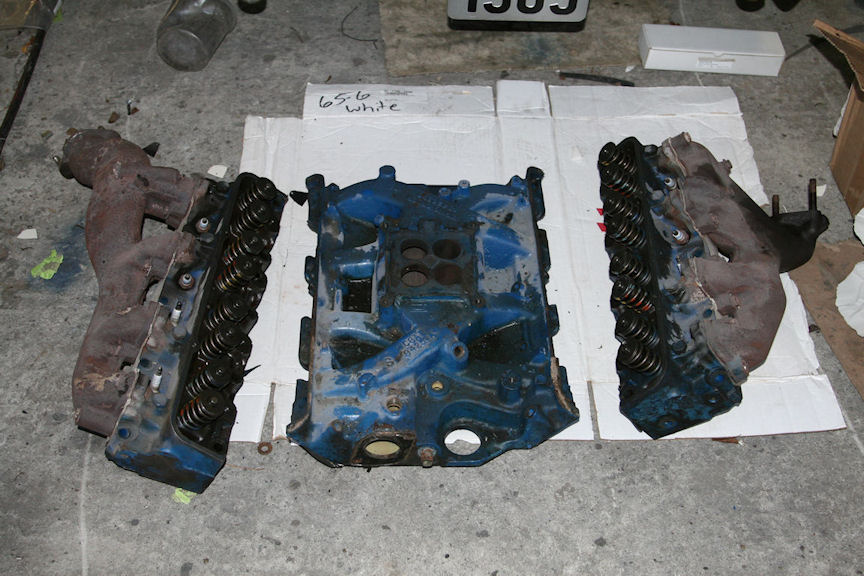
Here is the rebuilt CJ head standing beside the GT head I just had removed from the engine. It is easy to see which is which by the size of the valves. 
July 17th, 2011
My new CJ heads had the holes for the smog system so I decided to try to find the parts to get a functional smog system back on the engine.
After a few searches on ebay and at some parts vendors I realized that this was not going to be cheap. In fact all correct smog parts are insane priced so I decided to build a smog system, but not to care about all the correct number matching stuff.
Not only the smog parts are expensive, I found out that almost anything for these engines cost more than I like to think about. And then I also found that my complete A/C set up from a 67 Mercury was wrong, so I had to get all those parts. Of course the brackets I had for the alternator was wrong as well. Oh well, I could have done it easier for myself on this by using most of the 67 parts I had, but for me some of the fun is to get things as correct as possible for the money I can afford to put into this.
In the first picture here is the transmission already installed in the car and the engien is ready to go in. 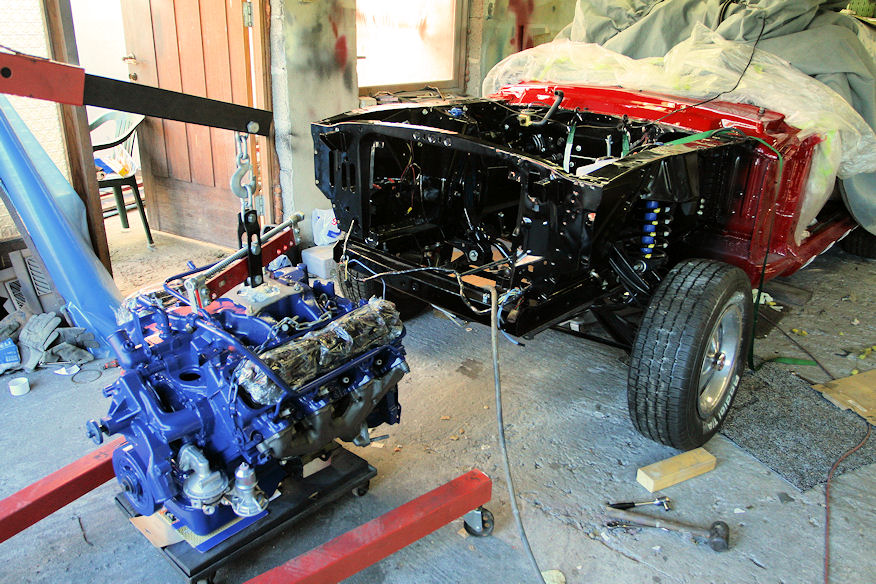
A few days later it looks like this. Of course there is a lot more work into this than what is shown in this picture. All semi gloss black parts have been painted, power steering pump has been rebuilt, and even the brake booster has been totally apart as it was leaking.
While I test installed the pulleys and belts I soon realized that something was wrong as the belts didn't fit. It turned out that the the crack pulley I have is from a regular 390, and that the correct pulley for a 390GT/428CJ is different. So far I have not been able to find the correct pulley so if you know about a pulley for a 428CJ with A/C with the number C8AE-6312-A I would be very interested in buying it. 
July 18th, 2011
I just thought I should tell that there is more going on right now that I have not mentioned. One of the things on this car that needed some serious attention was the interior. More than 40 year under the Southern California sun caused a lot of damage to the upholstery so the original interior was long gone and the seats had been redone in an ugly fabric and vinyl combination. Also both front seats were worn out and seat backs were broken. In fact everything inside the car was in bad shape. The woodgrain in the dash was faded, instruments looked bad and did not function like they should and the plastic on the dash was cracked and in helpless shape.
Luckily another forum member had a red XR7 interior that was better than mine so I ended up buying the complete interior including door panels and so on.
Right now the front seats and the rear seat back are at the upholstery shop to be redone in all leather. I am looking forward to the day when I can post some pictures of the redone interior. 
Just one picture of what might be a great restoration tip. The vacuum hoses for my car were dry and extremely stiff and I found out that very little could be re used. My neighbor has a 78 Lincoln Continental and I noticed that his car had exactly the same vacuum hoses as my Cougar. So I bought a complete set of hoses from a Lincoln for less than $10 on ebay and after a good cleaning they are good as new ![]() As you can see in the picture I have also installed the export bar instead of the flimsy original braces from the firewall to the shock towers. I think this upgrade is needed, especially on a big block car that will be driven.
As you can see in the picture I have also installed the export bar instead of the flimsy original braces from the firewall to the shock towers. I think this upgrade is needed, especially on a big block car that will be driven. 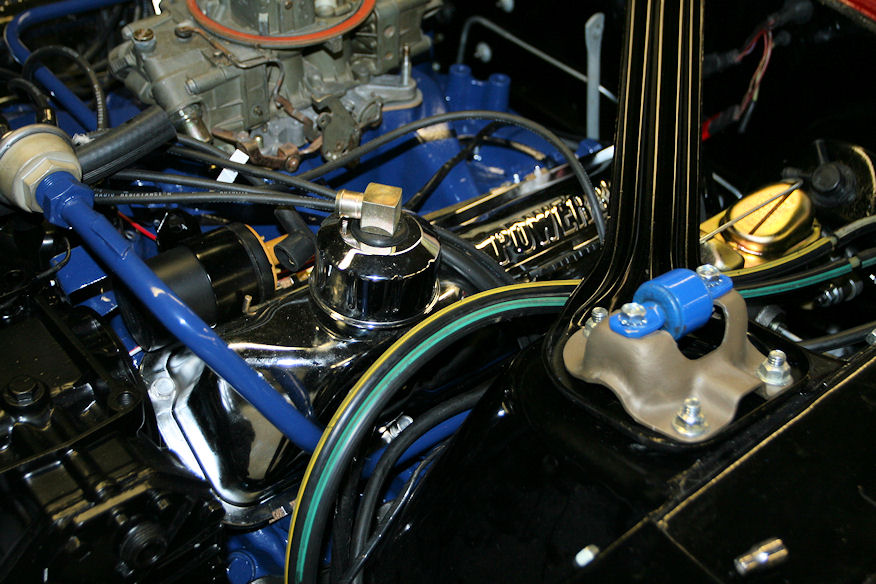
Things are slowly coming in place in my engine compartment. I have realized that a correct 68 crank pulley for a 428CJ with air is harder to find than chicken teeth. I have done a little research on which alternatives that should work and found that the 69 Crank Pulley for 428CJ and air C9OE-6312-D most likey will do the job. At least the 69 428CJ is listed with the same drive belts so the difference from the 68 version must be minimal. I have not found out what the difference is on this one and the C8AE-6312-A. If someone here knows I would like it if you can share that information with me. The 69 pulley i not something you can get easily either, but at least I know where to find one...
The air cleaner for my car has been one of the things I had my doubts about. An original CJ air cleaner with correct snorkel, S-tube and heat shield is totally out of my budget. Sometimes I wonder how these reproduction parts can get that expensive. A 428CJ heat shield and S tube is about $750 which I think is totally insane. So as a substitute I have decided to use the sporty chrome repro GTE 427 (and High Performance 289, 1967 S-55 428 and more) air cleaner. I like the look, and it is hard to beat the value for the money at about $30. SO here is a picture of the engine with a few more parts on it.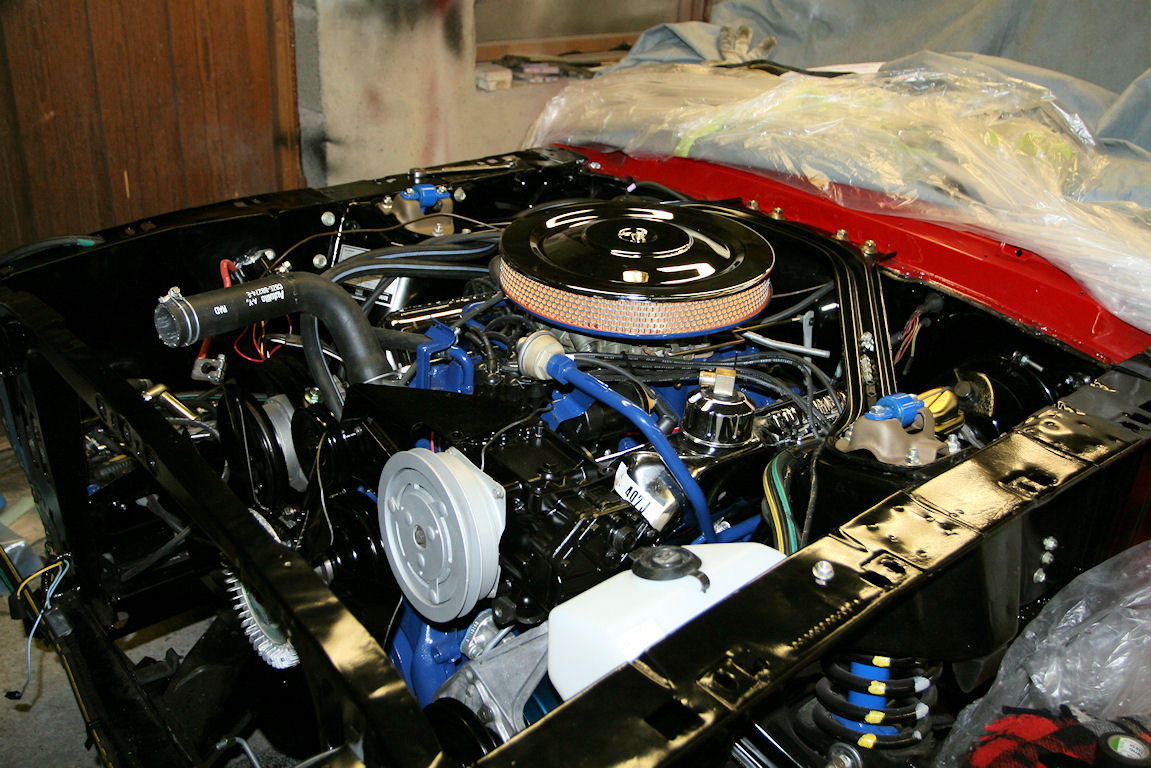
July 27th, 2011
Here is a picture of CJ and 390GT pulleys. I found the pictures at the Mansfield Mustang web site. I hope they will forgive me for using them. Unfortunately they don't have the correct pulley either so I will buy a 69-70 pulley. If it works I am fine, if not I will soon have a C9OE-6312-D pulley for sale.
I do also have a C8AE-6312-D here that I just got from the US, and I am pretty sure it could have been used but most likely not together with the correct belts.
It looks like the front groove on the these pulleys might be about the same but that the two inner grooves have a larger diameter on the CJ with air pulleys? It is hard to see, and it might also be the outer groove that has a larger diameter on the C8AE-6312-D pulley. 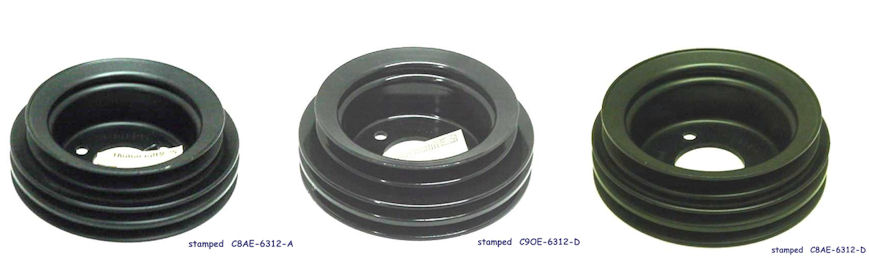
August 6th, 2011
A couple of days ago I got the correct crank pulley for the engine and it did not take long before I had it installed. Now pretty much everything attached to the engine is there except for some smog parts and the hoses for the AC. The next thing to do now is to get my radiator installed. The previous owner had put in a brand new correct 4 row radiator not long before I bought the car, so all I need to do is to repaint it. 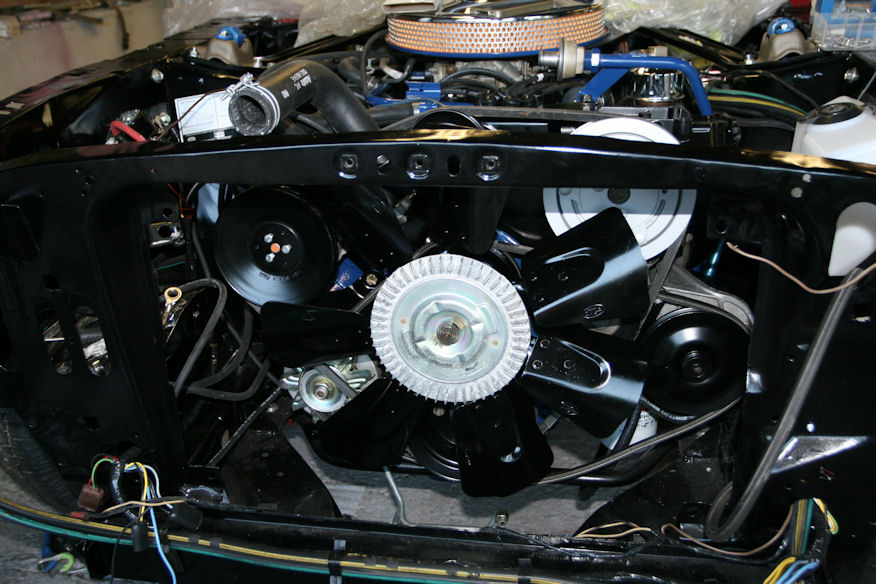
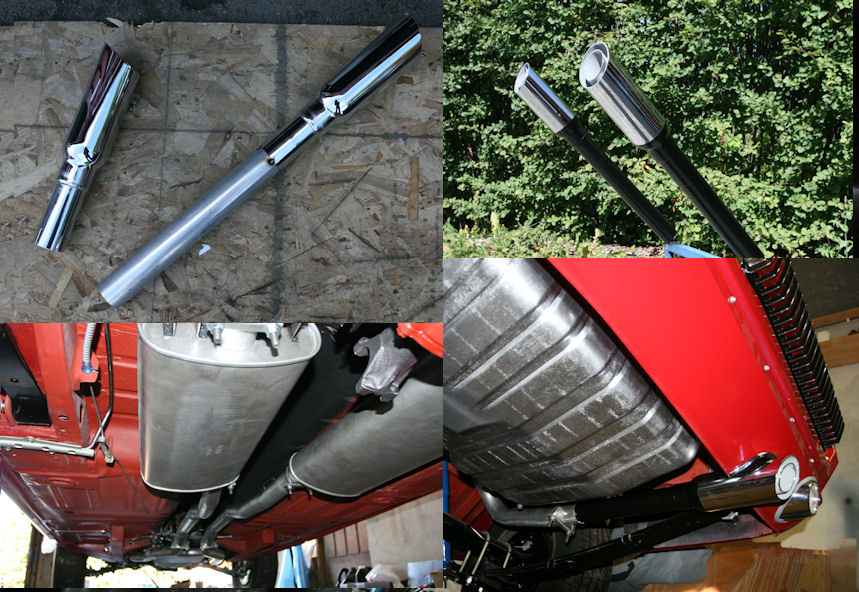
Today I have been doing what I consider to be one of the worst things I do when I restore a car, installing exhaust system. For some reason they never seem to fit like they are supposed to and usually I end up cutting and welding to make it fit right.
I ordered a complete 2 1/4 exhaust system with Turbo mufflers from Mustangs Unlimited and I also bought a set of not so correct exhaust tips from John's Cougar. Buying the concourse correct XR7-G tips for my car gave no meaning since I had to improvise to fit them to the 2 1/4 exhaust system anyways. OK, starting with the front H pipe I became pretty impressed by how nicely it fit to the engine and how nice it looked. Also the rest of the exhaust gave me no problems what so ever. For the exhaust tips I decided to cut them about 1 1/2 inch where they should connect to the original thin pipes and to weld on a 12" long 2" pipe. Then I cut both rear pipes in front of the bend going down so the pipes pointed straight to the cutouts in the rear valance. I made sure I cut the pipes in a place so I could use the same clamp for the hanger and to fast the tips. A little test fitting and I concluded that this would be easier than I feared. I painted the welded on pipes and some of the tips semi gloss black just like the originals and installed them. I am very happy with the result and I must believe that this is the first exhaust system I have installed that fits perfect ![]()
August 7th, 2011
I am not using a complete AMK kit for the car. What I do when I take apart the car is to get all the original screws, nuts and whatever fasteners there is and get them restored at a local shop.(Unfortunately they closed their doors last fall so for the future things will be more difficult. Then I buy additional kits for fasteners that are missing or just not can be reused. For fenders and body I always buy new screws and fasteners in big packages to keep the cost down. I bought a complete kit for my Eliminator, but I was not too excited about the correctness.
Everything in the engine/transmission department are now 428CJ parts including the exhaust manifolds.
What I found out today is that I have a incorrect yoke on my 9 inch rear end. When the original 390 were replaced by the 302/C4 they also had to replace the yoke to make the drive shaft with the narrow U-joints fit. So tonight I have tried to find out what yoke to order and where to get it. I have found that there are several different yokes for the 9 Inch, but I have not been able to find out if I need the long or the short version of the wide (1330) yoke.
August 19th, 2011
There is not much going on with my cougar right now, but at least I have bought a restored steering wheel from Best in Show steering wheels (http://bestinshowsteeringwheels.com/) and I am very happy with it.
To put together a really nice steering wheel for my G has not been easy. I have bought 3 steering wheel pads with woodgrain inserts on eBay to get one pad that was really nice with no or minimal shrinking. One of them also had a good plastic surrounding for the insert, while none of them had a nice woodgrain insert that was not faded or scratched. These woodgrain inserts are so hard to find that I am surprised that no one has made a good reproduction.
I did not want to put on a faded woodgrain insert and since I now had a few I decided to do some experimenting on how to restore it back to previous color. After some experimenting I ended up making a mix of a brown-reddish paint which I mixed with a flat clear coat paint to make it transparent. After a few coats I had the color I wanted and gave it a final coat of flat clear for protection and it looks better than I ever hoped for. ![]()
The horn ring and the pewter cougar emblem were the only parts I was able to reuse from my car. 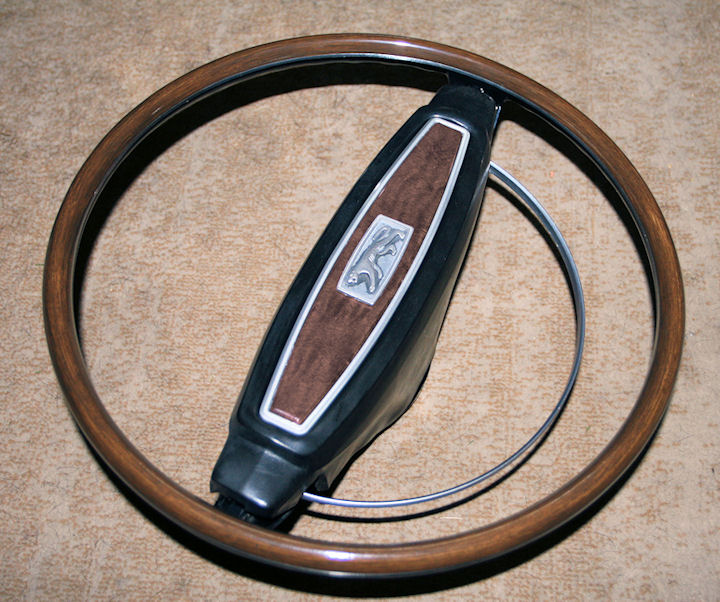
August 21st, 2011
I am sure most of you agree with me when I say that the 67 and 68 XR7 instrument panel is the best looking ever in a Cougar. Also the fact that this is the part of the car that you see most when you drive makes it important to restore it back to the same condition as when the car was new.
From the day I bought the car I have saved up all the parts I needed to restore my dash and instrument panel. Finding perfect parts that can be used as they are turned out to be much harder than I thought, but with good help from friends and some good Cougar parts suppliers I finally had what I needed to start the work.
Unfortunately there was not much from the interior department on my car that was worth saving. For the dash there was almost nothing. The chromed plastic parts were too cracked and brittle from the California sun to be re used. Instead I ended up buying some other part here and there and had them sent to Mr G's Rechromed plastic. (I am satisfied with how they came out, but I would probably have used WCCC for this service today).
Oh well, the woodgrain parts were faded and unusable as well. Fortunately a friend of mine here in Norway had a nice set that I got for restoring the instruments on his Cougar. The tach didn't work in my car, and the speedometer was no good either. Luckily my friend also had a used instrument cluster I could take parts from. Even if these looked better than those from my car, I had to do a lot of work to make everything look like new.
First of all I repainted all the metal parts for the instruments and the black upper parts on the re chromed plastic parts with a semi gloss black paint. Then I picked the best lenses I could find and polished them so they look really nice. 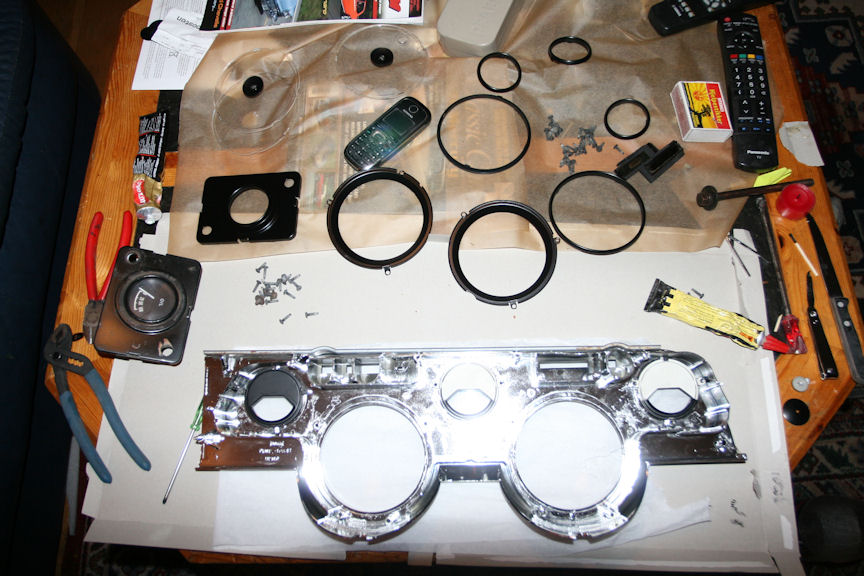
Then I repainted the orange stripes on the speedometer dial. The paint I used is a special paint for instrument needles, but it works fine for this as well.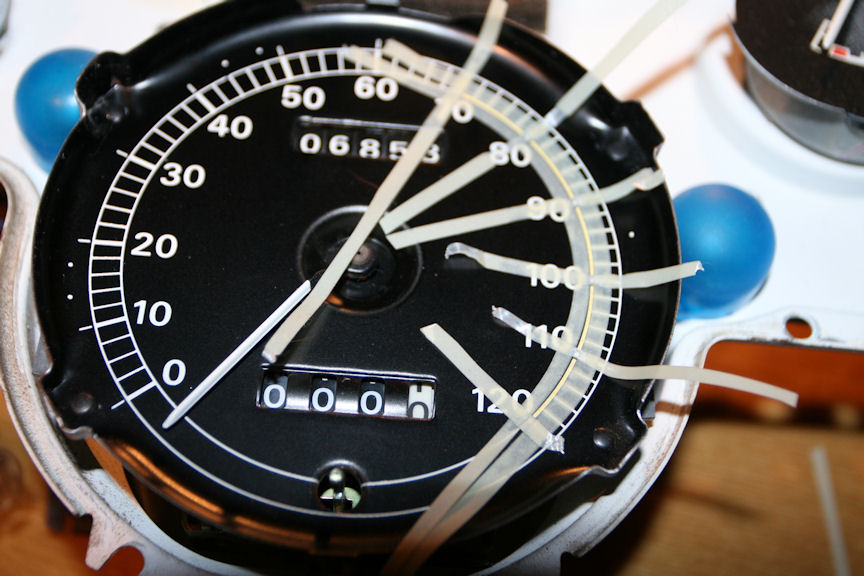
For the small gauges I bought a gauge overlay set from WCCC which makes these instruments look brand new. I have also adjusted the odometer back to 0 miles ![]()
Then I reassembled everything while I tried to keep unwanted dust and Doberman hair out of the instruments. That's not easy, but after a couple of tries I was happy.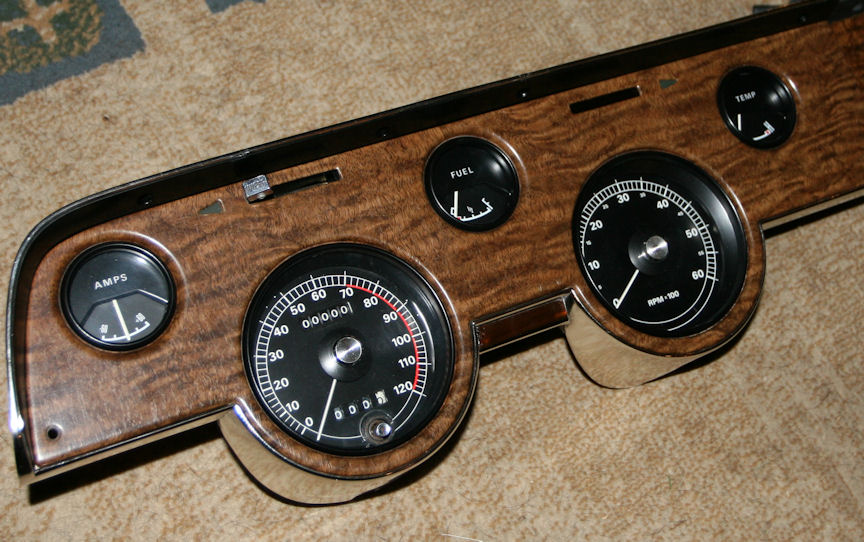
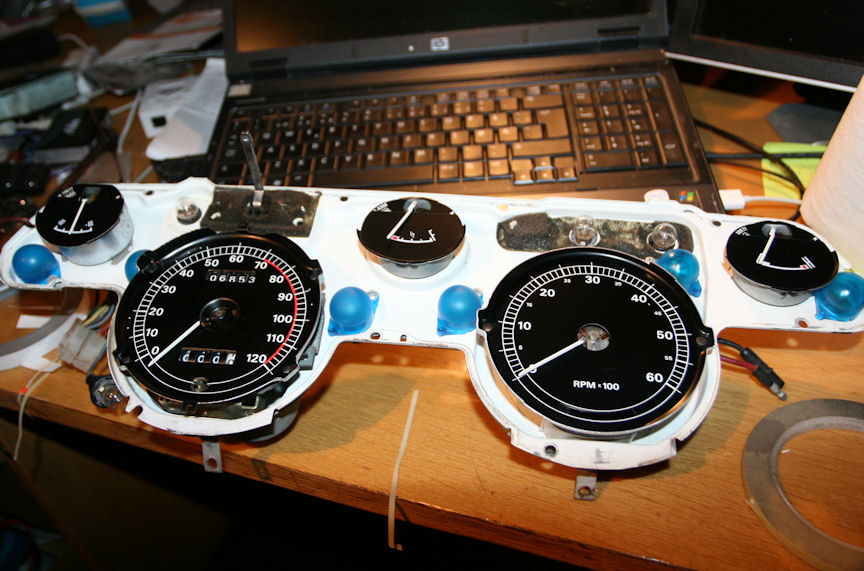
The passenger side of the instrument panel got a perfect A/C vent that I bought from John Benoit, some really nice toggle switches I bought on eBay and finally a set of NOS Cougar XR7-G gold emblems. ( I have an extra set of these NOS if anyone is interested).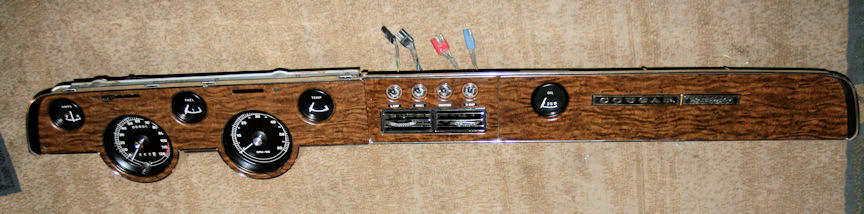
I can't wait to get these parts installed in the car together with the repro A/C side vents ![]()
Nice build!
Posted by Diggymart on 10/11/20 @ 2:20:28 AM