You must be logged in to rate content!
13 minute(s) of a 214 minute read
7-18-2011
I just thought I should tell that there is more going on right now that I have not mentioned. One of the things on this car that needed some serious attention was the interior. More than 40 year under the Southern California sun caused a lot of damage to the upholstery so the original interior was long gone and the seats had been redone in an ugly fabric and vinyl combination. Also both front seats were worn out and seat backs were broken. In fact everything inside the car was in bad shape. The woodgrain in the dash was faded, instruments looked bad and did not function like they should and the plastic on the dash was cracked and in helpless shape.
Luckily another forum member had a red XR7 interior that was better than mine so I ended up buying the complete interior including door panels and so on.
Right now the front seats and the rear seat back are at the upholstery shop to be redone in all leather. I am looking forward to the day when I can post some pictures of the redone interior.
Just one picture of what might be a great restoration tip. The vacuum hoses for my car were dry and extremely stiff and I found out that very little could be re used. My neighbor has a 78 Lincoln Continental and I noticed that his car had exactly the same vacuum hoses as my Cougar. So I bought a complete set of hoses from a Lincoln for less than $10 on ebay and after a good cleaning they are good as new ![]() As you can see in the picture I have also installed the export bar instead of the flimsy original braces from the firewall to the shock towers. I think this upgrade is needed, especially on a big block car that will be driven.
As you can see in the picture I have also installed the export bar instead of the flimsy original braces from the firewall to the shock towers. I think this upgrade is needed, especially on a big block car that will be driven.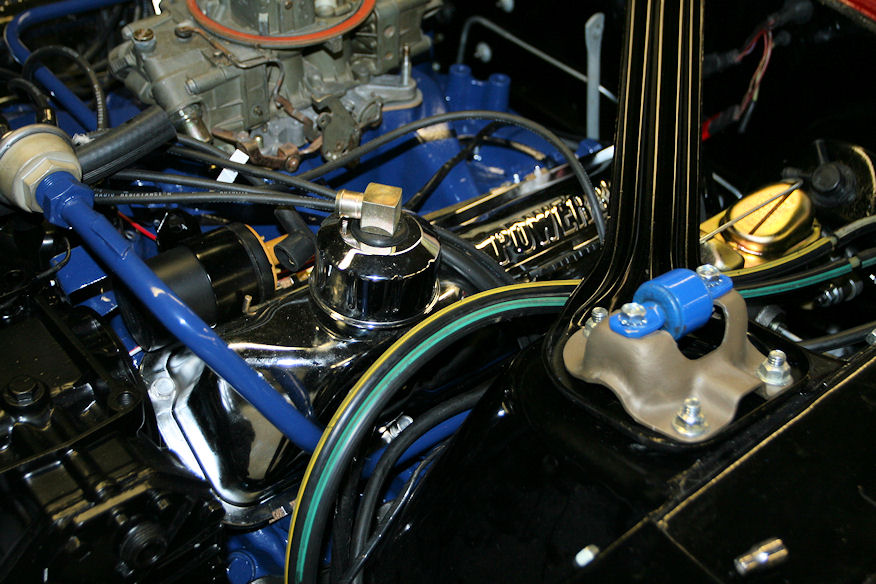
Things are slowly coming in place in my engine compartment. I have realized that a correct 68 crank pulley for a 428CJ with air is harder to find than chicken teeth. I have done a little research on which alternatives that should work and found that the 69 Crank Pulley for 428CJ and air C9OE-6312-D most likey will do the job. At least the 69 428CJ is listed with the same drive belts so the difference from the 68 version must be minimal. I have not found out what the difference is on this one and the C8AE-6312-A. If someone here knows I would like it if you can share that information with me. The 69 pulley i not something you can get easily either, but at least I know where to find one...
The air cleaner for my car has been one of the things I had my doubts about. An original CJ air cleaner with correct snorkel, S-tube and heat shield is totally out of my budget. Sometimes I wonder how these reproduction parts can get that expensive. A 428CJ heat shield and S tube is about $750 which I think is totally insane. So as a substitute I have decided to use the sporty chrome repro GTE 427 (and High Performance 289, 1967 S-55 428 and more) air cleaner. I like the look, and it is hard to beat the value for the money at about $30. SO here is a picture of the engine with a few more parts on it.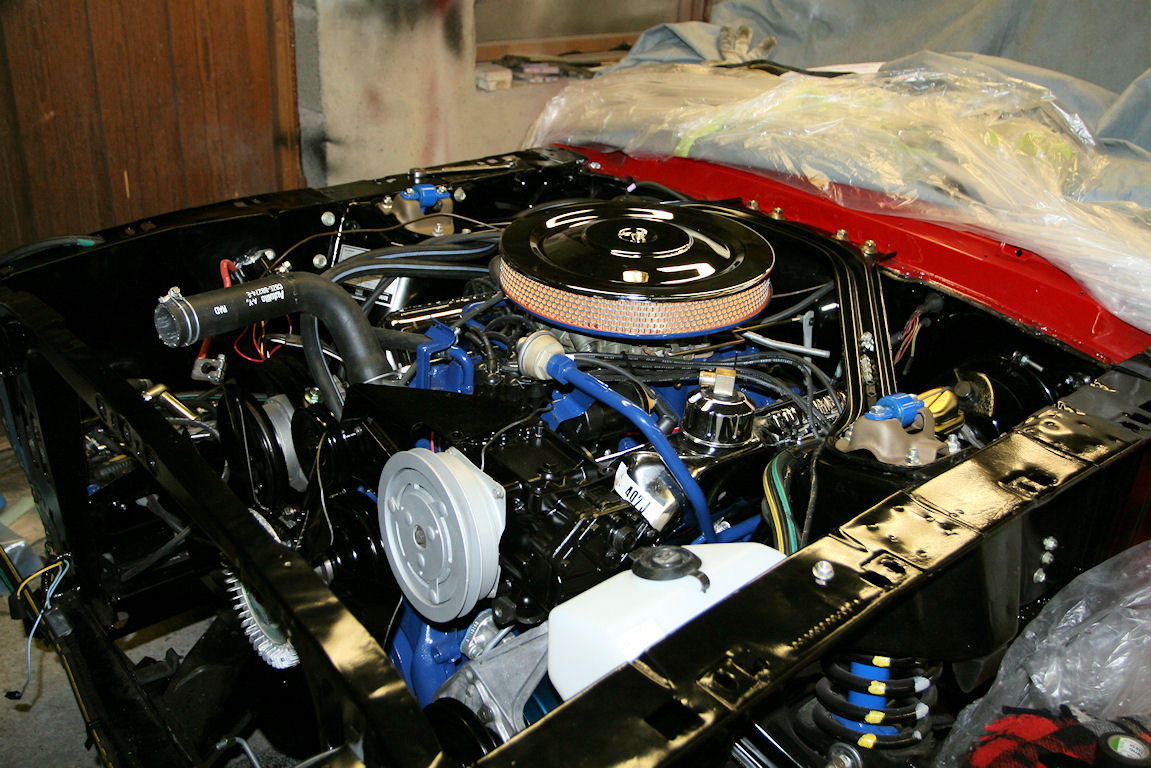
July 27th, 2011
Here is a picture of CJ and 390GT pulleys. I found the pictures at the Mansfield Mustang web site. I hope they will forgive me for using them. Unfortunately they don't have the correct pulley either so I will buy a 69-70 pulley. If it works I am fine, if not I will soon have a C9OE-6312-D pulley for sale.
I do also have a C8AE-6312-D here that I just got from the US, and I am pretty sure it could have been used but most likely not together with the correct belts.
It looks like the front groove on the these pulleys might be about the same but that the two inner grooves have a larger diameter on the CJ with air pulleys? It is hard to see, and it might also be the outer groove that has a larger diameter on the C8AE-6312-D pulley.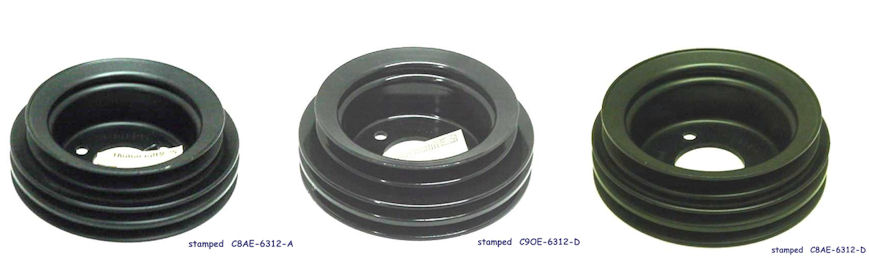
August 6th, 2011
A couple of days ago I got the correct crank pulley for the engine and it did not take long before I had it installed. Now pretty much everything attached to the engine is there except for some smog parts and the hoses for the AC. The next thing to do now is to get my radiator installed. The previous owner had put in a brand new correct 4 row radiator not long before I bought the car, so all I need to do is to repaint it.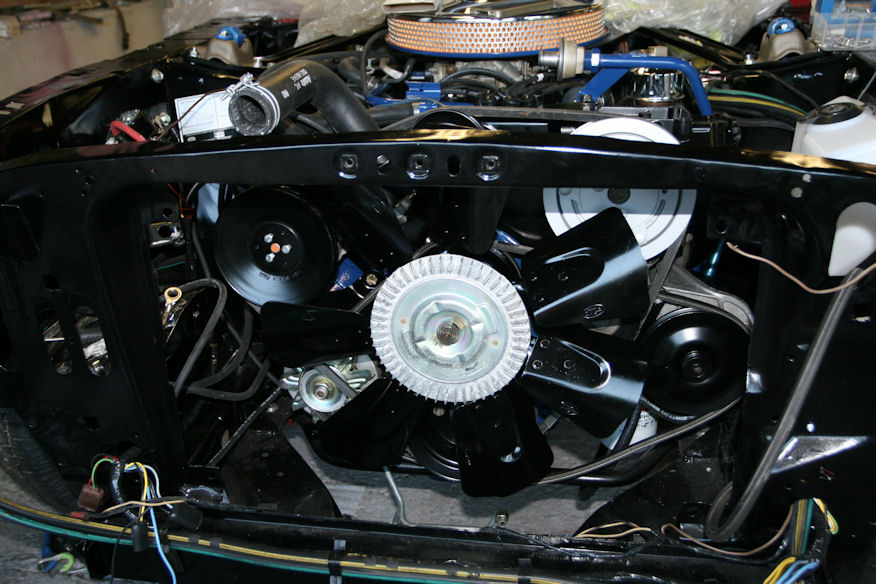
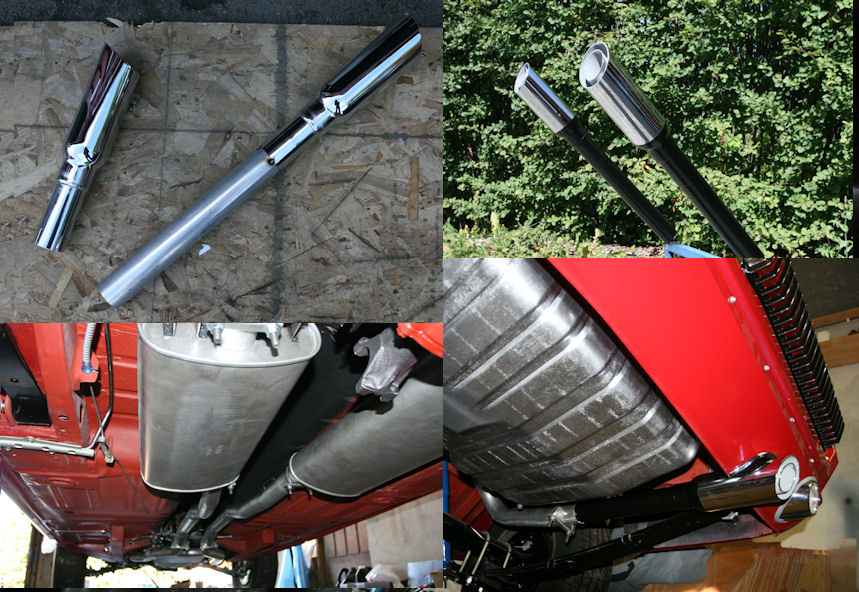
Today I have been doing what I consider to be one of the worst things I do when I restore a car, installing exhaust system. For some reason they never seem to fit like they are supposed to and usually I end up cutting and welding to make it fit right.
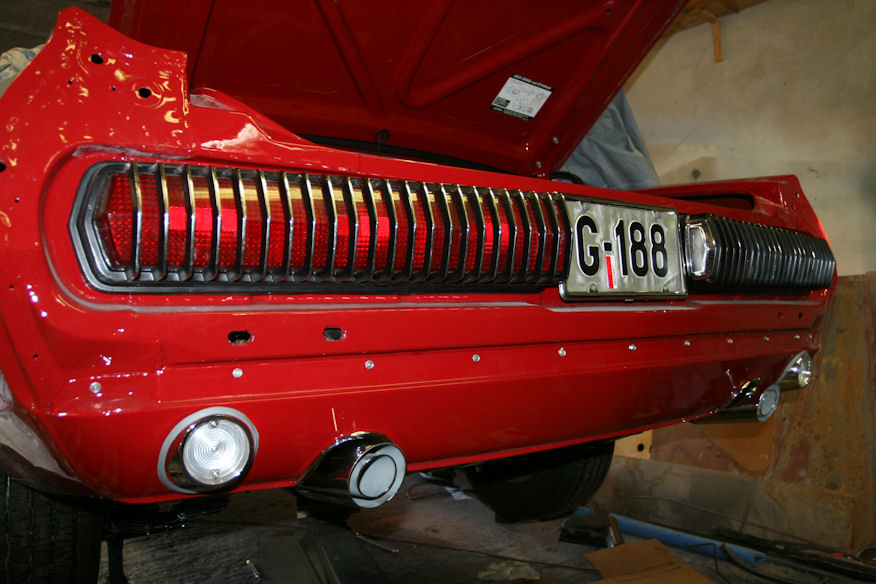
I ordered a complete 2 1/4 exhaust system with Turbo mufflers from Mustangs Unlimited and I also bought a set of not so correct exhaust tips from John's Cougar. Buying the concourse correct XR7-G tips for my car gave no meaning since I had to improvise to fit them to the 2 1/4 exhaust system anyways. OK, starting with the front H pipe I became pretty impressed by how nicely it fit to the engine and how nice it looked. Also the rest of the exhaust gave me no problems what so ever. For the exhaust tips I decided to cut them about 1 1/2 inch where they should connect to the original thin pipes and to weld on a 12" long 2" pipe. Then I cut both rear pipes in front of the bend going down so the pipes pointed straight to the cutouts in the rear valance. I made sure I cut the pipes in a place so I could use the same clamp for the hanger and to fast the tips. A little test fitting and I concluded that this would be easier than I feared. I painted the welded on pipes and some of the tips semi gloss black just like the originals and installed them. I am very happy with the result and I must believe that this is the first exhaust system I have installed that fits perfect ![]()
August 7th, 2011
I am not using a complete AMK kit for the car. What I do when I take apart the car is to get all the original screws, nuts and whatever fasteners there is and get them restored at a local shop.(Unfortunately they closed their doors last fall so for the future things will be more difficult. Then I buy additional kits for fasteners that are missing or just not can be reused. For fenders and body I always buy new screws and fasteners in big packages to keep the cost down. I bought a complete kit for my Eliminator, but I was not too excited about the correctness.
Everything in the engine/transmission department are now 428CJ parts including the exhaust manifolds.
What I found out today is that I have a incorrect yoke on my 9 inch rear end. When the original 390 were replaced by the 302/C4 they also had to replace the yoke to make the drive shaft with the narrow U-joints fit. So tonight I have tried to find out what yoke to order and where to get it. I have found that there are several different yokes for the 9 Inch, but I have not been able to find out if I need the long or the short version of the wide (1330) yoke.
August 19th, 2011
There is not much going on with my cougar right now, but at least I have bought a restored steering wheel from Best in Show steering wheels (http://bestinshowsteeringwheels.com/) and I am very happy with it.
To put together a really nice steering wheel for my G has not been easy. I have bought 3 steering wheel pads with woodgrain inserts on eBay to get one pad that was really nice with no or minimal shrinking. One of them also had a good plastic surrounding for the insert, while none of them had a nice woodgrain insert that was not faded or scratched. These woodgrain inserts are so hard to find that I am surprised that no one has made a good reproduction.
I did not want to put on a faded woodgrain insert and since I now had a few I decided to do some experimenting on how to restore it back to previous color. After some experimenting I ended up making a mix of a brown-reddish paint which I mixed with a flat clear coat paint to make it transparent. After a few coats I had the color I wanted and gave it a final coat of flat clear for protection and it looks better than I ever hoped for. ![]()
The horn ring and the pewter cougar emblem were the only parts I was able to reuse from my car.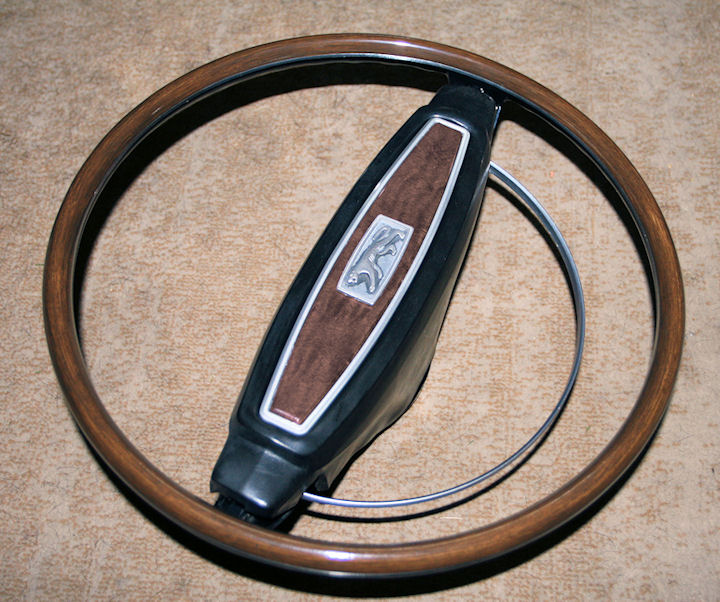
August 21st, 2011
I am sure most of you agree with me when I say that the 67 and 68 XR7 instrument panel is the best looking ever in a Cougar. Also the fact that this is the part of the car that you see most when you drive makes it important to restore it back to the same condition as when the car was new.
From the day I bought the car I have saved up all the parts I needed to restore my dash and instrument panel. Finding perfect parts that can be used as they are turned out to be much harder than I thought, but with good help from friends and some good Cougar parts suppliers I finally had what I needed to start the work.
Unfortunately there was not much from the interior department on my car that was worth saving. For the dash there was almost nothing. The chromed plastic parts were too cracked and brittle from the California sun to be re used. Instead I ended up buying some other part here and there and had them sent to Mr G's Rechromed plastic. (I am satisfied with how they came out, but I would probably have used WCCC for this service today).
Oh well, the woodgrain parts were faded and unusable as well. Fortunately a friend of mine here in Norway had a nice set that I got for restoring the instruments on his Cougar. The tach didn't work in my car, and the speedometer was no good either. Luckily my friend also had a used instrument cluster I could take parts from. Even if these looked better than those from my car, I had to do a lot of work to make everything look like new.
First of all I repainted all the metal parts for the instruments and the black upper parts on the re chromed plastic parts with a semi gloss black paint. Then I picked the best lenses I could find and polished them so they look really nice.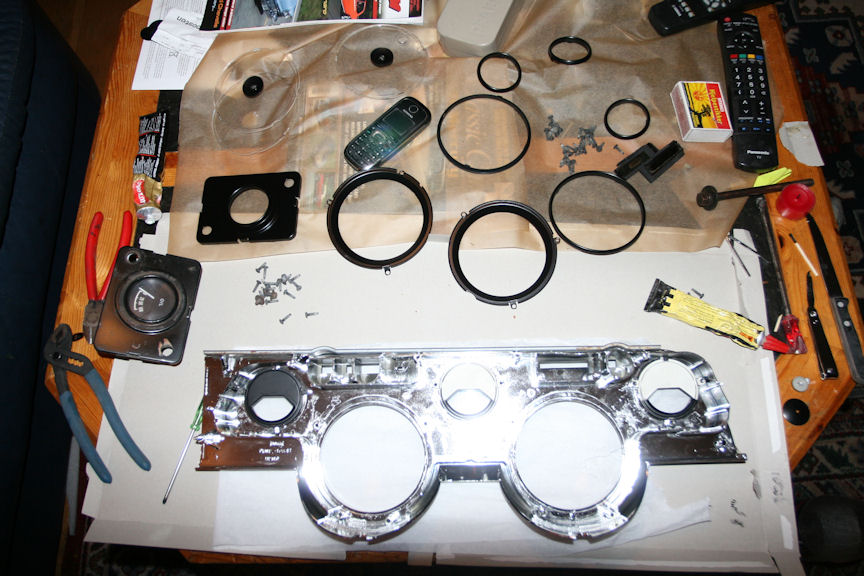
Then I repainted the orange stripes on the speedometer dial. The paint I used is a special paint for instrument needles, but it works fine for this as well.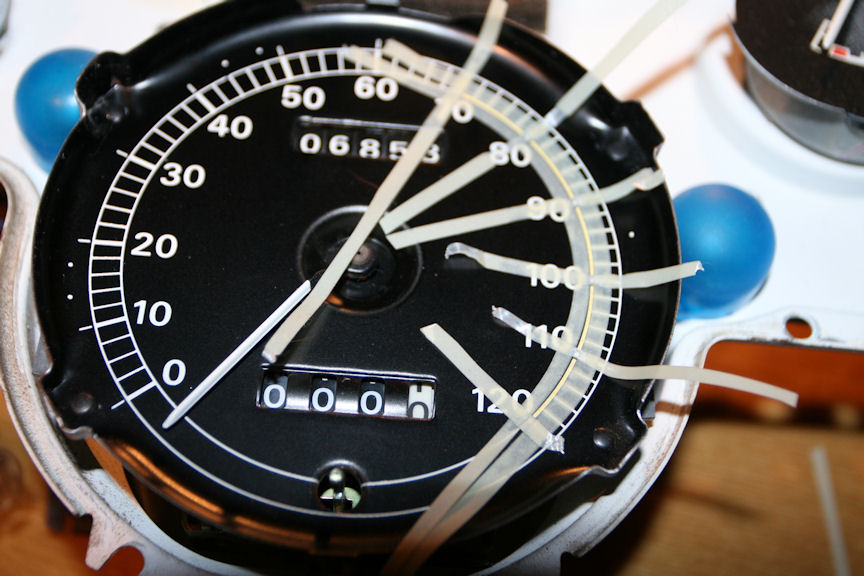
For the small gauges I bought a gauge overlay set from WCCC which makes these instruments look brand new. I have also adjusted the odometer back to 0 miles ![]()
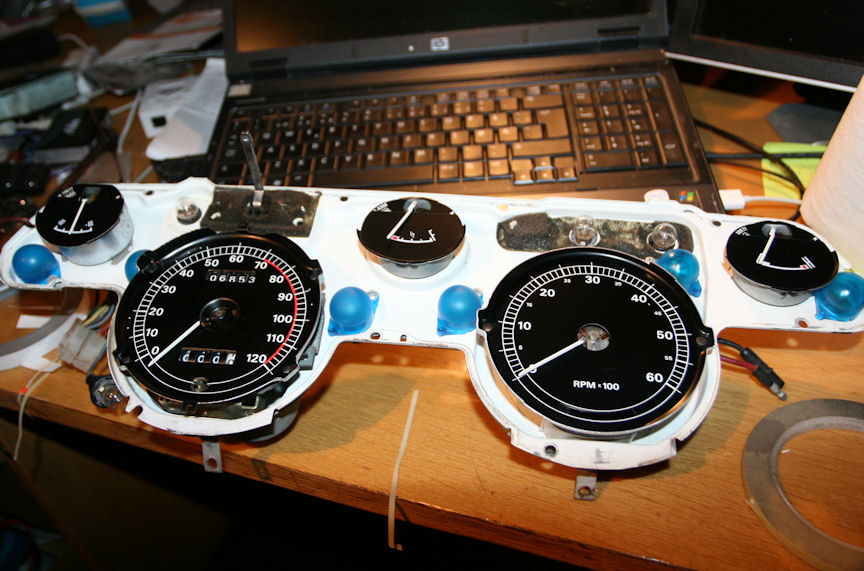
Then I reassembled everything while I tried to keep unwanted dust and Doberman hair out of the instruments. That's not easy, but after a couple of tries I was happy.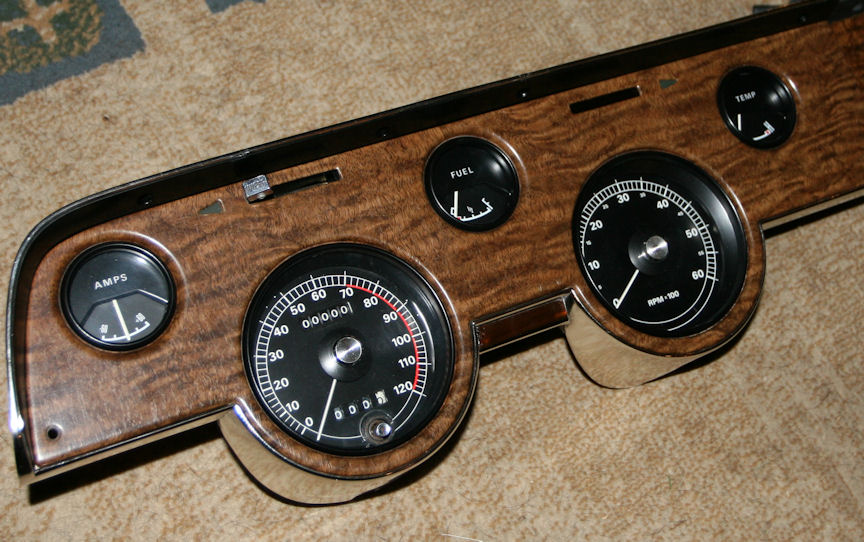
The passenger side of the instrument panel got a perfect A/C vent that I bought from John Benoit, some really nice toggle switches I bought on eBay and finally a set of NOS Cougar XR7-G gold emblems. ( I have an extra set of these NOS if anyone is interested).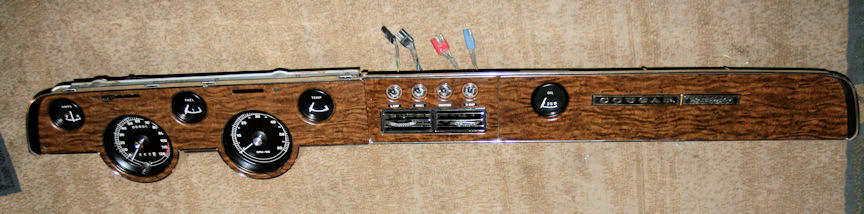
I can't wait to get these parts installed in the car together with the repro A/C side vents ![]()

Nice build!
Posted by Diggymart on 10/11/20 @ 2:20:28 AM