You must be logged in to rate content!
13 minute(s) of a 391 minute read
6-21-2009
I want to thank everyone else for the help. Blown020 has offered a tank or cost of shipping. Soon as we find out what hat is, I will proceed forward. A new tank off E-Bay is $100 shipped. I prefer to recycle the used bits though and give them new life if at all possible. We shall see.
My neighbor suggested washing it out where it sits with a pressure washer. I am almost tempted cept keeping it from getting everywhere in the interior would be hard to do. Not to mention environmentally irresponsible. The tank doesn't look rusty...
Other problem with that is that most of the cleaners I can come up with locally and quickly, would require resealing the gastank once I was done. I bet I could wash it out well with muriatic acid... But it HAS to be resealed if I do that. Resealing it means pulling it.
Any clean up effort is going to cost me about $75 and a headache to deal with. Used clean (hopefully) tank maybe $50. New one $100.
I really wish that a cabriolet tank could intelligently be made to fit. It solves one big problem with the Rabbit tank. No loss of fuel under hard cornering. They do this by returning the fuel to a smaller reservoir and by use of two fuel pumps. The small pump sends gas into the reservoir where the undercar pump sucks it out of. Also the gas being returned from the fuel pressure regulator is going into this. Effectively it keeps a constant gas pressure at the main pump thats not effected by cornering starving if for fuel. I might try and come up with a swirl pot of sorts to get around this later on.
Really thats the only major thing I have left to deal with. I am going to go try and get the other details sorted and then fire the car up using a gascan today weather permitting. Its super nice out there now but we have severe thunderstorm warnings in effect.
June 24, 2009
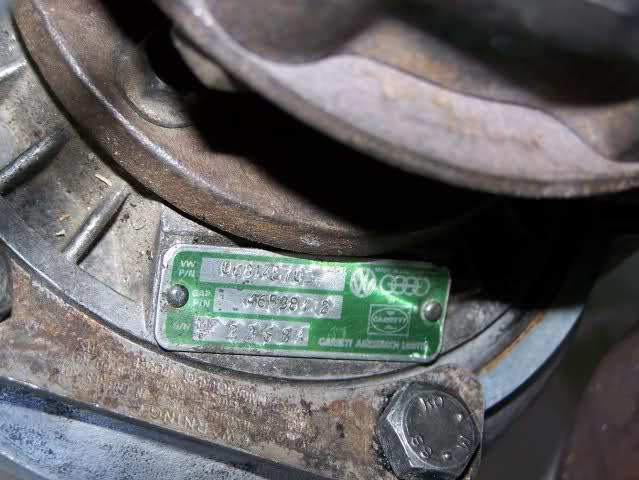
We are now down to all the small details. I am thinking I have an evening of work at most left before she ready to fire up. Had to tap and machine the turbo housing for the water jet. That was a huge pain as I really didn't have the right size drill bit for the tap so had to go too small. I still need to sort out the weirdness that is going on with the dual ports on the wastegate and the dual ports on the compressor housing.
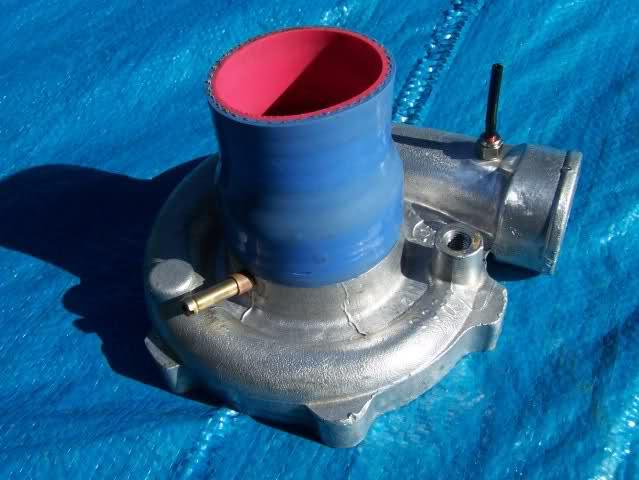
Gotta LOVE OE VW parts, especially when they are made by Garret!
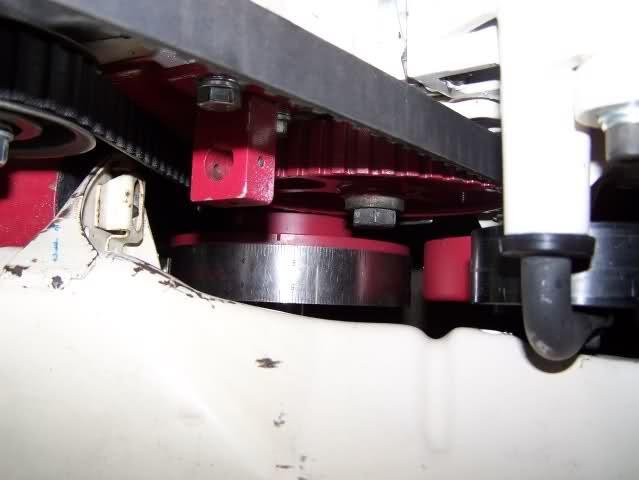
Timing "should be all sorted out now. Belt and all the marks are perfect at least. I am not 100% sure that the zero timing mark on the flywheel is accurate though. I was playing with this neeto little tool today. Basically it has a roller on the dial indicator shaft that sits on top of the piston to tell you when it stops moving.
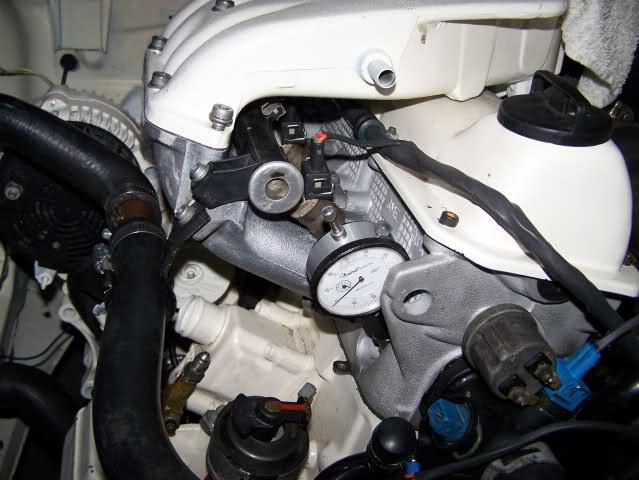
On the crank nose you place an indicator so that you can dial in zero perfectly by seeing how long it sits without moving. You usually dial it in 10-20 off on either side of a pointer. Most of the time this all falls on a single belt tooth and ends up being irrelevant. Zeroing the dial indicator usually gets it close enough.
Unfortunately my indicator was acting up. Unknown to me the roller ended up breaking off... I didn't realize this until I pulled it all out and ended up having to fish it out with a magnet. I am not sure if the issues I were having was because of this or what. Oh well. According to the VW marks, everything is perfect. So unless I have obvious timing issues when I start it up, I am going to leave it alone.
Still have some small things left to deal with. And at this point the only thing really stopping me from starting the car is the situation with the gastank. The only thing I still need to sort out is the fuel filter location, and getting the fuel system all online.
Oh and deciding where and what to do about an air filter...
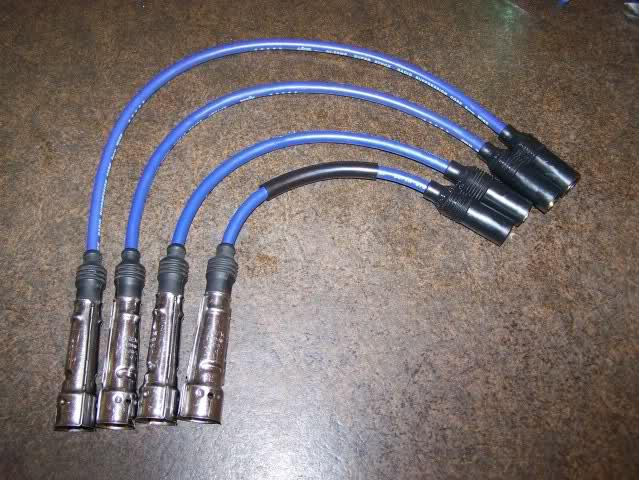
Making wires up is always fun! Usually I am making wires for wasted spark setups. This is the first set I have made for a normal dizzy setup. I needed to do this as the ends to fit the EMPI cap are different. So I just made up a whole new set. First thing to do is start with a decent set of donor wires for the ends. I then disassembled them to save the bottom. These twist off. Takes about two turns. Its important to remember when reassembling the new set.
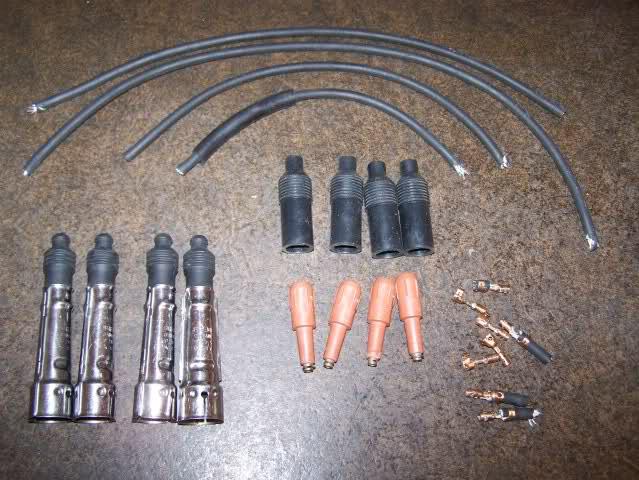
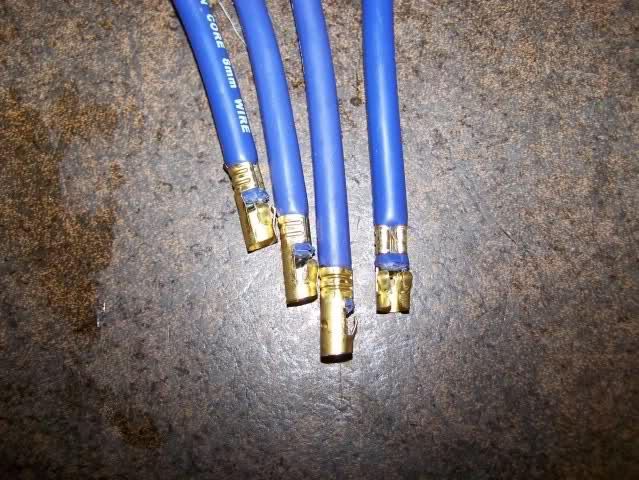
The twist ends will have to be reused. I destroyed one, but fortunately both ends of the plug wires had these. I used a pair of round nose pliers to gently and evenly open them up. Then I cut the new 8mm wires to length using the old wires as a guide remembering to add a little to compensate for folding the core over.
Next I strip the ends. Being careful to not cut or nick the core. The trick to not cutting the core is to not necessarily cut all the way through in one shot, but to slowly work the stripper around the wire. I use Blue-Point PWC-12A pliers for this one. I prefer them to the Moroso ones.
Next I crimped on the OE twist ends. Folding the core around the backside from where the end gets crimped over. The OE ends are for smaller 7mm wires, so crimping all the way down will cut the silicon jacket.
After crimping on the ends, I used a liberal amount of dish soap to pull the Bremi covers over the twists. This could be done pulling the other ends through too. And they are probably less likely to tear the wire jacket. I replaced the protective cover on #4 before putting the other ends on. Took a little work and some Simple Green.

Then comes time to crimp on the other ends.
And finally pulling the covers down, SLOWLY as to not pull them off. Now we have athe finished wireset (minus the coil wire). Not too bad for half an hour of work. Took me more time to find a donor set of wires and figure out how to take them apart than to make up the new set.
Performance gains? Who knows. I am already running a MSD Blaster 2 coil. Thinking about the OE ignition system though the limiting factor is not really going to be the coil but probably the ignition module as its controlling dwell. So last night I found a brand new ignition module in my parts bin and got curious. I drilled out the rivets for the backing plate and opened it up. Since I will be running a V2. MegaSquirt ECU, it does not have built in direct coil control. But it looks like it will be easy enough to get an ignition driver and mount it inside the OE ignition module. This should allow me to get a hotter spark out to the spakplugs.
June 25, 2009
Well no new pictures as I was too busy working, but the car powers up fully now. Engine, alternator, and starter all online. Car cranks over. After 2-3 weeks of evenings working on her while the droplight was still bright, there wasn't any bump left in the battery. So shes charging up.
If I get a chance to work on her tomorrow shes ready to plug in the coil, power relays, and ecu then should start right up. The only thing that hasn't been powered up yet is the MS system.
There's a few more evenings of little things and she will be all back together and hopefully fully road worthy. Only major system left is fueling. Blown020 has offered a gas tank for me, or I may be ordering a new one this weekend.
June 28, 2009
I got fuel system sorted out otherwise. I am cocerned about fuel starvation under hard cornering though... Been staring at some solutions for that but we wait for it to be an actual issue first.
Sorting out OE electrical crap right now. Have a bunch of extra stuff in the '83 harness I am figuring out, then ripping out anything not needed. I bet I can save 20lbs removing this excess wire and crap.
I almost have the full power grid up for the MegaSquirt and fuel pump rerlay. I am actually reconfiguring the OE FP relay right now. Or at least I was before getting distracted with the Vortex.
What the hell did I come inside for anyways???
June 30, 2009
Yeah I originally wanted to build a Kamei racer replica... I had everything except the bodykit lined up. But I had found a supplier for it at a very reasonable price. Unfortunately I also found a lot of bad internet press about said supplier not delivering and keeping monies etc.
As soon as I started building her, she kinda took on her own life and personality and the build went slightly different direction. Kamei was always about selling interior and exterior accessories. So instead my build became a car that would have been inspired by seeing the Kamei racers in action and "I just have to have all them cool parts now!" buying sprees from the 80's!
Accessories we have! While I have yet to post any pictures of said goodies.... They are stashed away. Interior comes last.
Besides, there were other themes I wanted to do and as cool as a racer theme is, it simply wasn't going to mesh with the rest of the style I was goign for on the car. Not to mention BBS wheels are stupid expensive. Getting my Turbos I have wanted for many many years was the defining part that completely changed the build.
But the pictures above have sparked a cool idea I am just gonna have to consider implementing...
Progress? Today? It was hot. I blame the heat on turning my brain to stupid. I did manage to bolt the TPS onto the car. Thats all.
Oh and I was waiting for a delivery of fuel injectors that sadly didn't arrive as expected. For now I am going to have to run digi injectors and boost... that should be fun. Not. I did sell the cabby today though clearing out my inventory of cars and parts a little bit more. Didn't let her go for much, but I can at least afford a tank of gas, inspection and maybe a new carpet set...
But last night on the other hand? Oh yeah! All systems are online and the MegaSqurt is fully online, except for plugging in the TPS. Wait I go do that now and do TWO things on it today... So TPS is now plugged in! I see one more thing I should do so parts don't get lost or broken, then I am calling it a night.
Theres a lot of minor details still to sort out before shes roadworthy. But first thing after my morning coffee tomorrow will be installing the coil wire and firing her up! Tomorrow is the big day for sure!
Did you ship that full of gas? No posting without morning coffee!!!!
Thanks Blown020! Trading parts usually seems to work out nicely!
Translation? I didn't sell the cabby for very much. But enough that filling her up and getting her inspected is doable. Once the cabby has becoming a parts car, it was just time to move away from that. The bunny will be an ongoing project, but other than that I am done with too many of my own projects sitting around. Anyways the cabby went to a good home and I will miss her.
Speaking of gastanks.... Hey Antonio, Jose left the spare cabby gastank sitting on my neighbors lawn. Dude was pissed and accused me of running a junkyard.... Didn't help that we had both the basically uncorked caddy, and a certain fox revving up trying to outdo each other. I mean checking timing,,,
Actually that picture gave me a killer of an idea that I will impliment here shortly. I just HAVE to get car running first before pulling anythign back off to clean and urmm... -=cough=- nevermind.
I may actually be able to help out on your project. I know where the guy who built/painted the first of the Kamei cars lives and works. At the moment his name is escaping me, but he shouldn't be too hard to find. When he heard what I was doing he volunteered his help. In the way of pictures. To the tune of several ALBUMS full of pictures. And as we know theres very few pictures of the Kamei racers out there.
In fact thats how I met him! he had a bunch of old photogrphs up on the wall of his shop of some Kamei cars I had never seen before.
Ugh... so she fails preflight tests. Engine won't turn over. I put a breaker on the crank nut and kicked it a few times. Shes tight. Starter tried to work, but then quickly said "F-U!" to me. I think am going to take a walk to the local supermarket and get me a basting bulb or some such. Some oil down the holes should free her back up.
Oh well at least I know why.