You must be logged in to rate content!
14 minute(s) of a 391 minute read
12-12-2009
Lol, somebody IMed me noticing that I wasn't running a speedometer glass face and asked if I needed another one.
Correct, no glass there. And I got a pile of spare glasses here. Suprised it took this long for someone to notice actually! Theres a reason behind it though. I have been trying to get my speedometer to read correctly. Been employing the use of my handy GPS, speedometer gear swapouts, and changing the preload tension on the needle.
No real progress reports, but I scrounged up a few new bits. Got some random electrical parts from the Rat Shack and a new antenna. Can't wait to see how good this old radio works!
Hoping to get them on tomorrow. I was busy getting the Audi all sorted out for winter driving fun. With bald (almost) tires she still grips like nothing else.... So much fun! Realy want some studded snow tires (cause I can) but fear it would take ALL my winter driving fun away!
December 14, 2009
Glad to entertain! For being out in the cold as long as we were, T3Raposa and I had fun! Thanks for the help!
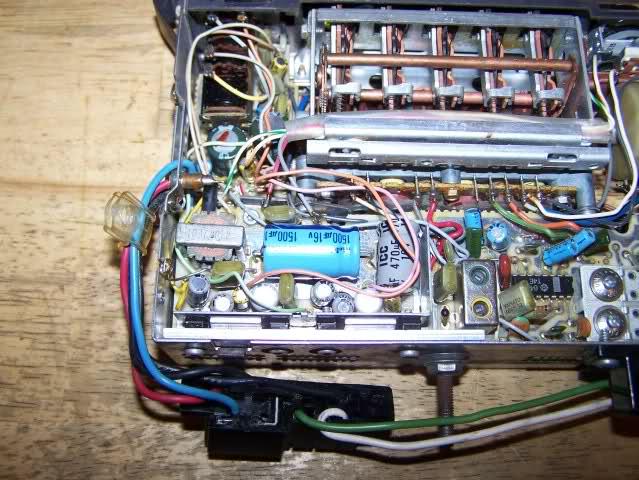
So got a little more time into her tonight. Started off by opening the radio back up and making some small mods to it. I finally got the lighting mostly working the way I wanted it to. I started off by cutting the wire that was going to the backlight. I then soldered a new wire to it and fed it down under the circuit board then out of the case. To be safe I capped off the original wire. I could have unsoldered it or cut it, but I have plans to use it later.
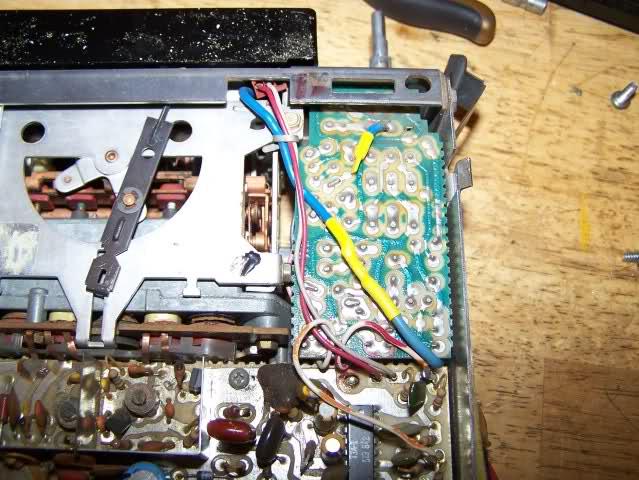
Then I modified the power grid on the back of the radio. I got into it with a Dremel and cut the smaller pin off the strip. Pulled the pin out and soldered my extended backlight wire to it.
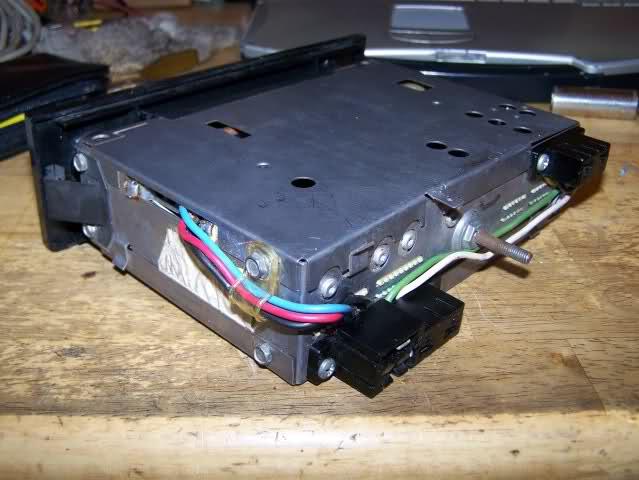
The finished and reassembled case looks completely stock and unmolested.
And a top view showing that it actually is an OE radio! The electrical tape I added to make sure the face surround stays in place. It was a little loose.
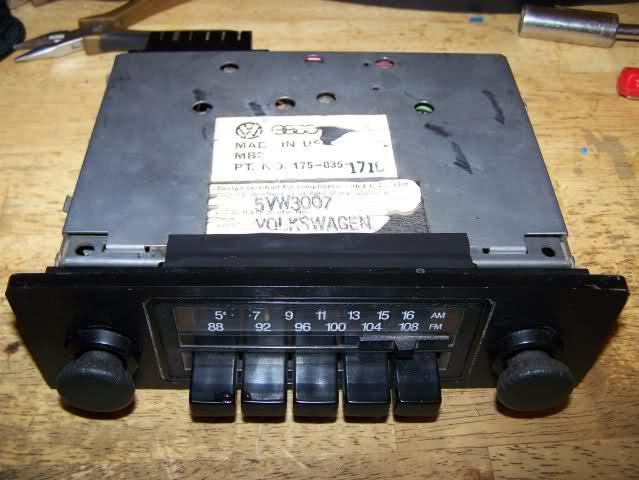
I then went and ran the new antenna and powered it up. I was pleasantly surprised at how crisp and clean it is for a 30yr old radio! I discovered the small LED is for stereo/signal strength when it locks on a station. I thought it was a simple power LED.
So I am mostly happy with the mods, but I am likely to be back into it sometime soon. I would prefer to have the backlighting only on when the radio is on. I need to relay it internally to the blue wire I capped off to accomplish this. I think I may also carefully mod in another LED to indicate the radio is powered on. Just because I can... Overall I am much happier with the radio.
Gods I would hate for somebody to steal my $5 radio though....
So while I was in there I took the time to sort out more lighting and wiring in the dash. Couldn't get my rear defrost switch to light up the indicator on the side at first so I went and grabbed a pile of other switches. I finally figured out I needed a ground to the light instead of parking switched. Then I noticed the other switch I had there was different. Studied it for a minute and got it plugged in. Turns out it has a translucent rocker and lights up the whole thing from behind. I suspected these switches existed! I wish I knew what it came out of so I could get a similar headlight switch...
All my dash wiring is figured out now other than whatever is wrong with my EQ. Its doing super strange stuff now. Its power is disconnected, but if I pop the ciggy lighter in somehow it powers up. WTF? I had to reroute some of the wire bundles. I will get them retied and sorted out then hopefully that solves whatever oddness the EQ is doing now. Something is likely just touching where its not supposed to be. Should have that sorted out in the next few days and maybe have the dash in a finished state by the end of the week! I can't wait to post up pictures of the final result!
December 17, 2009
Well the EQ seems to be okay. Turns out it was something stupid. The ground circuit going to it somehow got cut at the other side. I am not sure how it was powering up at all actually.... I figured out what was going on when at first it was only lighting up, then came alive when I plugged the antenna into the radio.
And the radio is definitely not going to work the way I want it to without some more fiddling inside.
Overall the dash wiring is coming along, just MUCH slower than I would like. But at least I have been able to put some serious miles on this project! I can't imagine how you guys keep going on these projects that have lasted for years. With some of you never even having driven the car, or any rabbit for that matter, before.
December 30, 2009
Still no intercooler. Since winter hit the car has been parked though and nothing much will be happening to it without a garage. My primary goal for the winter is simply to get all the wiring 100% the way I want it. And even thats not happening right now due to her being snowed in!
I am mostly limiting myself to indoors projects right now. Currently I am making a combination laptop/camera bag. I will do a test tun on it hopefully this evening and see how it goes. If my maching can handle this, the next project is going to be recovering the seats and doing the interior up a little bit.
I am out of time for lunch, I will try and get on tonight with a small writeup and some maps posted up for you guys!
January 01, 2010
Okay time for a lesson in MegaSquirting here people! Let me start off by saying that the below are not my best examples of maps. These are just whats currently in my bunny. Use at your own risk as always.
My fueling table, or VE Table 1:
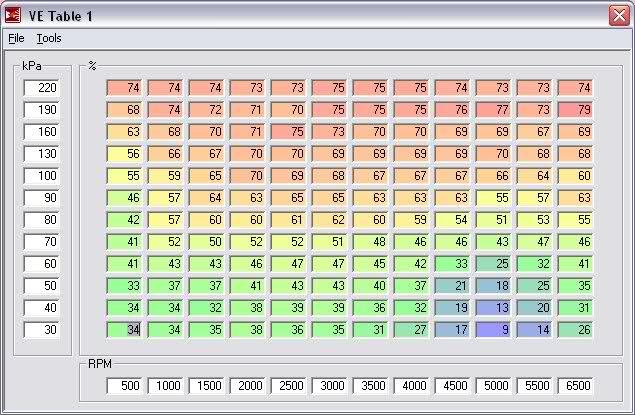
Fairly boring. And let me tell you guys a big secret. It means VERY LITTLE. What? Yep. Its pretty useless for anyone but my setup. How come?
Well first even though these tables are "supposed" to work perfectly loading from one motor to another, they never do. There are way too many variables. The biggest one being required fuel being setup incorrectly. In theory if required fuel is perfect, and lets say you make an injector size upgrade, the VE or Volumetric Efficiency table would remain unchanged. All your cold start settings would need to be changed as they are based off pulse width, but the VE "should" stay the same.
In practice it never seems to work that way though. So whats the important table for fuel? The AFR targets!
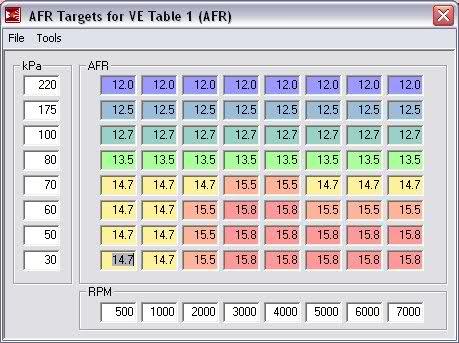
The reason these are so important is when processing the datalogs and dialing the engine in, these are what does almost ALL the work. If the VE tables are off, its going to dial it slowly closer to this table.
Most of the real work in tuning actually is in the setup stages. A good set of maps takes me usually a few sessions of about an hour each to build. First time I go in and rough it all out. With VW's this usually is simple and I grab an existing map set. Then I will dial it in for specific requirements and setups. Details like different transmissions actually change the ideal rpm bin points! After a tuning session or two I may see a couple areas I want to change around and will rebuild the appropriate sections accordingly, then go tune again.
Excluding cold start tuning, actual on the road tuning time is rarely more than 3-4hrs. And almost always in a few different tuning sessions. I will have initial fuel maps dialed in in about an hour. Turbo setups can take a little time to slowly build up boost and verify good fueling, but not much longer. I ALWAYS tune turbo setups with a manual boost controller first so there's less to go wrong. Its usually a good idea to tune first in the cool of the night. After its well dialed in that way then I will tune it during the day. Winter doesn't matter as much as your still tuning in the cool either way. A winter tune will ALWAYS have to be redialed back in in summer for safety.
Well lets move on the the ignition table. This is a lot more critical to get close out of the box. The example below is for the '77. Keep a few things in mind, this car is not intercooled! I have to pull a good bit of timing out of the upper boost areas to keep it safe. Took T3_Raposa and I at least 3-4 tuning sessions to get it dialed in last summer to where it was safe. All done out on the street. On a dyno we could have gotten it a lot faster, at the cost of much less fun, more strain on the car, and a heavy hit to the pocket.
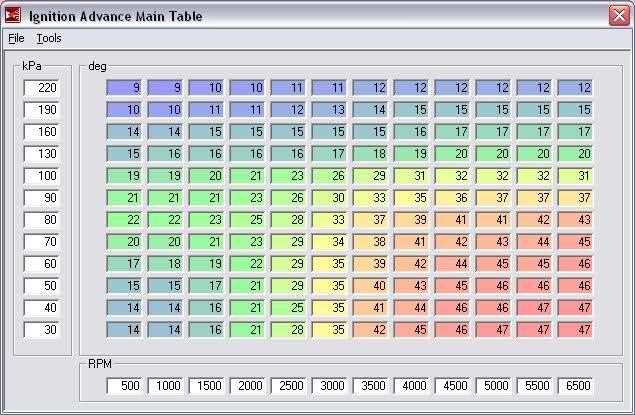
Lets go over the critical points where I see a LOT of mistakes made on maps posted everywhere in the internet. If you have an 8v motor your almost NEVER going to see less than 30 kPa at idle. A good idle number is 32-34 kPa. So there is no reason for kPa bins of 10. I have seen it many a time...
Then lets "box in" our idle bins. If the engine is setup right, it will idle happily at 800-900 rpm. I can get my bunny to sit at a nice 600rpm idle, it seriously messes with people! So lets start off with a 500 rpm bin followed by a 1000rpm bin. It will never see less than 500rpm at idle, and should never be much above 900rpm.
kPa is next. Again an 8v will like @ 32 kPa. So we set the next bin at 40 kPa. Since a 16v flows more air, it doesn't like to idle as low. Its going to like to see 36-37 kPa if my memory serves (I would have to pop us some maps from the other computer, its been a while!). Now what about a car with ITB's? If you can get one to idle at less than 45 kPa, your a wizard! At least in all the setups I have tuned. So an an ITB car your unlikely to use a lower bin of 30, but more likely to use a 40 bin.
What do I mean by "Boxed in"? Well we make a "box" at idle. MS will interlopiate between bins. So to keep a perfectly smooth idle, lets not give it that choice. The lower square of 4 bins for all of our tables will be set identically. Keep the numbers in the VE bins, the spark bins, and the AFR target bins the same. This will keep the ECU from hunting either spark or fueling during idle. Above 1k RPM and 40 kPa all bets are off though!
When tuning and processing datalogs, the fueling will usually get "tweaked" by processing in this square. You have a couple options, its easy to filter out these areas in the settings, or simply select them and revert back to original value before accepting the new tables. I usually just revert them back. Or write down the original number and see how the engine wants to idle as I am tuning it in with the new settings. Sometimes it will idle better, so I will average the new settings out and again level them all to the same number.
That's pretty boring to look at, but the same map in 3-D tells us a little more!
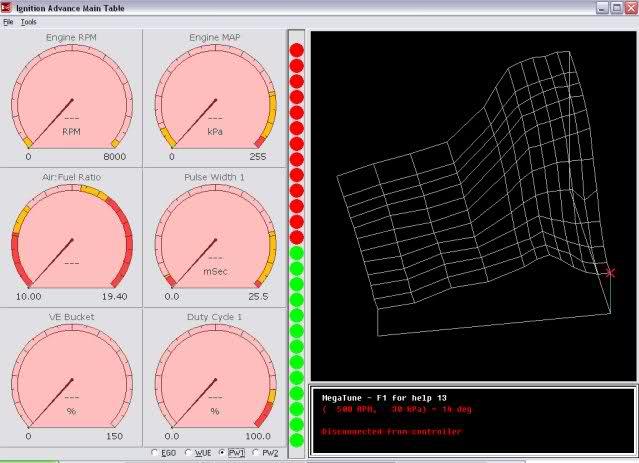
This is where you can tell my tuning really isn't done. Once everything is verified for safety, I like to go into this view and smooth out any holes. You can see such an odd hole at 40 kPa / 2500rpm. The rest of the map is not smoothed out as perfectly as I would like either. The big thing when looking at the VE or Advance maps is to avoid big holes in them. Pulling them up in 3-D mode lets you quickly rotate them around and smooth them all out.
Lets go over bin spacing a little more as its VERY critical and done wrong can cause odd tuning problems. First have the bin spacing be the same for both Fuel and Timing. If the Target tables do not match (impossible since it has fewer spaces), then make sure its top and bottom kPa bins match, and the max rpm bin is the same, or bigger. The same is better (I see mine is 500 rpm above).
Why? When processing datalogs if your target bins cover more area than your maps do, you will get some WHACKED readings and cell changes back. Since you use the max cell change as a good gauge of tuning, this will mess up the process.
Next lets talk about the important areas of the maps. I am at a pretty high elevation herein Utah. I think my base kPa reading is 82 or 83 kPa. IE my atmosphere reading. At see level it will be closer to 95 kPa. So we are going to make a dead spot in our bins between 80-100 kPa. This is the transition stage between vacuum and boost, so its really not important.
Next how do we space the other bins out? Well if the car is naturally aspirated then why have a bin for 250 kPa? Pointless. Space the rest of them out and maybe have a max bin of 80. For boosted cars no need to have bins above the max boost you will run. Sure on a turbo car you can give yourself room for what your turbo can do, even if your going to usually run less. but your never going to run 20psi, always keep it at 10psi even though your turbo can hit 20psi? Set your overboost protection boost to slightly above your max bin.
You do not need as many bins in boost as you do in the NA sections. You really only need a spread up there for timing as fueling is going to stay pretty consistent Still, I usually bump more fuel into the upper regions for safety.
To tune for fuel economy your going to need to pay attention to the rpm range your engine sits at on freeway cruise speeds. The tranny will determine if you need an extra 2500rpm bin in there or the like. Even more critical is the kPa range its sitting in. Make sure to have smooth transitions in and out of that area in your target AFR table. You can pull a lot of fuel out of these economy areas. You can also fiddle timing in this area differently from the rest of the maps to gain economy.
Well for now I think that covers Basic Map Building 101!