You must be logged in to rate content!
14 minute(s) of a 668 minute read
2-27-2012
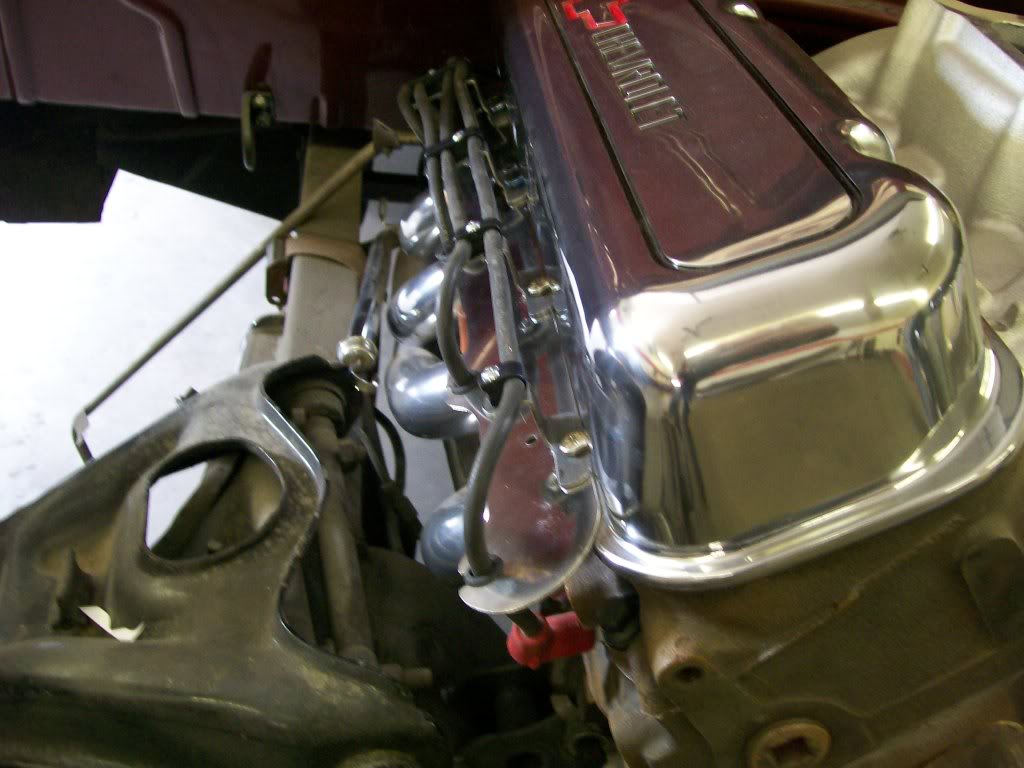
I've mentioned before about not getting emotionally attached to your fabricated pieces. I have to listen to my own advice. I've drilled holes into the stainless cover, now I will toss it and make a new one with no holes.
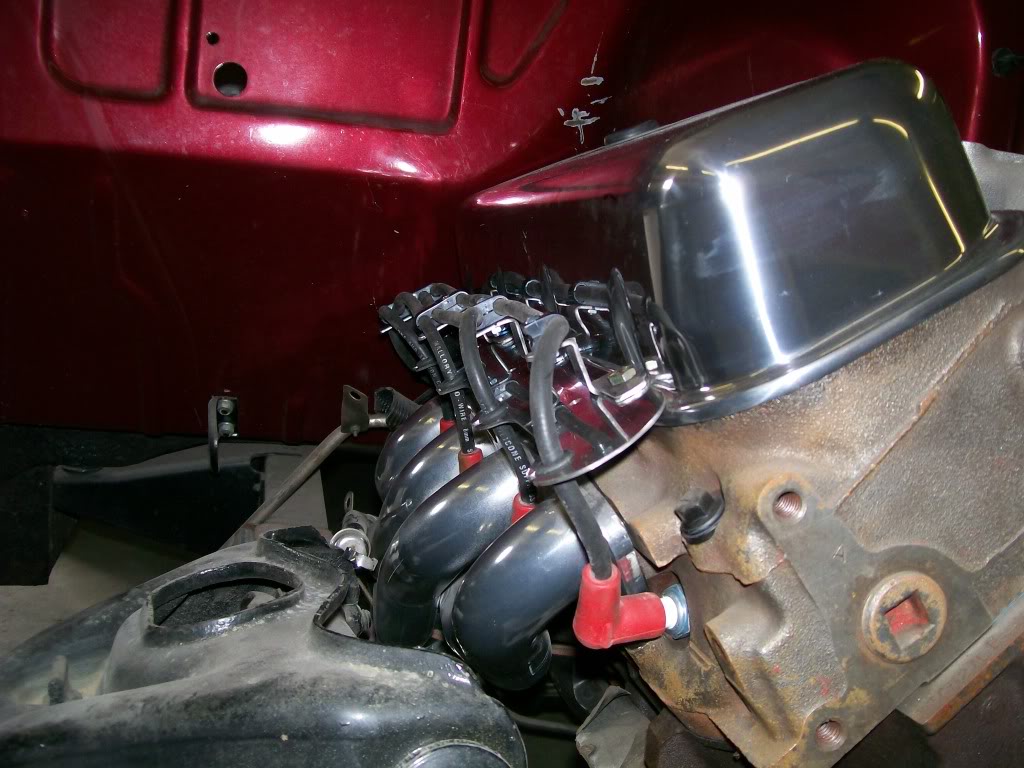
In the last pics I showed the plug wires attached to the stainless cover. There was just something that didn't settle with me, there wasn't a 3D look to it. Hmmm, how can I explain.....I'm not sure I can. , although they are secure, I'm not getting the visual pleasure that I want.
During fabrication there are different needs we have to fill.
1) The first is function, does the fabrication serve the purpose that is butilt to do?
2) Visually, is it pleasing to the eye?
For the Willys I was more concerned about function, then if I could blend the visual along with the function, then it was a plus.
For the engine compartment on the "57 I want both, function and visual, in most that I create. My problem is I can visualize before I create, but come up short of the complete 3D image. So I build, I look, I think, then finally, I come up with what I'm looking for.
I realized I wanted the wires raised above the stainless cover. With the stainless polished, it is aching to reflect an image. If I have the wires raised above the covers there will be more reflective imaging going on.
I made some brackets that will bolt to the valve cover bolts and will rise 3/4" then provide a mounting tab for the wire seperators to bolt to.
I haven't finished the trimming and final grinding, but I'm much happier with the look already.
I'm nearing the carburetor work. Hmmm, only 2 guys are interested in learning about carburators. Thanks for your honesty guys.
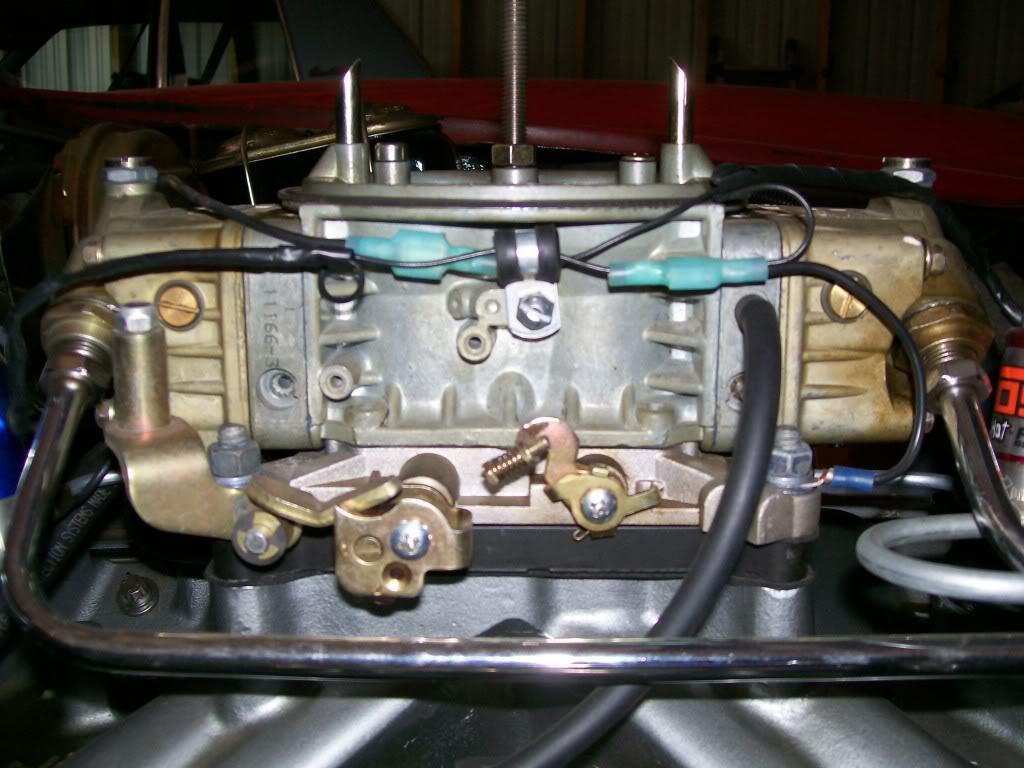
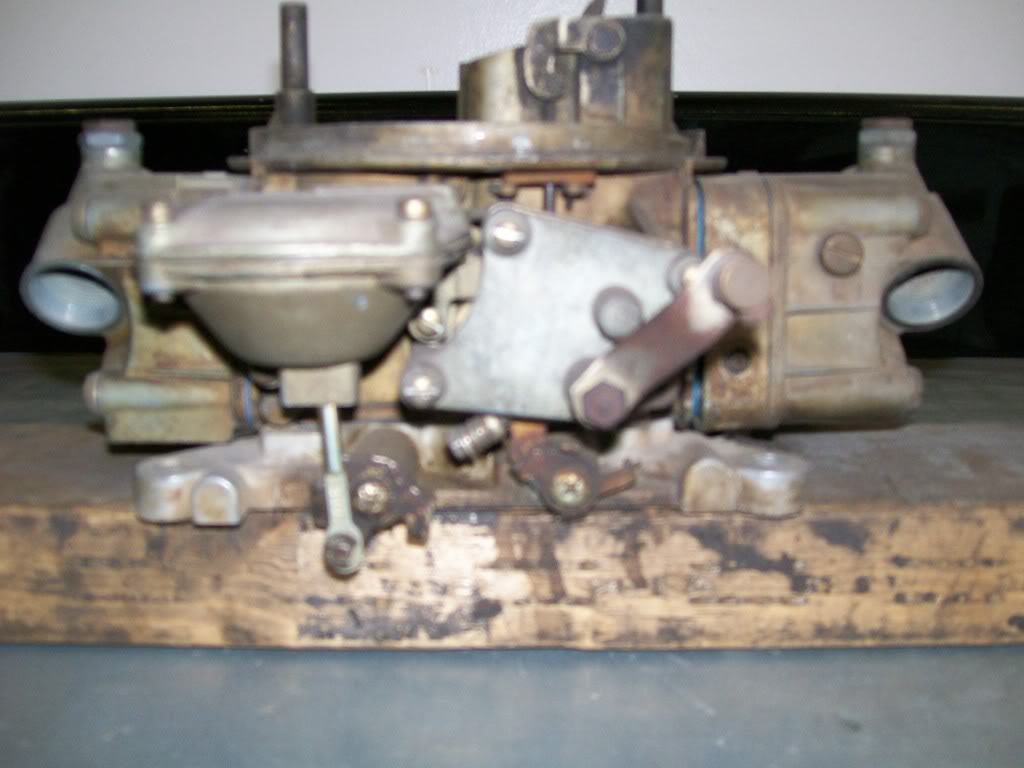
I did take a picture of the carb that's gonna be worked on. It's a close-up picture. With this picture we can tell some characteristics of this carb.
Is this a vacuum secondary or mechanical?
Is it a double pumper?
Does it have a choke?
Scooter402, you are not allowed to participate as a student.

You have to move to the front of the class and act as a teachers assistant.
When you get a chance try to skim through the thread from the start. What has happened along the way, and this is for anyone jumping onto the tailend of this thread, I started this thread about an old Willys truck with much needed frame, suspension, rear axle, ect,ect.
I've never started anything like posting pictures or a build thread, but I had a calling to do so. You'll find as you read through the posts in december and Christmas I got slightly into my belief in Jesus, and have tried to provide a teaching thread as I feel I'm being lead to do. So to speak, I'm trying to maintain an extremely humbled composure while building, fabricating and teaching.
So far we've cover a great many projects that one will encounter while rebuilding/restoring/or building from scratch. Usually as I have been working in the shop, I grab the camera and allowed everyone to follow along. It's been a pleasure having comments and questions along the way.
Although I've been somewhat a teacher, I am more of a "jack of all trades" vs a "master of one". With this in mind, any subject we have tackled along the way, when someone has an education or knowledge in a subject, I welcome the assistance and their input. Your Holley knowledge is welcome, feel free to fill in the blanks as we go through this subject.
Your answers were right on in your reply. The wires are for a Nitrous plate system, and the missing metering block screw hole isn't open, it's the secondary metering block with no opening. Otherwise, you know your
Holley.
On this subject I'm starting next with the difference between the spreadboreand the squarebore, then settle the missunderstanding of the double pumper, since many think that the double fuel lines means double bumper carb.
Wildspear and The1AndOnlyBug, looks like your in the right mindset for a teaching.
Jeff88, good guess, you're right with 2 out of 3. It is what's called a HP series. Holley got rid of the whole choke tower for a much smoother flow of air entering the carb. You did great.
Deuskid, you and your verses, you always hit the right one at the right time.
axxxgijoexxxa, first post I see. welcome. All the way from Canada?
We'll start with a simple visual identification of a couple Holley's. I've been in both sets of shoes over the years. I've stood there next to someones car or truck as they describe the carburation nodding my my head as I had no idea what was being said, but I looked like I knew...... I nodded my head, I looked confident.
")
I perfer now a days, I listen with knowledge, I stand confident, I stand with my mouth closed, a slight shmirk on my face, occasionally nodding. If I catch incorrect/mismatched desciption of the carburation, I judge the pride of the person speaking. If the pride is overflowing, and I need boots, I appreciate the passion of the owner, but I offer no teaching.
On the other hand, I find the owner humbled and open, I know it's gonna be a good time, I gonna watch the light bulbs turn on in his head as the pieces now start to fit together.
Let's move forward on this carburator learning and see if we can dismiss some myths, some exagerations, some blaming of parts in a carb that aren't the problem at all.
Spreadbore and squarebore. Very easy to identify. The spread bore is the one on the left in the picture below. It has small primary barrels/venturies, and large secondary barrels.
The term primaries and secondaries refers to the idea that from idle to around 1/2 throttle, only the primaries operate. Once the throttle is opened beyond 1/2 throttle, the secondaries begin to open. The linkage has a ratio that although the secondaries begin to open at half throttle, they open at a faster ratio to catch up with the primaries by time the throttle is open fully.
Going back a few posts Oldtime ironman and I discussed the Quadrajet. It is clearly a favorite of his. The carb on the left is a Q-jet, you can clearly see the design of the spreadbore. A benefit I like on the Q-jet is the small primaries. To me this provides a more defined mixture of fuel and air off idle to cruising speed, the smaller the passage the air goes through, the better we can manage the atomization of the fuel into the air.
I could write for another hour, but let's get a visual of the difference between the two. Spreadbore left, Squarebore right.
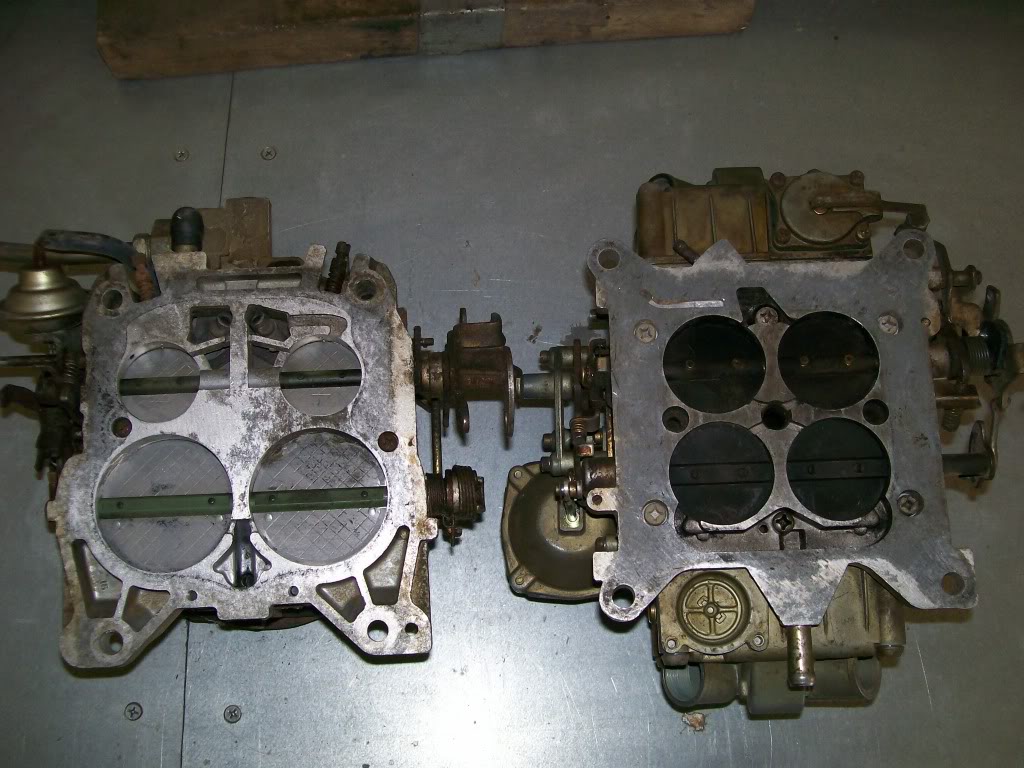
Now the second quick easy identifier of two carburators. I'm talking of Holleys now, not Q-jets. The Holleys have a vacuum secondary style and a mechanical secondary.
What's the difference?? The mechanical secondary has a piece of linkage that once the primaries open around half throttle, the linkage acually pulls the secondaries open.
The vacuum secondaries also has a piece of linkage that goes from the primaries to the secondaries, BUT, the linkage DOES NOT pull the secondaries open, in this case the movement of the linkage only ALLOWS the secondaries to open. The secondaries are opened by a rubber diagram on the passengerside of the carb. This diaphram has a vacuum that is being drawn from the primary side. As the air is drawn through the primaries, the rubber diaphram is being pulled by vacuum. Once the linkage is moved it allows the diaphram to be pulled upward by the vacuum, which in turn can now pull the secondaries open. If the linkage is moved just a little bit, that's all the diapham can open the secondaries. Like I said, the likage from the primaries doesn't open the secondaries, it only ALLOWS the secondaries to be opened by the diaphram.
Once again, I could write for an hour. Later I'll get picks of the parts that will help but the words to a visual image.
A vacuum secondary carb. Notice the canister on the side of the carb with the cap and the screws on top. Notice the rod that comes out the bottom that connects to the secondary shaft. This canister/vacuum diaphram is the only true piece that acually opens the secondaries.
Now once again, my mechanical secondary carb, no canister, no rubber diaphram. The secondary shaft has nothing attached to it other than stuff going to the rear of the carb and we'll get to that later.

Ok, Spreadbore and Squarebore carbs identified.....
Ok, Vacuum secondaries carb vs Mechanical secondaries carb identified.....
It is the identifiying of these carbs that tells you other items go with each carb. It is when I listen to people talk and they overlap the items that I know their knowledge.
No, this is not a laughing matter to me, I once was a not knowing person also, I will not mock another, but I do look forward to enlightening them.
2-28-2012
Good questions. especially the one concerning what size carb for the motor.
I could yack and yack, but do what I did. Go to Holley.com. There will be a size topic to click. It will run you through a bunch of questions concerning weight, transmission, engine size, rpm range, and I think gear ratio. At the end it will recommend a size. I think there is also a chart that goes by engine size and rpm that gets you close also. The right size carb is the first place to start. Trying to dial in a wrong size carb never gets the most out of your vehicle.
I'm gonna stick with the vacuum secondary carb for now. Last post I tried to be very clear that the linkage on this carb only allows the secondaries to be opened by the vacuum diapham, the linkage itself does not do the opening.
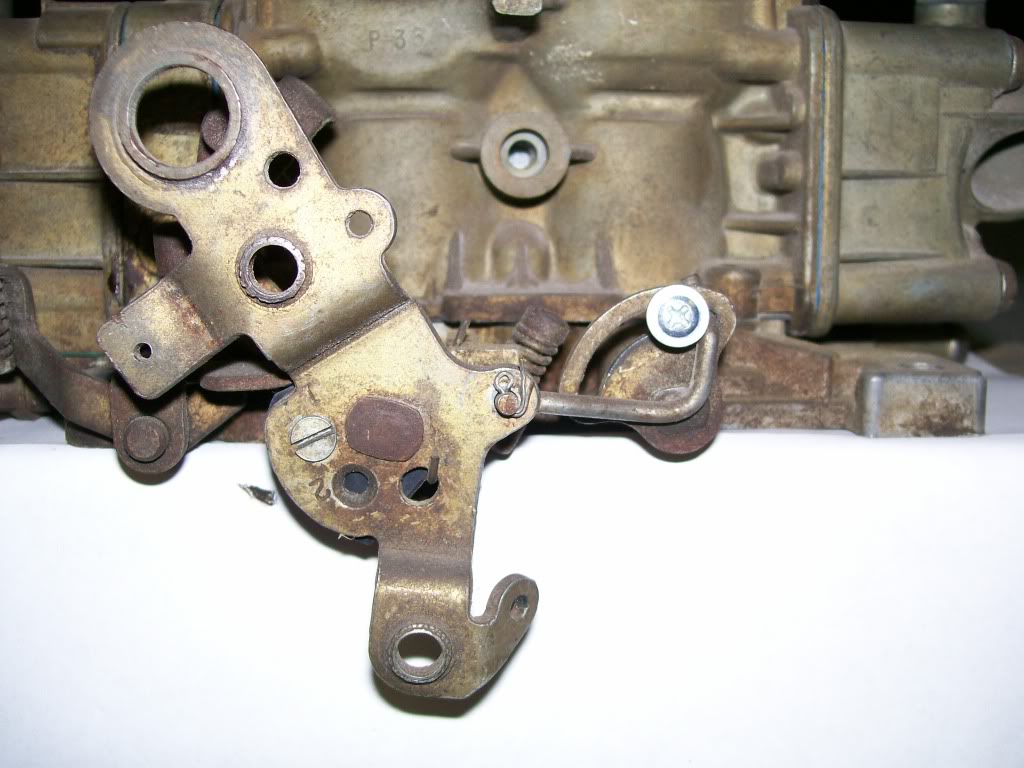
In the next picture I have the carb in the idle position. Follow a piece of linkage that goes from the primary to the secondaries. This linkage hooks into a slot, and not a hole.
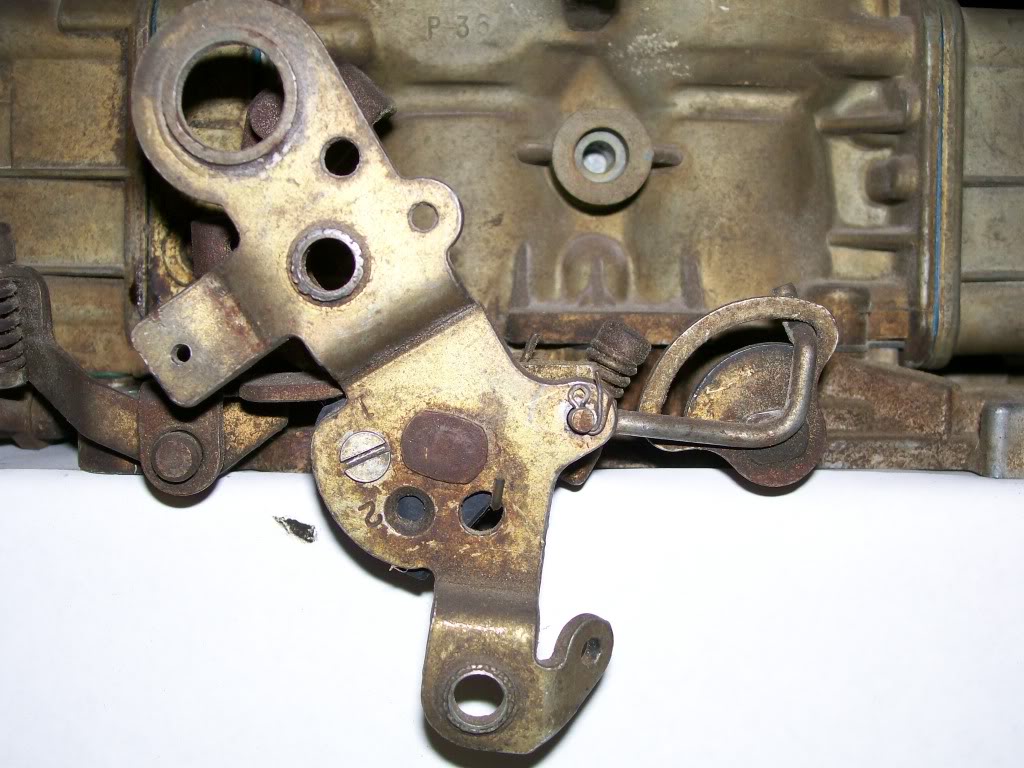
In this next picture, the carb is in the full throttle position. Notice the linkage has moved forward in the slot, but has not moved the shaft one bit. With this linkage moved forward, it now allows the vacuum diaphram to turn the secondary shaft from the other side. If I had the throttle at half throttle, the linkage would have moved less, thus limiting how far open the diaphram could open the secondaries. If there was a vacuum source going to the vacuum diaphram, it would be able to open the secondaries to the point where the slot would touch the linkage.

Why use a vacuum diaphram instead of just locking the linkage to the secondary shaft?
This type of carb is built to be sensative to the needs of the engine at any given time. The vacuum diaphram gets it's vacuum source from the amount of air passing through the primaries. Once the demand of the engine requires and is capable to handle the extra air/fuel into the cylinders, then and only then does the secondaries open.
I can compare the concept to a 3000 pound drag car vs a 5000 pound truck hauling a 2000 pound trailer. Both have a 4 barrel carb, but the demand is extremely different.
Open the truck throttle wide open and if the secondaries opened immediatly, the truck would have less power. The opening of all 4 barrels open would drop the intake vacuum and disturb the whole fuel/ air mixture.
On a drag car, it's gonna be at 5 or 6 thousand rpm in a second or two, the fuel/ air demand is immedate, the intake vacuum raises as fast as the rpm so 4 barrels open immediatly in needed. This is where the mechanical secondaries are needed.
Instead of talking about a "hot rod" fix, I'm gonna post a picture. Do not do this, I repeat, do not do this. This is something that is done, but accually creates more problems. This is only for demonstration, not for usage.
Notice the screw, and yes, if I opened the throttle, the secondaries will open. This is similar to how mechanical secondaries work, the linkage doesn't allow the secondaries to open, it forces the secondaries open.
Other than the possibility of this screw causing the linkage to bind, there is another issue that it creates when doing this to a vacuum secondary carb. Not so much a safety issue, but a performance issue.
Scooter402, if you know the answer, go ahead and answer. If anyone else has an idea, post it, if your thinking it, someone else might be thinking the same thing.